

Michael Fulford’s Reference Fulford2001 paper on evidence for pervasive ‘ritual’ at Romano-British sites — i.e. behavioural links and continuity of traditions with the prehistoric past — brought together examples of many types of such activity.Footnote 1 The rituals he focused on typically involve ‘special deposits’, particularly those found in pits and wells. The contents of these deposits are notable, and complete vessels are often included. Many of these vessels are forms associated with drinking and eating, such as beakers, cups, bowls and tankards. Also seen in some special deposits are vessels that had been deliberately holed, as well as complete vessels in unusual forms. Whole skeletons of animals, often dogs, and the complete skulls of animals, both wild and domesticated, also occur.
Buried complete pots are not rare in south-eastern Britain, in comparison to the west and north. Fulford looked principally at the evidence from Silchester together with a number of other large urban centres in the south-east as places that would be generally assumed to be the loci of more formal rituals of the kind associated with e.g. temples. He noted variability between the sites in terms of the specific objects, or groups of objects, that were recurringly included in the special deposits put into these pits and wells, and in all five places he looked at he found evidence that older types of rituals were taking place alongside typical mainstream Roman ones. Wroxeter, Shropshire makes a useful addition to his survey of the evidence.
The Bushe-Fox excavations at Wroxeter
The origins of Wroxeter (Viroconium Cornoviorum), Shropshire, lie in a major military base on the line of Watling Street, which was subsequently developed into the capital of the Cornovii tribe when the Roman legion based there relocated in the late 80s a.d. (Fig. 1). By the end of the second century a.d. the city, at its greatest extent, occupied an area of 78 hectares divided into 48 insulae enclosed within a defensive circuit. The central zone contained the usual range of civic buildings: a forum and a baths complex, here with an integral macellum. Research excavations were undertaken in the baths complex/Insula 5 between the 1950s and the 1990s by Philip Barker and Graham Webster.Footnote 2 This was followed by extensive geophysical survey of the more peripheral insulae and Wroxeter’s hinterland in the 1990s.Footnote 3
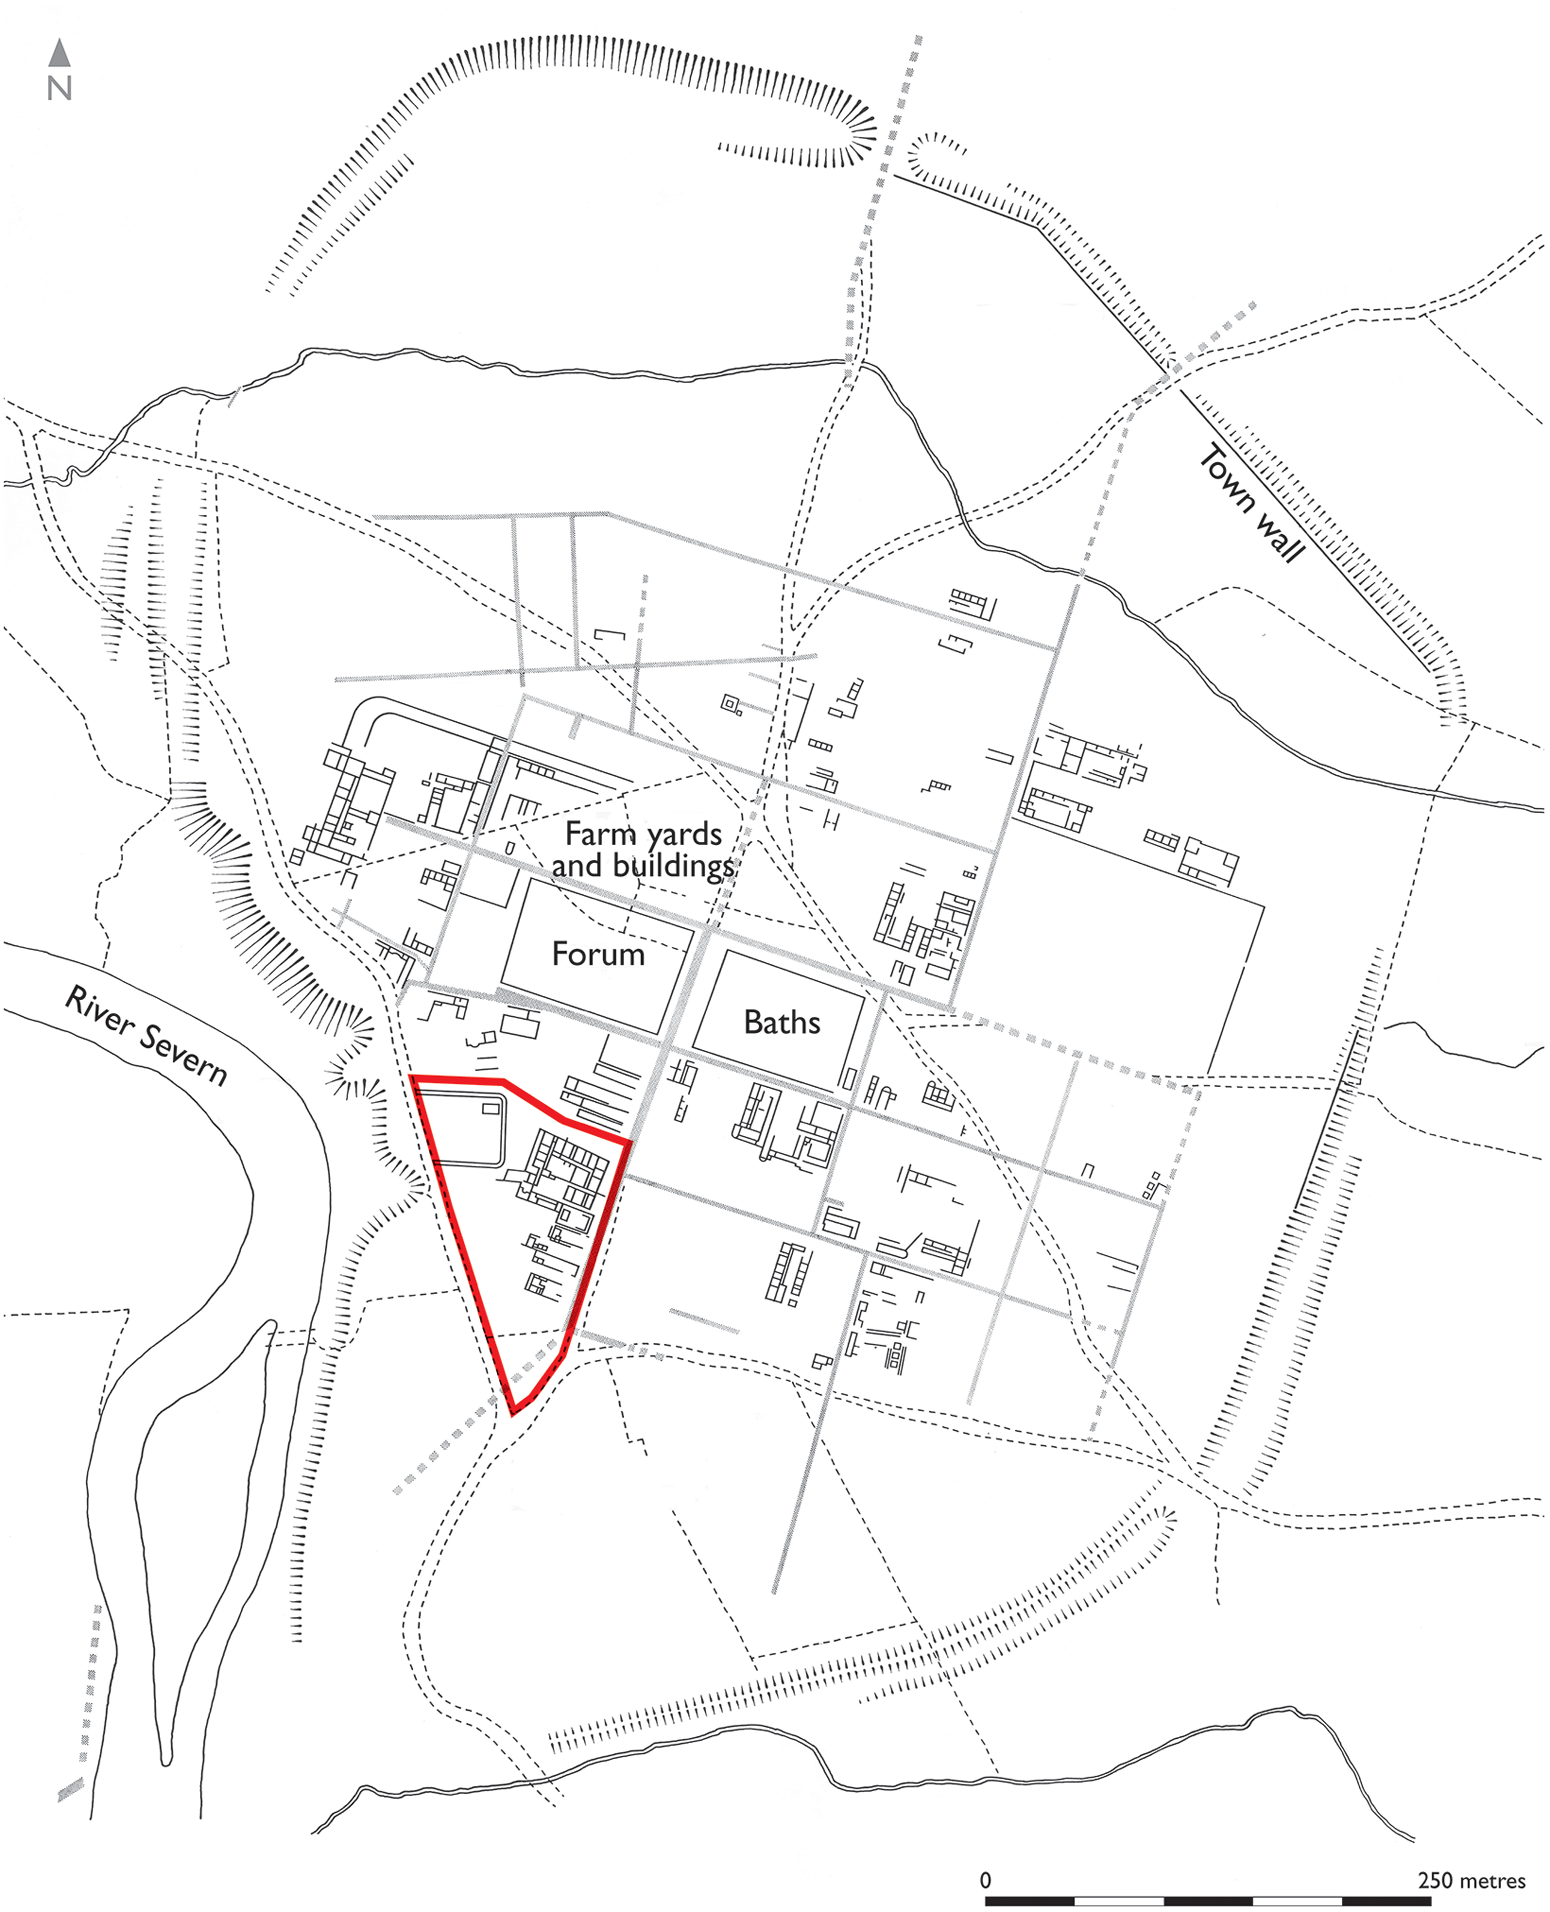
Plan of the early town with Bushe-Fox site shown in red (permission of R. White).

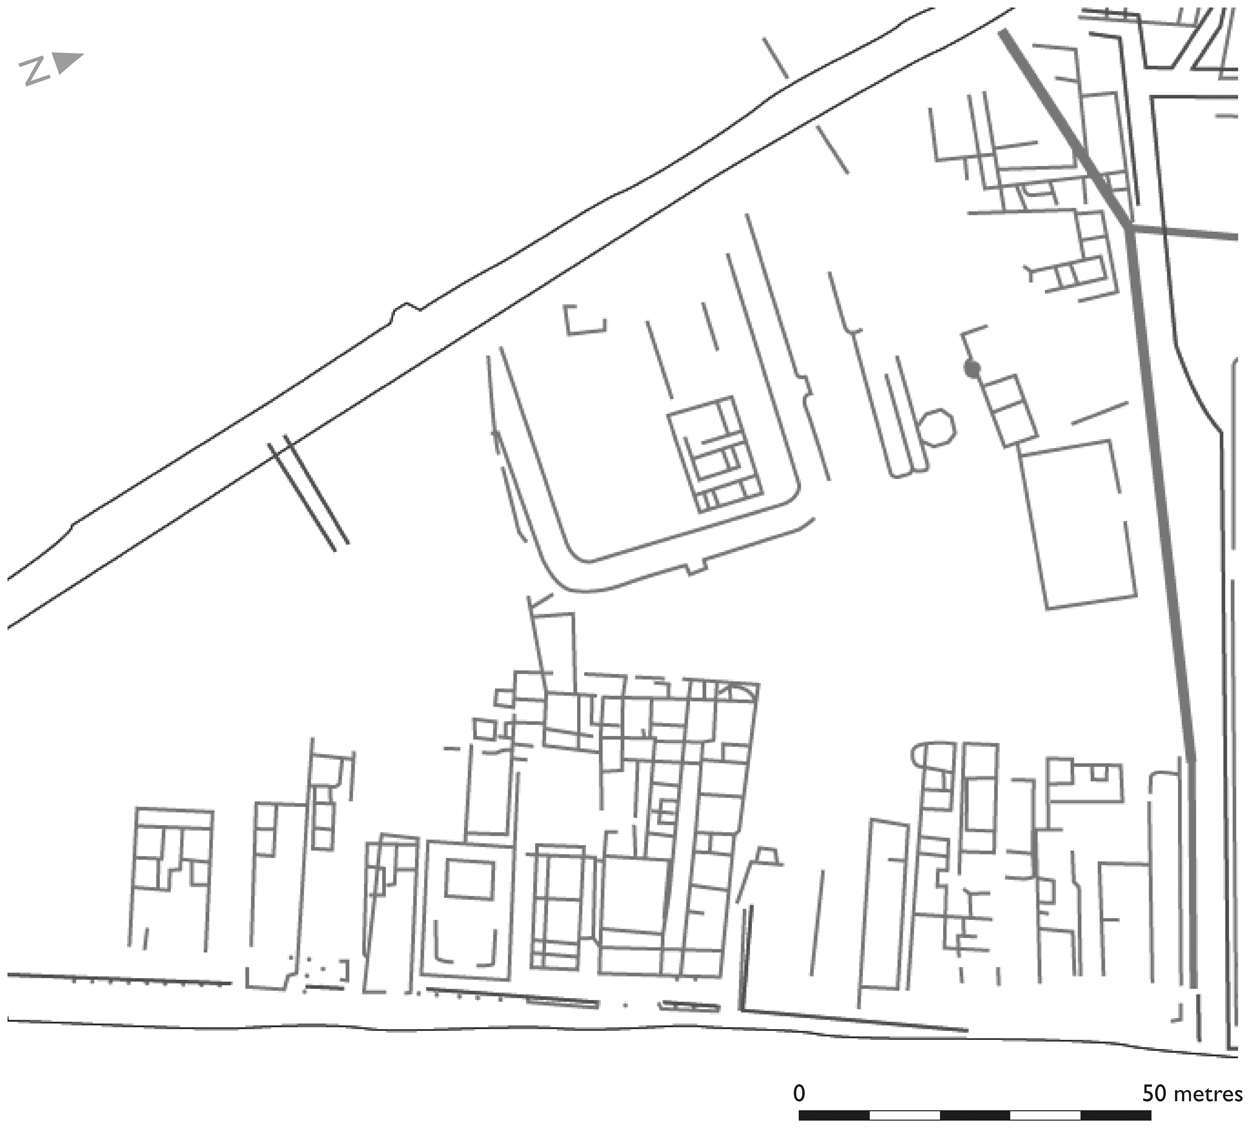
Insulae 5 and 8 differ from each other in both their buildings and their archaeological deposits. In Insula 5, Webster and Barker excavated huge civic buildings constructed over the remains of the demolished fortress, while occupation of the Bushe-Fox site, in the southern portion of Insula 8, began as two runs of dual-purpose residential/commercial buildings (Sites I–IV and VI) facing onto Watling Street, separated by a Romano-Celtic temple (Site V).Footnote 4 Though the early history of Insula 8 is still uncertain, Roger White has interpreted this zone of the city as the canabae for the fortress.Footnote 5 The insula’s earliest buildings are located at the north (Fig. 2), facing onto what was originally the Via Principalis which later became the dividing road between Insulae 4 and 8.Footnote 6
The buildings of Insula 8. The southern section from Bushe-Fox’s excavations, redrawn and corrected by Graham Webster. The northern section is from aerial photography (based on White et al. Reference White, Gaffney and Gaffney2013, fig. 3.16).

The earliest uses of the southern half of the insula were seen in a pile of cremated human remains with a melon bead found on the edge of Watling Street;Footnote 7 three unprovenanced ceramic vessels of late first- to early second-century date containing cremated remains also came from the excavation. A number of furnaces on open ground adjacent to Watling Street were found, with more below the floor of Site II, pre-dating it. Here there were some indications of the likely uses of the furnaces in the form of 11 crucibles (all unprovenanced), some containing silver globules. A blue melon bead and occasional pieces of Egyptian blue (presumably used in the production of melon beads) were found in furnaces in the Site II building, as well as evidence of bronze working.Footnote 8
Sites I–IV (Fig. 3), in the south of the insula, were strip houses of the early second century a.d., with commercial/workshop space on the Watling Street frontage and private accommodation consisting of timber-frame partitioned chambers at the rear. These strip buildings were almost immediately upgraded and modified by replacing wattle-and-daub walls with stone ones. Sites I–III burned down in the same fire c. a.d. 165–75 that destroyed the west range of the forum.Footnote 9 The Site IV building survived, was modified further, including the addition of elaborately painted wall plaster (with blue pigment), and remained in use to the end of the third century.
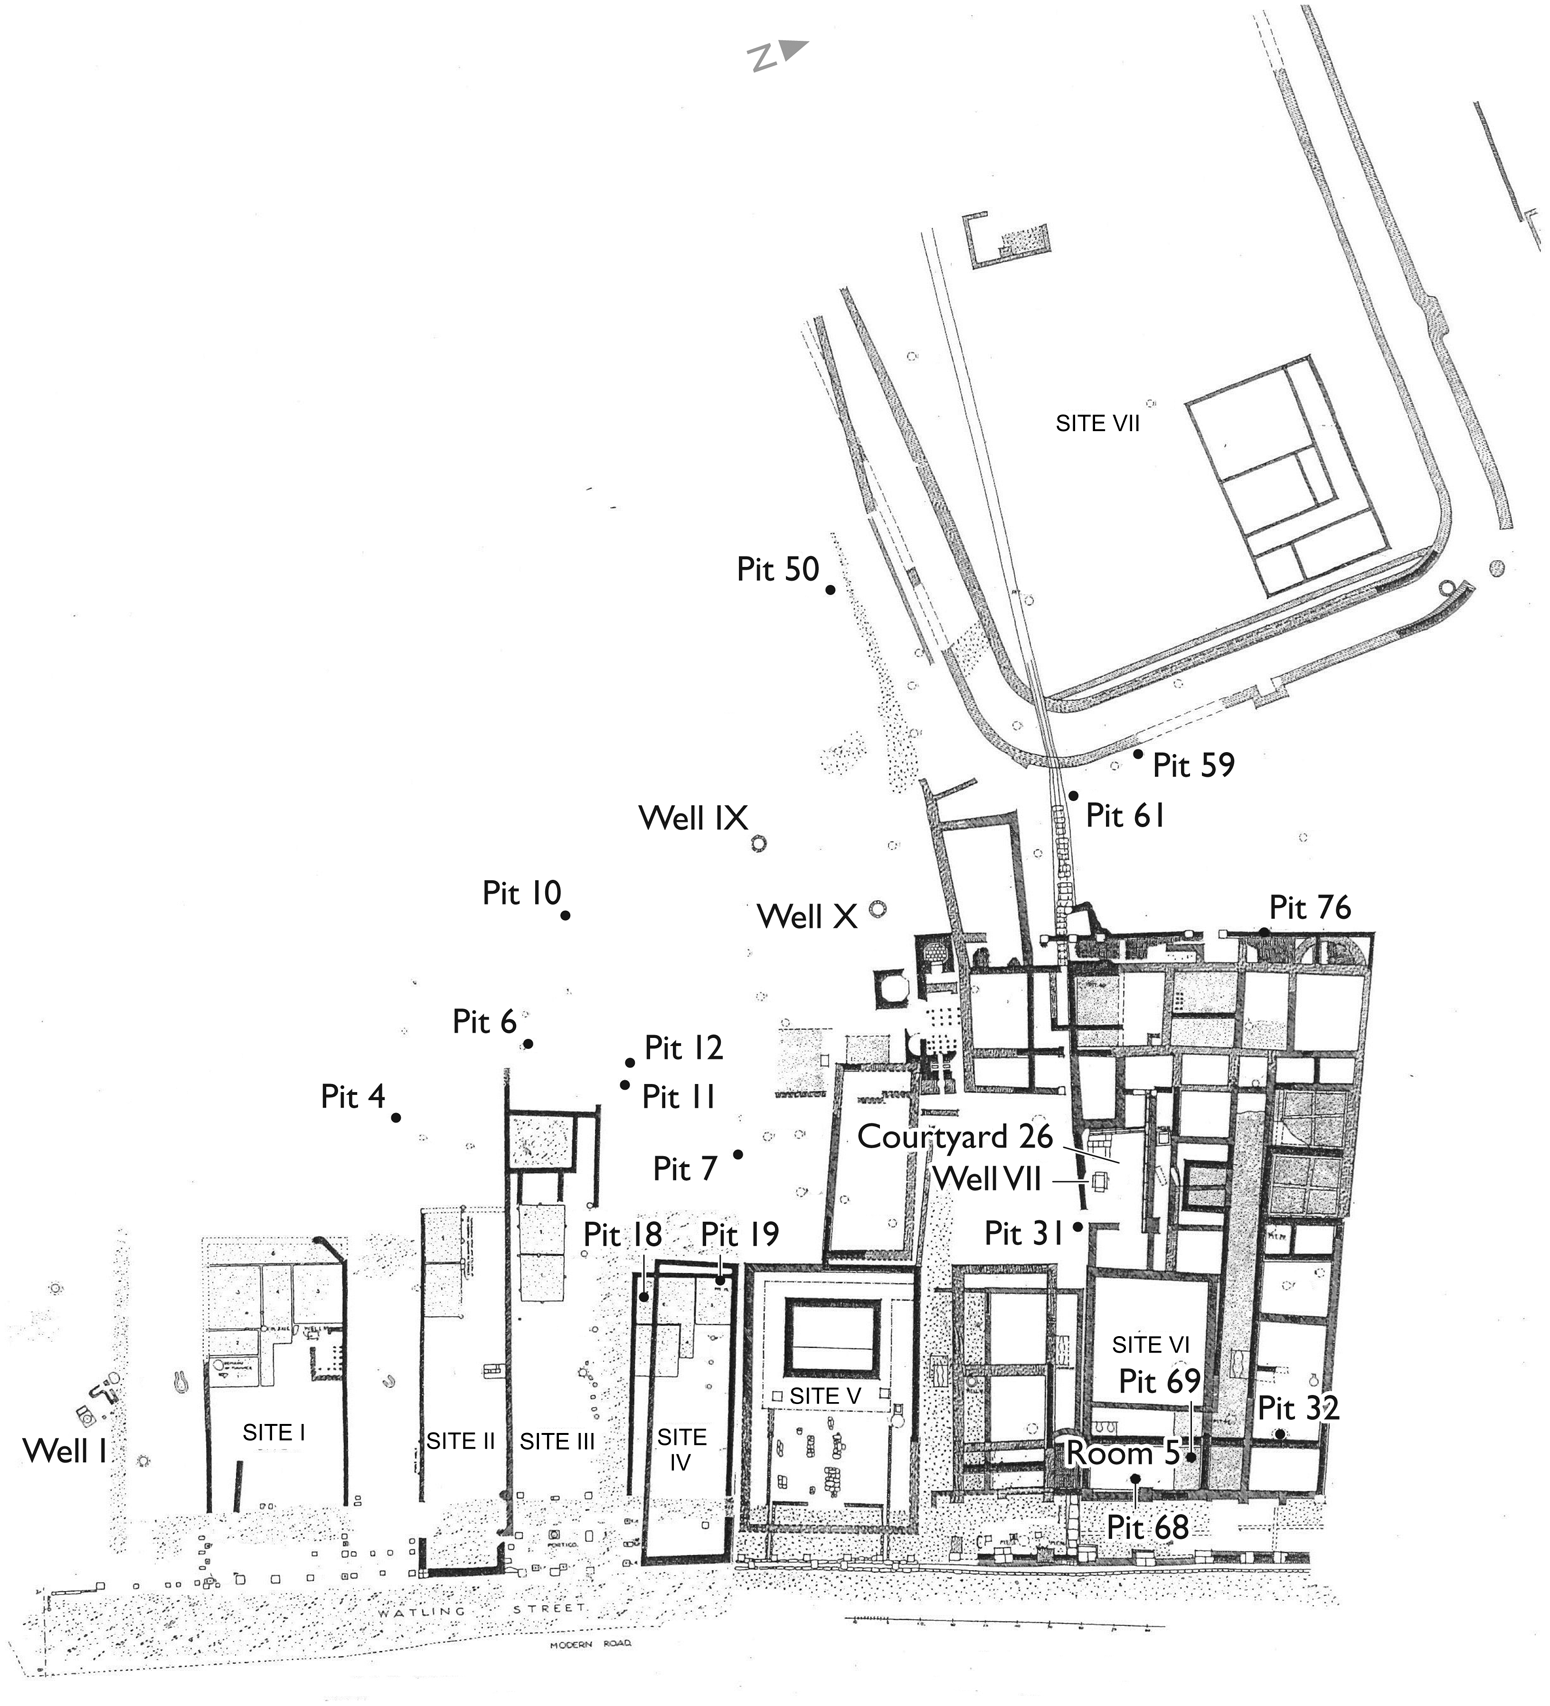
The Bushe-Fox excavations (Bushe-Fox Reference Bushe-Fox1916).

The few pits encountered in the Site V temple forecourt were suggested by Bushe-Fox to relate to the building’s construction and none contained complete vessels. The temple did, however, produce clear evidence for ‘classical’ rituals associated with both its foundation — a ceramic vessel which Bushe-Fox dates to a.d. 120–50 containing the bones of sacrificed animals placed below a cornerstoneFootnote 10 — and the temple’s termination at the end of the third century, manifested by a very large deposit mainly comprising 1,300 iron nails and fragments of broken-up bronze statues found placed in front of the temple’s podium.Footnote 11 Among the 14 fragments, one depicts drapery and another a greave, so more than one statue is represented.
North of the Site V temple was Site VI, a large and sprawling high-status property with its own bathhouse which had been created by amalgamating and extending three earlier strip houses on the site (A, B and C).Footnote 12 Bushe-Fox attributed these strip buildings to the start of the second century — an earlier strip house was seen below Building A — and put their amalgamation into the Site VI townhouse at c. a.d. 130–50.Footnote 13 Sites V and VI were supplied with piped water via a channel running along the side of Watling Street. The Site VI complex was extensively modified around the end of the second century. Its bathhouse was demolished at this date, but money was clearly spent on renewing other parts of the building and in constructing a lararium.
The final structure investigated by Bushe-Fox was the enigmatic Site VII, a large playing-card-shaped enclosure, for which there are no parallels, lying to the west of Site VI, the west end of which is cut through by a relatively modern road. The enclosure is not oriented to Watling Street, as its large double-doored entrance is in its north-east corner and points towards another, smaller, enclosure close by the insula’s earlier buildings on the former Via Principalis.Footnote 14 Just inside the door of Site VII on the left was a deep stone-lined tank. The enclosure was surrounded by a double set of masonry walls. Bushe-Fox interpreted the enclosure as a space for sporting events with the walls supporting staged seating.Footnote 15 He recorded no finds associated with the use of the enclosure; the few finds relate to the minor buildings seen within it, which are much later than the enclosure itself.
Ritual deposition at Wroxeter
Bushe-Fox encountered a large number of pits and wells across most of the site, some containing structured deposits of the kind described by Fulford and others.Footnote 16 Such features were generally uncommon in and around the municipal public buildings at the heart of the city centre, but there are some examples of other buried complete vessels from the many excavations that have taken place here. Two complete ceramic vessels from features of the military phase of Wroxeter seen in Webster’s excavations are cited by Evans in the catalogue below. The Baths Basilica excavation focused on the later levels, and Roger White recalls excavating two complete pots: a bowl just within Insula 2 (context C407) and an upright black-burnished ware jar in Insula 5, both of which had been included in dumps of soil (pers. comm. 2024).
Ritual deposition of other object types has also been seen at Wroxeter. Two pits encountered in the macellum produced significant objects: Pit F855, of the early third century, contained an interred dog and fragments of a human infant’s jaw and skull,Footnote 17 and from Pit 930,Footnote 18 of the early fourth century, came a small lead domestic shrine depicting Venus of third- or fourth-century date. A recent study of the ritual deposition of coin moulds, often found in features associated with boundaries, or in watery features,Footnote 19 cites four examples from Wroxeter, and Roger White has described the significant deposition at a villa site just outside the town of a tiny crude bust made of a modified natural pebble placed face-down in the bottom of a ditch, which he interpreted as a deposit relating to the end of the site’s use.Footnote 20
Phasing of the Bushe-Fox sites (synthesis of the three reports)
Each of Bushe-Fox’s three reports stands alone, and he did not publish any overview of the wider phasing of the buildings he encountered; a summary is attempted here. It is assumed that none of the buildings seen in the Bushe-Fox excavations pre-date c. a.d. 85, and all are later than the demolition of the fortress undertaken to prepare the site for its development into a town. The run of colonnaded strip houses along the Watling Street frontage appears more unified than it actually was. The dates given by Bushe-Fox for the pottery suggest the southern strip houses may be slightly earlier than buildings A, B and C further north, and there the building underlying A shows that there was more than one phase of construction. The Site VII enclosure is clearly early, as its walls had been demolished before the drain for the baths suite of the Site VI townhouse was installed c. a.d. 130–50, but Bushe-Fox did not suggest a specific date for its construction or a chronological relationship between it and the earliest buildings on the Watling Street frontage.
Phase 1, end of first century a.d. (c. 85–100): furnaces operating on land adjacent to Watling Street; occasional burial of cremated remains; one strip building below Building A on Site VI (Bushe-Fox Reference Bushe-Fox1916, Pl XXX); construction of Site VII enclosure?
Phase 2a, start of second century a.d. (c. 100–110/20): strip buildings I, II, III, IV and pre-Site VI strip buildings A, B and C.
Phase 2b, end of first quarter second century a.d. (c. 120/30): Construction of Site V Temple and upgrading of Site IV building.
Phase 3, mid-second century a.d. (c. 130–50): Demolition Site VII enclosure. Consolidation of strip buildings A, B and C into Site VI townhouse with detached baths suite.
Phase 4, end of second century/start of third century a.d.: remodelling of entire west face of Site VI and demolition of baths suite, implying piped mains water coming from the east was no longer available to the building.
Phase 5, second half of third century a.d.: upgrading of building Site IV with stone walls with elaborate painted plaster.
Phase 6, end of third century a.d.: demolition of the Site V temple. Site IV falls out of use.
Phase 7, end of fourth–mid-fifth century a.d.: infilling of the wells/abandonment of central Wroxeter. (NB the end date for Wroxeter has recently been revised; see White et al. in prep.)Footnote 21
The Bushe-Fox Collection
Wroxeter was taken into state guardianship in 1947. Because the Bushe-Fox excavations had occurred before this, the collections from that intervention are split between the English Heritage Trust (henceforward EH) and Shropshire Museums. In nearby Shrewsbury, what was then the Borough Council’s museum collection was moved in 1936 from a smaller building into Rowley’s House and Mansion to allow for a new display of the many high-profile finds from the recent excavations at Wroxeter — both Bushe-Fox’s and those of Donald Atkinson in the Forum in the 1920s. That element of the Wroxeter collection is now held by Shropshire Council’s museum service and much of the Bushe-Fox material is now on display in the Music Hall Museum in Shrewsbury. Many objects remained on the site after 1936, however, in the site museum and stored in outbuildings and sheds, and this component of the collection came into guardianship together with the monument. The EH Bushe-Fox collection for Wroxeter runs to more than 1,500 records: c. 5% of the total EH collection for Wroxeter. This paper is based on the English Heritage holdings (indicated by 8-digit accession numbers) though the complete vessels with pit or well contexts published by Bushe-Fox but not held by EH are referred to here (Evans, below).
The stone of Wroxeter’s Roman buildings had been robbed from the Anglo-Saxon period onwards and there had been a farm on the Bushe-Fox site in the nineteenth century. Bushe-Fox’s published photographs show that he dug trenches looking for wall footings which he then chased through the deep and much-disturbed ground, expanding into area excavations where he encountered intact floors. Bushe-Fox’s three reports on his work at Wroxeter are brief and lack structure. In them he frequently describes objects and deposits simply as being at either a high or a low level, or, less often, above or below a particular floor. He describes the stratigraphy as simply ‘bad’.
The finds he published are often missing any detail of their context. Typical of the period, Bushe-Fox was more concerned with dates provided by coins, published parallels for individual objects, and in the case of the ceramics, particularly the samian vessels, their form and maker’s stamps. He did not attempt to bring together into discrete groups the full contents of any of the individual features he excavated, though some reconstruction of groups can be done by combing through his text. Almost no section drawings appear in his reports, and no paper archive relating to his work at Wroxeter has ever been found.
Complete vessels and miscellaneous ceramics
During recent routine documentation work on the EH Bushe-Fox collection, the large coarseware assemblage from the Bushe-Fox excavations was seen to hold considerable potential as a subject of further research due to its large number of complete and reconstructed vessels. There are 60 complete vessels in the EH collection, almost all locally made, with another 30 or so on display in Shropshire Museums Service’s Music Hall Museum. This equates to many more than actually appear in Bushe-Fox’s reports. Bushe-Fox recorded 76 pits and 11 wells and most of them appear on the published plans; these are the source of most of the vessels with a known context. Of the 60 complete vessels in the EH Bushe-Fox collection, only 21 have valid contexts linking them to an individual site and a specific context, and these are the focus of this paper, together with a small number of vessels marked indicating that they came from a pit or well context but not mentioned in Bushe-Fox’s report.
Although a few vessels were found intact (generally smaller ones) most of the vessels came out of the ground in pieces and were reconstructed in the 1930s, so that the group examined here is an extract from a selection made 90 years ago specifically for the purposes of museum display. Considered as a group, however, they provide a very strong indication that some of the pits and wells had been filled with structured deposits. The approach of this paper has been to focus on the coarsewares, where the potential for updating and enhancing Bushe-Fox’s account was very much greater; however, a number of complete samian vessels were found in the excavations. Most are unprovenanced, but there are two exceptions which are discussed here.
The EH Bushe-Fox collection includes a further 21 large crates of unaccessioned coarseware sherds of flagons, bowls, jars and mortaria, the majority of which are unprovenanced and/or unmarked. Fragments of a number of more unusual, potentially religious, forms exist within the bulk material, such as triple vases, candlesticks, unguent bottles and a patera handle. Unprovenanced examples of a triple vase and candlesticks also occur in the group of reconstructed vessels discussed below.
Any reconsideration of the Bushe-Fox excavations and the complete ceramic vessels found in them requires an updated assessment of the ceramics themselves. The catalogue provided by Jane Evans covers both the provenanced complete and reconstructed vessels and the unprovenanced reconstructed religious vessels, which are significant and for which there are almost no parallels from the other Wroxeter excavations. The vessel numbers used here refer to entries in her catalogue. For background and context, Fiona Seeley has contributed a report providing parallels for both the religious forms found by Bushe-Fox and for the contexts in which he found buried vessels, based on her work in the south-east.
The vast collection for Wroxeter is held at the English Heritage collections store at Wrest Park, Bedfordshire.Footnote 22
Summary of the pit and well groups
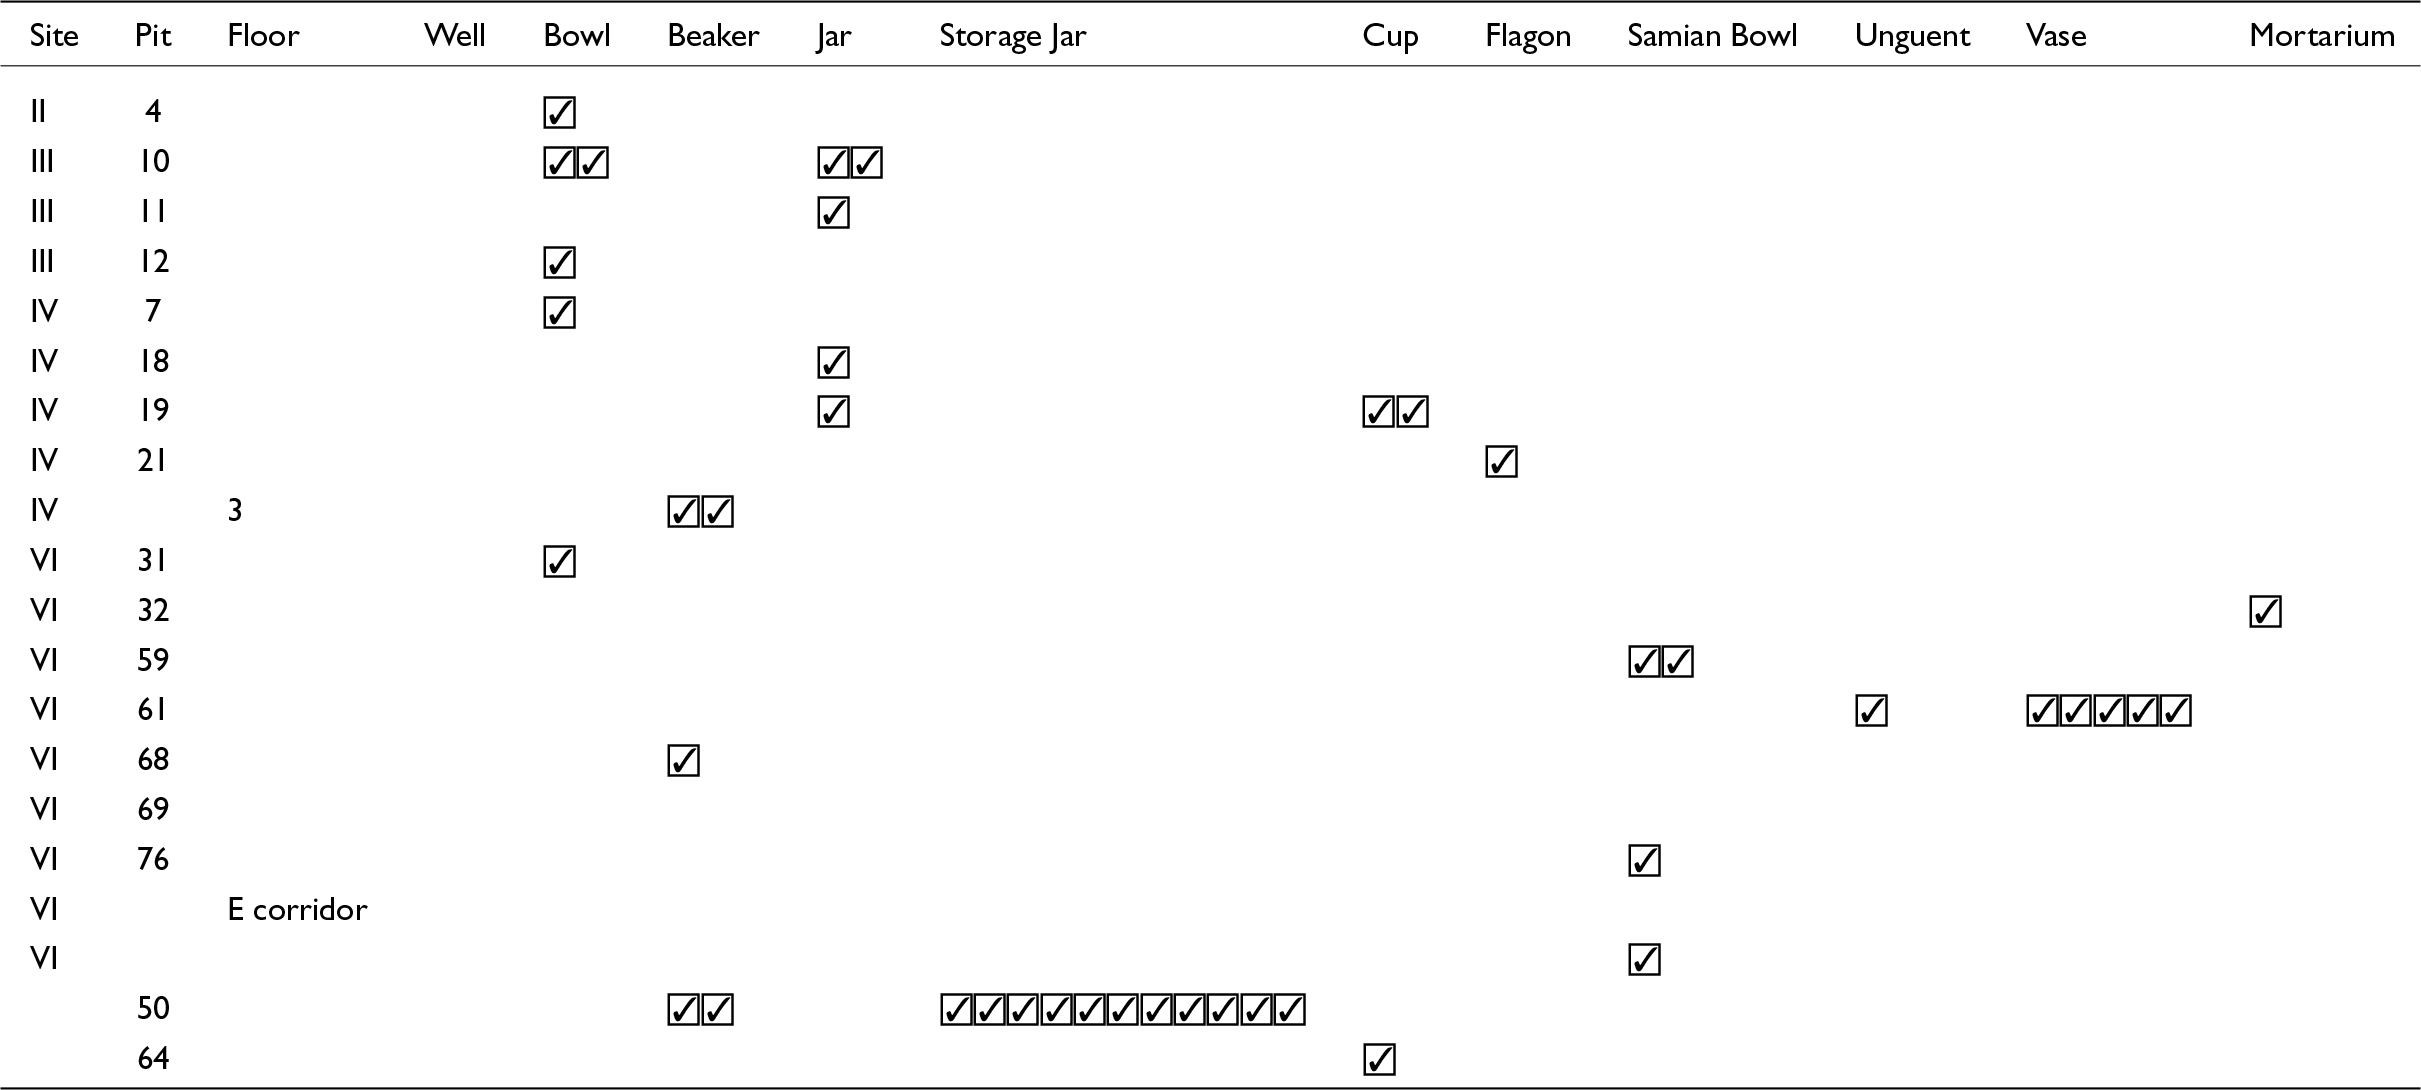
Bushe-Fox records 17 of his 76 pits as containing complete vessels (Table 1). The initial approach to the complete vessels here has been to group them by the location of the feature in which they were found. Most of the pits were outside the buildings, often in a location we might call ‘the bottom of the garden’. Inside the buildings, a number of pits containing complete vessels were found, while other vessels had been incorporated into the makeup of a new floor during construction rather than being placed into a negative feature. Two of the wells also contained complete vessels. The pits and wells contained sherds of samian and mortaria, as well as occasional amphora sherds, and these are ubiquitous. While most are likely to be residual, sherds of elaborately decorated samian did occur in noticeably large numbers in the pits and the inclusion of some may have been deliberate.
Vessel types by location

The pits at the south end of the site, in the vicinity of Sites I–III (Fig. 3), were all outside the buildings and either did not contain complete vessels or had only a single one, which were all bowls, dishes or jars. Pit 10, which contained three complete vessels, is at the back of the Site III building. As a solitary outlier situated some 16 metres west of the back wall of Site III, it cannot be assumed that this relates to any one building, but the dates of the vessels it contained make it contemporary with the buildings on Watling Street. The pits containing the greatest number of vessels, as well as the more unusual ones, were encountered in the area at the back of the large, multi-phase townhouse Site VI, alongside the outer wall of the former Site VII enclosure to its west (Fig. 3). The drain running from the Phase 3 baths suite at the rear of Site VI can be seen to cut across the exposed foundations of the former enclosure walls: the buildings were not extant at the same time and the pits there are unlikely to occupy a meaningful zone between Sites VI and VII.
The wells comprise a discrete group; Bushe-Fox mentions 11 wells, and four of these had noteworthy contents. Well I, south of Site I (Fig. 3), contained a complete early jar, while the other three wells (VII, IX and X) were focused around Site VI and contained unusual assemblages dating to the end of the inhabitation of central Wroxeter (see below). Only one well was in a location likely to have been roofed — Well VII, the main courtyard well for the Site VI complex.
Pits outside buildings
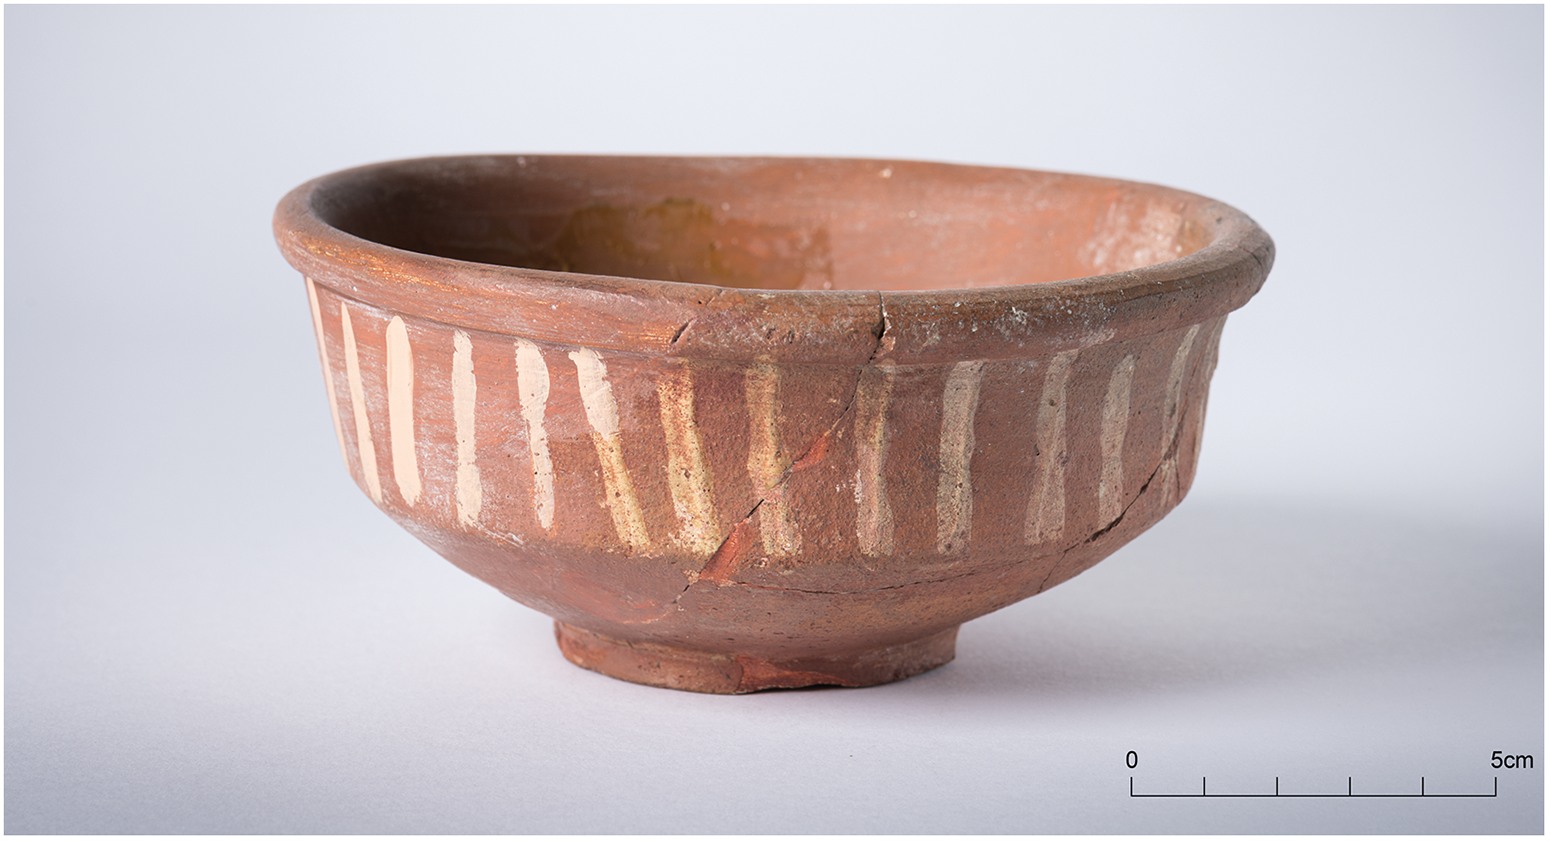
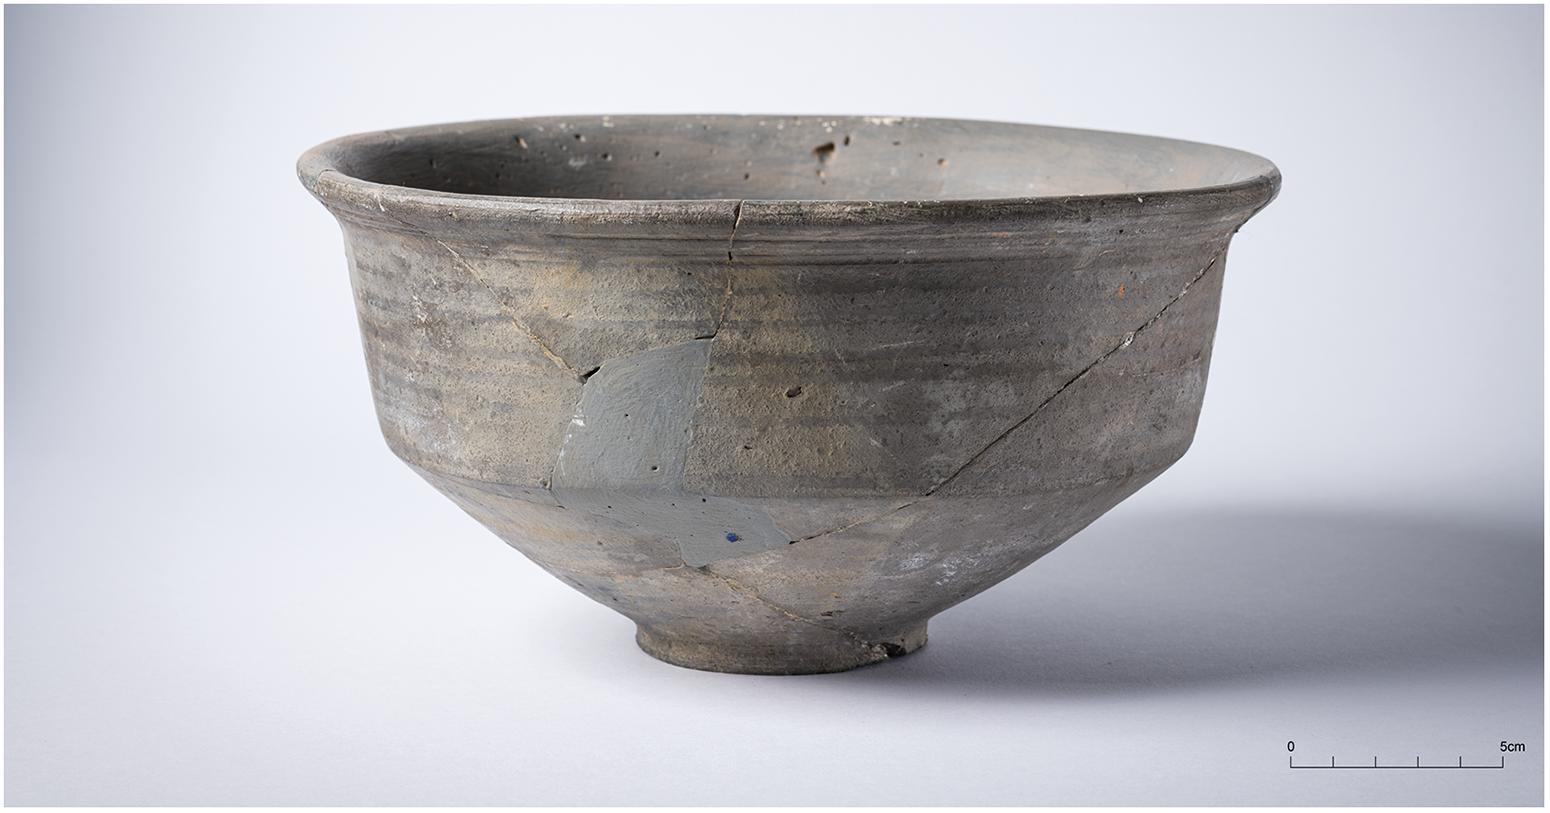
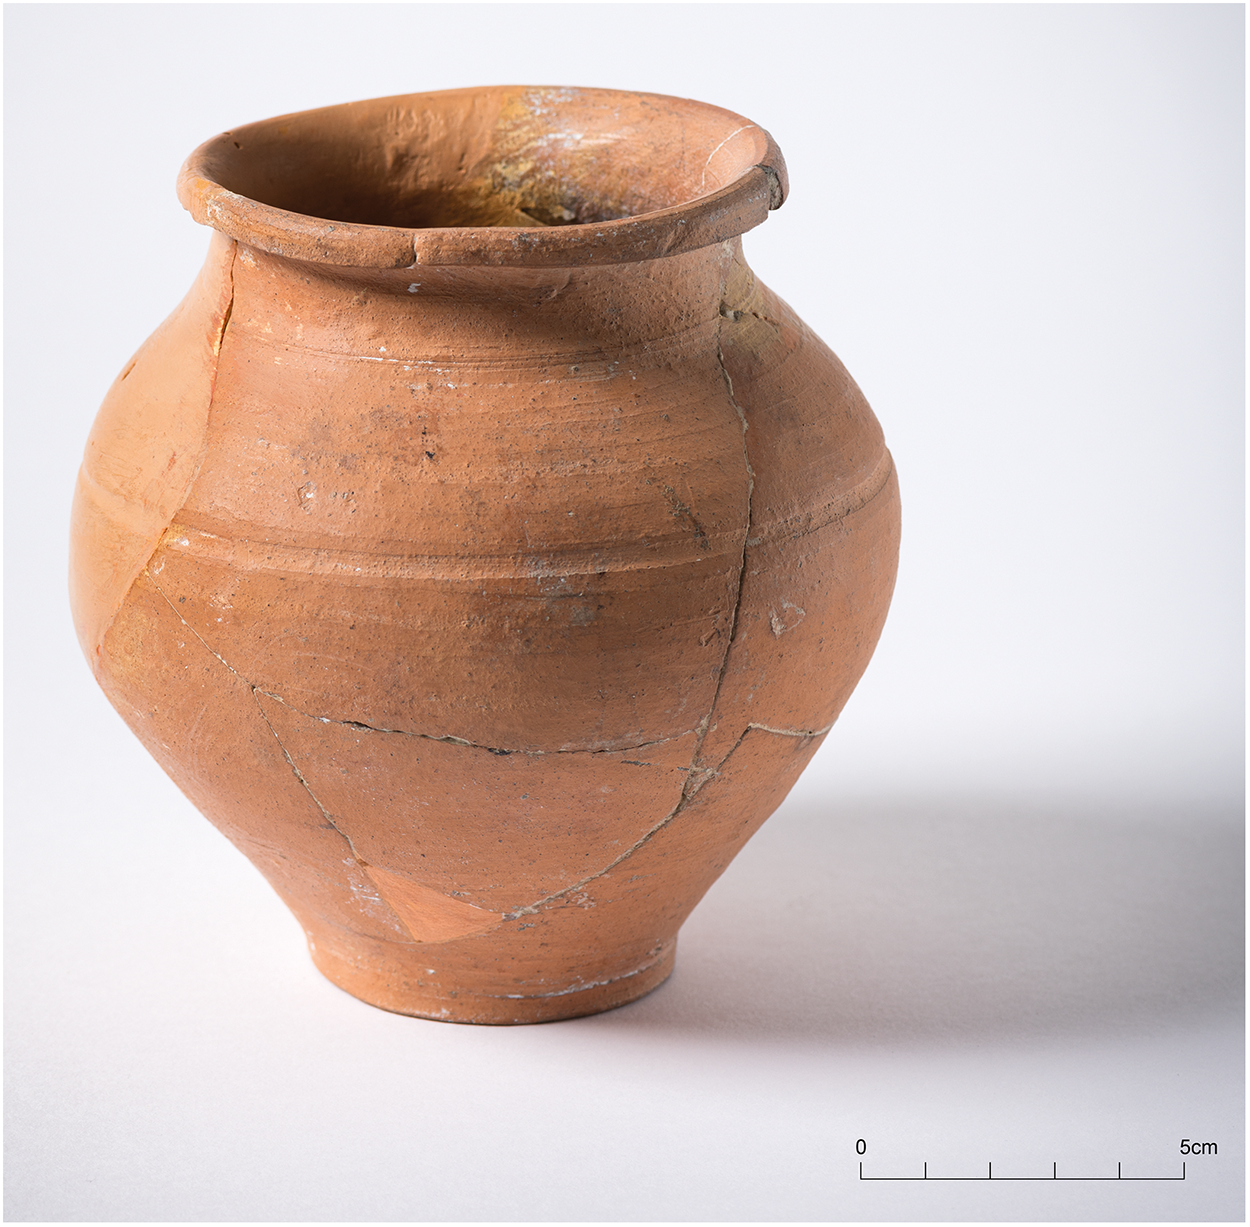
In the area behind the strip houses Sites I–IV (Fig. 3), Pits 4, 6, 7, 10, 11 and 12 had unusual contents. Pit 6 produced a potsherd with a finely modelled head on it,Footnote 23 and the rest contained complete vessels of the early second century. Vessel 1, a painted bowl from Pit 4 (Fig. 4) and Vessel 2 from Pit 7 (Fig. 5), a plain bowl, are held by EH.
Vessel 1 from Pit 4, Site II (image: Historic England/Steven Baker).

Vessel 2 from Pit 7, Site IV (image: Historic England/Steven Baker).

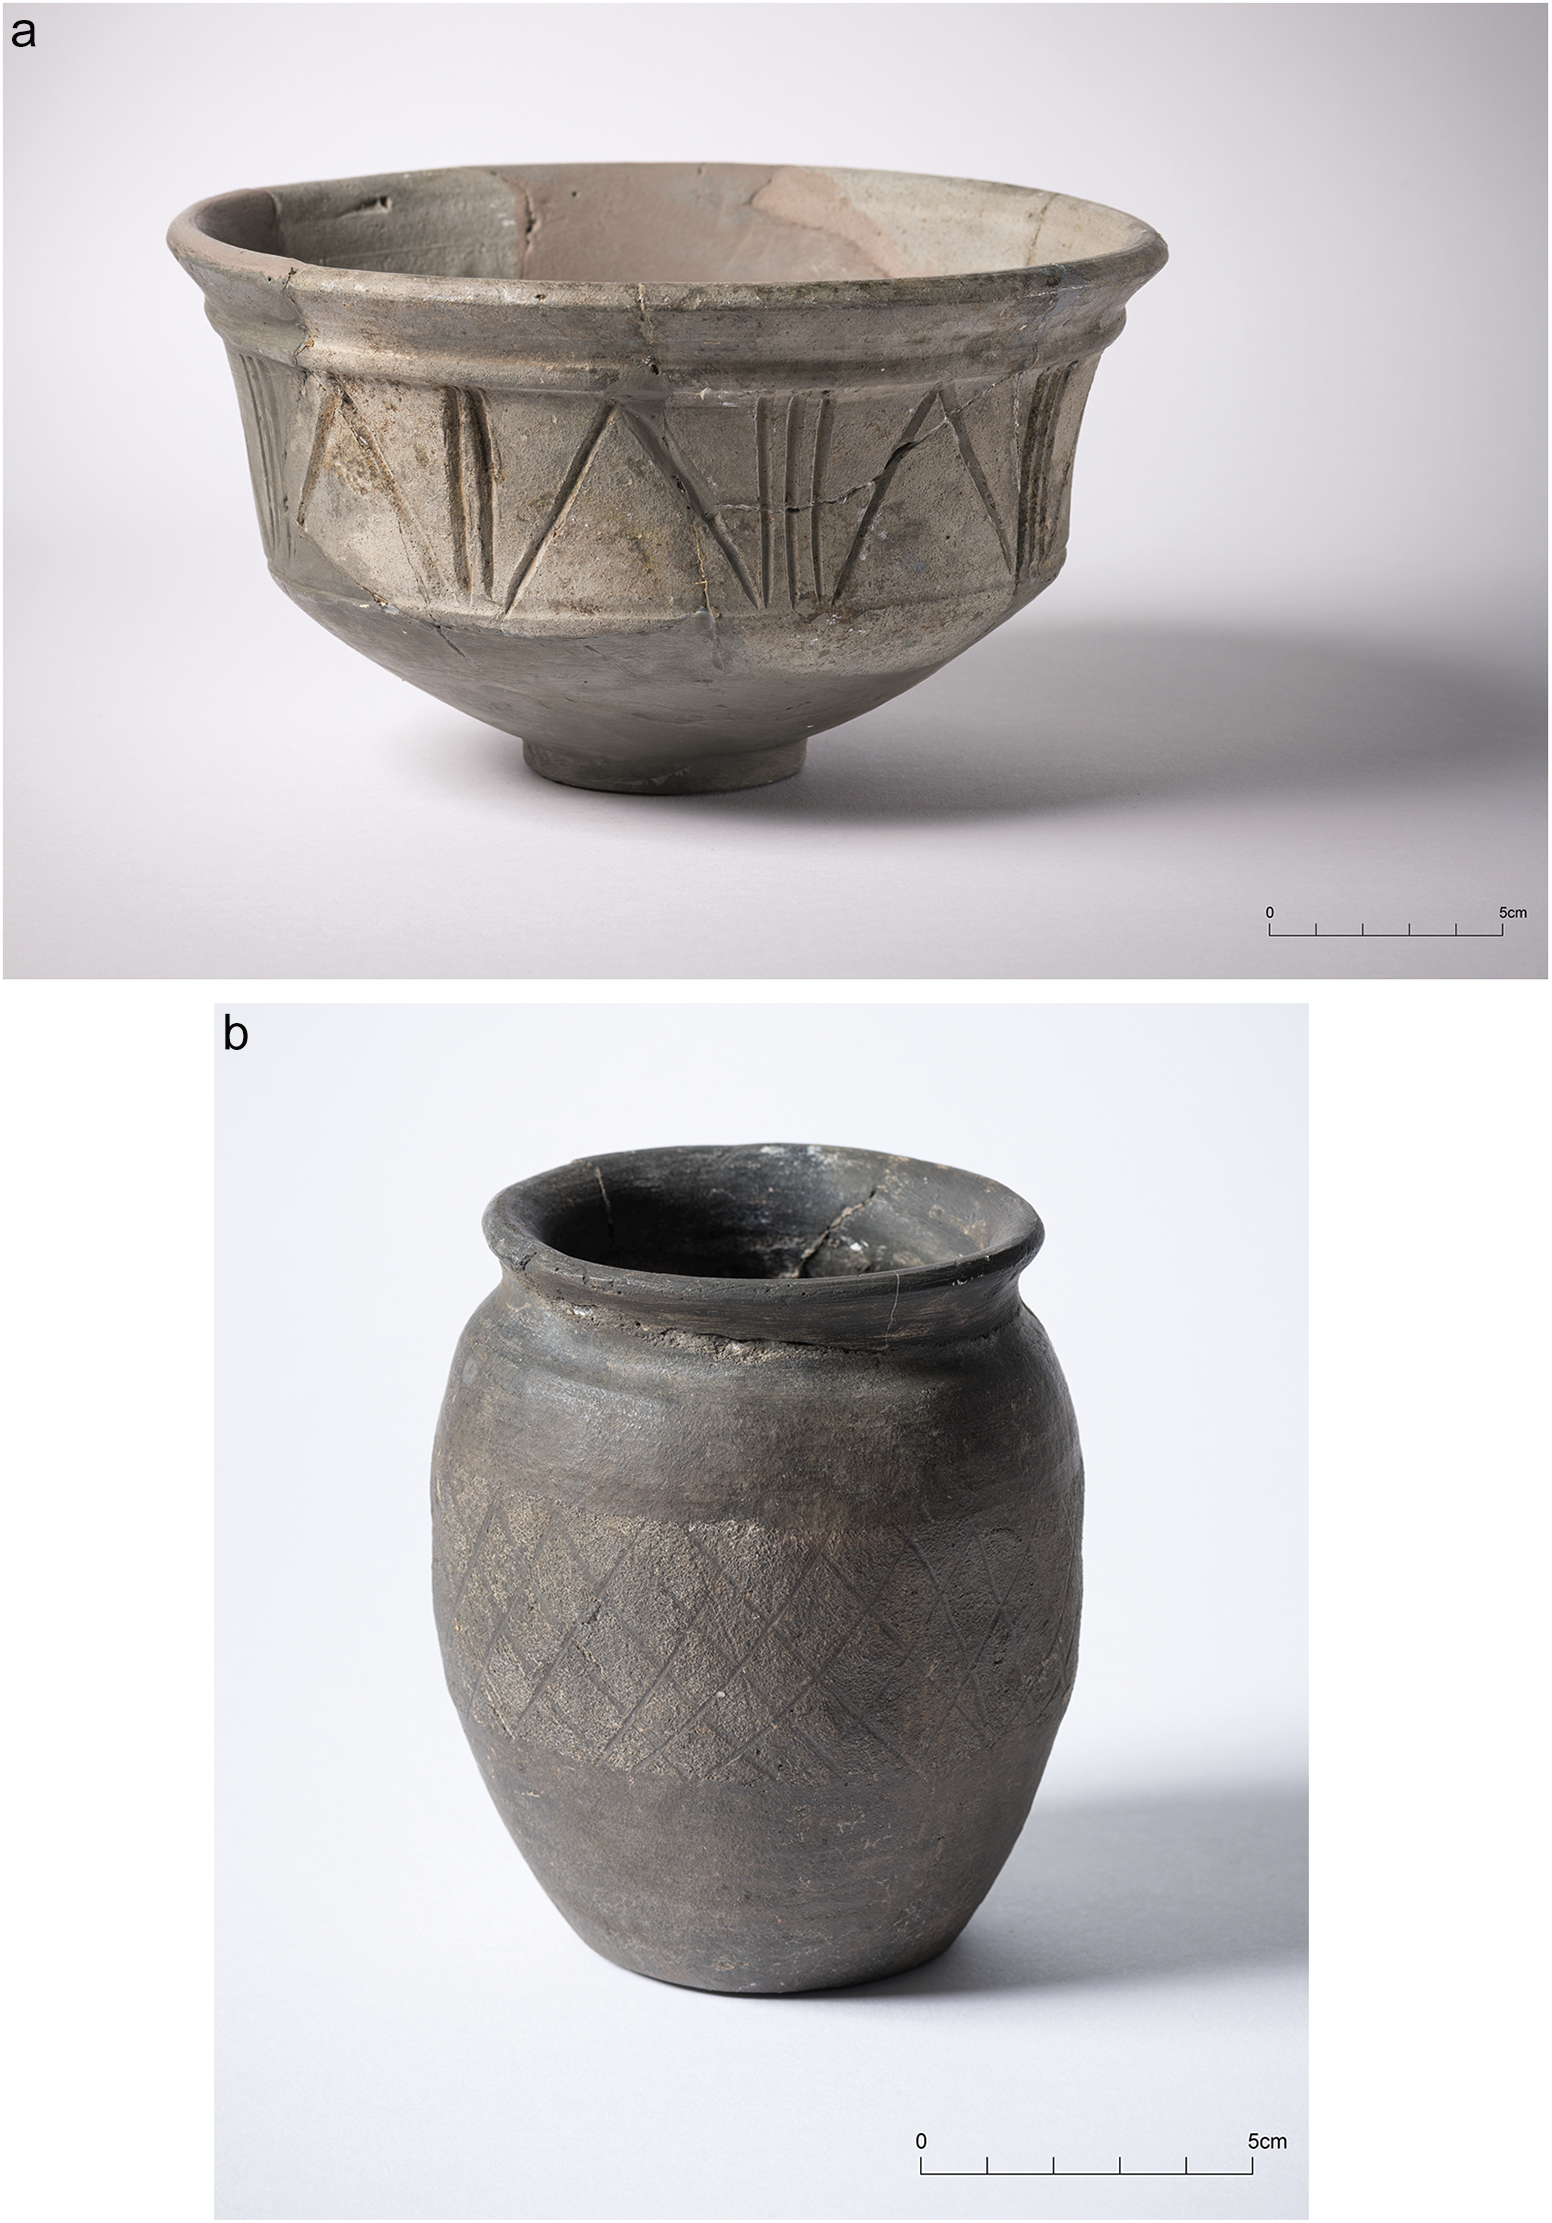
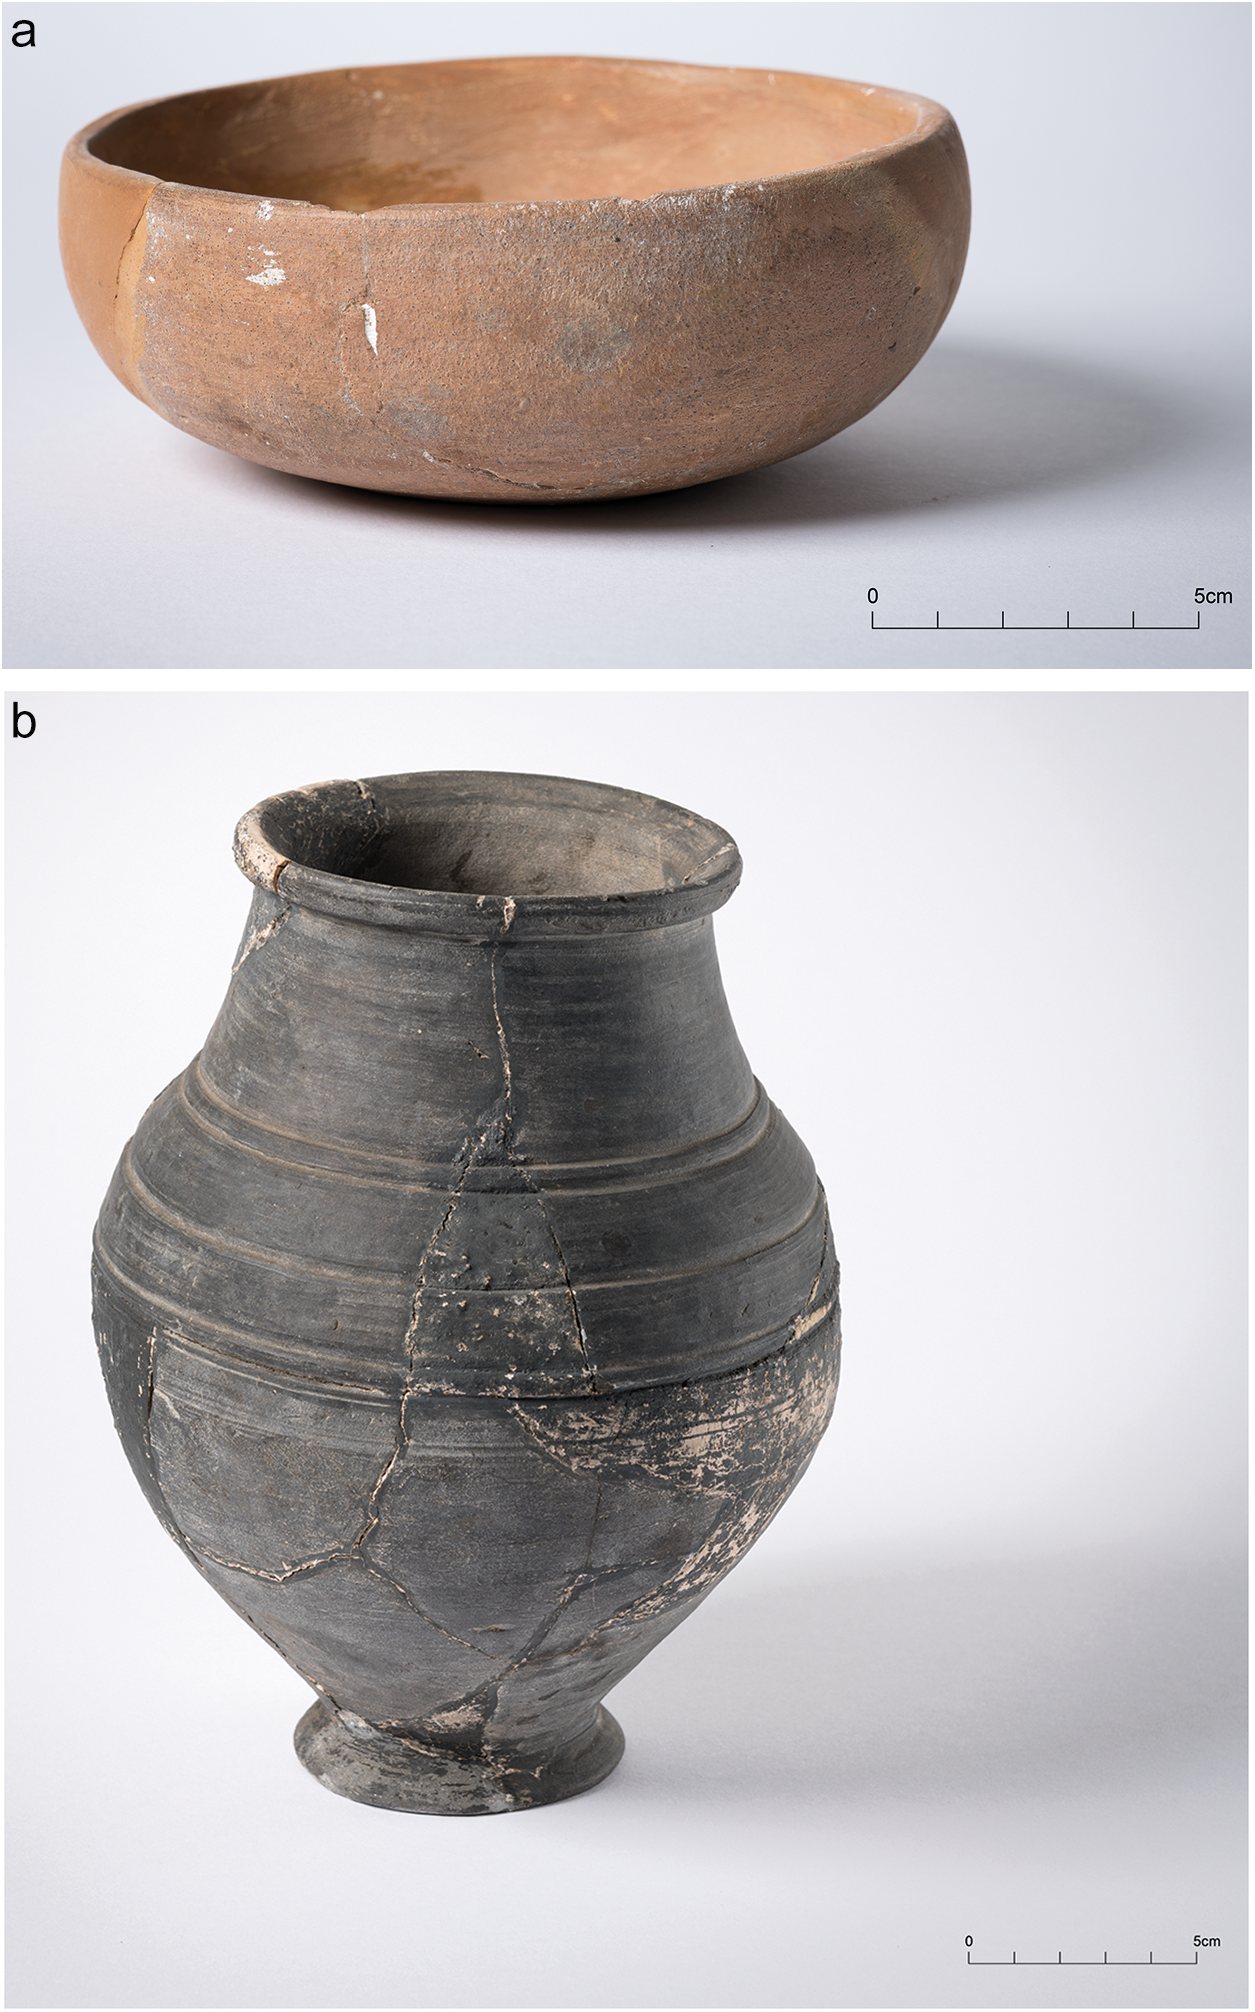
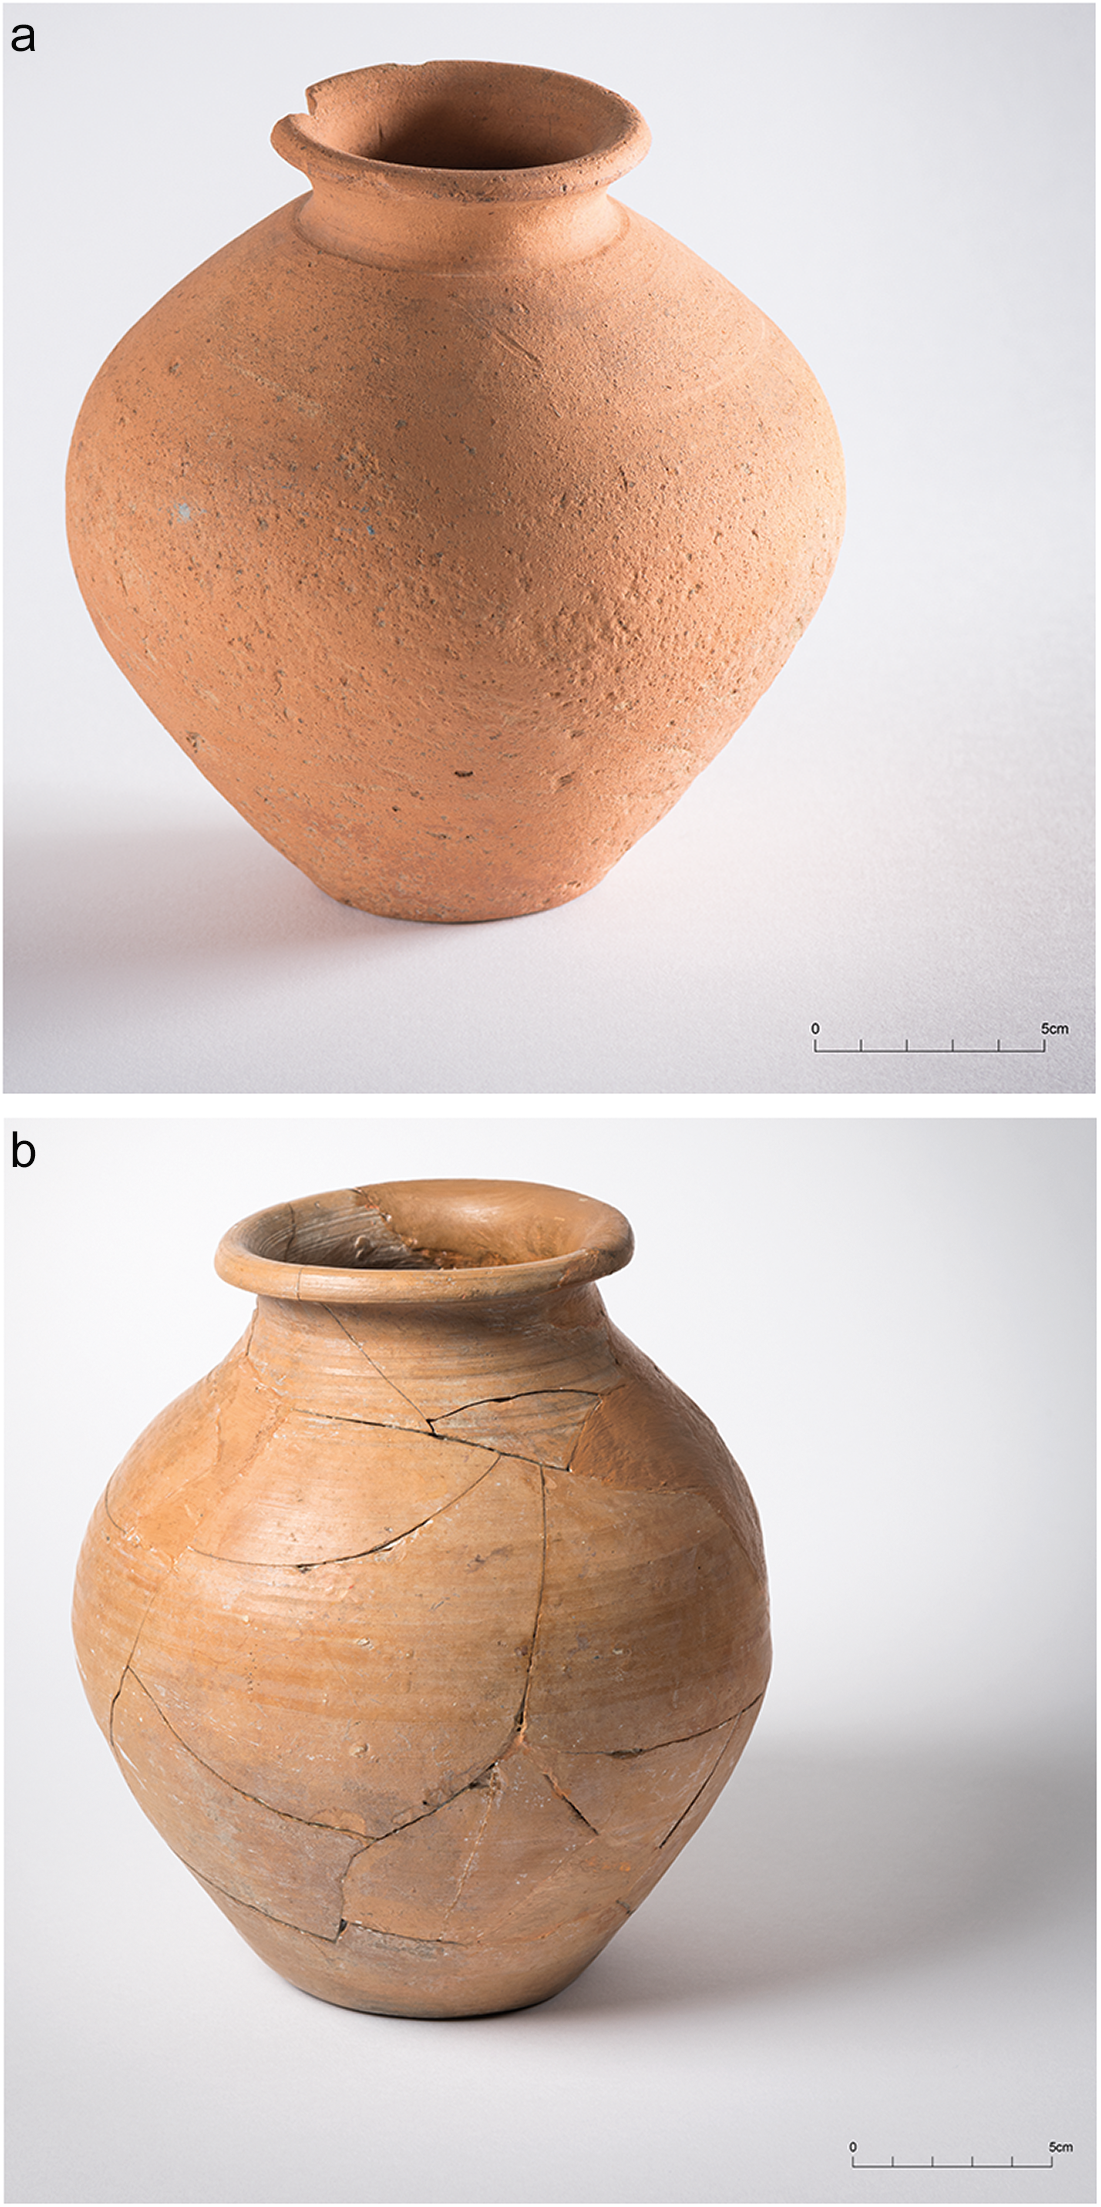
Of the three complete vessels in the solitary Pit 10, EH holds a bowl of early second-century date (Vessel 3, Fig. 6a) as well as a second-century black-burnished ware jar (Vessel 4, Fig. 6b) not mentioned by Bushe-Fox but marked Pit 10. In addition, Bushe-Fox recorded sherds from a mica-dusted dish of the second century in a form which has no parallels at Wroxeter (see Evans below).
(a) Vessel 3 and (b) Vessel 4 from Pit 10, west of Site III (images: Historic England/Steven Baker).

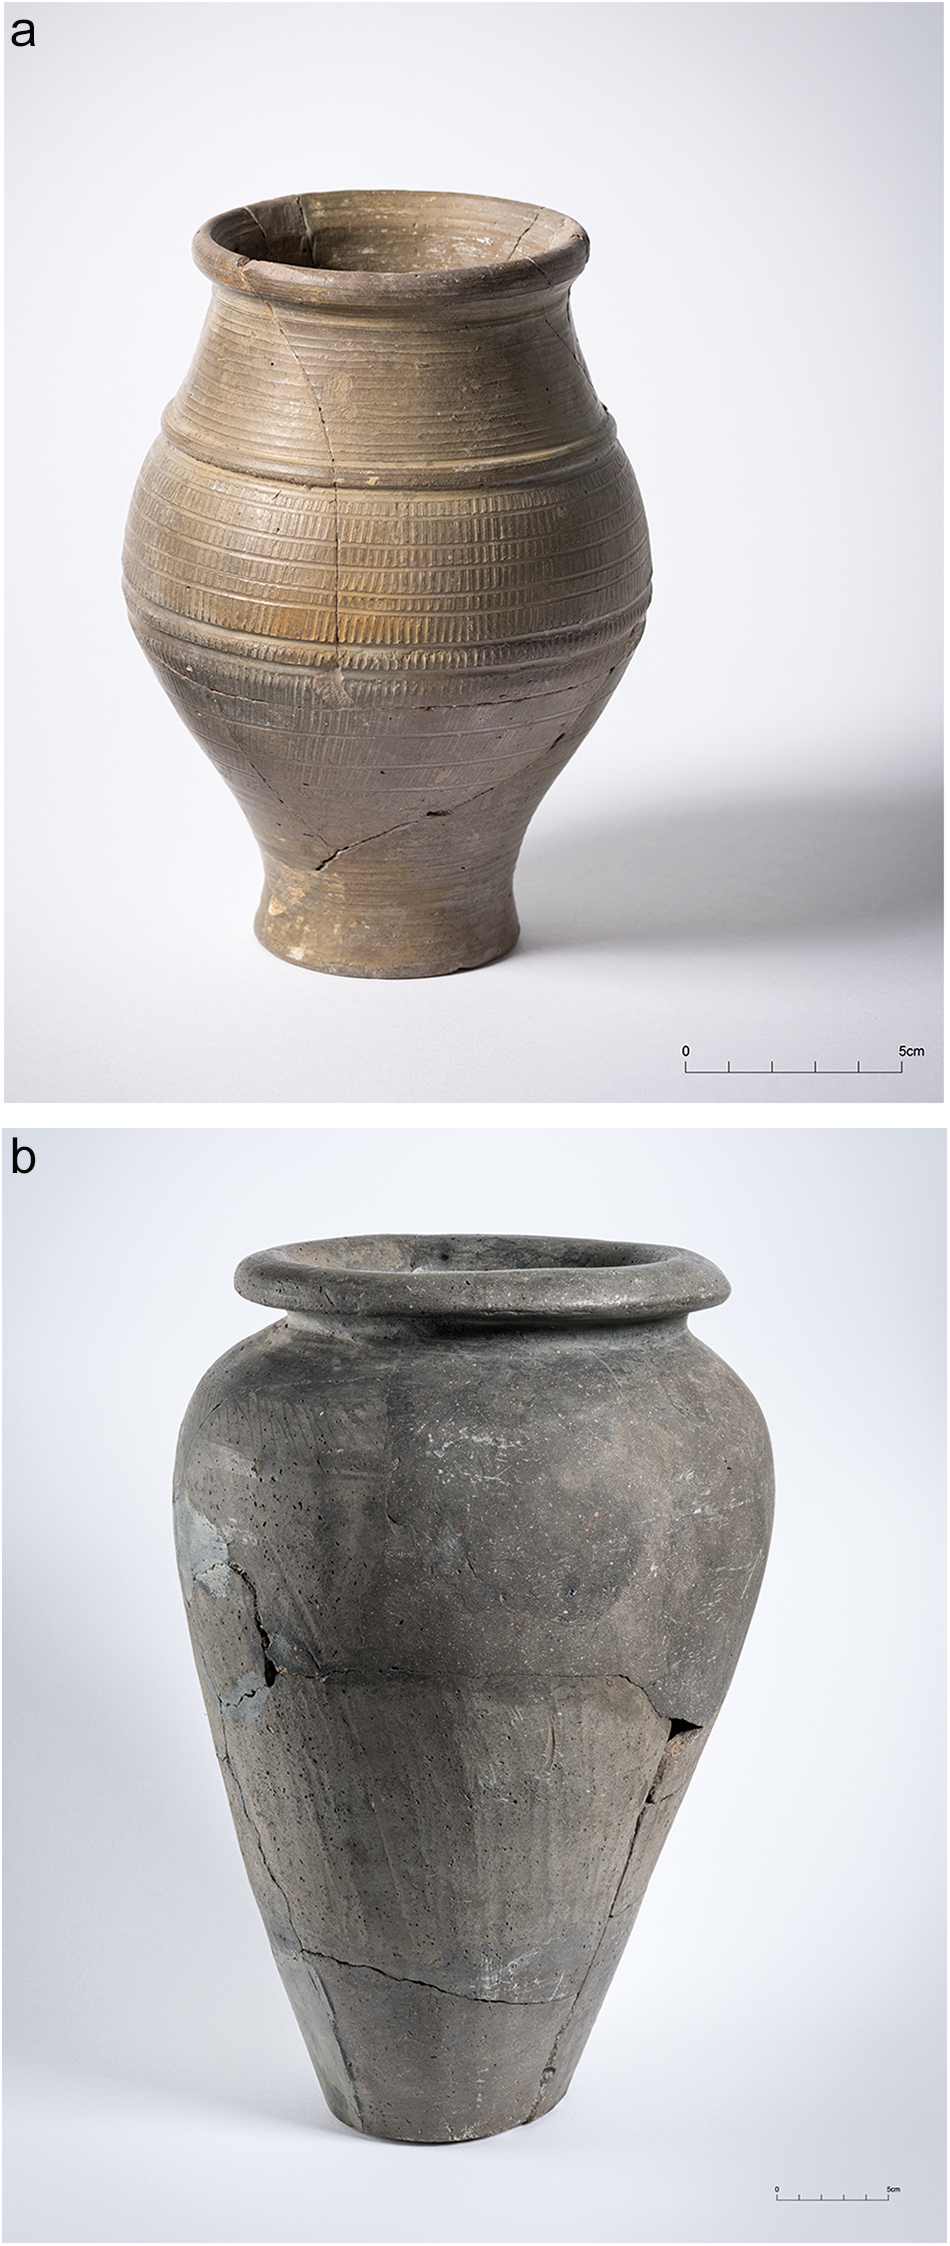
A number of pits were encountered behind the Site VI townhouse, outside the south-west corner of the Site VII enclosure (Fig. 3). Pit 50, the furthest away from Site VI, produced the sherds of two identical Gallo-Belgic-style butt beakers of the late first century (Vessel 5, Fig. 7a), the sherds of 10 or 12 very large storage jars all of the same form dating to the late first to early second century (Vessel 6, Fig. 7b) with a further, smaller storage jar with cordoned decoration, of the same date bracket as the beakers (not with EH). There was also a coin of Faustina II (161–75), perhaps intrusive.
(a) Vessel 5 and (b) Vessel 6 from Pit 50, south of Site VII (images: Historic England/Steven Baker).

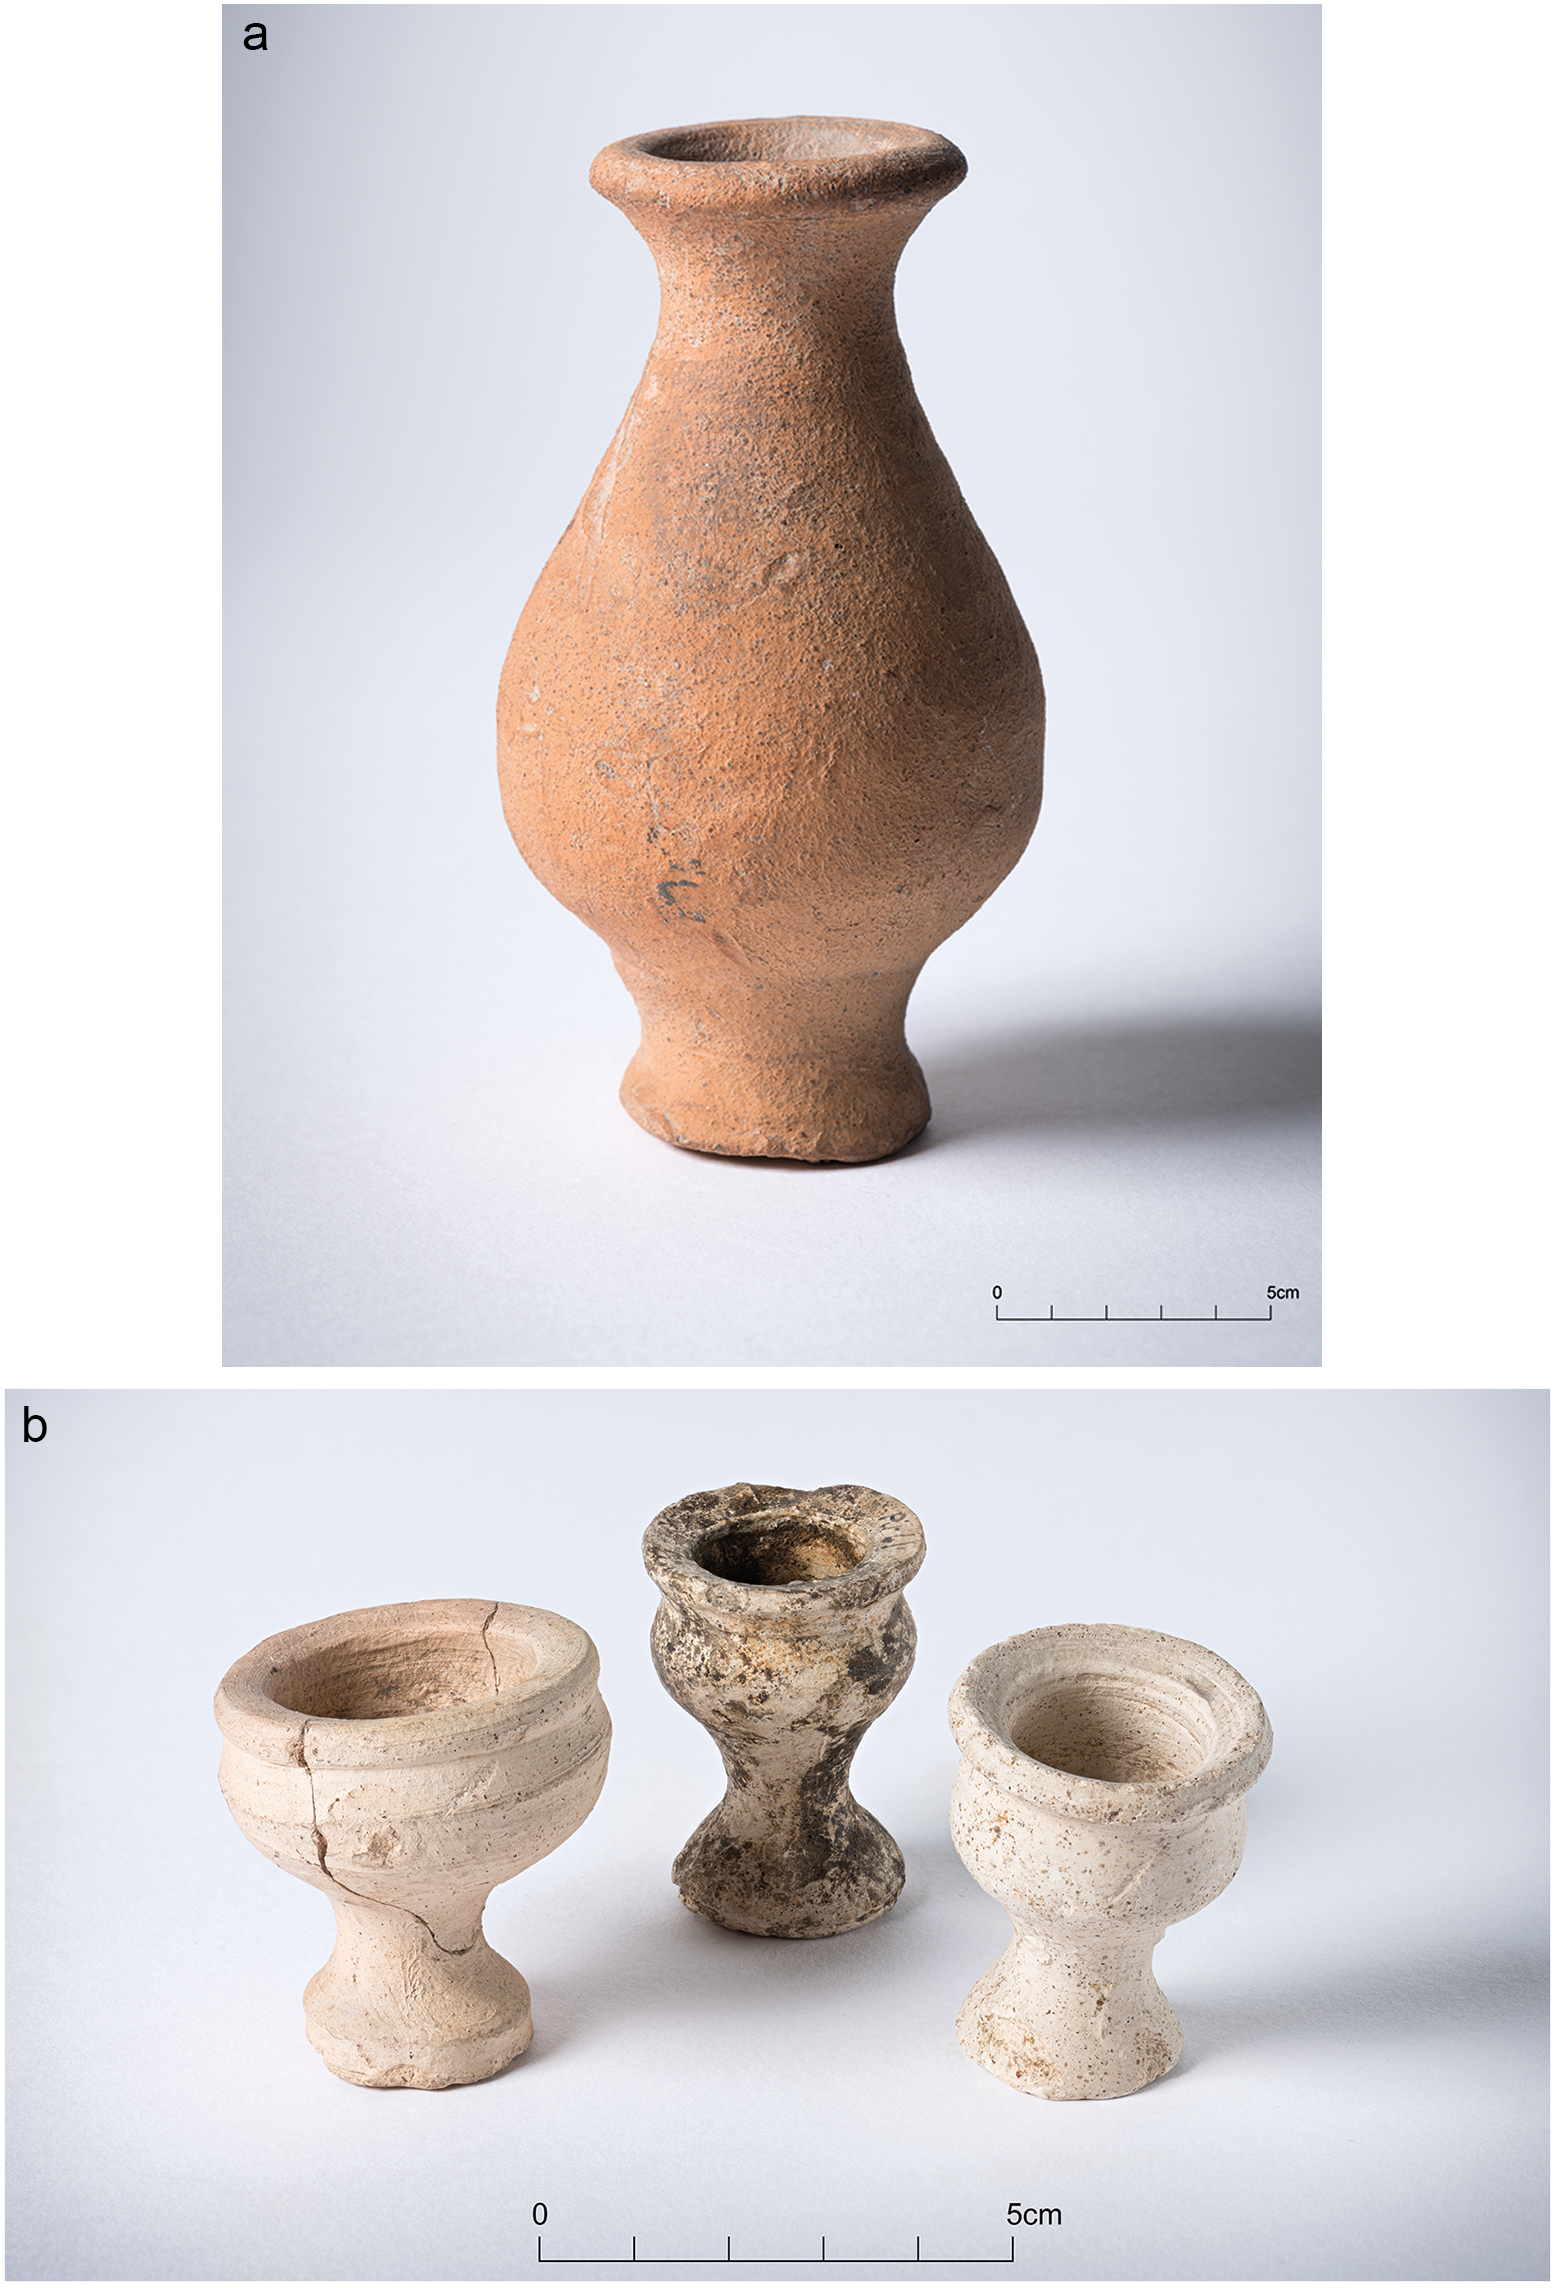
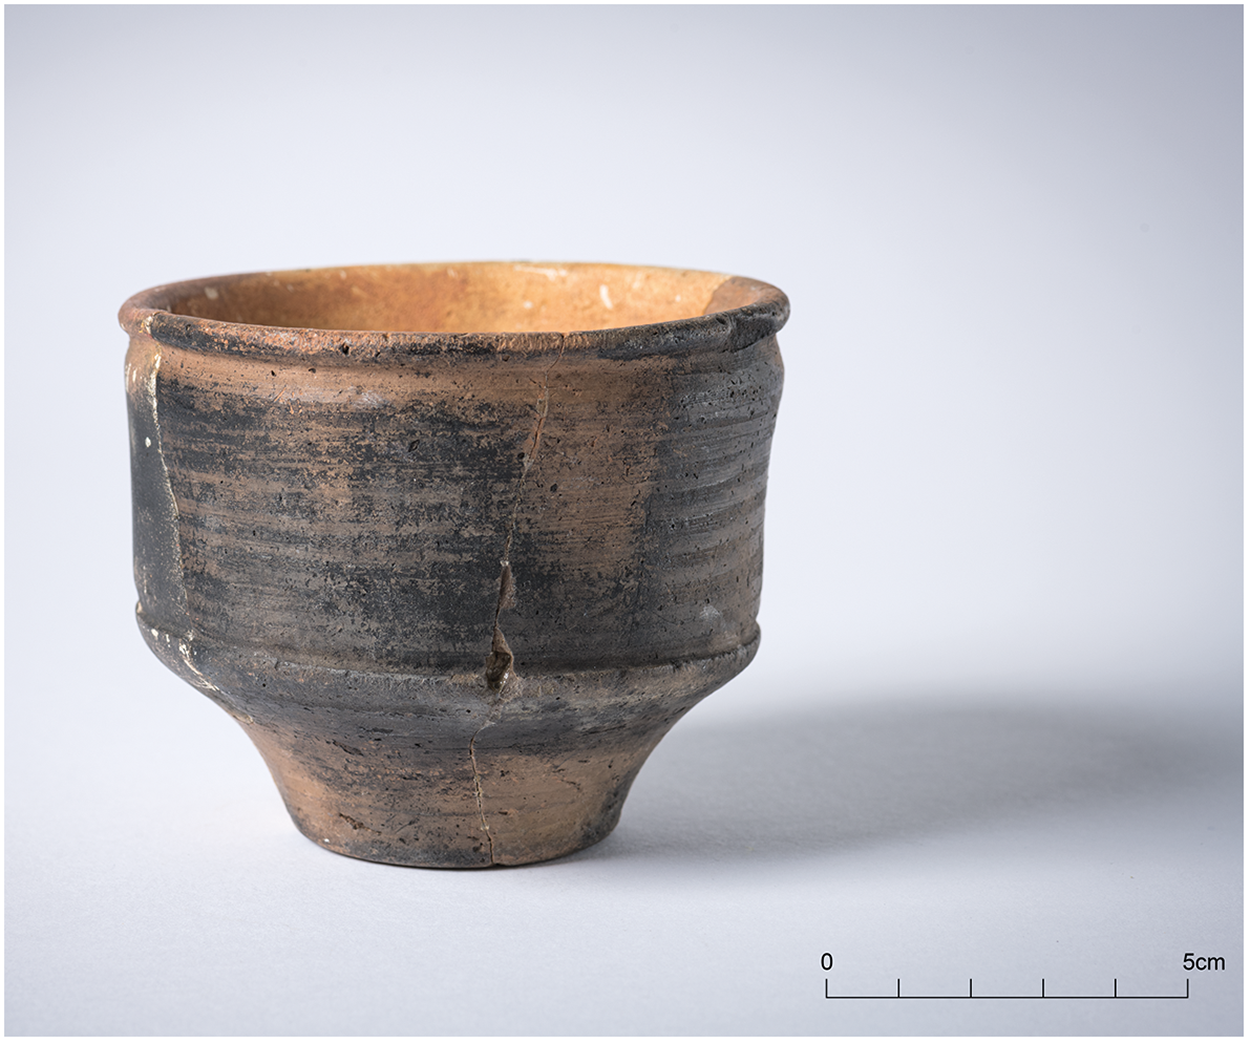
Pit 61, close to the back of the Site VI building contained an unguent pot (Fig. 8a) of the late first to mid-second century (Vessel 7) and five miniature vases (Fig. 8b) probably of the same date (Vessel 8). One example of this type of vase had been found the previous year in the area of the temple, though its context was not recorded. Pit 64, not shown on a plan but in the same area, contained a coarseware cup of late-first- to mid-second-century date (Vessel 9, Fig. 9) and a fragment of a human skull.Footnote 24
(a) Vessel 7 and (b) Vessels (8) from Pit 61, Site VI (images: Historic England/Steven Baker).

Vessel 9 from Pit 64, Site VI (image: Historic England/Steven Baker).

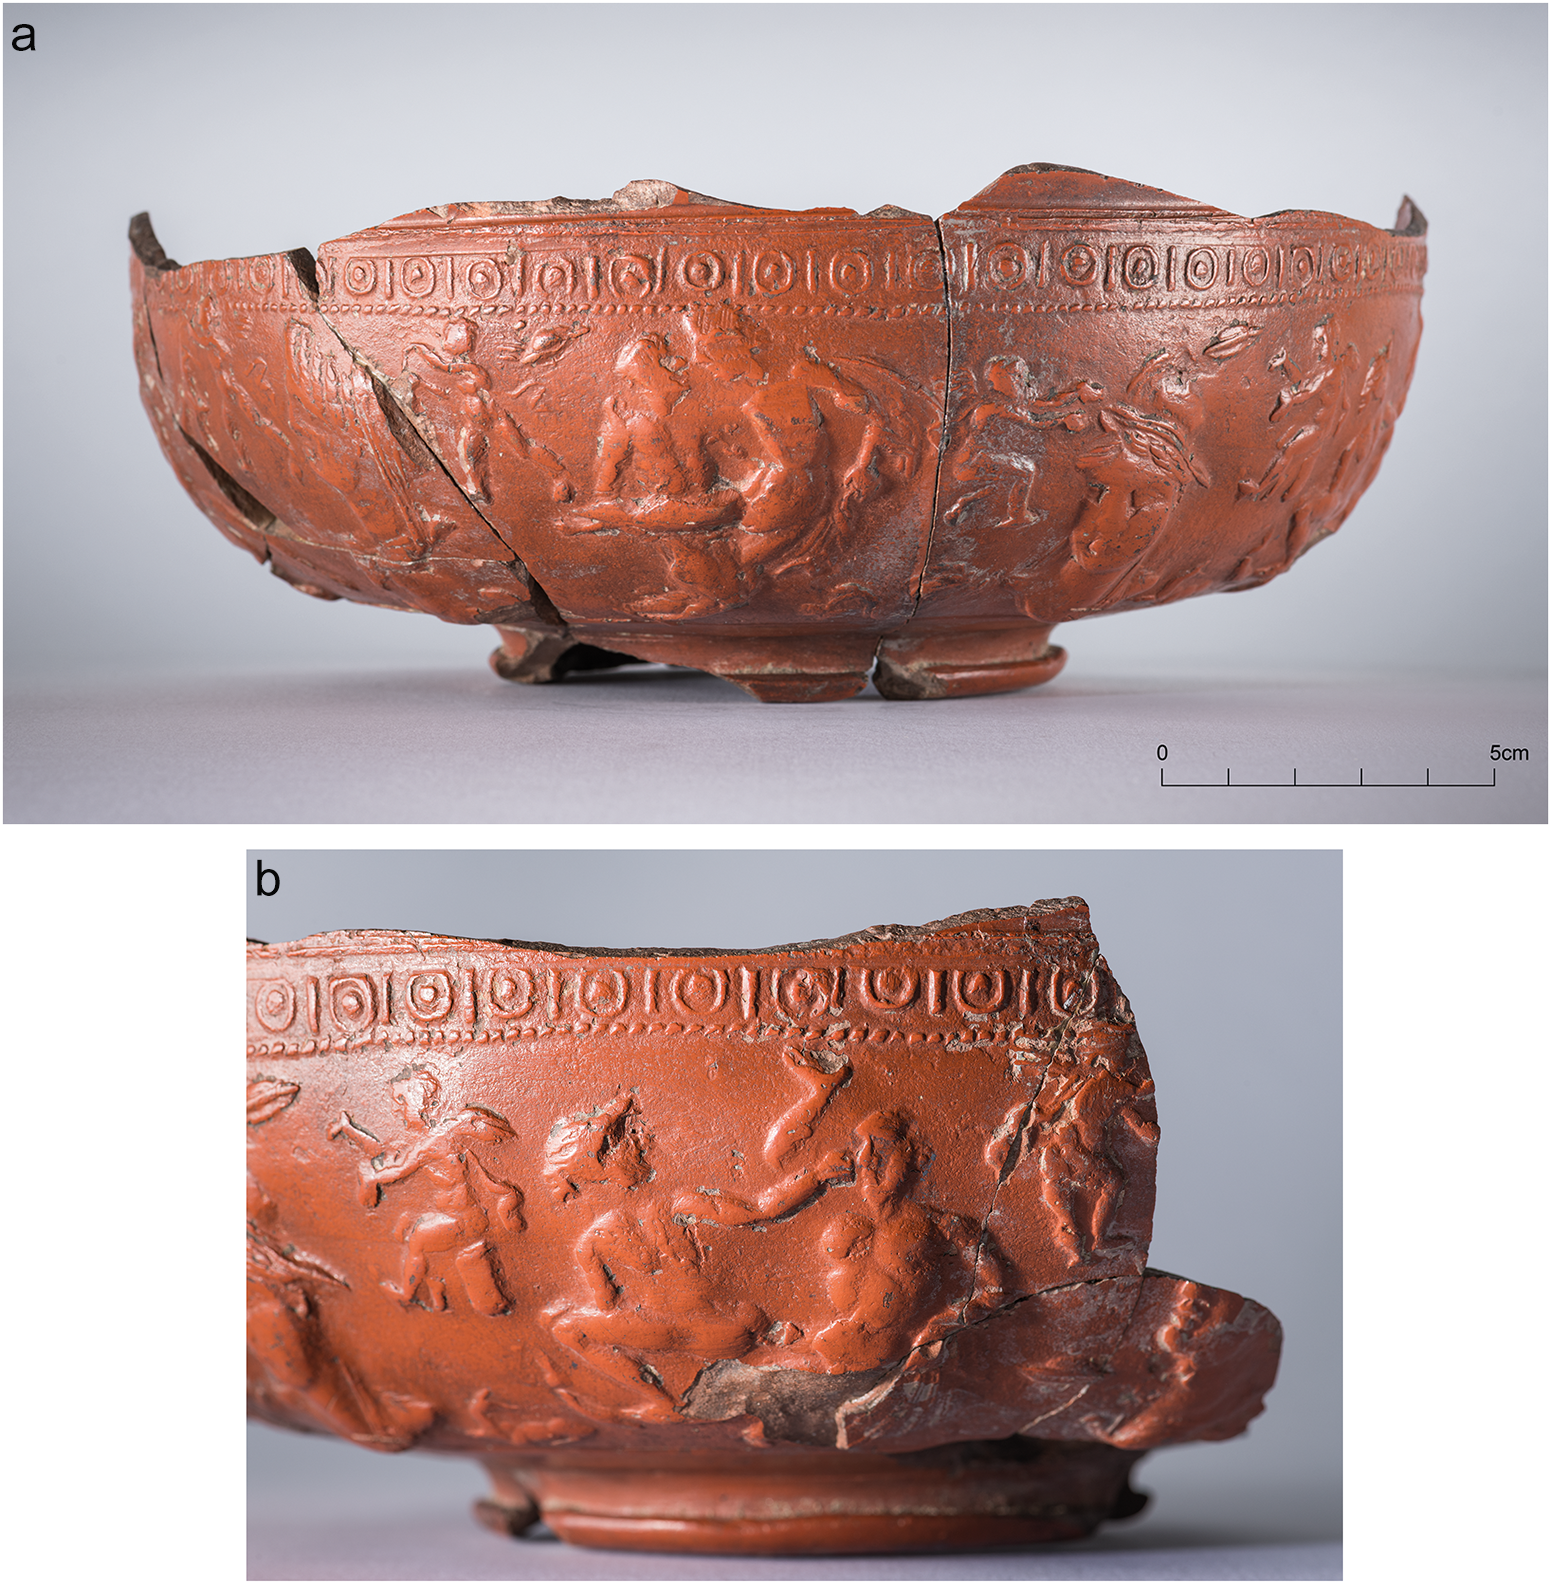
Pit 59, outside the east wall of the Site VII enclosure and near to Pit 61, contained the sherds of a near-complete samian ware bowl (Vessel 10) decorated with motifs that include sphinxes, animals and fantastical beasts.Footnote 25 From the same pit were multiple sherds amounting to most of another samian bowl, this one decorated with erotic images alternating with large busts (Vessel 11, Fig. 10). Unlike the other broken vessels, this one appears to have been deliberately split in half. A male same-sex couple depicted on the bowl in a sexual encounter has been suggested by Steve Willis (University of Kent, pers. comm. 2024) to be Hercules, shown as an older man wearing a head-band for wrestling, with a helmeted younger man, probably his charioteer Iolaos. Bushe-Fox withheld the detail of this bowl’s decoration in his publication,Footnote 26 probably believing it would fall under the Obscene Publications Act. A plain necked samian bowl (Vessel 12) was found in Pit 76, which was cut by the Phase 4 remodelling of the back wall of Site VI. Willis puts these three samian vessels in the date bracket a.d. 130/40–160, when the three strip houses there were being amalgamated into the Site VI townhouse.
(a) Vessel 11 with (b) detail, from Pit 59, west of Site VI (images: Historic England/Steven Baker).

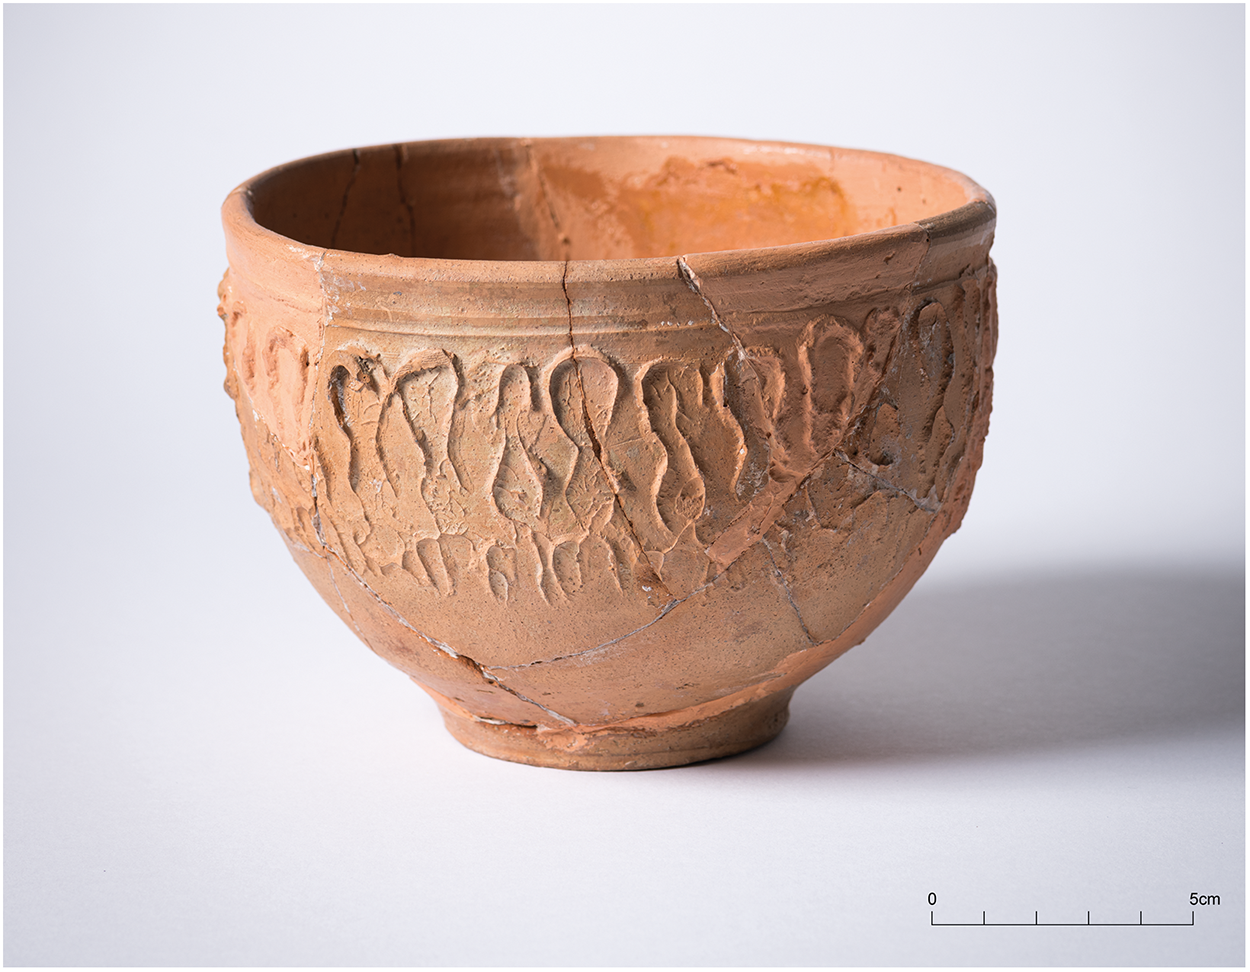
Pit 31 in the central large courtyard of Site VI contained a rusticated red-ware bowl (Vessel 13, Fig. 11) dating to the late first/early second century, pre-dating the Site VI complex, and likely to relate to Building A or its predecessor. Bushe-Fox wrote that the excavations produced three examples of this form; this is the only one with a recorded context.
Vessel 13 from Pit 31, Site VI (image: Historic England/Steven Baker).

Features within buildings
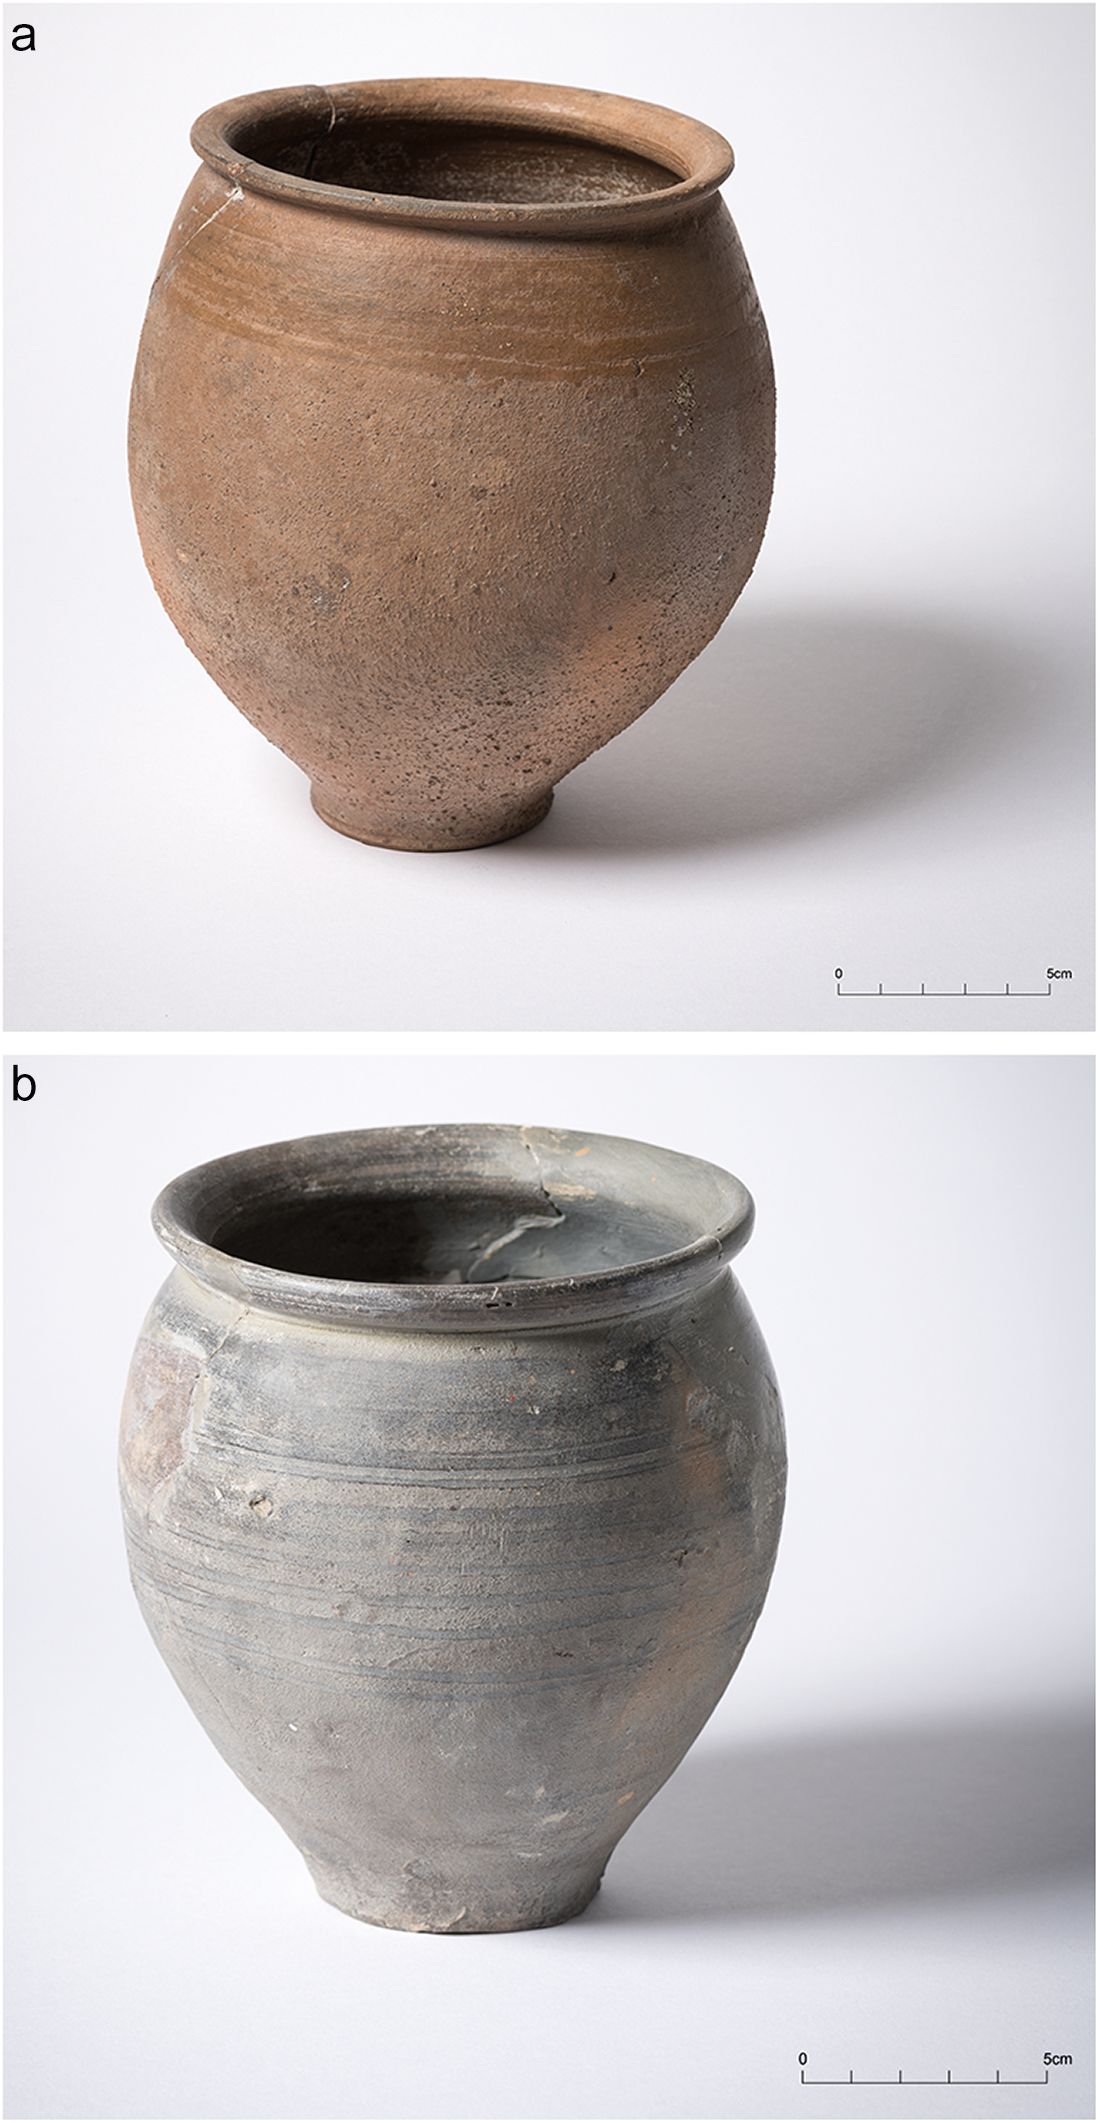
Site IV, immediately south of the Site V temple, showed evidence of more alterations and episodes of upgrading than Sites I–III, and it also produced painted wall plaster of a much higher quality than that seen from Site I. Six complete vessels were buried within the footprint of the first phase of the Site IV building (Phase 2a). Two had been incorporated in the make-up for what was probably a primary floor during its construction: Vessel 14, a deliberately holed bag-shaped beaker of the first half of the second century (Fig. 12a), and Vessel 15, a slightly earlier jar (Fig. 12b). The other vessels there were found in pits in the western room: Pit 18, sealed by what was probably a primary floor, and Pit 19, which was slightly later and cut through that floor. Together Pits 18 and 19 contained a total of four complete vessels dating to the end of the first/early second century, of which only Vessel 16, a plain cup or bowl, is held by EH (Fig. 13a). The others are two jars and another cup.
(a) Vessel 14 and (b) Vessel 15 from the primary floor material, Site IV (images: Historic England/Steven Baker).

(a) Vessel 16 from Pit 19 and (b) Vessel 17 from Pit 68, both Site IV (images: Historic England/Steven Baker).

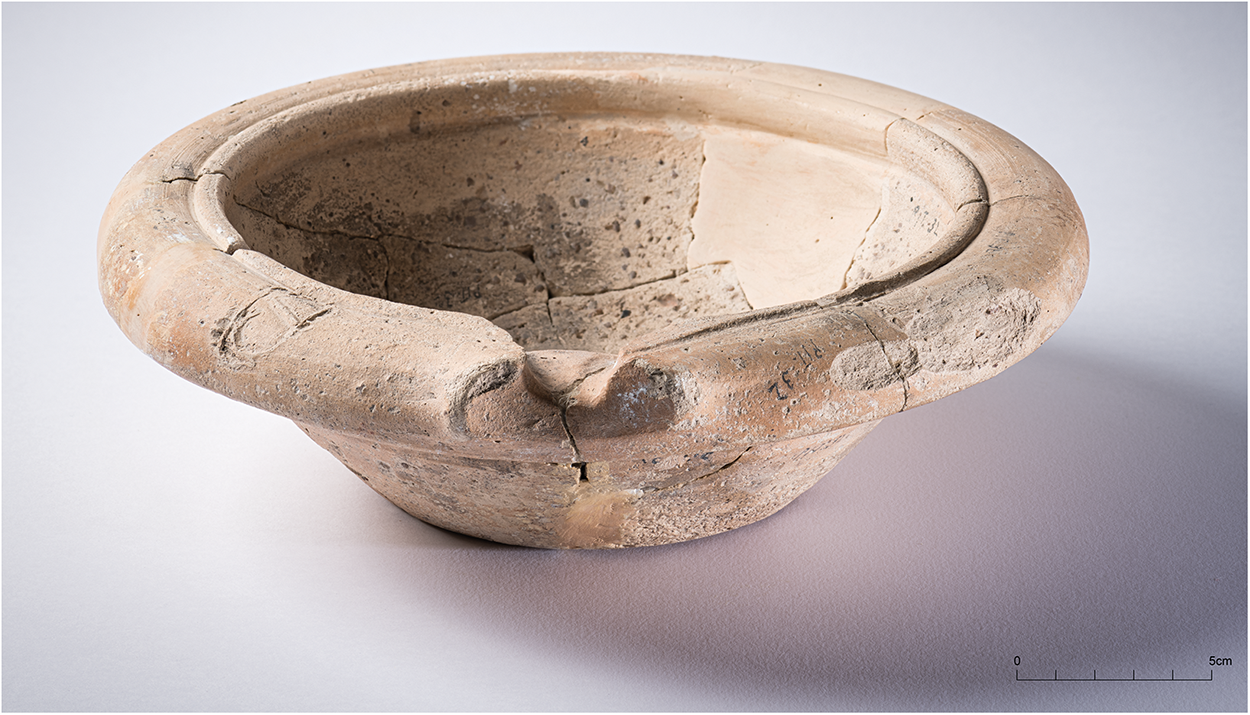
At Site VI, three pits containing complete pots found within rooms on or close to Watling Street are described by Bushe-Fox as being part of a group of pits sealed by construction levels of Site VI and must therefore relate to the earlier strip houses A, B and C incorporated into the Site VI townhouse. Pits 68 and 69, in Room 5 on the Watling Street frontage, in what had been Building B, each contained a complete vessel, one of which was a late first-century butt beaker made in the traditional Gallo-Belgic style (Vessel 17, Fig. 13b), very similar to the beakers found in Pit 50. A nearby room contained Pit 32, within which was a complete mortarium of the first half of the second century (Vessel 18, Fig. 14).
Vessel 18 from Pit 32, Site VI (image: Historic England/Steven Baker).

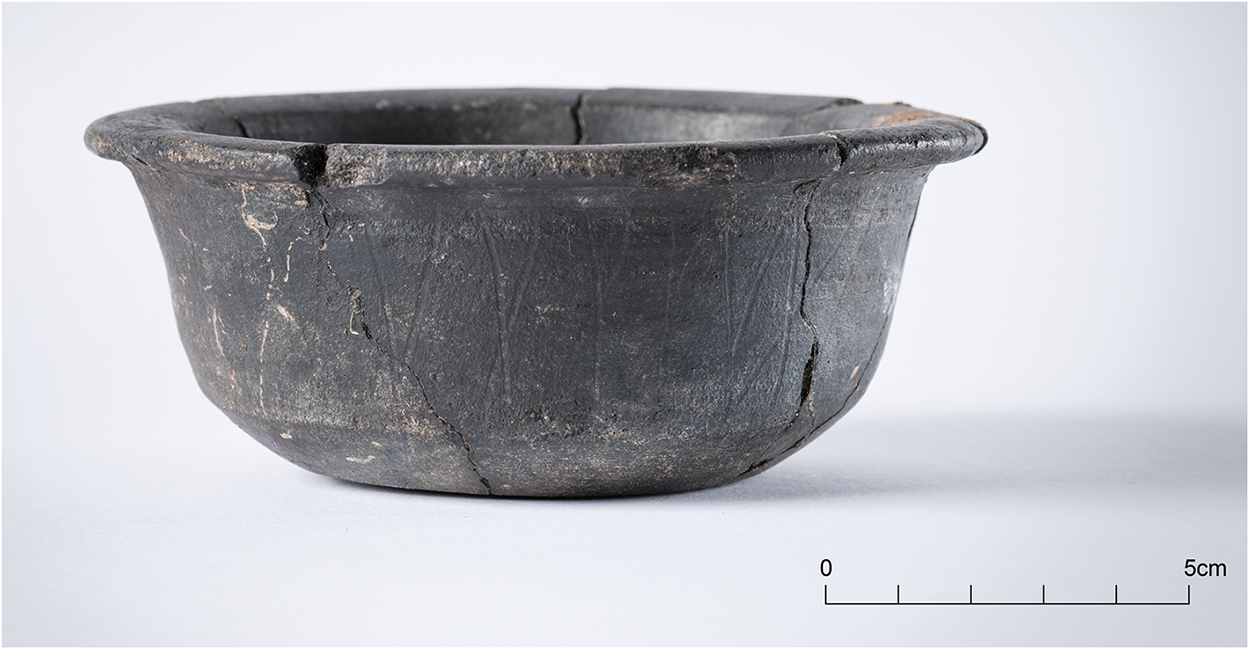
An unpublished but marked bowl (Vessel 19) was found below the floor of the eastern corridor. Bushe-Fox ascribed this floor to the later (Phase 5) modifications undertaken on the Site VI townhouseFootnote 27 which corresponds to the date of the vessel, the latter part of the second century (Fig. 15).
Vessel 19 from floor material of second phase of Site VI (image: Historic England/Steven Baker).

Wells
Well 1, a substantial stone-lined construction (Fig. 3), is likely to be one of the earliest wells here, as it is in a cluster with other external features at the far southern end of the site: two furnaces and two more wells.Footnote 28 Bushe-Fox mentions only a fragment of gold leaf and sherds of late second- and third-century date in its fill; however, the collection contains a complete jar marked W1 dating to the end of the first century (Vessel 20, Fig. 16).
Vessel 20 from Well I (image: Historic England/Steven Baker).

Well X, south-west of Site VI (Fig. 3), is described as containing a great deal of material including potsherds of the third and fourth centuries and a coin of Tetricus I (268–73), and at the well’s bottom, c. 2.5 m deep, there were three complete pots: a colour-coated beaker and two jars (Vessel 21 and Vessel 22, Fig. 17), all of which Bushe-Fox attributed to the fourth century. Evans, below, mentions a further vessel from Well X, a Nene Valley colour-coated beaker of a form that is very rare at Wroxeter. Bushe-Fox’s account of Well IX says only that it contained similar pottery to that in Well X, though possibly slightly earlier.
(a) Vessel 21 and (b) Vessel 22 from Well X (images: Historic England/Steven Baker).

At the centre of the Site VI complex was a timber-lined well, Well VII, within Courtyard 26. This area was probably covered by a roof in the first phase of Site VI but may latterly have been unroofed in Phase 4 when it was given a flagged floor with open channels to direct away rainwater coming off the roof.
Well VII is an example of the very few occasions when Bushe-Fox reports that the finds from a well or pit were interesting or unusual. No ceramics were present, but it contained a large assemblage of animal bone, the majority of which were the generally complete leg bones and antlers of red deer.Footnote 29 A number of other animals, domesticated and wild, were represented together with a piece of human femur. It also contained a number of coins, the latest of which was of the late fourth century, which Bushe-Fox took as the last date at which the well was open and functioning before it was abandoned. He described the well’s contents but did not speculate on the nature of its deliberate filling; a century later, this assemblage is recognisable as being typical of what Fulford describes as a ‘special deposit’.
Unprovenanced complete vessels
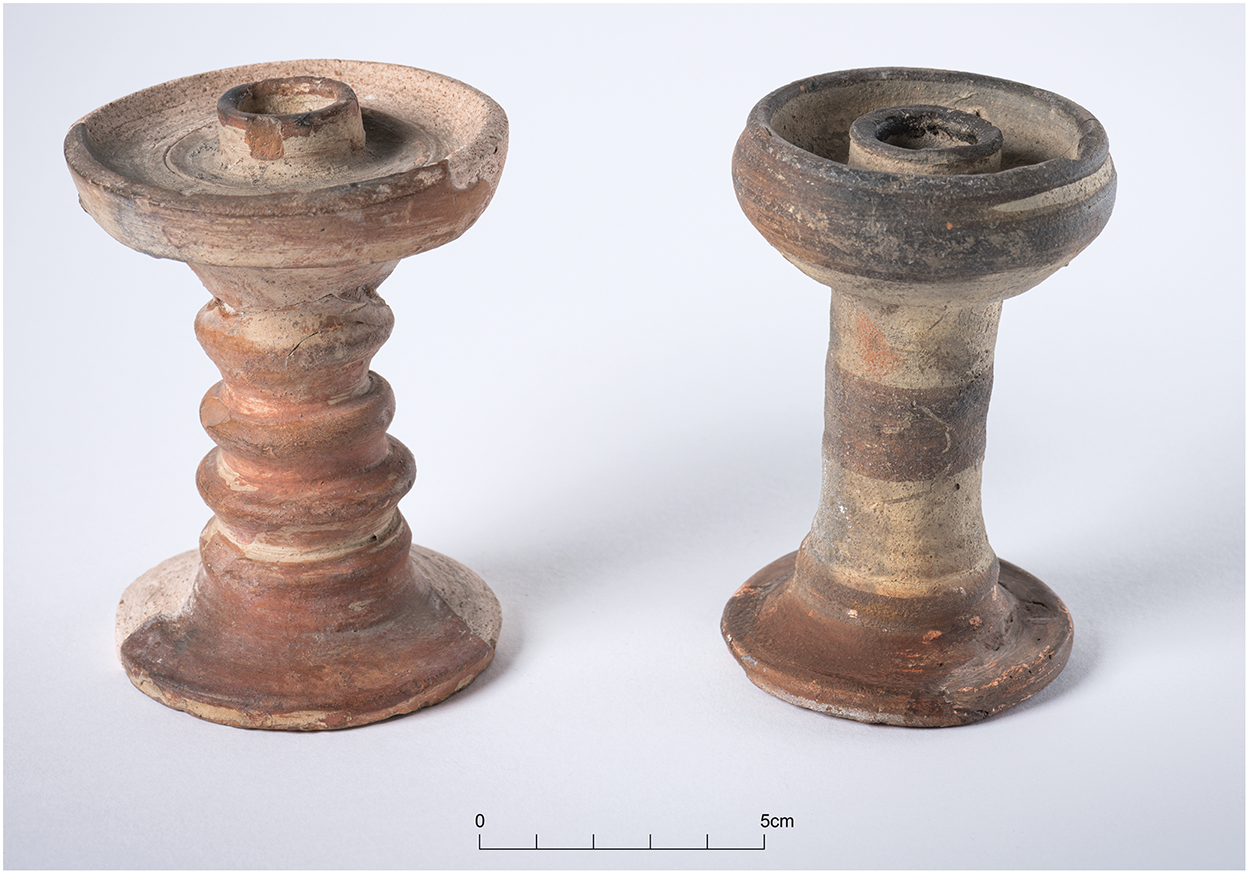
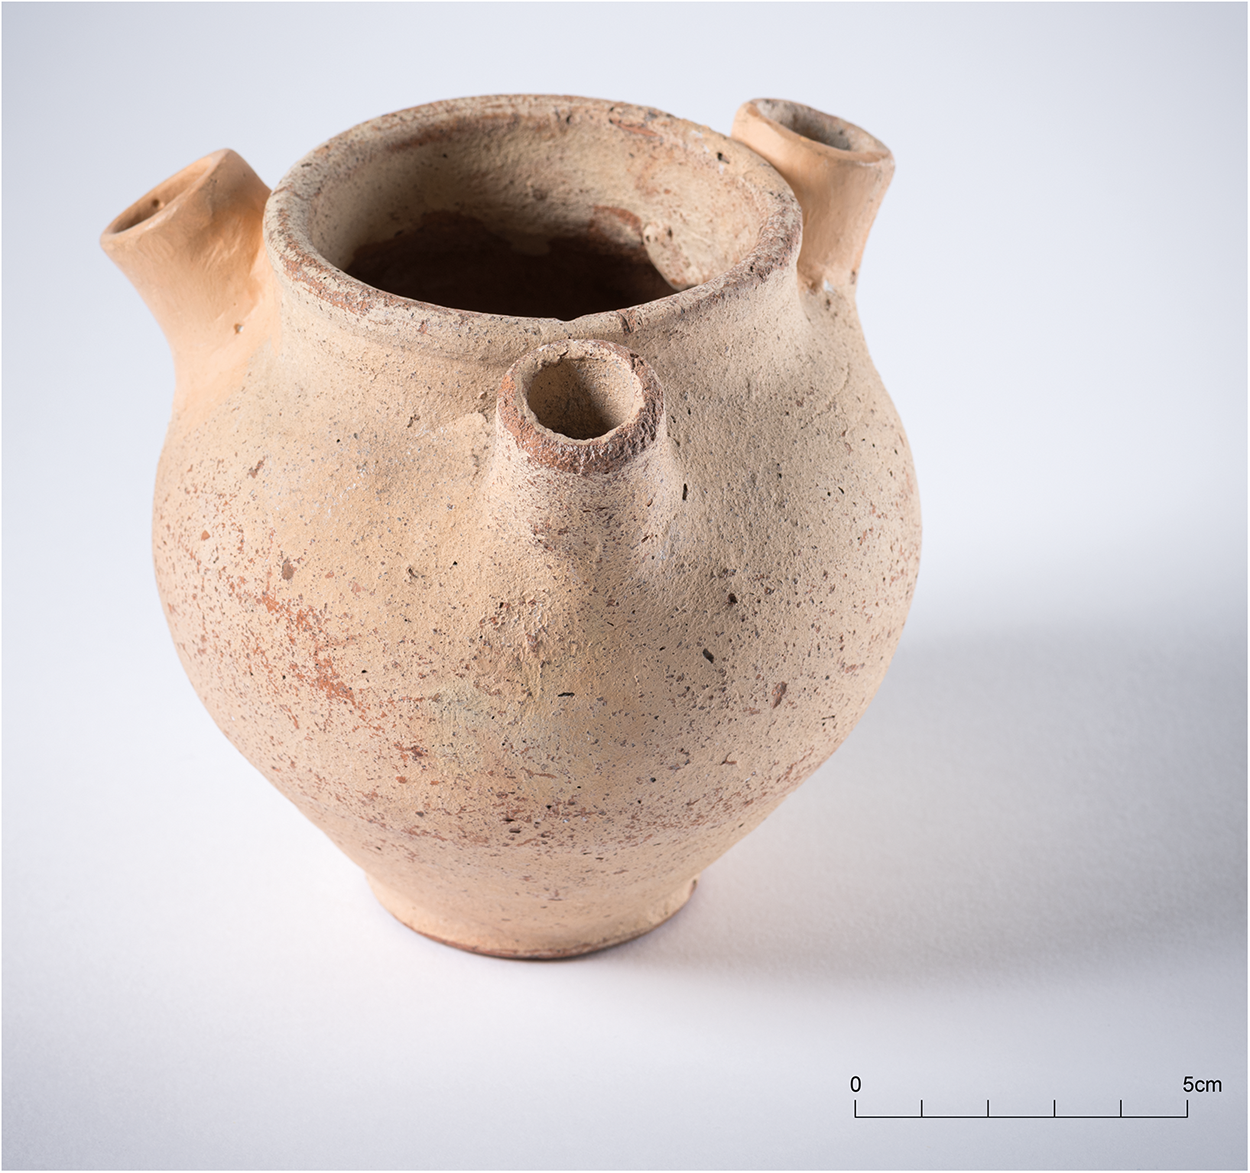
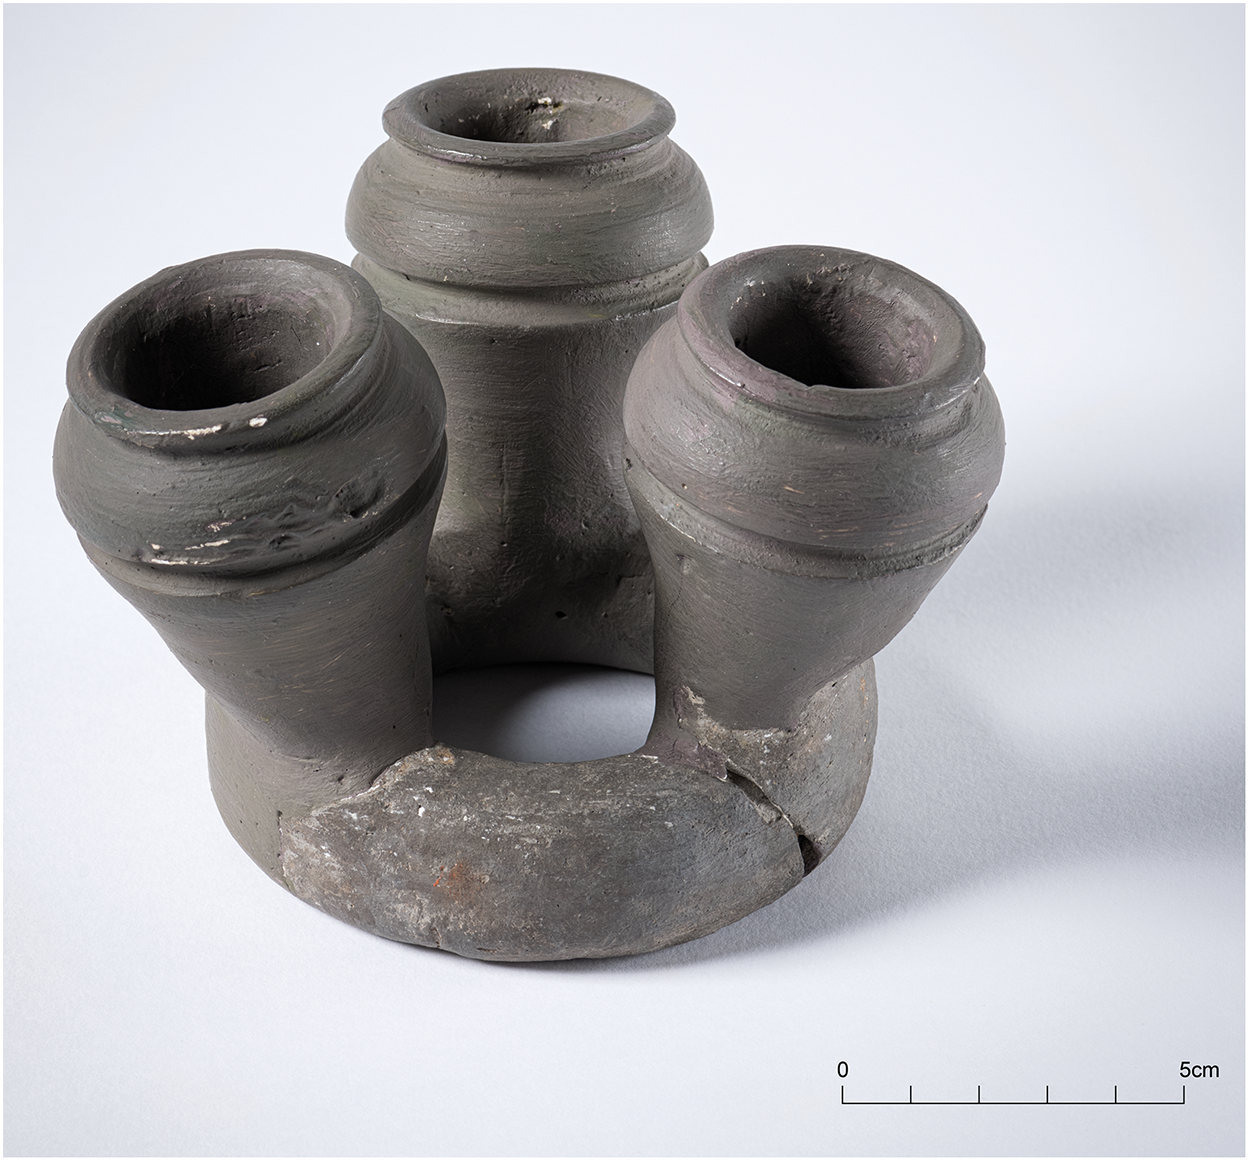
Thirty-nine of the complete vessels are either recorded only to the level of the individual site or have no markings or illegible ones; only a small selection of these appear in the published reports. Tankards and flagons occur here. A number of more unusual vessel forms, not seen among the group with contexts, appear among the unprovenanced complete ceramics: a triple vase, a jar with three spouts, and candlesticks. Within the unaccessioned bulk collection of sherds from the Bushe-Fox excavations there are further unprovenanced sherds from triple vases, candlesticks, as well as a patera handle and a cheese press, and a number of vessels which had been deliberately holed. The likely and possible religious ceramics in the catalogue (Vessels 23–26, Figs 18–20), discussed below by Seeley, are vessel forms seen very infrequently in other excavations at Wroxeter.
Vessels 23 (left) and 24, unprovenanced candlesticks (image: Historic England/Steven Baker).

Vessel 25, unprovenanced three-spouted jar (image: Historic England/Steven Baker).

Vessel 26, unprovenanced triple vase (image: Historic England/Steven Baker).

Flagons require some individual consideration here. Few of these were published by Bushe-Fox: the two complete examples held by EH are unprovenanced but are very likely to be from his excavations; an extremely small example has been deliberately holed (acc. 78070058). In the unaccessioned reserve material there are three large crates of complete flagon necks of various forms, some of which are marked. The prior assumption has been that these were the result of selective retention of the more complete flagons in the 1910s. This has been called into question by recent work at Venta Icenorum (Caistor), where a deposit in a gulley containing a large number of complete tops of flagons has been interpreted as ‘a purposeful structured deposit’.Footnote 30
A catalogue of the provenanced complete ceramic vessels and unprovenanced complete religious ceramics from the Bushe-Fox excavations
By Jane Evans
Methodology notes
Forms were recorded with reference to the Wroxeter macellum and baths type series (the military and second-century pottery)Footnote 31 and forms from the Baths Basilica,Footnote 32 which produced later Roman pottery. Definitive identification of some fabrics was hampered due to vessels being complete or heavily restored with no accessible breaks.
Complete early vessels from excavations at Wroxeter other than Bushe-Fox’s
The earliest complete vessel is a complete, though shattered, large Malvernian ware tubby cooking pot (acc. 88237430) which was found in a linear feature in the earliest sub-phase of activity in Insula XXVII.Footnote 33 The feature was interpreted as structural, relating to an early Roman building. No samian was associated with this vessel, but the sub-phase above produced Claudian and Flavian forms. The evidence for sub-phase X1 was interpreted as a Dobunnic trading settlement established as early as the late 40s a.d., before the fortress was constructed,Footnote 34 with sub-phase X2 belonging to the period after the establishment of the fortress. Some forms in the Pit 50 group have parallels in this assemblage.
From Webster’s excavation of the military levels in Insula 5, Pit F2807 was notable for the inclusion of some substantially complete vessels, and other fragmentary vessels that might have been substantially complete, and for the unusual character of the individual vessels — a relatively large number of imports together with a substantial group of wasters and seconds. This is associated with phase M7iv (c. a.d. 90), a period of demolition.Footnote 35
The catalogue of vessels
1. Acc. 78070081; Bushe-Fox Report 1, Reference Bushe-Fox1913, 70, fig. 17.8. Carinated bowl with bead rim, decorated with vertical lines of white slip. Dated by Bushe-Fox to a.d. 80–120/30. A type associated with second-century deposits in the macellum assemblage.Footnote 36 In her report on the Wroxeter military assemblage, Darling notes that painted wares were extremely rare in the military assemblage and only occur in demolition contexts.Footnote 37 Fabric WWO. Pit not recorded by Bushe-Fox as containing complete vessels, and the vessel is heavily restored. Diameter 150 mm, 42%. Pit 4, open ground west of Site II. (Phase 2a; Fig. 4).
2. Acc. 78070070; Bushe-Fox Report 2, Reference Bushe-Fox1914, 52, fig. 19.64. Reduced ware, carinated bowl. Dated by Bushe-Fox to a.d. 80–110. Wroxeter macellum type B3.2Footnote 38 and Baths Basilica form 240.Footnote 39 Carinated bowls are typical of the Wroxeter military assemblage.Footnote 40 The decoration and slacker form of this vessel suggest a later date; it is reminiscent of London-ware type bowls dated to the early second century.Footnote 41 An example of this form is illustrated from the Wroxeter Period 2 assemblage, which included pottery dating from the first to the mid-second century, coming from contexts forming the make-up, construction and consolidation of the main stone phase of the macellum and the south-west corner of the baths insula.Footnote 42 Fabric WWRF. Pit not recorded by Bushe-Fox as containing complete vessels, and the vessel is heavily restored. Diameter 245 mm, 39%. Pit 7, open ground west of Site IV (Phase 2a; Fig. 5).
3. Acc. 78070057; Bushe-Fox Report 1, Reference Bushe-Fox1913, 69, fig. 17.6. Reduced-ware bowl with a bifid or ‘pulley’ rim and a dark grey slip; imitating samian form 29. Decorated with incised grooves. Dated by Bushe-Fox to a.d. 80–110 and found in early second-century contexts at Wroxeter.Footnote 43 A similar form was produced at the Trajanic kiln complex near Little ChesterFootnote 44 and is among the late first- to early second-century bowls produced at Holt.Footnote 45 Similar forms were produced at the Sherifoot Lane kiln, Sutton Coldfield. The kilns and these bowls were dated there to the early second century, though the report notes that the type is dated to the mid- to late second century at other sites in the region.Footnote 46 Fabric WWR. Pit recorded by Bushe-Fox as containing complete vessels but this vessel heavily restored. Diameter 230 mm, 33%. Pit 10, open ground west of Site III (Phase 2a; Fig. 6a).
4. Acc. 78070052 (not published). Small black burnished-ware jar decorated with acute cross-hatch burnish. The profile is similar to a form dating from c. a.d. 120 to the late second century.Footnote 47 Wroxeter macellum type JC3.3Footnote 48 and Baths Basilica form 411.Footnote 49 The size of the vessel would put it in Gillam’s ‘beakers of cooking pot form, without handles’;Footnote 50 the jar is 118 mm high, towards the upper end of the 80–120 mm range for this class. Symonds notes that the transition in the shortening of the lattice and the orientation of the rim was perhaps not as abrupt at Wroxeter as it seems to have been elsewhere, making some vessels difficult to classify and date. Fabric WWR. Pit recorded by Bushe-Fox as containing complete vessels, vessel complete. Fabric BB1. Diameter 85 mm. Pit 10, open ground west of Site III (Phase 2a; Fig. 6b).
Other incomplete vessels found in Pit 10 included an incomplete mica-dusted dishFootnote 51 and a globular jar with an everted rim and rouletted decoration.Footnote 52 The jar is Wroxeter macellum Type JM4.Footnote 53 The dish has a reeded rim and an up-kick base, incised with four grooved rings. There are no parallels for this form in the Wroxeter type series. Mica-dusted wares were widespread in Britain in the early second century, produced for example at London and Holt, and reeded rim dishes are a typical productFootnote 54 (Phase 2a).
5. Acc. 78070062; Bushe-Fox Report 3, Reference Bushe-Fox1916, 62, pl. XXVII.71. Butt beaker decorated with raised cordons and bands of vertical incised lines delineated by horizontal grooves; one of two identical beakers found in the pit. Wroxeter macellum type BK1.Footnote 55 Butt beakers are not common at Wroxeter. DarlingFootnote 56 notes that a few local copies of Gallo-Belgic beakers, and sherds from a non-local butt beaker,Footnote 57 were found in military phase 4b, dated to c. a.d. 79–90. This phase of activity saw selective demolition prior to a major redevelopment of the fortress, and a possible change of status of the site.Footnote 58 The non-local vessel was in a b-Belgic-type white ware, possibly from south-east England; Wroxeter fabric GBWW. The form, if not the fabric, is similar to the example illustrated here. Another beaker, in a local reduced fabric, BK1.11,Footnote 59 was associated with phase 7i, the demolition of the defences. Sherds from butt beakers are published from Insula XXVII, thought to be in the area of the vicus; one from dumping contemporary with the fort,Footnote 60 and one from a modern layer.Footnote 61 Fabric uncertain. Diameter 90 mm. Pit 50, outside the Site VII enclosure. (Phase 1; Fig. 7a).
6. Acc. 78070098; Bushe-Fox Report 3, Reference Bushe-Fox1916, pl. XXVII.72. Large, narrow-mouthed jar with a short neck and rolled over, bead rim. The jar has pattern burnish on the shoulder, vertical burnish on the body, and horizontal burnish near the base. This form is extremely rare in the Wroxeter military assemblage; one vessel is illustrated in the form series, but this is not an exact parallel.Footnote 62 The form was broadly dated by Webster to the second to third centuries a.d.,Footnote 63 but the vesicular fabric suggests a first- to second-century date. A rim from a similar jar was associated with one of the butt beakers discussed above; from Insula XXVII, in dumped material contemporary with the fort and thought to be in the area of the vicus.Footnote 64 Similar vessels in organic tempered ware are associated with first-century activity elsewhere, for example at Ariconium in Herefordshire,Footnote 65 at Metchley fort in Birmingham;Footnote 66 in the unpublished assemblage from Beckford, Worcestershire, and from Alcester’s southern extra-mural area.Footnote 67 Fabric SVORGR. Diameter 270 mm. Pit 50, outside the Site VII enclosure. (Phase 1; Fig. 7b).
A further vessel found in Pit 50 but not accessioned by EH, so unavailable for study (Bushe-Fox Report 3, Reference Bushe-Fox1916, pl. XXVII.70), a narrow-mouthed jar with an out-curving, bead rim; Wroxeter macellum type JN4.1, a late first- to mid-second-century form.Footnote 68 The jar is decorated on the shoulder with cordons, grooves and pattern burnish. Fragmentary rims from similar jars are also recorded from Insula XXVII, in dumped material contemporary with the fort.Footnote 69 Fabric uncertain, but oxidised and likely a Severn Valley ware variant. Estimated diameter 145 mm. Pit 50, outside the Site VII enclosure. (Phase 1).
7. Acc. 78070060; Bushe-Fox Report 3, Reference Bushe-Fox1916, pl. XXVIII no. 84. Unguent pot with a long neck and flaring rim; Wroxeter macellum type MU1.1.Footnote 70 Dated by Bushe-Fox to a.d. 90–140. Unguent pots have been recorded elsewhere at Wroxeter: from deposits associated with the first period of the forum dated to c. a.d. 130–60Footnote 71 and from Insula 9, residual in period IXb.Footnote 72 Fabric WWO? Diameter 40 mm. Pit 61, open ground at south-west corner of Site VII enclosure. (Phase 2; Fig. 8a).
8. Acc. 78070041 (not published, but see Bushe-Fox Report 2, Reference Bushe-Fox1914, fig 8.28 for a similar vessel from the temple). Three of five small pedestal vessels found associated with the unguent pot above. There is no similar type in the Wroxeter macellum or Baths Basilica form type series. These are described by Bushe-Fox as Verulamium products but are in a fairly fine fabric, which could be Wroxeter fabric CREAMF or from Mancetter-Hartshill; a similar vessel is illustrated amongst the finds from the Mancetter-Hartshill kilns.Footnote 73 The three vessels are c. 45 mm high and have diameters of 40 mm, 34 mm and 32 mm respectively. Pit 61, open ground at south-west corner of Site VII enclosure. (Phase 2; Fig. 8b).
9. Acc. 78070061; not illustrated by Bushe-Fox. Small, carinated bowl, decorated with horizontal burnishing; Webster’s ‘Iron C derived bowl’, a typical early Severn Valley ware type, dating to the first to second century.Footnote 74 Wroxeter macellum form B3.4Footnote 75 but not a type found commonly in the assemblage. A rim from a similar vessel is published from the Insula XXVII assemblage discussed below, in relation to the Pit 50 vessels.Footnote 76 Bushe-Fox illustrates two similar vessels from other contexts, which are dated by him to a.d. 100–120 or 130, and a.d. 80–120, respectively.Footnote 77 Fabric SVO but with blackened surfaces. Diameter 100 mm. Pit 64, behind Site VI building. (Phase 2, Fig. 9).
10. Acc. 78070017; Bushe-Fox Report 3, Reference Bushe-Fox1916, pl. XXV no. 3. Hemispherical samian bowl by Attianvs, Drag 37, decorated with a motif of leaves, deities, animals and mythical beasts including sphinxes. Stamped below the decoration. Dated by Bushe-Fox to the first half of second century. Diameter 240 mm. Pit 59, open ground at south-west corner of Site VII enclosure. (Phase 3; not illustrated).
11. Acc. 88061016. Bushe-Fox Report 3, Reference Bushe-Fox1916, 38. Hemispherical samian bowl by Libertvs and Bvtrio, Drag 37, decoration mainly consisting of erotic scenes. Steve Willis suggests a bracket of 130/40–160 a.d. for both these samian bowls (pers. comm. 2024). Diameter: est. 225 mm. Pit 59, open ground at south-west corner of Site VII enclosure. (Phase 3; Fig. 10).
12. Acc. 78070013. Bushe-Fox Report 3, Reference Bushe-Fox1916, 46, no. 2369(a). Necked samian bowl, Drag 81. Exterior stamp ‘IVLI.TALVSSA[?]’ on upper half of body. Dated by Bushe-Fox to a.d. 120–50; Steve Willis suggests a bracket of a.d. 130/40–160 (pers. comm. 2024). Fabric? Diameter 164 mm. Pit 76, outside the south-west corner of enclosure Site VII. (Phase 3; not illustrated).
13. Acc. 78070068, Bushe-Fox Report 2, Reference Bushe-Fox1914, 49, fig. 18.53. Hemispherical bowl with an upright rim and barbotine decoration. Dated by Bushe-Fox to a.d. 80–110. Bushe-Fox notes that three examples of this type were recovered, the other two coming from deposits on Site VI dated to a.d. 80–120. There are no good parallels in the Wroxeter form series, but it falls within the broad category of macellum Type B7.Footnote 78 The form may perhaps be a crude copy of a glass pillar moulded bowl. Crude barbotine is found on some Caerleon-ware copies of samian bowls, dating to the first half of the second century.Footnote 79 Fabric WWOF? C. 15% of this vessel is reconstructed. Diameter 160 mm, 40%. Pit 31, Site VI, main courtyard. (Phase 2a; Fig. 11).
14. Acc. 78070064; Bushe-Fox Report 1, Reference Bushe-Fox1913, 75, fig. 18.36. Bag-shaped beaker with cornice rim and roughcast decoration. Dated by Bushe-Fox to c. a.d. 120-40. Similar forms are found in the second-century Wroxeter macellum assemblageFootnote 80 and from the Baths BasilicaFootnote 81 in Red Colour Coated Ware 2/CLR. Symonds notes that these were made at potteries across western Europe in the second century. Given the number of examples noted in the Baths assemblage, he suggests that these were locally made.Footnote 82 Similar forms, in a fine sandy fabric and dated to the second century, are published from Alcester’s southern extramural area.Footnote 83 Deliberate hole low down. Fabric WWO? Diameter 130 mm. Site IV strip house, under op. sig. Floor 3. (Phase 2; Fig. 12a).
15. Acc. 78070071; Bushe-Fox Report 1, Reference Bushe-Fox1913, 73, fig. 17.25. Globular jar with thickened everted rim, decorated with bands of horizontal burnishing below a shoulder groove. Dated by Bushe-Fox to a.d. 80–110/20. The form and decoration is similar to Wroxeter macellum Type JM3.21,Footnote 84 represented by a waster, and Baths Basilica form 431.Footnote 85 Fabric WWRF? Diameter 120 mm, 35% reconstructed. Site IV strip house under op. sig. Floor 3. (Phase 2; Fig. 12b).
16. Acc. 78070082; Bushe-Fox Report 1, Reference Bushe-Fox1913, 72, fig. 17.15. Hemispherical bowl with a very slightly beaded rim; dated by Bushe-Fox to a.d. 100–120 or 130. Similar forms are associated with second-century deposits in the macellum assemblage,Footnote 86 and examples are illustrated from the Baths Basilica,Footnote 87 but it is not a form associated with the earlier, military assemblage. Similar vessels were produced in Severn Valley ware at a kiln site in Worcestershire dated to the second to third centuries.Footnote 88 Fabric WWO. The bowl is heavily restored. Diameter 155 mm, rim EVE 15%. Pit 19, inside back wall site IV strip building. (Phase 2, Fig. 13a).
A further complete vessel from Site IV was published by Bushe-Fox (Report 1, 15, fig. 5), but is not held by English Heritage and is unavailable for study: a decorated Rhenish-ware pedestal cup of the same date bracket that was found on the surface of the final, Phase 5 (c. mid-third century) floor of the Site IV building.
17. Acc. 78070075; Bushe-Fox Report 3, Reference Bushe-Fox1916, pl. XXVIII.80. Butt beaker, with everted bead rim, and decorated with horizontal incised grooves on the shoulder. Dated by Bushe-Fox to a.d. 80–130. Wroxeter macellum Type BK1 and BK1.11.Footnote 89 See 5 above for discussion of butt beakers in the Wroxeter military assemblage. Fabric ?SVORGR. Diameter 117 mm. Pit 68, Site VI building. (Phase 2a; Fig. 13b).
The vessel from the other pit below the op. sig. in this room, Pit 69, was not accessioned by EH, so was unavailable for study: Bushe-Fox Report 3, Reference Bushe-Fox1916, 63, pl. XXVII.75. Carinated bowl, with a slack carination and a pedestal base, decorated with a ‘zone of vertical ribs between girth grooves’. The form is reminiscent of London-ware type bowls, and the bowl was associated with other late first- to early second-century vessels. Fabric ‘reddish buff, smooth, friable clay intermixed with fragments of broken pottery’. Diameter c. 130 mm. Pit 69, Site VI building. (Phase 2a).
18. Acc. 78070093; not illustrated by Bushe-Fox. Mortarium, with a hooked rim down-turned at the tip, and an internal bead level with the top of the flange. Stamped with DECA dies (assigned to Decanius) either side of the rim, though the right-hand stamp is obliterated. Wroxeter macellum Type M5.6.Footnote 90 Dated c. a.d. 100–150 (R. Leary, pers. comm. 2024). Fabric CREAMC. Diameter 282 mm. Pit 32, Site VI, room east of the corridor. (Phase 2; Fig. 14).
19. Acc. 78070050; not illustrated by Bushe-Fox. Flat-rimmed bowl, decorated with burnished intersecting arcs around the sides, zig-zag lines underneath the base, and random scrolling on the interior of the base. Wroxeter macellum form B20.3,Footnote 91 Baths Basilica form 120;Footnote 92 the angle of the walls and the intersecting arc decoration suggest a date in the latter half of the second century.Footnote 93 Fabric BB1. Diameter 135 mm. Under the floor of the east corridor of Site VI. (Phase 3; Fig. 15).
20. Acc. 78070083; not published by Bushe-Fox but marked. Short-necked jar with an out-turned rim; a form characteristic of the Wroxeter military assemblage.Footnote 94 Maggie Darling records very few vessels in her catalogue of the military assemblage as ‘near complete’. It is worth noting, therefore, that four short-necked jars are described as such.Footnote 95 All are from Phase 4b deposits; ‘the depot period’ dated to a.d. 79–90, a period that saw dramatic change with the demolition of barrack blocks and centurial quarters. Fabric WWOF. Diameter 98 mm, rim EVE 32%. Well I, Site I. (Phase 1; Fig. 16).
21. Acc. 78070063; Bushe-Fox Report 3, Reference Bushe-Fox1916, 64, pl. XXVII.83. Globular, narrow-mouthed jar with a short neck and beaded rim. Dated by Bushe-Fox to the fourth century. The form is broadly dated by Webster to the first to fourth centuries,Footnote 96 but the short neck could support a fourth-century date. Fabric WWO. Diameter 75 mm. Well X, outside the south-west corner of Site VI. (Phase 5; Fig. 17a).
22. Acc. 78070076; Bushe-Fox Report 3, Reference Bushe-Fox1916, 64, pl. XXVII.82. Similar form to the vessel above, dated by Bushe-Fox to the fourth century. Fabric SVO. Diameter 110 mm. Well X, outside the south-west corner of Site VI. (Phase 5; Fig. 17b).
A further vessel came from Well X but was not accessioned by EH and is unavailable for study: Bushe-Fox Report 3, Reference Bushe-Fox1916, pl. XXVIII.81. Nene Valley colour coated ware, funnel-necked beaker with a bead rim; plain walled and undecorated. A later third- to fourth-century type. A similar, plain form, though with a more elongated rim, is illustrated from the Baths Basilica assemblage,Footnote 97 though Symonds notes that this is a surprisingly rare form at Wroxeter. Fabric NVCC. Estimated diameter 45 mm. Well X, outside the south-west corner of Site VI. (Phase 5).
Unprovenanced vessels
23. Acc. 78070018; Bushe-Fox Report 1, Reference Bushe-Fox1913, 32, fig. 18.41. Candlestick, with a cream slip and red-brown painted decoration and a rilled stem. Partially restored. Not a form represented in the Wroxeter type series. Fabric WWOC/New Forest ware??, partially reduced. Height 103 mm, maximum diameter 75 mm. Unprovenanced (?Phase 2/3; Fig. 18, left).
24. Acc. 78070019; Bushe-Fox Report 1, Reference Bushe-Fox1913, 32, fig. 18.42. Candlestick, with a cupped drip-guard, decorated with a cream slip and bands of brown painted decoration. Not a form represented in the Wroxeter type series. Fabric WWOC/New Forest ware (partially reduced). Heavily reconstructed. Height 105 mm, maximum diameter 65 mm. Unprovenanced. (?Phase2/3; Fig. 18, right).
25. Acc. 78070066; Bushe-Fox Report 1, Reference Bushe-Fox1913, 76, fig. 18.39. Small jar with three spouts, equidistant around the shoulder. Dated by Bushe-Fox to the first half of the second century. Fabric WWOC. Diameter 80 mm. Unprovenanced. (?Phase 2/3; Fig. 19).
26. Acc. 78070065 not illustrated by Bushe-Fox. Triple vase. Wroxeter form MTV1.Footnote 98 A single example is illustrated from baths and macellum, from the military assemblage.Footnote 99 This was in the fine oxidised Wroxeter fabric (WWOF). Only five sherds in this form were recovered from the Baths Basilica excavations,Footnote 100 four in oxidised ware and one in reduced ware. Fabric WWR. Height 90 mm, footring diameter 95 mm. Unprovenanced. (?Phase 2/3; Fig. 20).
A consideration of the complete ceramic vessels from the Bushe-Fox excavations
By Fiona Seeley
Apart from within cemeteries, complete Roman vessels are not a common find on archaeological sites, the vast majority of pottery being highly fragmented and found in rubbish deposits and dumps. An intact vessel is noteworthy and will usually alert the specialist to enquire about the nature of its context and what other artefacts or ecofacts are within the assemblage.
Of the 60 vessels in the wider group of complete vessels in the EH Bushe-Fox collection, six are of forms that have been attributed a ritual function; the triple vase, the unguentarium, the small votive pots and the spouted vessel. The remaining vessels are for the most part complete or were found complete in situ, albeit broken (and subsequently reconstructed), and are forms that relate primarily to the serving and consumption of food as opposed to its preparation (with the exception of the mortarium). They are under discussion here as the nature of their deposition as complete vessels suggests that they are potentially part of ‘informal’ ritual practices.Footnote 101
Many of both the provenanced and unprovenanced vessels within the group are at the lower end of the size range for their type. Although not miniatures, the size of these vessels may have been a factor in their selection for inclusion in these special deposits. Aside from the miniature vessels in Pit 61, of the provenanced vessels these include: a black burnished jar from Pit X (Vessel 4); the Dragendorff form 81 bowl from Pit 76 (Vessel 12); the carinated bowl from Pit 64 (Vessel 9); the hemispherical bowl from Pit 31 (Vessel 13); the black burnished bowl under the floor of the east corridor of Site VI (Vessel 19). This selection of small vessels is not confined to one form or fabric with fine and coarsewares being present; among the unprovenanced vessels there is also a particularly small flagon with a height of 166 mm (acc. 78070054). This flagon is also one of a number of deliberately holed vessels in the wider group.
Provenanced vessels
Votive, boundary and termination deposits
The three pedestalled vessels Vessel 8 (of a group of five) found in Pit 61 are unlikely to be products of the Verulamium kilns as originally suggested by Bushe-Fox. No parallel for this form in a Verulamium fabric is found at the production centres or at consumer sites in London. At the triangular temple in Verulamium there is a vessel described as an ‘incense cup’ that potentially would have performed the same function as the Wroxeter vessels,Footnote 102 but there is no indication that this is a Verulamium product. The group, together with the unguentarium Vessel 7, is typical of votive assemblages found at sanctuaries and temples such as at the triangular templeFootnote 103 and Uley,Footnote 104 where small or miniature vessels are found together. These vessels would have held liquids or other ingredients, either as an offering or to be used in ritual observance.
The assemblage from Pit 50 is noticeably different to that from Pit 61. Similar to foundation deposits, the forms are either beakers or jars, perhaps suggesting that they are containers for consumables now lost.
The ceramic assemblage in Well X containing both fragmentary and complete vesselsFootnote 105 can be paralleled to late well assemblages in Southwark such as a group from Redcross Way. This well group contained three near-entire albeit smashed vessels (two beakers and a jar) together with a complete and three partial dog skeletons.Footnote 106 As the function of a well or pit could change over time,Footnote 107 assemblages may reflect this in being a mixture of rubbish disposal and structured deposition. A ceramic assemblage from a well at the kiln site at 8–10 Moorgate, London, contained both production wasters and complete vessels that had clearly been used from the evidence of sooting.Footnote 108 Faunal remains within the well included butchery waste and the remains of a small lapdog that was probably articulated when deposited.Footnote 109
Foundation deposits
Of the vessels associated with the foundation deposits within this group, all are forms that, apart from the nature of their deposition, would not usually be attributed a ritual function. Where foundation deposits have been recorded, this is not unusual. At One Poultry, London, three foundation deposits containing a total of four jars were found, one deposit dating to the late first to early second century and the remaining two dating to the latter half of the third century.Footnote 110 All vessels showed signs of use and, as with heirloom vessels, this may have had significance in their selection. Jars and beakers are commonly used for foundation deposits, possibly as they could act as a container for other artefacts or consumables used in the ritual. At Bloomberg, 3 Queen Victoria Street, London, a large, complete ring-and-dot beaker was found buried under the floor of a renovated building. Dating to the first century a.d., this vessel contained two early brooches and was covered by a broken lid.Footnote 111 The choice of the mortarium as in Pit 32 (Vessel 18) is less common, but not unprecedented. A recent find at 80 Fenchurch Street, London, of an almost complete inverted mortarium with a repaired base that had been placed in a make-up layer underneath a building has also been interpreted as a possible foundation deposit.
One of the provenanced vessels discussed has a potentially deliberate hole — the bag-shaped beaker (Vessel 13) found below the floor in Site IV strip house. Within the wider group of unprovenanced complete vessels, a further three have been holed: a mortarium missing the centre of its base but otherwise complete (acc. 78070092), a jar with a holed base (acc. 78070085) and the tiny flagon mentioned previously with a hole low down in the side of its belly (acc. 78070058). There is further evidence of deliberate holing of vessels in the unaccessioned bulk collection of sherds. The intended purposes for modification of vessels by piercing post-firing vary depending on the location of the holes, their number, size and the vessel’s form.Footnote 112 In some cases it appears from the position of the hole or holes that they would have rendered the vessel unusable in regard to its original function. In a review of the Silchester Collection at the Reading Museum, of the 76 vessels that had piercings around the maximum girth, the most frequently occurring types were jars followed by flagons.Footnote 113 In London, these types of piercings are particularly common on flagons with examples occurring in structured deposits such as those from the shafts and boundary ditches at Swan StreetFootnote 114 and 1–7 St Thomas Street in SouthwarkFootnote 115 and as grave goods in cemeteries as at West Tenter StreetFootnote 116 and at the eastern cemetery.Footnote 117 If the hole in the base of mortarium (acc. no. 780070093) is the result of a deliberate act, it is of particular interest. It is not uncommon to find otherwise intact mortaria with a hole in the base, but this is usually explained as a result of use and wear resulting in the base ‘popping’ out over time.Footnote 118 However, closer scrutiny of these vessels and the types of deposit they are found in is overdue and may be a fruitful line of research.
Unprovenanced vessels
Of the unprovenanced complete vessels, two are of forms associated with ritual activity, in particular, when found intact:Footnote 119 the spouted jar (Vessel 25) and the triple vase (Vessel 26).
Jars with multiple spouts or cups applied at, or just below, the rim are recognised as having associations with religious or ritual practice. The spouted jar Vessel 25 is unusual in being undecorated and is referenced by Braithwaite in her comprehensive study of Roman face pots as the only complete example of a spouted jar of this type without applied facial features.Footnote 120 However, as spouts and cups are more commonly found detached from the main vessel, it is possible that more plain examples of spouted jars do exist; such an example comes from the London amphitheatre, where fragments of a large jar with applied cups and handles but with no other types of decoration were found, said to be used for ‘the ritual mixing of liquids’.Footnote 121
The association of face pots with religious activity has been discussed in detail.Footnote 122 Other cult vessels with spouts or cups include the ‘frog’ pots associated with the cult of Sabazius or a cult linking Sabazius with Bacchus-Dionysus.Footnote 123 Bird discusses the use of the cups or spouts to hold spices or other ingredients to be mixed in the main chamber of the vessel, or alternatively to hold the incense or candles required for the rituals of the cult.Footnote 124 The style and shape of the cups and spouts varies, and not all cups have apertures linking them to the main vessel, suggesting that the function of each differs.
The reduced-ware Wroxeter triple vase (Vessel 26) is of Kaye type 2 where the cups are attached to a tubular ring.Footnote 125 Further published examples from Wroxeter come from the Baths Basilica where five fragments are known: four are in red wares and the fifth is reduced.Footnote 126 Although the distribution of complete examples has demonstrated a ritual significance to their deposition,Footnote 127 there is evidence to suggest that fragmentary and incomplete examples are also significant in the interpretation of ritual activity. Partial triple vases are found in structured deposits together with unusual faunal assemblages such as those in the Union Street wells in Southwark.Footnote 128 Additionally, incomplete examples are found at ritual sites, for example those found at Structure X, the presumed hostelry adjacent to the temple at Uley.Footnote 129
The two unprovenanced ceramic candlesticks (Vessels 23 and 24) are two of three published from the 1912 excavations.Footnote 130 Analysis of the distribution of candlesticks of different materials has shown that, in contrast to iron examples, there is limited evidence for ceramic candlesticks linked to ritual activity or religious sanctuaries.Footnote 131 The only exception listed is one from a potential structured deposit at Armsley, Hampshire, which contained a candlestick together with a carved wooden head and several complete vessels.Footnote 132 Given the lack of provenance, it is not possible to conclude that the Wroxeter candlesticks held a religious or ritual significance. However, as is demonstrated with the provenanced examples of complete vessels within the collection that are part of special or structured deposits, this cannot be discounted.
Discussion
By Cameron Moffett
This attempt to extract more of the detail and nuance embedded in Bushe-Fox’s reports has teased out some unrecognised implications of his work. Of particular interest is the possibility that the Site IV building might have been directly associated with the Site V temple. On the basis of the many ritual ceremonies that seem to have taken place within it, its comparative opulence, and the fact that it falls into disuse in Phase 6 as the temple is demolished, Site IV is suggested here to have been a priest’s residence. At Site VI, there is the loss of piped water implied by the demolition of the bathhouse c. a.d. 200 in the Phase 4 modifications to Site VI. This seems to have led to the harvesting of rainwater to flush the rebuilt latrine, presumably elevated to increase the drop to help with a reduced flow of water. If this loss of the town water supply affected the entire west side of Watling Street, then this aspect of the infrastructure was starting to fail at an early date.
There are some discernible patterns within the pits and their deposits. There are fewer pits associated with the Phase 2a strip houses at the south, where all the pits with significant deposits are located outdoors and contain only a single vessel. Notable pits outside the buildings may have been related to rituals associated with the marking of boundaries, though they could easily have functioned as foundation deposits as well, as the vessels are of the same date as the houses they relate to.
Moving north, we encounter vessels interred within buildings and these are likely to mark a building’s foundation or an episode of modification. Site IV, with its many structured deposits inside the building, and complete vessels included within floor make-up material and also in pits, stands out. Henig writes that foundation deposits under floors were probably intended to be offerings for the Lares, the spirits of the household, who were believed to live below the floor.Footnote 133
Pit 50 is an exceptional and early deposit, containing as many as 14 vessels, including the matching pair of early butt beakers. We have seen above (Evans) that the butt beaker, a vessel type associated with Gaul, is an early and unusual form for this site. This pit is well away from the Watling Street buildings but right outside the west wall of the early Site VII enclosure. Seeley sees this as a foundation deposit based on its contents, and an association with the Site VII enclosure in Phase 1 is possible though the pit could, potentially, have been a marker of the initial development of this section of the insula.
One further type of ritual deposition likely to exist here is a votive one. Pit 61, with its collection of small ceramics of religious use, broadly dating to the first half of the second century, has been identified by Seeley as a typical votive deposit; however, Pit 61 is not close to any temple or known sacred location, the places one would expect to be the focus of votive deposits. It is impossible to say whether this might denote the site of a small, personal shrine, or even be an ad hoc votive deposit: a ritual enacted where or when it was needed or appropriate.
The rapid development and redevelopment of the Site VI plot resulted in a complicated sequence, but the dates of all but one of the complete vessels found within rooms indicate that these are likely to relate to the underlying Phase 2a buildings: A, B and C, subsequently amalgamated into Site VI. A single bowl of the latter half of the second century buried under the secondary floor of the eastern corridor dates to the Phase 4 remodelling of the townhouse that absorbed those early buildings. In the area west of Site VI, Pit 59 is of particular interest — a likely foundation deposit for Site VI, as the date of its samian bowls correspond to the construction of the Site VI complex in Phase 3.
The final group of structured deposits comes from the wells. Merrifield, in his classic work on ritual,Footnote 134 describes one type of foundation deposit as a ‘commencement’ deposit, which usually consists of a complete jar placed at the bottom of a well to inaugurate its productive life, and Well 1 of Phase 1, with its early jar, falls into this category. The contents of the other wells with complete vessels, or a structured or unusual deposit, are of a late date, and relate to the termination of a well. The exceptional deposit of animal bone in Well VII in the central courtyard of the Site VI townhouse and, lying south-west of the townhouse, the infilled Well X with its large number of complete vessels dating to the late fourth century, along with Well IX nearby, with contents similar to Well X but more fragmentary — these were all probably filled as one element of rituals of closure taking place at the end of the fourth or early fifth century. Robin Fleming, who has recently assembled dozens of examples of this type of deposit made in late and post-Roman wells, describes such ceremonies as ‘a funeral for a place, and, indeed, for a way of life’.Footnote 135
We see from the evidence of the complete Malvernian jar cited by Evans, which is potentially as early as the late 40s a.d., that the burying of complete ceramic vessels occurred at Wroxeter from its very earliest years, a practice brought there by a new population whose influences originated in Gaul. The tradition continues with the residents of the just-built strip houses on Watling Street, starting off life in a new house in the right way by burying a pot in the garden or below the floor, and from there to the burying of exotic samian bowls to mark the construction of the Site VI townhouse. Though the events underlying the late depositions made in the wells are different, undertaken as the city shrank and its population departed, the action is the same: all are aspects of a very long-lived tradition with a deep history. The pits, with their various significances and contents, are manifestations of the everyday rituals of Romano-British Wroxeter, relating to the overlapping spheres of life: social, familial, magic and religious.