

INTRODUCTION
Following Germany’s invasion of Poland on 1 September 1939, Britain and France declared war on Germany, and the British Expeditionary Force (BEF)Footnote 1 moved to France to help to defend the Franco-Belgian border. Initially they took over French defences comprising an anti-tank ditch covered by small concrete forts known since the First World War as pillboxes. The Germans did not attack until the following spring and, in the months of waiting, the BEF prepared similar defences to the rear of the border with c 65km of revetted anti-tank obstacles, covered by over 400 concrete pillboxes.Footnote 2 Political considerations also meant that the British and French would go to Belgium’s aid if she were attacked, but could not do anything beforehand that would violate Belgium’s neutrality. When the attack came on 10 May 1940, the prepared defences were left as the Allies advanced into Belgium to repel the German invasion forces. This they failed to do and were then driven back so rapidly that regrouping on the prepared defences was impossible. The Germans continued to push into France, using so-called blitzkrieg (‘lightning war’) tactics, with armoured columns advancing rapidly along main routes and meeting, or bypassing, limited opposition from retreating Allied forces. The Germans reached the coast on 19 May 1940, trapping a large part of the BEF, with French and Belgian troops, around Dunkirk. These troops were evacuated to Britain from the port and beaches by 4 June, leaving most of their equipment behind.
By the middle of June that year, the French were seeking an armistice and the British realised that the terms of this would most likely give the Germans access to the northern coast of France with its harbours and aerodromes. German bases in this area would seriously increase the threat of air attacks, airborne landings and seaborne invasion along the whole of the south coast of Britain, previously considered a remote possibility. The remaining British troops were evacuated from Normandy and Britain prepared for invasion.
ANTI-INVASION PLANS
The British response to the threat of invasion was put in the hands of General Edmund Ironside, who was appointed Commander-in-Chief Home Forces after an unsuccessful time as Chief of the Imperial General Staff (the head of the British Army). Faced with a potential attack anywhere along the south and east coasts, and with very few tanks, vehicles or other equipment, a strategy of five main elements was devised. Firstly, there would be a static coastal ‘crust’ to report and oppose any landings. Secondly, inland Local Defence Volunteers (later called the Home Guard) would manage blocks with improvised weapons such as ‘Molotov cocktail’ petrol bombs to delay the advance of armour. Thirdly, small local mobile reserves would further hamper any advance. Fourthly, a strong defence line would be constructed to prevent a breakthrough aimed at London or the industrial areas of the Midlands and, behind this, the GHQ (General Headquarters) LineFootnote 3 would be the GHQ Reserve of four divisions.Footnote 4
Ironside’s plan was built upon his predecessor’s emergency works at ports and beaches but took into account recent experiences in France where the Germans had mostly advanced speedily along the roads.Footnote 5 In Britain the roads generally intersected at towns, so these would be prepared for all-round defence (known as anti-tank islands), particularly to slow an armoured advance. The linear defences, known as stop lines, performed a similar role against forces leaving the road and attempting to bypass the islands.
GHQ Home Forces instructed the units under their command to begin work on the GHQ Line in mid-June, starting reconnaissance at the Bristol outer defences and working east, around the south of London and then north to Yorkshire.Footnote 6 As construction work began in early July, attention turned to the subsidiary stop lines. The design and construction of these was the responsibility of the commands below GHQ, which, in the area to the west of Portsmouth, was HQ Southern Command, who were to be responsible for the construction of a series of ‘command’ stop lines from its HQ near Salisbury.Footnote 7 An officer from the Royal Engineers was appointed as senior fortifications officer (SFO) to oversee the construction of each line, and construction began slowly in July. Meanwhile, on 19 July, Ironside was replaced by one of the fiercest critics of his plans, General Sir Alan Brooke, and in early August Brooke issued an order to cease new construction of static defences and reduced the priority given to materials supply for the work. These reductions hit hardest those areas in the east where most had been achieved and allowed other areas to catch up. Southern Command rapidly scaled back their plans and by late August the only stop line planned to defend against an attack from the south west was the Taunton Line.Footnote 8 That this attack would have almost certainly already captured the port and naval base at Plymouth, allowing heavier armour and bulk supplies to be landed, probably led to the Taunton Line being one of the most complex and well-documented stop lines in Britain.
PLANNING AND CONSTRUCTING THE TAUNTON STOP LINE
The course for a stop line would be dictated by suitable existing landscape features. The best anti-tank obstacle would be a wide, deep river, but other existing linear features, such as canals, railway embankments and cuttings or steep hillsides, could be used. Where no existing feature was suitable, an anti-tank ditch would be dug or lines of large concrete cubes would be emplaced. It was, however, vital to allow the normal movement of civilian and military traffic along roads and railways before the invader arrived and here movable obstructions known as road or railway blocks were used, each covered by a pillbox to engage tanks and their accompanying infantry as they approached the line. Although the pillboxes had several loopholes, most would not be facing an attack and the main purpose of the pillbox would be to protect the crews of weapons such as the Boys anti-tank rifle or the Bren light machine gun. Most troops would be dug in positions around the pillbox, armed with rifles.
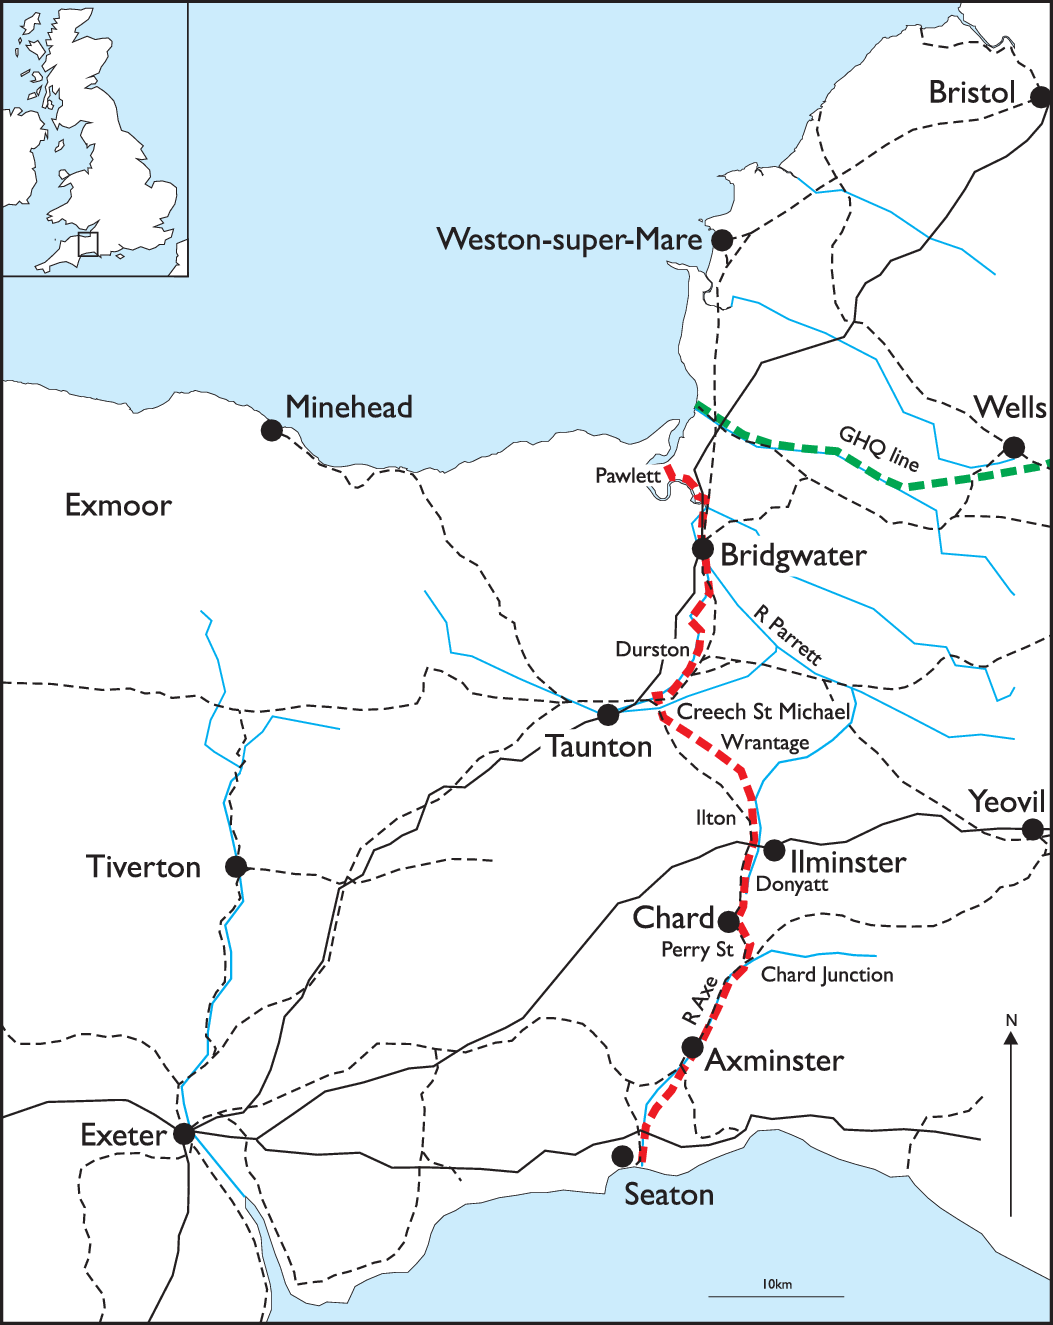
The line covered a linear distance of 56km, but some 75km of defences were needed for the chosen route. Between July and November 1940, a continuous anti-tank obstacle was created mainly using the rivers Parrett and Axe, together with the Bridgwater and Taunton Canal, the bed of the former Chard Canal from Creech St Michael to south of Ilton, joining the Great Western Railway branch line on to Chard and then the Southern Railway to Chard Junction (fig 1). Over 300 concrete pillboxes and gun emplacements were built together with 126 road and twenty-one railway blocks. Some forty-nine bridges were prepared for demolition.Footnote 9
Map showing the route of the Taunton Stop Line across the ‘waist of the South West’ with contemporary major roads and railways (dashed line). Drawing: authors.

Gun emplacements were added to strengthen the line, based on plans for defending it with two infantry divisions from the GHQ Reserve, each comprising three brigades of three infantry battalions.Footnote 10 Each division would also include a machine-gun battalion with forty-eight Vickers medium machine-guns (MMG), and an anti-tank regiment with forty-eight towed 2-pounder anti-tank guns. The MMG were a key part of the stop line defences to be used against enemy infantry trying to force a crossing of the obstacle and building up a bridgehead. The MMG were used in sections of two guns, sharing a range-finder, and sixty-one special concrete emplacements were built to protect them.Footnote 11
The 2-pounder anti-tank guns were mobile and could be towed between fire positions, some sixteen of which were provided with pre-dug gun pits.Footnote 12 In five places, special concrete emplacements were built for these guns. In addition to the mobile 2-pounders, a limited number of old 6-pounder guns recovered from First World War tanks were issued. These needed special fixed concrete emplacements with steel pedestal mounts to mimic the fixings in the tank. Only sixteen of these guns were allocated to the Taunton Stop Line. In the Middle Sector, basic gun pits were complete by 30 August and all emplacements were fully completed by 22 October and manned a week later by newly trained Royal Artillery crews, who lived on-site.Footnote 13
The line was reconnoitred on 24 and 25 June 1940, followed by a much more detailed reconnaissance of the Railway (Middle) Sector, which reported on 5 July.Footnote 14 The reconnaissance party was instructed to decide the defence locations and mark them on the ground using pegs or paint. It was accepted that construction of these works would take time and it was vital that crossings of primary importance were rapidly put into a basic state of defence. The first priority was the removal of any non-essential bridges (mainly eleven swing bridges on the canal and three wooden bridges on the river Axe) as ‘Preliminary Demolitions’ and to prepare most other bridges crossing over the obstacle as ‘Reserved’ or ‘Final’ demolitions.Footnote 15
From the weekly progress reports in the National Archives, construction started on the first nine of fifteen pillboxes planned for the northern part of the line in the week ending 10 July 1940.Footnote 16 One week later, ten pillboxes were started further south. Building started in parallel with the road blocks, using county council resources on public roads, military resources on byways and railway resources for railway blocks. By the end of July, the weekly report indicated that 104 pillboxes and MMG emplacements were now planned, twenty-five pillboxes were in progress, but only five had been completed. As building progressed so did the numbers planned, reaching 379 in August 1940; a figure never achieved.
There were also changes to the military command structure. On 18 July 1940, HQ 8 Corps was formed, and it assembled in Tidworth, Wiltshire, on 25 July.Footnote 17 On 5 August, it moved to the Taunton area and established its main headquarters in Pyrland Hall, some 3km to the north of the town. It was one of three corps now under HQ Southern Command and had ‘operational control’ of most troops stationed in Somerset, Devon and Cornwall. On 1 August, before the move to Taunton, the new Corps commander, Lieutenant General Franklyn, accompanied by his chief engineer, Brigadier Kerrich, inspected the Taunton Stop Line with its ongoing work, clearly indicating its importance to the defences.Footnote 18 On 17 September 1940, HQ 8 Corps took over responsibility for the Taunton Line.Footnote 19
The actual building work was undertaken by national and local building firms. Charles Brand and Son Ltd were appointed on 16 July 1940 as ‘organising contractors’ for the Taunton Line under the direction of the SFO. Brand’s role was to co-ordinate the work of the other contractors (Mowlem and Stansell of Taunton) as well as having direct control of workers seconded from the British Cellophane factory in Bridgwater and from West Piling.Footnote 20 Stansell managed eleven subsidiaries and Mowlem three. According to T A Bushell (see below), the builders were given very little instruction: ‘Early in July a meeting was called at the County Hotel, Taunton, under the chairmanship of Mr Stansell. A general attended, told the builders what was wanted, and with the remark that it was “up to them” left the meeting. The work was divided out among the builders and they were promised first priority in labour and materials.’Footnote 21
In early September 1940, there was an increasing build-up of German forces, suggesting preparations for an invasion. Between 8 and 10 September, the moon, tides and weather conditions were considered most favourable for a German invasion and during the evening of 7 September GHQ Home Forces issued the ‘Cromwell’ alert, bringing troops from expecting ‘8 hours’ notice of invasion’ to readiness for ‘immediate action’.Footnote 22 Had this invasion happened, the Taunton Stop Line would have had sixty-eight pillboxes and ten MMG emplacements completed (about 25 per cent of those then planned), but many of these (perhaps over 50 per cent) would have been without camouflage.Footnote 23
On 6 November 1940, authority was given to start work on the twelve anti-tank islands, which required another eighty pillboxes.Footnote 24 The islands required 25km of artificial obstacle, more than had been constructed for the Taunton Stop Line, where natural features could be employed. By 27 December it was reported that two islands had been completed (Ilminster and Axminster) and one was ‘in hand’ (probably Chard).Footnote 25 On 4 February 1941, Brigadier Kerrich visited the Durston anti-tank island, which appears to have been next in priority after Axminster, Ilminster and Chard.Footnote 26
By early 1941 opinions on the usefulness of stop lines were beginning to change, as illustrated by a letter from Brigadier Collingwood at Southern Command: ‘To put it baldly [the Army Commander] hates the idea of them … They do not enter into his plan of defence in any way whatsoever because he looks upon the holding of lines as something which is quite out of place in modern tactics.’Footnote 27 On 11 February Southern Command ordered the withdrawal of the sixteen 6-pounder guns from the Taunton Stop Line for use at coastal sites, showing the change of priority from stop lines to beach defences, and in April 1941 the stop line was abandoned, leaving only the twelve anti-tank islands, of which only three were nearly complete, to fill the gap.Footnote 28 The German invasion of Russia on 22 June 1941 significantly reduced the threat of a full invasion of Britain, and on 21 July orders were given to Somerset County Council to remove all stop line road blocks except those forming part of an anti-tank island.Footnote 29 The islands were retained as limited raids by airborne or seaborne troops were still possible, and to maintain civilian morale, particularly amongst the Home Guard.
In the account that follows, pillboxes and other structures will be referred to by both their contemporary number and also by the number in the Somerset Historic Environment Record, which provides a unique identifier as the contemporary numbers changed.Footnote 30
CAMOUFLAGE AND CAMOUFLEURS
The British Army’s Manual of Field Engineering defined camouflage as ‘any artificial means employed to deceive the enemy’s visual or photographic observation from the ground or from the air’. In the case of defence works, it ‘was essential to ensure that the enemy remained unaware of the existence of pillboxes and gun emplacements’. Camouflage would make ‘close range attacks by dive bombers or field artillery more difficult and ground forces, particularly armoured vehicles, would have more difficulty in locating structures and, hopefully, where defensive fire was coming from’.Footnote 31
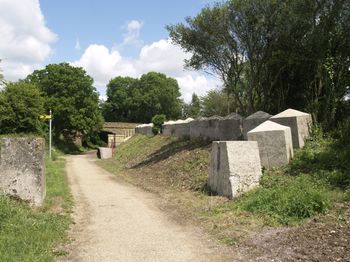
It was impossible however to conceal the anti-tank ditches, the scarping of slopes and concrete cubes or posts as anti-tank obstacles or the building of road and railway blocks (fig 2). These would have immediately confirmed that a defensive line was being prepared and would focus the search for pillboxes and gun positions, making their effective camouflage more essential.
Taunton Stop Line defences at Donyatt in 2009 looking north. The stop line followed the railway, then in use, with an anti-tank ditch on the west side (HER 11063). The obstacle crossed the line at the railway block (HER 55412) in the foreground and was then carried up to the bridge by concrete cubes (HER 55355) to another roadblock (HER 55356) across the lane before continuing north on the east side of the railway cutting. The former railway halt has been reconstructed as an information point on a cycleway and the concrete cubes (and one side of the railway block) cleaned. This provides an impression of the situation when the concrete was newly cast and shows the need for camouflage, if only in this case by paint or dirtying. Photograph: Somerset Historic Environment Record.

Camouflage covered a wide range of activities and, at corps level, called for a high degree of technical skill. Royal Engineer officers with special qualifications and civilians, who were commissioned into the RE before attending camouflage courses, were appointed as camouflage officers at both Command HQs and Corps HQs.Footnote 32 Their activities included not only providing advice for camouflaging coastal and inland defences, such as pillboxes and gun emplacements, but also for buildings, camps and depots. Other aspects of camouflage work included teaching soldiers how to conceal field guns, trucks and other vehicles.
At HQ 8 Corps, Captain F G Baxter RE was appointed as GSOFootnote 33 3 Camouflage. Godfrey Baxter had previously worked in West End theatres as an actor, stage manager and director, and also at Glyndebourne.Footnote 34 HQ 8 Corps Engineers Branch War Diary gives clear indication of the pressure of work on the camouflage officer and his team.Footnote 35 For example, during August 1940: ‘Capt Baxter made a detailed reconnaissance of the Taunton Line and all Beach Defences [300 miles (480km) of coastline is mentioned elsewhere] and produced a list of recommendations for improvement of camouflage. He also produced a list of special camouflage stores required.’ On the Taunton Stop Line there would have been some seventy-eight completed pillboxes for him to examine and this diary entry suggests that the camouflage work had already started.
In September: ‘Capt Baxter was continually employed, inspecting all defences in the area, making recommendations for camouflage. He produced sketch designs of each individual pillbox etc to suit local conditions and these designs were issued to the Areas, etc, and used by contractors building the defence works.’ The War Diary notes that ‘some of the designs were so effective that one inspecting officer failed to find a pillbox marked on his map for some considerable time’.
In early September, Southern Command HQ noted that the instructions for the camouflage of pillboxes were being disregarded.Footnote 36 It was stressed that disruptive painting could never be an entirely satisfactory form of camouflage as it could never simulate the ordinary features of the landscape. If a pillbox could be made to look like a haystack, barn, shed, garden wall, etc, it was much more likely to escape observation than if it were painted; painting could never really break the hard, distinctive outline of the roof and sides. This may have applied to the Taunton Stop Line as some pillboxes are known to have been painted with a disruptive pattern, such as pillbox N65, which retained camouflage painting in the 1950s.Footnote 37 Locally, it is remembered as being disguised as a shed, suggesting that this camouflage may have been applied to replace the paint.
On 22 September 1940 Second Lieutenant Oliver Messel reported for duty at HQ 8 Corps as Staff Lt Camouflage to assist Captain Baxter.Footnote 38 Messel (1904–74) was already an established theatre designer, designing both costumes and sets for London and Broadway theatres and for films.Footnote 39 He had been nominated for two Academy Awards in 1936 and was still working in London at the beginning of the war, joining the Army in mid-1940. He was given leave from training at Aldershot to complete a production and is recorded as attending the first night in uniform on 5 September. He stayed in Taunton for about seven weeks before being posted to 2 Corps as a camouflage officer, where he was based at Norwich and tasked with setting up a camouflage school for Eastern Command. His theatre career continued after the war until the late 1950s when the emergence of greater theatrical realism did not suit Messel’s flamboyant style. He retired to Barbados in 1966 and re-invented himself as an architect, including work for Princess Margaret on Mustique.
Castle’s biography of him, based partly on some autobiographical notes, makes no mention of Messel’s stay in Taunton, moving straight from his pre-war theatre work to his time in Norwich.Footnote 40 There is, however, a small amount of information in the Oliver Messel collection at the Bristol Theatre Museum.Footnote 41 This shows him writing in August 1940 to suggest that tanks might be halted by pools of sticky tar, which received the reply that the idea was unworkable as it would take too much tar. In the same month he wrote from Gibraltar Barracks (in Aldershot) to Kew Gardens to enquire about the best way to keep cut foliage looking lifelike. There is also a handwritten autobiographical note on the setting up of a camouflage school for 2 Corps in Norwich and various photographs from there and later in the war. Somerset is only represented by a collection of unsent postcards of buildings with no obvious connection to camouflage. These may have been collected as inspiration for stage sets.
One further source of information on Messel’s time in Somerset comes from his replacement, the artist Julian Trevelyan, who reported for duty on 2 December 1940, fresh from six week’s training at the Camouflage School in Farnham Castle, Surrey.Footnote 42 Messel left on 6 December, so he was able to show Trevelyan ‘his achievements and projects’.Footnote 43 Trevelyan describes this as ‘the great age of pillboxes, and a line of them had been built across Somerset to stop a possible German invasion from further west’. He says that the pillboxes, which he describes as ‘awkward little pentagonal objects’, had to be disguised ‘so as to deceive the German columns coming across the country and we camouflage officers were given full rein to our wildest fantasies’. Messel is described as ‘in his element’ camouflaging ‘many as gothic lodges’ and others as ‘caravans, haystacks, ruins and wayside cafes, always with great attention to detail’. This included telling Trevelyan to ‘plant some old-man’s-beard here in the spring’ and ‘paint a pot of flowers in that window’. Messel is also described as using cob to make ‘new walls look old almost before they were dry’. Trevelyan says that Messel’s designs looked ‘a bit theatrical, as might be expected, but he built them at a lucky moment when labour was unlimited and the urgency of the situation worked miracles’.Footnote 44
The War Diary also records Messel’s work in October 1940: ‘camouflaging of all gun positions on the beaches and the defence lines progressed well. Capt Baxter and Lt Messel made continuous inspections of all defences and produced designs for the individual pillboxes and emplacements. Lt Messel manufactured very many scale models of defences showing the exact camouflage required on each.’Footnote 45
Trevelyan seems to have been less busy as the immediate threat of invasion had passed with the onset of winter. He describes trips to visit coastal defences in Cornwall, often staying with his artist friends. He designed ‘disguises for pill-boxes all round the coast of Cornwall, and to this day, I believe, there exists one on the pier of St Ives that I see constantly painted in exhibitions; I had turned it into an old Cornish cottage with cement-washed roof and lace curtains’. Trevelyan lists other disguises: ‘garages complete with petrol pumps, “Closed for the Season”, public lavatories, cafes, chicken houses and romantic ruins.’Footnote 46
An undated syllabus (probably early 1941) for a three-day ‘Camouflage Maintenance Course’ run by Baxter and Trevelyan covered such topics as air photography interpretation, camouflage net garnishing, animal camouflage, the air view, camouflage materials, vehicles, painting, sniper suits and the erection of a dummy pillbox.Footnote 47 A tour of the ‘Taunton Line’ was included and it was hoped to view this from the air. This syllabus indicates the breadth of the responsibilities of the camouflage officers beyond pillbox camouflage and the importance of camouflage against air photography. Clearly there was also a degree of pride in the Taunton Line work.
Camouflage work continued after the Taunton Stop Line was abandoned in April 1941 and the new anti-tank island pillboxes (all numbered with a ‘T’ prefix) are known to have been camouflaged, although there is very little information. One pillbox, at Ilton railway halt, was camouflaged as a water tank (T45, HER 55200) as shown in a sketch by Bushell.Footnote 48 At Dillington House, Ilminster, a pillbox on the South Drive disguised as a lodge still shows some vestiges of its disguise (T55, HER 55236). New features of the anti-tank island construction phase were the use of dummy pillboxes and dummy loopholes in adjacent walls (see, for example, fig 4).
THE MATRAVERS COLLECTION
In recent years a collection of drawings prepared for camouflaging pillboxes on the Taunton Stop Line has been recovered, and it is believed that many of these were drawn by Oliver Messel. This attribution is based on comparisons with Messel’s theatrical set design drawings held in the Bristol Theatre Collection and examination by Thomas Messel, Oliver’s nephew.Footnote 49 The survival of the drawings had been known locally for several years and they were photocopied by Somerset County Council’s archaeological service in 1991 before being returned to the owner.Footnote 50 The poor quality of these photocopies prompted the present authors to contact the owner, Dennis Matravers, in 2011 with a view to obtaining good digital images and perhaps persuading him that they should be preserved in a public archive. In both they were successful, with the exception of six drawings that had been framed – these were scanned and returned. Matravers also told why he had kept them. He had started work aged sixteen with the building firm Stansell and one of his first tasks had been taking the workmen’s wages out to the sites where the pillboxes were being built. These were often several miles from the road, and he remembered cycling out with the wages in their individual envelopes. Matravers stayed with Stansell, eventually becoming managing director, and at some time during his career acquired the drawings, which would presumably otherwise have been discarded.
In 2016 one of the authors (CW) was contacted by Vera McKay, who had inherited following the death of Dennis Matravers, and, almost immediately thereafter, his son. She remembered Dennis Matravers’ wish that the framed drawings should join the others, and they were added to the collection in the Somerset Record Office together with some reminiscences by Dennis Matravers, prepared for publication in the Stansell internal newspaper to celebrate his fifty years with the firm.Footnote 51
The drawings fall into three groups: a sketchbook, loose papers and the framed artwork.
Sketchbook
The printed cover titles this ‘Landseer Drawing Book’ with a two-colour picture of a stag and hounds. The date ‘9 Nov 1940’ has been stamped at the top outside the picture border. A pencilled title ‘Northern Sector’ has been added, which must have been written after the renaming of the Taunton Stop Line sectors, known to have happened in late October.Footnote 52 On the inside of the cover are two pencilled notes: ‘Can spoil be removed by contractors as the pill boxes are finished’ and ‘To the south. Before this one is already disguised as a woodstack these then follow in succession’. The latter seems to be identifying the pillboxes before formal numbering (see below); the former suggests that no effort had been made to try and conceal the works before the camouflage was considered.
Within, the fourteen right-hand pages have been used for camouflage sketches, together with some notes. There are some rough sketches on the rear of one page, but otherwise the left-hand pages were not used.
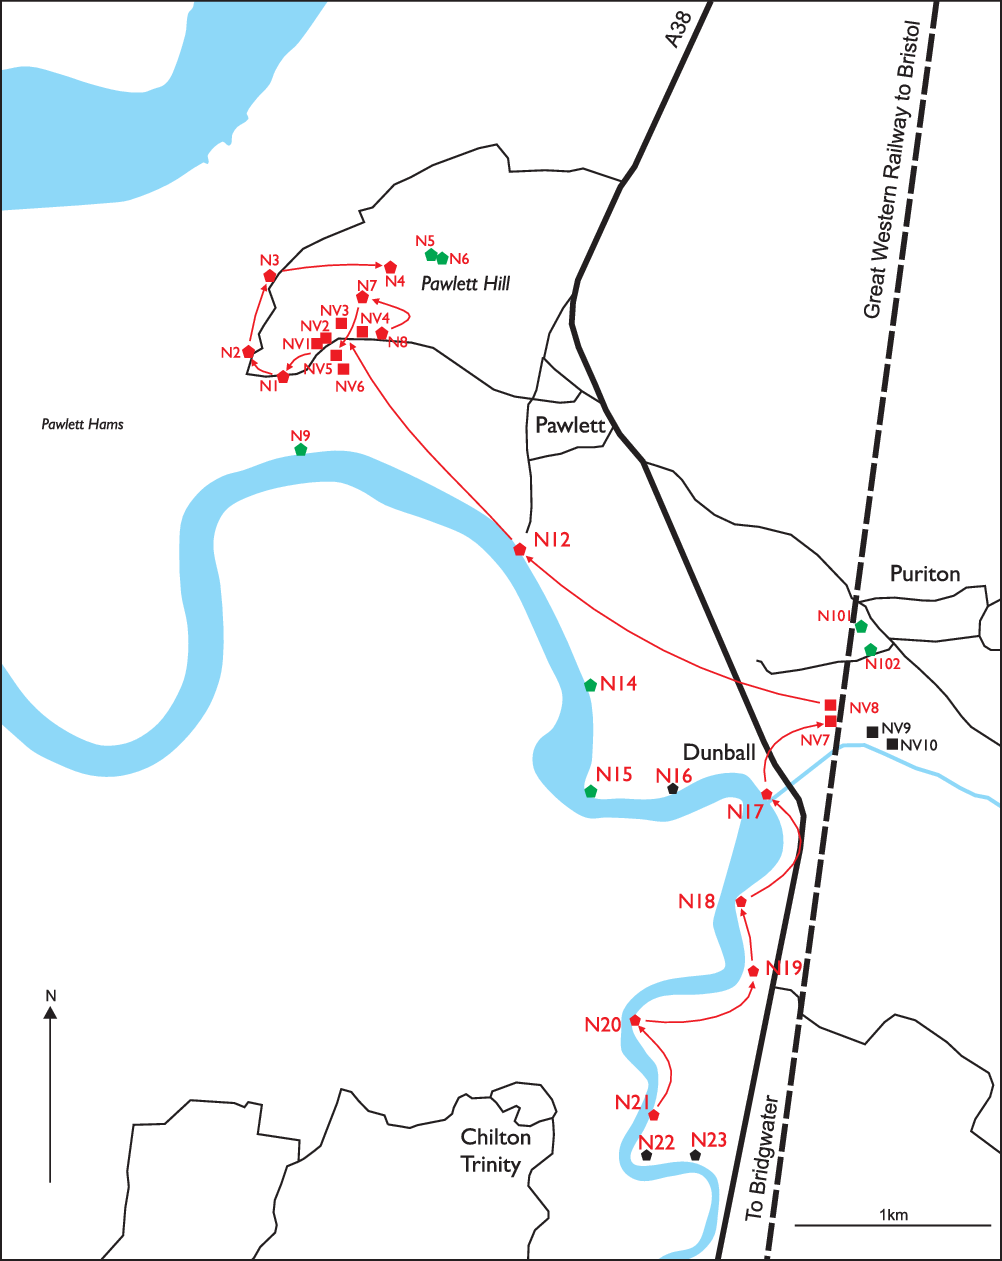
Some illustrations have had Taunton Stop Line numbers from the final numbering system added in a different hand – in several cases this overwrites an erased identical number without the sector prefix. The drawings are in geographical order, running from N21, on the northern outskirts of Bridgwater, to the concentration of defences at the start of the stop line around pillbox N1 on the hill above Pawlett Hams. Four riverside pillboxes (N9, N14–16) were missed, as were N4 and N5 at Pawlett. N101 and N102 are also not present, but these, covering ‘rear road blocks’, were later additions to the stop line. All of these ‘missed’ pillboxes, with the exception of N16, are present in the loose papers (see below). The book suggests a single, or perhaps two-day, trip along the line sketching the completed pillboxes with designs for their camouflage (fig 3).
Map showing the pillboxes drawn in the sketchbook (red) and the order in which they appear. Pillboxes shown in green have loose camouflage drawings, but those in black have none. Drawing: authors.

Framed drawing 2. Pillbox N66 (HER 44300). Note explanations of how camouflage works and use of dummy loopholes on the adjacent building. Drawing: Reproduced with kind permission of the South West Heritage Trust.

Loose sheets
The loose sheets had obviously been shuffled several times over the years, but evidence from fastening marks show that some had been clipped together into groups whose significance and date is unknown. Most are drawn on scraps of paper, including pieces cut from envelopes and paper bags, and three are on the back of joining pieces of a cut-up cinema poster that can be dated to 30 September 1940.
Framed drawings
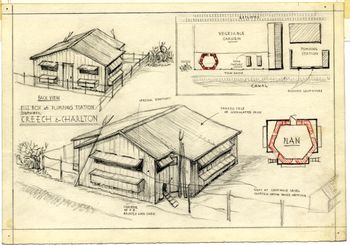
Six drawings had been framed by Dennis Matravers and are of a very different character to the other sketches. They are all more carefully drawn and neatly lettered in the style of architectural drawings. Each has a plan with the concrete pillbox coloured red showing how the camouflage fits around it (fig 4). They have a pencil border ruled around the card and several have been pinned with rusty pins in the corners. Some have been trimmed after the pinholes had been made, probably when being framed. Three have draft versions amongst the loose drawings. It is not possible to say when or why these drawings were made; they could be post-war, done for reminiscence, or in wartime as exemplars.
T A Bushell
The only other known contemporary description of the camouflage of the pillboxes is the notes prepared by T A Bushell for his never published ‘Somerset on Guard 1939−45’.Footnote 53 The drafts and papers for this remain in the Somerset Record Office and were heavily quarried by Mac Hawkins for his Somerset at War.Footnote 54 As well as the text there are various contemporary documents from Bushell’s time in the Home Guard and material that others gave to him to prepare his account, which includes a carbon-copy of a typewritten report on nine pillboxes south of Creech St Michael. As well as comments on the fields of fire and obstructions, the camouflage is described:

Five of these feature in the Matravers drawings. Number 1 is numbered as N73 on loose drawing sheet four, but from the illustration is almost certainly N74 at the south end of the old canal bridge over the river. The note to the drawing says ‘Hedge has been removed completely and exposed pill box. Replace hedge growth with brushwood Artificial stone continuous [these three words crossed through and the last is partly illegible] Plant ivy and brambles or any quick growing plants to cover’, which fits well with Bushell’s description. Number 6 should be N79 that is described as ‘Chicken shed stone in plaster’ and drawn as a shed with a wire netting run, differing significantly from Bushell’s ‘paint camouflage’. It is possible that this is mis numbered on the Matravers drawing as the location on the old canal bank on the edge of a cutting seems unsuitable for the chicken shed. Numbers 7, 8 and 9 are listed but not illustrated as M80, M81, M82 above this on the sheet and their descriptions as ‘hayrick’, ‘old cart shed’ and ‘corn rick’ match Bushell.Footnote 55
CHANGING APPROACHES TO CAMOUFLAGE
There is little historical or other evidence to suggest that camouflage measures were taken against air surveillance during the construction of pillboxes or immediately after completion, except for the suggestion that the 1941 training course would include viewing the line from the air. Building sites do not appear to have been provided with netting or other camouflage and matters such as preventing vehicle tracks and the concealment of dumped materials appear to have been ignored. This is perhaps surprising as the problem had been identified by the BEF in France in 1939 at the highest level; a report to the BEF Engineer-in-Chief wondered: ‘could not some attempt be made to provide camouflage against air observation for pillboxes under construction. If no proper material [is] available could not wire netting laced with locally purchased coloured cloth be used. It was noted that the French are attempting to camouflage all of theirs during construction.’Footnote 56 Either the commanders in Britain were unaware of this, or it was considered too difficult to implement with the time, resources and civilian contractors available. Some pillboxes do, however, retain an earth covering that was probably put there to hide the bright skyward reflection from new concrete and it is possible that this was also one of the uses for cob (as described above). Overall, camouflage was seen as important: ‘Every defence work, whether blockhouse, post or trench, must be thoroughly hidden from the ground and the air. This applies to all works, whether inland or on the beach. Failure to achieve concealment will be treated as a lack of efficiency on the part of the responsible commander.’Footnote 57
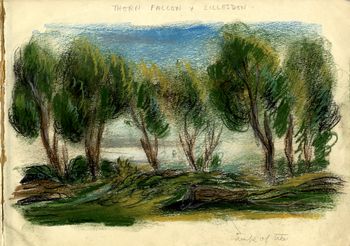
From the ground pillboxes and other structures were expected to have to stand observation at 400m or less, at which range fairly small details are appreciable. Two basic approaches were employed. The first was to ‘conceal by merging’ the pillbox into its background by the elimination of shadows and by distortion of the silhouette (fig 5). This type of camouflage can be effective against observation and attack from both the air and the ground, but it was considered difficult to use ‘merging’ if the enemy might be able to get close to the object. Typical examples of merging are pillboxes merged into hedgerows or sloping rough ground. The other method, ‘concealment by disguise’, was to make the pillbox look like something else. Early instructions on building stop lines suggested that, where possible, pillboxes should be hidden within existing buildings and a few examples of this are listed in October 1940, including three around Bridgwater: ‘in an existing building’ (N27, HER 16722), ‘in a cement store shed’ (N28, HER 12445), ‘end of an old brick kiln’ (N34, HER 16725); and two at Creech St Michael: ‘in old house’ (N72, HER 44311) and ‘in tunnel at old canal site’ (N75, HER 44283).Footnote 58 Only the latter two partially survive, but at most sites along the Taunton Stop Line, there were simply no suitable buildings to use and the pillboxes had to be disguised in new forms.Footnote 59
Camouflage by merging, loose sheet 19, possibly used in more than one place as captioned ‘Thorn Falcon and Lillesdon’. The only full colour drawing in the collection, which has attached pencil sketches of the design and the description: ‘1) Take large branches and brushwood. Cut out pieces of cullacorts feathers on wire. Wire separately on to branches to represent large groups of leaves. Wire upright behind emplacement to fill in gaps between trees. 2) Cover emplacement with steel wool add small pieces of colourfast [?] and brambles to appear as clumps of brambles matching in with either side. 3) place cut down tree with brushwood to one side.’ Drawing: Reproduced with kind permission of the South West Heritage Trust.

Both merging and disguising were used on the Taunton Stop Line, although there were significantly more disguised pillboxes; particularly along the more isolated banks of the river Parrett and the Bridgwater–Taunton Canal, where there was limited opportunity to merge. On 12 March 1941 HQ Southern Command pointed out that many pillboxes located at a distance from buildings were very conspicuous and drew attention to what otherwise might be a well-concealed position.Footnote 60
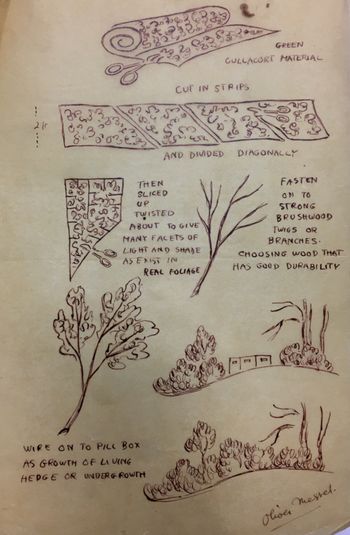
A contemporary manual pointed out that: ‘It is not sufficient to paint typical green and black, wavy lines on the pillbox with a hedge as the background; an impression of the hedge itself, coupled with natural or artificial foliage, or something to break the outline, is essential, and special care must be taken to work the loopholes into the shadows, or conceal them by natural looking means. Natural foliage will soon fade and, therefore, is not a permanent solution.’Footnote 61 It was in this area that Messel excelled in his use of artificial materials like ‘cullacorts’ that were already in use in civil camouflage schemes. Cullacorts consisted of wire netting with feathers stuck onto it and painted various appropriate colours. Messel wrote officially from HQ 8 Corps in early November 1940 advocating that it should be cut into strips, twisted and attached to bare branches to represent growth (fig 6).Footnote 62 His ideas appeared in 1941 advice as ‘artificial foliage’.Footnote 63 Several of the drawings in the Matravers collection show sites where it was to be used (see fig 5).
Oliver Messel’s suggestion for the use of cullacorts to represent foliage that would not die off. This is the only known drawing from 8 Corps that is signed by Messel. Drawing: The National Archives, PRO WO 199/1628.

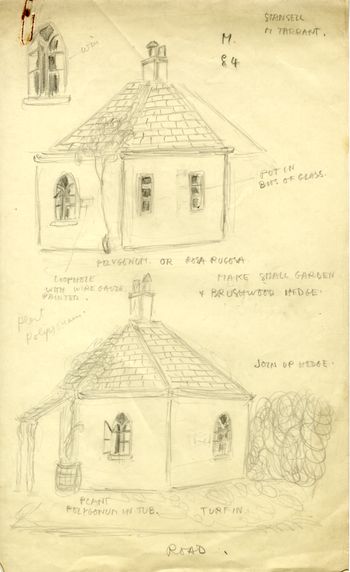
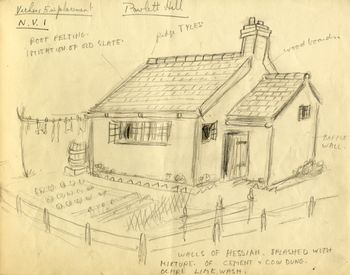
Trevelyan says that Messel paid strict attention to minor detail like plants in cottage gardens (fig 7) or the type of thatch to be used, even getting thatchers from Norfolk to thatch a pillbox with reeds.Footnote 64 One of his prides appears to have been a gypsy caravan disguise for a pillbox (M45, HER 55208) at Sea near Ilminster.Footnote 65 However, the 1941 advice noted that ‘the disguise chosen should be appropriate to the surroundings’ and suggested that ‘milk bars must not grow out of deserts’.Footnote 66 It was advised that: ‘It is not necessary to credit an invading army with too detailed knowledge of local variations. For instance, plaster casts of a type of tile or bond of bricks used in the Midlands may if desired be used in Kent.’ This may be indirect criticism of Messel and his use of Norfolk thatchers. A later paragraph was more direct: ‘Disguises should be lacking in interest and inconspicuous. Gipsy caravans and public monuments are somewhat at a disadvantage in that they by their nature challenge inspection.’ Another of Messel’s designs, the Vickers MMG emplacement on Pawlett Hill (fig 8, NV1, HER 15915) was disguised as a small cottage, but the sketch shows it with washing on a line flapping in the wind, which would have drawn attention to a structure whose front face would only have been about 4m wide.
Camouflage by disguise, loose sheet 13. Pillbox N84 (HER 16505) disguised as a Gothic lodge building. Note the use of specific plants. Image: Reproduced with kind permission of the South West Heritage Trust.

Camouflage by disguise, sketch book page 21. Vickers MMG emplacement NV1 (HER 15915) disguised as a small cottage on the hillside overlooking the river Parrett. Image: Reproduced with kind permission of the South West Heritage Trust.

Messel’s use of cob as a building material also appears in the later training manual, which stated that ‘a useful formula for the creation of artificial walls is as follows: On rough framework covered with hessian and wire netting apply the following mixture – two parts of cement, one part cow dung, two parts water. This can be treated to represent any surface and coloured with lime or distemper. To give an appearance of age, use cow dung, soot, oatmeal and water, the mixture to be of a consistency that can be sprayed through a stirrup pump. The oatmeal in the mixture will encourage the growth of lichen’.Footnote 67 Messel was obviously in close contact with the Army Camouflage School and it is possible that the framed pictures in the Matravers collection could have been drawn (possibly not by Messel) for them but never passed on.
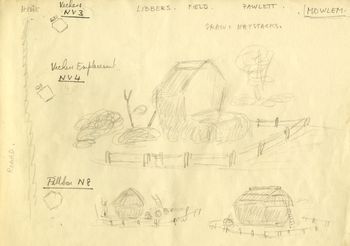
Other disadvantages of elaborate disguises became apparent.Footnote 68 For example, where pillboxes were disguised as haystacks (fig 9), it was found that they did not stand up well to the weather as the hay or straw blew away, both exposing the pillbox and making movement and access difficult. Similarly, ‘rubbish heap’ concealment made simply of dumped material needed to be attached to an overall cover of galvanised wire netting with the items attached so that they could not become dislodged and block visibility. It was also pointed out that pillboxes disguised as buildings with a pitched roof should be designed so that if the roof was dislodged (by natural or enemy action), the loopholes would not be covered. Many of the drawn designs would appear to be at risk from this.
Camouflage by disguise, sketch book page 13. Three different designs for haystacks disguise at adjacent pillboxes (NV3 HER 11957, NV4 HER 11958, N8 HER 11960). Image: Reproduced with kind permission of the South West Heritage Trust.

There was also the fire hazard from flame throwers and other weapons that had been identified in early September 1940. Captain Baxter personally conducted experiments on the conditions inside a pillbox with burning camouflage in December. He concluded that burning camouflage did not necessarily force the pillbox crew to evacuate.Footnote 69
PILLBOX CAMOUFLAGE IN RELATION TO WIDER MILITARY CAMOUFLAGE
Pillbox camouflage formed a small and short-lived part of military camouflage as used widely at a tactical level to provide concealment for protection and surprise. Most military equipment, buildings, vehicles and personnel were camouflaged to some degree. At a strategic level, similar techniques were used to produce fake airfields and other targets to attract bombing raids, or to suggest the build-up of forces in an area to be used for a diversionary attack, as was commonly used in North Africa or during the build-up to D-Day.Footnote 70
The use of camouflage on the stop lines was severely constrained by the time pressure imposed by the expected invasion, but was also seen as vital to give the defenders every advantage possible. This set of circumstances, together with the necessary location of many pillboxes in highly visible locations, led to schemes of great ingenuity that would be unlikely to have application in other areas of the war effort. Much camouflage work was directed to concealment from the air, where detail was much less important than breaking up the shape of the target. The overall route of a stop line would be very hard to conceal from the air but, if attacked on the ground, the element of surprise provided by sudden fire from a concealed but well-protected location would have given the defenders an advantage.
As Julian Trevelyan noted, there was a ‘golden age’ of pillbox camouflage when expense was almost no object and time was thought to be extremely short.Footnote 71 Ideally, concealment by merging would have been employed as part of the design stage, as can be seen in the unrealised January 1941 plans for the Bodmin Stop Line in Cornwall, where forty-eight of the seventy-three planned pillboxes were intended to be dug into the ground although this added 25 per cent to the cost.Footnote 72 In 1940, however, the absolute priority was construction and, where concealment by merging was not possible, the pillboxes would have to be built and camouflage added as soon as possible after construction.Footnote 73 The Army turned to those such as Oliver Messell with artistic and design skills that would provide the expertise thought to be needed for these projects which would have to stand close scrutiny.
By the time these plans were in place, the tide was turning against the pillbox and the stop line; the former seen as too static and discouraging troops to come out and fight, and the latter as too demanding of men and equipment.Footnote 74 Work could not just be stopped, however, as it would principally suggest to the military and civilian populations that the invasion threat had passed and lead to a relaxation of vigilance and effort.
After the frenzied work of late 1940, Oliver Messel was promoted to an instructional role, and his replacement, Julian Trevelyan, concentrated on the concealment of coastal defences, which were still considered necessary to counter raids, and teaching troops how to hide their equipment, seemingly in a much more relaxed environment.Footnote 75 Both Trevelyan and Godfrey Baxter later moved to the Mediterranean, where camouflage skills were still needed and where Baxter was killed when the plane he was travelling in was shot down.Footnote 76 Messel seems to have been granted leave to continue his theatre designs while working at Norwich, presumably to raise civilian morale, and he was released from the Army in 1944 to design the film Caesar and Cleopatra.Footnote 77
CONCLUSIONS
The decision, in the event of a German invasion of Britain, to use stop lines to counter the blitzkrieg tactics and to give time for the limited British armour to counterattack meant that infantry stop line defenders would have to face German armoured troops. Shell-proof pillboxes seemed to be the only solution to protect the limited number of infantry anti-tank weapons available, particularly the Boys anti-tank rifle. The challenge lay in constructing the pillboxes in time and ensuring that camouflage made them more effective.
In the only invasion alert (8 to 10 September 1940), the Taunton Stop Line only had about 25 per cent of the pillboxes completed and probably less than half of those were camouflaged. It appears also that many of the sites may have been compromised as the construction work in progress does not appear to have been camouflaged. Despite the major efforts of the camouflage officers, they could not keep up with the demands of the overall building programme and camouflage had to come second.
Baxter and Messel therefore appear to have visited the sites once the pillboxes were, partly or fully, complete to design the disguise. Where possible, they should have used ‘concealment by merging’, but in some areas, such as open river or canal banks, this would have been extremely difficult, and many pillboxes, as the sketches show, were disguised as buildings. Messel’s natural flamboyance seems to have steered him towards more complex solutions. His attention to detail was certainly later seen as excessive, both in the time and trouble needed to produce the effects and the subsequent requirement for care and maintenance.
Luckily, the defences were never put to the test, and German records subsequently showed that there had never been any consideration of the sort of attack on the South West that the Taunton Stop Line was designed to counter.Footnote 78 This was not known at the time, and, after the defeat of France in under six weeks, almost anything seemed possible. All available skills were required, and significant leeway given to the employment of people who did not fit naturally into the military. They brought new ideas, which were encouraged, but subsequent experience and realism caused some of the designs to be criticised. The preservation of these sketches provides a sidelight onto the vast undertaking of trying to defend Britain from invasion in the last months of 1940.
ACKNOWLEDGEMENTS
None of this would have been possible if Dennis Matravers had not preserved the drawings. The authors would like to thank Vera Mackay for ensuring that the framed drawings are also now in the public domain. Thanks are also due to Thomas Messel, for his confirmation of the identity of his uncle’s work, and Emma Howgill at Bristol Theatre Collection, who provided access and advice on their collection of Messel’s theatrical work. The authors would also like to thank the referees who suggested several improvements, resulting in the present paper.
SUPPLEMENTARY MATERIAL
To view supplementary material for this article, please visit https://doi.org/10.1017/S0003581520000293.
ABBREVIATIONS AND BIBLIOGRAPHY
Abbreviations
- BEF
-
British Expeditionary Force
- BTC
-
Bristol Theatre Collection, University of Bristol
- GHQ
-
general headquarters
- GSO
-
general staff officer
- HER
-
Historic Environment Record
- PRO
-
Public Record Office, The National Archives, Kew
- MMG
-
medium machine gun (normally a tripod-mounted, water-cooled, Vickers gun with a range of over 3.5km. Also referred to as VMG or VM on drawings)
- RE
-
Royal Engineers
- SFO
-
senior fortifications officer
- SHC
-
Somerset Heritage Centre, Taunton