

Ye haue a figure which takes a couple of words to play with in a verse, and by making them to chaunge and shift into others place they do very prettily exchange and shift the sence.Footnote 1
Sixty years ago, on 25 April 1953, probably the most influential scientific article of the twentieth century appeared. Its uninviting title, ‘Molecular Structure of Nucleic Acids: A Structure for Deoxyribose Nucleic Acid’, concealed the revolutionary discovery by the molecular biologists James Watson and Francis Crick of the structure of what became known as ‘the molecule of life’. The ‘radically different structure’ that they proposed for the salt of deoxyribose nucleic acid (DNA) had ‘two helical chains each coiled round the same axis’. ‘Both chains’, they wrote, ‘follow right-handed helices, but owing to the dyad the sequences of the atoms in the two chains run in opposite directions.’Footnote 2 When Bruno J. Strasser asked in the same journal fifty years later ‘Who cares about the double helix?’, he answered that it marked ‘an age of (lost) innocence, when youth, intelligence and self-assurance were sufficient to make great discoveries in science’.Footnote 3
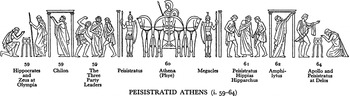
The same year also saw the publication of Herodotus. Father of History, written in the final years of his life by the Greek archaeologist and historian Sir John Linton Myres. With his archaeological perspective, Myres revealed how certain episodes in Herodotus' Histories were structured through ‘pedimental composition’, arranged like temple sculptures with the most important element at the centre framed symmetrically by other elements like pendant side panels. In particular, he showed how Herodotus' account of Pisistratus centred on the tyrant's sensational return enacting an epiphany of Athena in her chariot and was framed by parallel visits to Olympia and Delphi by Hippocrates and Pisistratus respectively with intermediate episodes set in parallel (see figure 1).Footnote 4 Myres was not alone in this visual approach. Five years later, across the Atlantic, the poet and classical philologist Cedric H. Whitman elaborated on the comparison between early Greek literature and art in his Homer and the Heroic Tradition. He identified the ‘principle of circularity, including concentricity, or framing by balanced similarity and antithesis’ as ‘one of the chief dynamic forces of Geometric vase design’.Footnote 5 He explained:
In the Iliad, the old device of hysteron proteron has been expanded into a vast scheme far transcending any mere mnemonic purpose, a scheme purely and even abstractly architectonic. Not only are certain whole books of the poem arranged in self-reversing, or balancing, designs, but the poem as a whole is, in a way, an enormous hysteron proteron, in which books balance books and scenes balance scenes by similarity or antithesis, with the most amazing virtuosity. The very serious question arises, of course, as to whether the audience, listening to an oral presentation of the poem, could possibly have caught the signs of such ‘fearful symmetry’, or whether it would have meant anything to them if they did. Granted that the procedure abba is useful in small compass to a singer, and perceptible as a structural unit to the audience, such can hardly be the case when ba is separated from ab by many thousand lines. Yet two things may be said regarding this point. The human mind is a strange organ, and one which perceives many things without conscious or articulate knowledge of them, and responds to them with emotions necessarily and appropriately vague. An audience hence might feel more symmetry than it could possibly analyze or describe. The second point is that poets sometimes perform feats of virtuosity for their own sake and without much hope of understanding from their audiences, for one of the minor joys of artistic creation is the secret which the artist buries in his work, the beauty (if such indeed it be) which he has deliberately concealed amid the beauties which he has tried to reveal and express.Footnote 6
‘Pedimental composition’ of the Return of Pisistratus in Herodotus' Histories. Source: Myres (n. 4), fig. 83.

The visual resemblance between the double helix and the chiasmus may be fortuitous, but both forms, despite or even through their movements in opposite directions, have a unifying role. In each the pattern of inversion may be more or less concealed. In both cases we are dealing not with ‘a stable structure, but a dynamic pattern; chiasmus has always translated its motion over the text it structured, or the space it generated’.Footnote 7
The tendency to observe such patterns in literature, in both individual sentences – ‘grammatical chiasmus’, ‘an arrangement of words in which the relative order of corresponding parts is reversed’Footnote 8 – and the arrangement of themes or events across a whole episode, book, or poem – ‘structural chiasmus’ – goes back to classical antiquity, when individual grammatical chiasms were flagged up as ‘rhetorical’ forms.Footnote 9 The first-century bc critic Aristarchus saw structural chiasmus in the exchange in the Odyssey between Odysseus and his mother, Anticleia, in the underworld, where Anticleia answered Odysseus' seven questions in exactly the opposite order.Footnote 10 This hardly accidental reverse construction is an elaborate version of what for Near Eastern literature has been called ‘concentric symmetry’ or sometimes ‘ring composition’.Footnote 11 When Cicero used the same reverse order to answer Atticus' queries, he did so ὕστερον πρότερον, Ὁμηρικῶς (‘in Homeric style, from last to first’).Footnote 12
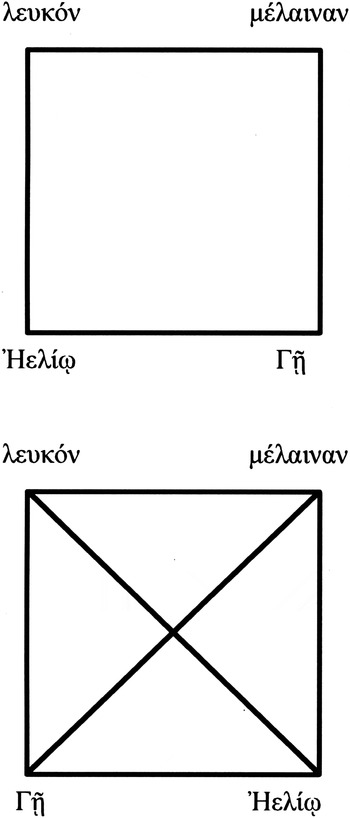
The term ‘chiasmus’ does not appear in rhetorical handbooks until the fourth century ad, when it is used of a criss-cross arrangement of clauses.Footnote 13 In the twelfth century, Eustathius, Bishop of Thessalonica, well immersed in this rhetorical tradition, recognized a grammatical chiasmus in the Iliad, but found it a
distorted and contrived figure, like those that are called periodic, chiastic and composed of four cola…the poet is confusing the sense more by arranging the four words like a Chi (X), as in the following diagram [see figure 2]. … The meaning is contrived, contorted and confused: the poet has imitated a man whose mind is disturbed and who is not at home in arranging words naturally.Footnote 14
Reconstruction of Eustathius' diagram to indicate Homeric chiasmus (based on the surviving manuscript). Source: after Lehnert (n. 14).

Eustathius clearly regarded the chiasmus as an anomalous figure in a literary context which needed a diagram. Despite the readiness of late critics to see such forms in earlier texts,Footnote 15 it is hardly identifiable in classical Greek literature. The two exceptions, Heraclitus and Plato, seem to have cultivated the device for their own purposes. The former used it programmatically as a stylistic reflection of his ideas of opposition and flux,Footnote 16 the latter as an alternative for Socratic speech to the antitheses favoured by the Sophist Gorgias.Footnote 17
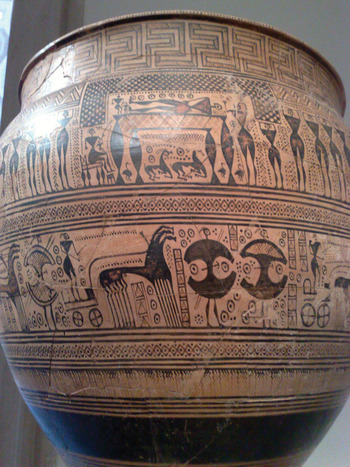
Since Myres and Whitman, many scholars have seen structural reversals or symmetries in classical literature, in the manner practised for Near Eastern texts since the sixteenth-century Jewish physician Azariah de Rossi and, more extensively, Bishop Robert Lowth's eighteenth-century identification of parallelismus membrorum in biblical texts.Footnote 18 More recently, however, critics have reacted against this trend and become more circumspect in identifying patterns of verbal or structural symmetry, laying down rules for where they may reasonably be identified in a medium where such inverted correspondences are not readily apparent.Footnote 19 Objectivity is repeatedly urged in the identification of chiasms in a text, with ambiguous cases excluded if in doubt. The most recent study suggests that three requirements need to be met: that the chiasmus be present in the text as it stands without resorting to unsupported emendation; that the symmetrical elements occur in inverted order; and that the chiasmus begins and ends at a reasonable point.Footnote 20 However, to understand how Plato and Heraclitus adopted a word order to which normal Greek sentence structure was unfavourable, it should not be forgotten that chiasmus is a visual metaphor, and it was in visual media that it was most visible and self-evident.Footnote 21 Whitman suggested as an analogue for Homeric poetry the friezes on vases of the Geometric period (see figure 3), whose symmetrical arrangements have been considered ‘a Semitic inheritance, like the alphabet’.Footnote 22 But it has rightly been objected that the repeated sequences of such representations cannot be considered as chiasmus.Footnote 23 Myres's suggestion of pediments is more promising.
Detail from the Dipylon Crater, Metropolitan Museum of Art, New York. Photo: E. V. Thomas.

Chiasmus in Greek temple pediments
Everyone knows that Greek temples are symmetrical, not only architecturally on both axes but also in the disposition of their sculpture in their pediments. But how were such reliefs read? In sequence, from left to right (ABC), right to left (CBA), or outwards from the centre (ABA)? Myres's comparison of Herodotean narrative with pedimental art raises a further question: how far should the inflected arrangement of figures and groups be explained by reference to bilateral symmetry, as is usually done, and how far should their arrangement be interpreted in the poetic or rhetorical terms of the chiasmus? To what extent is it possible to read chiasmus of this kind in artistic monuments and how far does doing so help us to interpret or explain them?
To modern eyes, the structural chiasms identified in Homer and Herodotus are nothing more than symmetry, but in the ancient world symmetria had a different meaning, relating to the commensurability of parts to one another and to the whole.Footnote 24 What we call symmetry corresponds to what ancient writers called chiasmus or antimetabole. Chiasmus has been regarded
as a form of inverted parallelism…that presents subjects in the order A, B, C and then discusses them C, B, A, sometimes using exact repetition, sometimes displaying the successive clauses by means of parallel syntax. The seed of chiasmus is to be found wherever framing devices, cyclic form, or symmetry are used.Footnote 25
Chiasmus can therefore be expanded to refer to ‘the use of bilateral symmetry about a central axis’.Footnote 26 But a distinction should be made. Symmetry, as it is conventionally understood, refers to an exact mirror image, equal in dimensions on each side; in so far as it can be called a chiasmus, it is a particular kind of arrangement in the form ABBA or ABCBA. Chiasmus, on the other hand, involves an inverted parallelism between two pairs of elements with the layout ABB′A′ or ABCB′A′, which creates the kind of criss-cross relation between parallel artistic elements that Eustathius describes for text. Chiasmus is said to occur
if the text exhibits bilateral symmetry of four or more elements about a central axis, which may itself lie between two elements, or be a unique central element, the symmetry consisting of any combination of verbal, grammatical or syntactical elements, or, indeed, of ideas and concepts in a given pattern.Footnote 27
This means that directly symmetrical forms can be considered not necessarily as instances of symmetria, which requires commensurability of the parts, but as particular varieties of chiasmus. Yet texts or artefacts shaped in the manner ABA cannot be considered true examples of chiasmus. What makes a symmetrical formation chiastic is the inversion of the relation between pairs or groups of figures.
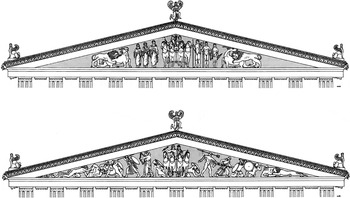
As in literature, chiastic patterns in Greek art do not follow a single set format. The pedimental composition envisaged by Myres resembles that of the sixth-century bc pediments of the Temple of Apollo at Delphi, where the centrepieces are the chariots of Apollo and Zeus (see figure 4). Surviving sculptures from the east pediment suggest that Apollo's chariot was flanked on one side by male statues, kouroi, and on the other by female, korai.Footnote 28 If this was the case, the composition did not show symmetry, hardly surprising as that concept was not articulated until the following century. But in so far as the male figures are inversions of the female it could be regarded as designed on a chiastic principle. The representation does not stop there, however. The kouroi and korai are placed between corner images of a lion fighting a bull and one fighting a stag. Little is known about the rest of the pediment, but there is no clear narrative or representational relation between the standing human figures in the middle of the pediment and the animal fights at the end. The west pediment is quite different, the figures (illustrating the gigantomachy) being as mobile as those of the east pediment seem static. There is no symmetry between the figures on each side of Zeus's chariot but, seen from the front, the sequences of action are reversed.
Reconstruction of the east and west pediments, Temple of Apollo, Delphi, c.530 bc. Source: drawing by Candace Smith, from Stewart (n. 28).

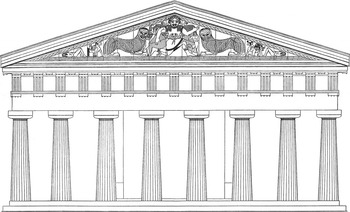
A different kind of chiasmus occurs on the somewhat earlier pediment from the Temple of Artemis at Corcyra (see figure 5). The figures are more symmetrical, especially the panthers on either side of the medusa head. There is no clear relation between the different elements of the pediment, so no clear inversion of that relation from one side to the other. But there is one striking inversion. On each side, towards the corner, a standing figure strikes a seated one. On the right, Zeus, king of the gods, administers justice with his thunderbolt against the Titan. On the opposite side, however, the seated victim is King Priam, his attacker Neoptolemus. The chiasmus shows us the young man's Titanic hubris.
Reconstruction of the pediment from the Temple of Artemis, Corcyra, c.580 bc. Source: after G. Rodenwaldt, Altdorische Bildwerke in Korfu (Berlin, 1938), end figure.

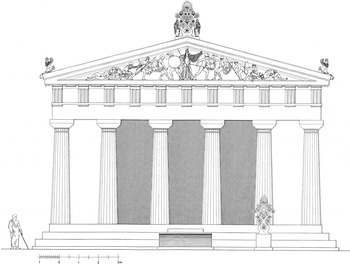
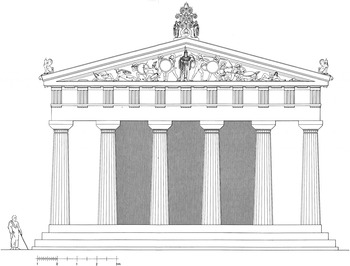
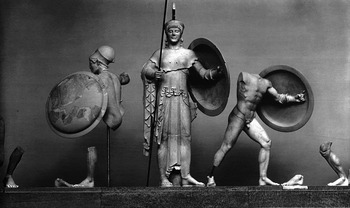
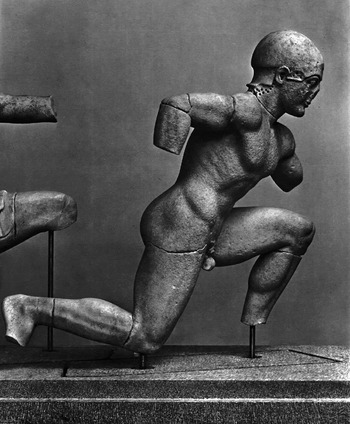
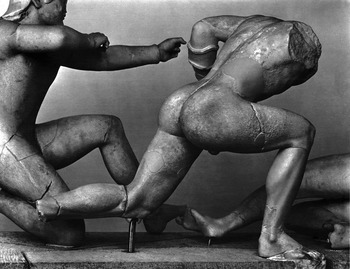
The difference between symmetry and the chiasmus is further demonstrated by the pediments of the Temple of Aphaia at Aegina (c.480–70 bc) (see figures 6 and 7). They appear to exhibit strict bilateral symmetry: reflected around the central image of Athena are the archers and hand-to-hand fighters defending Troy, on the east side under Laomedon, on the west under his son Priam. The chiasmus lies again in the reversed order of battle, overlooked both ways by the commanding figure of Athena. But there is a further inversion. The figures of the west pediment are not mirror images but rotations from one side to the other. Thus, while the two warriors to the left of Athena stand ‘shield side’ with their backs to the viewer, those to the right expose their unprotected flank. The whole representation is not, in fact, symmetrical, with the right half a reflection of the left, but one side is inverted as if to fold onto the other. The visual effect is to give more attention to Athena, around whom the figures seem to rotate (see figure 8). The best example of this avoidance of symmetry is the crouching figure with a shield on the left side of the pediment (W. XII), who from the front looks wholly different from the corresponding figure on the right (W. V, see figure 9) but is in fact in an analogous posture, concealed behind his shield (see figure 10).
Reconstruction of the east and west pediments from the Temple of Aphaia, Aegina, c.480–470 bc. Source: after Ohly (n. 29).

Reconstruction of the east and west pediments from the Temple of Aphaia, Aegina, c.480–470 bc. Source: after Ohly (n. 29).

Detail from the centre of the west pediment, Temple of Aphaia, Aegina. Source: photo by Franz Kaufmann, from Ohly (n. 29), Taf. 161.

Front view of crouching warrior from the right side of the west pediment (W. V), Temple of Aphaia, Aegina. Source: photo by Franz Kaufmann, from Ohly (n. 29), Taf. 108.

Rear view of crouching warrior from the left side of the west pediment (W. XII), Temple of Aphaia, Aegina. Source: photo by Franz Kaufmann, from Ohly (n. 29), Taf. 147.

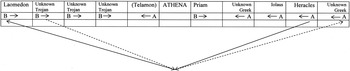
The same layout is followed in the east pediment, which shows a less rigid technique with more adventurous poses. In the central figure of Athena and the prostrate warriors at the ends there is even a move away from symmetry. The figures' allegiance is identifiable from the direction they face. On the left side, the Greek warrior Telamon beside Athena faces four Trojans including King Laomedon at the corner; on the right, the Trojan Priam turns toward four Greeks including the archer Heracles. The structure is therefore BBBBACBAAAA with Athena at the centre.Footnote 29 The individual combats – Heracles shooting Laomedon and the missing Trojan archer E. X shooting the corner figure E. VI – cross each other like the terms of a grammatical chiasmus (see figure 11). As with literary forms of chiasmus, the central divine figure has the special role of a ‘turning point’, on which attention is particularly focused, and is the ‘pivot’ at which the two halves fold onto each other.Footnote 30
Diagrammatic reconstruction of the east pediment, Temple of Aphaia, Aegina (E. V. Thomas).

The pediments of the Temple of Zeus at Olympia (see figure 12) present an arrangement of concentric symmetry, as envisaged by Myres. When observed as a whole, comparing figure by figure, the composition is rather symmetrical. But the figures should not be seen individually. In terms of the representation, they stand in relation to those beside them. Seen in this way, the two sides resemble the inverted halves of a grammatical chiasmus: on the east pediment stand the couple Hippodameia and Pelops, in the order female/male, but, beyond the pivot of Zeus, Oinomaos and Sterope, male/female.Footnote 31 Similarly, on the west pediment, the groups of centaurs raping Lapith women and centaurs wrestling with Lapith men are presented in inverted order on different sides of the central figure of Apollo, whose right arm extends to point the viewer's attention to the arrangement of the figures.
Reconstruction of the east and west pediments, Temple of Zeus, Olympia. Source: drawing by Candace Smith, from Stewart (n. 26).

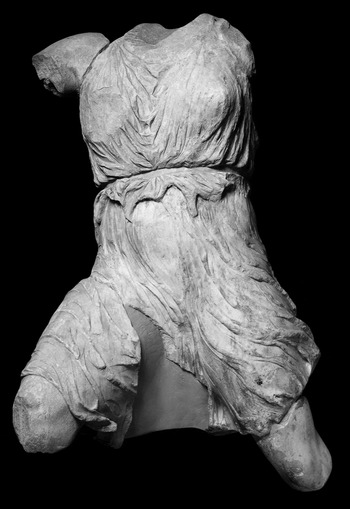
The pediments of the Parthenon show greater variety. The west pediment (see figure 13) presents a sequence of figures on one side and their counterparts on the other, in the basic format ABCC′B′A′. There is no single central ‘pivot’, but the central position is disputed, aptly for the myth, between Athena's olive tree and Poseidon's trident.Footnote 32 The balance between opposing halves is governed by the two central figures of Athena and Poseidon and accentuated by the exaggerated postures of their bodies, which lean away from each other symmetrically and are followed on each side by the horses of their chariots leaping towards them in almost synchronized fashion. There is no bilateral symmetry in the format ABCBA; correspondences between opposite sides appear through similarities in composition rather than equal distances from the centre. The inversion results from the formal rhetoric of the design, rather than a desire for symmetry. On the right side of the composition Iris (N, see figure 14), with her draped body twisting towards the centre and her purposeful stride resting on her left leg, mirrors Hermes on the left (H, with weight on the right leg, see figure 15). The similar physiognomy fits the analogous role of the two figures, sent by Zeus to resolve the dispute. The two messengers literally intervene between Athena and Poseidon and their charioteers, Nike and Amphitrite respectively, both seated and looking towards their masters. The two legendary families of Athens extend on either side, that of Cecrops on the left and that of Erechtheus on the right. The pediment as a whole is read not from left to right but outwards from the centre. The order of the two halves is chiastic inversion: on one side, Cecrops' family precedes the chariot of Athena, driven by Nike, and Hermes' intervention; on the other, the representational sequence – one should be wary of calling this a ‘narrative’ – is reversed, with the family of Erechtheus following Iris and Poseidon.
Reconstruction of the west pediment, Parthenon, Athens. Source: drawing by Marion Cox, from Palagia (n. 33), fig. 22.

Figure N (Iris) from the west pediment of the Parthenon, British Museum, London. Photo: British Museum.

Figure H (Hermes) from the west pediment of the Parthenon, British Museum, London. Photo: British Museum.

The east pediment (see figure 16) presents an alternative form of chiasmic disposition. Unlike the contested central point of the west pediment, the theme demanded a clear centre, although, because of the bombardment of 1687, its nature is unclear to us today. Technical considerations – the height of the space and the shallowness of the shelf on which the figure(s) would have stood – have suggested a flat group consisting of a standing Zeus, flanked by Athena and perhaps Hera (the so-called ‘Peplos Figure’).Footnote 33 Around this group, figures were arranged in a symmetrical or inverted layout but, whereas in the west pediment the figures are inversions of their ‘opposites’ and face each other, here some of the corresponding figures point in the same direction. Thus Selene and her horses at the north end of the pediment lean away from the rest of the figures and in the same direction as Helios and his horses at the opposite end. This style of representation reflects the fact that the figures on this side of the building, unlike those of the west pediment, interact in a sequential narrative, read from left to right. The direct parallelism makes the chiasmus not so much ABCB′A′, like the ABB′A′ manner on the west façade, as ABCA′B′.
Reconstruction of the east pediment, Parthenon, Athens. Source: drasing by Kostis Iliakis, from Palagia (n. 33), fig. 18.

Chiasmus and commutatio in Roman art
These arrangements in Greek pedimental art demonstrate how what are usually understood as symmetrical dispositions should rather be understood as chiastic. In the Roman world the chiasmus was far more prevalent. Philologists have found that the ‘criss-cross arrangement of words’ was very common in Latin literature.Footnote 34 It can be found on almost every page of Virgil's Aeneid.Footnote 35 The alternation of words in different cases is called commutatio.Footnote 36 The same term is used of the interlocking arrangement of two phrases, particularly in maxims such as Oportet esse ut vivas, non vivere ut edas (‘You should eat to live, not live to eat’), which was later twisted by Spike Milligan into ‘If I don't eat soon then I'll die. And if I die…then I won't eat soon.’Footnote 37 Quintilian calls this antimetabole (ἀντιμεταβολή), adding the jibe ‘Write quickly and you will never write well; write well and you will soon write quickly’.Footnote 38 Examples multiplied in the flexible word order and lapidary brevity of Latin;Footnote 39 and memorable modern parallels abound, such as J. F. Kennedy's ‘Ask not what your country can do for you, ask what you can do for your country’, Oscar Wilde's ‘Life imitates art far more than art imitates life’, and Dr Johnson's verdict on Lord Chesterfield: ‘This man I thought had been a lord among wits; but I find he is only a wit among lords.’ Until recently, however, scholars have seen little significance in such instances, usually attributing them to motives such as variety of expression, rhetorical emphasis or contrast, and metrical convenience.Footnote 40
There was a serious side to this. Chiastic formations were considered good rhetorical style. Quintilian argued that a literary work should begin and end in the same way, with similar material, and that smaller passages within the work should be similar, with the most important material sandwiched in the middle. Others argued that passages should be ‘mixed and tied together by their ends’.Footnote 41 Indeed, a readiness to frame sentences chiastically, with or without inversion, was built into Roman education. Children learned the alphabet by reciting the letters not just from alpha to omega, or from A to X, but also in reverse.Footnote 42 The practice of reading scripts not just from left to right but from right to left encouraged an ‘ambilateralism’ that failed to distinguish between left and right and preferred symmetry to asymmetry.Footnote 43 In short, the chiasmus is a figure that serves more than mere rhetorical variety. An art form in itself, it could also be a mnemonic device.Footnote 44 A recent study of the letters of St Paul has suggested that readers may have been attuned to the occurrence of chiasms in these texts ‘because of a much more highly developed consciousness of chiastic patterns resulting from its prevalence in the languages of their day’.Footnote 45 Others have argued, like Myres, that the chiasmus was intuitively felt and not consciously perceived until after reflection.Footnote 46
Individual examples show how this essentially visual device presents alternative readings of the text. When Aeneas and Turnus stand at the centre of a passage in the Aeneid, with the rank and file at the ends, the composition may signal a moment of crisis, the two great leaders lost within the ranks, much as Shakespeare later uses the figure to ask compelling and sometimes troubling questions about the relationships between his characters.Footnote 47 Yet visually they stand at the apex of a pediment, with lesser warriors to either side, central protagonists like Pelops and Oinomaus at Olympia. Conversely, when they stand at either end of a chiastic passage, the implied mirror image subversively highlights the interchangeability of the heroes.
Livy, too, uses chiasmus to form alternative views of the leading characters. Palatium Romulus Remus Aventinum…capiunt (‘Romulus occupied the Palatine and Remus the Aventine’, 1.6.4) suggests in its meaning an image of the two brothers on top of their respective hills; yet the layout of the four names traps the twins in the valley between – the Vallis Murcia, in Livy's day the Circus Maximus – and reverses the sense of the text to suggest that the hills ‘contain’ (capiunt) them. The chiasmus always has the potential to encapsulate conflict and rupture. The chiastic formula Ramnenses ab Romulo, ab Tatio Titienses appellati (‘[three centuries of knights were created,] the Ramnenses named after Romulus, after Titus Tatius the Titienses’, 1.13.8) intimates the original conflict between the leaders of these two groups who would now live together in harmony; the third century, the Luceres, whose own derivation was uncertain to Livy, is marginalized by comparison. Later in the book, at another moment of division, the inverted parallelism of the chiasmus is redeployed, again with ambiguity of sense: Sabini Capitolium atque arcem, Caelium montem Albani implessent (1.33.2). The meaning is that ‘the Sabines and people of Alba Longa filled the Capitoline and the Arx, and the Mons Caelius, respectively’. But the word order implies the opposite – that the Sabines and Albani are themselves filled by the hills. These times of conflict and division (ABBA) stand in contrast to other moments in Rome's early history, where the direct parallelism (AA′BB′) of Livy's language reflects coordination, for example of Romulus and Numa enhancing the growth of the city state, ille bello, hic pace (‘the former by war, the latter through peace’).Footnote 48
These constructions of topographical antimetabole show a spatial awareness of chiasmus that makes it valid to look for possible chiastic formations in architecture. In Vitruvius' De architectura there are two explanations of architectural symmetries, neither of which corresponds to what we recognize as symmetry today, although what we call a symmetrical disposition may be likely to arise from them. First, in Vitruvius' third book, came the division of the Ionic base into equal parts, achieved in the mason's yard through a geometrical design with compasses, so that a certain number of units would be assigned to each element of the base, making them a given proportion of the whole. Second, in the following book, the front of the Doric temple was divided arithmetically into a given number of parts, of which one was the module, and all other parts were calculated as a certain number of modules. The first design process was a geometrical procedure of repeated division, whereas the second was one of arithmetical calculation, necessarily involving fractions as well as whole numbers.Footnote 49
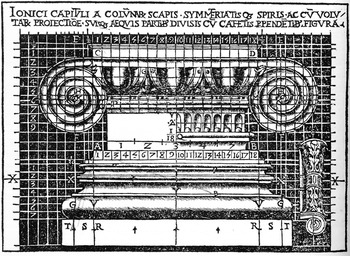
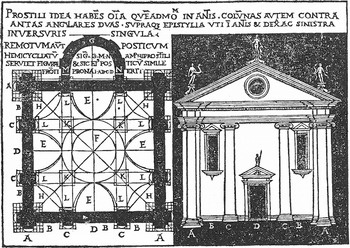
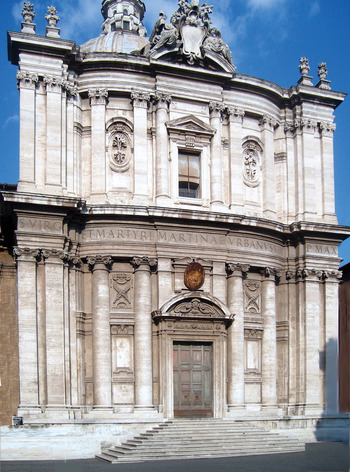
The first of these procedures had a potential for chiastic arrangement. In his illustrations of Vitruvius' text, published in Como in 1521, Cesare Cesariano explained the system of geometrical partitioning by annotating his diagrams of the orders with a series of grid lines, letter labels, and rows and columns of sequential numbers. His composite drawing of the Ionic capital and base ‘designed with symmetry and with parts divided equally’ (see figure 17) had the potential to convert symmetry from a proportional system to a mirror-image arrangement. His elevation and plan reconstructing Vitruvius' prostyle temple and temple in antis, though misconceived, made the chiastic arrangement explicit, dividing each façade into lettered elements consisting of the columns and pilasters and the walls in between arranged symmetrically (see figure 18).Footnote 50 The ABCDCBA taxis is a common spatial formula in Cesariano's illustrations, echoing the chiasmus pattern found in classical poetry and rhetoric just as the ABCBBCBA form resembles the octave pattern of contemporary sonnets.Footnote 51 But the chiastic form of plans on the page was also translated into built form. The façade of SS. Luca e Martina in Rome by Pietro da Cortona (begun in 1635; see figure 19) exhibits a chiastic reversal of pilasters and columns in its upper and lower stories, arranged on the upper level in the form AABBAA but on the lower as BBAABB.Footnote 52
Measured reconstruction of the Ionic capital and base according to Vitruvius. Source: Cesariano (n. 50), fo. l[v]iii verso.

Restored elevation of the prostyle temple according to Vitruvius. Source: Cesariano (n. 50), fo. lii verso.

Church of SS. Luca e Martina, Rome. Photo: Mario Castellani.

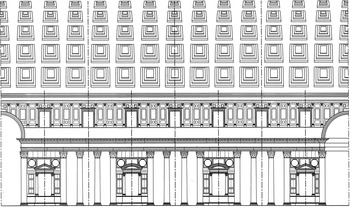
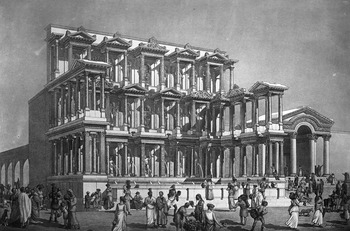
Cesariano had gone a stage further than Vitruvius, putting the symmetry into symmetria. But designers in antiquity had already started to draw out its chiastic implications. In the interior elevation of the Pantheon, surviving in Cortona's day, the orders were arranged to exhibit a similar alternation in the disposition of columns and pilasters on the ground and upper stories (see figure 20).Footnote 53 Around the same time, the syncopated arrangement of columnar elements in façades in Asia Minor reflected the same chiastic manner (see figure 21). The inspiration for this lay in contemporary rhetoric.Footnote 54 Just as in linguistic chiasmus ‘changes of cases, tenses, persons, numbers, genders, diversify and enliven exposition’,Footnote 55 so variation in architecture was offered by visual polyptoton, achieved by changes of order or material or changes of grammar, as for instance in switching between columns and pilasters.
Interior of the Pantheon, Rome. Source: Wilson Jones, (n. 56), 194, fig. 9.25.

Nymphaeum of Trajan, Miletus. Restored view by Julius Hülsen, 1901–10. Reproduced by permission of the German Archaeological Institute, Istanbul.

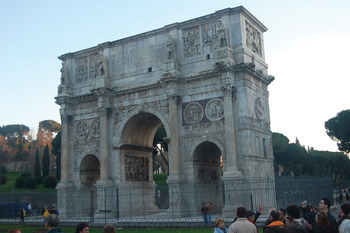
Constructions based on achieving symmetria in the ancient sense frequently resulted in formations that were symmetrical in our sense of term: a temple front can be considered as consisting of equal halves that were mirror images about a central axis. But the calculation of symmetria helped to produce symmetry in other types of building such as the triumphal arch, which were much more likely to have been based on arithmetical than geometrical calculations. The triple-arch structure of the Arch of Constantine (see figure 22), for example, was designed in a modular arrangement so that the smaller side arches and the larger central opening were proportionate to one another in a ratio of 2 : 3.Footnote 56 But if strict symmetry of an ABA kind was the intention, it was not reflected in the arrangement of the reliefs.
Arch of Constantine, Rome, north façade. Photo: E. V. Thomas.

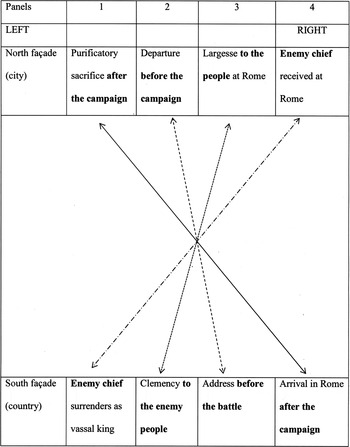
In fact, the attic reliefs, re-used from an arch of Marcus Aurelius, present a more complex chiastic arrangement. On the north face the scenes from left to right show: the emperor arriving in Rome after the campaign (the adventus); the emperor leaving Rome for the campaign (the profectio); the emperor distributing money, apparently in Trajan's Forum in front of the Basilica Ulpia; and an enemy chieftain being presented to the emperor, who sits on a tribunal. On the south face the scenes show, from left to right: the presentation of a captured enemy chieftain to the emperor at his camp, indicating a peace treaty and the installation of a vassal king (rex datus); enemy prisoners being brought before him; the emperor addressing troops before the battle (the adlocutio); and a sacrifice of a bull, pig, and sheep (suovetaurilia). When each attic frontage is viewed independently, it appears to show an AABB arrangement of themes grouped in pairs (north: arrival and departure scenes, tribunal scenes; south: reception of prisoners, rituals of war).
The replacement of the heads of Marcus by heads of Constantine reinforces how the resulting Constantinian arrangement was not a medley of spolia but intended to be seen as a unity, with correspondences between different elements of the group. Besides the well-noted distinction between the scenes on the north, inner façade (set inside the city) and those of the outer, south side (set outside the city on campaign), there is also a mirror correspondence between scenes on opposite faces placed directly behind one another. The arrangement can be shown in diagrammatic form (see figure 23). The surrender of the enemy chieftain (S4, on the west pier of the south face) clearly mirrors the presentation of the captured chieftain (N4); the common subject is reinforced pictorially by the common background of legionary standards. Panel N2 (departure for the campaign) is also a clear reflection of S2 (address to the troops before the battle). The other two pairs seem less clear, but if the lustratio (S1) is recognized not as the ritual of purification of the Roman army before the battle but as that taking place after the battle, as the victory wreaths above would seem to indicate, it is evidently the counterpart on the battlefield of the ritual adventus at Rome at the end of the campaign.Footnote 57
Arch of Constantine, Rome, folding arrangement of attic reliefs together on the monument. Drawing: E. V. Thomas.

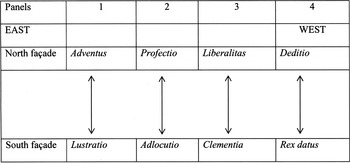
The two scenes N3 and S3 have caused the most controversy, with N3 particularly problematic. That panel is now seen as having depicted the distribution of largess by Marcus Aurelius and Lucius Verus in ad 177 after their triumph the previous year, the figure of Verus having been removed before the panel's insertion into the arch in order to fit the representation of a single emperor as Constantine.Footnote 58 But such a specific occasion did not fit with the re-use of the panels by Constantine, so in their re-used context they probably simply signified the general patronage of the emperor to Rome after his victory, corresponding to those appealing for clemency after the battle on the opposite face. The combination of the panels on the attic of Constantine's arch can thus be seen as a mirror image, with events outside Rome on the south face greeting those arriving in Rome through the Porta Capena and mirrored by images on the inner, north face of events in the city. The resulting formation – a flipped image on each side punctuated by the identical colossal figures of Trajan's Dacians – provides almost a perfect example of what has been called ‘the Fold’, characteristic of Baroque architecture, the line of inflection between the ‘exterior always on the outside’ and the ‘interior always on the inside’.Footnote 59 One might expect the frontages to have been composed analogously. Yet, if they are compared as they are seen, from left to right, the corresponding scenes are linked in a Chi form (see figure 24), reflecting the chiastic process of the design of the monument.
Arch of Constantine, Rome, chiastic arrangement of attic reliefs on north and south façades. Drawing: E. V. Thomas.

The presence of chiastic forms in Roman architecture went far beyond those buildings that were designed to exhibit symmetria in the Vitruvian sense. As a recent critic has argued, ‘chiasmus is the crossed building (tomb, temple, labyrinth), the crossed inside-out space of the agora, and the focal space of the hearth, where the manes issue forth ambiguous prophecies’.Footnote 60 Where we see rows of numbers in elementary times tables, ancient mathematicians identified a Chi formation,Footnote 61 and Roman architects were familiar with this. Curiously, the only instance in Latin of the word occurs in the writings of the Roman surveyors, where ‘the method involving chiasmus’ (referring to the intersection of two lines) was advocated to overcome the difficulty of establishing right-angled lines in rough terrain.Footnote 62
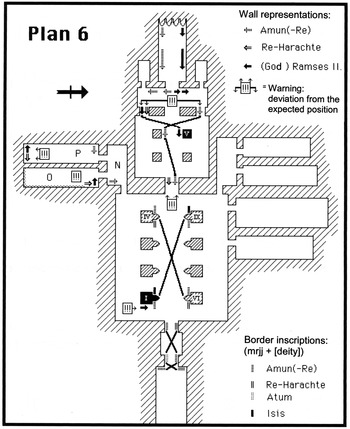
Can one then look beyond simple symmetry to observe in art the inverted parallelism that characterizes literary chiasmus? Such inversions have been observed at the Great Temple of Ramesses II at Abu Simbel in Egypt, where the decorative scheme of the inner sanctuary is arranged in a diagonal pattern. In the hypostyle hall preceding the innermost sanctuary and its vestibule, four statues on the Osiris piers projecting from the four outer piers of the hall are framed on the side by two lines of inscribed text in honour of Isis and Amun-Re, which begin with the title of the god and end with the divine formula (mrjj + divinity). The same formula is found on all four outer piers in two versions that are each repeated on piers that are diagonally opposite. Remarkably, however, the order in which the lines mentioning each god are inscribed on the diagonally corresponding piers is reversed. On the south-eastern pier the image of Amun-Re is on the left side of the Osiris statue and that of Isis is to the right, whereas on the north-western pier diagonally opposite this sequence is reversed. The images of Amun-Re and Re-Harachte on the north-eastern and south-western piers are similarly reversed. By linking the piers with corresponding inscriptions an X is produced, with each point of the X showing lines the same as at the opposite point but in reverse order. The arrangement of these lines is a chiasmus (see figure 25).Footnote 63
Great Temple of Ramesses II, Abu Simbel, plan of the inner sanctuary. Source: Loeben (n. 63), plan 6.

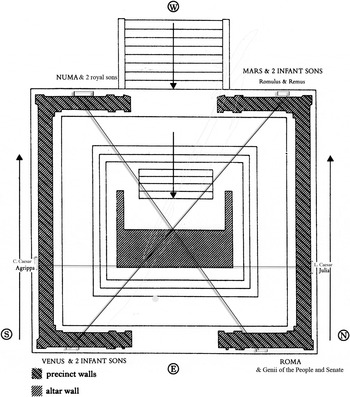
An example of such spatial chiasmus in Roman art lies concealed in one of the most famous Roman monuments, the Ara Pacis Augustae. As is well known, the two panels on the west front of the precinct wall form a pair, representing either Aeneas and Romulus as traditionally believed or, as recently argued, Numa and Romulus, models of peace and war respectively, between whom Augustus would pass as he approached the altar.Footnote 64 On the opposite, eastern front were two seated goddesses: on the right, northern side probably Roma, and in the left, southern panel a goddess of much-disputed identity.Footnote 65 Just as this latter goddess is flanked by nymphs of the air and sea, Roma was apparently flanked by genii, perhaps representing the Senate and People of the city.
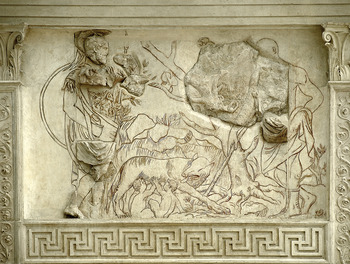
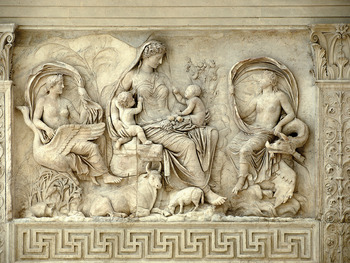
Less attention has been paid to the relation between the panels at diagonally opposite corners. The image of the twins Romulus and Remus on the north-west face (see figure 26) is answered on the south-east side by the image of two other infant children, carried in the lap of the goddess (see figure 27). The correspondence in the formal structure of the two scenes is emphasized by the framing figures on either side of the central tableau: in one case the two nymphs representing air and sea, in the other Mars and Faustulus. The correspondence is not just one of equivalence but also one of formal inversion. In the centre the goddess looks right, while the she-wolf bends her head back left; in the Romulean scene the central tree trunk bending left to shelter the wolf and children with a leafy branch swaying in the opposite direction mirrors the curve of the lady's veil and the counter-curve of the plant swaying towards the left-hand nymph. The vertical disposition of the central scenes is also inverted. Both sets of twins feed from a female figure, but, whereas on the west wall Romulus and Remus appear below the she-wolf, at the opposite corner the twins sit upon the lady's lap and above the animals. So, as at Abu Simbel, the arrangement is not just a correspondence but an inverted parallelism.
Too little survives of the Rome panel on the north-east face to understand its exact relation to the scene of Aeneas/Numa diagonally opposite, but it seems to have been composed similarly.Footnote 66 The two processional reliefs on the north and south sides are more obviously mirror images, with the line on the north side moving to the right and that on the south moving to the left so that both lines process in the same direction towards the entrance on the west front.
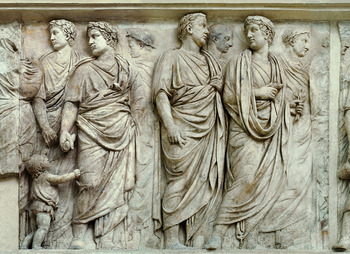
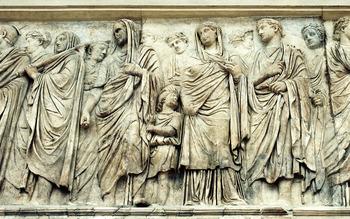
In literary works it has been noted that the employment of chiasmus is not gratuitous but helps to highlight or problematize key human relationships.Footnote 67 So, in the visual medium, the Chi form that links the ‘Tellus/Venus’ and Romulus and Remus reliefs with one arm (and Numa and Roma with the other) draws particular attention to the important ideological themes of the family and religious piety. The arms of the Chi fittingly intersect at the front of the altar (see figure 28). But this ideological meaning is further expressed by the spatial correspondence of key images on the side reliefs. The point of intersection at the front of the altar draws attention to a horizontal axis through the rear wall of the altar itself between the processional reliefs on the north and south sides, which passes from the figure commonly identified as Livia on the south side to a figure at the far left of panel N4 on the north side. We can no longer identify this second figure (N33) because the head was restored by Francesco Carradori in the late eighteenth century, but his significance is highlighted by the upward gaze towards him of a small boy tugging his toga (N35, see figure 29), analogously to the boy on the south side (S30) tugging the toga of Agrippa and looking up at Livia (see figure 30). The two boys, both wearing a short tunic with torque, have traditionally been identified as Gaius and Lucius Caesar, the sons of Agrippa and Augustus' daughter Julia. They are dressed for the Lusus Troiae of 13 bc, matching Virgil's description, including torques, in a procession that depicts the ritual celebration of that year in thanksgiving for Augustus' return from the West, although the monument was only completed in 9 bc, three years after Agrippa's death.Footnote 68 The two groups are arranged analogously, with the male leading, the child in the middle, and the female behind: on the south side, Agrippa, Gaius, and Livia (S29–32); on the north side, Julia, Lucius, and the unknown male (Lepidus?) (N33–6). Their location, at opposite points along the sides of the precinct and level with the rear wall of the altar, brings a thematic unity to the arrangement of the individual reliefs. Because the processions are mirror images, the parallel order of these two groups is in fact chiastic (male/child/female : female/child/male).
Ara Pacis Augustae, Rome, so-called ‘Lupercal Relief’. Photo: Charles Rhyne.

Ara Pacis Augustae, Rome, so-called ‘Tellus Relief’. Photo: Charles Rhyne.

Ara Pacis Augustae, Rome, plan. Source: after J. Elsner, ‘Cult and Sculpture: Sacrifice in the Ara Pacis Augustae’, JRS 81 (1991), 57, fig. 1.

Ara Pacis Augustae, Rome, detail of north frieze. Photo: Charles Rhyne.

Ara Pacis Augustae, Rome, detail of south frieze. Photo: Charles Rhyne.

The focal points of the panels on the east and west walls, to which the viewer's eyes are directed, are not the boys themselves but the fruits of the earth: the fruits on the lap of ‘Tellus’ and the patera with offerings held by the young camillus in the ‘Aeneas’ relief, whose other hand holds a jug in a gesture that echoes the central figure of the procession on the south side. What stood on the Lupercal and Roma reliefs can no longer be precisely determined, but enough is known to recognize a Chi form, linking thematically diagonally opposite panels: one arm of the cross connected the infants Romulus and Remus with the newborn progeny of the female goddess, while the other arm united the adolescent camilli performing a Roman ritual to guarantee peace with the youths representing the genii of Senate and People framing the goddess Rome. Intersecting these two extremes of childhood, the promise of birth and the consummation of adolescence, ran a horizontal cross-axis, which joined the intermediate ages of the boys Gaius and Lucius, the elder with his father, Agrippa, the younger with his mother, Julia. Chiasmus and cross-axis met at the altar itself, together reinforcing its message: childhood, fertility, peace, and security, achieved through the rituals of Rome, overseen by Senate and People, and guaranteed by the Augustan succession.
The inverted parallelism of the Ara Pacis reliefs prompts one to ask how common such chiasmus forms might have been in Roman art. A different kind of reverse parallelism can be seen in the back-to-back rounded cellae of Hadrian's Temple of Venus and Rome. In the Baths of Caracalla, the arrangement of the ‘Farnese Hercules’ and ‘Latin Hercules’ within the columnar screens on opposite sides of the entrance to the frigidarium shows how designers were preoccupied with antithesis and balance.Footnote 69 When Antonio da Sangallo the Younger discovered the statues in the sixteenth century, he observed that ‘the beautiful one’ (lo bello), the Farnese version, now in the Archaeological Museum in Naples was turned to face the frigidarium.Footnote 70 The Latin Hercules, now in the Royal Palace at Caserta, was not a mirror version, as once thought.Footnote 71 But might it have been turned the other way?Footnote 72 Too often modern reconstructions are based on modern, not ancient ways of viewing. The considerations raised in this article have revealed something of the mystery of the chiastic double helix and should lead us to ask more questions about how we read the decoration of ancient shrines, and how ancient Greeks and Romans did.