

Introduction
In Islamic literature and historical writing two main genres hold great importance in understanding and interpreting social, political, literary, cultural and religious matters. One of them is biographical dictionaries including accounts of the lives of the poets, sufis, statesmen, etc., which are known as tazkira (memorial, biography), and the other texts are manāqibnāma (hagiography, virtue books) that give precious information on the characters, sayings and miracles of a particular sufi or a compilation of sufis. Many authors produced numerous works from these genres, under different titles all around the Islamic lands, in Arabic, Persian and Turkish languages. While most of these texts have similar—or in many cases duplicated—data on the mentioned individual, quite a few of them are enriched with unique information on some of the contemporary celebrities. Only a very few of the myriad tazkira and manāqibnāma works contain illustrations.Footnote 1
One of these illustrated biographies is the Ṣafvat al-Ṣafā (The Purity of the Pure) (Shaʿbān 759 AH/July–August 1358 AD)Footnote 2 by Ismāʿil bin Bazzāz (d. 794 AH/1391–92 AD), also known as Tazkira-i Shaykh Ṣafī al-Dīn Isḥaq Ardabilī (The Biography of Shaykh Ṣafī al-Dīn Isḥaq Ardabilī). The hagiography gives detailed information on the life, sayings, virtues and miracles of Shaykh Ṣafī al-Dīn Isḥaq Ardabilī (b. 650 AH/1252–53 AD—d. 12 Muḥarram 735 AH/12 September 1334 AD, Ardabil), the spiritual founder of the Ṣafavid dynasty (r. 907–1148 AH/1501–1736 AD), which also makes this work a manāqibnāma.Footnote 3 The only known illustrated copy of the Ṣafvat al-Ṣafā is in the Aga Khan Museum Collection, dated Shaʿbān 990 AH/September 1582 AD,Footnote 4 which has fourteen illustrations. Measuring 35.2×22 cm, this unique manuscript was copied in Shirāz—one of the most important manuscript production centers of its time—during the reign of Ṣafavid Shāh Muḥammad Khudābanda (r. 1578–88).Footnote 5
The biographical sources and hagiographical accounts commonly state that Shaykh Ṣafī al-Dīn had been involved in religious practices since he was a boy and had searched for a spiritual leader (murshid) by traveling from town to town until he met Shaykh Zāhid Gilānī (d. 1301 AD) in 675 AH/1276–77 AD. Shaykh Zāhid treated Ṣafī al-Dīn very well and even gave his daughter Bibi Fāṭima in marriage to him. Before his death, Shaykh Zāhid designated Ṣafī al-Dīn to succeed him as the head of the Zāhidiyya order, which led to resentment among Zāhid's own sons and some of his followers. Nevertheless, under Ṣafī al-Dīn's leadership the Zāhidiyya order changed its name to “Ṣafaviyya” and it was transformed from a Ṣūfī order of local importance into a religious movement with significant political influence in Ardabil.Footnote 6 Although he was regarded as the founder of the Ṣafavid dynasty who established Shīʿism as the official religion of their state, Ṣafī al-Dīn himself was a Sunni of the Shāfiʿi madhhab.Footnote 7
Ibn Bazzāz al-Ardabilī Tavakkulī (Tuklī) b. Ismāʿil, the author of Ṣafvat al-Ṣafā, was a murīd of Shaykh Ṣadr al-Dīn (d. 794 AH/1391–92 AD), son and first successor of Shaykh Ṣafī al-Dīn. Information on his life and his family is very limited but his pseudonym “al-Ardabilī” hints that he was from this town and “Bazzāz” is a clue that he was probably a son of a textile merchant. His only known work is the manāqibnāma and tazkira of Shaykh Ṣafī al-Dīn, which was initially titled Mavāhib al-Ṣaniyya fi Manāqib al-Ṣafaviyya (The Second Gift in Safavid Hagiography) written for Ṣadr al-Dīn Ardabilī, and completed in 759 AH/1358 AD, twenty-four years after Shaykh Ṣafi's death. Ibn Bazzāz gives detailed information on the life of Shaykh Ṣafi in this voluminous work, starting with his birth, lineage and education. He describes Shaykh Ṣafi becoming a follower of Shaykh Zāhid, the circumstances of his succession, the daily activities of his lodge, his ideas, doctrines, sayings, virtues and miracles (karāmāt), and his death; the work concludes with chapters about his successors and their miracles after he died. The text also provides some information on contemporary politics, social life and religious movements in an account of the relations of the shaykh with the secular rulers in the period of the Īl-khāns.
The Ṣafvat al-Ṣafā appears to have been the main source of the Ṣafavid chroniclers for the early period of the dynasty, and its numerous manuscripts and Turkish translations prove the popularity of this important hagiographic work.Footnote 8 The text, however, was rewritten and dramatically altered in 1533 during the reign of Shāh Ṭahmāsb (r. 1524–76 AD). The author of the new version, Shīʿite jurist Abu'l-Fatḥ al-Ḥusainī (d. 1568–69 AD),Footnote 9 added a preface and an appendix and wrote that the Ṣafavids had descended from the seventh Imām Mūsā al-Kāẓim, thus producing an “official version” of the origin of the Ṣafavids. He stated in his preface that he had “received royal command to revise and correct the Ṣafvat al-Ṣafā” since the work existed in time only in versions corrupted as a result of dissimulation (taqīya) or of falsification by Sunnite antagonists.Footnote 10
The Ṣafvat al-Ṣafā has an introduction (muqaddima), twelve chapters (bāb) and an epilogue (khātima). Each chapter has numerous sections (faṣl) which include multiple short episodes (hikāyat). Many copies in Persian as well as Turkish translations—either complete or partial—have survived to the present.Footnote 11 The most complete version bears the name Tazkira of Shaykh Ṣafī al-Dīn.Footnote 12 This copy was inscribed by the distinguished calligrapher Shāh Muḥammad Kātib,Footnote 13 probably in the sixteenth century. The earliest Turkish version is named Tazkira.Footnote 14 The only known illustrated Ṣafvat al-Ṣafā, which will be introduced here, also bears the name Tazkira.
The Features of Aga Khan Ṣafvat al-Ṣafā
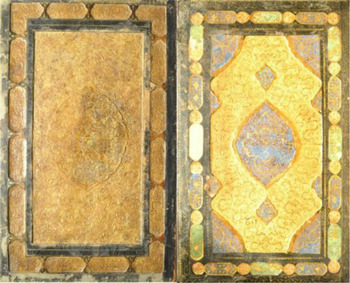
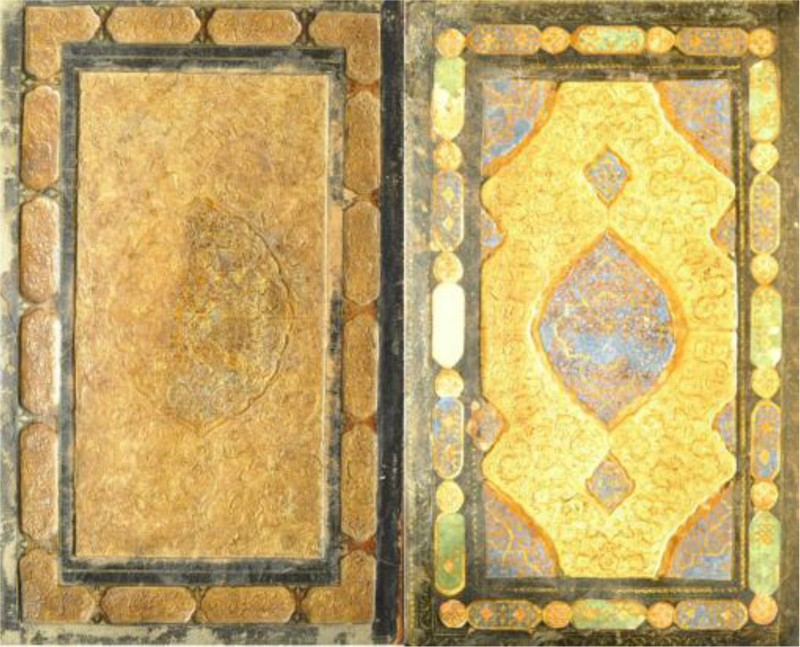
The brown leather binding of the Aga Khan Ṣafvat al-Ṣafā is probably original in terms of style and patterns (see Figure 1). The outer cover has a decoration of a gold-painted central design with stamped cloud bands, rosettes and small hatāyī motifs on spiral branches. The borders have cartouches within which the same ornamental pattern is stamped. The doublures have a classical center-piece, corner-piece and border design in which gold-painted paper filigree pieces are fixed on blue, green and orange fields.Footnote 15 This cover and doublure design may be traced in many Ṣafavid leather bindings throughout the sixteenth century from the Shāhnāma of Shāh TahmaspFootnote 16 to a Quran from Ṣafavid Shirāz dated 988 AH/1580–81 AD.Footnote 17
The outer cover of the binding and the doublure.
Source: Ibn Bazzāz, Ṣafvat al-Ṣafā (Tazkira of Shaykh Safi al-Din of Ardabil), 1582, Safavid Shirāz, Aga Khan Museum 264. Image courtesy of the Aga Khan Museum, Toronto.
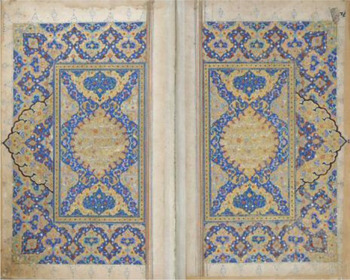
There is a double-page illuminated frontispiece on folios 1b–2a (Figure 2). The tripartite linked medallion layout of the illumination with a full medallion in the center and half medallions above and below demonstrate an example of a widely used design in sixteenth-century Shirāz manuscripts.Footnote 18 A thin frame surrounds this vertical rectangular field while the borders of the illumination are wide, with a hasp ornament. A rounded triangular medallion in the middle of the side border projects to the outer margin. The dominant colors are gold and blue, with red, light green, pink, yellow and orange. The main motifs are cloud-bands, spiral floral scrolls, palmettes and rūmīs. In addition to the illuminations, the 509 folios of the manuscript are framed with series of ruling in various widths and colors.
The double-page illuminated frontispiece.
Source: Ibn Bazzāz, Ṣafvat al-Ṣafā (Tazkira of Shaykh Safi al-Din of Ardabil), 1582, Safavid Shirāz, Aga Khan Museum 264, f. 1b-2a. Image courtesy of the Aga Khan Museum, Toronto.

In Ṣafvat al-Ṣafā, the experiences, ideas, miracles and sayings of Shaykh Ṣafī are given in chronological order. The extraordinary and supernatural events that happened following his death are also mentioned in the book.Footnote 19 This detailed narration is reflected in the visual program of the manuscript, representing the Shaykh as the protagonist of most of the illustrations. He is sometimes accompanied by Shaykh Zāhid, while in some pictures others such as his disciples and friends whose paths coincided with the shaykh are integrated into the depictions of various environments. There are only a few illustrations where Shaykh Ṣafī is not the main actor. All these narrative representations tend to visualize the text directly.
The fourteen illustrations in the manuscript occur in different chapters. The most illustrated one is the seventh chapter, where the miracles and prophecies of the shaykh are told in five sections. The first chapter, which is on the early years of Shaykh Ṣafī’s life, has three illustrations. The second, third, fourth, fifth, sixth, tenth and twelfth chapters have one illustration each while the eighth, ninth and eleventh chapters are without illustration.
The Illustrations of Ṣafvat al-Ṣafā
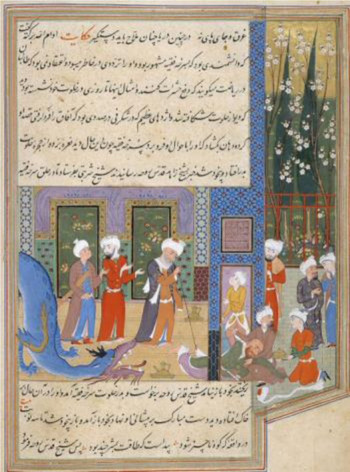
The first chapter, which is about Shaykh Ṣafī’s ancestors, the events at the beginning of his life and his approach to Shaykh Zāhid, has three illustrations. The first painting accompanies an anecdote about a miracle of Shaykh Zāhid. According to the story, a famous scholar named “Sorhe” (red-haired) Faqīh is suspicious about the pupils’ claims that they can repel insects and other creatures. One day while he is in seclusion (khalvat), a wall of his cell collapses and a dragon, entering through the gap in the wall, tries to attack him. Faqīh rushes out of the room and collapses from fright when he sees the dragon's mouth wide open. When Shaykh Zāhid is informed of this event, he goes to see Sorhe Faqīh, who is lying on the floor, and resuscitates him by putting his hand on his forehead. When Faqīh regains consciousness, and the Shaykh listens to the story, he realizes that the dragon was actually a creation of Sorhe Faqīh's mind and advises Sorhe to either fight with his “dragons” or take them to his grave.Footnote 20
In the representation of this story (Figure 3, folio 76b), a red-haired and red-bearded man (Sorhe Faqīh) is either running out of the door in panic or falling in the doorway as a blue dragon behind him lowers its head with its mouth open. An old man with a long stick in his hand, who must be Shaykh Zāhid, is standing calmly inside the room. Two possible disciples of the shaykh are in the room and a few onlookers are watching the scene from the courtyard. Sorhe Faqīh's turban is seen rolling along the ground as a detail showing his fear and panic.
Shaykh Zāhid saving “Sorhe” (red) Faqīh from the “Dragon of the Mind.”
Source: Ibn Bazzāz, Ṣafvat al-Ṣafā (Tazkira of Shaykh Safi al-Din of Ardabil), 1582, Safavid Shirāz, Aga Khan Museum 264, f. 76b. Image courtesy of the Aga Khan Museum, Toronto.

The painter seems to have decided to bind two phases of the story in a single scene. The initial act was Sorhe Faqīh's escaping from the room after the dragon appeared through a crack in the wall. The second act was Shaykh Zāhid's arrival on the scene to revive Sorhe. In the illustration Shaykh Zāhid is present when Sorhe is running out of the room, not when he is lying on the ground unconscious. Yet it includes the main elements of the story, with the dragon, the shaykh and the red hair and beard that gave the scholar his nickname.
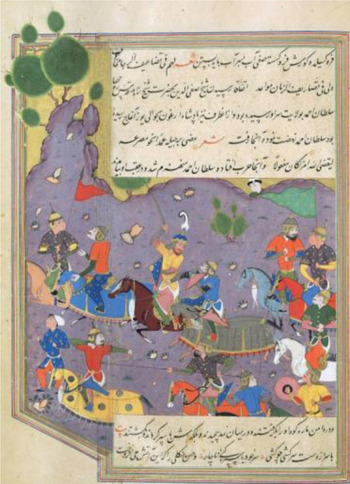
The second painting depicts the war between two Il-Khānid rulers: Arghūn Khan (r. 1284–91)Footnote 21 and his uncle Aḥmad.Footnote 22 The text relates the course of events that led to a war between these two men. The episode first tells of Sulṭān Aḥmad's relationship to Ḥasan Manglī, a regent of the Yaʿqubis, who envied Shaykh Zāhid and slandered him and his disciples, which brought hatred into Sulṭān Aḥmad's heart. When he heard that Sultan Arghūn was away on campaign, Sultan Aḥmad mobilized his own army, first marching towards Ardabil, where he was greeted by the notables of the city including Shaykh Ṣafī al-Dīn. There Ḥasan Manglī, believing that Shaykh Zāhid and his turbaned followers were among them, started to speak ill of Zāhid and professed his plans for his army to massacre Zāhid and all of his disciples after he returned from combat with Arghūn. When Shaykh Ṣafī heard this statement he rushed to relate this serious situation to Shaykh Zāhid, but found that his shaykh was already aware of it. By the time Shaykh Ṣafī had gone to warn Shaykh Zāhid, Arghūn's army had reached the city where the battle took place and Arghūn defeated his uncle. Sulṭān Aḥmad and Ḥasan Manglī were brutally killed on the battlefield.Footnote 23
The episode about the war does not give any details of the actual battle except that Sulṭān Aḥmad was beaten and killed, and Ḥasan Manglī was also killed by being thrown into a boiling cauldron. The text surrounding the painting gives a brief account of Aḥmad's defeat and death.Footnote 24 The picture accompanying the text (Figure 4, folio 85a) shows a battle scene where men on horses are fighting on a lilac-colored field. In the middle of the illustration two men are shown in close combat. Both of their horses are on the move and the man on the left is attacking another warrior behind him on an armored horse with a sword. The swordsman who has a white aigrette on his helmet might be Sulṭān Aḥmad whereas the cavalry following him is most likely Arghūn's. Apart from these figures, there are two horsemen holding banners in different colors, representing the two armies, and some anonymous warriors either in one-on-one combat or in pursuit with weapons like bows, spears and shields.
The war of two Il-Khānid rulers, Arghūn Khan vs. his uncle, Sulṭān Aḥmad.
Source: Ibn Bazzāz, Ṣafvat al-Ṣafā (Tazkira of Shaykh Safi al-Din of Ardabil), 1582, Safavid Shirāz, Aga Khan Museum 264, f. 85a. Image courtesy of the Aga Khan Museum, Toronto.

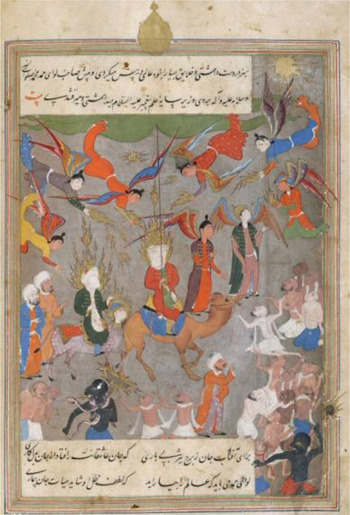
The last illustration in the first chapter is one of the most interesting paintings in the manuscript since it depicts the Prophet Muḥammad. The illustration is in the eleventh section, which is on the guidance of the Prophet who is a harbinger of the coming of the shaykh with his hadith “the person who saw me in a dream saw me correctly, for Satan has no power to come in my shape.”Footnote 25 The text surrounding the painting conveys the story from Pīr (elder) Saraj, whose father Pīr Ali Parniqī has seen the shaykh in his dream, holding a green staff in his hand and trying to bring order to a crowd, while Muḥammad Muṣṭafā stands by his side as he takes them under the shadow of the Prophet. The story then continues with a poem.Footnote 26
The painting (Figure 5, folio 115b) shows two veiled figures in the middle ground, one riding a camel and holding a long pole (that holds both a large green banner and a standard which extends out to the margin) and the other riding Burāq, the human-headed steed of the Prophet during his Miʿrāj, behind him. Each has a flickering nimbus surrounding his head signifying sanctity. On the middle left, two men are watching the riders as they move to a group of half-naked men in the lower part of the painting, who raise their arms as if they are asking for mercy. These half-naked people are apparently being tortured by two black divs holding flaming maces who are leading a similar group of men tied with ropes by their necks or wrists. A grizzly-bearded man can be spotted in the middle of the image between two groups of half-naked men. In the upper part of the illustration, six angels carry trays of light (nūr) over the veiled figures while two others—one probably Jabrāʾīl, who can be differentiated from rest of the other angels by his crown—are leading the riders to the right. A shining sun can be seen in the upper right corner.
Pīr (elder) Ali Parniqī’s dream of the shaykh with Prophet Muḥammad.
Source: Ibn Bazzāz, Ṣafvat al-Ṣafā (Tazkira of Shaykh Safi al-Din of Ardabil), 1582, Safavid Shirāz, Aga Khan Museum 264, f. 115b. Image courtesy of the Aga Khan Museum, Toronto.

In Islam, oneiromancy has been a traditional practice in which dreams are associated with mystical facility since the “true good dream” is a potential pathway to the divine.Footnote 27 Dreams in Islam carry a special authority as they communicate truth from the next world.Footnote 28 Dream episodes in historical and philosophical texts also have many religious and political functions as distinguished in classical and medieval sources.Footnote 29 The vision of Prophet Muḥammad in a dream is of particular importance since the above-mentioned hadith says that if the Prophet appears in a dream, it is a true dream, as is clearly emphasized in the title of this section in Ṣafvat al-Ṣafā. The eleventh section of the first chapter is a compilation of anecdotes about visions in which many respected and notable shaykhs have seen the Prophet in their dreams conveying various messages. In most cases the Prophet testifies to the truthfulness of Shaykh Ṣafī al-Dīn and praises his faith and devotion to sunnah, which show him to be the true leader of Islam. For instance, the anecdote before the one illustrated narrates Mavlānā Al-ʿAlim Bahā al-Dīn's dream in Tabriz where he has seen the Prophet referring to the disciples of Shaykh Ṣafī al-Dīn as followers of sunnah.Footnote 30 In this anecdote, a verse from the Sūra al-Najm is also quoted: “His sight never wavered, nor was it too bold” (53:17),Footnote 31 which gives the episode another meaning since this sūra is the one that contains verses implying the Miʿrāj, the night journey of the Prophet.
The Prophet's approval and validation of Shaykh Ṣafī al-Dīn as a true leader of Islam is emphasized and supported in this chapter by numerous anecdotes through various dreams. The painting accompanying this episode, on the other hand, includes only a few elements from the actual text while importing many other crucial components from the traditional representations of the eschatological and ascension stories.Footnote 32 First, let us consider the ascension elements of the illustration regarding its period. The usual Miʿrāj scenes in the sixteenth century show a veiled Prophet Muḥammad amidst the clouds, on his steed Burāq, preceding angel Jabrāʾīl. Sometimes, a Kaʿba representation is placed in the lower part of the painting.Footnote 33 The Ṣafvat al-Ṣafā illustration includes Burāq, Jabrāʾīl and angels, but excludes the clouds or Kaʿba; instead another veiled figure on a camel, a banner and a sun are included. The meaning of these insertions is one of the problematic issues with this painting. The initial thought is to define the rider of Burāq as the Prophet; but since Burāq is following another veiled and haloed figure on a camel who is larger in proportion—implying a holier person—this assumption is invalid. Moreover, the camel rider, who was described in the text as “the keeper of the banner,” referring to the Prophet, is holding a large green banner on a long staff. This leads to another question concerning the identification of the Burāq rider, which might be answered by considering the Day of Judgment elements in this painting.
Widespread consumption of eschatological accounts marked the year 1000 AH (1591–92 AD) as the “End of Time”;Footnote 34 therefore, many prophecies evolved in the sixteenth century, some of which were then illustrated with the visual elements of the apocalypse and the signs of its arrival. The Fālnāma (divination books) manuscripts, whose texts are often attributed to the Prophet Daniel, Imām ʿAlī and most frequently to Imām Jaʿfar al-Ṣādiq, include the scenes that depict the narrations for the Day of Judgment.Footnote 35
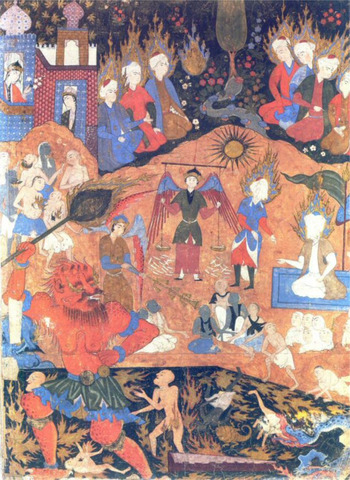
There are two extant paintings from the sixteenth century that bear richly illustrated iconographical features of the Day of Judgment narrations, both of which have some common elements. In the first one (Dresden Judgment) that is attributable to the 1550s, Qazvīn, the Prophet Muḥammad—veiled and haloed—is sitting on a carpet, under a green banner, on the middle right with another veiled and haloed figure standing in front of him, probably his cousin and son-in-law ʿAlī (Figure 6).Footnote 36 There are other significant figures like angel Isrāfīl with the trumpet that calls the souls to Judgment and Jabrāʾīl or Mīkāʾīl with the scale that is used to calculate the sins and the good deeds. In the upper part of this complex painting a glimpse of heaven is represented with domed architecture where women are present in a garden pavillion and men with nimbi over their heads (but with faces visible) are kneeling on either side of a small river flowing through the garden. In the middle section, groups of half-naked men and women are shown waiting either for their sins to be counted or for their punishment; and in the lower section sinners are burning in flames while a large div is carrying a flaming mace in his hand to torture them.
The Last Judgment.
Source: Fālnāma, 1550s, Qazvīn, SLUB Dresden, E445, f. 19b. Deutsche Fotothek/Regine Richter. Reproduced by permission of the Sächsische Landesbibliothek—Staats- und Universitätsbibliothek Dresden (SLUB).

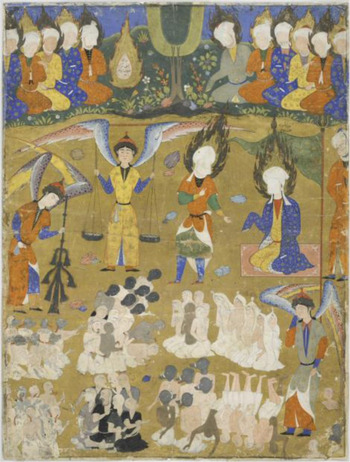
The second Day of Judgment scene (Harvard Judgment), that is attributable to mid-1550s and early 1560s Qazvīn, has elements similar to the first one with a few slight changes (see Fıgure 7).Footnote 37 Prophet Muḥammad's and ʿAlī’s position, Mīkāʾīl or Jabrāʾīl holding the scale, Isrāfīl with the trumpet, the groups of half-naked men and women with different facial and bodily features—which are representations of the narratives from the eschatological literature—are similar to the Dresden Judgment. The scene showing heaven is included in the upper part of the painting, but the faces of the haloed men are not visible, since they are either veiled or featureless. The exclusion of the div with the flaming mace and the architectural element in heaven are also notable.
Day of Judgment.
Source: Manuscript illustration from Fālnāma (Book of Omens), attributed to Aqa Mirak, Qazvīn, ca. 1555, (Harvard Art Museums/Arthur M. Sackler Museum, Gift of Stuart Cary Welch, Jr., 1999.302 (Photo: Imaging Department © President and Fellows of Harvard College); H: 58.5 cm; W: 43.7 cm). Reproduced by permission of the Harvard Art Museums/Arthur M. Sackler Museum.

When considering the Ṣafvat al-Ṣafā illustration, the ascension and Day of Judgment elements can be easily recognized although there is no mention of either in the text. Furthermore, the omission or inclusion of some other components like the camel rider and ordinarily dressed figures or the exclusion of the heaven scene make this depiction more complex. It is useful to turn to the text in order to identify the camel rider. The text clearly states the Prophet is “the keeper of the banner” and since the camel rider holds the green banner—which is one of the major elements from the Day of Judgment scenes and in some Miʿrāj scenesFootnote 38—he may be identified as the Prophet Muḥammad; though this is just a suggestion since there is not enough evidence to confirm it. Burāq's rider might, in this case, be ʿAlī, although he is represented neither in the appearance of a lion as in the traditional Miʿrāj paintingsFootnote 39 nor showing any attributes demonstrating his true self. When considering the Fālnāma depictions where ʿAlī is represented as the deputy of the Prophet in his human figure, it might be considered here to be depicted somewhat similarly. Yet, there are no other clues to prove this suggestion either; only his being one of the constituents of the traditional compositions of Miʿrāj and Day of Judgment scenes leads to this assumption.
Shaykh Ṣafī’s inclusion in the scene is yet another issue to be solved. According to the text, Ali Parniqī is the one who saw the dream and related it to his son. The two men behind the riders could be the father and son, as they are watching the whole scene. The orange-robed, middle-aged man in the middle of the painting might be Shaykh Ṣafī, although he does not hold the green banner as stated in the text, but is bringing the half-naked men under the “shadow of the Prophet.” A closer look will reveal that the two divs are only dragging some of the men who are tied with ropes while others are shown making pleading gestures, gravitating towards the camel rider. Therefore, Shaykh Ṣafī might well be the one who is taking these souls under the grace of the shadow, as is narrated in the quintet following the short episode.
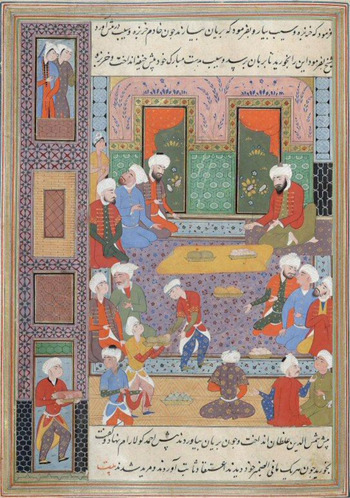
The most highly illustrated part of the manuscript, with four paintings, is the seventh chapter, which gives detailed information on Shaykh Ṣafī al-Dīn's miraculous deeds on many occasions, such as his intuitions on people's thoughts, his prognostication on events that would happen in the future, and his prophecies on death. The first illustration, which is in the first section of the chapter, accompanies the story reported to have been told by Muḥammad Tūlī. It is about Shaykh Ṣafī al-Dīn anticipating the wishes of his three visitors, Shams al-Dīn, Khanīfa Pūta and Aḥmad Kūlārām. They were on their way to visit Shaykh Ṣafi, talking about how they would like to adopt his creed. They decided each to think of something to request from the shaykh without telling him what it was and, if the shaykh discovered their individual wishes, to then respect his faith and become his disciples. Following this decision Shams al-Dīn decided to ask for a melon, Khanīfa for an apple and Aḥmad Kūlārām for roast chicken. When they were in Shaykh Ṣafī’s presence, he immediately ordered his servants to bring apple and melon and asked the three men to eat these first until the roast chicken was served. Since the shaykh sensed their wishes correctly, they believed in him and became his disciples.Footnote 40
The illustration shows an indoor scene in a two-storey house where many people are sitting on the carpets while young servants bring in the banquet (Figure 8, folio 318a). In the upper part of the painting, three men are sitting in front of Shaykh Ṣafī al-Dīn and two plates are placed on a piece of cloth between them. Since the story states what the men desired, melon and apples can be identified as the food on these plates. The third item, roast chicken, is being brought by a young servant into the room from the door on the left. The room is most probably Shaykh Ṣafī’s reception chamber and the three men in front of him are the newcomers. The illustration has a very strong word–image relationship since it shows all the necessary elements from the tale of the three men, thus making it easy to identify the scene. The artist, however, depicts a beautifully furnished room with two windows, a large carpet and decorated walls as well as many other visual additions such as the several other men and the servants, the women observing the feast from the upper floor window and plates of different kinds of food.
Shaykh Ṣafī al-Dīn's miracle on anticipating what his guests would like to eat.
Source: Ibn Bazzāz, Ṣafvat al-Ṣafā (Tazkira of Shaykh Safi al-Din of Ardabil), 1582, Safavid Shirāz, Aga Khan Museum 264, f. 318a. Image courtesy of the Aga Khan Museum, Toronto.

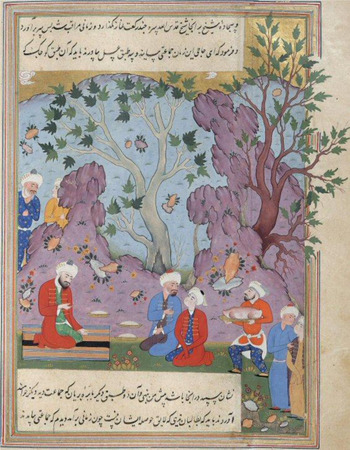
The next illustration in the seventh chapter is in the second section which relates various miraculous deeds that emanated from Shaykh Ṣafī. In this episode, the shaykh is on his way to a visit when he and his retinue stop in the forest to perform their prayers. After they complete the ritual, the shaykh talks about the arrival of two groups, one of them bringing three plates of honey and the other a tray of roasted lamb, of which he should have one plate of honey only but leave the rest of the honey and the lamb untouched. Sometime later two groups bring the anticipated food and the shaykh takes the small plate of honey while the other plates are not served. After a brief investigation, it becomes clear that the two plates of honey were sent by a suspicious person while the roasted lamb was already being taken to someone else which made them unacceptable. Thus, this incident indicates the shaykh's miraculous sense of future events.Footnote 41
In a mountainous landscape, Shaykh Ṣafī al-Dīn is sitting on a rug under the trees with two people in front of him. Two plates are set on the ground and a man is carrying a large tray with meat on it (Figure 9, folio 326b). The illustration depicts the episode after the shaykh has told his people about the upcoming treats with the plates of honey and the lamb. The young boys at the right-hand side of the picture may be some of his disciples and the trees are the visual representation of the forest that the group had entered.
Shaykh Ṣafī al-Dīn asking his disciples to accept honey from the villagers but not meat.
Source: Ibn Bazzāz, Ṣafvat al-Ṣafā (Tazkira of Shaykh Safi al-Din of Ardabil), 1582, Safavid Shirāz, Aga Khan Museum 264, f. 326b. Image courtesy of the Aga Khan Museum, Toronto.

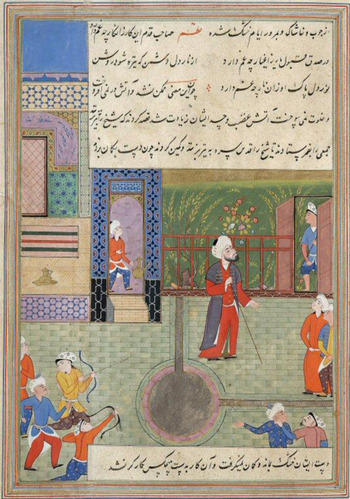
The fifth section of the seventh chapter, which relates other virtues of Shaykh Ṣafī, has two illustrations, one of which depicts the unsuccessful assassination attempt on Shaykh Ṣafī al-Dīn that accompanies the first—and probably the most important—episode in this section. The story relates the circumstances upon Shaykh Zāhid's death and the succession of Shaykh Ṣafī, which was a time of peace for almost three years until some opponents of the shaykh became angry and jealous over his increasing power and fame. They laid an ambush on Shaykh Ṣafī’s route to the grave of Shaykh Zāhid, which he used to visit every now and then, despite the warnings of his disciples. He believed that there was no way of escaping one's own destiny as set by God and therefore went on his way to his intended visit while Shaykhzāde Jamāl al-Dīn and other opponents argued over how they would assassinate Shaykh Ṣafī. First they planned to kill him in a fire by burning his retreat down after nailing the door shut in order to block the shaykh's exit. But they could not succeed as the flames were extinguished by the shaykh's spiritual power. Then they decided to kill him by shooting arrows and sent their best archers, but none of them were able to release any arrows as their hands were paralyzed by the power of the shaykh. Another attempt was to poison him, which also ended unsuccessfully since someone from the congregation warned the shaykh. Their decision to drown him at sea also failed when Shaykh Ṣafī refused to take the ship after having a vision of Shaykh Zāhid asking him to take the land route. Finally Shaykh Ṣafī al-Dīn had a meeting with Shaykhzāde Jamāl al-Dīn and told him that it was against God's will to assassinate him, but if he really wanted him dead, the shaykh would poison himself in order to make his wish come true. With these honest words, Jamāl al-Dīn was ashamed of what he had done and asked for forgiveness.Footnote 42
The painting depicts the assassination attempt using bows and arrows (Figure 10, folio 346a). Shaykh Ṣafī is seen in a courtyard by a circular pool with a stick in his hand. In the lower left-hand corner, two men with bows and arrows can be identified as the assassins for Shaykhzāde Jamāl al-Dīn, who might be the man in a blue robe behind these two. A few onlookers, a gardener at the garden gate and a servant inside the kiosk, are the other figures in the painting. The scene is a direct representation of the episode with the archers who seem to be unable to shoot since there are no arrows in the air although the bows are drawn. Shaykh Ṣafī on the other hand seems very calm and appears to be unaware of what is going on.
The unsuccessful assassination attempt on Shaykh Ṣafī al-Dīn.
Source: Ibn Bazzāz, Ṣafvat al-Ṣafā (Tazkira of Shaykh Safi al-Din of Ardabil), 1582, Safavid Shirāz, Aga Khan Museum 264, f. 346a. Image courtesy of the Aga Khan Museum, Toronto.

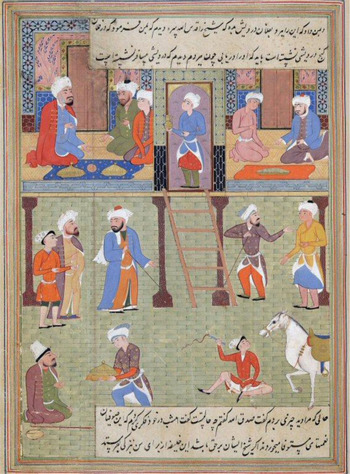
The last illustration in the seventh chapter accompanies the tale of the hungry dervish that is conveyed from Mavlānā Shams al-Dīn Aqmiyūnī. According to his story, ʿUmar Nāsr Ābādī was a guest at a banquet and he ordered his man to take a tray of rice and roasted chicken to a dervish. When the man came with the food, the dervish told him his story. He said that he was thinking of how rich were the meals of the sufis and wished for a benefaction which would be a sign of their shaykh's justice. Then as he slept that same night he saw the shaykh in his dream asking him if he would not respect the sufis unless they sent him gifts and telling him that he would send a gift the next day so that he would strengthen his prayers.Footnote 43
The illustration depicts the two phases of the story (Figure 11, folio 373a): the top part shows an upper level of a building constructed on columns and reached by a stepladder. A man, probably ʿUmar Nāsr Ābādī, sits on the left-hand side of the dining room with two companions while two trays of food and a loaf of bread are served to them. Below, the activities of the street are depicted with men talking and walking and a young boy scourging a horse. In the lower left-hand corner of the scene a dervish—identifiable from his headgear, a stick lying on the floor and a kashkūl at his side—is being brought a tray of food by a young servant. Since there is a lid covering the tray the contents are unknown.
The story of the hungry dervish.
Source: Ibn Bazzāz, Ṣafvat al-Ṣafā (Tazkira of Shaykh Safi al-Din of Ardabil), 1582, Safavid Shirāz, Aga Khan Museum 264, f. 373a. Image courtesy of the Aga Khan Museum, Toronto.

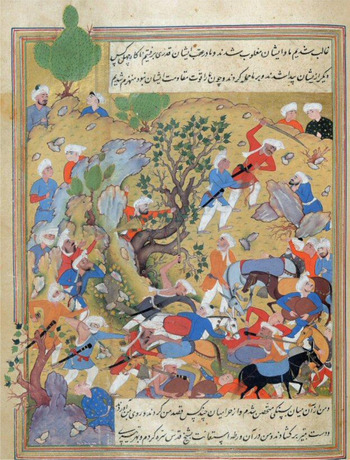
Although the seventh chapter of Ṣafvat al-Ṣafā is devoted to Shaykh Ṣafī al-Dīn's miraculous deeds, stories of his prophecies may also be found in other chapters. Some of these stories are illustrated whether the shaykh is actually represented or not. The first one is about Khvāja Amīn al-Dīn's caravan which is attacked by bandits, and tells how Shaykh Ṣafī rescues the caravan. The story is in the third section of the second chapter, about the shaykh rescuing people who experience major difficulties or suffer from various misfortunes. According to the story, Khvāja Amīn al-Dīn was traveling from Shirāz to Iṣfahān in a group of ten people when seven bandits laid an ambush in the mountains. After repelling the first blow, Amīn al-Dīn's companions followed them only to find that there were forty other bandits hidden and waiting. As the number of travelers was so limited, their defense collapsed. Amīn al-Dīn sat on a rock when the bandits aimed their arrows at him and he prayed for Shaykh Ṣafī to rescue them by calling “Shaykh help” (“Shaykh medet”). The arrows of the bandits hit the rock but not Amīn al-Dīn as he was protected by shaykh's spiritual power. In the end the thieves stole all the money and possessions of the travelers. When they tried to take those of Amīn al-Dīn, he told them that the owner of the fabrics and other things was the shaykh so the thieves did not touch them.Footnote 44
The picture illustrates the scene in a mountainous terrain where a large group of bandits are beating the travelers and taking their belongings (Figure 12, folio 136a). In this dynamic narration, bandits, many of them wearing masks, are aiming arrows or thrusting with swords while some of them are fighting with the travelers over the baggage. On the upper right of the picture, a black-bearded man, probably Khvāja Amīn al-Dīn, is hidden behind the rocks and is being approached by two men with swords. This could be the moment when he was praying for Shaykh Ṣafī’s help.
Shaykh Ṣafī al-Dīn saving the caravan of Khvāja Amīn al-Dīn from attack by the bandits.
Source: Ibn Bazzāz, Ṣafvat al-Ṣafā (Tazkira of Shaykh Safi al-Din of Ardabil), 1582, Safavid Shirāz, Aga Khan Museum 264, f. 136a. Image courtesy of the Aga Khan Museum, Toronto.

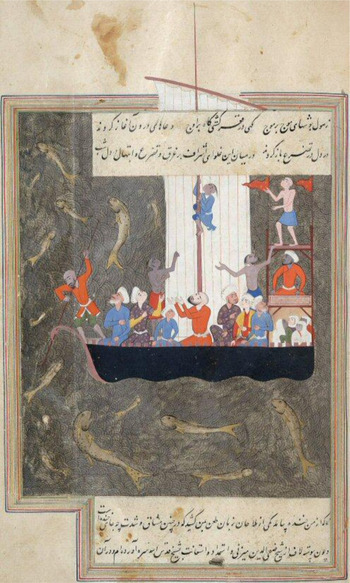
In another illustration, the power of the shaykh's miraculous guidance is depicted. This legendary tale tells of Khvāja Muṣṭafā during a sea journey when a fierce storm hits the ship. In a state of panic and pain, he prays that the shaykh will rescue them from that natural disaster and then falls asleep. Shaykh Ṣafī appears and tells them to veer right. Muṣṭafā awakens immediately to tell the captain to steer the ship to the right. When the captain resists this maneuver, Muṣṭafā explains that it was Shaykh Ṣafī’s instruction in order that they can escape from the storm. So the captain believes him, steers the ship to the right and they all reach the shore safely.Footnote 45
The illustration (Figure 13, folio 448a) shows the crowded deck of a sailboat with some significant individuals: a young boy climbing on the main mast, a man in the hawse hitting the sea with a long stick, a few women under the quarterdeck and a man in red sitting in the middle with open hands as if he is praying. Some half-naked sailors are depicted with troubled expressions while a few men on the deck are just sitting and watching. The picture most probably illustrates the moment when, just before falling asleep, Khwāja Muṣṭafā prays for the shaykh to help them. Shaykh Ṣafī is not depicted in this illustration, but his spiritual power is emphasized in the text.
Khvāja Muṣṭafā’s ship saved from the stormy sea with the miraculous help of Shaykh Ṣafī al-Dīn.
Source: Ibn Bazzāz, Ṣafvat al-Ṣafā (Tazkira of Shaykh Safi al-Din of Ardabil), 1582, Safavid Shirāz, Aga Khan Museum 264, f. 448a. Image courtesy of the Aga Khan Museum, Toronto.

Salvation from sea storms is a common legendary tale in religious texts as well as in hagiographic stories. In the “Acts of the Apostles” book of the New Testament, St. Paul's ship was struggling in a storm for days until one night he was visited by an angel who told him that the only way to survive was to run aground on some island. After following the angel's instructions they actually ran the ship aground and all were brought safely to land (27: 21–26). Another similar anecdote can be found in Savākib al-Manākib (Stars of the Virtues),Footnote 46 a hagiography on Mavlānā Jalāl al-Dīn Rūmī, in which a commercial ship on its way to Alexandria is caught in a whirlpool. All the passengers and crew ask for help from their saints whereas Kurd Kūnavī asks for help and salvation from Rūmī. Mavlānā appears in that very moment, takes the ship out of the whirlpool and sets it again on the sea by holding it with his bare hands, witnessed by everyone on board.
Although there are different aspects of these stories, such as storm vs. whirlpool and dreaming vs. summoning, the main theme of being rescued from a maritime disaster by a holy being is common. It is noteworthy that this miracle is depicted in both texts where the initial motivation behind these anecdotes might be traced to the legend of the Great Flood and Noah's Ark since the hagiographic literature generally refers to the existing religious context.Footnote 47
In the seventh section of the first chapter of Ṣafvat al-Ṣafā on the early years of the shaykh, there is another anecdote regarding a sea storm. Shaykh Ṣafī is actually present in that non-illustrated story, which is recounted by Pīr Nacīb Khanavī Ardabilī, who was traveling with Shaykh Ṣafī from Gīlān to Astarābād after meeting Shaykh Zāhid. They were on a ship when a storm broke; seventy people were on board suffering from the waves and the accompanying snowfall until Ṣafī took charge and brought the ship to safety.Footnote 48 It is interesting that the painter of the Aga Khan Ṣafvat al-Ṣafā chose to illustrate this anecdote in which Shaykh Ṣafī is not actually there, the possible reason being that it was in the tenth chapter, which related Shaykh Ṣafī's miracles after his death, and thus he might have decided to depict this later, otherworldly story instead of a mundane miracle.
Although this comprehensive multi-page manuscript has only fourteen illustrations, the themes include battle, caravan and naval scenes, various miracles, dreams, allegories and assemblies from the life of Shaykh Ṣafī and his disciples. In one of the illustrations Shaykh Ṣafī is shown in two states of being: one while dreaming and the other in his dream (Figure 14, folio 159b).
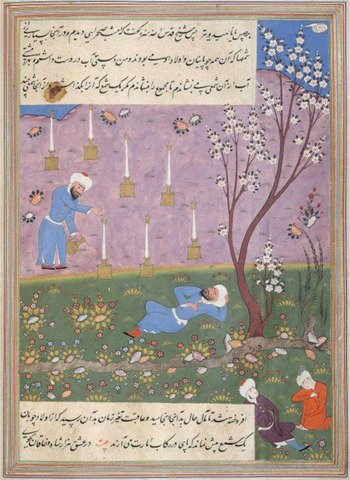
Shaykh Ṣafī al-Dīn's dream about the rise of the Chubanids.
Source: Ibn Bazzāz, Ṣafvat al-Ṣafā (Tazkira of Shaykh Safi al-Din of Ardabil), 1582, Safavid Shirāz, Aga Khan Museum 264, f. 486b. Image courtesy of the Aga Khan Museum, Toronto.

In the lower part of this two-layered picture Shaykh Ṣafī is lying on a green field by the river with his eyes closed. In the upper part, wearing exactly the same clothes—giving the clue that he is the same person—he is walking on lilac-colored ground, extinguishing candles with water from a ewer in his hand. The text that gives details of the shaykh's dream in the second section of the third chapter, which is on his miracles derived from jamāl (favor and kindness) and jalāl (wrath), indicates that the candles are the allegorical motifs of the Chūbānids (r. ca. 1336–53), who were about to rise after the fall of the Mongols. The shaykh says that in his dream he extinguished all the candles but one, hinting that one generation of the Chūbānids would be a threat.Footnote 49 The picture is interesting as it depicts dream and reality in one scene by integrating all the essential elements from the text.
In the fourth chapter of Ṣafvat al-Ṣafā on the sayings of the shaykh, his explanations of some of the couplets of distinguished poets and sufis were given in section four, which is illustrated with a single painting. The chapter includes the shaykh's interpretations of the various couplets related to Sufism, mostly from Rūmī, ʿAṭṭār, Kirmānī, as well as Mākī, Shaykh Aḥmad Jām, Sanāyī, Hākānī, etc. In this episode Shaykh Ṣafī reads a couplet by ʿAṭṭār on Zoroastrian temples and zarathustra in the temple in which he interprets the temple and the fire in it as the world of love where they worship fire and live in love. Then he continues with the theme of love and interprets love as love for God and if the prayer is practiced for the love of God, there is no fear in the disciple's soul while he is busy worshipping God.Footnote 50
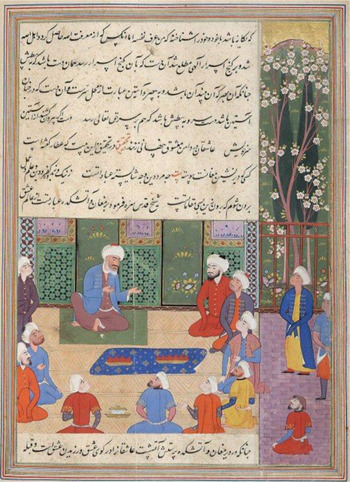
The illustration in this section depicts Shaykh Ṣafī al-Dīn sitting barefoot on a carpet in a preaching gesture with both arms up as if he is addressing his disciples. Ten people of different ages and varied clothing are staring at him while either sitting or standing inside the room and three more are listening from the courtyard (Figure 15, folio 243b). There is no direct element from the text referring to the couplet, nor is there any sign of Zoroastrians, but the address of the shaykh to the audience fits with the theme of the whole fourth section. The illustration could be integrated anywhere in this chapter and would still match the text since it is a general visual narration of the anecdotes and interpretations.
Shaykh Ṣafī al-Dīn interpreting for his disciples various verses by distinguished poets.
Source: Ibn Bazzāz, Ṣafvat al-Ṣafā (Tazkira of Shaykh Safi al-Din of Ardabil), 1582, Safavid Shirāz, Aga Khan Museum 264, f. 243b. Image courtesy of the Aga Khan Museum, Toronto.

The fifth chapter, which relates accounts of the shaykh's miracles in the rescue of animals, also has one illustration in its second section. The text tells about the shaykh's horse named Qulla that he was using either to ride or to carry his belongings. In Hashtrūd the villagers prepared a new horse for the shaykh. While he was mounting the new horse, Qulla ran after him in anger, biting the new mount. Qulla repeated this jealous behaviour despite the disciples’ ineffective attempts to stop him from hurting the new horse. Finally Shaykh Ṣafī stopped and put his saddle back on Qulla and thus the horse calmed down.Footnote 51
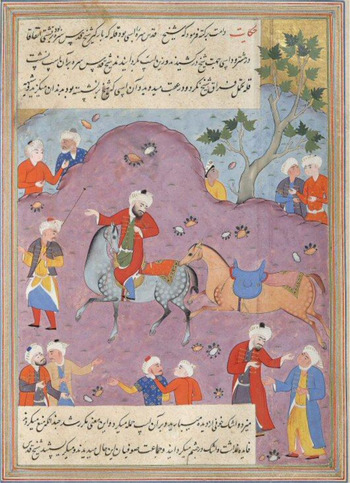
The illustration (Figure 16, folio 268b) shows Shaykh Ṣafī in the center of the painting, before a violet pink background, seated on a dappled blue horse, turning only to witness Qulla biting the new mount on its tail. The new horse turns his head in pain with his mouth open. A stableman is walking ahead, also turning to see what is going on between the two horses. The painting is a direct narrative of the text with all the essential elements present.
Shaykh Safi al-Din's favorite horse Qulla bites the newly acquired steed.
Source: Ibn Ibn Bazzāz, Ṣafvat al-Ṣafā (Tazkira of Shaykh Safi al-Din of Ardabil), 1582, Safavid Shirāz, Aga Khan Museum 264, f. 268b. Image courtesy of the Aga Khan Museum, Toronto.

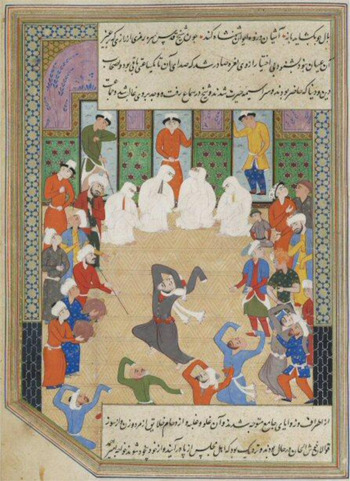
The sixth chapter of Ṣafvat al-Ṣafā is devoted entirely to Shaykh Ṣafī’s dance ritual (samāʾ), which is illustrated with a single painting depicting Shaykh Ṣafī dancing in ecstasy. The illustration accompanies the story of the preaching of Shamsa al-Dīn Tūtī at Rashīdī Mosque at Friday prayer where many statesmen, scholars and sufis were present. The hidden messages in Shamsa al-Dīn Tūtī’s morality speech were clear to the shaykh; therefore he first unconsciously screamed out with the power of comprehension, then started to whirl (samāʾ). The congregation watched with admiration while some of them joined him later.Footnote 52
The picture illustrates Shaykh Ṣafī’s samāʾ in the mosque (Figure 17, folio 280a) with many onlookers, including musicians playing def (tambourine with cymbals) and ney (reed flute), men of different ages, in different clothes, and a child. One of the most significant aspects of the depiction is the women wearing white jilbāb (burqa) watching the samāʾ together with men in the mosque. This distinctive detail demonstrates the place of women in religious practice in sixteenth-century Iran.Footnote 53 Shamsa al-Dīn Tūtī’s presence cannot be determined with certainty as there is no significant attribute to him within the text.
Shaykh Ṣafī al-Dīn dances in ecstasy after the preaching of Shams al-Dīn Tūtī.
Source: Ibn Bazzāz, Ṣafvat al-Ṣafā (Tazkira of Shaykh Safi al-Din of Ardabil), 1582, Safavid Shirāz, Aga Khan Museum 264, f. 280a. Image courtesy of the Aga Khan Museum, Toronto.

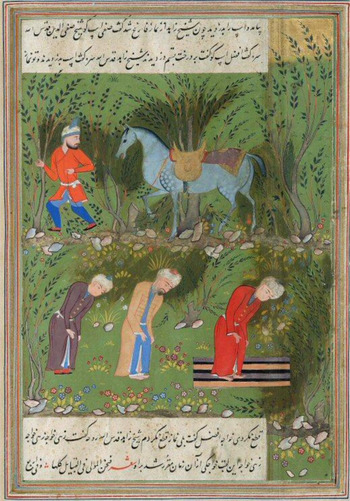
The last illustration of the manuscript is also a depiction of a miraculous deed including Shaykh Ṣafī, Shaykh Zāhid and Khvāja Afzal. This painting is in the twelfth chapter, which is on the prophecies of Shaykh Ṣafī al-Dīn's disciples. The episode tells the story of Shaykh Ṣafī, Shaykh Zāhid and their young follower Afzal passing through the forest of Gīlān. Shaykh Zāhid is riding a horse while the others are on foot. At the time for the daily prayer, Shaykh Zāhid commends his horse to Shaykh Ṣafī so that he can complete his ritual. Shaykh Ṣafī decides to join him and let Afzal keep an eye on the animal. Finally the young boy, also wanting to pray, ties the horse to a tree and joins the others. While the three of them are performing their religious rituals, a thief comes and steals the horse. After they have finished, the shaykhs ask Afzal where the horse has gone, and he answers that a thief has stolen it. They then question him as to why he did not stop the thief since he was aware of the situation and he replies that he did not want to quit praying so he ignored it. The shaykhs say, “congratulations, Khvāja,” which from then on became his pseudonym. The story does not end here, as the thief suddenly appears with his shroud wrapped around his neck pulling the horse. He grovels before Khvāja Afzal, claiming that the young boy prevented him taking the animal away by showing visions of sea, fire and swords, so he had no other choice than to bring back the horse.Footnote 54
The illustration depicting the thief stealing the horse and leaving the small group shows a green forest where three men, two of them beardless, bow in prayer in the foreground and a man pulling a horse by the rein in the background is going in the opposite direction (Figure 18, folio 486b). According to the text, the bearded man in the middle should be Shaykh Zāhid since he must have been the oldest while Shaykh Ṣafī may be the one on the prayer rug and Khvāje Afzal the one praying behind the other two.
A thief stealing the horse while Shaykh Zāhid, Shaykh Ṣafī al-Dīn and Khvāja Afzal pray.
Source: Ibn Bazzāz, Ṣafvat al-Ṣafā (Tazkira of Shaykh Safi al-Din of Ardabil), 1582, Safavid Shirāz, Aga Khan Museum 264, f. 159b. Image courtesy of the Aga Khan Museum, Toronto.

There is distinct over-painting of dark green on the heads of the men and the horse as well as on some parts of the forest. Those areas might have been erased and repainted afterwards since there are signs of relining on some of the contours and re-coloring of plants and flowers. It is important to note that there are no paint smudges on the opposite pages or any distinctive marks on the faces of the men. This addition seems to have been made by an inexpert hand, probably long after the production of the manuscript.
The Significance of the Aga Khan Ṣafvat al-Ṣafā
The Aga Khan Ṣafvat al-Ṣafā is a rare manuscript of the text, not just in being the only illustrated copy, but also as one that bears the date and the place of production, which is helpful in interpreting the style of the paintings. Regarding the general features of the manuscript, it is a fine example of the 1580s Shirāz workshops with its gold-painted leather binding, double-page illumination, blue, gold and red rulings on its 509 folios and neat Nastaʿlīq script with highlighted words and phrases in red, blue, gold or orange. The rich use of colors and elements in the illustrations adds more value to the already precious copy.
Some of the manuscripts that were produced in Shirāz in the 1580s are large, luxurious copies, with skillfully executed compositions that generally extend the picture over the margins by integrating the text into the paintings, and with great diversity of compositions.Footnote 55 The Aga Khan Ṣafvat al-Ṣafā follows some of these general characteristics with its broad range of topics and richly painted, decorative illustrations. Except for slight overflows on folios 85a, 115b, 136a, 326b and 448a, all the paintings are composed within the frame. The vibrant colors, the crowded compositions in which figures are shown from various angles and sometimes in embroidered clothes, the detailed and repetitive decoration on the surfaces, and the plain flora enriched with trees are the general stylistic features of the manuscript that have parallels with the 1580s Shirāz productions.
An interesting issue that is immediately discernible is the absence of the tāj-i haydarī, the male Ṣafavid headgear wrapped around a cap with a high central baton.Footnote 56 None of the figures bear tāj-i haydarī in any of the paintings of Ṣafvat al-Ṣafā,Footnote 57 which could be attributed to the preference of the painter(s) since many illustrated manuscripts are known to have excluded the tāj-i haydari in their headgear depictions.Footnote 58 While the lack of tāj-i haydarī is not questioned in these other manuscripts, it is a point of debate in Ṣafvat al-Ṣafā when considering the efforts made to “shīʿize” the text through the re-writing, re-phrasing and sometimes removal of data. Although the text was processed, the visual program of the manuscript did not seem to have undergone a similar transformation.
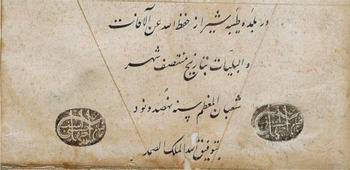
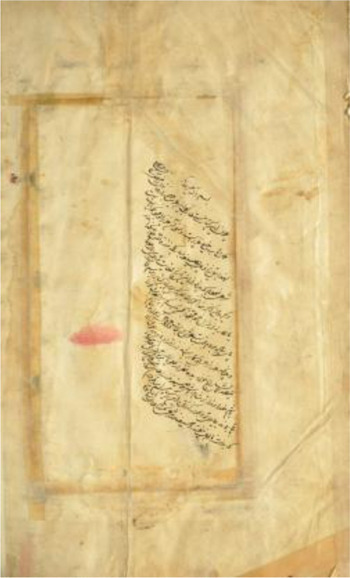
Another significance of the Aga Khan Ṣafvat al-Ṣafā is its records. On folio 509a, a seal is stamped twice on each side of the triangular colophon (Figure 19). The seal bears the date 1281 AD/1864–65 AD, and the name “Ṭahmāsb al-Husaynī” is written in the form of a ṭughrā. The sentence that follows the ṭughrā reads either “O guarantor of the imām of all time” or “O guarantor of the eternal days,” which leads to a dilemma regarding interpretation as to whether the name of the seal bearer was Ṭahmāsb or if he was commemorating the Ṣafavid leader. The phrase carries a double meaning, first evoking the twelfth imam—Mahdī—if the word is read as “imām” and secondly referring to God if it is read as “days.”Footnote 59 In any case, the content of the seal does not hint at a certain ownership; however, it implies an Ottoman attachment with the name written in the ṭughrā style. There is another record on folio 509b that reads in brief: “This book is very precious and it is a unique copy. Therefore, I am making the following vow that I will not sell this book. If I do, I will make the pilgrimage, and if I die before completing it, I will leave money for the Sayyids so that you (God) witness that I have kept my word” (Figure 20).Footnote 60 Again the name of this former owner is unstated.
The colophon with the seals.
Source: Ibn Bazzāz, Ṣafvat al-Ṣafā (Tazkira of Shaykh Safi al-Din of Ardabil), 1582, Safavid Shirāz, Aga Khan Museum 264, f. 509a. Image courtesy of the Aga Khan Museum, Toronto.

Note by a previous owner.
Source: Ibn Bazzāz, Ṣafvat al-Ṣafā (Tazkira of Shaykh Safi al-Din of Ardabil), 1582, Safavid Shirāz, Aga Khan Museum 264, f. 509b. Image courtesy of the Aga Khan Museum, Toronto.

For Shirāz manuscripts, the names of the patrons very rarely appear in the colophons, which shows that even the most luxurious and grandiose manuscripts were completed in advance in workshops, then sold to the owner.Footnote 61 This might be the reason why the colophon of Ṣafvat al-Ṣafā only includes the date and place of production but excludes any names. Most of the extant illustrated sixteenth-century Shirāz manuscripts are copies of Shāhnāma (Book of the Kings) of Firdawsī, Khamsa of Niẓāmī and other literary works by Jāmī, Saʿdī and Ḥāfiẓ, which were in great demand among the Ṣafavid and Ottoman elites.Footnote 62 The biographical writings—either tazkira or manāqibnāma—were also on the rise in the sixteenth century, yet illustrated copies of these were very few. The prevalence was in Shirāz, with many copies of Majālis al-ʿUshshāq (Assemblies of Lovers) by Kamāl al-Dīn Ḥusayn Gāzurgāhī,Footnote 63 the poet biography Tuḥfa-i Sāmī (Gift of Sām) by Sām Mīrzā, and the Aga Khan Ṣafvat al-Ṣafā, whereas in the Ottoman capital there is a single illustrated poet biography that was prepared in the sixteenth century, Mashāʿir al-Shuʿarā (The Signs of Poets) by ʿĀşık Çelebi,Footnote 64 and three illustrated manāqibnāmas.Footnote 65
The illustration cycle of the Aga Khan Ṣafvat al-Ṣafā seems to be very well organized with regard to choice of topics, diversity of compositions, its skillful execution and the strong text–image relationship. Except for a few paintings, all the illustrations depict the text directly where all the necessary elements and figures are present, like the embodiment of the “dragon of the mind,” the attack of the bandits, the jealousy of Shaykh Ṣafī’s horse, the attempted assassination of the shaykh, etc. The scenes in some of the illustrations become more understandable when the text is considered, namely folios 159b, 318a and 486b.
There are exceptions in this regard. The text-related image is not easy to identify for the shaykh's interpretation of sayings of important sufis (folio 243b) and the illustration with Prophet Muḥammad (folio 115b). The former illustration has a general compositional design that could have accompanied any other text related to Shaykh Ṣafī’s speeches or sermons. This must be the choice of the painter to depict him in the act of preaching, which is quite relevant when considering the theme of the chapter: the sayings of the shaykh.
When it comes to the depiction of Prophet Muḥammad in a combination of “Miʿrāj” and “Day of Judgment” scenes, it is more difficult to define the motivation of the painter. Going back to the Shirāz manuscripts, an answer can be found. From the fifteenth through the seventeenth centuries, depictions of religious subjects were used frequently in literature texts. Khamsa of Niẓāmī and Haft Awrang (The Seven Thrones) of Jāmī are the most common examples of this genre. In most Khamsa manuscripts the miʿrāj of the Prophet is represented at the beginning of the book.Footnote 66 This is relevant as the first masnavi, Makhzan al-Asrār, describes the Prophet's ascension. Moreover, in some Majālis al-ʿUshshāq copies, one of the first depictions is Ādam adored by the angels.Footnote 67 All these religious themes in illustrated manuscripts must have been familiar to the painter(s) of the Aga Khan Ṣafvat al-Ṣafā; therefore he must have decided to combine some of the components when it came to representing the dream in which Prophet Muḥammad is present. It is tempting to detect the addition of ʿAlī as an effort in “shīʿizing” the manuscript, but the idea cannot be supported with further evidence, as the rest of the illustrations do not have any attribute to support this assumption. On the contrary, the pictorial program of the Ṣafvat al-Ṣafā parallels the production of the Shirāz workshops of the last quarter of the sixteenth century.
Concluding Remarks
Aga Khan Museum's Ṣafvat al-Ṣafā is one of the modest yet precious samples of the period. In general it reflects the dominant style in Shirāz. The content of the text allows the painter(s) to implement the rich iconographic repertory of the region in the 1580s by designing different scenes for the important or remarkable events in Shaykh Ṣafī’s life.
In this neat and elegant copy for an unknown patron, there is evidence from the illustrations of the artist(s) being well aware of the use of traditional elements of Shirāz painting in the production of the day. These elements were brought together to accompany such a text probably for the first time. The general scheme of the illustrations is to stress the topic without referring to the usual intricate decoration. It is also clear that the artist(s) of the manuscript considered the contents of the narratives that were illustrated since a strong text–image relationship is apparent. When examining the general cycle of illustrations, the life, teachings and miracles of Shaykh Ṣafī seem to have been reflected where he is highlighted as both a scholar and a spiritual leader. This could lead to a presumption that the illustrated Ṣafvat al-Ṣafā could have been prepared as a tool of knowledge and learning.
The artistic manuscripts that were produced in Shirāz are known to have been popular among the Ottoman elites as witnessed by the Ottoman seals and/or ex libris in many of them.Footnote 68 It might be suggested that an illustrated copy of Shaykh Ṣafī’s biography could have been chosen to be prepared at that time in order to appeal to the Ottoman lands, which was a significant market for illustrated manuscripts. However, this cannot be strongly supported as there is only one known copy of Ṣafvat al-Ṣafā with miniatures.
Considering both the visible and the absent features, the Aga Khan Ṣafvat al-Ṣafā, as pointed out earlier, is a beautifully inscribed, elegantly illuminated, neatly illustrated manuscript that might have been prepared by special request, following the rules of its predecessors. Although, according to custom, the artists of the illustrated manuscripts produced in Shirāz were usually anonymous,Footnote 69 there are many luxurious Shirāz manuscripts that include the names of the artists, especially calligraphers, and sometimes the patrons are mentioned.Footnote 70 Thus, unique manuscripts like the Aga Khan Ṣafvat al-Ṣafā lets us consider the possibility that the production of such an exceptional illustrated manuscript followed a commission.
The biographical texts—whether those of tazkira or manāqibnāma—regard the accounts of the people who gain fame or recognition in their areas. Thus, the rare illustrated copies depict them accordingly. As the founder of the Ṣafavids and a successor of Shaykh Zāhid, Shaykh Ṣafī al-Dīn is an important figure and is therefore represented in the illustrations of the Aga Khan Ṣafvat al-Ṣafā with emphasis on his power and wisdom. The illustrations as well as the text may be considered as tools to commemorate him. Shaykh Ṣafī al-Dīn lives verbally and visually through this unique manuscript and his memory is transferred to future generations in many ways.