

INSTRUMENTUM DOMESTICUM
CHESHIRE
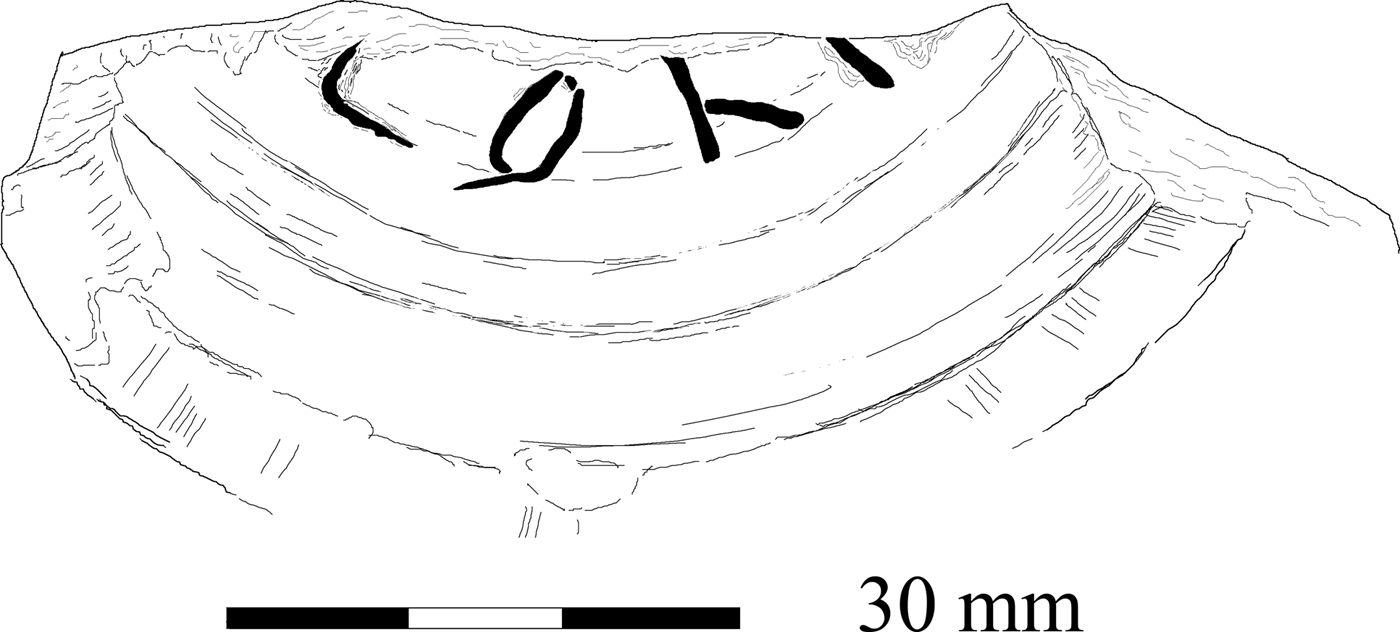
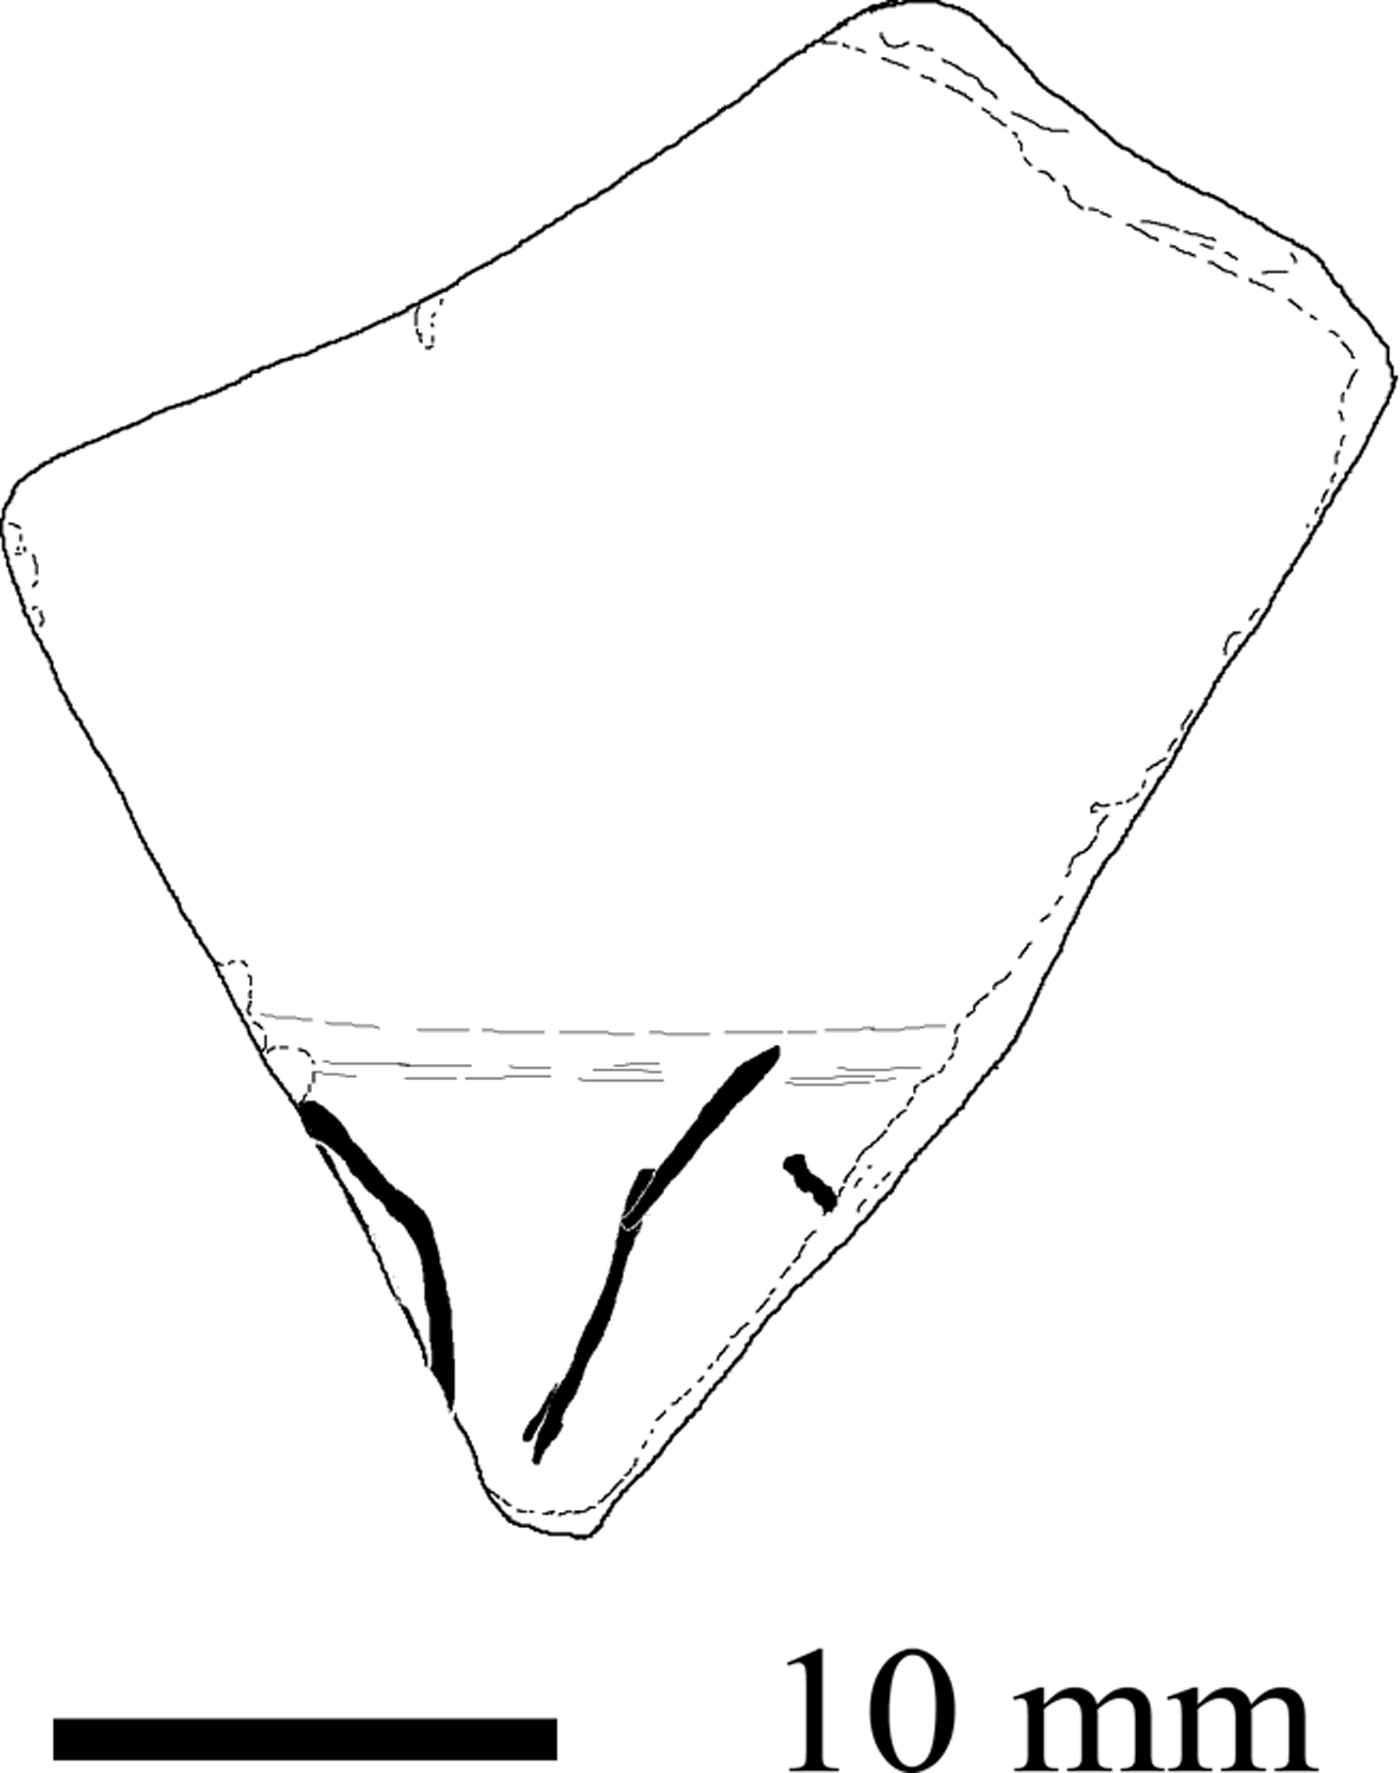
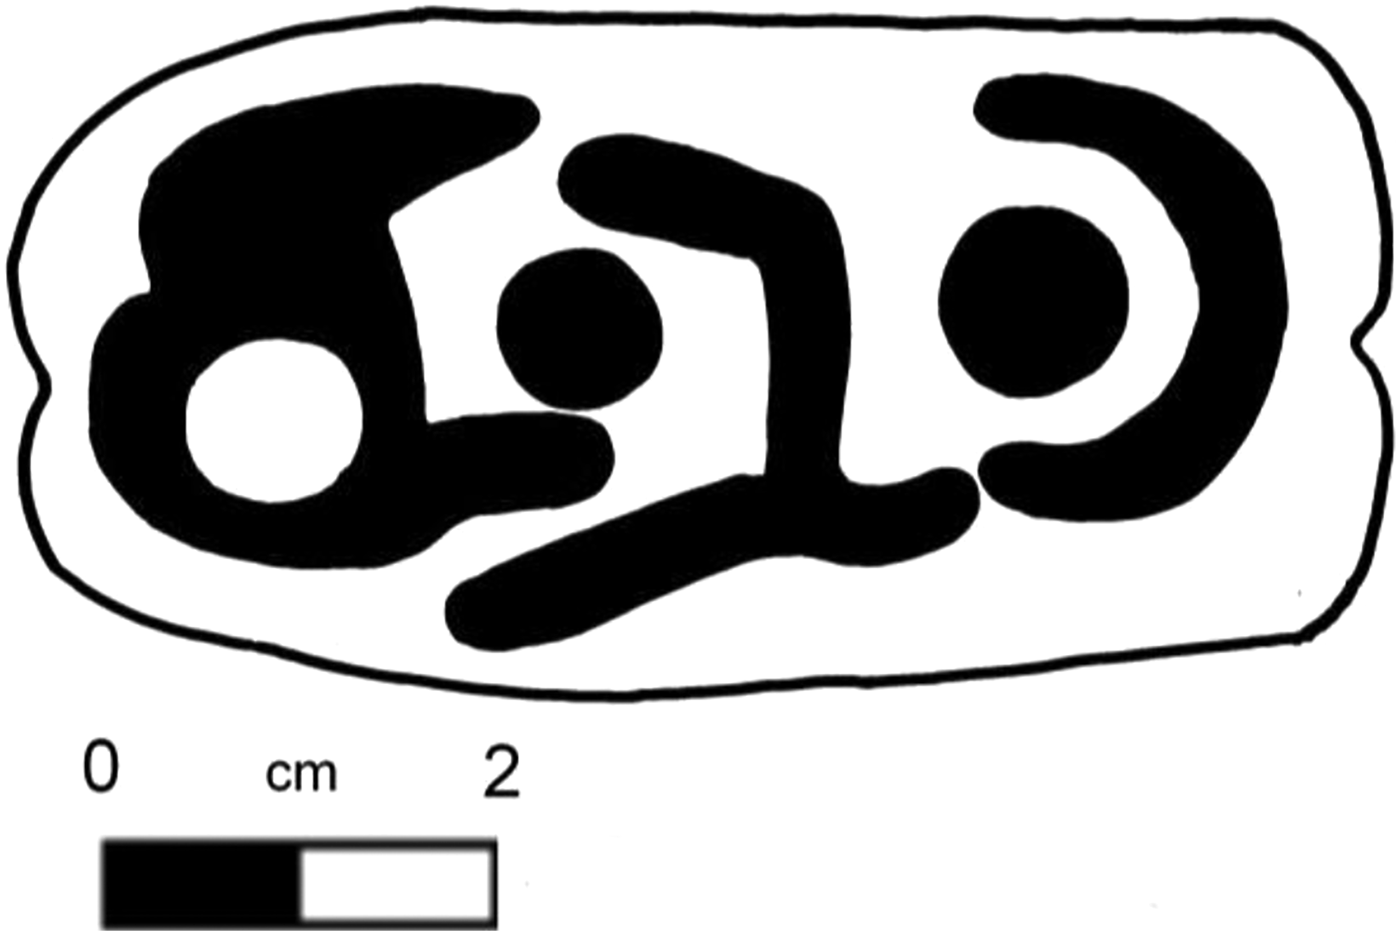
1. Chester (Deva, SJ 404 663), legionary fortress, in the extramural area outside the east gate (fig. 1). Base sherd of a samian dish (CG Drag. 31, c. a.d. 150–200), foundFootnote 2 in 1970. Incised after firing underneath, within the foot-ring: […]C̣OL.[…], perhaps [Agri]cola Footnote 3
Chester samian graffito (No. 1). (Drawn by R.S.O. Tomlin)

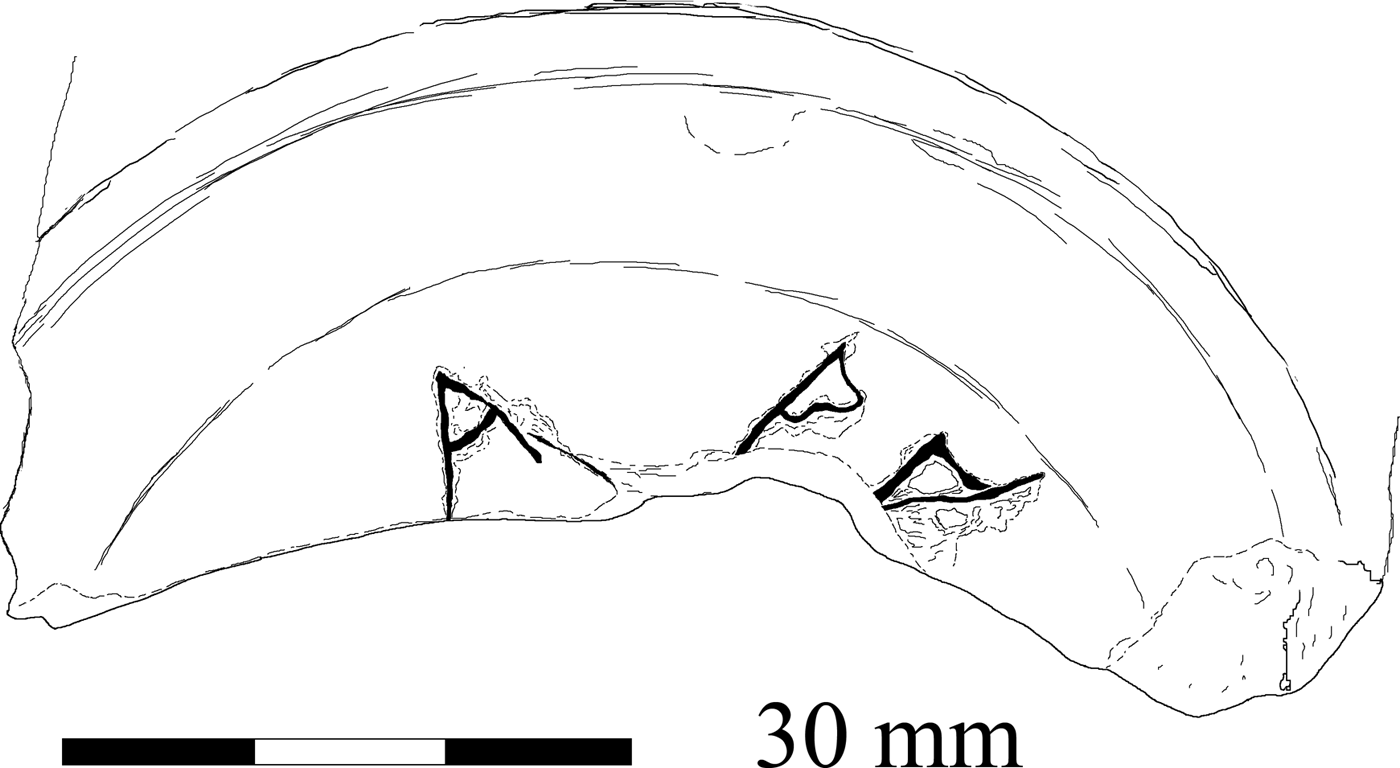
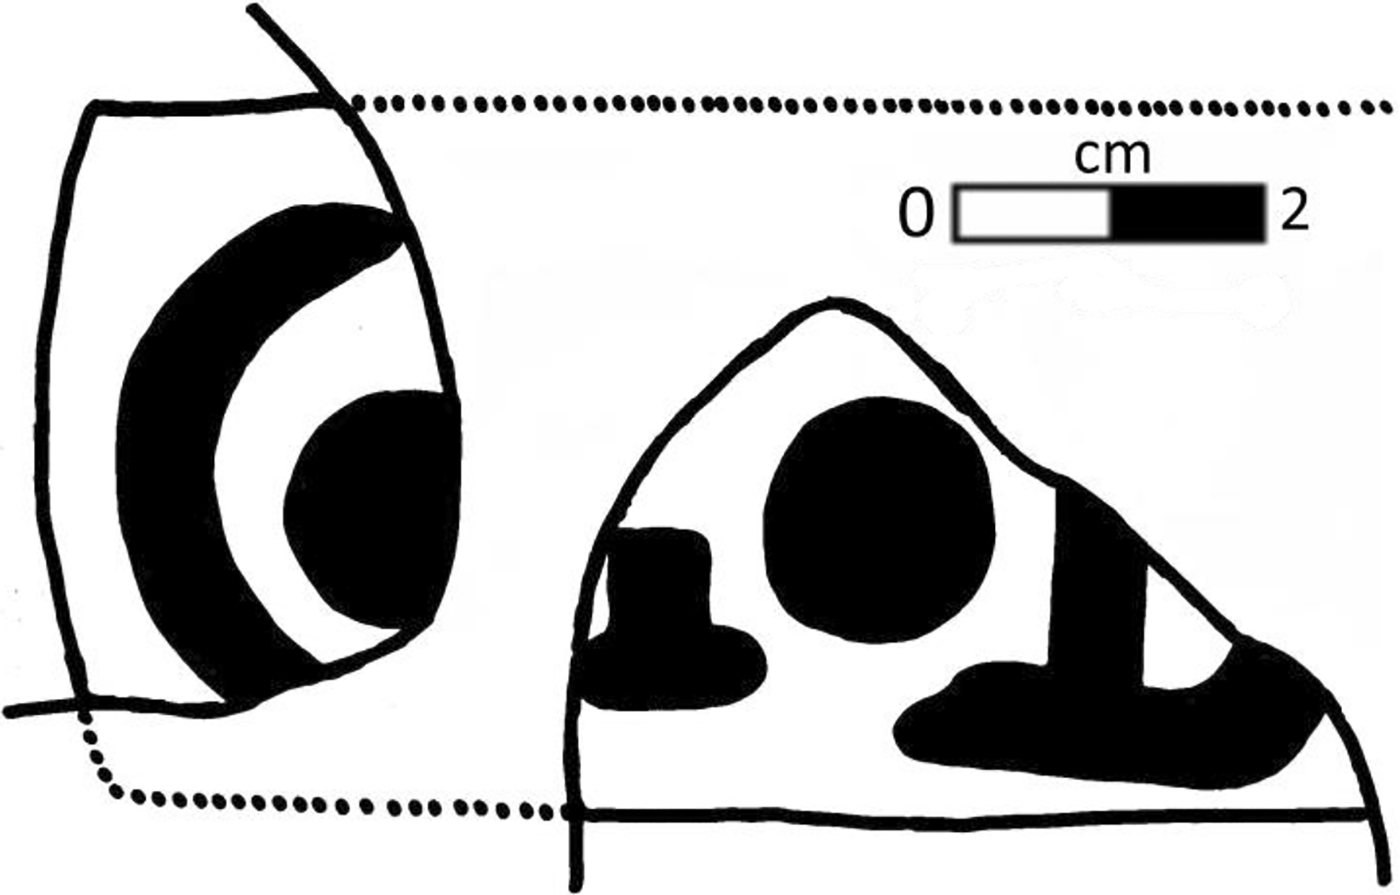
2. Ibid. (fig. 2). Base sherd of a samian bowl (CG Drag. 31R, c. a.d. 160–180/190). Coarsely incised after firing underneath, within the foot-ring: three letters, all incomplete; perhaps AP̣Ṛ[…], Apr[ilis]Footnote 4
Chester samian graffito (No. 2). (Drawn by R.S.O. Tomlin)

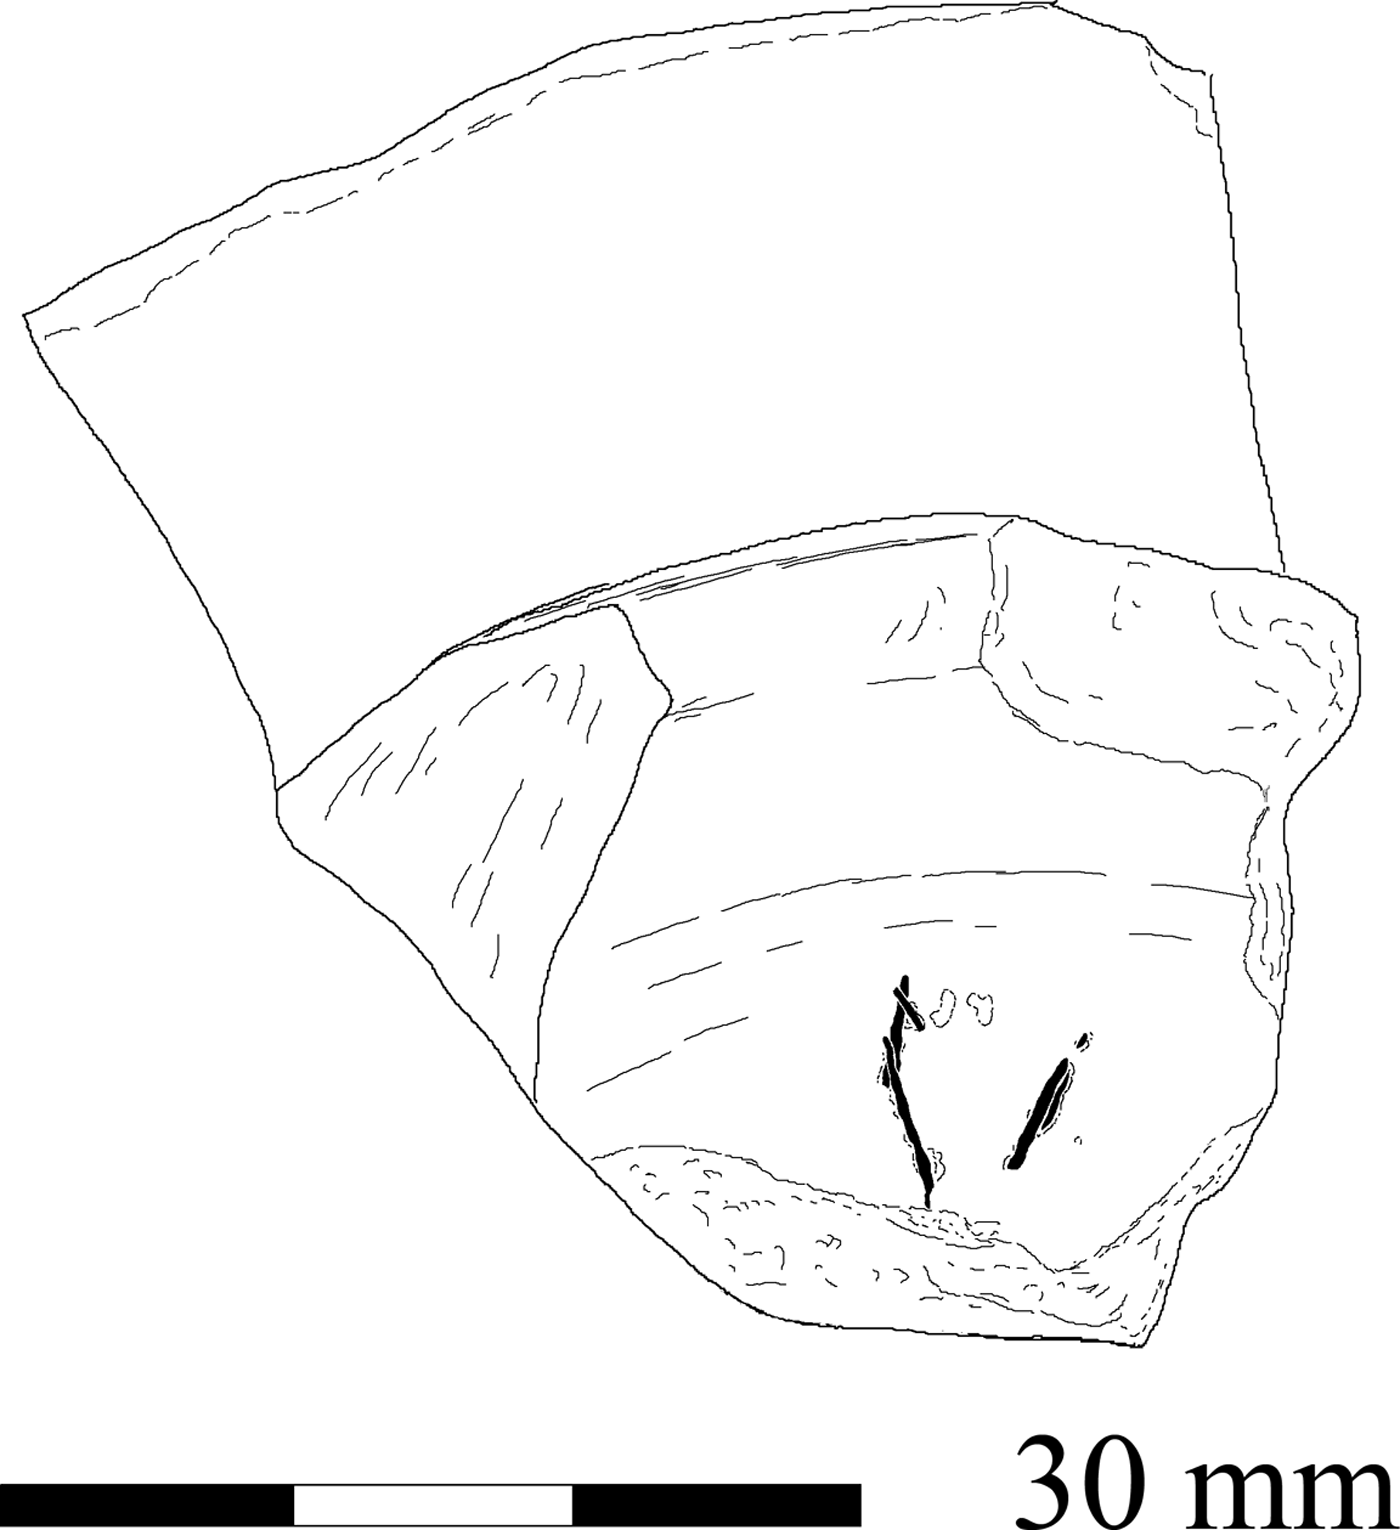
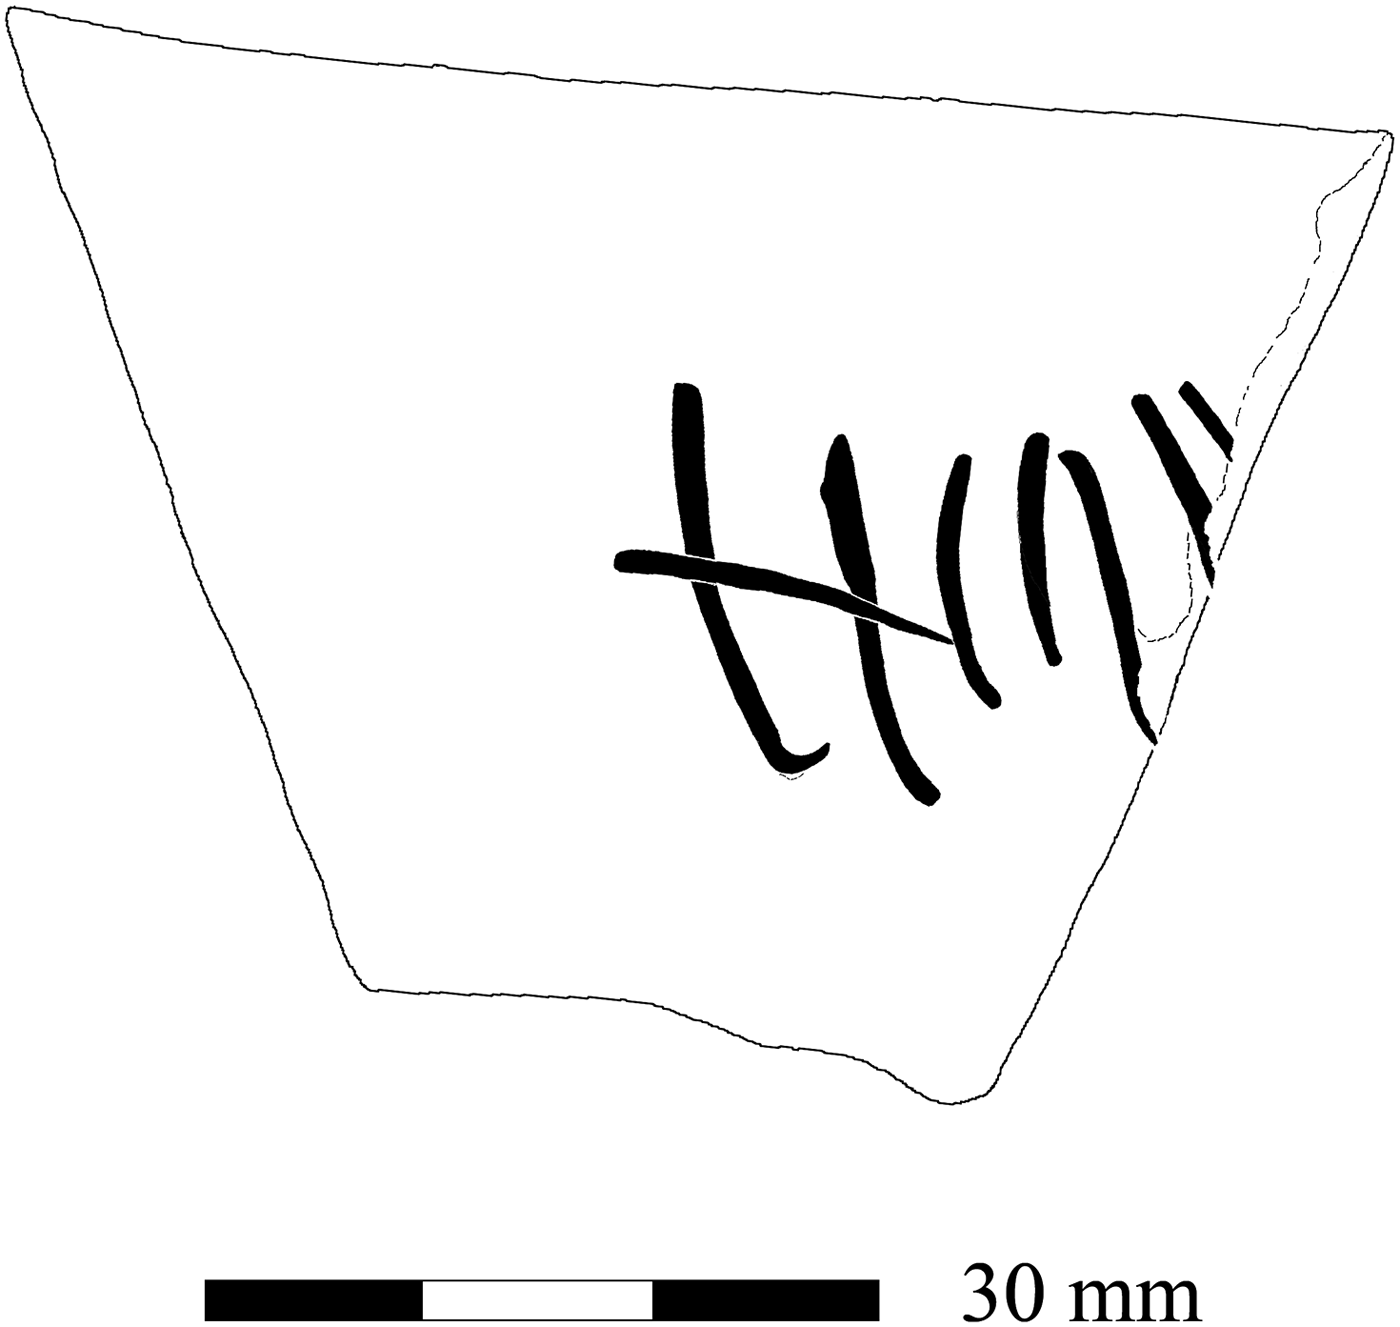
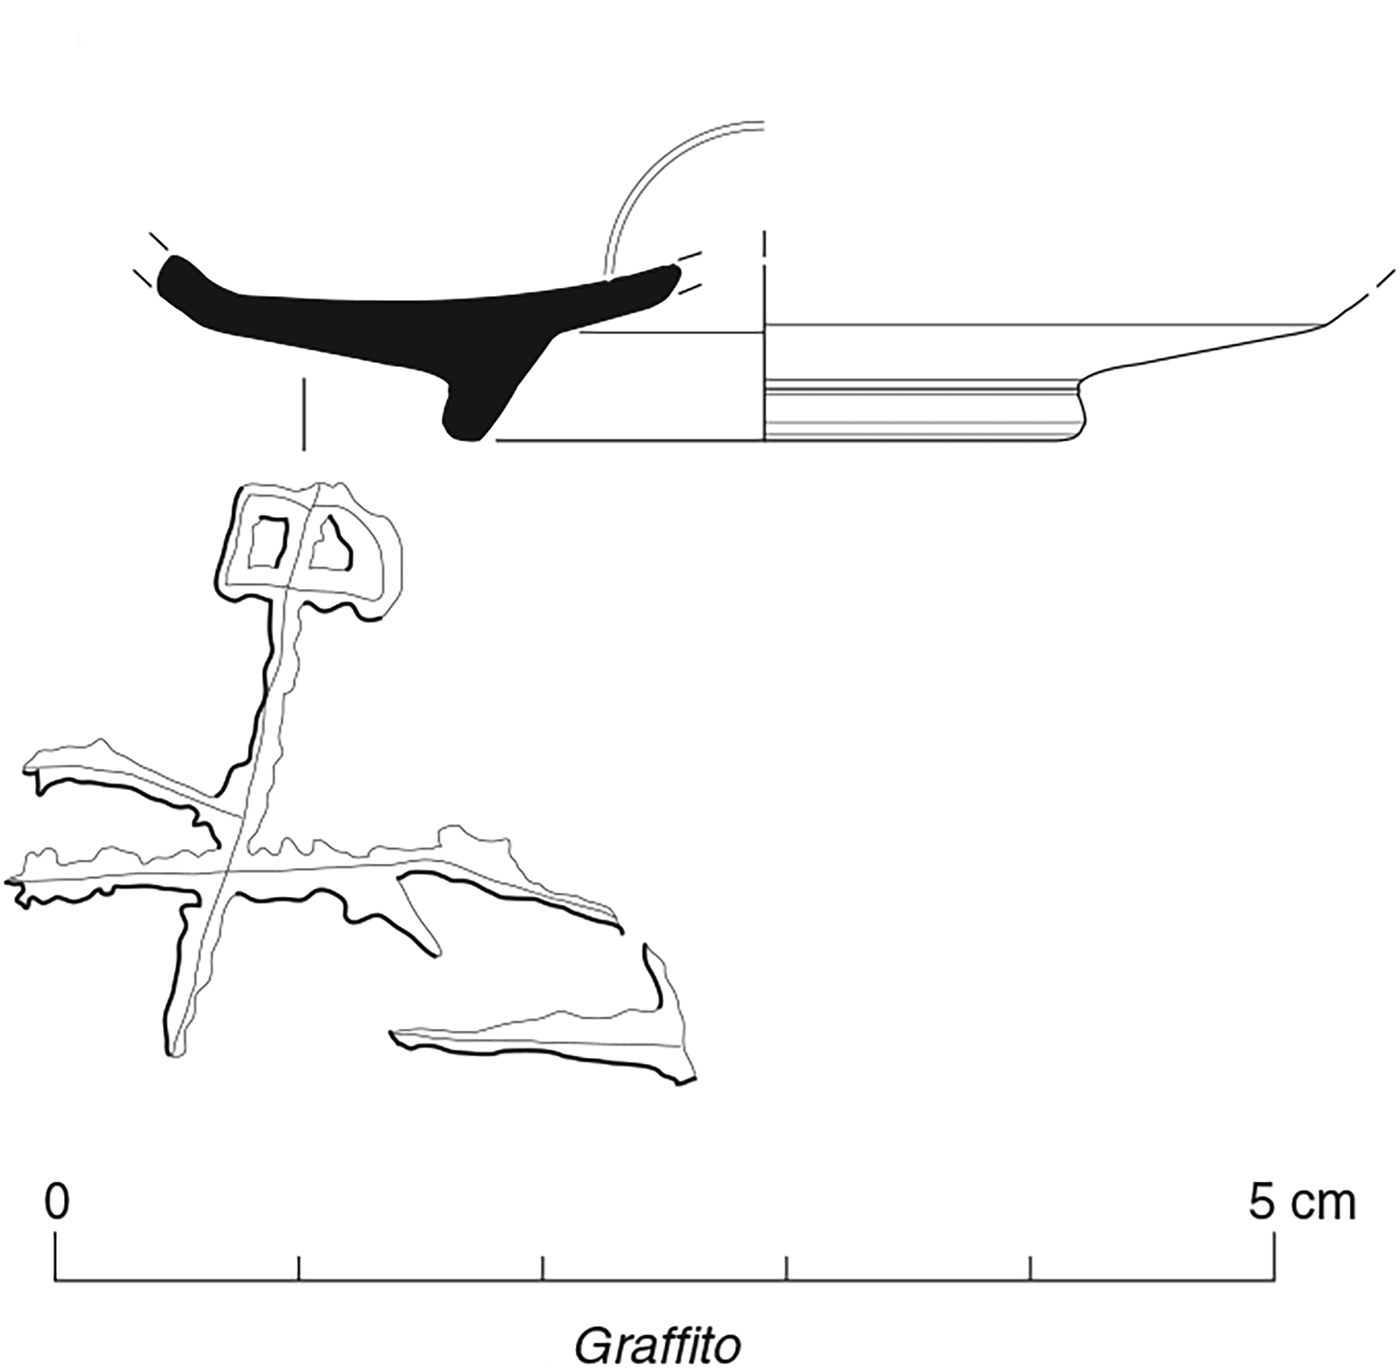
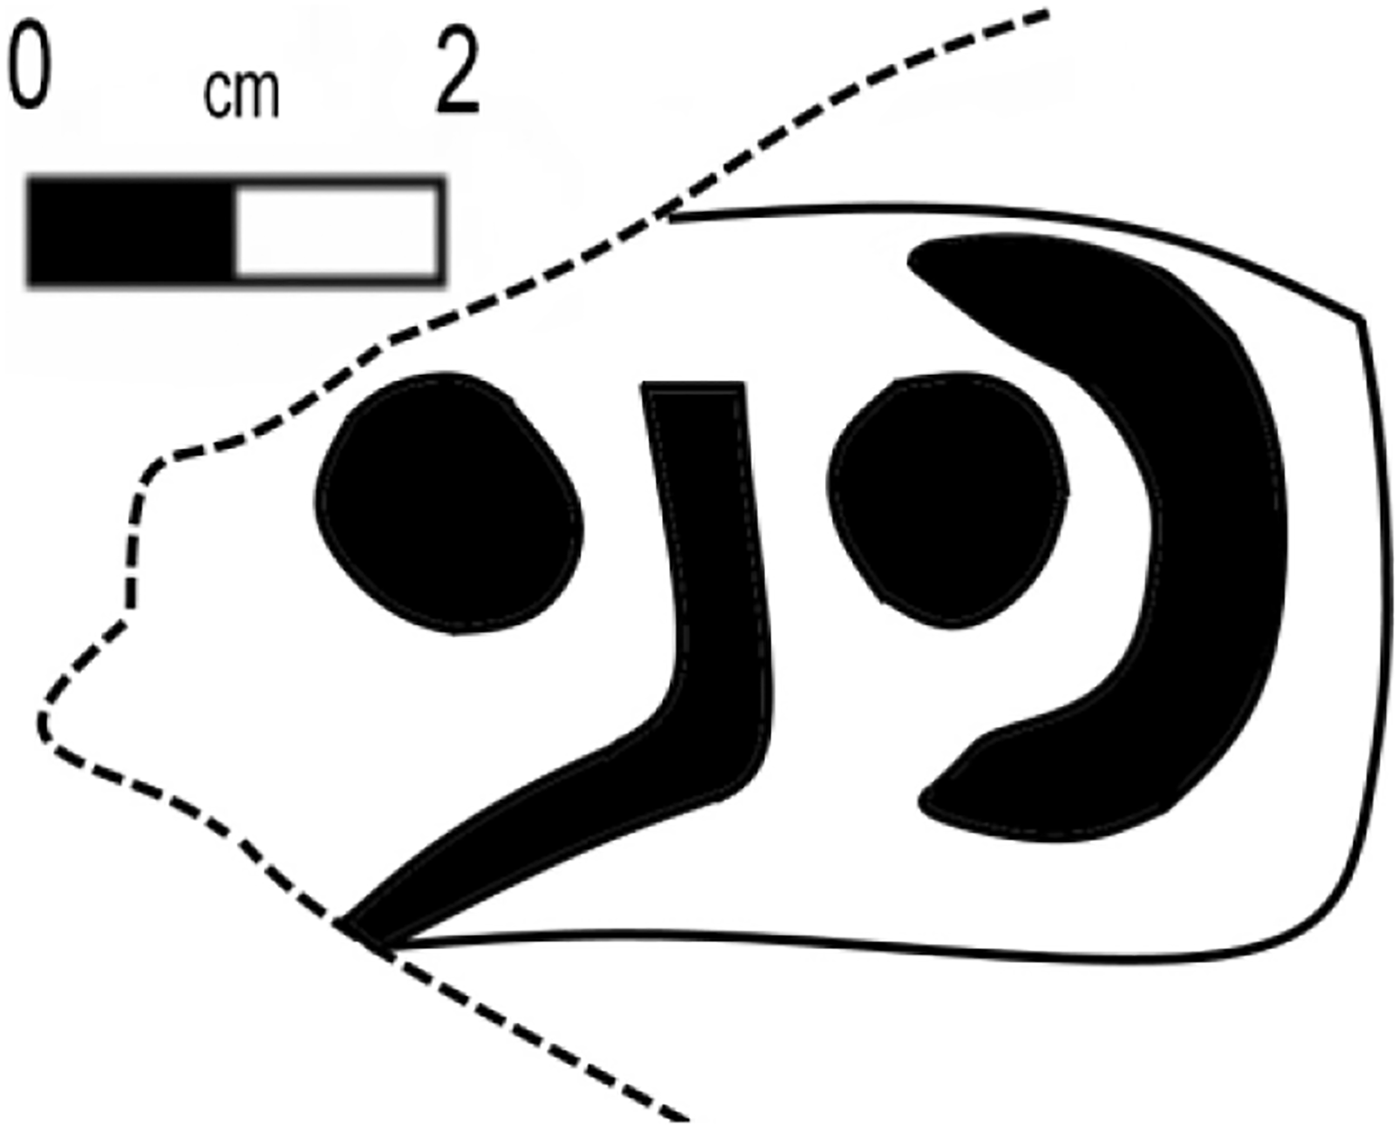
3. Ibid. (fig. 3). Base sherd of a samian dish (CG Drag. 18/31, c. a.d. 120–150). Coarsely incised after firing underneath, within the foot-ring, two vertical strokes more or less parallel. The first has been cut by two diagonal strokes, a short one at the top, and a much longer descender at the bottom: LI, Li(…) Footnote 5
Chester samian graffito (No. 3). (Drawn by R.S.O. Tomlin)

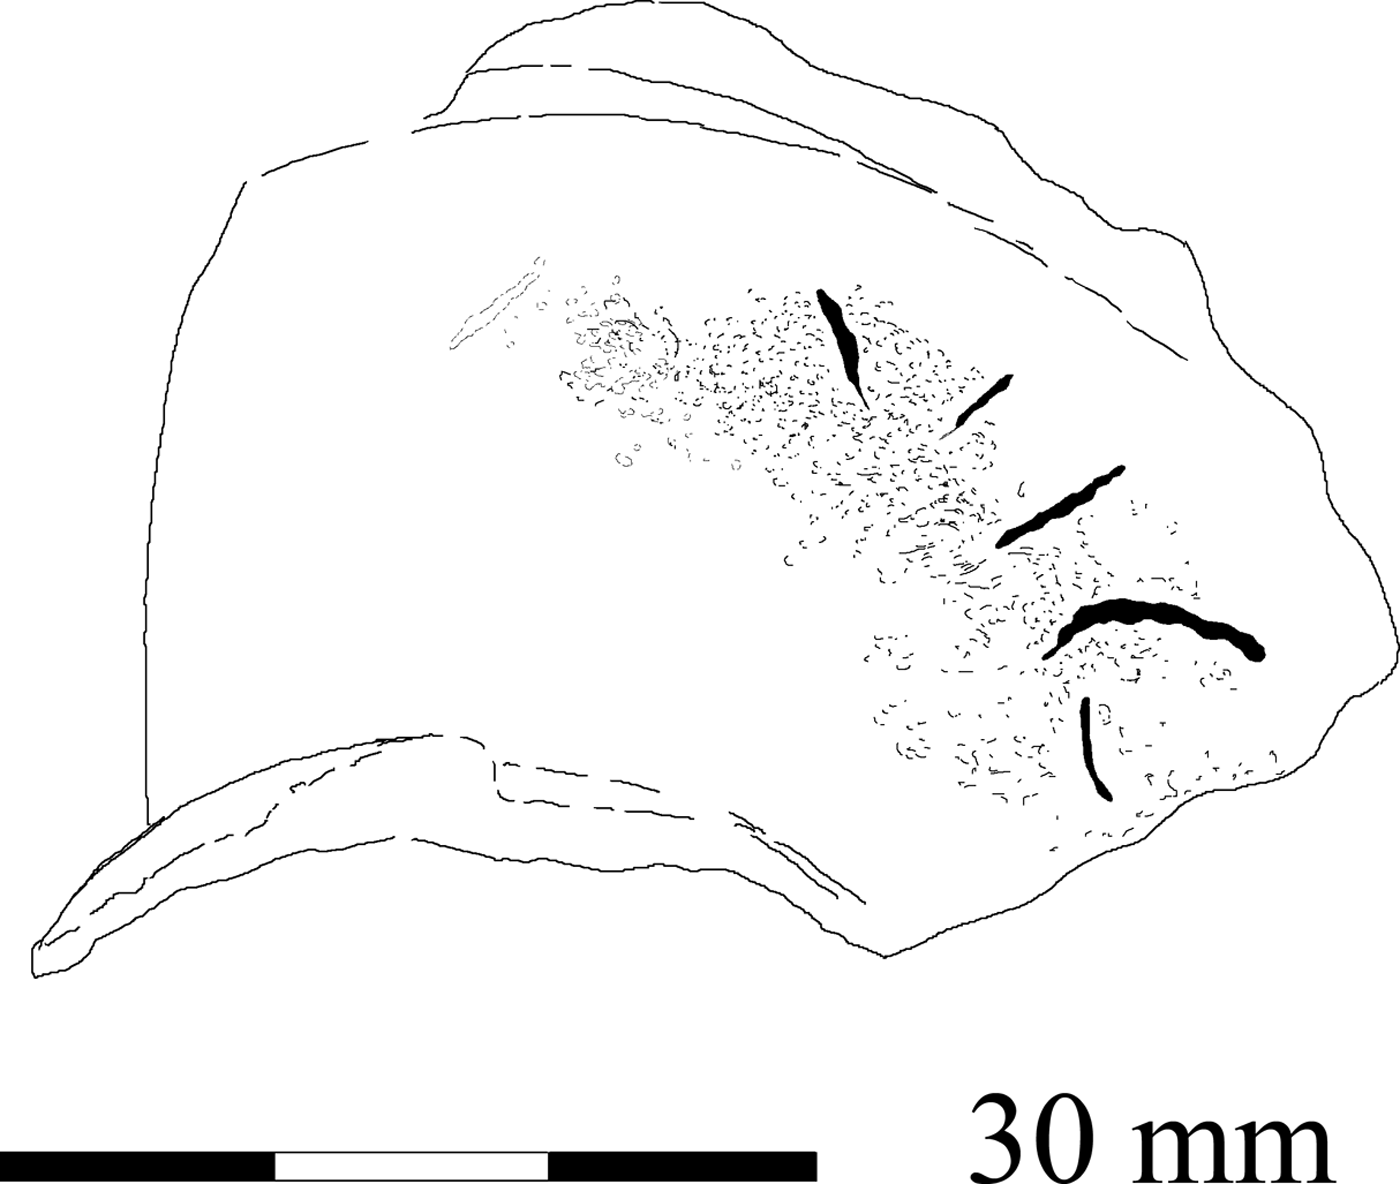
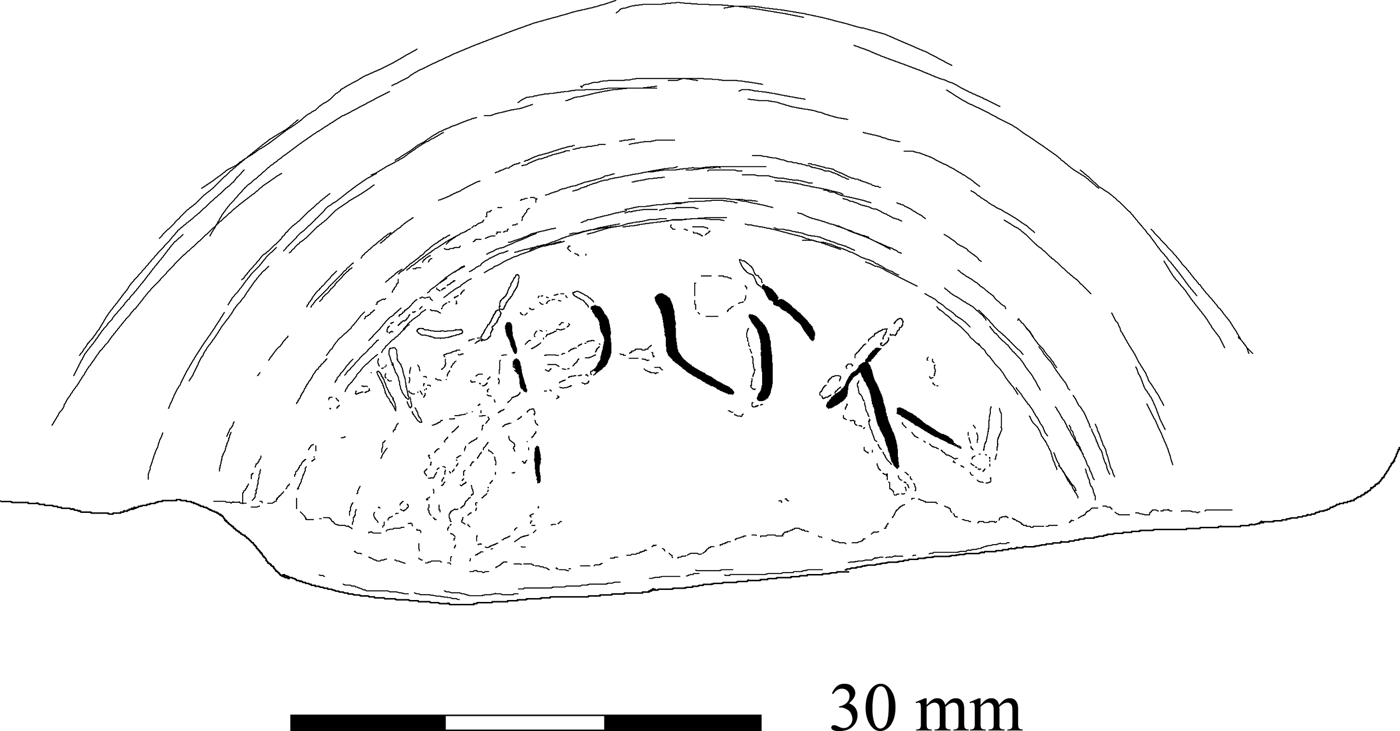
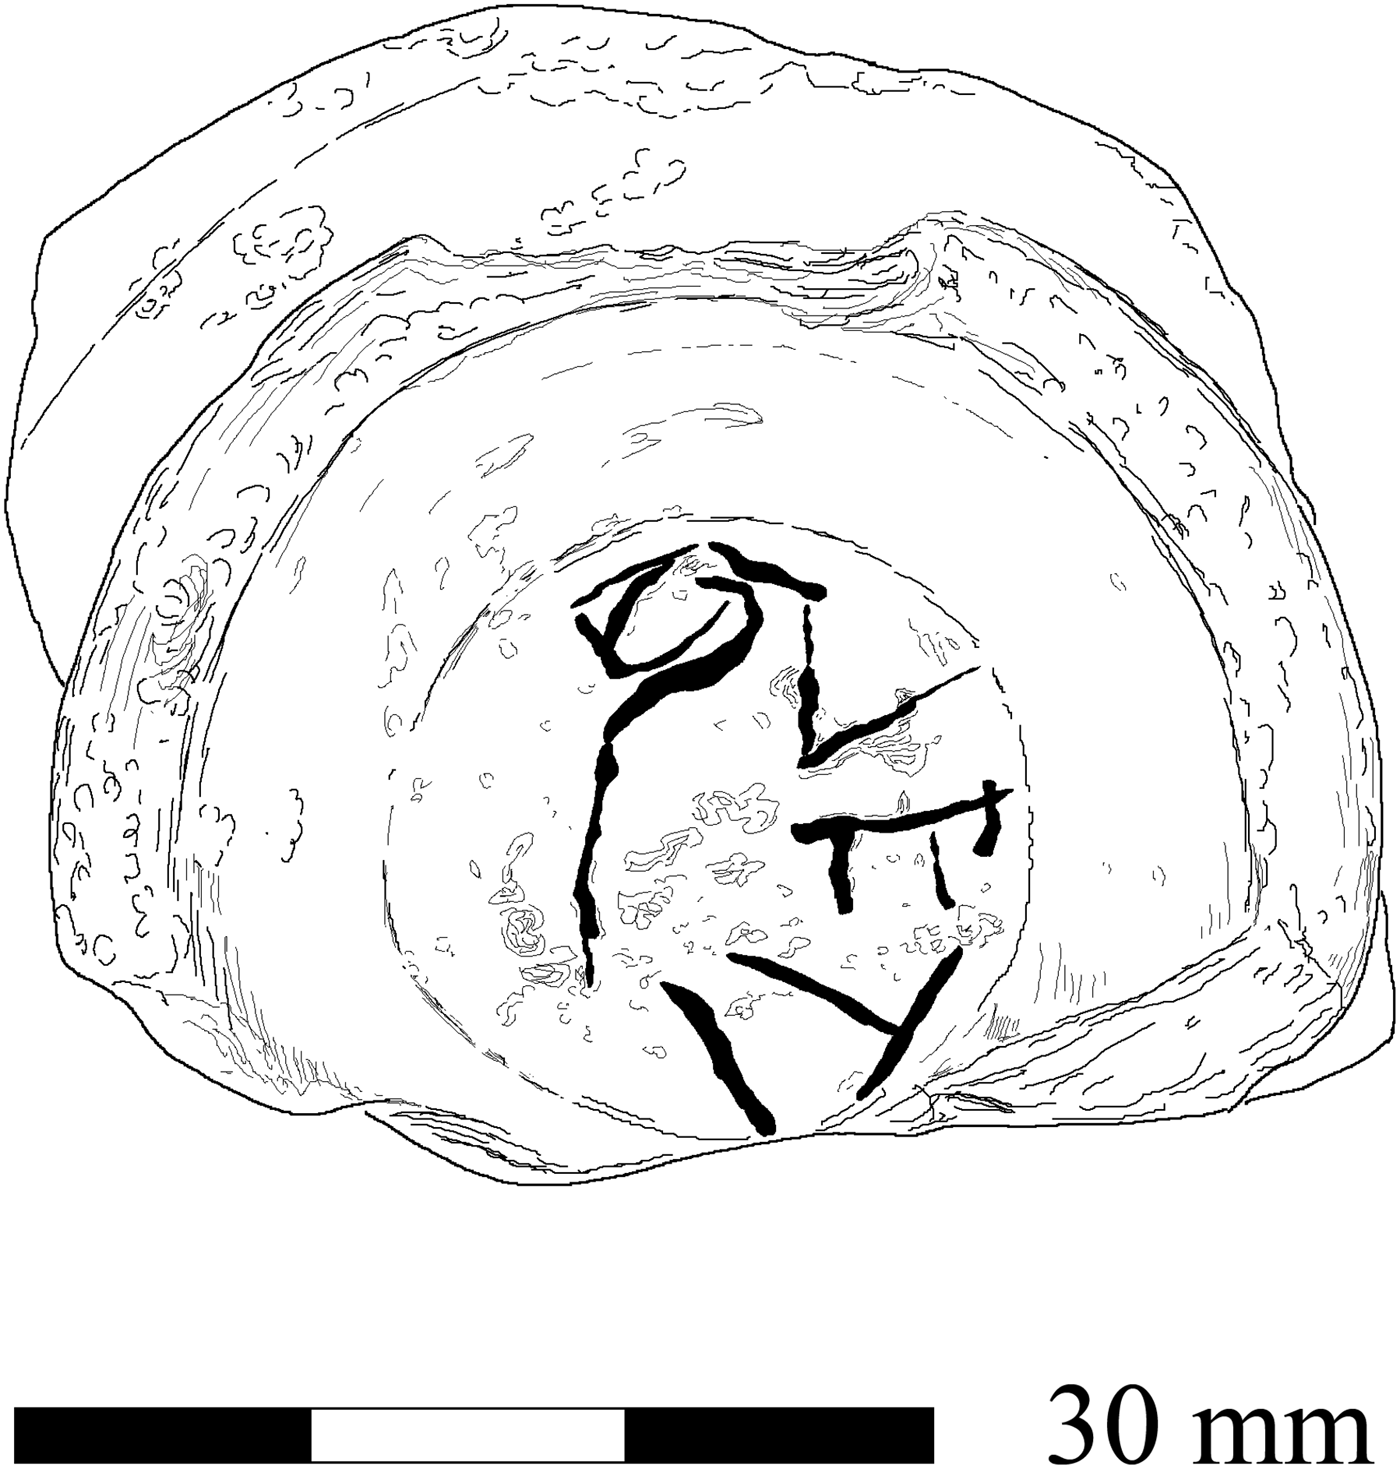
4. Ibid. (fig. 4). Base sherd of a samian cup (SG Drag. 27, c. a.d. 70–100). On the wall above the foot-ring is an abraded area which seems to be intentional since it obscures what look like deliberate strokes made after firing, the best preserved being the upper curve of C or possibly G. They can be read, but with some uncertainty, as ṾỊC̣[…], Vic[tor] or a derived personal name. This was then erased by a subsequent owner.
Chester samian graffito (No. 4). (Drawn by R.S.O. Tomlin)

5. Ibid. (fig. 5). Wall sherd of a samian cup (CG Drag. 33, c. a.d. 120–160). Scratched after firing just below the groove, part of two letters either side of S which is formed by a diagonal downstroke and a diagonal upstroke. Probably […]OSṾ[…]Footnote 6
Chester samian graffito (No. 5). (Drawn by R.S.O. Tomlin)

CUMBRIA
6. Maryport (?Alauna, NY 038 372), Camp Farm (fig. 6). Base sherd of a samian bowl (CG Drag. 37) foundFootnote 7 in 2015. Impressed underneath before firing, within the foot-ring, are traces of the mould-maker's signature, retrograde and obscured by the subsequent coating of slip: perhaps C̣ATṾC̣Ị, Catuci. ‘(Work) of Catucus’.Footnote 8
Maryport samian graffito (No. 6). (Drawn by R.S.O. Tomlin)

DURHAM
7. Lanchester (Longovicium, NZ 15 46) area. Most of the first and second tablets of a military diploma, each fragmented into four pieces, foundFootnote 9 in 2015. It was issued by Antoninus Pius to a British veteran of the German Fleet (classis Germanica pia fidelis).Footnote 10
ESSEX
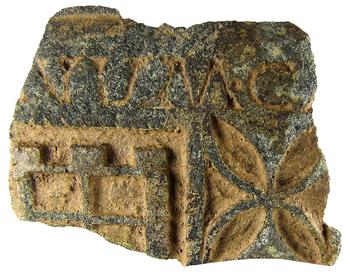
8. Bowers Gifford and North Benfleet (TQ 75 88) (fig. 7). Small fragment, 40 by 32 mm, 3.2 mm thick, of a copper-alloy pan foundFootnote 11 in 2016. The outer wall is recessed for enamel inlay, now lost. Above two motifs side by side, a square grid and a rosette, are the incised letters: […]ṆVM o CẠ […], [… Uxelodu] num Ca [mboglanna …] Footnote 12
Bowers Gifford and North Benfleet copper-alloy fragment (No. 8). (Photo: PAS)

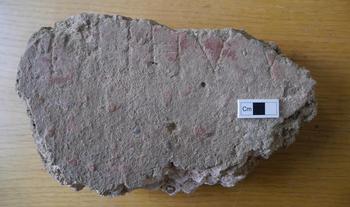
9. Colchester (Camulodunum, TL 998 245), Roman circus (fig. 8). Fragment of opus signinum, 0.25 by 0.15 m, originally painted red, foundFootnote 13 in 2015. It is convex, which would suggest it was part of a wall-coping, especially since it was found on the line of the robbed-out foundation for the inner wall of the north cavea.Footnote 14 Scored into the painted surface: traces IIIV V[…], apparently the numerals ‘8’ (written retrograde) and ‘5’ (or more).Footnote 15
Colchester opus signinum fragment (No. 9). (Photo: Philip Crummy)

GLOUCESTERSHIRE
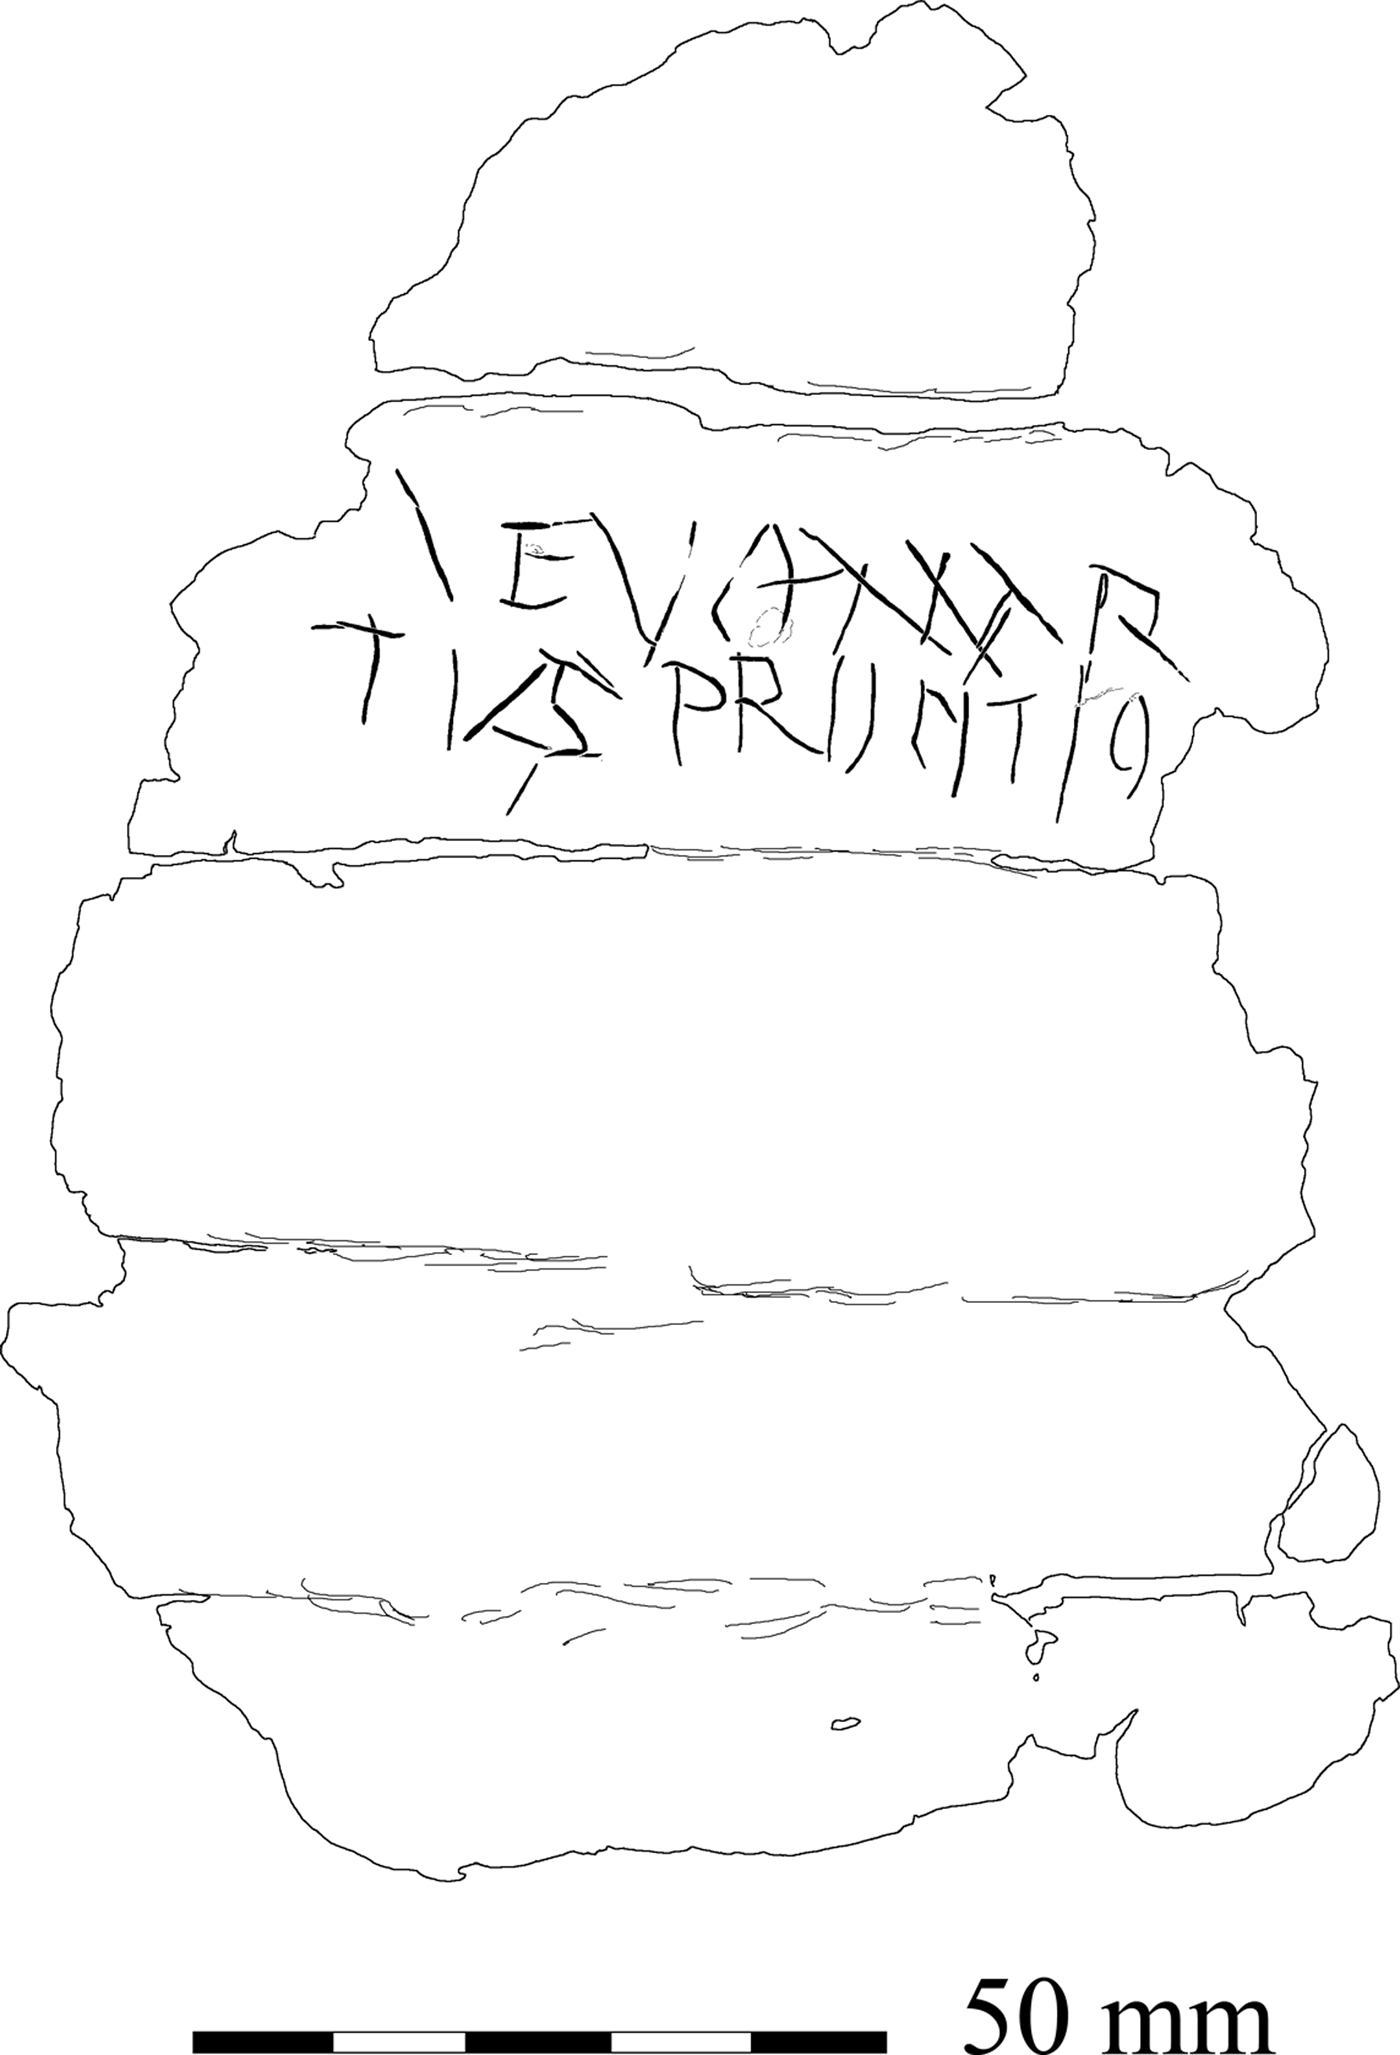
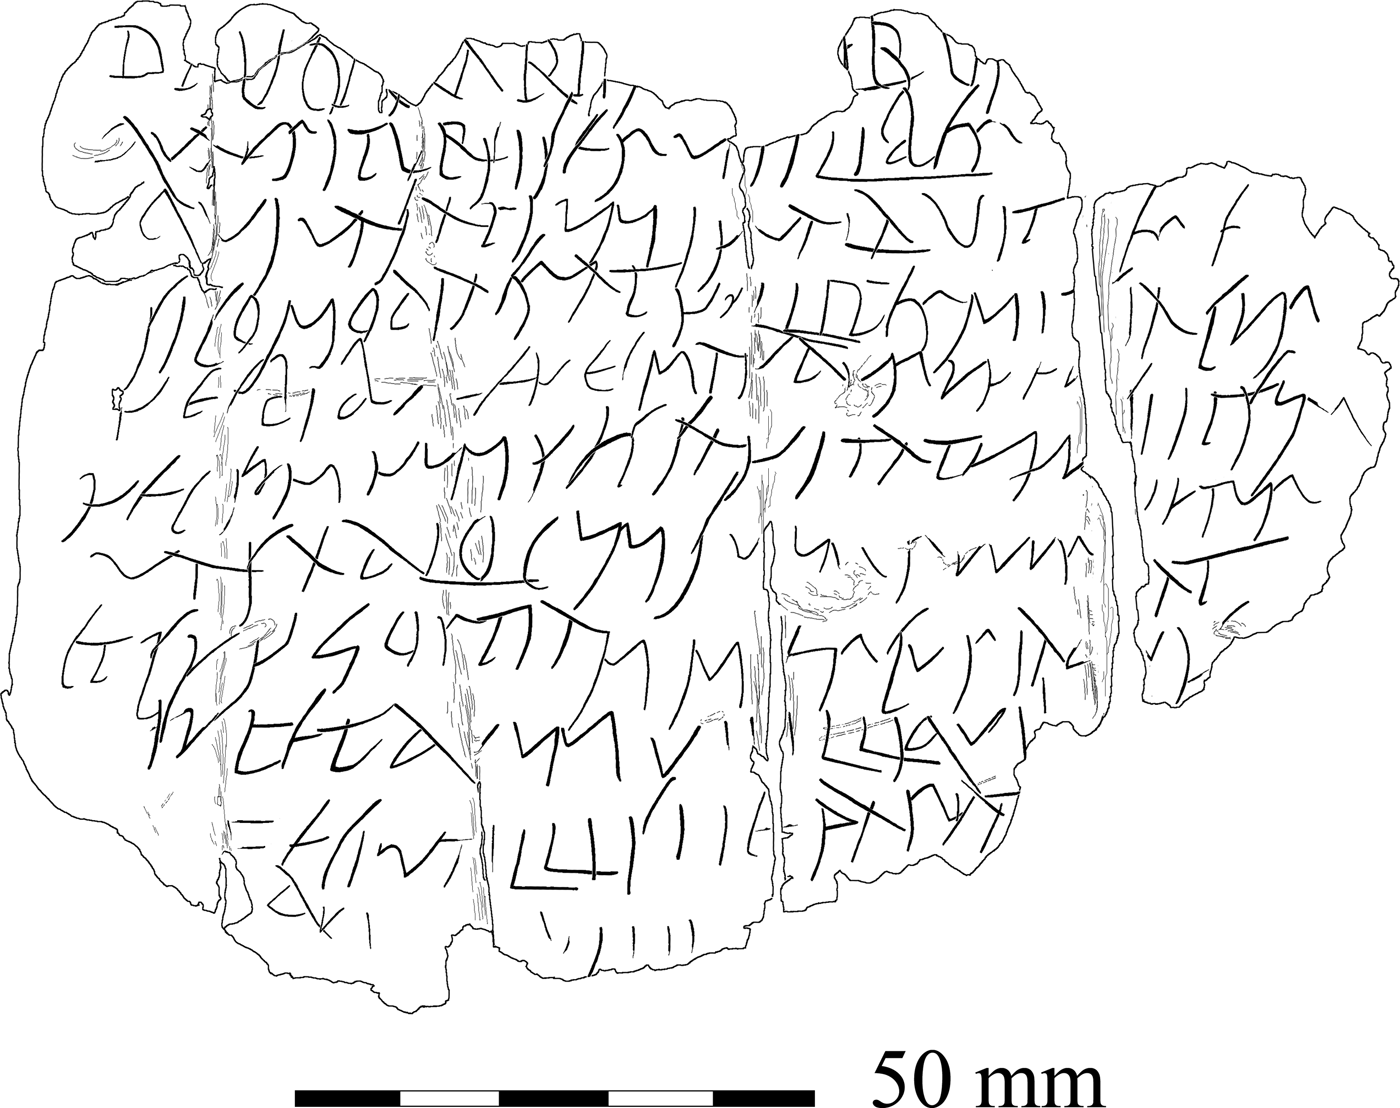
10. Uley (ST 789 996), West Hill, the temple of Mercury (figs 9 and 10). Inscribed lead tablet, 125 by 92 mm, foundFootnote 16 in 1978. It was originally folded four times and is now broken or damaged at the folds. The edges are also damaged except to the left, and some text has been lost. The outer face is inscribed with two lines of irregular capitals: [d] evo Mar|ti ?v(otum) s(olvit) Propitio. ‘To the god Mars the Propitious (…) paid his vow.’Footnote 17 The first line of the inner face is also in capitals, but is continued by ten lines of fluent but careless Old Roman Cursive: devo Marti […] lirus | qu{a}eritur, si ser(v)us si liber | qui vas apium invalavit(!) ?[v] ere | si COMODIA erat, ne illi permittatur | nec bib [er] e nec mandu(ca)re nec | <nec > somnum nec sanitate(m), nesi(!) ipsum | vas ad locum suum reversetur | et c(o)ngortiam(!) Mercuri agat | SEPET deum u.. illi qui […] | feci(t) ut illi s(i) me pariat | qui … ‘[…] complains to the god Mars: whether slave or free, (he) who has stolen (my) beehive … if it was … let him not be permitted to drink or eat, nor (to have) sleep or health, unless the said hive be returned to its proper place and (he) gain the goodwill of Mercury. … the god … to him who did (this), that to him if he furnishes me …’Footnote 18
Uley lead tablet (No. 10) outer face. (Drawn by R.S.O. Tomlin)

Uley lead tablet (No. 10) inner face. (Drawn by R.S.O. Tomlin)

LEICESTERSHIRE
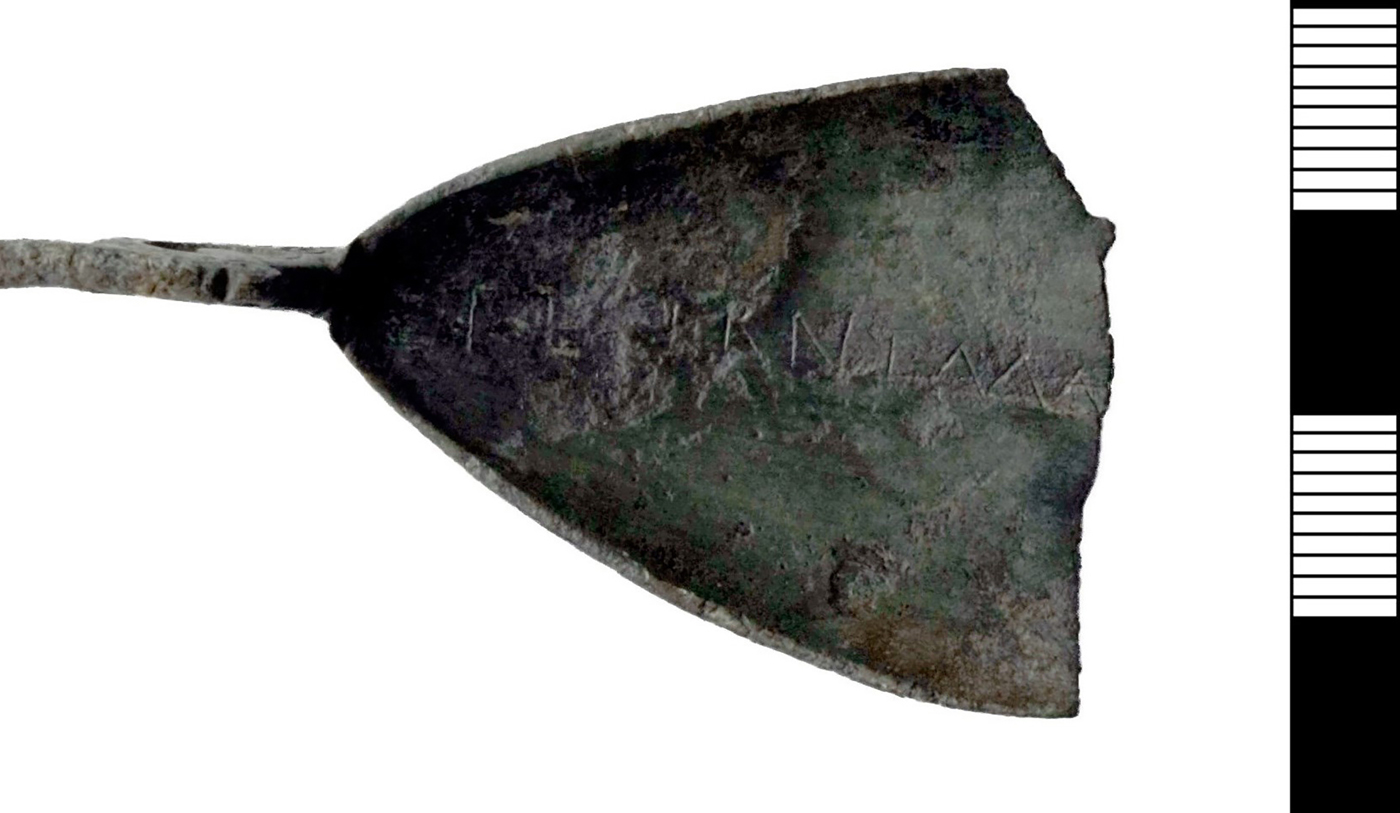
11. Eaton (SK 78 26) (fig. 11). Fragment of a copper-alloy spoon, 31 by 109 mm, consisting of the stem and about half the ovoid bowl, recordedFootnote 19 in 2016. Inscribed within the bowl: TEG̣ẸRNEMA[…], Tegernema [glus].Footnote 20
Eaton copper-alloy spoon (No. 11). (Photo: PAS)

LINCOLNSHIRE
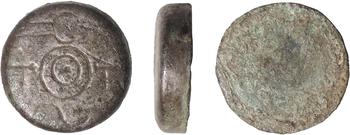
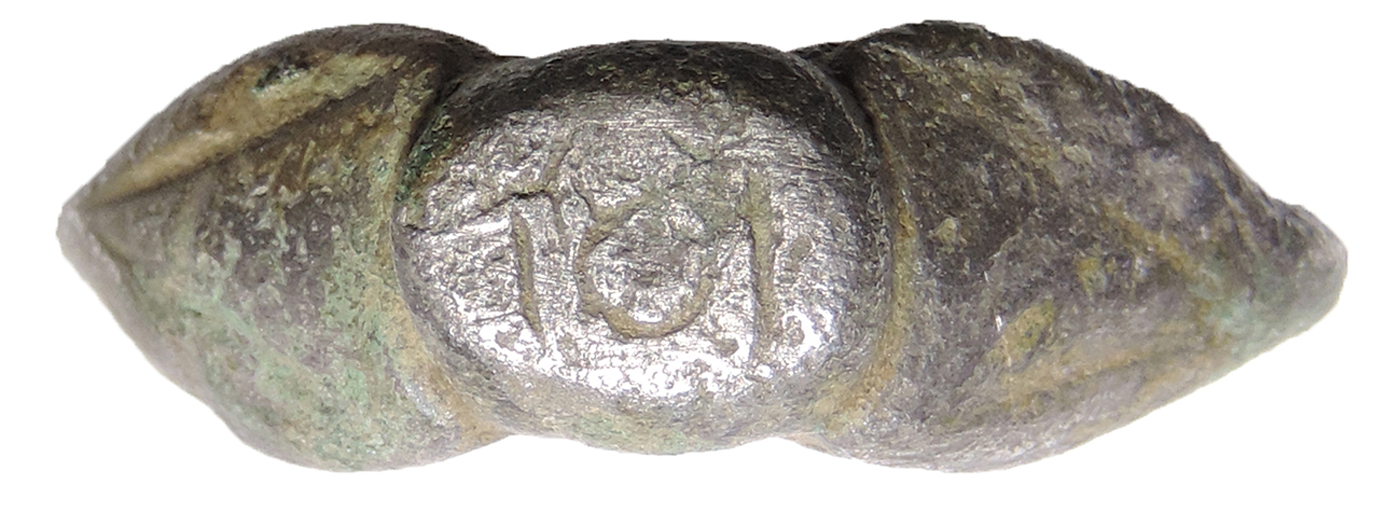
12. Horncastle (TF 26 69). Circular silver bezel 10 mm in diameter, 1 mm thick, detached from a finger-ring, foundFootnote 21 in the 1970s. Inscribed: TOTFootnote 22
13. Great Ponton (SK 92 30). Bezel and shoulders of a silver finger-ring (Henig type VIII) foundFootnote 23 in 2015. Inscribed: [T]O[T]Footnote 24
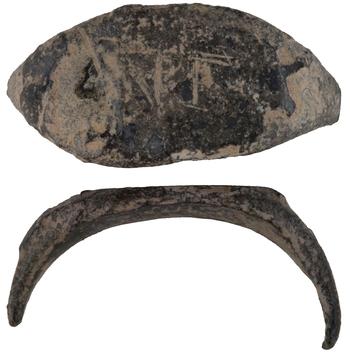
14. Normanton (SK 95 46) (fig. 12). Circular silver bezel 13.8 mm in diameter, 3.7 mm thick, detached from a finger-ring, foundFootnote 25 in 2016. Inscribed: TOTFootnote 26
Normanton silver bezel (No. 14). (Photo: PAS)

15. Wellingore (SK 98 56) (fig. 13). Bezel and shoulders of a silver finger-ring (Henig type VIII), foundFootnote 27 in 2014. Inscribed on the bezel: TOT
Wellingore silver bezel (No. 15). (Photo: PAS)

NORTHUMBERLAND
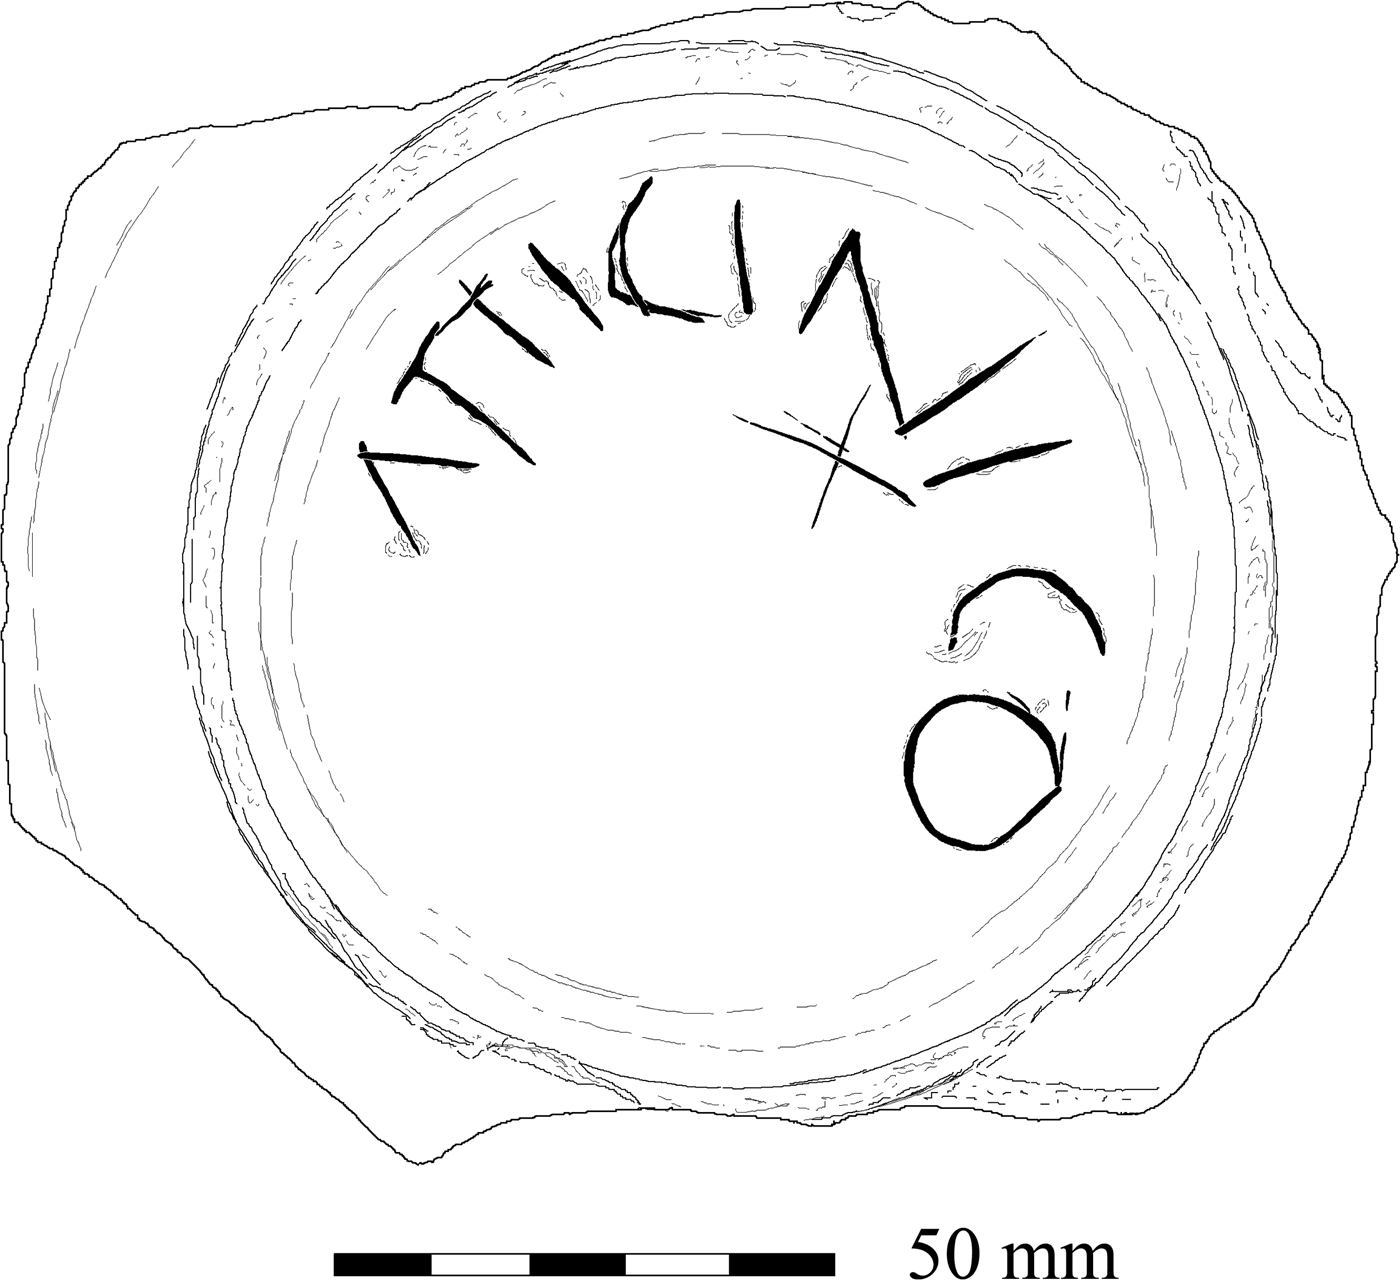
16. Corbridge (Coria, NY 982 648) (fig. 14). Two conjoining base sherds of a samian dish (Drag. 18/31, CO 28654) stamped GIAMILLVS (Die 1a, c. a.d. 160–200), foundFootnote 28 in the 1930s. Incised underneath in a semi-circle within the complete foot-ring, in crude capitals of increasing size: ΛTTICINICO, apparently Atti extended in larger capitals to Attici, followed by Nico(…) in even larger capitals. This might indicate successive owners, but since the letters first written were not deleted but rather extended, the graffito is better understood as Attici (servus) Nico(…). ‘Nico(…) (the slave) of Atticus.’Footnote 29
Corbridge samian graffito (No. 16). (Drawn by R.S.O. Tomlin)

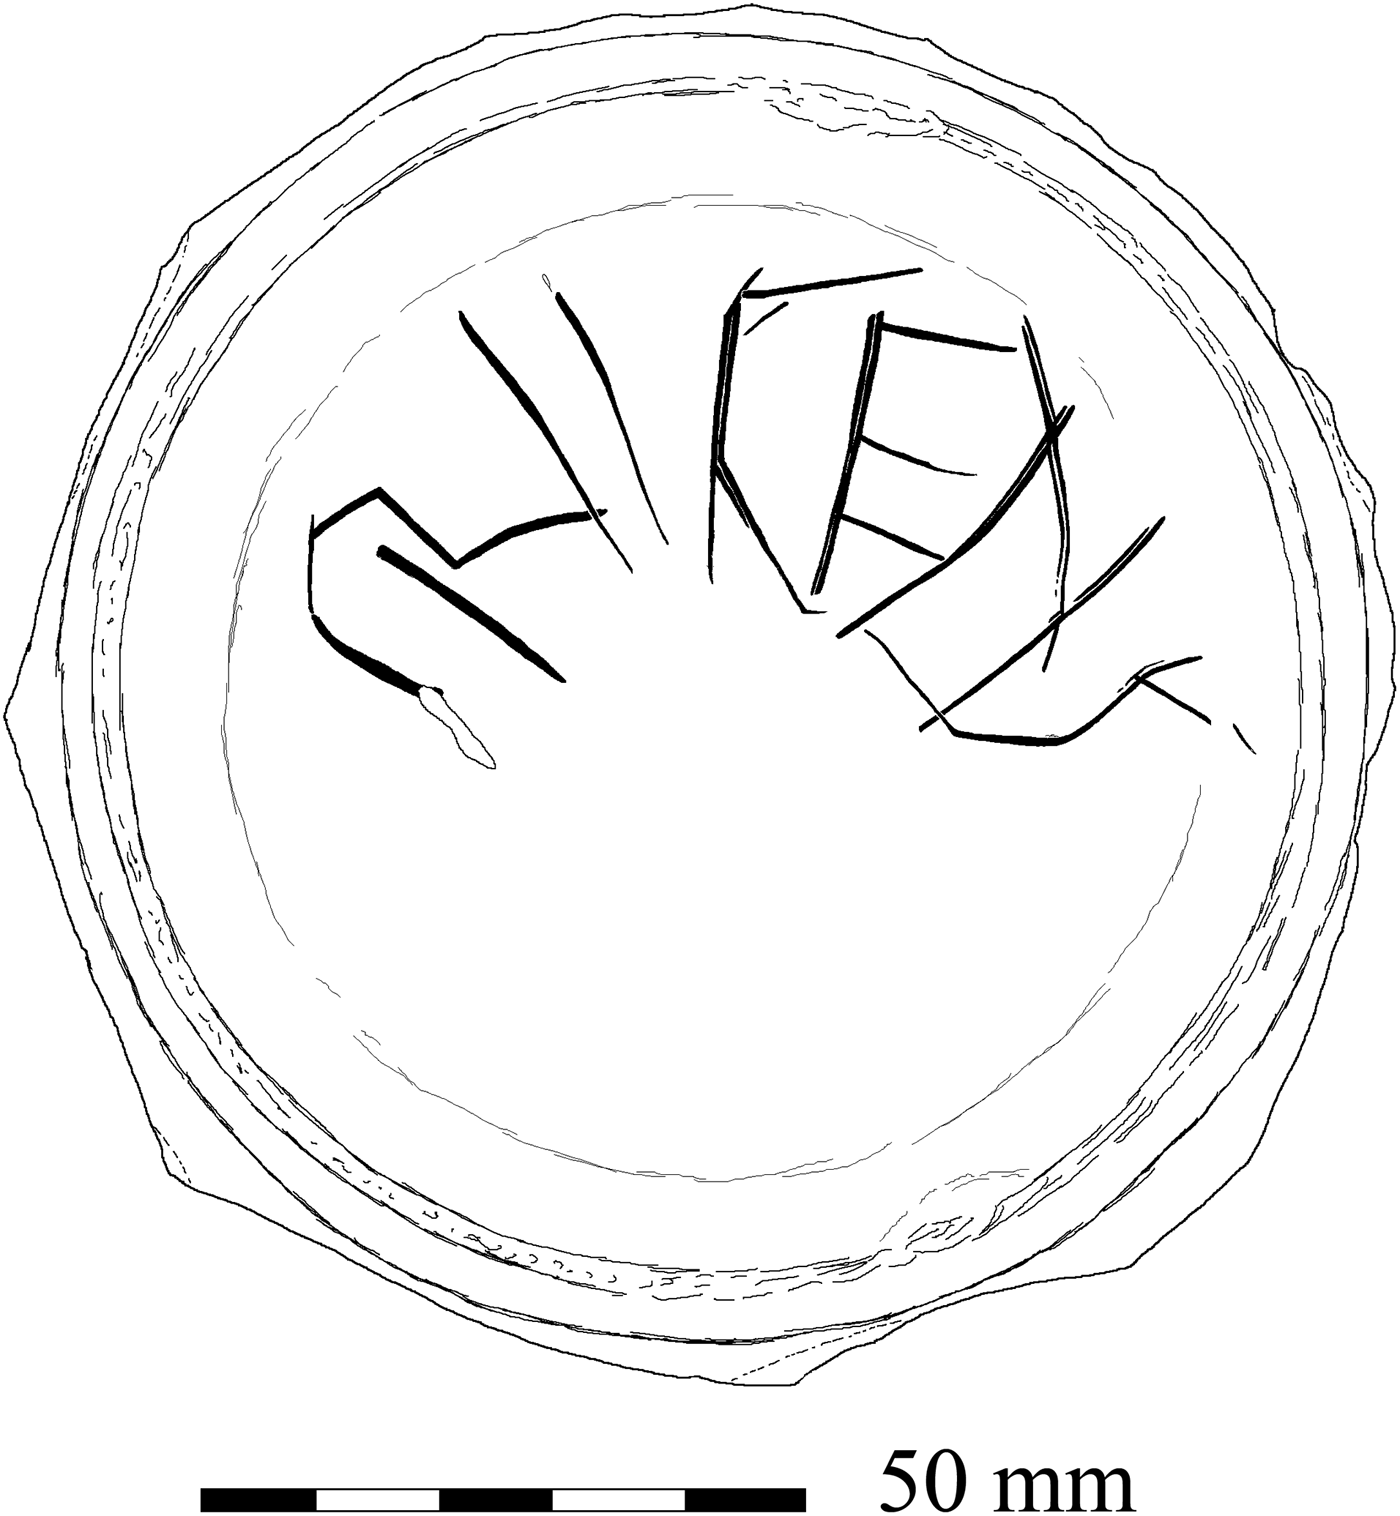
17. Ibid. (fig. 15). Base sherd of a samian bowl (Drag. 31, CO 42848) stamped HABILIS.F which has been chipped back to the foot-ring to form a crude disk. Incised underneath in clumsy, angular capitals: C̣RIIṢC̣ENS, Crescens Footnote 30
Corbridge samian graffito (No. 17). (Drawn by R.S.O. Tomlin)

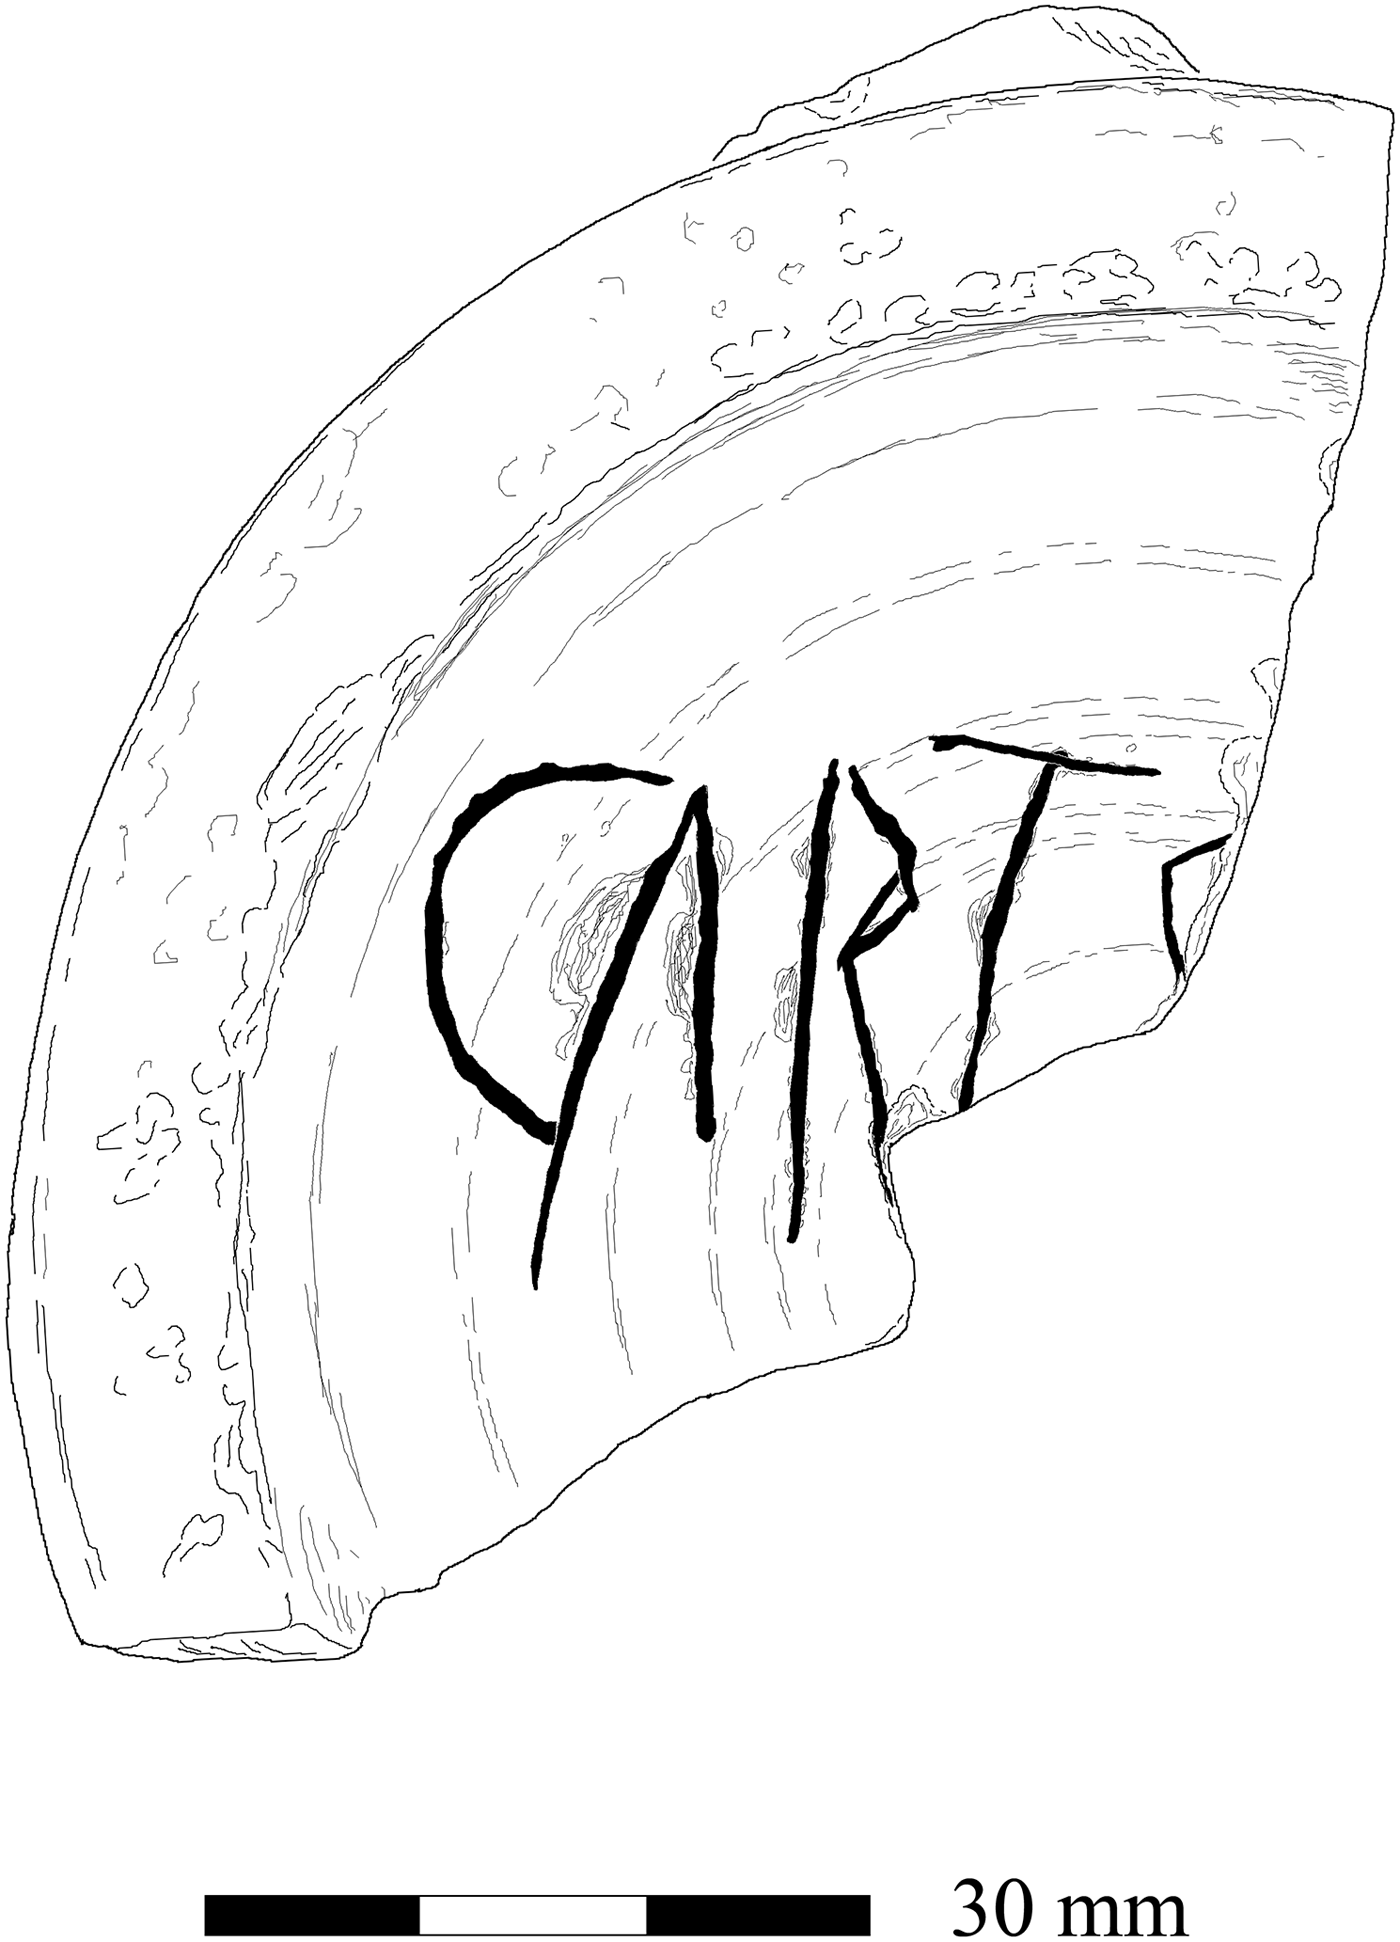
18. Ibid. (fig. 16). Base sherd of a samian platter (Drag. 18R, CO 41618), found in 1909. Incised underneath in rather cramped capitals: CΛRT Ṣ[…], perhaps Cart(…) S […] Footnote 31
Corbridge samian graffito (No. 18). (Drawn by R.S.O. Tomlin)

19. Ibid. (fig. 17). Base sherd of a samian cup (Drag. 33, CO 36236) stamped DAGODVBN[ preserving half the foot-ring. Awkwardly incised in a semicircle underneath: QVETI, Qu(i)eti. ‘(Property) of Quietus.’
Corbridge samian graffito (No. 19). (Drawn by R.S.O. Tomlin)

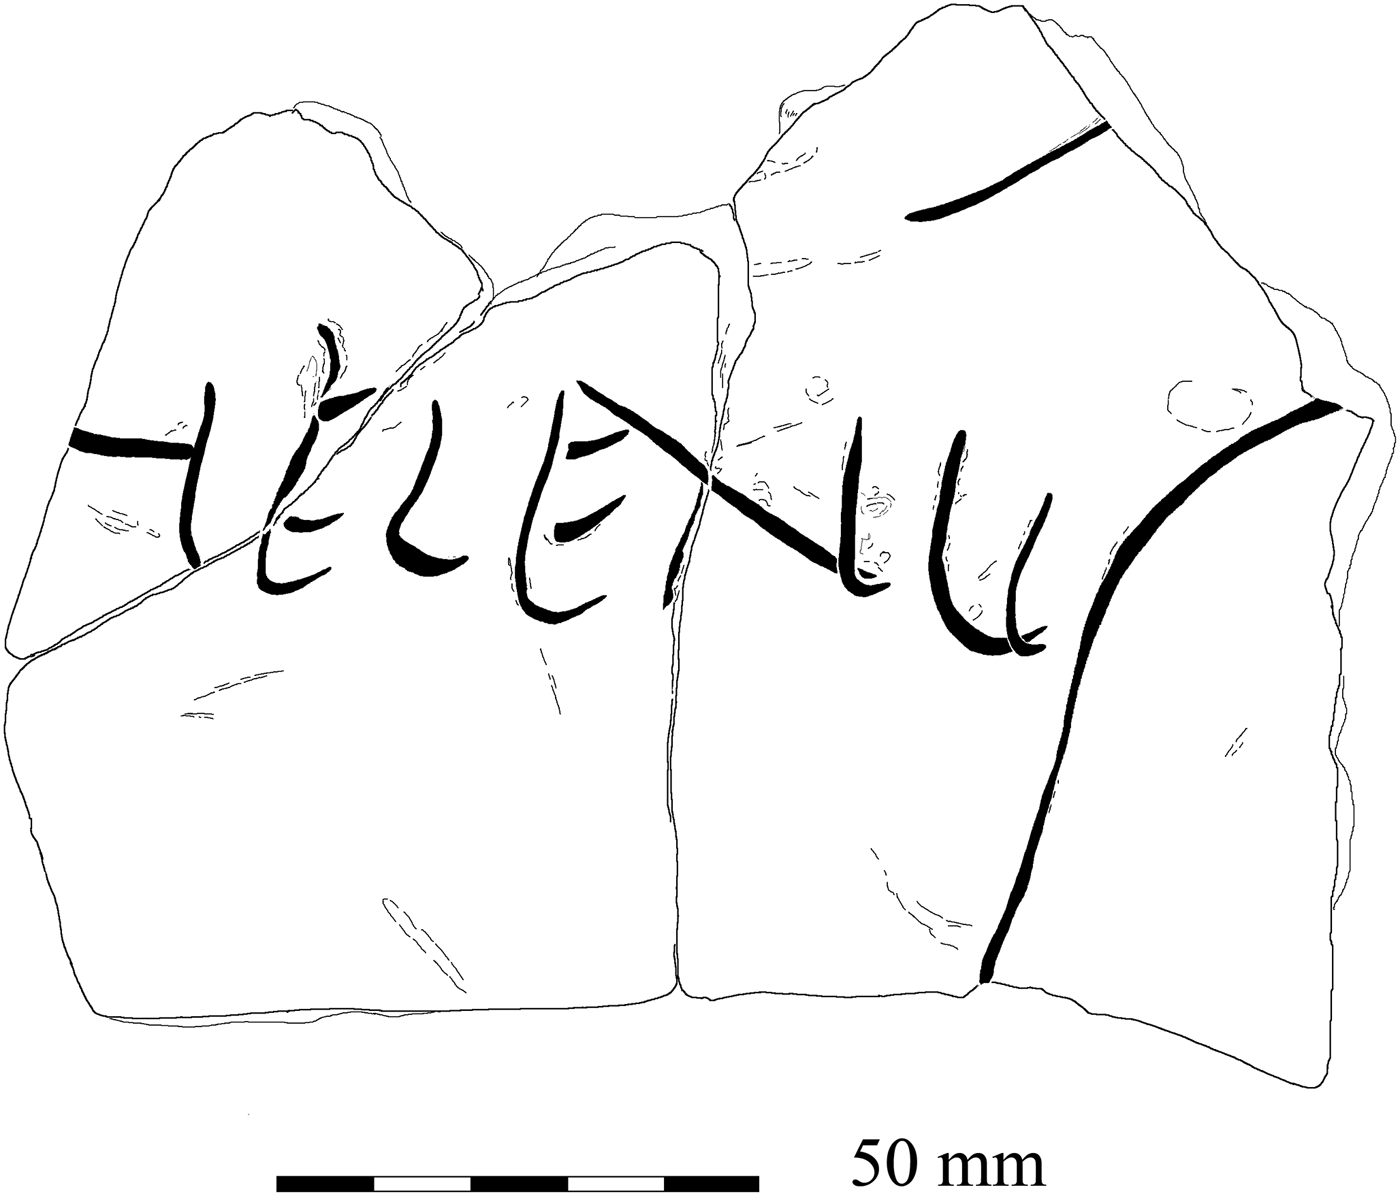
20. Ibid. (fig. 18). Wall sherd in reddish-buff fabric under white slip (CO 36650), found before 1914 north-west of Site XI. The vessel has not been identified, but might be a wine amphora. Incised before firing: HIIḶỊỊ[…], probably Helen [us …] Footnote 32
Corbridge amphora(?) graffito (No. 20). (Drawn by R.S.O. Tomlin)

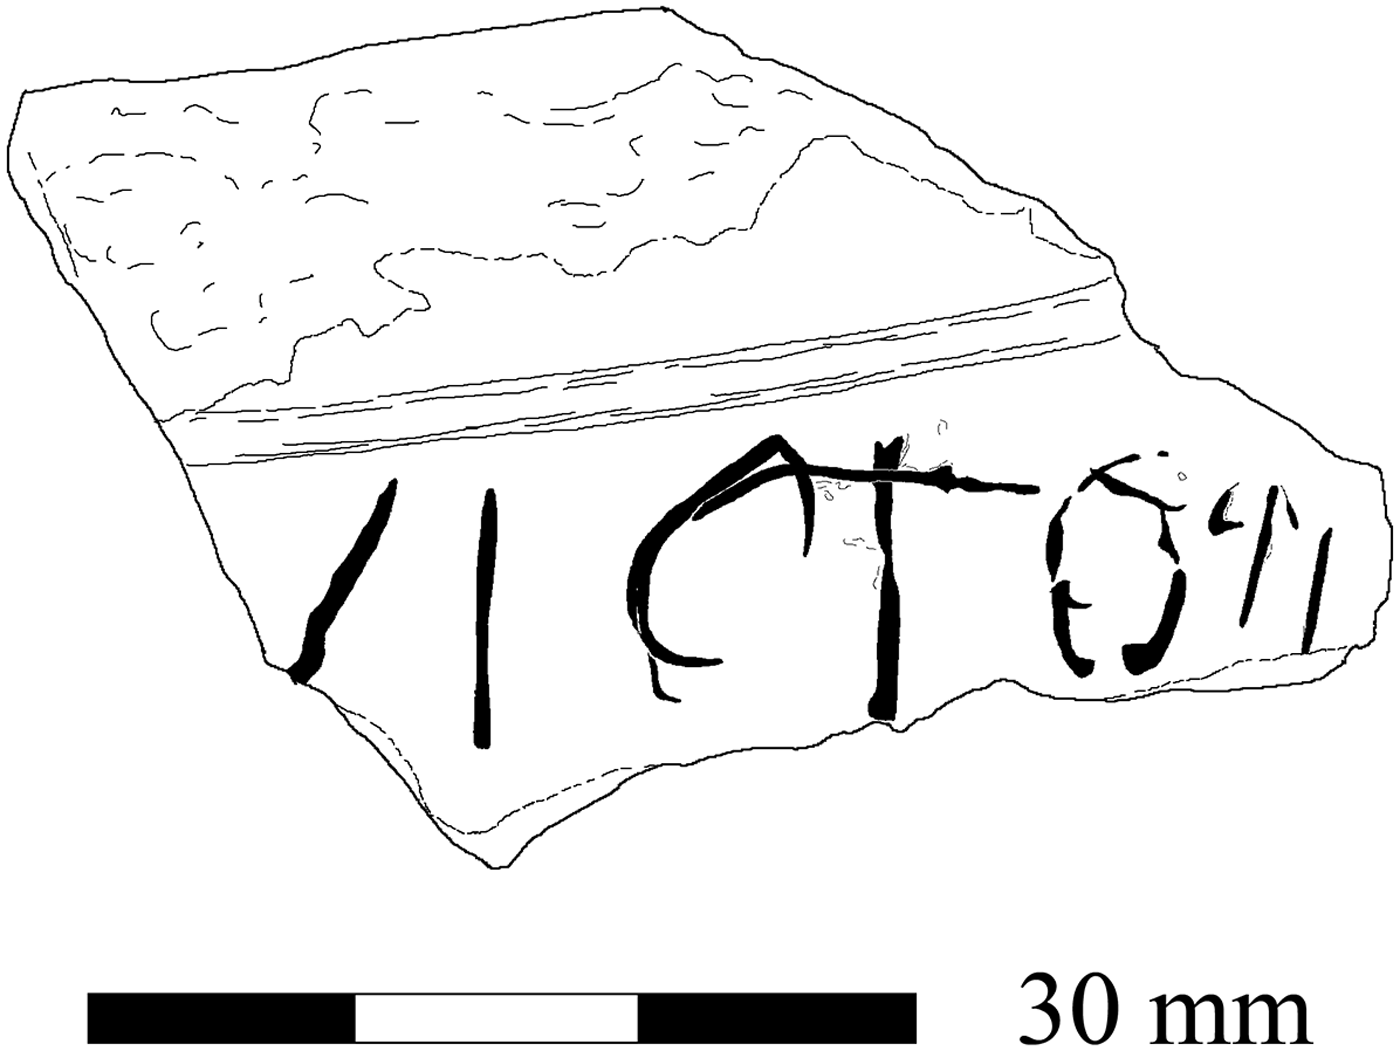
21. Ibid. (fig. 19). Wall sherd of a black burnished vessel (BB2, CO 18993), found in 1976 on the Stanegate. Crudely incised: […]VICTORI[…], Victori [s] or a cognate name. ‘(Property) of Victor’ (etc.).Footnote 33
Corbridge coarseware graffito (No. 21). (Drawn by R.S.O. Tomlin)

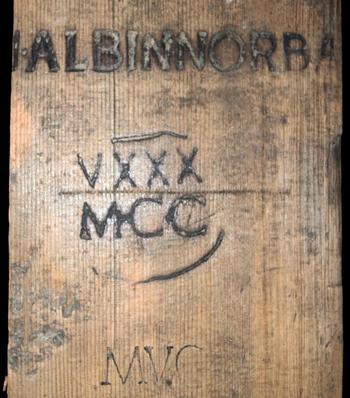
22. Vindolanda (NY 768 663) (fig. 20). Complete wooden (silver fir) barrel stave, 0.84 by 0.17 m, foundFootnote 34 in 2016. The maximum thickness is 33 mm, tapering towards both ends which are rounded, indicating that it formed part of the barrel-head. There are three impressed inscriptions. (1) Branded in bold sans-serif capitals 20 mm high: […]I o ALBINNORBẠ[…], probably the nominative plural termination of a nomen […] i shared by two cognomina, Albin(us) and Norba[nus].Footnote 35 (2) Branded within two incised lines like part of a circle: VXXX | MCC, probably the numerals ‘35’ (in reverse order) and ‘1200’. (3) Incised in neat capitals, probably by a metal die: MVC, the initials of a Roman citizen, M(arcus) V(…) C(…).
Vindolanda barrel stave (No. 22). (Photo: Vindolanda Trust)

23. Ibid. (fig. 21). Two conjoining wall sherds of a South Spanish oil amphora (Dressel 20, sf 20,263), inscribed before firing in cursive letters, now incomplete and worn: […]…L LVCFootnote 36
Vindolanda amphora graffito (No. 23). (Drawn by R.S.O. Tomlin)

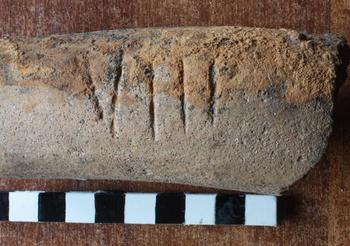
24. Ibid. (fig. 22). Part of the handle of a South Spanish oil amphora (Dressel 20, sf 20,119), incised: VIII, ‘8 (modii)’.Footnote 37
Vindolanda amphora handle (No. 24). (Photo: R.S.O. Tomlin)

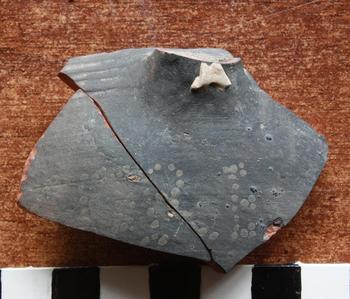
25. Ibid. (fig. 23). Two conjoining sherds of a reddish-buff vessel coated in black slip (Rhenish ware, sf 20,743). On the wall below the stump of a handle, in capital letters formed by dots of white slip, now grey: […]VTERE […], […?] utere [felix]. ‘Use (this and be) happy.’Footnote 38
Vindolanda slip-painted sherd (No. 25). (Photo: R.S.O. Tomlin)

26. Ibid. Samian base sherd (sf 20,021), incised underneath within the foot-ring: F[…]Footnote 39
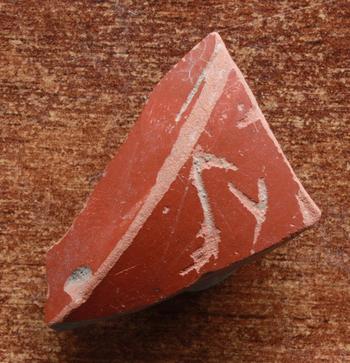
27. Ibid. (fig. 24). Samian wall sherd (?Drag. 18/31, sf 20,438), scratched above the carination, running vertically upwards: SV.[…]Footnote 40
Vindolanda samian graffito (No. 27). (Photo: R.S.O. Tomlin)

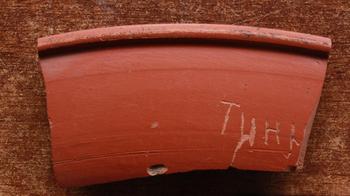
28. Ibid. (fig. 25). Rim sherd of a samian dish (Drag. 18 or 8/31, sf 20,116), scratched below the rim: TIIHL.[…]Footnote 41
Vindolanda samian graffito (No. 28). (Photo: R.S.O. Tomlin)

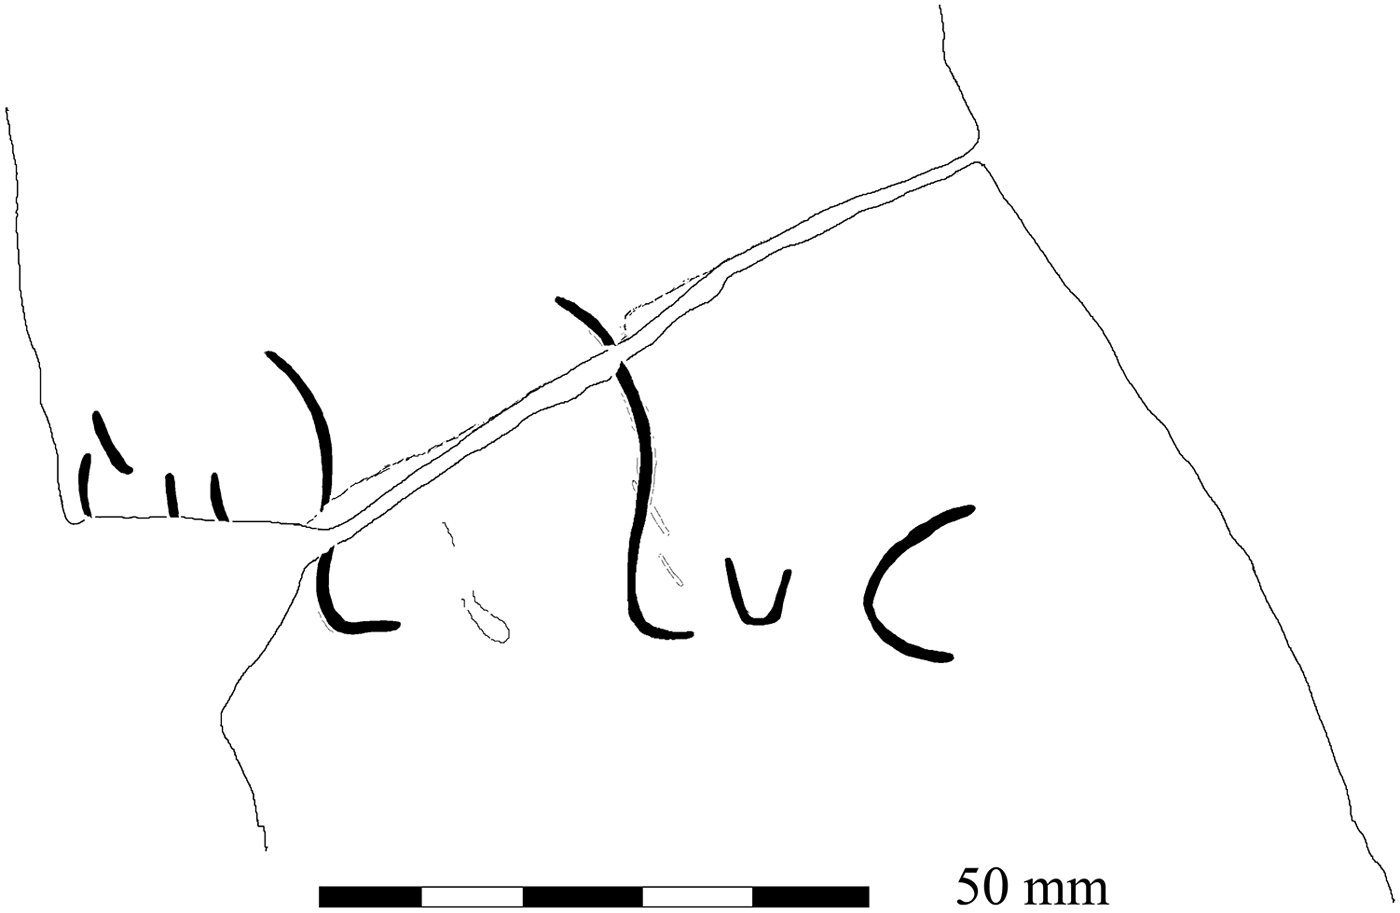
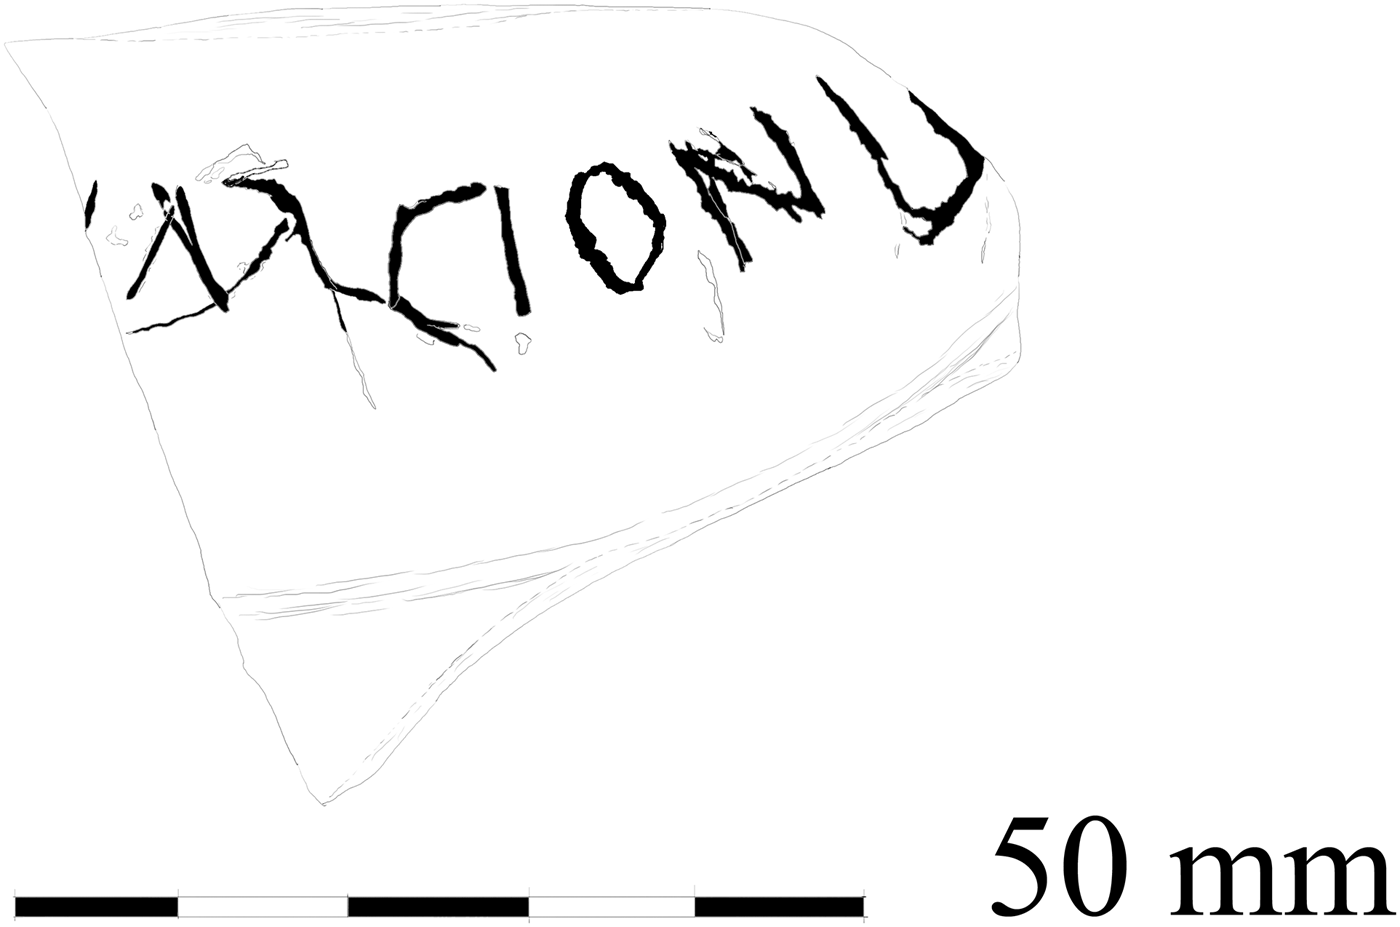
29. Ibid. (fig. 26). Two conjoining sherds of a samian cup (SG Drag. 27, sf 19,101), preserving the rim and much of the profile, found in 2014. Incised on the lower curve of the wall when the vessel was inverted: […].ΛRCIONIṢ[…], probably [M] arcionis. ‘(Property) of Marcion.’Footnote 42
Vindolanda samian graffito (No. 29). (Drawn by R.S.O. Tomlin)

30. Ibid. Rim sherd of a samian dish ornamented with leaves en barbotine (Drag. 36, sf 20,372). Coarsely incised below the rim: MFootnote 43
31. Ibid. Samian sherd (sf 20,767) apparently from the inner face of the foot-ring. Scratched: […]VCṾ[…], perhaps [I] ucu [ndus]
32. Ibid. Rim sherd of a samian bowl (Drag. 18/31, sf 20,439). Scratched below the rim: […]TFootnote 44
33. Ibid. Two conjoining base sherds of a samian dish with rouletted decoration (?Drag. 79R, sf 20,457). Coarsely incised underneath just within the foot-ring: ṾṆT[…]Footnote 45
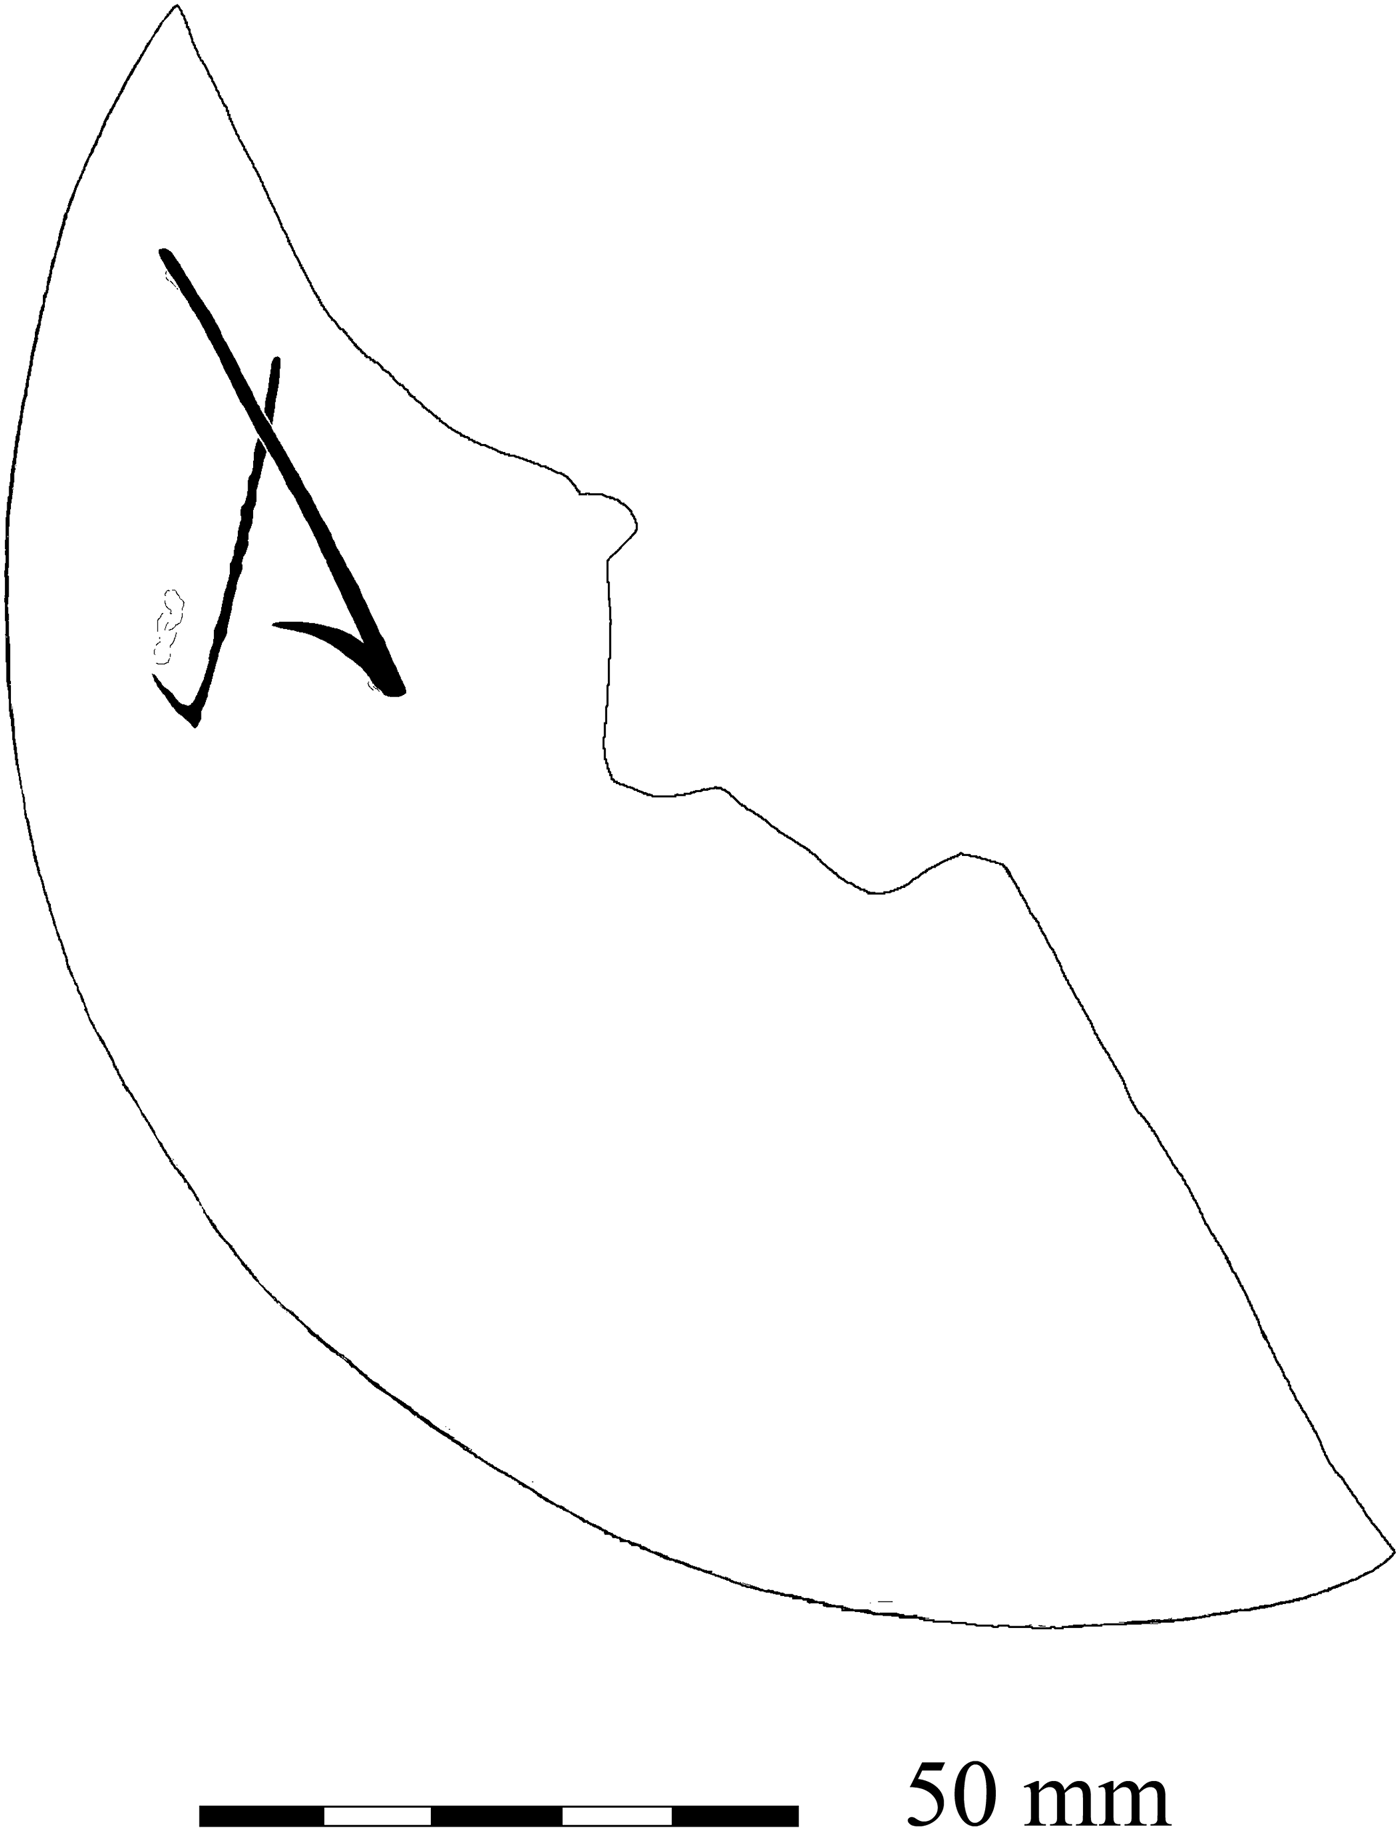
34. Ibid. (fig. 27). Rim sherd preserving the profile of a flat-bottomed black burnished dish, boldly incised underneath: ΛFootnote 46
Vindolanda coarseware graffito (No. 34). (Drawn by R.S.O. Tomlin)

35. Ibid. (fig. 28). Base sherd of a flat-bottomed grey vessel (sf 20,756), scratched underneath: ḶΛIIṬΛ, probably Laeta Footnote 47
Vindolanda coarseware graffito (No. 35). (Drawn by R.S.O. Tomlin)

36. Ibid. Wall sherd of a buff-slipped grey vessel, incised: […].ΛDṾ[…]Footnote 48
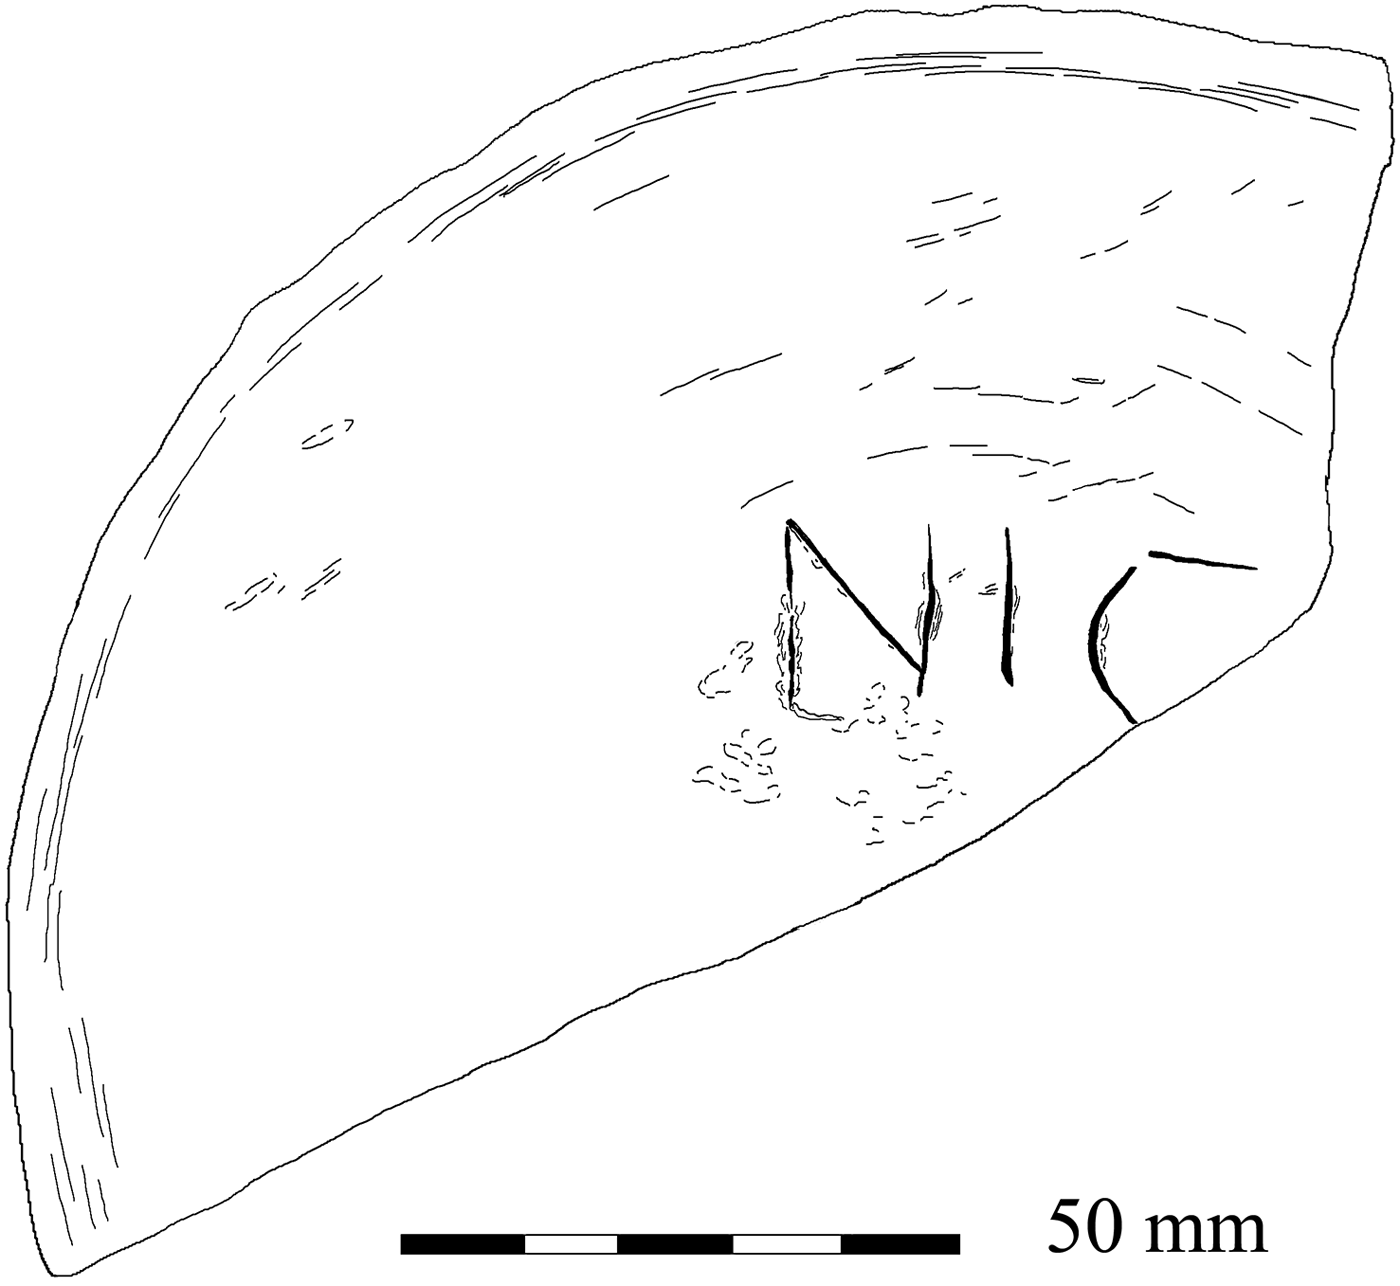
37. Ibid. (fig. 29). Base sherd of a grey flat-bottomed dish (sf 19,645) found in 2015. Scratched underneath: NIC[…]Footnote 49
Vindolanda coarseware graffito (No. 37). (Drawn by R.S.O. Tomlin)

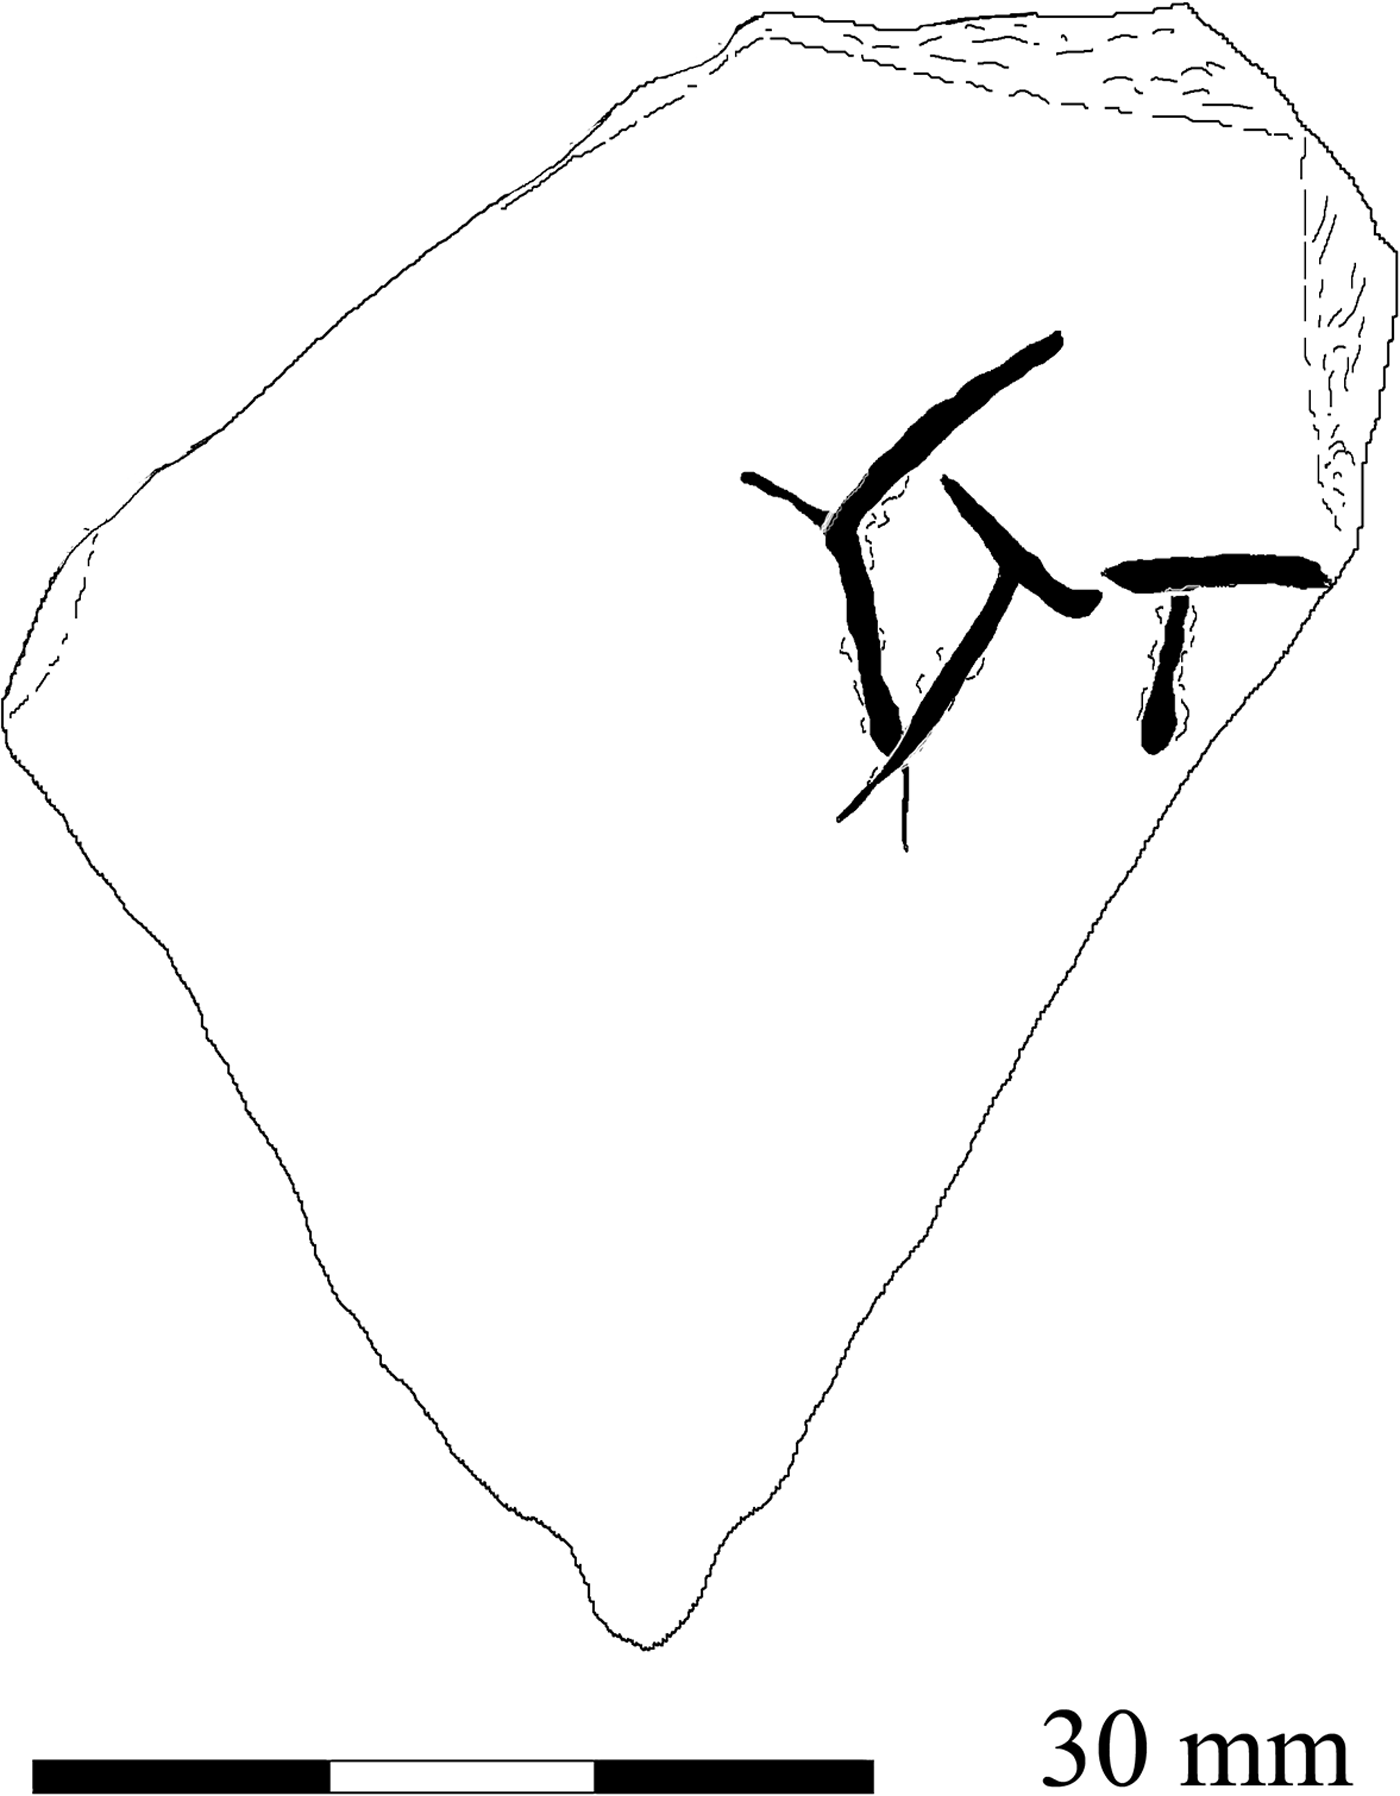
38. Ibid. (fig. 30). Base sherd of a black burnished vessel (sf 20,092), incised in cursive letters underneath: ṢAT[…], perhaps Sat [urninus] Footnote 50
Vindolanda coarseware graffito (No. 38). (Drawn by R.S.O. Tomlin)

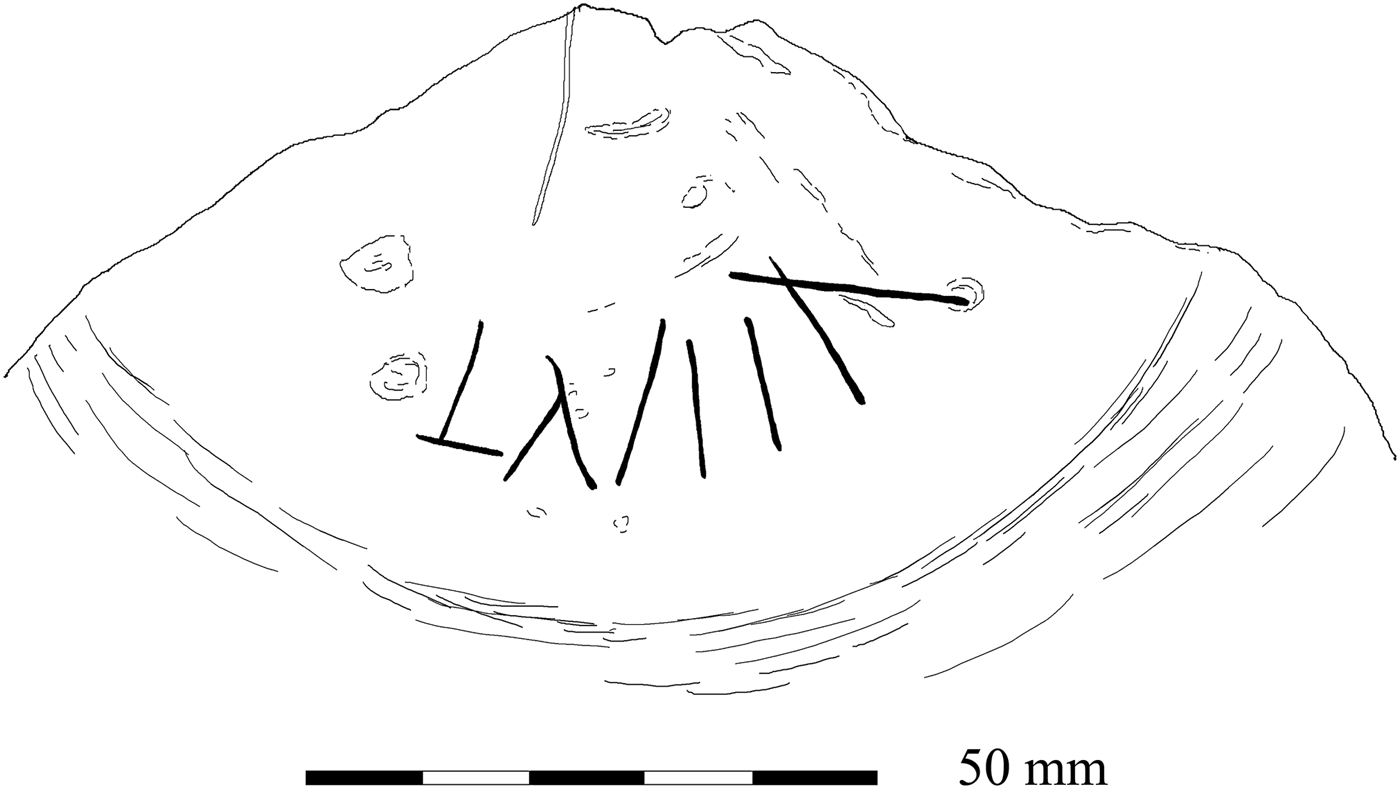
39. Ibid. Rim sherd of a grey vessel (sf 19,963), coarsely incised: XṾ[…], ‘15’ (or more).
40. Ibid. Rim sherd of a black burnished vessel (sf 20,633), incised on the edge of the rim: XVII, ‘17’.Footnote 51
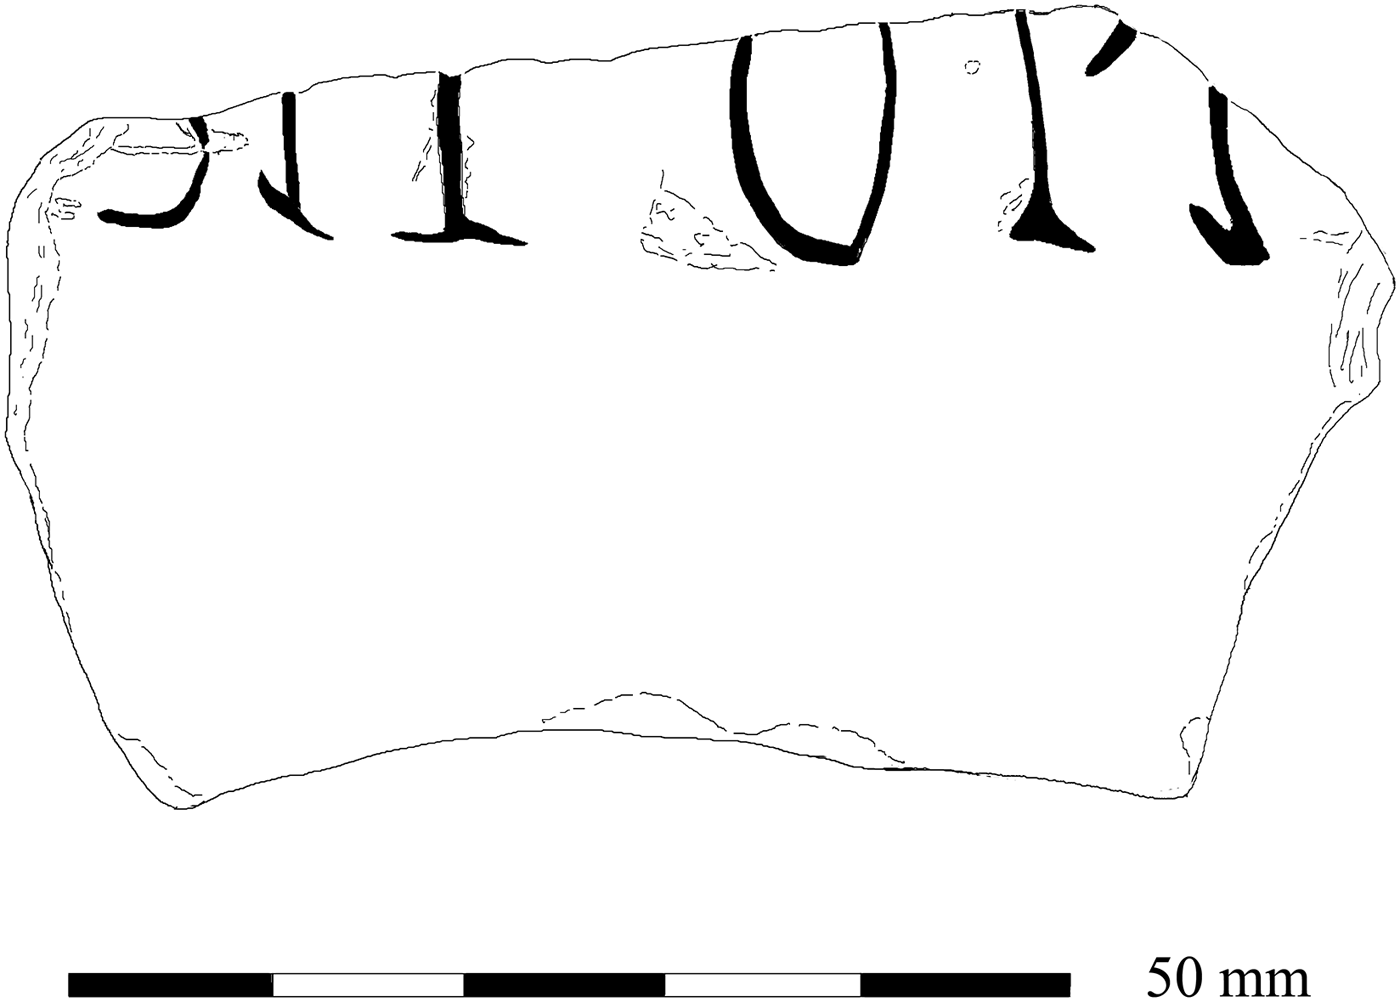
41. Ibid. (fig. 31). Wall sherd of a reddish-buff vessel (sf 20,194), incised after firing with neatly made capital letters, of which only the lower portion survives: […]SṬỊ OPṬ[…], perhaps [Se] sti Opt [ati]. ‘(Property of) Sestius Optatus.’Footnote 52
Vindolanda coarseware graffito (No. 41). (Drawn by R.S.O. Tomlin)

OXFORDSHIRE
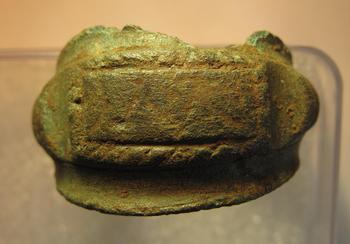
42. Bicester (SP 58 22) (fig. 32). Copper-alloy finger-ring (Henig type XI), 22 mm in diameter, foundFootnote 53 in 2016. The bezel is defined by shallow grooves top and bottom that converge to form triangular shoulders. Inscribed on the bezel within a rectangular panel: DME, d(eo) Me(rcurio). ‘To the god Mercury.’Footnote 54
Bicester copper-alloy ring (No. 42). (Photo: Arwen James)

SOMERSET
43. Binegar (ST 615 494) (fig. 33). Bezel and shoulders of a copper-alloy finger-ring, 25 mm in diameter, recordedFootnote 55 in 2016. Incised: [.]NT, probably [A]nt(…) Footnote 56
Binegar copper-alloy ring (No. 43). (Photo: PAS)

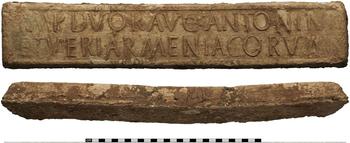
44. Westbury-sub-Mendip (ST 50 48) (fig. 34). Lead ingot or ‘pig’ of trapezoidal form, 0.522 by 0.097 m, 0.042 m thick, weight c. 19.3 kg, foundFootnote 57 in 2016. Moulded in relief: IMP DVOR AVG ANTONINI | ET VERI ARMENIACORVM, imp(eratorum) duor(um) Aug(ustorum) Antonini | et Veri Armeniacorum. ‘(Property) of the two August Emperors Antoninus and Verus, conquerors of Armenia’ (a.d. 164–9).Footnote 58
Westbury-sub-Mendip lead ingot (No. 44). (Photo: PAS)

SUFFOLK
45. Wenhaston with Mells Hamlet (TM 4285 7535), small Roman town, land off St Michael's Way (fig. 35). Base sherd of a samian vessel (CG, Drag. 18/31) foundFootnote 59 in 2015. Incised after firing on the outer wall above the foot-ring: (star) BFootnote 60
Wenhaston samian graffito (No. 45). (Drawing: Oxford Archaeology East)

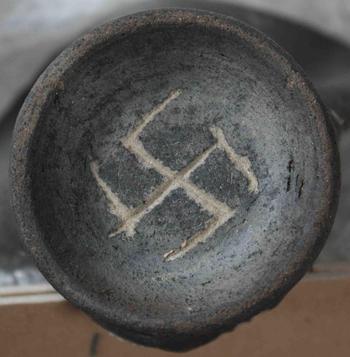
46. Ibid. (fig. 36). Five conjoining sherds and a small fragment, comprising about one-half of a sandy greyware folded beaker (late second/early third century). Neatly incised after firing underneath, within the foot-ring: a ‘hooked cross’ or swastika.Footnote 61
Wenhaston coarseware graffito (No. 46). (Photo: Oxford Archaeology East)

SUSSEX (EAST)
47. Ashburnham, Kitchenham Farm (TQ 677 125), river port and roadside settlement of the classis Britannica. Thirty-one tile fragments stamped by the fleet were foundFootnote 62 between 2007 and 2014. The impressions are all incomplete, but they include seven dies not in RIB II.5, 2481, the best-preserved being reconstructed from six fragments of tegula (fig. 37). Impressed retrograde in relief: C o L o B, cl(assis) B(ritannica).Footnote 63
Ashburnham tile stamp (No. 47). (Drawing: HAARG)

48. Ibid. (fig. 38). Two fragments of tegula, impressed retrograde: C o L o B[…]
Ashburnham tile stamp (No. 48). (Drawing: HAARG)

49. Ibid. Fragment of tegula, impressed: C Δ L[…]
50. Ibid. Fragment of tegula, impressed (reading downwards): […]|R
51. Ibid. Fragment of imbrex, impressed (reading downwards): […]B|R
52. Ibid. Fragment of tegula, impressed retrograde: CL[…]
53. Ibid. (fig. 39). Two fragments of tegula, impressed retrograde: C o L o […]
Ashburnham tile stamp (No. 53). (Drawing: HAARG)

54. Ibid. Rim sherd of a grey indented beaker (c. a.d. 250–300), foundFootnote 64 in 2011. Scratched after firing below the rim: HE[…], He […] Footnote 65
WILTSHIRE
55. North Wraxall, Truckle Hill (ST 8370 7624), Roman bath-house (fig. 40). Fragments of two bricks foundFootnote 66 in c. 2010. Impressed stamps read: L H S and [L] H SFootnote 67
North Wraxall tile stamp (No. 55). (Photo: Peter Warry)

YORKSHIRE (EAST RIDING)
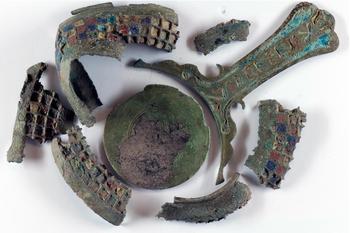
56. Eastrington (SE 80 30) (fig. 41). Eight fragments of a copper-alloy pan decorated with enamel inlay, including the whole of the (now detached) handle, foundFootnote 68 in 2016. On the upper side of the handle, in letters incised and filled with alternatingFootnote 69 blue and red enamel: VTERE FELIX, utere felix. ‘Use (this and be) happy.’
Eastrington copper-alloy pan (No. 56). (Photo: PAS)

YORKSHIRE (NORTH)
57. York (Eburacum, SE 596 517), Railway Station Roman cemetery, west of the colonia (fig. 42). Gold tag or label, 78 by 25 mm, foundFootnote 70 in 1872 close to a woman's skull with a denarius of Septimius Severus in its mouth. After being folded in half, it was pierced for attachment. The inner face had already been inscribed: FLFootnote 71
York gold tag (No. 57). (Photo: Adam Parker)

YORKSHIRE (WEST)
58. Slack (?Camulodunum, SE 084 176), Roman fort vicus (fig. 43). Three conjoining wall sherds of a South Spanish oil amphora (Dressel 20), foundFootnote 72 in 1969. Inscribed before firing: […]Ṣ[…] | […]HELENVS, […] | Helenus.Footnote 73
Slack amphora graffito (No. 58). (Drawn by R.S.O. Tomlin)

CHANNEL ISLANDS
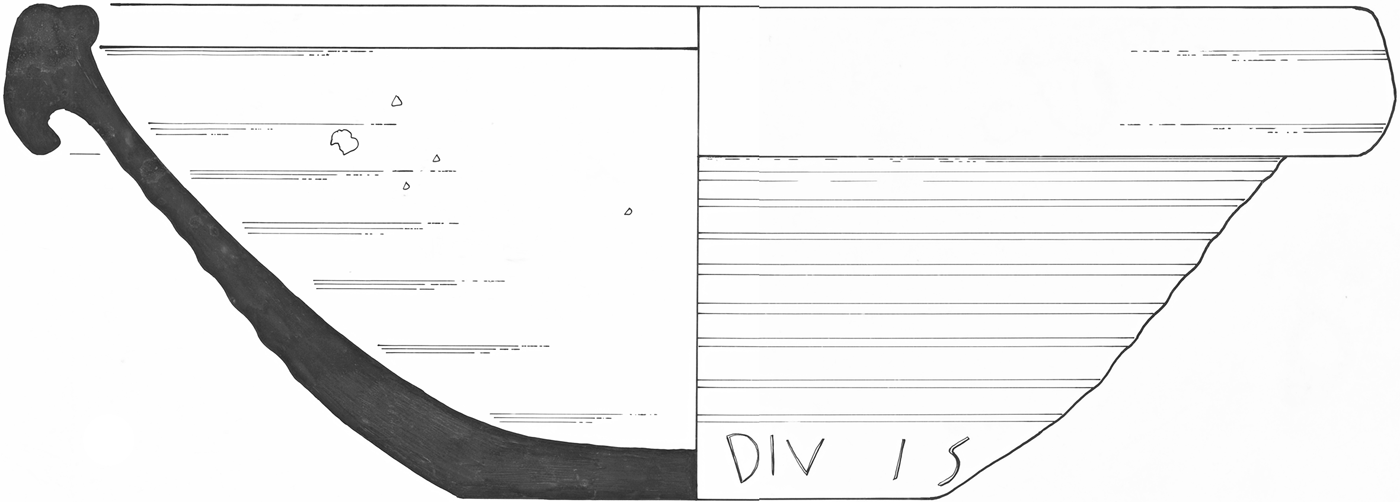
59. St Peter Port, Guernsey (WV 336 784), La Plaiderie (fig. 44). Sherd preserving the profile of a Rhineland mortarium (second or third century), foundFootnote 74 in 1984. Scratched on the wall above the base: DIV I o S, Div(…) I s(emis). ‘Div(…): one and a half.’Footnote 75
St Peter Port mortarium graffito (No. 59). (Drawing: Philip de Jersey)

ADDENDA ET CORRIGENDA
(a) RIB 2147 and 2152 (Castlecary) are respectively the upper part of an altar dedicated to the Matres, and the lower half of an altar dedicated by ‘Britons’, which are both now lost. More evidence has been foundFootnote 76 to suggest that they formed one stone in 1682, which read: MATRIBVS | MILITES | VEXILL[..]IO | LEG XX VI | BRITTON | V S L L M, Matribus | milites | vexill [at] io(nis) | leg(ionum) XX (et) VI | (et) Britton(um) | v(otum) s(olverunt) l(aeti) l(ibentes) m(erito). ‘To the Mothers. The soldiers of a detachment of Legions XX and VI and of the Britons paid their vow, gladly, willingly, deservedly.’
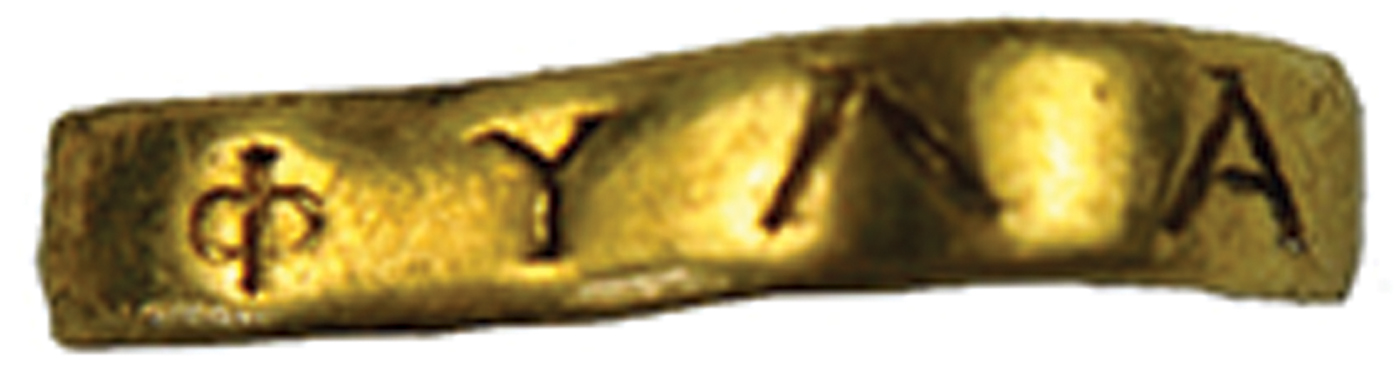
(b) RIB II.3, 2422.43 (Corbridge) (fig. 45). About one-third of the hoop of a gold-plated finger-ring, which should be read as […]ΦΥΛΑ[…] since it is broken too close to the surviving letters to show where the word began or ended. Probably [δια]φύλα[ξον], ‘Protect …’.Footnote 77
Corbridge gold-plated ring (Add. (b)). (Photo: Corbridge Roman Site)

(c) RIB II.3, 2422.51 (Croxton Kerrial), copper-alloy finger-ring read as ƆMV. Since this ring is ‘formed of three cordons’ like No. 42 (Bicester) above, and carries what appears to be the same inscription, it should be read: DME, d(eo) Me(rcurio). ‘To the god Mercury.’Footnote 78
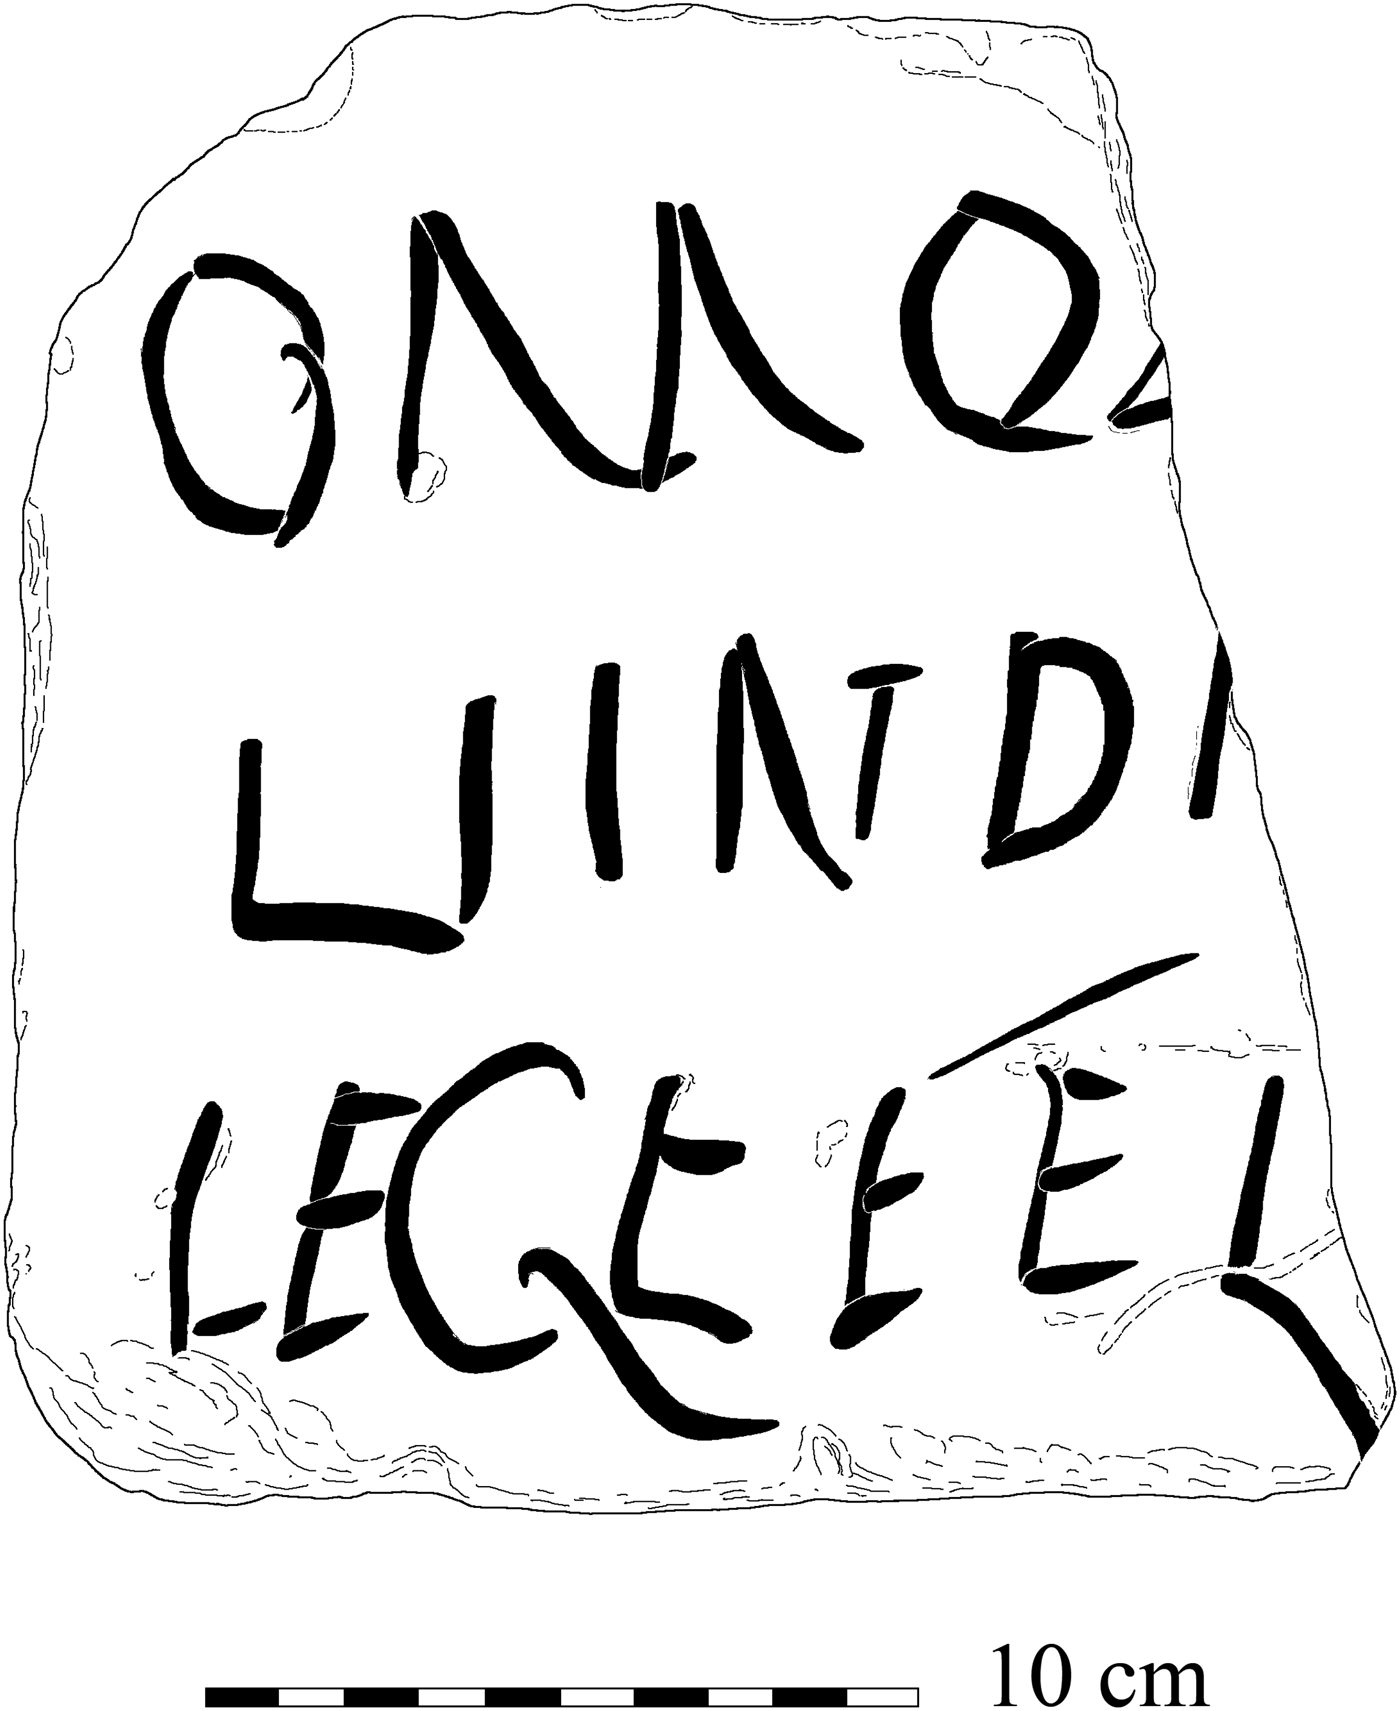
(d) RIB II.5, 2491.155 (Corbridge), inscribed fragment of brick, 0.17 by 0.19 m, 43 mm thick (fig. 46).Footnote 79 The published drawing is not quite accurate. It should be read: OMO.[…] | LIINDI[…] | LEGEFEL[…], perhaps Omo [bonus] | Lendi [nie(n)sis] | lege fel [iciter]. ‘Omobonus the Lendiniensis, read (this) happily.’Footnote 80
Corbridge inscribed brick (Add. (d)). (Drawn by R.S.O. Tomlin)

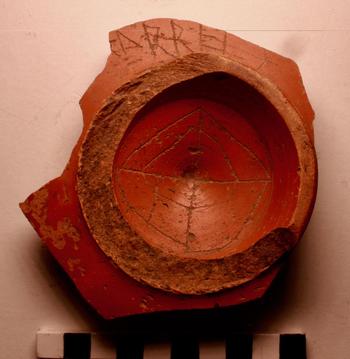
(e) RIB II.7, 2503.785 (Corbridge) (fig. 47). Base sherd of a samian bowl (Drag. 18/31) foundFootnote 81 in the 1930s and read as: […]SΛRREI S (acephalous). The published drawing is not quite accurate. There are two graffiti made after firing. (1) Underneath within the foot-ring, two diameters intersect at right angles, linked by two sequences of concentric lines. This is a geometric pattern intended to identify the vessel. (2) On the wall just above the foot-ring: […].ΛRREI SFootnote 82
Corbridge samian graffito (Add. (e)). (Photo: R.S.O. Tomlin)

(f) City of London, the Bloomberg writing-tablets. The suggested form of abbreviation for reference to these texts was omitted from the edition.Footnote 83 It should be Tab. Lond. Bloomberg.
CHANGES OF LOCATION
(a) RIB 467 (Chester). Centurial stone now in the Grosvenor Museum, said to be found in 1748 ‘probably between Newgate street and the East Wall, from which it probably came’. The location should be the Groves (SJ 4118 6613), south-east of the fortress on the bank of the river Dee.Footnote 84
(b) RIB 2153 (Castlecary). This altar fragment, recorded as being in the National Museum of Antiquities, Edinburgh, but ‘not now available’ to the editors of RIB, has been rediscovered in a remote store.Footnote 85
(c) RIB 2283 (Middleton, Kirkby Lonsdale). This milestone, after being knocked over by cows, has been re-erected nearby in the churchyard of the Church of the Holy Ghost, Middleton (Cumbria), for its greater safety.Footnote 86
FALSUM
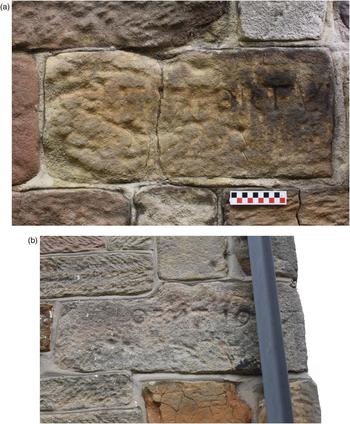
Ireton Wood (SK 287 478), Derbyshire (fig. 48a). Squared block of buff sandstone, 0.55 by 0.24 m, depth unknown, foundFootnote 87 in 2016 built into the west (gable end) wall of Whitehouse Farm at 1.25 m above ground-level. It is incised with one line of capital letters c. 50 mm high, those to the left being much worn and weathered: c.5F̣ỌṚTVṆ[…]. Despite this sequence suggestive of Fortuna or Fortunatus, the inscription is probably not Roman.Footnote 88
Ireton Wood, inscribed stones (Falsum). (Photo: R.S.O. Tomlin)