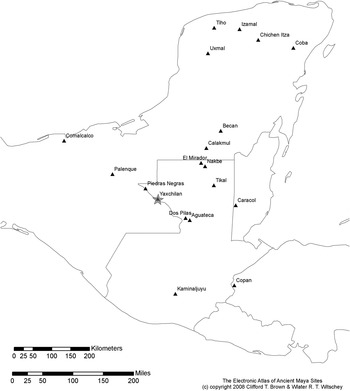


The ancient Maya of the Late Classic period (ca. seventh to ninth centuries a.d.) were surrounded by the material remains of their past. Over the centuries, Maya sites accrued stone and wood sculptures, painted murals, buildings, and hieroglyphic texts made by and about ancestors. Although damage to these objects and buildings was at times accidental, the Maya made decisions concerning preservation, destruction, display, and concealment of the material remains of their pasts. This article investigates some of these choices, focusing on the reuse of monumental stone sculptures at Yaxchilan, an ancient Maya polity located on the Usumacinta River in Chiapas, Mexico (Figure 1).
Maya area, with location of Yaxchilan. Map from The Electronic Atlas of Ancient Maya Sites © 2008 Clifford T. Brown and Walter R. T. Witschey.

This essay is one of several in which I explore reuse, burial, and other manipulations of ancient sculptures (O'Neil Reference O'Neil2009, Reference O'Neil2012). These studies raise a number of questions. For example, why did the ancient Maya keep some sculptures on view but bury others? Why did they move some from their original locations to new ones, and how does the movement of sculptures alter their meaning? How did additions of newer sculptures change older sculptures, and how did the presence of older sculptures affect the reception of newer ones? In addition, was there importance accorded to the materiality of reused sculptures, and were they perceived differently because they came from the past?
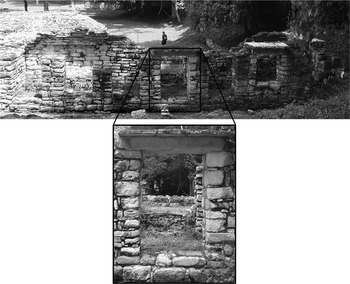
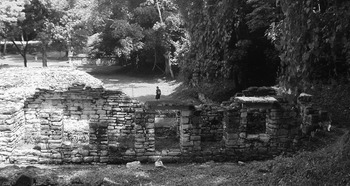
I begin to address these questions and others through close study and comparison of Yaxchilan Structures 12 and 22, where the Maya reset stone lintels from the fifth and sixth centuries a.d. in eighth-century buildings, during the reign of the ruler Bird Jaguar IV (Figure 2). Analyzing these sculptures within the historical contexts of their creation and reuse and in relation to other monuments, I conclude that the lintels’ antiquity played a crucial role in how they were experienced in the eighth century a.d.
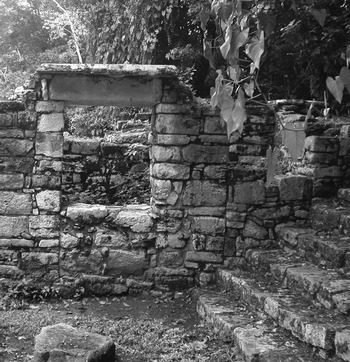
Structure 12 and Lintel 36 in situ (reconstructed), Yaxchilan, Chiapas, Mexico. Photographs by author.

In Structure 22, for instance, the Maya reset older lintels in association with a new lintel that narrated a connection between Bird Jaguar IV and a fifth-century ruler. The physical juxtapositions of lintels from different moments in time and the textual narration of a connection between rulers from different moments in time constitute parallel and complementary historiographic practices. For Structure 12, study of the reset lintels’ physical context and textual content in comparison with the contemporaneous creation of Hieroglyphic Stairway 1 suggests that the lintels not only narrated the past but also were considered relics from that past. Furthermore, there are indications that older lintels could be used to make contact with the past for purposes of ancestor veneration and the reshaping of history, both important for religious and political purposes.
In addition, another fundamental question—following Jaš Elsner (Reference Elsner, Nelson and Olin2003:209) regarding ancient Roman monuments and early modern English architecture—is whether memory could inhere in the materiality of Maya monuments. Elsner asks about memory and materiality in response to the burgeoning literature on memory studies in historical, sociological, and anthropological discourse. Maintaining that not enough attention had been given to objects’ forms in relation to memory studies, he calls on art historians and others to interrogate how objects may spur memory, particularly “the ways objects themselves, as material forms, may signify through a specifically material semiotics” (Elsner Reference Elsner, Nelson and Olin2003:209). Elsner concludes that memory can inhere in monuments’ materiality by way of visible damage to them. This conclusion is applicable to Maya sculpture. Yet in this article, I use the examples of Structures 12 and 22 to argue that memory can inhere in monuments’ materiality in other ways as well. These may include an unusual physical context, signs of resetting, or other material indices of use and transformation; inscribed texts referring to one or more episodes of use; or the perception that a person has become a part of an object, whether because he or she made contact with the object or because his or her life essence was imbued in it during a dedicatory rite.
My approach follows objects as they move through time and are transformed by changing contexts. This research relates to studies of the social lives, cultural biographies, or life histories of things, in which analysis is directed toward objects’ use, reuse, modification, and transformation, both contemporaneous with the work's production and in later times (Appadurai Reference Appadurai and Appadurai1986; Kopytoff Reference Kopytoff and Appadurai1986). Particularly important to these explorations is how objects function in changing physical, spatial, temporal, social, or cultural contexts, with special attention paid to the human interactions with them over time, with or without physical changes to the object. Moreover, crucial to some of these studies is the understanding that objects can accumulate or accrue histories (Gosden and Marshall Reference Gosden and Marshall1999:169–170; Joyce Reference Joyce, Joyce and Gillespie2000:190).
Studying how people engaged with Maya monumental stone sculptures over their life histories offers insight both into the people and the objects and may provide glimpses into Late Classic Maya perception of the sculptures, their material qualities, and symbolic valences of their materiality in various contexts.
Also fundamental to my analyses are how humans may have experienced these sculptures in the ancient past; this entails examination of the physical formats of the reset lintels and their placement in buildings. I argue that these installations created physical expressions of ancient Maya conceptions of intersecting cycles of time, history, and rulership, and inspired engagement with the sculptures and buildings in rites of ancestor commemoration, world renewal, and the shaping of social memory.
Although my primary foci are the buildings with reset lintels, my study also sheds light on other Yaxchilan structures, including Structures 23 and 33, where lintels were kept in place and maintained in buildings where deceased rulers and family members were buried. The buildings were transformed into places of memory for those ancestors, with the tombs and older lintels functioning as material loci for access to the past. Likewise, the Maya used these buildings for commemorative rites and the shaping of memory.
These analyses also articulate with studies of memory, particularly of the creation, maintenance, and modification of “collective memory” or “social memory” (Connerton Reference Connerton1989; Halbwachs Reference Halbwachs, Ditter and Ditter1980; Nora Reference Nora and Roudebush1989; Van Dyke and Alcock Reference Van Dyke, Alcock, Dyke and Alcock2003). Collective or social memory is understood as memory that is continually shaped, manipulated, and performed in the formation and sustenance of group identity. Although memory may be created and experienced in many ways, my study looks to memory as made and performed through material forms, involving the use and manipulation of materials, objects, and places. The examination of performance as an integral part of memory recalls Paul Connerton's (1989:4–5, 45, 61, 70) work on the role of commemorative ceremonies and ritual re-enactments in the shaping and sustaining of communal or social memory. Yet there were varying scales of the performance of memory at Yaxchilan, with some rites in the Main Plaza, which were open to larger audiences, and others in smaller, more restricted shrines such as Structures 12 and 22. Likewise, the seclusion of the reset lintels in these shrines precluded wider access to the polity's sacred ancestral relics.
For the Classic Maya, creating links with the past and ancestors was important for religious and political reasons. As Patricia McAnany (Reference McAnany1995) has demonstrated, veneration of ancestors was and is a fundamental part of ancient and modern Maya spirituality and ritual, but there also are political and economic motivations for Maya ancestor veneration. According to McAnany (Reference McAnany1995:1), “Communing with deceased progenitors was not a religious experience divorced from political and economic realities…; rather, it was a practice grounded in pragmatism that drew power from the past, legitimized the current state of affairs (including all the inequities in rights and privileges), and charted a course for the future.”
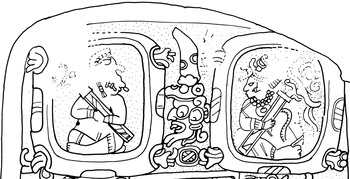
Classic period Maya rulers used stone sculpture to create and display their familial pedigrees and connections to ancestors. Maya hieroglyphic writing and Long Count dating enabled specificity in history and allowed the Maya to record, retain, and transmit historical details across centuries. These texts frequently included rulers’ parentage statements and juxtaposed persons and events from different moments in time. The ancient Maya also portrayed ancestors on monumental sculptures, thereby making them visible in contemporary spaces and producing opportunities for commemorating them (Houston and Stuart Reference Houston and Stuart1996; McAnany Reference McAnany1995:39–47, Reference McAnany and Houston1998; O'Neil Reference O'Neil2005:129–182; Tate Reference Tate1992:59–62, 66–67; Taube Reference Taube2004). Yaxchilan is rich in sculptural representations of ancestors. A common form of depicting ancestors at Yaxchilan is within cartouches in the upper registers of stelae. This placement correlates with a celestial realm, from which ancestors witness and sanction the ceremonial rite (Tate Reference Tate1992:98–101) (Figure 3). Ancestors were also depicted posthumously in historic scenes, comparable to modern European and American history paintings. These representations functioned as historical precedents that were vital for political legitimization.
Upper portion of Yaxchilan Stela 10, temple side, showing ancestors within cartouches. Drawing by Carolyn Tate (Reference Tate1992:Figure 130b), courtesy of Carolyn Tate.

The ancient Maya also conducted ceremonies and made offerings in the form of incense, fire, smoke, and blood in order to commemorate, celebrate, and nourish their ancestors. References to tomb re-entries and fire ceremonies appear in hieroglyphic texts (Fitzsimmons Reference Fitzsimmons1998; Stuart Reference Stuart and Houston1998:396–399), and traces of these practices appear in the archaeological record. These traces include smoke-blackened censers in and on elite buildings and common houses, as at Palenque (Cuevas García Reference Cuevas García, Miller and Martin2004); graves with evidence of post-interment activity, such as blackening from smoke, jumbled bones, and newer objects deposited upon re-entry, as at Caracol and Piedras Negras (Chase and Chase Reference Chase and Chase1996; Escobedo Reference Escobedo, Miller and Martin2004; Houston et al. Reference Houston, Escobedo, Scherer, Child, Fitzsimmons, Ruíz, Ruz and de León2002); and offerings placed in chambers outside sealed tombs, as at Copan (Sharer et al. Reference Sharer, Sedat, Traxler, Miller, Bell, V and Fash2005:173).
Portraying ancestors on monuments, narrating connections to them in hieroglyphic texts, creating loci of commemoration at their funerary pyramids, realizing commemorative ceremonies in their honor, and interacting with the monuments ancestors commissioned and used were among the strategies that the eighth-century Maya used to make visible and tangible connections to their ancestors. Ruth Van Dyke and Susan Alcock (2003:4) define the “overlapping categories of materially accessible media through which social memories are commonly constructed and observed: ritual behavior, narratives, objects and representations, and places.” We see all of these at play in the Yaxchilan examples described in this article, and evidence indicates that the eighth-century Maya explicitly used them together in the creation and shaping of social memory at various scales for different segments of the population.
AN INTRODUCTION TO YAXCHILAN
Yaxchilan—its ancient name probably Pa’ Chan, meaning “broken” or “split sky” (Martin Reference Martin2004)—is located on the southwestern bank of an oxbow bend in the Usumacinta River. Yaxchilan's standing architecture dates from the sixth to the early ninth centuries (García Moll Reference García Moll1996:40–45), although the hieroglyphic texts recorded in stone narrate dynastic information for the polity from as early as the fourth century a.d.
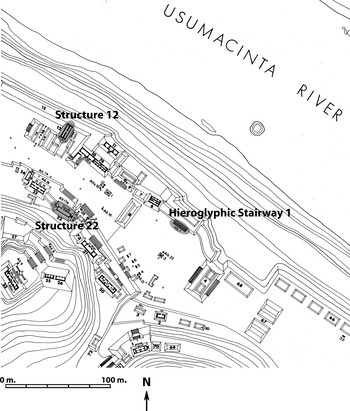
One part of the city's core stretches along the river bank, with buildings on both sides of the Main Plaza, which runs on a northwest-southeast axis (Figure 4). The Main Plaza consists of an elongated space that opens to the southeast into a much wider and more expansive plaza measuring more than 70 × 80 m. Natural limestone hills rise up to the south and southwest, providing a dramatic backdrop for structures built on the elevated terraces that edge the plaza. The hills also function as monumental substructures for buildings constructed atop them at various elevations, including Structure 33 and the buildings of the Pequeña Acropolis and the South Acropolis.
Detail of Yaxchilan map, showing locations of Structures 22 and 12, Hieroglyphic Stairway 1, and the Main Plaza. Map from Graham and von Euw (Reference Graham and von Euw1977:3–1:7). © President and Fellows of Harvard College.

In and around Yaxchilan's buildings are numerous monumental limestone sculptures, including stelae, altars, door lintels, and hieroglyphic stairways. Images carved in low relief on these sculptures depict nobles conducting ceremonies and dominating captives. Texts, either alone or accompanying the images, narrate events of religious and political import. The texts and images principally concern the k'uhul ajaw (holy lord), his family, and attendants, their relations with ancestors and the supernatural, and their interactions, both friendly and hostile, with other polities.
Explorers and photographers in the late nineteenth and early twentieth centuries such as Alfred Maudslay (Reference Maudslay1889–1902), Teobert Maler (Reference Maler1901–1903), and Sylvanus G. Morley (Reference Morley1937–1938) mapped the city's architecture, photographed the sculptures, and drew selections of their hieroglyphic texts. Later, Ian Graham and Eric von Euw (1977; see also Graham Reference Graham1979, Reference Graham1982) began to systematically document the sculptures through detailed drawings and photographs. The high quality and widespread availability of the drawings have been critical in stimulating epigraphic, iconographic, and other research about Yaxchilan.
Archaeological excavations also have contributed to our knowledge of the site's physical composition and chronology. The Proyecto Yaxchilan, directed by Roberto García Moll of Mexico's Instituto Nacional de Antropología e Historia (INAH), conducted excavations at Yaxchilan from 1973 to 1985, and a Japanese team worked there from 1989 to 1992. Publications resulting from these projects have focused on architecture and burials (García Moll Reference García Moll2003, 2004a, 2004b), ceramics (López Varela Reference López Varela1989), lithics (Brokmann Reference Brokmann2000; Kaneko Reference Kaneko, Laporte and Escobedo1998, Reference Kaneko2003), and skeletal analyses (Hernández and Lourdes Márquez 2006).
Epigraphic studies have revealed the polity's chronology, dynastic history, and inter-polity relations. Morley (Reference Morley1937–1938) deciphered many of the dates inscribed on the sculptures and set the foundation for later historical interpretations. Three decades later, Tatiana Proskouriakoff (Reference Proskouriakoff1963, Reference Proskouriakoff1964) began to map onto this chronology a narrative involving historical actors who were born, acceded to power, warred, and died—a narrative replete with familial connections and political jockeying, particularly in the seventh- and eighth-century reigns of Itzamnaaj Bahlam III and his son, Bird Jaguar IV. Peter Mathews (Reference Mathews1988, Reference Mathews and Saborit1997) further developed the site's chronology and historical narratives, particularly with his vital contributions to understanding the polity's Early Classic period. In fact, the dates for the Structures 12 and 22 lintels and Hieroglyphic Stairway 1 used in this article primarily come from Mathews (Reference Mathews and Saborit1997:71–119), with modifications from the work of Simon Martin and Nikolai Grube (2008:118–120).
A host of scholars built upon these foundations, particularly as script decipherment continued apace, to reveal more historical details from the site's wealth of monuments and inscriptions. Yaxchilan's architecture, sculpture, and inscriptions have offered opportunities for scholars to research a wide range of topics, including the political implications of the site's carved images and inscriptions; understandings of ancient Maya religion and ritual; and the social and artistic roles of women and their representation in sculpture and patronage of architecture (Grube Reference Grube, Bray and Manzanilla1999; McAnany and Plank Reference McAnany, Plank, Inomata and Houston2001; Martin and Grube Reference Martin and Grube2008; Miller Reference Miller, Sabloff and Henderson1993:373–389; Nahm Reference Nahm1997, Reference Nahm2006; Noble Bardsley Reference Noble Bardsley and Fields1994; Plank Reference Plank2004; Schele and Freidel Reference Schele and Freidel1990; Schele and Mathews Reference Schele, Mathews and Culbert1991; Tate Reference Tate1992). Carolyn Tate's (1992) book on Yaxchilan is an especially important contribution to our understanding of the site's monuments and histories and an invaluable resource for further study, both because of her analyses of sculptures and her detailed catalog of sculpture, architecture, and hieroglyphic texts.
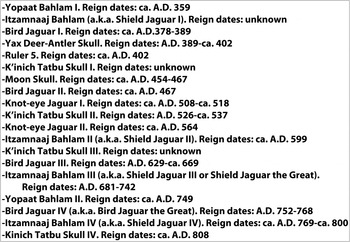
There are records of at least 19 Yaxchilan rulers who lived from the fourth to the ninth centuries a.d. (Mathews Reference Mathews1988, Reference Mathews and Saborit1997; Martin and Grube Reference Martin and Grube2008:116–137) (Figure 5). Some names appear on sculptures the rulers dedicated, though the majority of rulers are known only from posthumous texts at Yaxchilan or elsewhere. Rulers’ names repeat at Yaxchilan, for acceding rulers frequently assumed the names of their predecessors and thereby made explicit connections to them. When repeating names, they usually skipped a generation, often taking a grandfather's name. Robert Carlsen and Martín Prechtel (Reference Carlsen and Prechtel1991:26–29) describe an analogous custom of the contemporary K'iche’ and Tz'utujil Maya of naming a grandchild after a grandparent, where the repeating of names relates to the rebirth or regeneration of an ancestor's life essence in a descendant. Susan Gillespie (Reference Gillespie, Silverman and Small2002:68, 71–72) hypothesizes that Classic period Maya naming patterns indicate comparable beliefs in soul regeneration.
Table of Yaxchilan rulers and reign dates. Adapted from Mathews (Reference Mathews1988, Reference Mathews and Saborit1997) and Martin and Grube (Reference Martin and Grube2008:116–137).

Yaxchilan's most prolific sculptural and architectural patrons were Itzamnaaj Bahlam III (Shield Jaguar III), who reigned from a.d. 681 to 742, and his son Bird Jaguar IV, who reigned from a.d. 752 to 768.Footnote 1 Together, they commissioned 75% of the site's extant sculptures (Mathews Reference Mathews1988:14). Much of Yaxchilan's standing architecture comes from these two reigns, though the INAH archaeological project exposed Early Classic platforms and structures on the first terrace above the river, including Structure 7's substructure and the Structures 77 and 78 platforms (García Moll Reference García Moll2003:16, 337, 343). Comparably, there are relatively few surviving monumental sculptures dating before the late seventh century. The extant early sculptures are Structure 22's Lintels 18 and 19, which are undated but may be from the fifth century; Stela 14 of a.d. 523, a monument of Knot-eye Jaguar I; seven sixth-century lintels (Lintels 34, 35, 37, 47, 48, 49, and 60) from the reign of K'inich Tatbu Skull II that were reset in Structure 12; and Lintels 20 and 22, also probably from the sixth century, in Structure 22.
There are no other extant monuments from the polity's early rulers, though their descendants made posthumous textual and pictorial records about them. The sixth-century lintels reset in Structure 12 narrate a king list from the fourth-century dynasty founder Yopaat Bahlam I to the sixth-century ruler K'inich Tatbu Skull II, and the eighth-century Hieroglyphic Stairway 1 begins with the founder and culminates with Bird Jaguar IV in a.d. 761 (Mathews Reference Mathews and Saborit1997:71–119). Deep excavation at Yaxchilan could potentially unearth more monuments from those early reigns, as archaeologists have discovered at other sites such as Copan and Tikal (Fash Reference Fash and Houston1998; Jones Reference Jones and Culbert1991; Sharer Reference Sharer, Bell, Canuto and Sharer2004; Stuart Reference Stuart, Bell, Canuto and Sharer2004). Alternatively, if the dynasty came from elsewhere and moved to Yaxchilan, their Early Classic remains could be in an altogether different location. Indeed, Stephen Houston and others are pursuing this possibility through excavations at El Zotz, an archaeological site in the Peten that shares the Pa’ Chan—“split sky”—Emblem Glyph with Yaxchilan (Houston et al. Reference Houston, Escobedo, Nelson, Meléndez, Quiroa, Arroyave, Cambranes, Laporte, Arroyo and Mejía2007:395, 413–417).
A number of scholars have suggested that Bird Jaguar IV's profuse sculptural patronage and focus on portraying his ancestors resulted from political insecurity, specifically that he commissioned the sculptures after his accession in response to an unstable political situation and a contested claim to the throne after his father's death. Proskouriakoff (Reference Proskouriakoff1963, Reference Proskouriakoff1964) first observed that there was a ten-year period between Itzamnaaj Bahlam III's death in a.d. 742 and Bird Jaguar IV's accession in a.d. 752. During this apparent interregnum, there is no record of a k'uhul ajaw at Yaxchilan. Observing the proliferation of sculptures that depict or refer to events that took place before his accession or at the start of Bird Jaguar IV's reign, Proskouriakoff (Reference Proskouriakoff1963:163) concluded that Bird Jaguar IV took “great pains to prove and document his legitimacy” after his accession in the face of competition for the throne.
Through the creation of sculptures of his own ancestors, Bird Jaguar IV cultivated an image of a strong pedigree and an ordered succession, which he demonstrated by portraying a series of events that purportedly took place during his forebears’ lifetimes. These include posthumous portrayals of his grandfather (Bird Jaguar III), mother (Lady Ik’ Skull), and father (Itzamnaaj Bahlam III), some with images of Bird Jaguar IV and his father conducting ceremonies before his father's death (Martin and Grube Reference Martin and Grube2008:122, 128–130; Mathews Reference Mathews1988:135, 155; Noble Bardsley Reference Noble Bardsley and Fields1994:91; O'Neil Reference O'Neil2005:157–182; Proskouriakoff Reference Proskouriakoff1963:163–164; Schele and Freidel Reference Schele and Freidel1990:272–276; Stuart Reference Stuart1995:173–175; Tate Reference Tate1992:125–128, 133).
Mathews (Reference Mathews1988:215) has hypothesized that these events did happen but were recorded only in retrospect. Sandra Noble Bardsley (Reference Noble Bardsley and Fields1994:87), in contrast, has argued that Bird Jaguar fabricated them and that much of his sculptural program amounts to “rewriting history” and “propaganda.” Grube (Reference Grube, Bray and Manzanilla1999) and J. Kathryn Josserand (Reference Josserand2007) have presented additional evidence that supports this conclusion, citing references in other polities’ monuments to another possible heir and ruler during Yaxchilan's interregnum. In particular, Dos Pilas Hieroglyphic Stairway 3 (Step II) portrays a captive from Yaxchilan who may have been heir to Itzamnaaj Bahlam III. In addition, Piedras Negras Panel 3 mentions the visit to Piedras Negras of an otherwise unknown Yaxchilan ruler during the Yaxchilan interregnum. This evidence, albeit limited, indicates that Bird Jaguar IV was not Itzamnaaj Bahlam's hand-picked successor. If this was the case, in his rewriting or reshaping of the polity's visible history, Bird Jaguar IV used sculptures as tools of social memory for the legitimization of his authority, comparable to how Van Dyke and Alcock (Reference Van Dyke, Alcock, Dyke and Alcock2003:3) describe multiple cultures’ construction and manipulation of social memory in response to societal ruptures.
In addition to commissioning new representations and narrations about the present and past, Bird Jaguar IV also manipulated older lintels, reusing them in Structures 22 and 12. Examining these buildings sheds light not only on the eighth-century political situation but also on the status and perception of stone sculptures at Yaxchilan.
STRUCTURE 22: AN ECLECTIC COLLECTION OF LINTELS
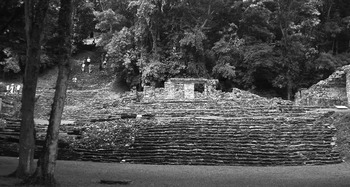
Yaxchilan Structure 22 is located on a high platform on the long part of the Main Plaza's southwestern side, and a wide stairway rises from the plaza to the top of the platform (Figure 4 and Figure 6). The building has three carved lintels in the doors of its front façade and a carved lintel in each of the building's two side doorways (Tate Reference Tate1992:200). The lintels range in date from as early as the fifth century to the eighth century, but the standing building appears to date to the eighth century, in the reign of Bird Jaguar IV.
Yaxchilan Structure 22 and stairway from the Main Plaza. Photograph by author.

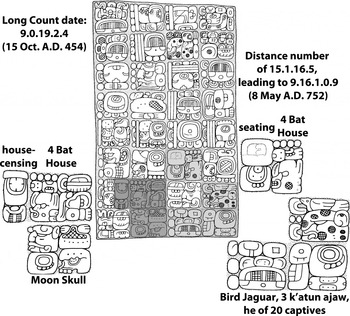
Lintel 21, set in the front façade's central doorway, narrates two events that took place in the same house about 300 years apart (Stuart Reference Stuart and Houston1998:390–391) (Figure 7). The first was on 9.0.19.2.4 (15 October a.d. 454), when Moon Skull, seventh in line from the founder, performed a house dedication at the Four Bat House. A distance number of over fifteen k'atuns (15 twenty-year periods) moves the chronology forward just under 300 years, to the date 9.16.1.0.9 (8 May a.d. 752), when Bird Jaguar IV participated in a “seating ceremony” in the Four Bat House, nine days after his accession (Stuart Reference Stuart and Houston1998:392). The text makes an explicit analogy between the two events and rulers, with Moon Skull's house-dedication ceremony compared to Bird Jaguar's seating ceremony. Moon Skull's dedication presumably involved an earlier version of Structure 22, and Bird Jaguar's seating would have taken place in the later phase of the building.Footnote 2
Yaxchilan Lintel 21. Drawing by Eric von Euw (1977). © President and Fellows of Harvard College.

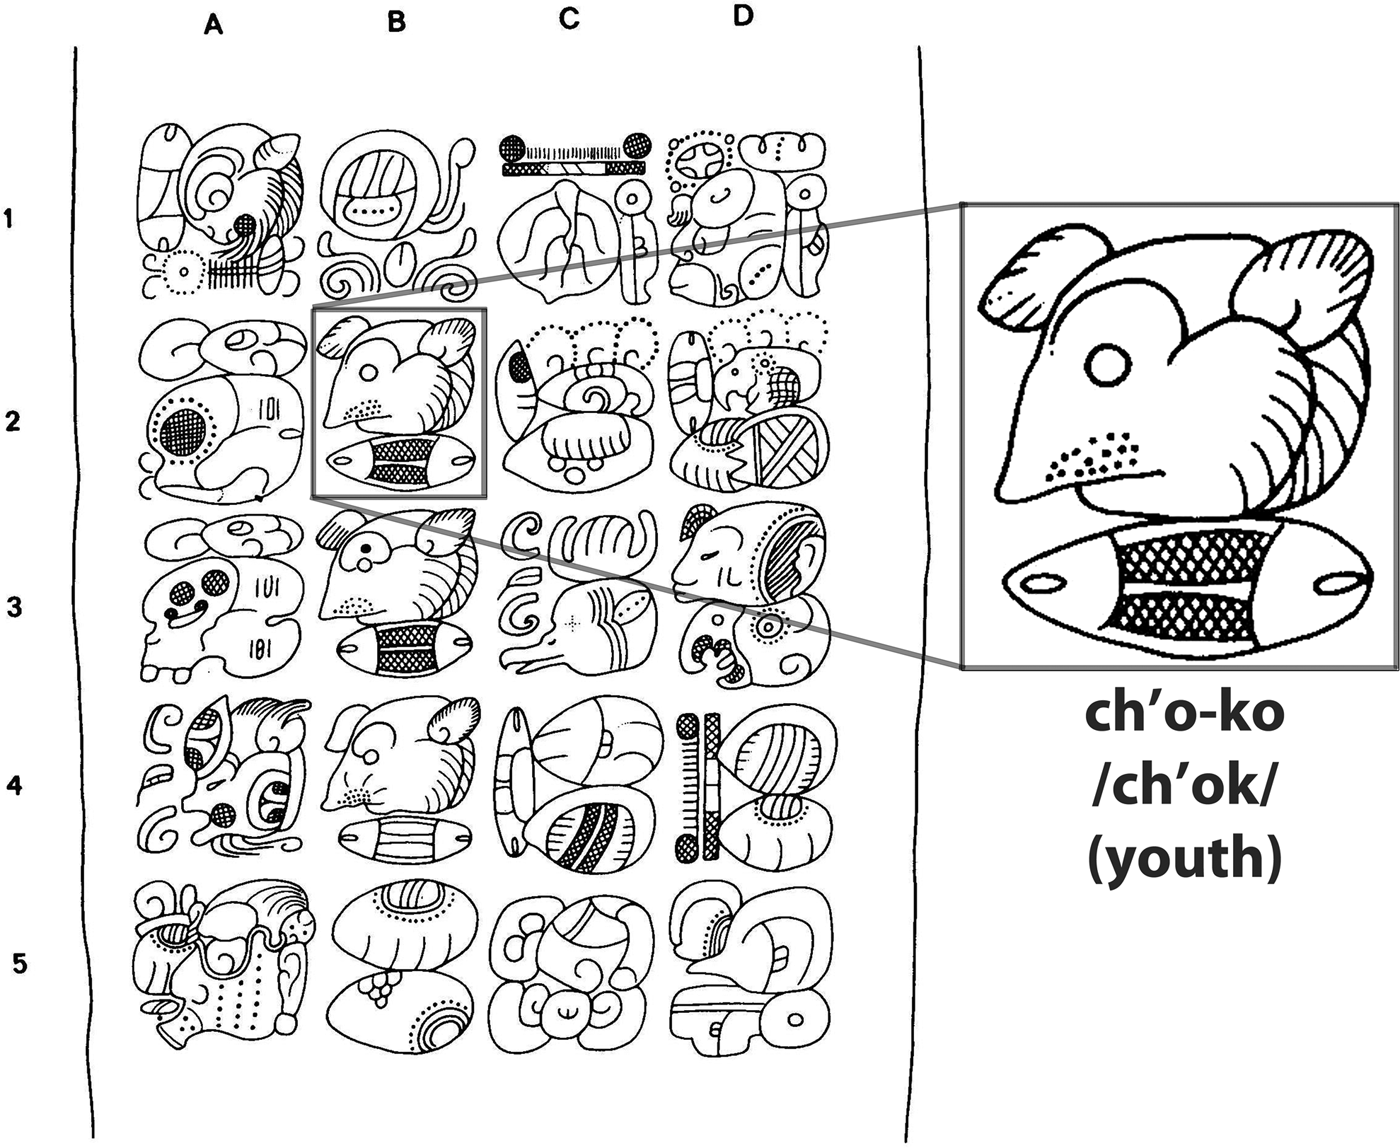
Furthermore, Bird Jaguar IV created another association with the past through the resetting of the other lintels in that building. Whereas Lintel 21 textually narrates a past event, the other lintels (Lintels 18, 19, 20, and 22) are older than the building and were reset in this house for its eighth-century dedication. Although they have no dates, Lintels 18 and 19 bear incised hieroglyphs in what appear to be an early calligraphic style. These are suspected to be the earliest lintels from Yaxchilan, perhaps from the mid-fifth century, and they may come from the earlier version of the Four Bat House (Martin and Grube Reference Martin and Grube2008:119; Morley Reference Morley1937–1938:II:387; Proskouriakoff Reference Proskouriakoff1964:182) (Figure 8 and Figure 9). Lintels 20 and 22, on the other hand, are in low relief and are similar to the carvings of the Structure 12 lintels; therefore, they are probably sixth-century commissions of K'inich Tatbu Skull II (Mathews Reference Mathews and Saborit1997:118) (Figure 10). Structure 22 is thus eclectic in its composition, for the lintels—Lintel 21 from the eighth century, Lintels 20 and 22 from the sixth century, and Lintels 18 and 19 from the fifth century—are gathered together from different moments in time.
Yaxchilan Lintel 18. Drawing by Ian Graham (1977). © President and Fellows of Harvard College.
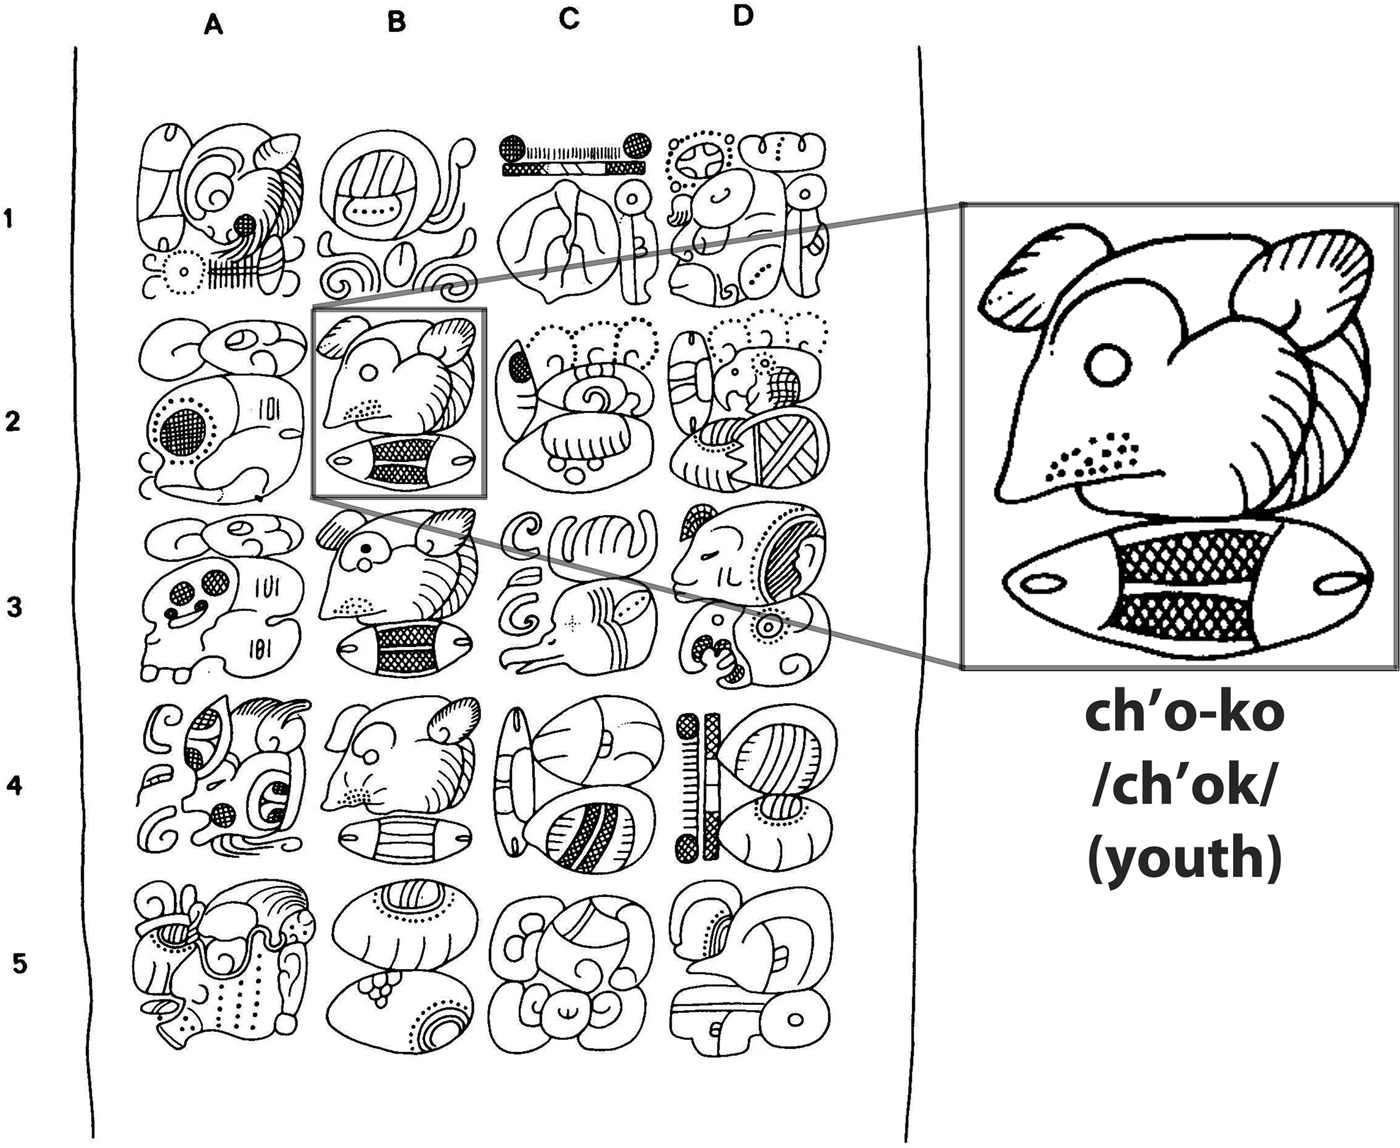
Detail of Yaxchilan Lintel 19, with early Bird Jaguar name (at A5) highlighted. Drawing by Ian Graham (Reference Graham1982). © President and Fellows of Harvard College.

Yaxchilan Lintel 47, from Structure 12, and Lintel 22, from Structure 22. Lintel 47, photograph by author. CONACULTA-INAH-MEX. Reproduction authorized by the Instituto Nacional de Antropología e Historia. Lintel 22, photograph by Ian Graham (Graham and von Euw 1977). © President and Fellows of Harvard College.

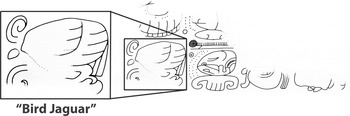
The meaning of the Lintel 18 and 19 texts remains opaque, though a series of ch'ok (youth) titles is recognizable on Lintel 18, likely naming youths from the Yaxchilan royal family (Figure 8). Lintel 19 is mostly destroyed, though part of the text survives and includes the name of a Bird Jaguar (Mathews Reference Mathews and Saborit1997:115) (Figure 9). This may be either the fourth-century or the fifth-century Bird Jaguar (Bird Jaguar I or II); either way, he was one of the ancestors after whom Bird Jaguar IV took his name.
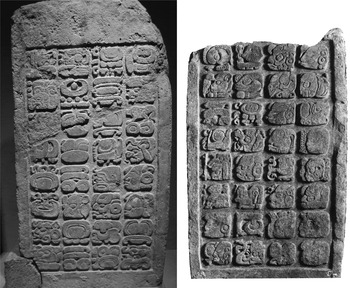
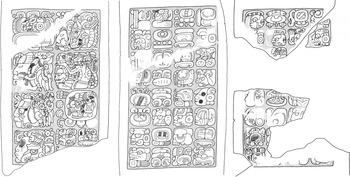
Lintels 20 and 22 are somewhat more comprehensible. Lintel 20, which survives only as a fragment, begins with an Initial Series Introductory glyph, the beginning of a Long Count, though the rest of the text is destroyed. Lintel 22, whose text may have followed Lintel 20, includes a parentage statement for K'inich Tatbu Skull II, which includes the name of his father, Bird Jaguar II (Mathews Reference Mathews and Saborit1997:97–100, 118). Mathews (Reference Mathews and Saborit1997:71, 118) demonstrates that this text is comparable to the texts on Lintels 48, 47, and 34 of Structure 12 that narrate K'inich Tatbu Skull II's accession and parentage, and he hypothesizes that the similarity in calligraphy in the lintels of the two buildings indicates that the same sculptor made them (Figure 10).
Two predecessors named Bird Jaguar thus appear on the Structure 22 lintels: Bird Jaguar I or II on Lintel 19 and Bird Jaguar II on Lintel 22. The presence of their names undoubtedly would have been meaningful to Bird Jaguar IV in his eighth-century resetting of them. Proskouriakoff (Reference Proskouriakoff1964:182) suggested that Bird Jaguar IV reset the early lintels and connected himself with a past ruler in the Lintel 21 text “to demonstrate the ancient origins of his family.”
By installing the lintels together, Bird Jaguar manipulated material objects to make explicit connections to the past, and these complemented Lintel 21's textual analogy. These were two different modes of establishing or displaying connections with the past—one through the making of narrations, the other through the manipulation of older and newer objects. In this case, the narrative and material modes function in a complementary fashion.
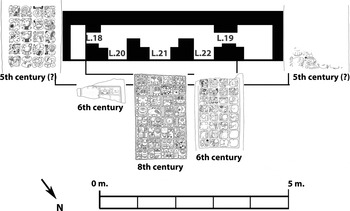
There is no consecutive reading order across all of Structure 22's lintels. Instead, the two lintel pairs are set in mirror image on opposite sides of the building's central axis, the early sets of lintels flanking the more recent ones as if contained in concentric circles (Figure 11). In particular, the eighth-century Lintel 21 is in the central door of the building; the sixth-century Lintels 20 and 22 flank Lintel 21; and the even older Lintels 18 and 19 are installed in the side doorways, book-ending the building and its other carved lintels. Through this arrangement, the objects create a physical expression of nested cycles of time and history, for they are placed as if in circles of time that are proximate to one another but in different registers.
Placement of Structure 22 lintels. Building plan after García Moll (Reference García Moll2003:171); Yaxchilan Lintel 18, drawing by Ian Graham (1977); Lintel 20, drawing by Ian Graham (1977); Lintel 21, drawing by Eric von Euw (1977); Lintel 22, drawing by Eric von Euw (1977); Lintel 19, drawing by Ian Graham (Reference Graham1982) © President and Fellows of Harvard College.

This format is analogous to Classic period Maya conceptions of time and history that are both linear and cyclical. In such a dual understanding of time, which Nancy Farriss (Reference Farriss1987) has cogently analyzed for the Classic and Colonial period Maya, forward movement may be interwoven with cyclical repetitions and juxtapositions that bring distinct cycles and personages together. Furthermore, according to Farriss (Reference Farriss1987:575), “it is the repetitive pattern of events that counts and not their exact duplication.” The cycles of time and history as materialized in the lintels set in Structure 22 are shown to be analogous and in proximity, but they are distinct from one another.
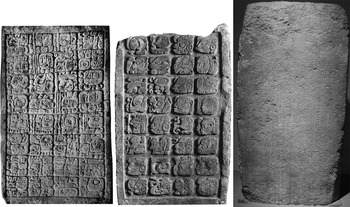
The Structure 22 lintels’ calligraphic styles and carving techniques are diverse, and the differences among them may have been apparent to ancient viewers, particularly for knowledgeable members of the royal family and court (Figure 12). Furthermore, their placement in the building, in pairs set in mirror image on opposite sides of the central axis, makes their particular features manifest. Even someone who could not read the texts may have been able to discern difference among these objects, both because of their diverse carving techniques and styles and because of their arrangement in the building. Their objecthood and context thus marked them as distinct from one another and performed in tandem with their narrations.
Photographs of three of Yaxchilan Structure 22's lintels. Left: Lintel 21, photograph by Sylvanus Morley (1931, in Graham 1979); Middle: Lintel 22, photograph by Ian Graham (1977). © President and Fellows of Harvard College; Right: Lintel 18, photograph by author. CONACULTA-INAH-MEX. Reproduction authorized by the Instituto Nacional de Antropología e Historia.

According to Lintel 21, Bird Jaguar IV's seating ceremony took place in this house, and with references to ancestors in the building, Structure 22 may have been a locus of rites related to ancestor veneration. But access to Structure 22's superstructure would have been limited, for it was small and set on a platform elevated above the Main Plaza. Images and texts on lintels and walls in nearby buildings such as Structures 21 and 23 offer an idea of who had access to these superstructures and what people did inside them. The images of rulers, their wives, heirs, and members of the court realizing ceremonial rites such as bloodletting and deity-conjuring indicate that these were among the people who could enter these buildings and these were among the activities that took place in them. Nevertheless, although rites inside the buildings may have been restricted to the royal family and court, Structure 22's platform and wide stairway could have been used for presentations that were visible to larger audiences in the plaza.
STRUCTURE 12: A PLACE FOR ANCESTORS
Structure 12, another eighth-century building, also holds lintels that most likely were reset in Bird Jaguar IV's reign, comparable to the ones from Structure 22 (Figure 13). The resetting is comparable to, but differs from, Structure 22 in intriguing ways. Structure 12 is located on a low platform on the river side of the longer part of the Main Plaza, to the north of Structure 22. It does not overlook the plaza but is tucked away among other structures and has a small patio in front. Structure 12 was constructed with two parallel vaults and seven doorways on the front (southeast) façade and two doorways on the building's sides that open into the back vault. All of the doorways of the façade and the doorway on the northeast side have a stone lintel with a text or image carved on the underside.
Yaxchilan Structure 12, front (southeast) façade. Photograph by author.

Structure 12's carved lintels include one pictorial lintel and seven all-glyphic lintels. The pictorial Lintel 36, placed in the front façade's central doorway, had an image of a standing person, now eroded. The other seven carved lintels bear only texts; these originally constituted two sets of lintels that the sixth-century ruler K'inich Tatbu Skull II commissioned. One set, with three lintels (Lintels 48, 47, and 34), begins with an exquisite, full-figure Long Count of 9.4.11.8.16 (1 February a.d. 526) on Lintel 48 and continues to Lintels 47 and 34, with a narration of the accession of Ruler 10, K'inich Tatbu Skull II. His accession statement includes his parentage, stating that he was the son of Bird Jaguar II (Mathews Reference Mathews and Saborit1997:99, 118) (Figure 14).
Yaxchilan Lintels 48, 47, and 34. Drawings by Ian Graham (Reference Graham1979, Reference Graham1982). © President and Fellows of Harvard College.

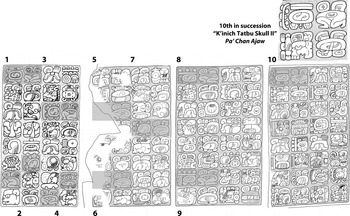
The other set, with four lintels (Lintels 60, 49, 37, and 35), recounts the kingdom's deep past through a list of the polity's first ten rulers, beginning with the reign of Yopaat Bahlam I in the fourth century and culminating with the reign of K'inich Tatbu Skull II in a.d. 526 (Figure 15). The narration consists of a series of ordinal phrases that state each ruler's order in the line of succession. The series ends with K'inich Tatbu Skull II's accession, corresponding with his accession statement on the other set of lintels installed in Structure 12.
Yaxchilan Lintels 60, 49, 37, and 35. Rectangles mark the ten ordinal phrases for each change of succession. Lintel 60, drawing by Carolyn Tate (Reference Tate1992:170), courtesy of Carolyn Tate; Lintels 49,37, and 35, drawings by Ian Graham (Reference Graham1979). © President and Fellows of Harvard College.

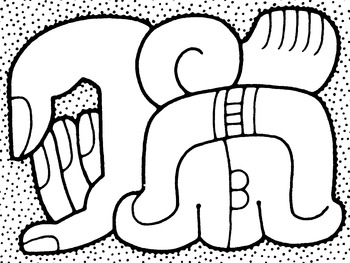
The king list would have given context and legitimacy to K'inich Tatbu Skull II's reign, but it also may have served as a list of military victories. In particular, the accession phrases are followed by a relationship glyph and one or more names with titles identifying them as foreigners—some of them royalty—from other Maya polities such as Piedras Negras, Bonampak, and the Snake kingdom (Martin and Grube Reference Martin and Grube2008:120–121; Mathews Reference Mathews and Saborit1997:72, 84, 91–103) (Figure 16).Footnote 3
Detail from Yaxchilan Lintel 37 of undeciphered glyph that appears to refer to a captor/captive relationship. Detail of drawing by Ian Graham (Reference Graham1979). © President and Fellows of Harvard College.

Schele and Mathews (Reference Schele, Mathews and Culbert1991) interpreted these relationship glyphs as signaling royal visits on the occasion of rulers’ accessions, but more recently, multiple epigraphers—including Nahm, Martin, Grube, and Houston—explain the relationship as one of captor-captive, with the foreigners named as captives to successive rulers (Houston et al. Reference Houston, Escobedo and Webster2008:80–82; Martin and Grube Reference Martin and Grube2008:118–121; Nahm Reference Nahm1997, Reference Nahm2006), although Stuart (Reference Stuart2007b) favors the interpretation that they were royal visitors and not captives. There is still debate regarding the decipherment of this relationship glyph. When spelled phonetically, it appears as ye-TE’-je or ye-je-TE’ (the variation being a distinct problem in its decipherment), and there is no clear translation or understanding of this word's form or meaning (Simon Martin, personal communication 2006). Nevertheless, examination of the Hieroglyphic Stairway 1 text and other monuments indicates the captive interpretation is more probable, for some records align with captures narrated on other monuments, including the capture of the Piedras Negras heir, T'ul Chihk, also appearing on La Pasadita Lintel 1 (Houston et al. Reference Houston, Escobedo and Webster2008:80–82; Nahm Reference Nahm2006:36–37).
If they were captives, the amplification of the king list with an accounting of captives would have made the king list into a display of military power, particularly in K'inich Tatbu Skull II's reign, when more foreigners’ names appear. Martin and Grube (Reference Martin and Grube2008:121) suggest that K'inich Tatbu Skull II commissioned these lintels as a reaction to recent adversity, particularly Piedras Negras’ capture ca. a.d. 518 of his predecessor, the Yaxchilan king Knot-eye Jaguar I, depicted on Piedras Negras Panel 12. Knot-eye Jaguar I may not have been sacrificed, for Stuart (Reference Stuart2007a:1) observes that he reigned until a.d. 526, when K'inich Tatbu Skull acceded, but the capture of their king still would have been a disturbing turn of events for Yaxchilan. The commissioning of lintels displaying K'inich Tatbu Skull II's ancestors’ and his own successes in warfare may have been an attempt to transcend this time of traumatic defeat and political insecurity.
But the sixth-century commissioning was only one phase of the lintels’ life histories, for their placement in Structure 12 was an eighth-century act. This conclusion is based on the architectural style of Structure 12 and its similarities with Structure 22. In particular, although Morley originally dated Structure 12 to 9.5.0.0.0 (in a.d. 534), the first k'atun ending after Lintel 48's Long Count date, he adjusted his interpretation when confronted with Satterthwaite's study of Piedras Negras and Yaxchilan architecture, in which Satterthwaite (Reference Satterthwaite, Weeks, Hill and Golden2005:84) determined that Structure 12 was one of the later structures at Yaxchilan—and not one of the earliest. Because of the disjunction between the textual dating of the lintels to the sixth century and Satterthwaite's architectural dating of the building to the eighth century, Morley convincingly conjectured that the lintels were re-used in Structure 12 (Morley Reference Morley1937–1938:II:366; Tate Reference Tate1992:170).
The eighth-century resetting of the sixth-century lintels could have been meaningful in a number of ways. The lintels were tangible connections to the polity's past, and their gathering and installation in a new building was analogous to that of Structure 22's lintels. Nevertheless, there was not an explicit narration akin to Lintel 21's textual juxtaposition of past and present, for in Structure 12 they used only objects from the past, without creating a new narration on the building to contextualize the older lintels. Yet comparable with Structure 22's lintels, two of Structure 12's reset lintels—Lintels 34 and 37—bear the name of Bird Jaguar II, once as the father of K'inich Tatbu Skull II and once as the eighth successor in the dynasty.
Structure 12's two sets of lintels may or may not have been installed together in the sixth century, but in Structure 12 they function as one set. The overall discourse structure, beginning and ending in K'inich Tatbu Skull II's reign, with a move back in time in-between, is analogous to the structure of many other Maya texts. Their physical placement in Structure 12 also implies a continuous text, for the reset lintels were installed in consecutive reading order.
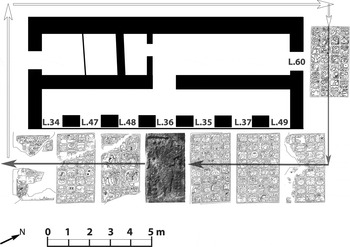
To follow the series of texts across the lintels, the viewer has to move from right to left around the building in a clockwise direction, stepping into each doorway to read or recite the texts (Figure 17). The series begins with Lintel 48, set in the doorway just left-of-center, with its full-figure Initial Series date of 9.4.11.8.6, K'inich Tatbu Skull II's accession date. The reading order then moves to the left, narrating his accession and parentage on Lintels 47 and 34 (Mathews Reference Mathews and Saborit1997:99, 118). Continuing in a clockwise direction, the reading circuit wraps around the building, processing to Lintel 60 in the northeast doorway,Footnote 4 and then turns the corner to return to the front façade, whose doorways hold Lintels 49, 37, and 35, which form the series of texts with the king list. Other buildings were erected around Structure 12 after its eighth-century construction, including the annexes of Structures 13 and 14 (García Moll Reference García Moll2003:109), in addition to the extension of the Structure 15 platform, which came to swallow the northeast end of Structure 12. Before these modifications, it appears one could have walked around Structure 12 to visit and read the lintels.
Yaxchilan Structure 12 diagram, with reading order of the lintels. Building plan after García Moll (Reference García Moll2003:107); Lintel 36, photograph by Sylvanus Morley (1931, in Graham Reference Graham1979). © President and Fellows of Harvard College. See also caption to Figures 14 and 15 for sources of drawings.

Yet this reading was unlikely a silent, private activity. Instead, as Cecil Brown (Reference Brown1991:490) and Houston (Reference Houston, Boone and Mignolo1994:30) have argued, several lines of evidence indicate that Maya texts were recited aloud during ceremonies or other performances. These could have been formal, organized rites that blended recitation, procession, and dance. Within this model, performers recited texts as they moved around the structure, and other participants witnessed their acts and perhaps participated in the circumambulation as well.
Circular patterns were and are a common shape of contemporary and Classic period Maya ritual processions and dances. For example, there is evidence of circular—though usually counterclockwise—movement in ritual processions and dances in twentieth-century Maya groups, including the K'iche’ and Tzotzil Maya, among others, particularly in relation to myths and ceremonial reenactments of world renewal and to movements of the sun (Gossen Reference Gossen1974:32–35, Reference Gossen and Gossen1986; Looper Reference Looper, Koontz, Reese-Taylor and Headrick2001:115; Reese-Taylor Reference Reese-Taylor, Koontz, Reese-Taylor and Headrick2002:146–147; Tedlock Reference Tedlock2003:24, 164–166).
For example, Dennis Tedlock recounts that in the beginning of the K'iche’ Maya Rabinal Achi, dancers proceed in a counterclockwise direction in large and small circles and squares, and he describes these counterclockwise dances as associated with the 260-day divinatory calendar (Tedlock Reference Tedlock2003:24, 164–166). Gary Gossen has noted the counterclockwise patterns in the Festival of Games, a festival of world destruction and renewal of the Tzotzil Maya community of San Juan Chamula. Gossen (Reference Gossen and Gossen1986:229) compares the festival to a mythical narrative of the death and rebirth of the Sun/Christ, in which the episodes of the sun's movement follow a counterclockwise pattern, beginning in the west, moving through the inter-cardinal and cardinal directions, and ending in the universe's northwestern quadrant, close to where it started. Gossen (Reference Gossen and Gossen1986:229) notes that with such movement of the sun, “the categories of time, space, and cosmic order are established in the beginning of Creation.” Analogous counterclockwise circular movement is used in at least one part of the rites of the Festival of Games, when the entourages of the Passions, custodians of the Sun, run around the plaza three times counterclockwise before the Fire-Walk across the plaza's east-west axis, which symbolizes the sun's ascent across the sky (Gossen Reference Gossen and Gossen1986:146, 232). The counterclockwise circling of the plaza both correlates with the sun's movements in the First Creation myth and is a fundamental part of renewal for the sun, the world, and the Chamula community.
Circular structures are also evident in Classic period Maya sculptures, buildings, and architectural complexes, and these too appear to correlate with solar movement and world renewal rites. Matthew Looper (Reference Looper, Koontz, Reese-Taylor and Headrick2001) has argued for circular counterclockwise dance among the stelae of Quirigua Platform 1A-1 and associated this movement with earthly and temporal renewal during period-ending ceremonies. Kathryn Reese-Taylor (Reference Reese-Taylor, Koontz, Reese-Taylor and Headrick2002:146–147) has hypothesized counterclockwise circumambulations among architectural complexes consisting of eight buildings set at the cardinal and inter-cardinal directions at Cerros, Uaxactun, and Tikal. And McAnany and Plank (2001:116–117) have observed the use of circular forms at Yaxchilan in the individual compositions of the Structure 23 lintels' images. They contend that the lintels’ circular, counterclockwise circuits of looking, starting in the east, and moving to the north, west, and south correspond to movements of the sun. In addition, I argue that most Piedras Negras stelae and altars guide viewers to move in a circular, counterclockwise direction and that the Maya circumambulated the monuments in rites commemorating calendrical cycles, emulating solar movement, and actualizing world renewal (O'Neil Reference O'Neil2012).
The placement of the Yaxchilan Structure 12 lintels around the building also would have prescribed and inspired circumambulation—both for consumption of the texts and for rituals related to ancestor veneration and the renewal of the world and cycles of time and history. The movement around Structure 12 was clockwise, unlike the majority of world-renewal rites and even against the grain of Classic Maya glyphic reading order that moves from left to right. Notably, McAnany and Plank (Reference McAnany, Plank, Inomata and Houston2001:116–118) observe that the reading order of Yaxchilan Structure 23's Lintel 25, whose texts are carved in reverse, forms a clockwise circle, which is opposite of the directionality of the building's other lintels’ compositions. They compare Lintel 25's directionality to Chamula female saint processions that proceed clockwise, the reverse of the male saints’ counterclockwise processions, a pattern Gossen (Reference Gossen1974:41–42) recorded. They propose, therefore, that Lintel 25's clockwise directionality is female, which they connect to the prominence of female actors and agency in Structure 23's texts, images, and ritual activities. There is no evidence for Structure 12 having comparable feminine qualities. Nevertheless, there may be an analogous opposition relating to the living versus the ancestral, for all of the named rulers were deceased by the time of the lintels’ re-installation. In fact, the lintels may have been reset in this order precisely because their protagonists were then ancestors.
Regardless of the directionality, the circular form undoubtedly was meaningful in Structure 12, and as with other circular ritual movement, processions in and around the building would have corresponded with the cyclical nature of Mesoamerican time, whose cycles repeated and intersected. Processing around the building, eighth-century ritual participants moved through, came close to, and even intersected with these earlier cycles of time and dynastic change.
Nevertheless, the installation of the lintels in this order may have evoked cyclicality through their very structure and may have materialized renewal even without human action. On the other hand, viewers and ritual participants could have experienced the building in different ways and selectively read the lintels, perhaps to reframe history and make other connections to the past.
YAXCHILAN HIEROGLYPHIC STAIRWAY 1
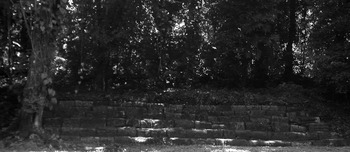
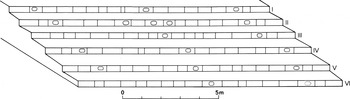
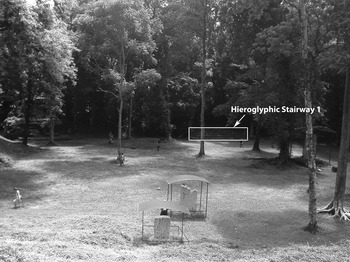
Another monument from Bird Jaguar IV's reign allows us to press further our understanding of the resetting of lintels in Structure 12. In a.d. 761, Bird Jaguar IV created an entirely new narration of the polity's dynastic history on Hieroglyphic Stairway 1 (HS 1). This stairway, with six limestone steps edging the Structure 5 platform, is located on the northeast side of the Main Plaza in a prominent, public setting—in front of one of the most expansive parts of the Main Plaza (Figures 18 and 19). The steps lead from the plaza surface to the top of the platform, which has no surviving superstructure. The stairway is truly monumental, for each step measures up to 13.9 m in length (Graham Reference Graham1982:3:141), and the text, carved on the steps’ risers, is Yaxchilan's longest extant text.
Yaxchilan Hieroglyphic Stairway 1. Photograph by author.

Diagram of Yaxchilan Hieroglyphic Stairway 1, by Ian Graham (Reference Graham1982). Ovals mark locations of earlier texts. © President and Fellows of Harvard College.

The text is severely eroded, but Mathews and Nahm have deciphered or reconstructed much of it by comparing it to others from Yaxchilan and elsewhere. Mathews (Reference Mathews and Saborit1997:71–119, Figures 3–14 to 3–23) determined the text's structure: a recounting of events in the lives of Yaxchilan's rulers beginning with the dynasty founder Yopaat Bahlam I in the fourth century and ending with events in Bird Jaguar IV's life in the eighth century. This monument thus deals with the same chronological period as the Structure 12 lintels but continues past K'inich Tatbu Skull II's reign and ends with Bird Jaguar IV, culminating in the 9.16.10.0.0 period ending in a.d. 761.
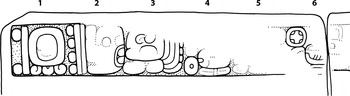
No single section is completely preserved, but each appears to begin with a Calendar Round date followed by an accession verb, chumwaan ti ajawlel, and the name of the ruler (Figure 20). Next are a distance number and a new Calendar Round, or simply a new Calendar Round, and—when preserved—a relationship glyph that is paired with a foreigner's name (Mathews Reference Mathews and Saborit1997:103–115; Nahm Reference Nahm1997:65, Reference Nahm2006:28). Each ruler has his own section, and these are ordered consecutively. The text moves left to right on each riser and from the upper step to each successive lower step, with the earliest at the top (Step I) and the latest at the bottom (Step VI), proceeding forward in time. Four steps have multiple kings’ reigns, and two have a single ruler: Step V recounts Itzamnaaj Bahlam III's reign, and Step VI, at ground level, narrates Bird Jaguar IV's reign and ends with the stairway's dedication (Graham Reference Graham1982:3–3:141; Nahm Reference Nahm2006).
Detail of Yaxchilan Hieroglyphic Stairway 1, Step I (1–6), drawing by Ian Graham (Reference Graham1982). © President and Fellows of Harvard College.

Bird Jaguar IV's lengthy text was not the first iteration of this stairway, though, for it is carved over another inscription. The first version had only about twenty carved ovals. Most contained texts, but at least two were serpentine cartouches, the type usually associated with ancestors at Yaxchilan (Graham Reference Graham1982:3–3:141) (Figure 21). The new inscription obliterated most of the earlier one; portions do survive below the line of the eighth-century carving, though plaster presumably once hid them (Nahm Reference Nahm1997:65, Reference Nahm2006:28). Not enough remains to determine the older inscription's full content. Nahm (Reference Nahm1997:65) has suggested it was a conquest stairway, but more evidence is needed to determine the validity of this hypothesis. Regardless, with the eighth-century re-carving and the creation of a new, victorious monument that provided a narration of continuity in kingship and success in warfare, Bird Jaguar IV contributed to shaping the visible history of the Yaxchilan polity.
Detail of text from Yaxchilan Hieroglyphic Stairway 1, Step I (48–67), drawing by Ian Graham (1982). Note the vestiges of earlier texts below the lines of text at 64–66. © President and Fellows of Harvard College.

The Structure 12 lintels and the first iteration of HS 1 were thus both modified during Bird Jaguar IV's reign. These two sets of materials survived centuries beyond their initial creation, and both were transformed—but in different ways. One set, the Structure 12 lintels, was privileged, preserved, and reset in a new location. The other, the first HS1 text, was obliterated, its surface recarved into a new historical narrative. Notably, these transformations were inextricably linked, for the narrative that effaced the first stairway's text essentially restated the historical information carved on the preserved lintels.
The information provided on the eighth-century version of HS 1 is comparable to that of the Structure 12 lintels, but the structure of the phrases is different, and there are additions, deletions, and changed emphases in the HS 1 text. For instance, the Structure 12 lintels function primarily as a list of rulers; each phrase begins with their order in line from the founder, and there are no dates for the accessions (Mathews Reference Mathews and Saborit1997:91). On the other hand, the HS 1 texts are verbal phrases that give a date and verbal expression for each accession. Furthermore, the HS 1 gives dates for each of the foreigner events. The texts on the Structure 12 lintels had not included dates for these events, except for two particularly important captives in the sixth century, that of a yajaw (sub-lord) of a Tikal ruler by Yaxchilan's Knot-eye Jaguar I (Ruler 9) and the capture of a yajaw of a Snake kingdom ruler by K'inich Tatbu Skull II (Ruler 10) (Martin and Grube Reference Martin and Grube2008:121).
Although the severe state of erosion precludes knowing for certain, the eighth-century stairway text appears to have included all dates of accessions and captures in successive, comparable phrases. This structure would have produced strong analogies and associations across the generations of dynasts, from the fourth century to the eighth. In tandem with the information expressed, the stairway text's physical, presentational, and narrative structure constituted an explicit display of continuity across the generations, with Bird Jaguar IV as the culmination of this array of venerable dynasts.
Nahm also demonstrates that there are subtle but distinct differences in the eighth-century HS 1 recounting of the first ten rulers’ reigns from the inscriptions on the Structure 12 lintels. For example, he shows that the HS 1 text omits records of captives—or the Emblem Glyph stating their origin—if they came from polities with which Yaxchilan more recently was in alliance, including Bonampak. On the other hand, the new text emphasizes captives from Piedras Negras, a polity with which Yaxchilan had alternating relationships of alliance and antagonism from the sixth to the ninth centuries. The emphasis on Piedras Negras captives may have related to conflict between the two polities in Bird Jaguar IV's reign, for although Piedras Negras had captured Yaxchilan's Knot-eye Jaguar I in the early sixth century, Yaxchilan captured T'ul Chihk, the heir to Piedras Negras Ruler 4, in a.d. 759, as recorded on HS 1 and La Pasadita Lintel 1 (Alexander Safronov 2006, cited in Houston et al. Reference Houston, Escobedo and Webster2008:39–40, 42, 85; see also Martin and Grube Reference Martin and Grube2008:151).
Nahm (Reference Nahm2006:29) argues that these changes relating to captives and their polities of origin constitute historical revision that was “carefully adapted to contemporary political needs.” Notably, these changes do not amount to historical fabrication but instead are based on differential omission and emphasis. They are an exemplary case of the selective, active, and ongoing nature of writing and revising history and memory in relation to particular needs of the present among the Classic Maya. Such emphasis and omission correspond to the acts of remembering and forgetting that Van Dyke and Alcock (Reference Van Dyke, Alcock, Dyke and Alcock2003:2–3) describe as integral parts of the “active and ongoing process” of the creation and maintenance of social memory.
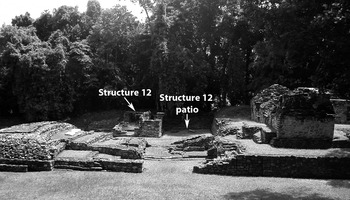
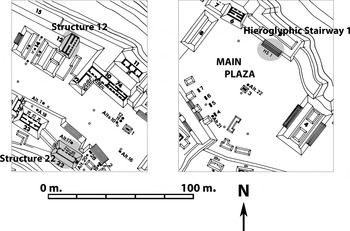
It is useful to consider further the presence of these two monumental sets in the eighth century and thereafter at Yaxchilan, for their comparison raises important questions concerning ancient Maya interrelations not only with memories of their ancestors but also with the very materials they left behind. First, HS 1 and its texts were a new creation, whereas Structure 12 contained older, reset lintels. Second, HS 1 was located in a relatively public setting, on the edge of the Main Plaza where it was most expansive, measuring more than 70 × 80 m, where large groups could have congregated for public display (Figures 22 and 24). In contrast, Structure 12 was less accessible, located away from the Main Plaza (Figures 23 and 24). Its interior space was limited, and the patio in front was small, measuring roughly 7 × 15 m, which would have allowed only limited congregations and more restricted activities, involving the royal family, court, and regional governors, comparable to that described for Structure 22's interior.
Yaxchilan Main Plaza in front of Structure 5/Hieroglyphic Stairway 1, taken from the platform of Structure 20, facing northeast. Note the expanse of the plaza at this location. Photograph by author.

Yaxchilan Structures 12 (middle background) and 13 (right), from the Main Plaza, facing northeast. Note the small size and exclusive location of the patio in front of Structure 12. Photograph by author.

Details of Yaxchilan map, showing relative sizes and locations of Structures 22 and 12 (left) and Hieroglyphic Stairway 1 on the Main Plaza (right). Map from Graham and von Euw (Reference Graham and von Euw1977:3–1:7). © President and Fellows of Harvard College.

These spatial distinctions reveal crucial facets of the monuments’ potential uses and audiences and how Classic period Maya people may have perceived and experienced these sculptures and buildings in the eighth century. For despite the lintels’ overt political content, a consideration of the material components of their reset context—including the physical spaces and the human occupation of these places—suggests a use of the objects and the information they bear that is qualitatively different from engagement with the HS 1 text.
Structure 12 and its lintels undoubtedly were meaningful in the eighth century from the standpoint of political legitimacy, for the reused lintels made connections between present and past and provided anchors for validation of political power in the present. Bird Jaguar IV's accession came after a 10-year interregnum that appears to have been rife with power struggles, and upon his accession, he had to justify his rule, thereby dedicating a flurry of monuments highlighting his connections to past rulers.
But there appears to have been more at stake than merely the display of information, for the texts of the Structure 12 lintels and HS 1 contain much of the same information, and HS 1 gives more. If the information alone were important, it seems the display on HS 1 would have sufficed, particularly because it provided a more comprehensive documentation and placed Bird Jaguar IV as the culmination of Yaxchilan's dynastic and military history.
In contrast, for Structure 12, it is not just the information that is important but the antiquity of the sculptures as well, for the lintels are tangible relics from the past. Furthermore, in Structure 12 there is no explicit connection made to the eighth-century moment or to Bird Jaguar IV. As opposed to the HS 1 text, which culminates with Bird Jaguar IV, and to Structure 22, where Bird Jaguar IV compares his action to that of Moon Skull, in Structure 12 there is no motivation made explicit for the resetting of the early lintels. Instead, Structure 12 appears to have been purely about the past—and about coexisting with its material remains. Built for these lintels, Structure 12 contained and displayed objects from the past and remained a dedication to Yaxchilan's early kings, a place for memory, ancestor veneration, and preservation of the past, kept physically proximate through the curation of its material remains.
PERFORMANCES OF MEMORY
The arrangement of the lintels in Structure 12 indicates that it was a place that inspired rituals of ancestor veneration also related to cyclical renewal. But these may have been reserved only for small groups of Yaxchilan's nobility, for the building was not open to the larger masses of people who could have assembled in the Main Plaza.
The eighth-century Maya also may have used other buildings at Yaxchilan for ancestral veneration and commemoration, again for limited audiences. These had analogous foci on certain ancestors; however, the sculptures installed in them were not reset but remained in place. In particular, to the northwest of Structure 22 was Structure 23, the house of Lady K'abal Xook, one of the wives of Itzamnaaj Bahlam III. Structure 23 held three pictorial lintels, Lintels 24, 25, and 26, which portray Lady K'abal Xook and Itzamnaaj Bahlam III conducting rites on his accession and later. The textual Lintel 26 narrates the dedication of this building as the house of Lady K'abal Xook in a.d. 726 (McAnany and Plank Reference McAnany, Plank, Inomata and Houston2001; Tate Reference Tate1992:204–208).
These lintels remained in place after her death and through the end of the site's occupation. McAnany and Plank (Reference McAnany, Plank, Inomata and Houston2001:119) observe that the texts on the lintels of the adjacent Structure 24 (Lintels 27, 59, and 28), from Bird Jaguar IV's reign, record Lady K'abal Xook's death and the deaths of Itzamnaaj Bahlam III, his mother, and Lady Ik’ Skull (Bird Jaguar IV's mother). In addition, Lintel 28 recounts a fire ceremony at the burial place of Lady K'abal Xook. This was conducted in or near Structure 24, which is adjacent to Structure 23, the building that may contain her tomb. In fact, INAH excavations discovered Tomb III, the tomb of a female, beneath Structure 23's front central room, and García Moll (Reference García Moll, Benavides, Manzanilla and Mirambell2004a) hypothesizes this was Lady K'abal Xook's tomb.Footnote 5 Structure 23, Lady K'abal Xook's house, thus was transformed into her funerary structure and, in tandem with Structure 24, became a place where she was remembered and commemorated, both in the monuments that portrayed her and in at least one fire ceremony realized after her death.
Another possible ancestral place is Yaxchilan Structure 21, a small building to the southeast of Structure 22. Structure 21 centers on Lady Ik’ Skull, the mother of Bird Jaguar IV, for inside the shrine was Stela 35 (García Moll Reference García Moll2003:166), a monument portraying Lady Ik’ Skull conducting a bloodletting ceremony and conjuring a war serpent. The text records a date of 4 Imix 4 Mol (9.15.10.0.1, or 27 June a.d. 741), and the stela clearly emulates Structure 23's series of lintels. But unlike the Structure 23 lintels, the Stela 35 portrayal of Lady Ik’ Skull was created years after her death. It is not explicitly marked as posthumous, though, and its retrospection is known only from an anachronistic three-k'atun ajaw title for Bird Jaguar IV in the text, which signals that the monument was made at least eight years after its given date (Tate Reference Tate1992:125). The fact that it is not explicit about its posthumous facture may have been because the Maya intended to suggest it was an older monument that was made during her lifetime and remained in the building as an embodiment of her or an ancestral relic from her life. Furthermore, it is the only stela erected inside a Yaxchilan building, and its placement there marks this monument as distinct, set inside this shrine as another of the kingdom's relics to which access was limited.
Moreover, the presence of the stela in the shrine may mark the building as a place for the commemoration of Lady Ik’ Skull because it was her funerary shrine, for beneath the structure's floor, the INAH project found Tomb V, which they propose was her grave (Hernández and Márquez Reference Hernández, Márquez, Tiesler and Cucina2006:141–142). If this is her tomb, Bird Jaguar IV transformed this building into a memorial shrine that was comparable to Structure 23's shrine to Lady K'abal Xook. Yet different from Structure 23, Bird Jaguar had to create an ancestral sculptural relic to become the focus for Lady Ik’ Skull's commemoration.
During Bird Jaguar IV's reign, Structures 23 and 21 were transformed into commemorative locales for two of his father's queens, one of them his mother. Such use of dedicated loci for particular ancestor veneration would have continued past Bird Jaguar IV's reign, with his descendants continuing to pay homage to their ancestors, who then included Bird Jaguar IV. Indeed, it is probable that Structure 33, a building located high atop one of the hills to the south of the Main Plaza, became the locus of memory for Bird Jaguar IV. Structure 33 held eighth-century lintels and panels commissioned by Bird Jaguar IV that portray him realizing ceremonies and playing ball. After his death in a.d. 768, the sculptures portraying him remained in place. Beneath one room of Structure 33, the INAH project found Tomb I, which they hypothesize was his grave (García Moll Reference García Moll1996:41; Hernández and Márquez Reference Hernández, Márquez, Tiesler and Cucina2006:138). This building, comparable to the others, most likely was devoted to his memory.
Structures 23 and 33, therefore, were dedicated to personages who used the buildings and conducted ceremonial rites in them during their lifetimes. After the deaths of these personages, their descendants continued to perform commemorative ceremonies in honor of those ancestors, whose sculptural relics were installed in the building, and whose bodies were buried beneath the floors. These buildings and their dedications to particular ancestors were thus comparable to Structure 12's focus on the sixth-century K'inich Tatbu Skull II and the polity's first nine rulers and to Structure 22's references to the fifth-century Moon Skull and other historical actors from the Early Classic period.
In each case, the persistence of sculptures over time appears to have concentrated the locus of memory and commemoration for those ancestors, and the sculptures enabled tangible connections to them. Indeed, these sculptures were left in place and maintained, and their preservation may have been as meaningful as the resetting of lintels in Structures 12 and 22. I contend that these stone sculptures were valued not only for what they narrated but also for the histories they had accrued, particularly for their histories of contact with certain ancestors. The monuments thereby had the ability to evoke the past and allow descendants to have contact with their revered forebears.
Moreover, like Structures 12 and 22, these buildings were small, and only restricted groups could have conducted rites in them. Nevertheless, participants may have incorporated visits to these buildings in extended ceremonial circuits that involved larger gatherings in the more public spaces of the site such as the plazas and the stairways edging them. In fact, Structure 12's lintels and HS 1, which were inextricably connected because they share the same subset of information, also may have been linked in processions between them. Such a procession could have circumambulated Structure 12 and then moved to the long part of the plaza, turning to the southeast and then to the Main Plaza's larger area, possibly with stops at various buildings and sculptures, and ending at HS 1, where a more public celebration of the polity's history from the time of the founder to the present could have taken place.
Moreover, contrasting with the circumambulation of Structure 12, the form of HS 1 would have inspired a vertical trajectory, in which the movement through space was also a journey into the past. In this case, time is given a physical and visual expression that differs from but is analogous to those in Structures 12 and 22. On HS 1, the narrations convey order and repetition in the listing of the successive cycles of dynasts and history. Stretched across the surfaces of the six steps’ risers, time and history are portrayed as linear, moving forward in time and space. Yet with each successive step, the reading order loops back to the beginning, returning to the start of the next step but at a lower register. Furthermore, the cycles of time and history inscribed on the steps are stacked one on top of another, comparable to how Barbara Tedlock has explained twentieth-century K'iche’ Maya concepts of the passage of time as an “accumulation” or “piling on” of time analogous to the accumulation of duties and titles by religious and political leaders in Momostenango that “do not so much change as accumulate” (Tedlock Reference Tedlock1993:202).
The physical format of the stairway texts functions in tandem with the narrations to give a physical expression of a combination of cyclical and linear time and history in which multiple temporal and historical cycles are made physically proximate. The cycles of time and generations of rulers are distant from each other, for they are separated by a linear flow of time, characterized by the use of distance numbers and the physical space of the carved textual bands stretched along the step risers. But they are also made proximate in the layering of the inscribed cycles on the stacked steps. Moreover, in processions, the body of a ritual participant could have moved up and across these cycles of history, thereby linking the piled up layers and making further connections among them, creating new historical narratives in time and space.
Such performances of memory—both the restricted and more public ones—would have been important occasions for the creation and sustenance of social memory and community identity, analogous to the ways Connerton theorizes the role of commemorative ceremonies in the shaping of communal memory. In particular, Connerton (Reference Connerton1989:45) contends that commemorative ceremonies, particularly those that re-enact a narrative of events from the past, “do not simply imply continuity with the past but explicitly claim such continuity.” Furthermore, he observes that through commemorative ceremonies, “a community is reminded of its identity as represented by and told in a master narrative” (Connerton Reference Connerton1989:70). Likewise, Inomata (Reference Inomata2006b:805–806) has made a similar case for the importance of theatrical performances and other public events in Classic period Maya polities.
Through recitations of the texts on the Yaxchilan lintels, HS 1, and other sculptures, the Maya could make contact with ancestors and their remains. But in these performances, they also may have re-enacted the historical and ceremonial narratives inscribed on them and by doing so established continuity with the ancestors and narratives. Such rites brought ancestors into the present moment, whether through memory and recall, conjuring, or impersonation. These rites may have focused on particular ancestors’ commemoration or encompassed longer chronologies of the polity's history. In fact, HS 1 was truly an eighth-century master narrative, for its text reshaped and redirected the polity's overall dynastic history to culminate in Bird Jaguar IV's reign.
But as Inomata (Reference Inomata, Inomata and Coben2006a:210) has argued for other polities, Maya performances not only contributed to community cohesion but also established and sustained hierarchies of power, particularly because the public displays were “opportunities for elites to assert their images as moral leaders of the community.” In addition, Inomata (Reference Inomata, Inomata and Coben2006a:197–198, Reference Inomata2006b:807–809) contrasts the large open areas such as plazas for public performances or mass spectacles and the smaller, more exclusive spaces such as palaces and courts for elite interaction. Inomata (Reference Inomata, Inomata and Coben2006a:210) maintains that the more private rites were occasions for social distinction because of the limitation of access to them, the more restricted performances effectively defining or managing “social categories and ranks through the right and duty of participation.”
The differences in size and access to Yaxchilan's large Main Plaza and small buildings such as Structures 12 and 22 indicate that gatherings in them involved different scales of audience size and participation. Performances in the Main Plaza could have brought the larger polity together in experiences that encouraged broader community cohesion. But those in the smaller buildings on elevated terraces or otherwise secluded from the plaza privileged certain groups of people and excluded others.
MEMORY AND MATERIALITY
For Yaxchilan Structures 12 and 22 (and also Structures 23 and 33), the degrees of access to the buildings also limited proximity to ancestral relics. It cannot be known exactly who had the right to come close to them, but one possibility is that only those from the royal families who successfully claimed descent could gain entry. The control of access to sculptural relics and the commemoration of associated ancestors may have been essential to defining identity and authority for those smaller groups.
This conclusion aligns with Gillespie's (2002) argument that ancient Maya family groups or “houses” curated both physical and non-physical components of ancestors—graves, bodies, and material goods, in addition to names, titles, and souls—in order to strengthen and retain rights to property and power. Gillespie contends that the house guarded ancestors’ souls so they could be regenerated in the newly born, and she maintains that holding, protecting, and reusing the intangible and tangible components of ancestors allowed the house to establish and maintain continuity. Comparably, the preservation and guarding of the ancestral sculptural relics in Structures 12 and 22 may have been among the strategies that Bird Jaguar IV and his house used to cohere and maintain power.
These discussions also echo the work of Rosemary Joyce (Reference Joyce, Joyce and Gillespie2000, Reference Joyce, Dyke and Alcock2003) regarding continuity and identity in ancient Maya houses in relation to their material holdings. In particular, Joyce (Reference Joyce, Joyce and Gillespie2000:190) focuses on the retention and curation of material goods such as ancestors’ costume ornaments. Her analyses are based on and contribute to understandings that objects may create, reflect, or mediate social relationships and, furthermore, that “histories accrue in material things.” She identifies curated costume ornaments as heirlooms and argues that they were “the basis for the identity and perpetuity of the house” and that people used them to materialize memory (Joyce Reference Joyce, Joyce and Gillespie2000:189). In addition, she considers how the inscription of texts—whether about the original maker or owner, or a subsequent owner—on these ornaments may fix particular episodes of use in the objects’ material forms. Such texts make explicit some facets of the objects’ accrued histories and make them accessible to later users (Joyce Reference Joyce, Joyce and Gillespie2000:205–208).
However, objects’ accrued histories also may be retained and transmitted in other ways. For instance, episodes of use may physically transform an object and thereby fix or mark that occurrence. In this way, the histories of use accumulate in the object's materiality and may be perceptible through observation or handling. Elsner has explored such possibilities for ancient Roman monuments and early modern English architecture. In particular, Elsner argues that objects’ material natures can signify or spur memory by way of physical changes that remain visible on a monument after it has been defaced, broken, or recarved, such that both the object's original form and its secondary modification are materially manifest. Viewing these objects, then, inspires or produces what Elsner (Reference Elsner, Nelson and Olin2003:209–211) calls a “‘two-directional’ interpretation,” in which the material form points to the previous and present states of the monument—unaltered and altered—and the historical, social, and cultural contexts at both moments. In this way, memory inheres in the materiality of monuments through visible manifestations of alterations, such as damage, that signal a previous iteration of the object's form. The Classic period Maya left some damaged monuments on view and reset others. These damaged monuments could have inspired two-directional interpretation in the manner Elsner suggests.
But, as I demonstrate for Yaxchilan Structures 12 and 22, damage is only one way memory may inhere in monuments’ materiality. Another is in contexts of resetting or reuse, in which a monument's physical context and its juxtaposition with other monuments from which it differs point not only to its contemporary context but also to a previous state. In such cases, there is not necessarily damage to the monument. Instead, there has been another sort of physical alteration, and this alteration may be accessible through visible signals or may be known from memory and transmission of information about the monument's anterior state or its transformation.
For instance, differences in carving technique or style and calligraphic form among juxtaposed monuments—as with the Structure 22 lintels—can signal an alteration or anterior iteration and can mark difference, whether or not the specificity of difference is given. Inscriptions, whether from the monument's original context or its new context, may specify and make explicit one or more of the monument's iterations by bearing a dedicatory date or patron name or making reference to one or more instances of ownership or use. Examples include the texts on the reset lintels of Yaxchilan Structures 12 and 22 and other nearby monuments, as discussed in this article, or on the heirloom costume ornaments that Joyce (Reference Joyce, Joyce and Gillespie2000, Reference Joyce, Dyke and Alcock2003) describes. Thus, memory can inhere in the materiality of a monument through the accumulation of histories of contact with earlier users, and texts inscribed on or near it may identify these episodes of use and make them available to others.
Memory also may inhere in a monument's materiality because of its location in a physical context that is not typical for such a thing, one example being a Maya stela enshrined in a temple sanctuary or vaulted niche. Enshrinement was an unusual setting for stelae and would have signaled a physical transformation. Although rare, enshrinement may have been a recognized pattern of reuse, for there are examples from Uaxactun, Tikal, Calakmul, Yaxchilan, and elsewhere (Ayala Falcón Reference Ayala Falcón1987; Coe Reference Coe1990:476–487, 498–505, 513, 534, 758; Laporte and Fialko Reference Laporte and Fialko1995; O'Neil Reference O'Neil2009; Pincemin et al. Reference Pincemin, Marcus, Folan, Folan, Carrasco and López1998:312–315, 319; Smith Reference Smith1950:14, 25, 86). The presence of a stela within a shrine may have marked difference and spurred memory of an anterior location or the ancestor the stela embodied.
Alternatively, memory can inhere within or can be attached to a monument through stories retained and transmitted by persons about the physical object and its histories. This memory exists outside the monument, but it may be carried with it and transmitted as a fact of its biography. Simple interaction or organized performances involving the object may spur memory and incite storytelling about the object and its accrued histories.
Memory also may inhere in an object when a person—whether maker, owner, or user—is perceived to have become an inherent part of it. This may happen through the social relations involved in an object's use or transfer from one person to another (e.g., Gell Reference Gell1998:122–123), which may be recalled through memory, inscriptions, or story-telling. Or there may be a perception that a person's vital essence is instilled in the object. For example, Gillespie cites a sixteenth-century Maya practice described by Fray Bartólome de las Casas of rubbing a precious stone over a dying man's face. The stone was subsequently preserved and venerated, and its handling was analogous to the veneration of the deceased's ashes or other corporeal remains, which were treated as a locus for the person's ancestral spirit (Gillespie Reference Gillespie, Silverman and Small2002:71). For the sixteenth-century Maya, therefore, objects had the capacity to absorb and retain a person's essence, and people subsequently revered it as a representative or material locus of the deceased person. The precious stone, then, becomes a type of touch relic, known from other religious systems such as Christianity and Buddhism. In contrast to corporeal relics, touch relics become sacred from physical contact with a deity, ancestor, or other sacred being and thereafter are protected and venerated (e.g., Belting Reference Belting and Jephcott1994:61–62, 221).
Houston, Stuart, and Taube have argued that Classic period Maya stelae had the capacity to hold part of the extendible essence of persons as well, particularly of the rulers portrayed on them. When this essence was transferred into the stelae, they became embodiments of divine rulers and were then available for supplication and veneration (Houston and Stuart Reference Houston and Stuart1998:90; Houston et al. Reference Houston, Stuart and Taube2006:74–78; Stuart Reference Stuart1996:158–165).
I contend that the evidence from various Classic period Maya sites indicates that older stelae were perceived to be loci for commemorating and communicating with ancestors and may have functioned as long-term embodiments of these deceased rulers. For example, at Piedras Negras, older sculptures were left in place, and newer sculptures were installed in visual and physical dialogue with them (O'Neil Reference O'Neil2012). At Tikal, Uaxactun, and Calakmul, the Maya installed older stelae—often (but not always) broken—in temple sanctuaries or in rooms built around them and surrounded the monuments with offerings. They also buried stelae and other sculptures on temples’ central axes and made offerings to them during their interments and later (Ayala Falcón Reference Ayala Falcón1987; Coe Reference Coe1990:476–487, 498–505, 513, 534, 758; Laporte and Fialko Reference Laporte and Fialko1995; O'Neil Reference O'Neil2009; Pincemin et al. Reference Pincemin, Marcus, Folan, Folan, Carrasco and López1998:312–315, 319; Smith Reference Smith1950:14, 25, 86). The treatment of these sculptures indicates that the Late Classic Maya considered them akin to relics, with value coming from their antiquity, materiality, and connections with honored forebears.
The key to their connections to particular ancestors may have been because the stelae had been imbued with a ruler's extendible essence. Furthermore, the particular treatments of these stelae over time indicate that some part or trace of this essence remained in the monuments, which subsequently had to be cared for and revered. For stelae portraying rulers, figuration and affinity may have aided the soul transfer between ruler and sculptural embodiment (Houston et al. Reference Houston, Stuart and Taube2006:74).
But there is colonial and modern Maya evidence that non-figural objects and buildings could absorb and retain sacred essence as well. One example is the precious stone described by Las Casas that looks nothing like the dying man but could absorb his life essence. Also comparable—albeit different—are the dedication ceremonies for twentieth-century Maya houses, for as Evon Vogt (Reference Vogt1976:51–55) has explained, the Tzotzil Maya enact house dedication rituals in order to give the house c'ulel—an “inner soul”—so that it becomes “a part of living Zinacanteco society.”
For the Classic Maya, Stuart (Reference Stuart1995:99–107, Reference Stuart and Houston1998) emphasizes the fundamental importance of object dedications and the ubiquity of dedication texts across media, including stone sculptures, ceramic vessels, and buildings. Evidence indicates that, similar to the figural monuments of rulers, these objects and buildings were imbued with sacred essence—or k'uh—during dedication ceremonies as well. This instillation is analogous to the extendible soul of the ruler entering into the figural monument, because both may ensoul or enliven the object or building. Indeed, Classic Maya transference of a sacred essence into an object or building was not dependent on figuration and hypothetically could take place with any object that was ritually activated. The reset Yaxchilan lintels may have been guarded and venerated for more than 200 years after they were made because they had received sacred essence that persisted in them over time and guided future use.
Additionally, the eighth-century Maya may have valued the reused lintels because they retained a connection with the ancestors who made or used them or otherwise came in contact with them. As with Joyce's heirloom costume ornaments, they accrued histories and retained connections to the ancestors whose biographies were narrated on them, although I conjecture that the connection was most palpable for K'inich Tatbu Skull II, who dedicated the lintels, lived amongst them, and made physical contact with them. If so, the lintels were not only antiques but also touch relics.
CONCLUSION
There was significance in the antiquity of the lintels of Yaxchilan Structures 12 and 22 and most probably Structures 23 and 33 as well. For example, the Structure 12 lintels initially demonstrated ancestry and political validation for K'inich Tatbu Skull II in the sixth century, and at that point, the lintels offered narrations about his past. But later preserved and installed in an eighth-century building, they not only continued as narrations but also functioned as documents and relics from that past, with a certain authenticity or power imbued in the antique, a case in which memory inhered in the materiality of the monument. Preserving and displaying these lintels provided an experience of direct physical proximity to the past through its material remains, giving another manner of access to revered ancestors.
In juxtaposition with newer materials, objects, buildings, and people, the ancient lintels made connections between past and present more physical, the past made present not only figuratively but also materially. Moreover, although these lintels were from the past, they were not fully of the past, for they existed physically in the present. In this way, their material existence, histories, and the memories and connections they evoked were analogous to conceptions of linear and cyclical time and history that not only moved forward but also looped back, with the cycles of time distinct from one another but proximate and effectively concurrent. Likewise, the lintels are analogous to Maya ancestors, who were from the past but could occupy the present to witness their descendants (as on Yaxchilan Stela 10), whether because they were conjured or impersonated or because they occupied a realm that was distinct from, but parallel and proximate to, the present (Figure 3). Indeed, both ancestors and the relics associated with them could inhabit, embody, or evoke multiple cycles of time in the past and present, for they had origins in the past but persisted spiritually or materially into the present, inhabiting multiple cycles amidst the forward movement of time.
Furthermore, the structures and placement of these sculptures indicate that the ceremonial performance of these materials recreated and renewed paradigmatic forms of time and history. The narrative of successive rulers from the polity's early history on the lintels of Structure 12 consisted of an ordinal list of rulers distinct from each other in linear time and separated in space by the form of the inscribed list. But their placement in the building was circular, end meeting beginning after moving across a large expanse of time and history, celebrating the cyclicality of time and world renewal. Structure 22 also modeled and actualized conceptions of time and history, for the lintels from different cycles were set in nested circles, distinct from, but in proximity to, one another, the moments in time and generations of history shown to be distinct but parallel and proximate. Although we cannot know how they were arranged in their original contexts, in Structures 12 and 22 they created new configurations, visualizing and materializing connections between past and present in novel ways.
These expressions and performances of narratives were also among the strategies used for the shaping and celebrating of social memory, the formation of communal identity, the legitimization of power, and the establishment and maintenance of social distinction. The eighth-century Maya used these buildings and sculptures in different scales of display, some more public and others more private. Performances of the polity's master narrative on Hieroglyphic Stairway 1 in the Main Plaza, for example, were open to the larger community and were important both in legitimizing Bird Jaguar IV's authority and creating opportunities for larger social cohesion. In contrast, ceremonial rites in the shrines of Structures 12 and 22 would have been more restricted.
The fact of the lintels’ preservation and resetting in small, secluded buildings indicates that they not only were kept and valued but also were controlled, and that keeping and controlling them may have been an essential part of the maintenance of the identity of Bird Jaguar IV's ruling house and its connections to the polity's venerable past. Bird Jaguar IV's explicit connections to the past involved both spiritual continuity, as evidenced by the reusing of names (and possibly souls), and material continuity, which included the preservation and reuse of objects such as the older lintels. These spiritual and material connections to the polity's venerable past may have worked in tandem to strengthen Bird Jaguar IV's rights to the power of rulership.
The conclusions of this article regarding the treatment of these lintels over time contribute to what has been an especially fruitful area in Maya scholarship over the past 15 years, particularly in the exploration of sculptures not simply as bearers of information but as physical things with political and religious aspects and agency. Stuart and Houston (Stuart Reference Stuart1996; Houston and Stuart Reference Houston and Stuart1998) have been pioneers in encouraging considerations of material and religious questions and the ontology of ancient Maya sculptures, looking beyond what their carvings said or portrayed and exploring instead how the sculptures functioned in society. For example, Stuart has argued that Maya stelae were not billboards erected simply to bear historical information or project elite propaganda but sacred works offered in the context of religious ceremonies, in which the ritual dedication of objects was paramount (Stuart Reference Stuart1996:151, Reference Stuart and Houston1998:374–375). The lintels reused in Structures 12 and 22 were primarily concerned with historical narration and probably were used for political legitimization. Nevertheless, through analysis of what happened to the sculptures long after their creations, we find that their materiality is absolutely of the essence, for their antiquity and connections with ancestors made them physical loci for communication with the past.
Finally, the lintels’ placement in particular orders in the buildings’ doorways guided ritual participants to move around the buildings, inspiring engagement with the lintels, their texts, and their status as relics and with the building as a sacred place of ancestral veneration and the renewal of the past through the activation of its material remains. The reset antique lintels not only materialized but also activated memory, their presence and placement in these buildings inspiring commemoration and the performance of memory, renewing, reiterating, and actualizing claims of continuity with the past as a fundamental and integral part of the present.
Postscript
Despite its focus on the past, Structure 12 was not left frozen in time, for the ancient Maya made further modifications to the building even after the lintel resetting (Figure 25). These modifications included the partitioning of the back vault and the blocking of most of the interior and exterior doorways, except for the façade's central doorway, which held the pictorial Lintel 36 (García Moll Reference García Moll2003:109; Maler 1901–Reference Maler1903:133). The motivation for these closures is not apparent, though the building, which Maler found completely ruined, may have had structural problems that necessitated the modifications. Regardless, the closures dramatically limited or severed access to the carved lintels and the building's interior.
Photograph of Yaxchilan Structure 12, showing blocking of the doorway. Photograph by author.

There is not enough archaeological evidence available to provide a chronology for these modifications. It is unclear whether the various doorways were sealed at once or at different times. And because the sealed contexts were broken and the building reconstructed in the twentieth century, more detailed information about the chronology of modifications may be lost forever. One possible scenario is that the doorway that held Lintel 34 was the first to be sealed, for this lintel was broken before the door was sealed, whereas others, such as Lintel 60, were intact when their doorways were sealed. Notably, the fragments of Lintel 34 were neither removed for disposal elsewhere nor were they replaced with a new lintel. Instead, the pieces were left in place and the door sealed. The series of lintels were thereby left complete, even if they were not fully visible, their circular directionality intact and potentially still vital, even if not seen, experienced, or activated by living humans.
Yet it may have been the removal of these lintels from view in the ancient past that has preserved them and allowed modern scholarship to recreate Yaxchilan's early dynastic history. The HS 1 text, a more complete account of this history, is mostly effaced because it was located in a more public place and was left vulnerable to the ravages of time and the tropical environment. In contrast, the Structure 12 lintels, first displayed and then enfolded into the building, were thereby preserved. Today, however, they are scattered to far corners of the earth—in the British Museum in London, Harvard University's Peabody Museum in Cambridge, Massachusetts, the Museo Nacional de Antropología e Historia in Mexico City, and at Yaxchilan, still in situ—and have not been reunited since the late nineteenth century, when Maudslay removed Lintel 35 from the site for transport to London, initiating yet another phase of these monuments’ life histories.
RESUMEN
Este artículo se centra en las Estructuras 12 y 22 de Yaxchilan (Chiapas, México), donde los mayas antiguos repusieron unos dinteles de piedra del siglo VI d.C. en unos edificios del siglo VIII, durante el reinado de Pájaro-Jaguar IV. Por un estudio de su contento textual y su contexto físico con respeto a la creación contemporánea de nuevos monumentos como la Escalera Jeroglífica 1, este ensayo discute que la antigüedad de los dinteles jugó una parte crucial de su importancia en el siglo VIII. El reponer de los dinteles demuestra preocupaciones con la conservación de monumentos antiguos que funcionaron como reliquias del pasado. En la yuxtaposición con más nuevos objetos y edificios, los antiguos dinteles hicieron conexiones entre el pasado y el presente, sirviendo como localidades para la comunicación con el pasado. Este ensayo concluye que estas esculturas fueron valoradas no sólo por lo que narraron sino también por las historias que se habían acumulado, especialmente de contacto con ciertos antepasados. En estos casos, la memoria fue inherente en los monumentos.
Además, este ensayo explora los contextos físicos y el acceso a estos monumentos para investigar cómo los mayas podían haber relacionado con las esculturas y los edificios en el siglo VIII. Por ejemplo, el arreglo de los dinteles en la Estructura 12 habrían inspirado a los participantes rituales para hacer un circuito alrededor del edificio. Tal movimiento fue asociado con las procesiones sagradas, y la evidencia sugiere que este edificio fue un lugar para la veneración y la memoria ancestral. Los dinteles así se activaron la memoria, su presencia y su colocación inspirando la conmemoración y realizando los reclamos de continuidad con el pasado como una parte fundamental del presente.
Las Estructuras 12 y 22 fueron pequeños y apartados, y sólo grupos restringidos podrían haber realizado ritos en ellos. Igualmente, el hecho de la conservación de los dinteles en tales edificios sugiere que los dinteles fueron controlados, posiblemente como parte del mantenimiento de la identidad de la casa gobernante de Pájaro-Jaguar IV. No obstante, las visitas a estos edificios pueden haber integrado en circuitos ceremoniales prolongados involucrando ritos más grandes en los espacios más públicos del sitio. Ambos los ritos públicos y los ritos privados habrían sido unas ocasiones importantes para la creación y el mantenimiento de la memoria de la comunidad, la legitimación del poder, y el establecimiento de la distinción social.
El enfoque y las conclusiones de este artículo alinean con estudios en cuál el análisis es dirigido hacia los usos, las modificaciones y las transformaciones de los objetos. Examinar cómo las personas usaron y modificaron las esculturas monumentales ofrece entendimiento de los monumentos y las personas que los usaron y además proporciona vislumbres en la percepción de esas esculturas y sus calidades materiales en el periodo clásico tardío de la civilización Maya.
ACKNOWLEDGMENTS
I am grateful to Kam Manahan and Byron Hamann for inviting me to develop this essay for their 2004 AAA session, “Revival, Reoccupation, and Reuse in the Ancient Americas,” and to David Stuart and the Maya Meetings at the University of Texas at Austin for giving me another opportunity to present this work. My research for this essay was supported by a Faculty Development Award from the University of Southern California. I revised this essay while an A.W. Mellon Postdoctoral Fellow at the Center for Advanced Study in the Visual Arts at the National Gallery of Art, and I am indebted to my colleagues there for our many stimulating conversations. Thanks also to Mary Ellen Miller, Claudia Brittenham, and Matthew Robb for their comments on an earlier version of this essay; to Simon Martin for his willingness to answer questions about hieroglyphs; to Roberto García Moll for discussing Yaxchilan archaeology with me; and to three anonymous reviewers. And, finally, I am grateful to Linda Schele, who assigned the Structure 12 lintels’ text as a class project at U.T. Austin many moons ago and sparked my interest in them. All errors are my own.