

The Portable Antiquities Scheme (PAS) was established in 1997 as an initiative to record archaeological objects found by members of the general public. Initially set up in pilot form, in 2003 it was extended to the whole of England and Wales.Footnote 1 Surveys of Roman period finds recorded by the PAS have been published in Britannia from 2004 onwards. This 18th annual report first briefly summarises the general character of Roman finds reported in 2020. As last year, we no longer present artefact and PAS record numbers in detail by county, since consistent regional differences in artefact frequencies recorded by the PAS are well documented in the first 16 reports. The majority of the report comprises the publication of significant individual and groups of artefacts recorded by Finds Liaison Officers (FLOs).
OVERVIEW
In total 21,432 objects of Roman date were recorded by the PAS in 2020. As a single record may sometimes document more than one item, for example describing a coin hoard, an assemblage of ceramics or building materials, the total number of objects documented exceeds the number of records (10,767). The difference between the two is largely due to the documentation of some coin hoards containing many individual coins under a single record. The number of finds recorded in 2020 is significantly lower than in previous years, testament to the impact of the COVID-19 pandemic both on metal-detecting, the major source of objects reported to the scheme, and on the work of FLOs. Although the number of recorded finds is lower, the spatial distribution of objects and the types reported closely resemble those documented in previous years. The largest numbers of finds records are again associated with counties in eastern and central-southern England.Footnote 2 By contrast, in south-west England, Wales, north-west and north-east England the number of artefacts documented is much smaller, this year in single figures in some unitary authority areas. The most important factors in determining this distribution remain the variable circulation and deposition of metal objects in the past, land-use including regional differences in historic and current farming practice and the constraints on metal-detector use and its consequent uneven intensity.Footnote 3
Discoveries of coins and brooches again outnumber those of all other Roman artefacts, although the much smaller numbers of both reported for 2020 again demonstrate the pandemic's impact. With the addition of the 8,191 coins recorded in 2020, approximately 410,000 Roman coins have now been recorded by the PAS as noted in these annual summaries, reflecting the long-standing emphasis on recording assemblages of Roman coins in toto.Footnote 4 After coins, brooches are the most frequently reported artefact type. A total of 33,716 examples have been documented by the scheme since 2003, including 1,224 further examples recorded in 2020.Footnote 5 As in previous summaries, this total includes brooches with date spans across the Late Iron Age to Roman transition as well as those dated to the Roman period proper. The distribution of brooch finds continues to follow well-established patterns, with larger numbers being documented in eastern and some southern counties than in northern and western England and Wales.Footnote 6 The ratio of brooches to coins continues to be higher in northern, western and midland areas of England and in Wales than the average of c. 1:10.Footnote 7 The exceptional number of brooches documented from parishes near the junction of Watling Street and Ryknild Street in Staffordshire exemplifies the potential for individual find-spots to have a significant impact on regional variability in distribution.
ARTEFACT DESCRIPTIONS
The following 23 entries publish highlights among the past year's finds recorded by members of the PAS and Treasure Department at the British Museum.Footnote 8 They are selected for their contribution to the study of the material and visual culture of Roman Britain, in particular where object types extend understanding of typological and decorative variability, of object distribution or of object form through exceptional preservation. The reference number associated with each record is the unique identifier which can be used to consult individual object records on the PAS website: https://finds.org.uk. Six entries report objects also treated as Treasure cases and are therefore also designated with their Treasure number in the format of year (20XX) and reference number (TXX).Footnote 9
The artefacts included in this report were made between the late first millennium b.c. and the fifth century a.d. in a variety of materials (precious metal, copper alloy, cameos and gemstones) and they belong to diverse functional categories. These include brooches, rings and objects for modifying personal appearance, a statue fragment, tools, votive objects including a rattle handle and figurines, as well as three metalwork groups comprising horse gear, (likely) grave goods and possible votives.
Co. DURHAM
(1) Bowes area (DUR-885FC8/2019T20) (fig. 1).Footnote 10 A complete gem-set gold finger-ring of late Roman date (c. a.d. 300–425). The ring is 26.6 mm wide by 25 mm high (external dimensions), with a rectangular bezel measuring 20 by 11.4 mm. It weighs 8.7 g. The hoop is not quite circular in plan, widening from the back to triangular shoulders. The lower part of the hoop has shallow grooves on its outer surfaces, somewhat irregularly spaced. At the mid-section three horizontal grooves demarcate two bands, both incised, vertically above and diagonally below. The heavy, clumsily facetted shoulders frame a large rectangular bezel which contains emeralds (as determined by analysis) in two square settings, held in place by narrow rims. Where the settings divide, a pellet projects on both sides from the centre of the bezel, above a groove which follows the edge of the hoop.
Bowes area, finger ring (no. 1). Scale 1:1 (photo: B. Westwood). (© Durham County Council)

It is not easy to identify direct parallels to this finger-ring, but it shares some affinities with other late Roman rings. Its form and size, rich colour and presence of pellets, an echo of wider contemporary trends towards the use of granulation as decorative technique, recall the late Roman rings in the Thetford treasure, with one ring with a square setting for an emerald between heavy shoulders offering a quite close parallel in some details.Footnote 11 Martin Henig (pers. comm.) draws our attention to further fourth-century parallels with solid hoops and box settings from Trier and from the Koch collection.Footnote 12 The strong emphasis on colour also echoes some of the more flamboyant rings of third- and fourth-century date grouped in Guiraud's type 4h, with large bezels framing multiple plain gemstones or glass, for example the three-stone ring from Lyon used to illustrate the type, paralleled in a ring from Pozzuoli in the British Museum collection and in several instances documented by the PAS.Footnote 13 Examples of the latter from southern England include three-stone rings from Clyffe Pypard (2014T38/WILT-8E66D4) and the Bowerchalke Hoard (WILT-654180), both from Wiltshire, and from Langford, Oxfordshire (2018T682/GLO-50652C), with round, square and polygonal settings for coloured stones and pellets at the settings’ corners. These rings however are more delicate than those from the Bowes area and Thetford.
NORTH YORKSHIRE
(2) Thormanby (DUR-83CC6C) (fig. 2).Footnote 14 Incomplete dividers, comprising part of the spindle and one arm. What survives of the arm is 92.9 mm long; the object weighs 22.4 g. The spindle is threaded through the arm, with a conical terminal carrying an incised radial or ‘sunburst’ design. The broken spindle has two protruding stubs, creating a space or slot in which a wedge would have been inserted to keep the arms in place. The spindle from Eye, Suffolk (SF-A3C1A5), preserves this slot while the wedge remains in place in an example from Haversham cum Little Linford, Milton Keynes (NARC2571). The outer surface of the Thormanby dividers’ arm is facetted for the entirety of its surviving length, being subdivided into at least four sections by grooved and ridged collars. The collar at the junction between head and arm carries a saltire motif, and two lozenges are also incised on the arm.
Thormanby, dividers (no. 2). Scale 2:3 (drawing: E. Foulds). (© Durham County Council)

Better-preserved iron and copper-alloy dividers suggest that this pair should have originally been between 150 and 180 mm in length, tapering to a point.Footnote 15 Some others carry stylised zoomorphic terminals for the spindle, typically bovine and avian heads. Geometric decoration on the arms is varied but shares some of the attributes of this example, for instance the moulded facets as well as champlevé enamel on the Shouldham (Norfolk) dividers, ring and dot on those from Lyford (Oxfordshire) or the triangular facetting on the surviving single arm from Stoke Bruerne (Northamptonshire).Footnote 16
(3) Ampleforth area (YORYM-870B0E) (fig. 3).Footnote 17 Four copper-alloy objects discovered in close association comprising a plumb bob, horse-and-rider figurine, zoomorphic (horse head) key(?) handle and a sceptre head in the form of a bearded male bust, all sharing the same smooth green-grey patina.
Ampleforth, figurine, plumb bob, sceptre mount and key handle (no. 3). Not to scale (photo: A. Downes). (© PAS)

The solid plumb bob, conical with a blunted tip, is 72.7 mm long and weighs 282 g. The flat top bears concentric circular grooves. Projecting from its centre is a domed terminal with perforations enabling suspension piercing its head and neck. It is similar to many Roman examples found across the northern provinces.Footnote 18 Suspended on a plumb line the bob features on representations of sets of mason's tools on funerary monuments in central and northern Italy.Footnote 19
The horse-and-rider figurine is incomplete, the patination of the breaks suggesting damage in antiquity. It is 73.7 mm long, weighing 22 g. The well-modelled facial features are worn while the helmet rim and crest are much damaged. The right arm extends sideways at shoulder height and turns up at the elbow, the tapering forearm being broken at the wrist. The extended left arm also tapers below the elbow and ends in a likely attachment point. The rider wears a belted tunic, decorated with paired brace-like vertical lines on the back and chest, and a pleated kilt below. The thick legs are short compared to the body. The horse's musculature is modelled in some detail, albeit with losses to damage. The mane's crest carries parallel incised lines. Disc-like eyes stand proud of the face, perhaps rendering eye protectors. The harness is modelled prominently, including the headpiece with brow and nose bands and bridle bit to which the reins, laying on the neck, would once have been connected. On the animal's body the girth, breast band and breeching strap are also shown, extending from behind the rider's thigh and carrying large phalerae. The saddle's short ‘horns’ project behind the rider. The horse raises its right foreleg while the left is straight, as if the animal steps forward. Both front hooves are missing. The back legs both bend, as if the horse is moving at a canter. Rounded extensions project from the rear hooves, perhaps to slot into a base. The tail with incised strands hangs against the back legs. Horse-and-rider figurines are documented in more than 25 examples in Britain, this being the northernmost yet known; they are usually taken to be a provincial version of Mars.Footnote 20 Integrally cast examples are not common and tend, like this one, to be modelled with slightly greater finesse.Footnote 21 Better-preserved examples suggest that the right hand held a spear and the left a shield.
The solid copper-alloy zoomorphic handle takes the form of a horse protome, 52 mm long, 17.7 mm wide and 48 mm high, weighing 90 g. The head is expressively modelled, with large eyes set slightly lopsidedly, ears flat against the mane, flared nostrils and a wide mouth. The forelegs extend forward, ending in moulded hooves. Behind the shoulder is a flat surface covered by iron corrosion, from which projects the corroded remnant of a square iron shank for a likely key. Although not directly parallels to this find, several key handles from the north-western provinces take the form of horse heads emerging from a calyx, similar in conception to other animal protome handles.Footnote 22
The incomplete but otherwise well-preserved hollow copper-alloy stylised male bust is 130 mm long and weighs 417 g. The top of the head is domed and smooth, with hair and beard forming a continuous wide fringe around the face. Short twisting locks curl up from the temples, swept back and arranged somewhat symmetrically in the centre. Curvilinear incisions pick out individual strands of hair. The short beard and moustache are similarly modelled, the beard lengthening towards the chin where it divides. The ears are represented as single scrolling curls, expanding at the spiral's inner terminus. The lentoid eyes, emphasised with a strong outline, turn downward at their outer extremities. The now empty pupils may once have held settings, but no trace survives. The eyes are framed by prominent curving brows which extend into the ridged nose, indented with slightly recessed nostrils at its base. The slot-like mouth is framed by thin lips, slightly parted. Where the neck widens to meet the thin curving plate of the bust a ‘step’ or raised line may represent clothing. Three rivet holes are visible on the front of the chest plate, one broken to the edge, serving as points of attachment between the bust and another element. On both sides of the neck are the remains of copper-alloy rivets for attaching the backplate (now detached), a thin (c. 1 mm thick) sheet of copper alloy with a torn rivet hole articulating with the rivet on the neck's left side. The damaged sides of the backplate are bent round the outside of the head and cover the whole of the opening at the back. The hole at the base where the backplate and front of the head meet would have likely allowed for insertion of a pole or staff for mounting the bust, creating a sceptre-like object.
The size of the sceptre head, its portrait features resembling those of Antonine emperors (a.d. 138–92) and the evidence for it being mounted all give this object an affinity with the terminals argued to be parts of sceptres or similar portable images of the emperor as component parts of priestly regalia. The stylisation of the portrait is similar in spirit to other examples, especially the Steane (Brackley) head (BERK-E24C84).Footnote 23 This latter is thought to depict Marcus Aurelius and a similar attribution is possible for the current example, though a definitive identification is impossible. This too is the northernmost find hitherto of an object of this type. With the exception of a burial at Brough-on-Humber, other finds are all from eastern and central England south of the Humber.Footnote 24
Two potential interpretations can be suggested for this group of finds, assuming that their discovery circumstances and similar condition suggests their derivation from the same or related deposits, dated to the mid-second century or later from the presence of the sceptre head; without further investigation of the find-spot, however, they remain speculative. The objects’ diversity might indicate their collection as scrap bronze, including material from a ritual context.Footnote 25 A more likely possibility is that this is a votive deposit. Sceptres from priestly regalia are recurringly documented in structured deposits of likely votive origin, while the horse-and-rider figurine also fits a votive context, and the presence of the horse-protome key handle might be explained through its secondary use as a substitute for an animal sacrifice. Similar deposits include nineteenth-century discoveries at Willingham Fen, Cambridgeshire (including both a sceptre head and horse-and-rider figurines) and Felmingham Hall, Suffolk, as well as the group documented by the PAS near Bury St Edmunds (SF-D4D044).Footnote 26 As part of a mason's, architect's or surveyor's toolset, the plumb bob is harder to parallel in assemblages of this type, but reasons for its possible association with votive objects can be suggested. Its presence might be explained as a foundation offering related to an act of building or enclosing sacred space related to the putative shrine from which the other pieces derive. That construction or survey instruments could symbolise the demarcation of sacred space is indicated by visual or textual reference to the ascia on tombstones.Footnote 27 Alternatively, as a potential component of the groma, the main Roman survey instrument, the plumb bob might be offered through its association with ritualised aspects of landscape division. In this connection its presence might echo another find in the same region, the Piercebridge plough group of cow and bull yoked together, a copper-alloy statuette found in the early nineteenth century and a likely votive model of the scene in which the furrow is cut to form the line of the pomerium (urban religious boundary).Footnote 28 No towns are in the immediate vicinity of the find-spot, the nearest (Aldborough) being c. 20 km to the south-west. However, other local surveying operations perhaps requiring ritual sanction can be conjectured, for example in association with roads branching from north–south routes into the Vale of Pickering or the reallocation of land associated with villas like those at Beadlam and Hovingham a few kilometres away. The terminus post quem potentially supplied for this group by the likely imperial portrait coincides, in very general terms, with the major rural landscape reorganisation identified in other parts of Yorkshire in the later second and early third centuries a.d.Footnote 29
(4) Thormanby (YORYM-F847B5 / 2020T617) (fig. 4).Footnote 30 A silver Colchester-derivative brooch dated c. a.d. 25–75, c. 68 mm long, c. 19 mm wide and weighing 13.8 g, bent over on itself. The wings are short and rectangular with a central forward-facing hook projecting from the upper edge. The end of the hook sits on the upper bow with a flattened terminal, decorated with grooves and ridges, the latter carrying moulded ribbing. The reverse of the wings houses a single-piece spring in four turns of silver wire. The wire's ends are drawn in to form a chord over the front of the spring, held in place by the hook. The wire terminates in a worn break from which the pin would once have extended. The fronts of the wings have ribbed stepped terminals from which a rectangular-sectioned tapering bow extends with raised edges, divided by a longitudinal rib into two parallel grooves. Part of the catch plate survives. The bow ends in a circular grooved foot, from the base of which projects a shallow damaged terminal.
Thormanby, brooch (no. 4). Scale 1:1 (photo: R. Griffiths). (© York Museums Trust)

An exact parallel has not been found. The brooch is most similar to a Colchester-derivative type with the single-piece spring, stepped wings and forward-facing hook, although these brooches usually lack a foot.Footnote 31 The longitudinal ribbing on the present example recalls the treatment of Aucissa and Hod Hill brooch types (N. Harlow, pers. comm.), although these are hinged rather than sprung types. These affinities suggest a date between the first and third quarters of the first century a.d. The use of silver for a brooch is only occasionally paralleled.Footnote 32 Combined with the unusual form, the choice of material suggests that this is an experimental or custom-made brooch.
EAST YORKSHIRE
(5) Little Weighton area (YORYM-98A607 / 2020T331) (fig. 5).Footnote 33 A complete but flattened and broken gold finger-ring with a cameo setting, 30 mm long (as flattened), 15 mm wide at the shoulders but with a hoop c. 2.5 mm in width and a cameo measuring 11 by 10 mm. The flat hoop, now broken and distorted, divides at both ends to form scrolling openwork shoulders. These connect to the bezel's round backplate. The bezel's edge is rilled and has a raised setting which secures a white stone cameo, likely onyx. The cameo is cut as a draped female bust in profile facing right. The hair is swept back in parallel grooves and fastened at the nape in a large bun. On the very worn face the near triangular eye socket and nose remain the most prominent features.
Little Weighton area, gold ring (no. 5). Scale 2:1 (photo: R. Griffiths) (© York Museums Trust)

This is only the third ring-set cameo portrait to be documented from Roman Britain, the others from Silchester and Kettlebaston (Suffolk) also being set in gold rings. Both of these are also schematised, but with more nuanced modelling of the hair and drapery than the Little Weighton cameo. In all three cases the coiffure resembles that of imperial examples, especially Faustina II (130–76), wife of Marcus Aurelius, and Lucilla (c. 149–82), wife of Lucius Verus. Footnote 34
Martin Henig (pers. comm.) notes as follows: ‘The raised bezel and stylised rilling suggest a third-century date for the present example; compare the ring from Sully Moors near Cardiff, set with a small Medusa cameo, dated by coin evidence to the early fourth century though with solid shoulders.Footnote 35 Closer with regard to the bezel and rilling is another gold ring from Lincoln set with a cameo depicting a grotesque male head.Footnote 36 The very open openwork design beginning to swell on the shoulders of the present example looks to be early in the sequence, perhaps fitting better into Henig Type VIII rings or Johns's keeled rings with triangular shoulders, which are often pierced.Footnote 37 The nearest, but in silver is in the Snettisham jeweller's hoard.Footnote 38 It would be Henig Type VIIIb but the hoard is shortly after the mid-second century. I would think the gem could be late second or even early third century in date and the ring, too, probably early third century.’
NORTH LINCOLNSHIRE
(6) Kirton-in-Lindsey (NLM-9EC006) (fig. 6).Footnote 39 A copper-alloy key handle in the form of a finely patinated but worn ram's head, with the remnants of an iron shank. The ram's head terminal is 79.2 mm long and weighs 129 g. The head is modelled naturalistically, reproducing physiognomy in relatively fine detail, for example the grooves along the nose and jaw, the shallow adjacent recesses for eyes and scent glands, the swelling at the tip of the nose, as well as the curling horns. A raised band stamped with circles extends around the head between the tips of the horns, separating the smooth face from the woollen locks which cover much of the head. These locks are rendered more schematically by overlapping circular stamps in sizes that vary according to the space available, larger beneath the chin and on top of the head, smaller within the curls of the horns and on the band that separates the back of the head from the grooved collar. The latter forms the junction between the terminal and shank.
Kirton-in-Lindsey, key handle (no. 6). Scale 2:3 (photo: M. Foreman). (© North Lincolnshire Museum)

The handle almost certainly belongs to a key, a close parallel being a key handle from South Oxfordshire, albeit with detail less well preserved due to wear.Footnote 40 Rams’ heads remain rare as key terminals compared to large felines and dogs, examples of which have also been documented by the PAS.Footnote 41
LINCOLNSHIRE
(7) West Keal (LIN-15CBCC) (fig. 7).Footnote 42 An incomplete copper-alloy furniture fitting in the form of a standing male figure with stylised features, worn with a heavily pitted and corroded surface, and missing its lower arms and hands. It is 129.4 mm long, 52.1 mm wide and weighs over 200 g. The figure stands upright, clad in a belted tunic. The outsize head sports hair swept back from the forehead in parallel lines. At the back of the head are further sets of parallel grooves representing hair combed and layered at different angles. On the sides of the head are worn round recesses for ears. The face carries two similar (albeit less worn) recessed eyes framed by brows rendered as short diagonal grooves, a worn wedge-shaped nose and a short groove for a mouth. The figure has a short, thick neck and sloping shoulders with arms extended forwards, hands lost. His tunic ends just above his knee and is tied by a broad belt at the waist which shows traces of decoration. At the neck and hem short diagonal grooves indicate the tunic's edging and on the back two vertical lines of short, paired grooves render further decoration or straps, while on either thigh beneath the belt a similar vertical line indicates the same. The legs may be bare and bend slightly at the knees. No toes are visible, suggesting the figure is shod, with the several tiny recesses on the underside of each foot perhaps rendering hobnails, albeit irregularly distributed. Traces of corroded iron beneath the heels may be the remains of attachment points. Integrally cast with the figure is a cylindrical fitting attached to the top of the head by a rectangular strut which is grooved on its front face. The fitting, 24.3 mm in diameter, is hollow and open at top and bottom. On its exterior surface it carries circumferential ridges and grooves.
West Keal, figurine (no. 7). Scale 1:2 (photo: R. Trevaskus). (© Lincolnshire County Council)

No parallels among free-standing figurines can be identified for this fitting. The loss of the hands prompts caution, but the figure would appear to echo in spirit, if not in specific detail or style, the furnishings that take figural form as ‘human tools’ and ‘props’, for example tray bearers, light carriers and so on identified among small-scale and large-scale Roman bronzes.Footnote 43 An object from Reims, taking the form of a standing monkey on a base with a conical tube from the back of the head, a likely candle holder, provides a possible parallel but it is smaller.Footnote 44 The West Keal figure echoes also the small copper-alloy figures, sometimes in working dress, with pointed extensions to their heads sometimes identified as candlesticks, the best known of which is the priapic figure in the Thorvaldsen Collection.Footnote 45 However, the fitting attached to the West Keal figure's head is not paralleled in either case and may instead resemble better the ferrules used to connect handles to knife blades, for example. Handles in figural form are abundant for folding knives, rarer for fixed-blade knives, although in this case the figure would make for an awkward grip.Footnote 46 Thus the function remains unresolved. The figure itself raises further questions. Some prop figures are given bestial forms, an additional dehumanising element, while others, for example the light bearers like the oil flask documented from Roman Aldborough, give enslaved individuals idealised youthful forms.Footnote 47 While the heavy wear makes it hard to be confident, the elaboration of the tunic might put the West Keal figure into the latter category, representing a finely clothed slave attendant in a high-status household (puer delicatus).Footnote 48 The stylisation of the hair might be explained either by the tradition in which the maker worked or by the deliberate use of a ‘Celtic’ style as a marker of the exotic origins of an enslaved subject from north-western Europe. It echoes the hairstyles seen in some clean-shaven images of captives, for example on the Type II ‘bound captive’ figurines, or in more monumental format, for example the column bases probably from the legionary principia at Mainz, as well as in other stylised anthropomorphic images.Footnote 49
WARWICKSHIRE
(8) Chesterton and Kingston (WMID-97AF41) (fig. 8).Footnote 50 A fragment from a bronze portrait head, corroded and worn, smaller than life-size, 63.5 mm long and 35.1 mm wide. It is 10.6 mm thick and weighs 36.3 g. The fragment comprises the left ear and neighbouring areas. The ear itself is modelled with limited detail: a lobe at the base, prominent helix or outer edge and less prominent anti-helix or parallel inner ridge, these framing a simplified recess. The rather coarsely modelled hair is short and clumped in parallel locks in front of the ear, forming the upper part of a beard; above, poor preservation makes the arrangement of the hair less easy to understand, with locks seemingly at angles to one another.
Chesterton and Kingston, statue fragment (no. 8). Scale 1:1 (photo: T. Gilmore). (© Birmingham Museums Trust)

This is another example of a fragment from a large bronze statue now documented in significant numbers through the PAS, the thick hair in this case perhaps indicating a mid-second- to early third-century date.Footnote 51 These are usually identified as single finds of bodily extremities, including fragments of head and fingers.Footnote 52 A larger group that may be the fragmented survivors of temple votives has also been documented recently.Footnote 53
BEDFORDSHIRE
(9) Central Bedfordshire (BH-72C17B/2020T30) (fig. 9). A group of copper-alloy objects, including fragments of a decorated mirror, a pair of tweezers, a pin and numerous fragments from vessels as well as other sheet-metal fragments and rim and body sherds from at least one ceramic vessel. This note focuses on the two best-preserved objects, the mirror and tweezers, both decorated with curvilinear La Tène ornament.
Central Bedfordshire, grave group(?) (no. 9): (a) mirror; (b) tweezers. Scale 1:2. (c) close-up of terminal of tweezers. Scale 1:1 (photo: M. Fittock). (© PAS)

The mirror is in rather poor condition, fragmented and with a green patina compromised by corrosion and pitting. Two substantial joining fragments measure respectively 192 mm and 174 mm at their widest, at least three-quarters of the original diameter of the mirror; they are 2 mm thick and weigh 132.2 and 52.3 g. The once-polished reflecting surface is in poor condition, delaminating and scratched. The back carries complex engraving. Arms extending from a central roundel taper and then swell towards four similar roundels on the plate edge; each of these five larger roundels contains two smaller examples. The arms divide the surface into symmetrically arranged quarters. Within each is a complex arrangement of swirling forms, roundels, fins, crescents, cusps and trumpet voids, some defined negatively by incised outline, others positively by hatched basket-weave, chevrons or short parallel strokes. The proliferation of small shapes makes for a busy surface, the design lacking the fluidity of the best-known mirrors. No close parallel to the design has been noted.Footnote 54 The handle, 154.2 mm long, weighs 141.3 g. Its arms have a narrow slot in which a fragment of mirror plate remains in situ. A collar of two raised mouldings separates these arms from the handle proper, comprising a teardrop-shaped loop fitting within the grip, separated from the ring terminal by a grooved moulding. This handle, belonging to Joy's Type IV, resembles that of the Langton Herring mirror (DOR-F12EF3/2010 T415).Footnote 55
The tweezers are complete, being 85.5 mm long and weighing 17.9 g. Decorative detail is well preserved beneath a green patina. The loop connecting the arms of the tweezers expands into a near-circular terminal. This terminal carries similar curvilinear decoration on both sides, comprising three circled tricornes (a roundel divided in three by a hatched tricorn motif), set within zones of basket hatching. The outer edge has an incised border. The arms are D-sectioned and widen to turned-in terminals, each engraved with an ‘X’ on the exterior. Decoration of this type is exceptional among tweezers and provides another example of the transfer of the ‘mirror style’ onto other objects, in this case perhaps prompted by the similar kidney-shaped surface.Footnote 56 The main motif on the tweezers, the circled tricorne, is not engraved on the associated mirror.
The combination of items for cultivating appearance with other metal objects and at least one ceramic vessel suggests that this group derives from a funerary context. The presence of the mirror in particular suggests a burial setting, graves being the documented provenance of most decorated examples of early first-century b.c. to mid-first-century a.d. date from southern Britain.Footnote 57 The inclusion of tweezers also characterises other burials of this period, some with quite large and diverse grave-good assemblages, for example at Langton Herring and Portesham in southern Dorset.Footnote 58
HERTFORDSHIRE
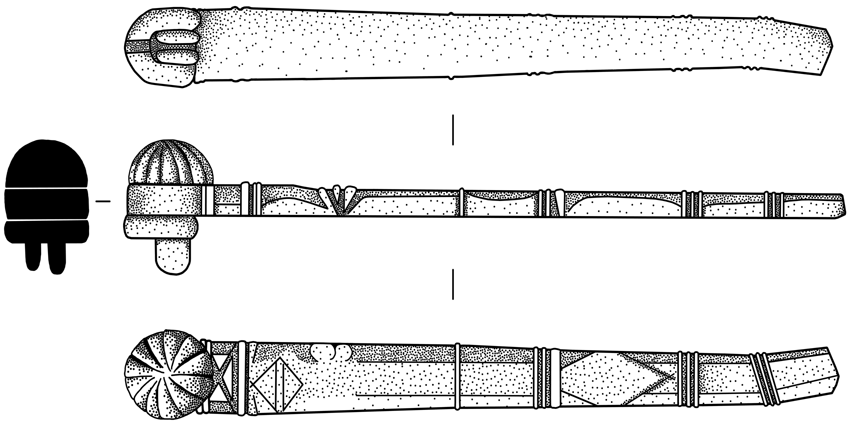
(10) Ashwell (BH-5CFC9B/2020T31) (fig. 10).Footnote 59 A complete copper-alloy handle from a rattle, once silvered and now worn and abraded, 58.4 mm long and weighing 32.9 g. Baluster-like in form, at one end the handle has a hollow domed terminal, decorated around its edge with diagonal rilling. A circular hole in the centre extends into the handle proper, perhaps enabling the attachment of a further terminal element. A collar with a central ridge, grooved on either side, separates the terminal from the main part of the handle. The widest part of the handle carries a short strip on both sides, seemingly rivetted to it, perhaps a repair. The narrow neck expands into a concave disc which would have been soldered to the body of the rattle proper.
Ashwell, rattle handle (no. 10). Scale 2:3 (photo: M. Fittock). (© PAS)

Rattle handles like this are rare survivals in Britain of priestly regalia.Footnote 60 One of the closest comparanda is the handle of similar design, albeit much longer, found with the temple deposit at Barkway in 1743. The rattle handle from Felmingham Hall, Suffolk, differs both in terms of its more angular decoration and its greater size, as does a silvered example from the temple site at Vieil-Evreux, Eure.Footnote 61In both these cases the body of the rattle proper also survives: a thin-walled metal sphere containing metal balls that would rattle when shaken. The small size of the Ashwell handle may indicate its purpose as a miniature votive rather than as a functional item, a characteristic of several offerings from the nearby Ashwell End ritual site.Footnote 62
NORFOLK
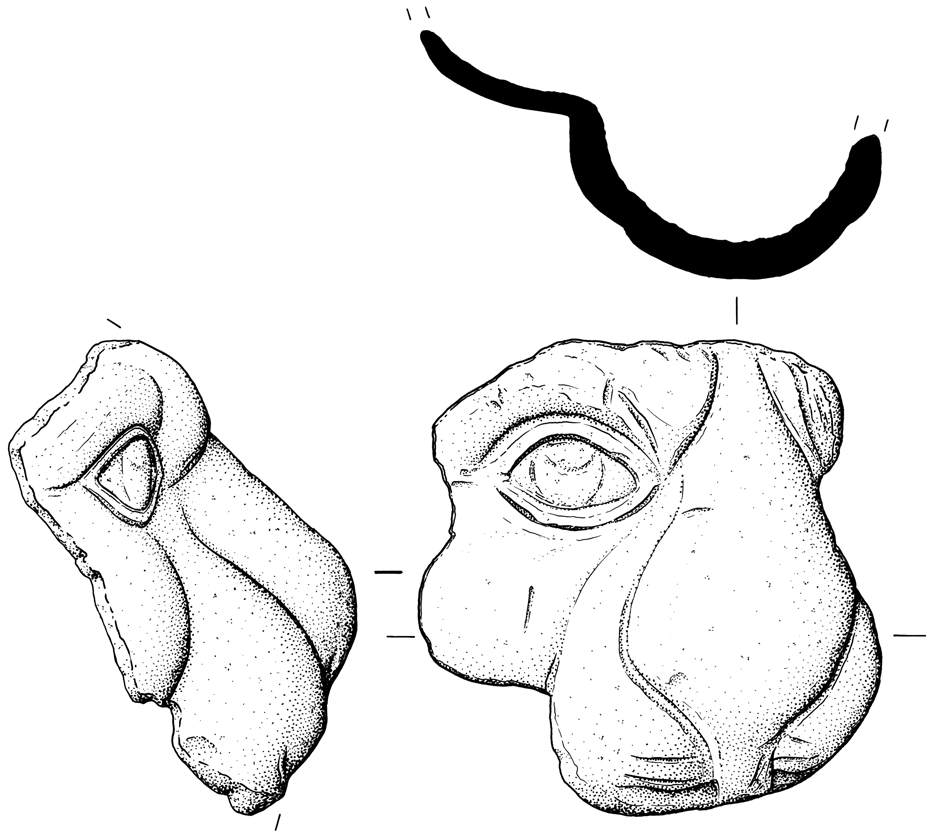
(11) Trowse with Newton (NMS-D7B5E2) (fig. 11).Footnote 63 A copper-alloy fragment from a mount in feline form, 45 mm at its widest. This piece from the centre of the face comprises the right eye, with defined lids, iris and pupil, as well as the cheek and most of the broad nose and the upper part of the muzzle. The three-dimensional modelling is notable, especially the swell of muscle around the eyebrows and nose. A lion is the most likely subject, but the fragment size limits the confidence with which the species can be identified. It is substantially larger than the lion-head studs used as decorative elements on caskets and their lock plates, and is more likely to have been the central portion of a furniture mount in the form of a feline mask. Its form recalls other larger copper-alloy lion-head furniture mounts in high relief from Britain and Gaul.Footnote 64 These vary between 2.5 and 9.5 mm in diameter, the Trowse with Newton fragment seemingly deriving from a mount equivalent in scale to the largest of these from the villa at Helmsange, Luxembourg, but with greater finesse in its physiognomic modelling.Footnote 65
Trowse with Newton, mount (no. 11). Scale 1:1 (drawing: P. Hughes). (© Norfolk County Council)

(12) Near Swaffham (NMS-1396BC) (fig. 12).Footnote 66 A Roman hardstone ‘pebble-back’ cameo, depicting a gorgoneion or Medusa head in three-quarter view, 21 mm long by 17 mm wide, 11.5 mm thick and weighing 4.7 g. The cameo, probably cut from layered nicolo onyx, is white to bluish-grey with polished features carved into the white layer. Carving is less careful towards the margins of the cameo. On Medusa's rounded face the individual features are quite angular, the heavy-lidded right eye, for example, cut in a near triangular recess, the nose with two facets meeting at a worn ridge and the mouth a short narrow slot. The hair, delineated by wide-spaced diagonal cutting, rises above the temples and frames the right side of the face, reproducing the snake-locks sweeping to the side more clearly rendered in examples in jet and other media.Footnote 67 The wing that sprouts from the right side of the head is differentiated from the hair in its much denser cross-hatching, a convention seen in other materials.Footnote 68 The rear is rough, typical of third-century cameos, in an as-cut condition. A groove has been cut around the edge to facilitate mounting within a brooch or pendant.Footnote 69
Near Swaffham, cameo (no. 12). Scale 2:1 (photo: G. Crace). (© G. Crace)

Cameos of all types are rare finds in Britain.Footnote 70 Amulet cameos of Medusa are the commonest category of second- to third-century date in Britain and elsewhere, worn in jewellery including finger-rings and pendants as well as bracelets and earrings.Footnote 71 Other cameo types include female portraits (see no. 5 above) and mourning cupids.Footnote 72 Gorgoneia in cameos and other materials, predominantly jet, were worn for their perceived apotropaic effect.Footnote 73 Copper-alloy gorgoneia on mounts and fittings, with a similar intended protective function, are much more frequently documented as PAS finds. The accumulating evidence highlights the role of the gorgoneion in the repertoire of apotropaic images.Footnote 74
ESSEX
(13) Great Bentley (ESS-014824) (fig. 13).Footnote 75 A probable first-century gem, reset in a gilded ring of third-century date, now broken. The hoop is 29.7 mm in diameter at its widest, with a band 2.3 mm thick and a bezel 25.2 by 21 mm, housing an intaglio. The ring weighs 21.5 g. The hoop has been flattened out of shape and is broken into three pieces. It once broadened into angular shoulders with traces of openwork which frame the bezel; the octagonal setting and the nicolo gem are now detached from the backplate.
Great Bentley, ring (no. 13). Scale 2:1 (photo S. Flynn). (© Colchester and Ipswich Museums Service)

Martin Henig comments as follows: ‘The gem is a nicolo in excellent condition depicting a young satyr seated upon a rock playing the double pipes (auloi). It is paralleled on an example from Colchester also in nicolo, though here the satyr seems to be holding a cup.Footnote 76 Another intaglio, probably of black jasper rather than glass as stated, from Charterhouse-on-Mendip, Somerset, depicts a satyr seated on a rock and perhaps holding an aulos; in front of him is a tree.Footnote 77 The auloi was the instrument par excellence played by satyrs and it was by challenging Apollo to a musical competition that the satyr Marsyas came to grief, as shown on the splendid chrome chalcedony intaglio from Chichester, West Sussex. Here Marsyas sits on the ground wearing a lugubrious expression, his auloi now useless leaning on a rock while the poor satyr awaits his fate.Footnote 78 Satyrs are often portrayed playing auloi in cult scenes.Footnote 79
Secondly the ring can be paralleled in several instances. For a silver ring with octagonal bezel with keeled shoulders, typical of the third century, the example from Groveley Wood, Wiltshire, may be noted. The colour contrast beloved of the period is provided by a gold inset in the bezel depicting clasped hands.Footnote 80 A gold ring with octagonal bezel from Ilchester is set with an aureus of Severus Alexander,Footnote 81 while a gold ring found near Oxford is set with a nicolo intaglio depicting Minerva in an octagonal setting.Footnote 82 Openwork shoulders are also a feature of rings of this period, as illustrated by a silver ring with hexagonal bezel and openwork shoulders from Wavre (Brabant, Belgium).Footnote 83 The gold or gilded surround of the gem, serving as a collet, is reminiscent of the gold box setting containing a nicolo gem depicting an eagle in a silver ring of late second-century form from Wotton-under-Edge, Gloucestershire, which can be related to the conceit in Heliodorus (Aethiopica 5.14) in which the ring Calasiris gave Nausicles contains a gem depicting a pastoral scene and the gold surround acts as a pen, fencing in the scene.’Footnote 84
SUFFOLK
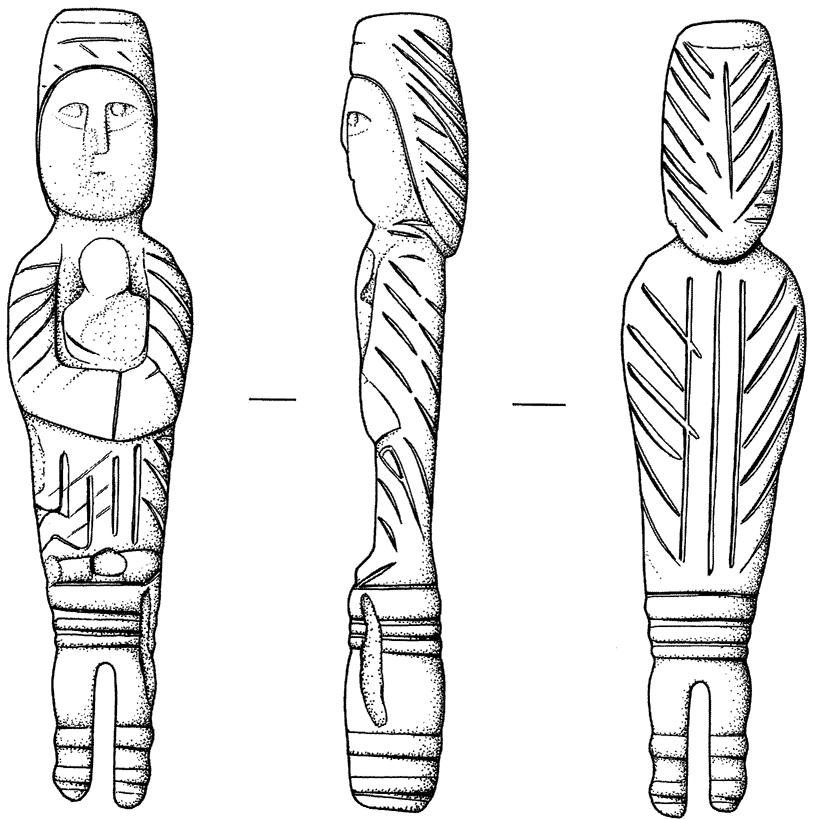
(14) Hacheston (SF-3ED040) (fig. 14).Footnote 85 A cast copper-alloy handle in the form of a stylised standing female figure, with a pitted green patina and evidence of corrosion. It measures 66.8 mm long and weighs 30.9 g. The figure's head is disproportionately long in comparison to the body. It has a flattened plain top with hair swept back from the face into a coiffure extending below the nape of the neck, formed by parallel diagonal ridges. Her face is worn with oval eyes, a broad nose and a slit mouth just visible. The flat body tapers from the shoulders to the feet with arms folded across her waist, cradling an object or form which is very difficult to identify, an infant perhaps. Clothing extends from head to foot, with folds indicated schematically. Those on the upper body comprise diagonal parallel grooves extending from the upper arms to the middle of the back. Vertical grooves run down the middle of the back and the lower body at the front. The feet stand on an integrally cast attachment, cylindrical in form, with a grooved collar at either end and split by a slot for housing a now lost blade or similar.
Hacheston, handle in figural form (no. 14). Scale 1:1 (drawing: D. Wreathall). (© Suffolk County Council)

The object's function is uncertain, seemingly a handle. As for the figure, her coiffure echoes that of later second- and third-century empresses. The difficulty of characterising the object she holds compounds the difficulty of identifying her; while the pose somewhat echoes that of Dea Nutrix and mother-goddess figurines that hold children or foodstuffs, close parallels with such (normally seated) figures are lacking.Footnote 86
OXFORDSHIRE
(15) Cholsey (BH-4FAE3D) (fig. 15).Footnote 87 A complete cast copper-alloy ring-headed pin with green patina, 112 mm long and weighing 22.8 g. The head is rounded, flat and worn on the sides. Both faces are decorated with a central dot-and-ring motif comprising a hollow surrounded by a groove and another circumferential groove runs around the edge. The decoration on the sides of the pinhead survives best near the junction with the shaft. Here two incised crosses enclose an (off-centre) lozenge; on the edges, within the spaces between the arms of each cross, triangles of diminishing size are formed by parallel incision, around a central groove. Traces elsewhere suggest this scheme extended to the entire circumference of the head. Below, the shaft has the curved shoulder that characterises this insular pin type, is circular in cross-section and tapers to a point.
Cholsey, ring-headed pin (no. 15). Scale 2:3 (photo: M. Fittock). (© PAS)

Ring-headed pins are widely documented in Iron Age Britain and Ireland, where they were in use to the end of the pre-Roman Iron Age as a distinctive element in insular costume, contrasting with the disappearance of pins for fastening clothing from continental Europe in the same period. The ring head developed out of the S-curve of swan-necked pins, this curve serving as an ‘elbow’ to keep cloth folds in place.Footnote 88 More than 25 examples of ring-headed and related pins documented by the PAS form a significant addition to the known corpus, mainly from southern and midland England. They comprise mainly pins with an open head, such as from near Keelby, Lincolnshire (NLM-7A3F0F), or Kingston Bagpuize, Oxfordshire (BERK-40849E), as well as examples with solid or near-solid heads, for example from Bishop's Waltham, Hampshire (HAMP-338A41), or Shouldham (NMS-F0C164) and Forncett (NMS-6D8782), both in Norfolk. Many pins carry decoration on the head, the likely most visible part when the pin was worn, but this lozenge motif is rare, being partially paralleled on an example from Isleham, Cambridgeshire (SF-F4BD24).Footnote 89 The dot-and-ring motif is also rare and may indicate a Roman period date for the Cholsey pin.
(16) Alvescot (OXON-4391B5) (fig. 16).Footnote 90 An incomplete cast copper-alloy steelyard weight with a lead core, sensitively modelled as a bust of Jupiter. The weight is 63 mm high and weighs 455 g. The face is framed by thickly curling hair and beard. The beard is especially thick at the chin, while the hair is gathered into three clumps, one over each ear and one over the forehead. The head is ringed by a garland from which a vine leaf(?) extends to cover each clump of hair. Thin curling grooves radiate from the crown to render the hair on the top of the head. The contrasting texture between the crown, flat, regularly patterned, and the more organic three-dimensional massing of curls around the margins of the coiffure echoes sculptural representations of Jupiter.Footnote 91 A suspension loop projects from the top of the head. Further strands of hair cover the back of the neck, partly lost to damage. Facial features are well-preserved if worn. The eyes are offset from large oval hollows framed by brows which extend into a well-shaped nose with delicately indented nostrils visible above the moustache and narrow-lipped mouth. On the figure's left side part of the neck and shoulder survive, but most broke away in antiquity. The lead core is revealed at the break.
Alvescot, steelyard weight (no. 16). Scale 1:1 (photo: E. Caswell). (© PAS)

This steelyard weight joins a small number of anthropomorphic examples documented from Britain. Minerva is the commonest in figural form, but other examples of Jupiter, Cupid and grotesque figures are known.Footnote 92 That this object's weight does not directly correspond to an obvious Roman unit of weight may be explained by its incompleteness.
LONDON
(17) Walbrook (PUBLIC-435C3C) (fig. 17).Footnote 93 A near-complete copper-alloy figurine of Mercury, 78.3 mm tall and weighing 91.5 g. The god wears a winged hat (petasos) with broad brim from which one complete wing and the stump of the other project. Under the brim the curling hair is visible, with the god's youthful features worn but still discernible with large eyes, a narrow nose and a small chin. The deity is naked save for the cloak draped over the left shoulder and hanging to the knee, supported by the extended left arm, which it covers to the wrist. The god's left hand is turned upwards, perhaps once holding a caduceus. The right arm, also bent at the elbow, extends forward with the hand holding the top of a small pouch. The god's physique is well modelled, with visible pectoral and abdominal muscles, as well as backbone and rounded buttocks. The legs are straight, broken at the ankles, with a possible indication of footwear.
Walbrook, figurine (no. 17). Scale 2:3 (photo: W. Thompson). (© PAS)

The attributes of this figurine, especially the petasos and pouch identify him as Mercury, the most common Roman deity documented as a figurine in Britain, both among those reported to the PAS and from excavation and museum collections. Focused on the south of the province, more than 100 examples are catalogued in Emma Durham's corpus and at least 15 more can be added from recent examples. These include another well-preserved and well-modelled nude Mercury with chlamys and coin bag documented in 2020 from the Itchen Valley (BERK-2BACFB). The variant with petasos and pouch as documented here is the most frequently attested.Footnote 94
SURREY
(18) Oxshott and Stoke D'Abernon (SUR-1C1A4E) (fig. 18).Footnote 95 A cast copper-alloy figurine of Mars, 128.4 mm high, weighing 231.5 g, notable for its fine modelling of anatomy and surface detail in a highly classicising form, well-preserved with a uniform green patina. The god is rendered as a mature bearded figure, dressed in cuirass and cloak. The head is topped with a Corinthian helmet with a high elongated crest, though partly broken and bent to the figure's left. The facial features are rendered in proportion, with eyelids and eyebrows visible, a nose worn flat and the mouth slightly open. The face is framed by rows of curls emerging from beneath the helmet cap and by a double row for the full beard. The god stands in contrapposto pose, right leg straight, left flexed though now bent out of position. The right arm is raised with the hand lost to an ancient break, likely once holding a spear. The left, at the side, perhaps once held a shield. The square-necked cuirass carries relief images of opposed griffins on the chest, replicating the characteristics of larger versions of the statue, as well as other finely moulded detail such as the pteryges visible at the shoulders and waist over a tunic.Footnote 96 Greaves on the lower legs carry mouldings indicating decoration on the front and lacing to the rear. Under the sandalled feet are traces of attachment to a base. Wrapped around the left elbow, the cloak extends diagonally across the body to the right shoulder, from which it hangs with precisely moulded folds to the knee.
Oxshott and Stoke d'Abernon, figurine (no. 18). Scale 2:3 (photo: S. Maslin). (© Surrey County Council)

After Mercury and Hercules, Mars is the most frequently attested figurine type in Britain, most like this example being found in the central-southern part of the province. This figurine follows in detail the Mars Ultor type, a less frequent manifestation of the god in Britain than other versions of the deity but also attested in several other finely modelled examples, notably figurines from Stanstead Abbotts (Hertfordshire) (BH-247012), Wrawby (Lincolnshire) and Earith (Cambridgeshire).Footnote 97
HAMPSHIRE
(19) St Mary Bourne (HAMP-D18D76/2020T233) (fig. 19).Footnote 98 A group of copper-alloy vehicle fittings, comprising two bridle bits, a pair of linchpins, five rein terrets as well as a copper-alloy ingot and small mount.
St Mary Bourne, vehicle fittings (no. 19): (a) bridle bit elements (nos 1 and 3); (b) linchpin; (c) terrets (nos 1 and 3). Scale 1:2 (photo: S. Maslin). (© Surrey County Council)

The two bridle bits are both of double-jointed snaffle or ‘three-link’ type.Footnote 99 Each comprises a pair of connected rein rings and side links in figure-of-eight form. The side links have a terminal bulb at the point of attachment to the rein ring and a teardrop-shaped loop to connect to the centre link. The latter is absent in both cases. The bits are very similar in form and size, the main difference being that one bit (nos 1 and 2) is unfinished, retaining casting flash as well as sprues and casting gates. The other (nos 3 and 4) shows extensive tool marks. In each case one terminal bulb (1 and 3, i.e. one of each ‘unfinished’ and ‘finished’ pair) carries relief decoration reminiscent of plastic style in the form of pellets and bosses connected by curling lines; the tendency for only one side link to carry decoration has been noted in other examples of bits, perhaps related to greater visibility in use.Footnote 100 If the casting gates are excluded, the rein-ring and side-link pairs are between 111 and 117.2 mm long. The rein rings have an external diameter varying between 78.4 and 80.2 mm. The finished rein-ring and side-link combinations (3 and 4) weigh 188.1 g and 191.6 g respectively.
The two linchpins are very similar to one another though one lacks its foot. The following description of the complete pin applies in almost every detail to the other. It is 131.7 mm long and weighs 302.8 g. Its head is vase shaped, with a discoidal terminal with three raised foliate motifs, also reminiscent of plastic style, decorating its rim and a central recess which may once have held enamel decoration. The perforation through the terminal would have allowed for the attachment of linchpin to wheel; it is visible, albeit filled with corrosion product, near the junction with the iron shank, 52.8 mm long and square in cross section. The foot is sub-conical, curving into a flared ‘hoof’ terminal at a right-angle to the axis of the shaft, this having a central recess with a moulded rim around the circumference.
The five copper-alloy terrets are of ‘lipped type’, with a flat bar and a hoop decorated with repeated paired transverse ‘lips’, one (no. 1) with 13 pairs, the others with seven. The form of the lips varies, each pair on no. 1 being more sharply articulated by a double ridge and groove, while the others are more simply rounded. One terret (no. 1) is more rounded in plan, the others D-shaped. Their external and internal diameters vary respectively from 50 to 54 mm and from 29.2 to 36.1 mm; the terrets weigh between 43.6 and 57.1 g. These comprise a likely set for a vehicle yoke, on which terret 1 was perhaps the centrally mounted element.Footnote 101 The other two copper-alloy objects comprise a discoidal ingot, 61.8mm in diameter and weighing 233.5 g, and a thin copper-alloy mount in leaf or arrowhead form, 32.9 mm long and weighing 4.4 g.
These objects were found in close association, the mount in the plough zone and the rest of the group below the plough layer. The bridle bits had been placed on top of one another with the linchpins, terrets and ingot below. The group comprises fittings from a single chariot or similar vehicle. Deposition of vehicle fittings is widely documented from the Middle Iron Age to the mid-first century a.d., both in burials (principally in East Yorkshire) and in structured deposits, the latter sometimes independent of the chariot body. The group perhaps most closely resembles the assemblages of fittings found in such deposits excavated at Burrough Hill, Leicestershire, and Bury Hill, Hampshire, both dated to the second century b.c. and the latter only a few miles from the find-spot of this group.Footnote 102 However, the unfinished condition of one bridle bit, allied to the presence of the ingot, gives a distinctive emphasis to this group which recalls the metalworking association of other Iron Age hoards.Footnote 103 The bit, linchpin and terret forms are widely documented in central and southern Britain.Footnote 104 All have potentially long date ranges, from the fourth/third century b.c. to the first century a.d. or second century a.d. for three-link bridle bits and vase-headed linchpins, respectively, and a similar if not longer span for lipped terrets. The decorative motifs on the bridle-bit terminal bulbs and linchpin heads may limit the date range to between the later third and later first century b.c. rather than the conquest period or later, but a longer span from c. 300 b.c. to a.d. 100 cannot be excluded.
(20) Soberton (BERK-6CBB0D) (fig. 20).Footnote 105 A copper-alloy solid portrait head of Venus, 47.2 mm high and weighing 122 g. The head is sharply broken at the neck and whether it was once attached to a body is uncertain. Cast with sensitively modelled features, the head is held tilted slightly to the left. Delicately waved locks fall away to either side of a central parting. At the forehead locks are gathered into thicker tresses which are drawn to a bun at the back of the head. From the bun fall loose braids, better preserved on the left, while to the right a single braid is set at an angle to the neck, broken in antiquity. The downcast eyes are carefully modelled with brows, lids and pupils clearly rendered, though no trace of inlay is noted. The nose is straight and the small mouth is closed.
Soberton, head of Venus (no. 20). Scale 1:1 (photo: R. Trevaskus). (© Berkshire Archaeology)

The image resembles other copper-alloy representations of Venus from Britain, albeit being more sophisticated in its modelling than most and (if from a complete statue) larger than any otherwise known.Footnote 106 The angling of the strand of hair from the right side of the tilted head suggests that the statuette is an example of the Venus Anadyomene type, i.e. where the goddess wrings out her hair as she leaves her bath. Other figurines documented by the PAS show versions of this type. One from Pitsea, Essex (ESS-CEA6C1), for example, raises both arms to wring out the hair, while a statuette from Wingham, Kent (KENT-E80066), raises a single hand to complete the task and another covers her groin, the gesture defining the Venus Pudica type.Footnote 107 The same combination is seen on a knife handle modelled in the form of the goddess from Dodderhill, Worcestershire (WAW-378661).Footnote 108 The more numerous pipeclay figurines typically share the gesture.Footnote 109
WEST SUSSEX
(21) Harting (SUSS-912292) (fig. 21).Footnote 110 A mount in the form of a hooded bust of a beardless male figure, perhaps the god Attis, 56.9 mm high. The figure wears a Phrygian cap with a crest-like peak. Beneath the cap the face is fringed by a row of large curls. Facial features are well defined if rather schematically rendered, with large orbits for the eyes, a broad worn nose and groove-like mouth. The cloak is pinned at the right shoulder, with its folds rendered by parallel grooves and ridges, beneath which is a seemingly bare torso. On the bottom edge are three holes which would have attached the mount to a vessel or furniture by rivets. In the absence of other attributes, it is difficult to identify the subject of this and similar hooded figures with confidence.Footnote 111 Attis or Ganymede are more likely candidates for a youth in a Phrygian cap than Mithras, who is very rarely represented in miniature metal form.
Harting, mount (no. 21). Scale 2:3 (photo: C. Lima). (© PAS)

GLOUCESTERSHIRE
(22) Sodbury (GLO-FD3948) (fig. 22).Footnote 112 A copper-alloy zoomorphic mount in the form of a stylised boar protome, 52 mm high and weighing 32.2 g. The head is plain and conical, tapering to the snout where it expands into a grooved cylindrical terminal, perforated by a narrow channel. The large erect ears angle slightly outward, flanking a high crest. This crest arches backwards, gradually shortening, with plain shoulders on either side leading to slender tapering legs, circled by grooves. The right foot is broken away, the left is complete with a hoof turned inwards (by damage). The underside of the body is concave. Similar protomes are documented in northern and eastern England by the PAS from Crambe (LVPL-30FD58) and Long Marston (LVPL-E1A822), both North Yorkshire, Asgarby and Howell, Lincolnshire (LIN-D4C887), and South Cambridgeshire (CAM-A1B4AA); other examples are documented at Aldborough and London.Footnote 113 Lacking an obvious attachment mechanism, save for the potential socket within the hollow of the boar's body, their function is unknown. The protome belongs to a much larger corpus of boar images of Late Iron Age to Roman date.Footnote 114
Sodbury, protome (no. 22). Scale 2:3 (photo: K. Adams). (© Bristol City Council)

(23) Lechlade (WILT-B40D2D) (fig. 23).Footnote 115 An incomplete plate brooch in the form of a highly stylised amphora or kantharos, of second- to third-century a.d. date, 40 mm long and weighing 7 g. The body of the amphora widens from a narrow foot to a broader neck, flanked by openwork curved handles which connect at top and bottom. Enamel inlay has likely been lost from the recessed plate which forms the amphora body. At the ends of the amphora are a flaring head and foot, with lugs for housing the (lost) pin projecting from the latter and the remnants of the catch plate from the former. Plate brooches in the same form are documented from northern France and Belgium, albeit differing in decorative detail.Footnote 116
Lechlade, brooch (no. 23). Scale 1:1 (photo: W. Partridge). (© Salisbury and South Wiltshire Museum)