





Impact statement
This work contributes to the Biodesign community by demonstrating an accessible, low-tech approach to additive manufacturing of living mycelium objects using Do-It-Yourself-modified tools. By lowering technical and financial barriers, it encourages broader participation, experimentation and hands-on engagement of digital fabrication of living materials.
Rethinking material resources in digital fabrication
In response to the environmental impact of petroleum-based plastics, researchers and designers have introduced sustainably sourced materials and environmentally responsible production workflows as alternatives across diverse applications, including wearables (Danninger et al. Reference Danninger, Pruckner, Holzinger, Koeppe and Kaltenbrunner2022), packaging (Abhijith et al. Reference Abhijith, Ashok and Rejeesh2018) and architectural structures (Attias et al. Reference Attias, Danai, Abitbol, Tarazi, Ezov, Pereman and Grobman2020). Among these emerging material systems, mycelium-based composites represent a fundamentally different fabrication paradigm, as they rely on the biological growth of fungal mycelium rather than the extraction and processing of finite resources. The production of structural mycelium composites typically involves combining mycelial spawn with lignocellulosic biomass substrates and shaping the mixture within a rigid mold. Under controlled temperature and humidity conditions, the mycelium forms an interconnected hyphal network that permeates the substrate, fills void spaces and binds the loose particles into a cohesive, structurally stable material (Soh et al. Reference Danninger, Pruckner, Holzinger, Koeppe and Kaltenbrunner2023).
Accessible low-tech additive manufacturing of mycelium-based objects
Digital fabrication, particularly 3D printing, has become a central technology in contemporary manufacturing. 3D-printed mycelium objects have been explored by various researchers, from investigations into the fabrication and properties of mycelium-based materials (Elsacker Reference Elsacker2021) to interdisciplinary projects such as the MyCera, which integrates mycelial growth into digitally manufactured clay composites for enhanced structural performance (Jauk et al. Reference Jauk, Gosch, Vašatko, Ingolf, Klaus and Stavric2022) and transdisciplinary work like Pulp Faction, which develops 3D-printed mycelium composite materials for architectural applications (Goidea et al. Reference Goidea, Floudas, Andréen, Burry, Sabin, Sheil and Skavara2020). Based on this research, we tried to simplify processes and developed a way to easily 3D print and grow mycelium objects (up to 40 cm height – our printer height is the limiting factor) in a very cost-efficient way.
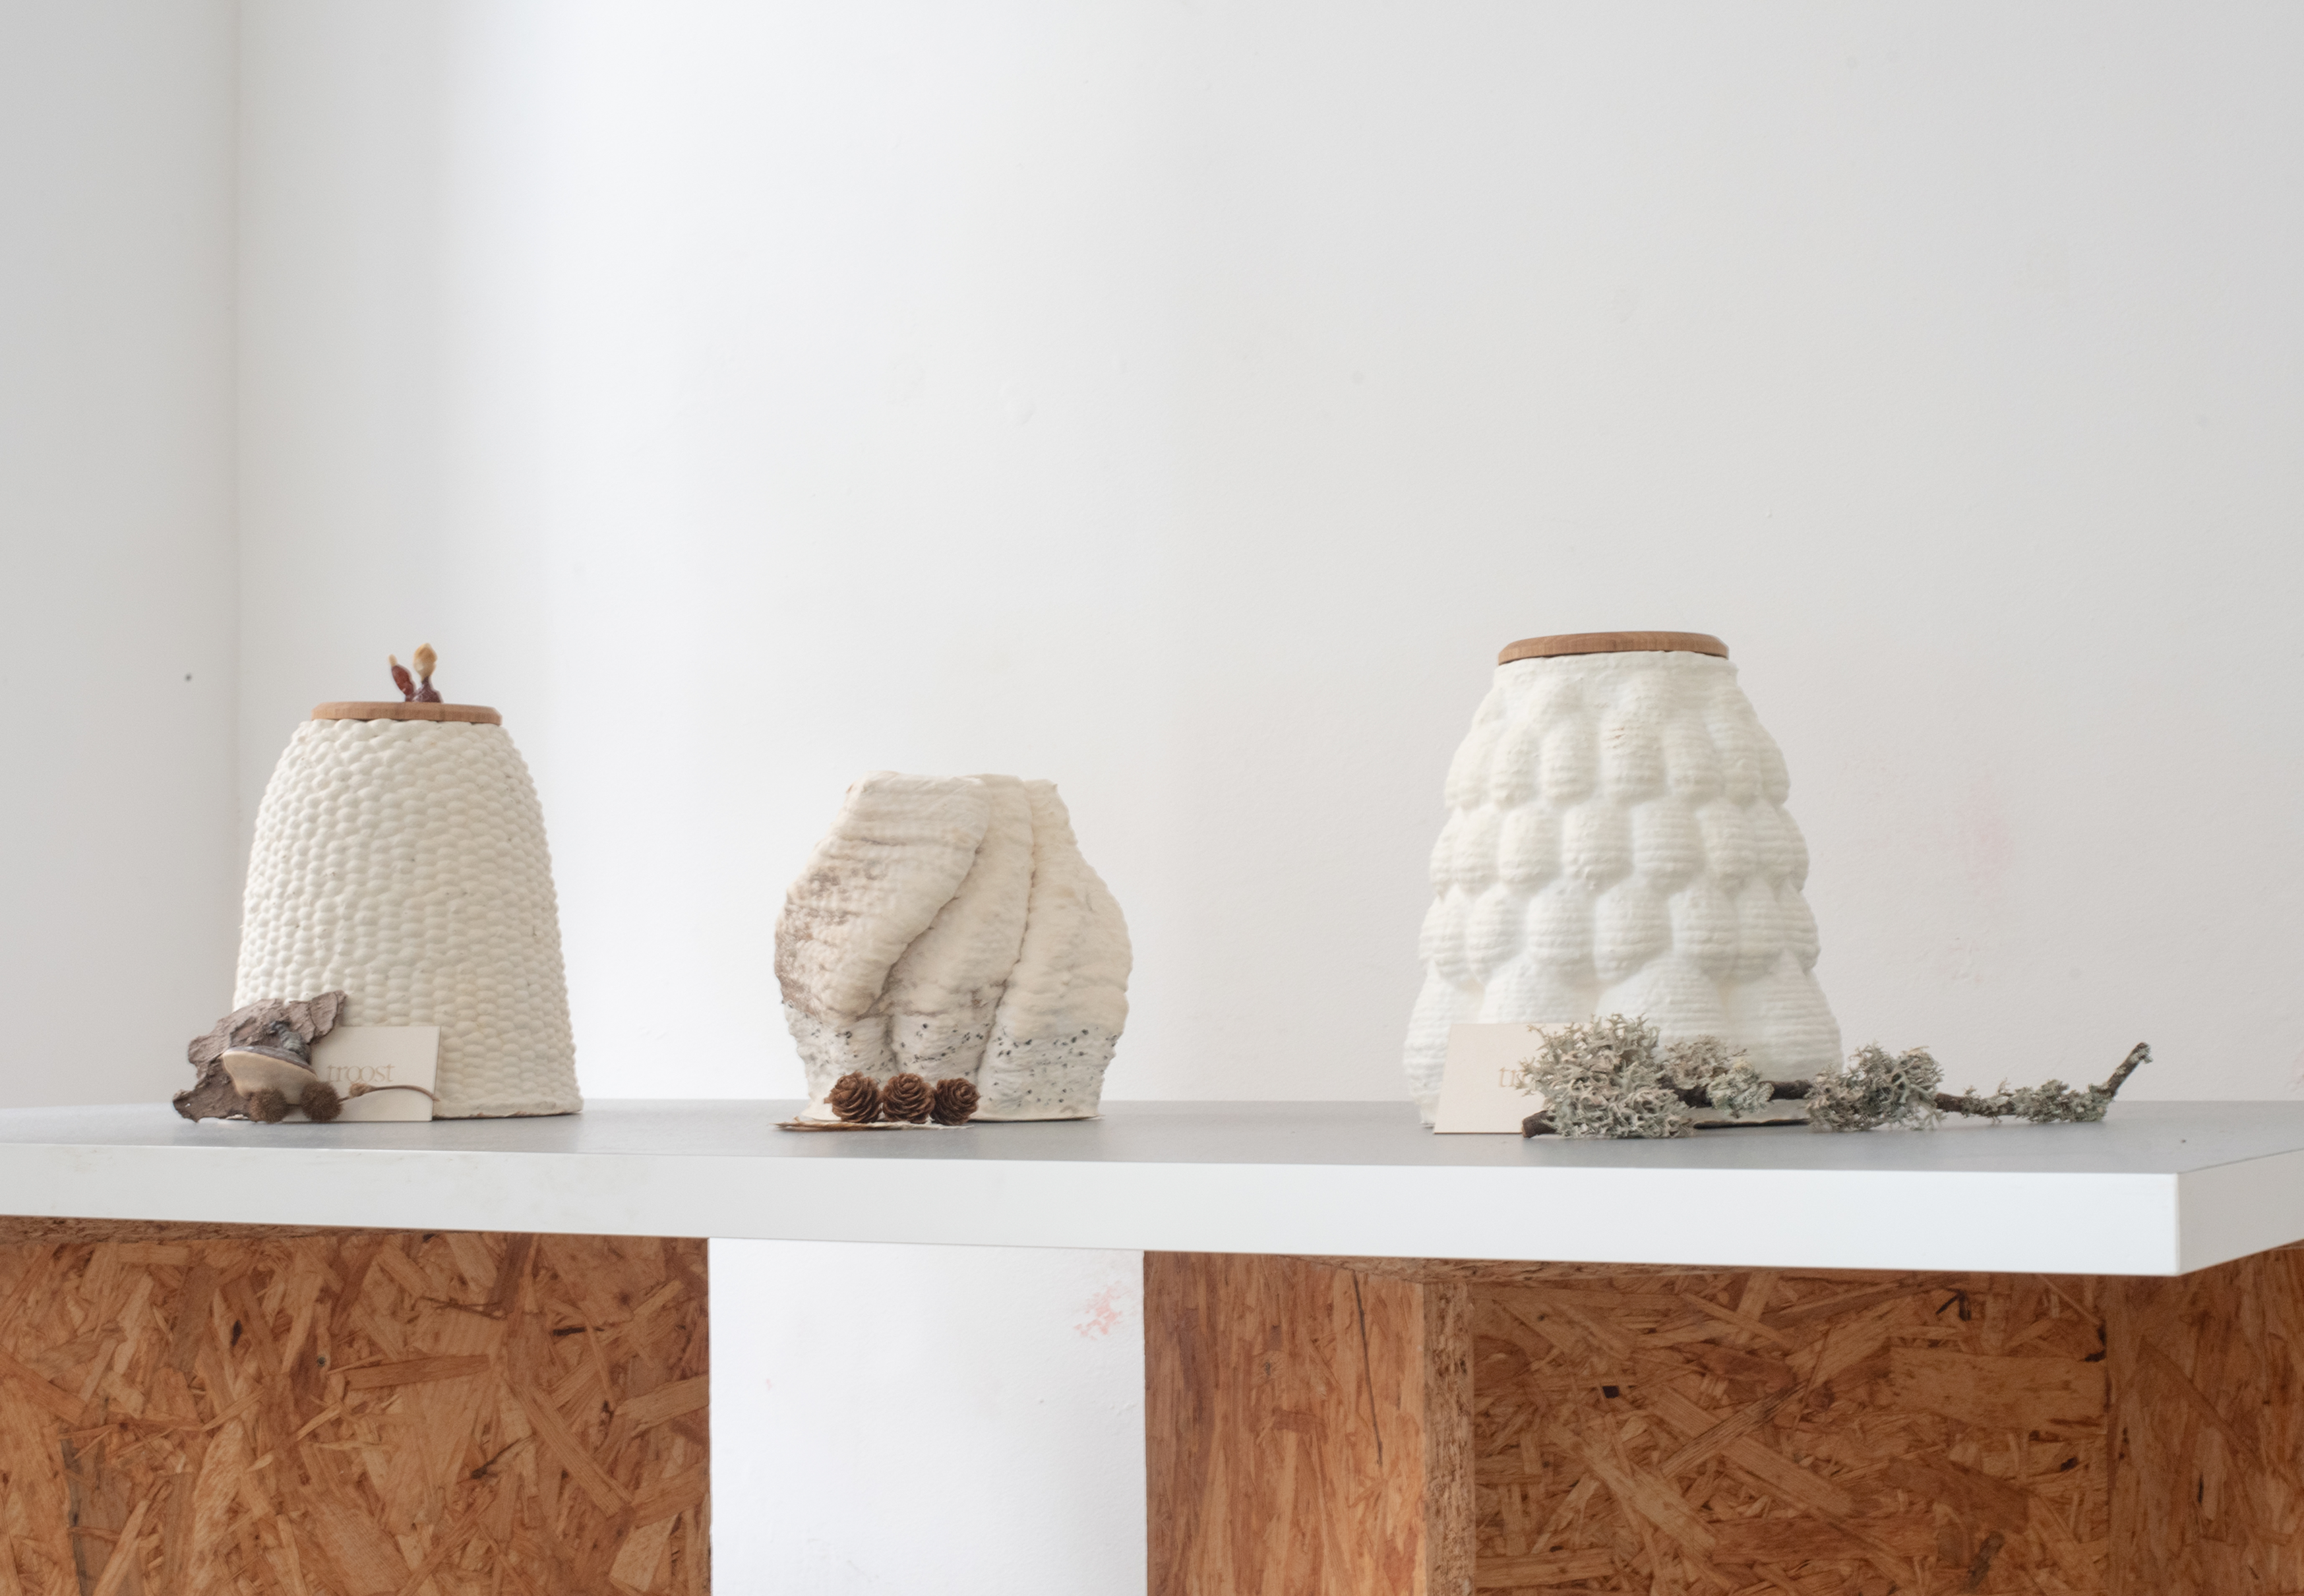
Our work builds on the use of widely available ceramic 3D printers, which are typically designed to extrude clay-based materials. These machines are comparatively affordable, broadly accessible and well suited for experimentation outside highly controlled laboratory environments. By modifying the extrusion system of a standard ceramic printer, we expand its capabilities to process various high-viscosity biomaterials. In our research, we focussed mainly on printing mycelium objects (Figure 1), but also other biomaterials like soil inoculated with wheat seeds got successfully printed and grown.
3D-printed mycelium objects.

Manipulating mycelial growth and induced fruiting
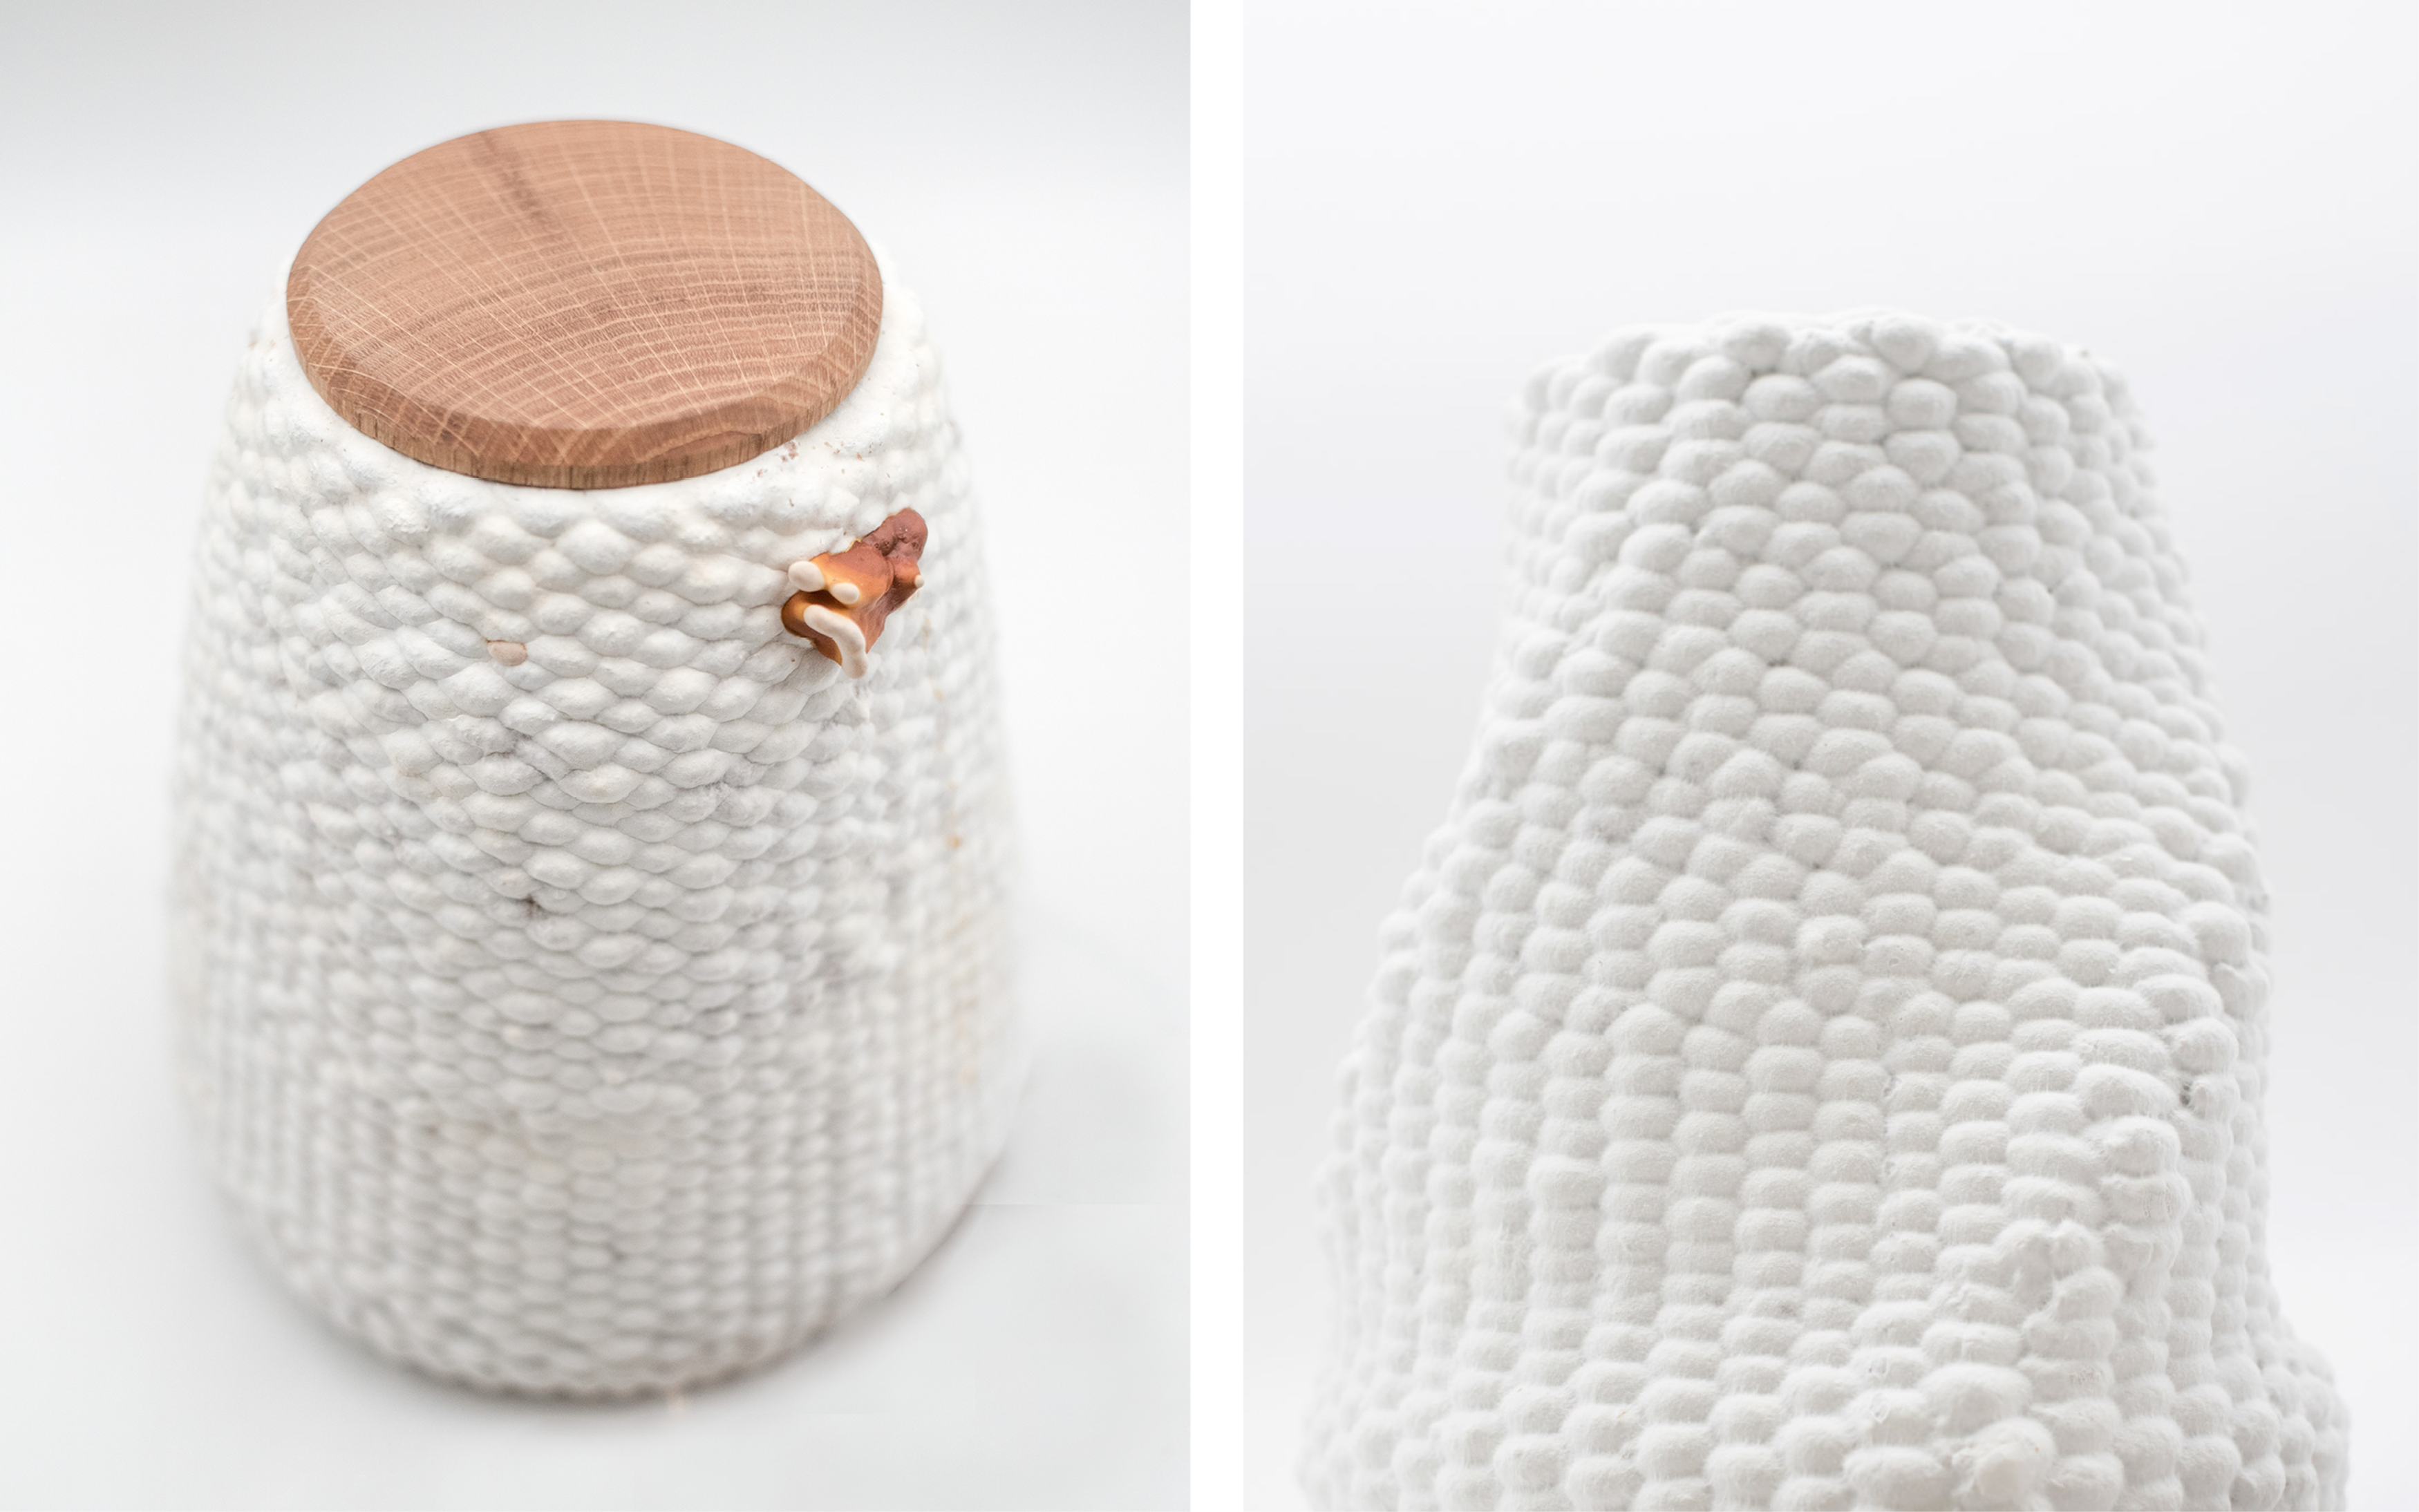
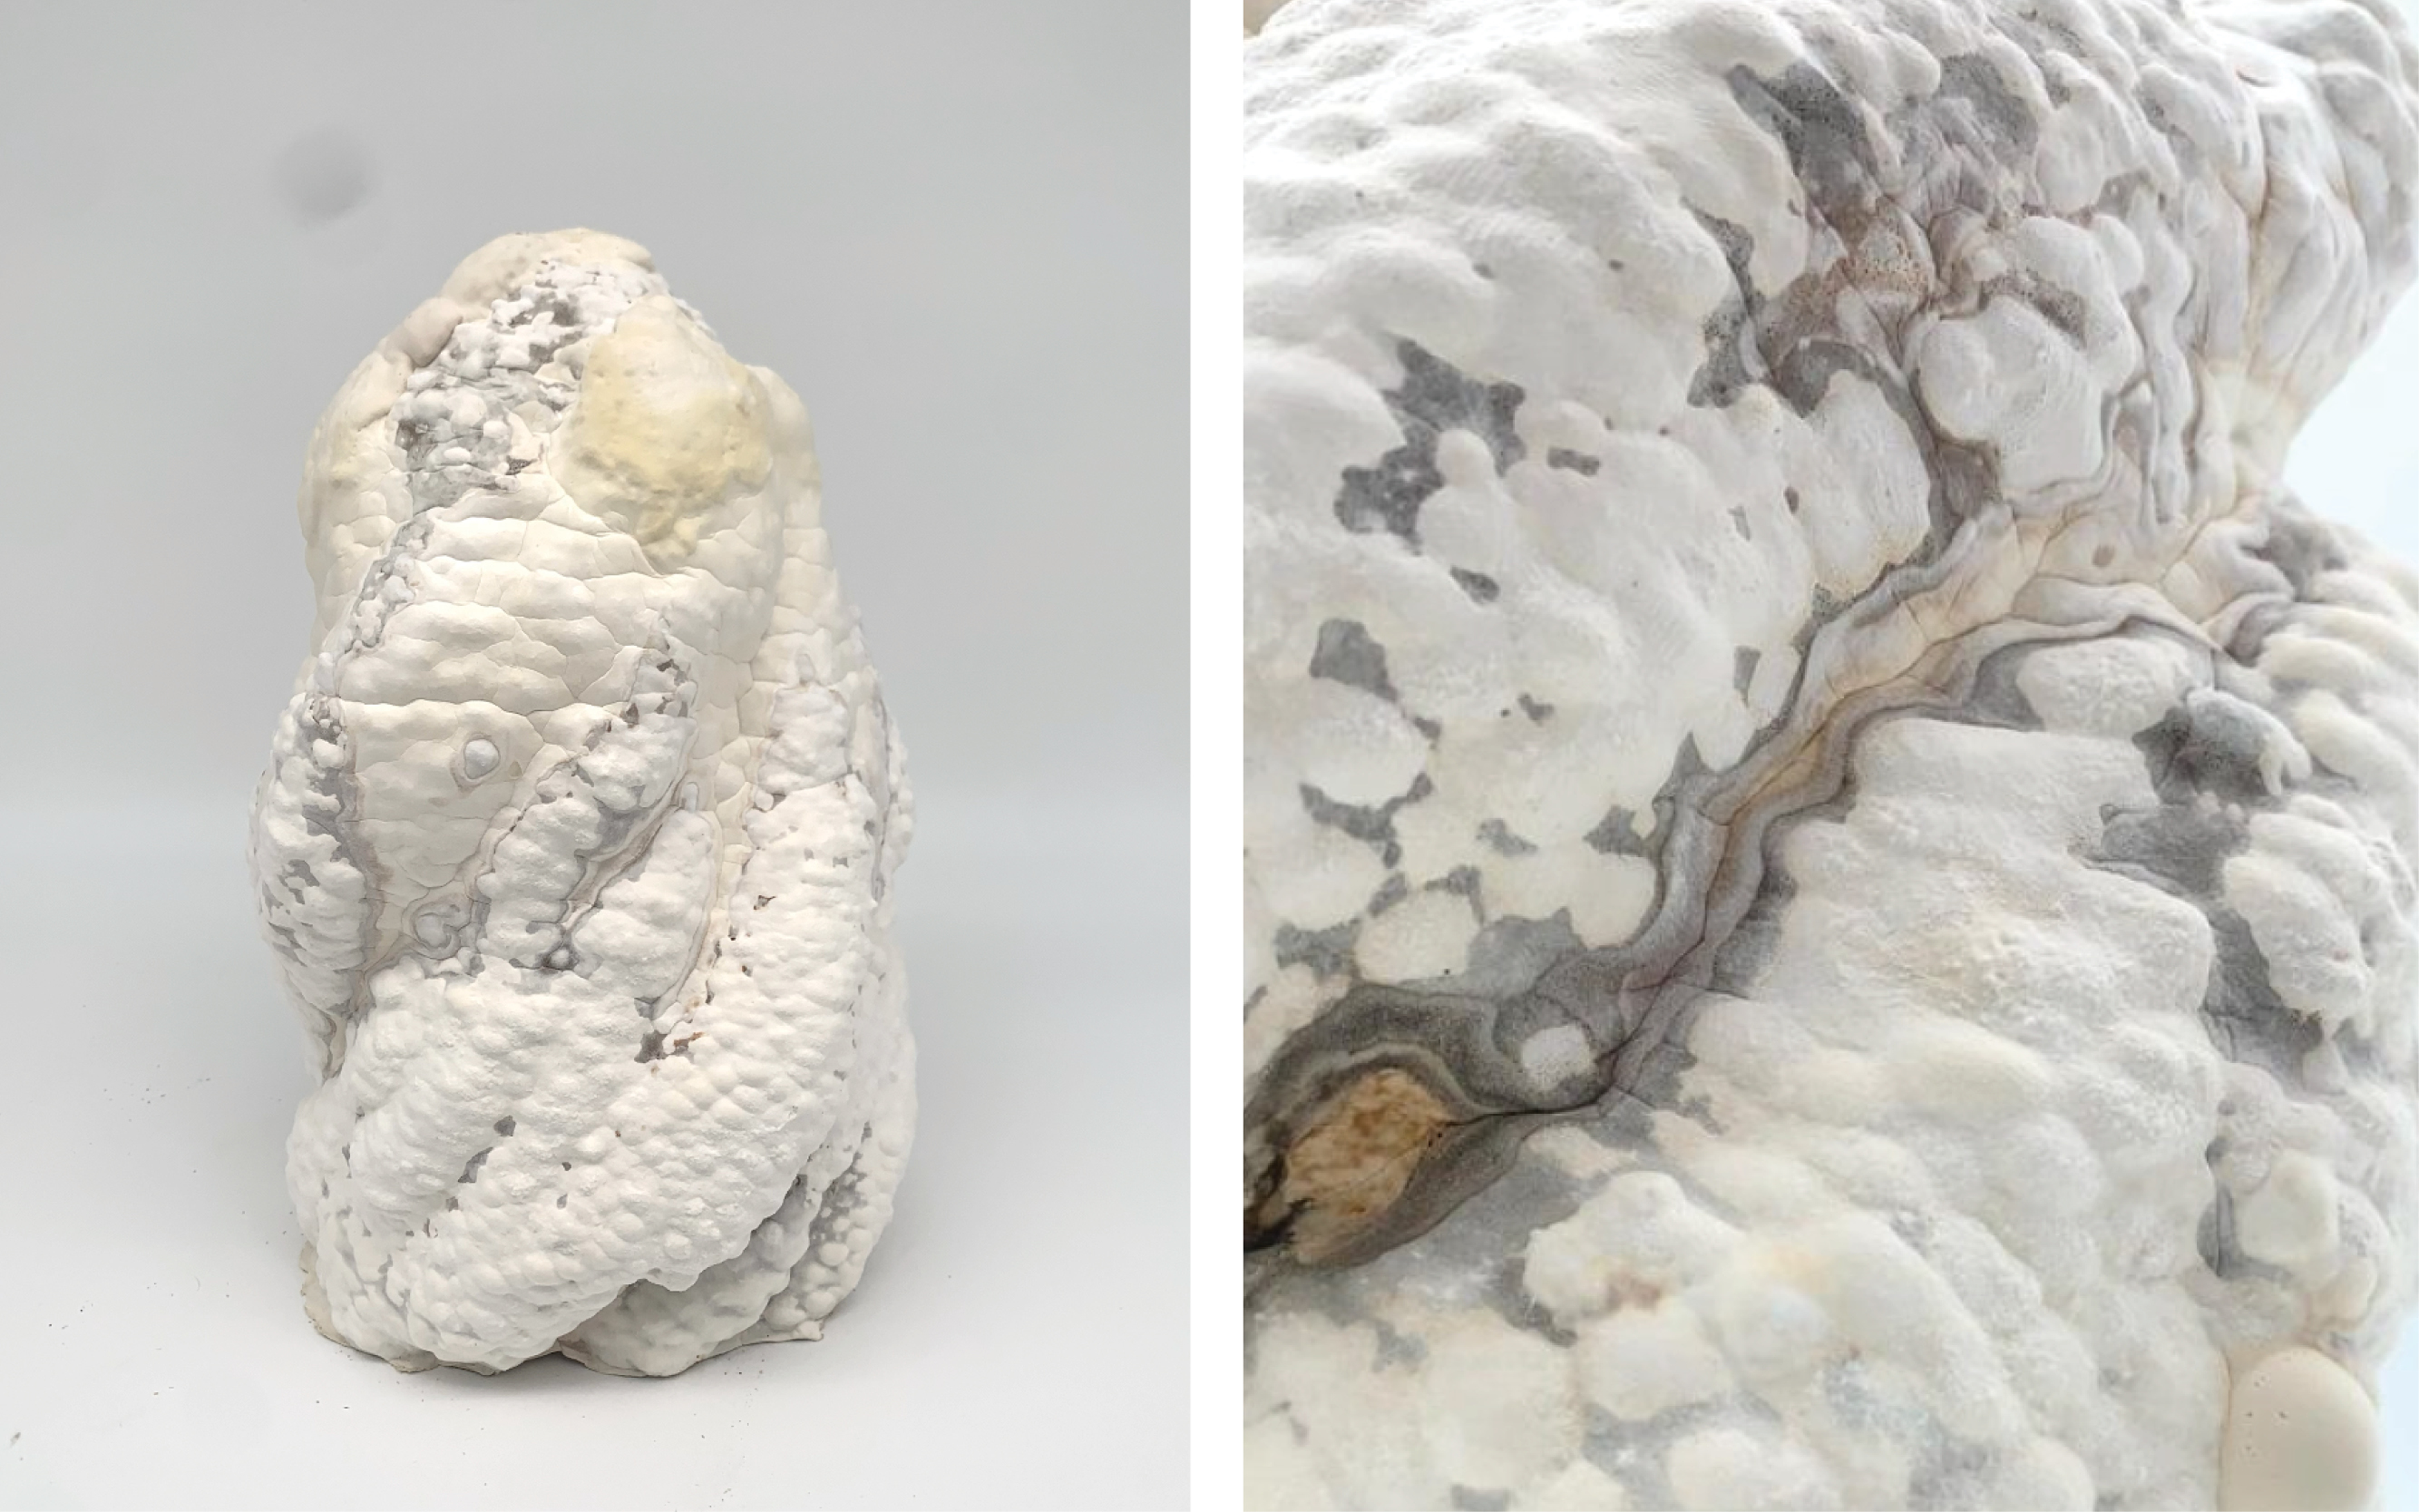
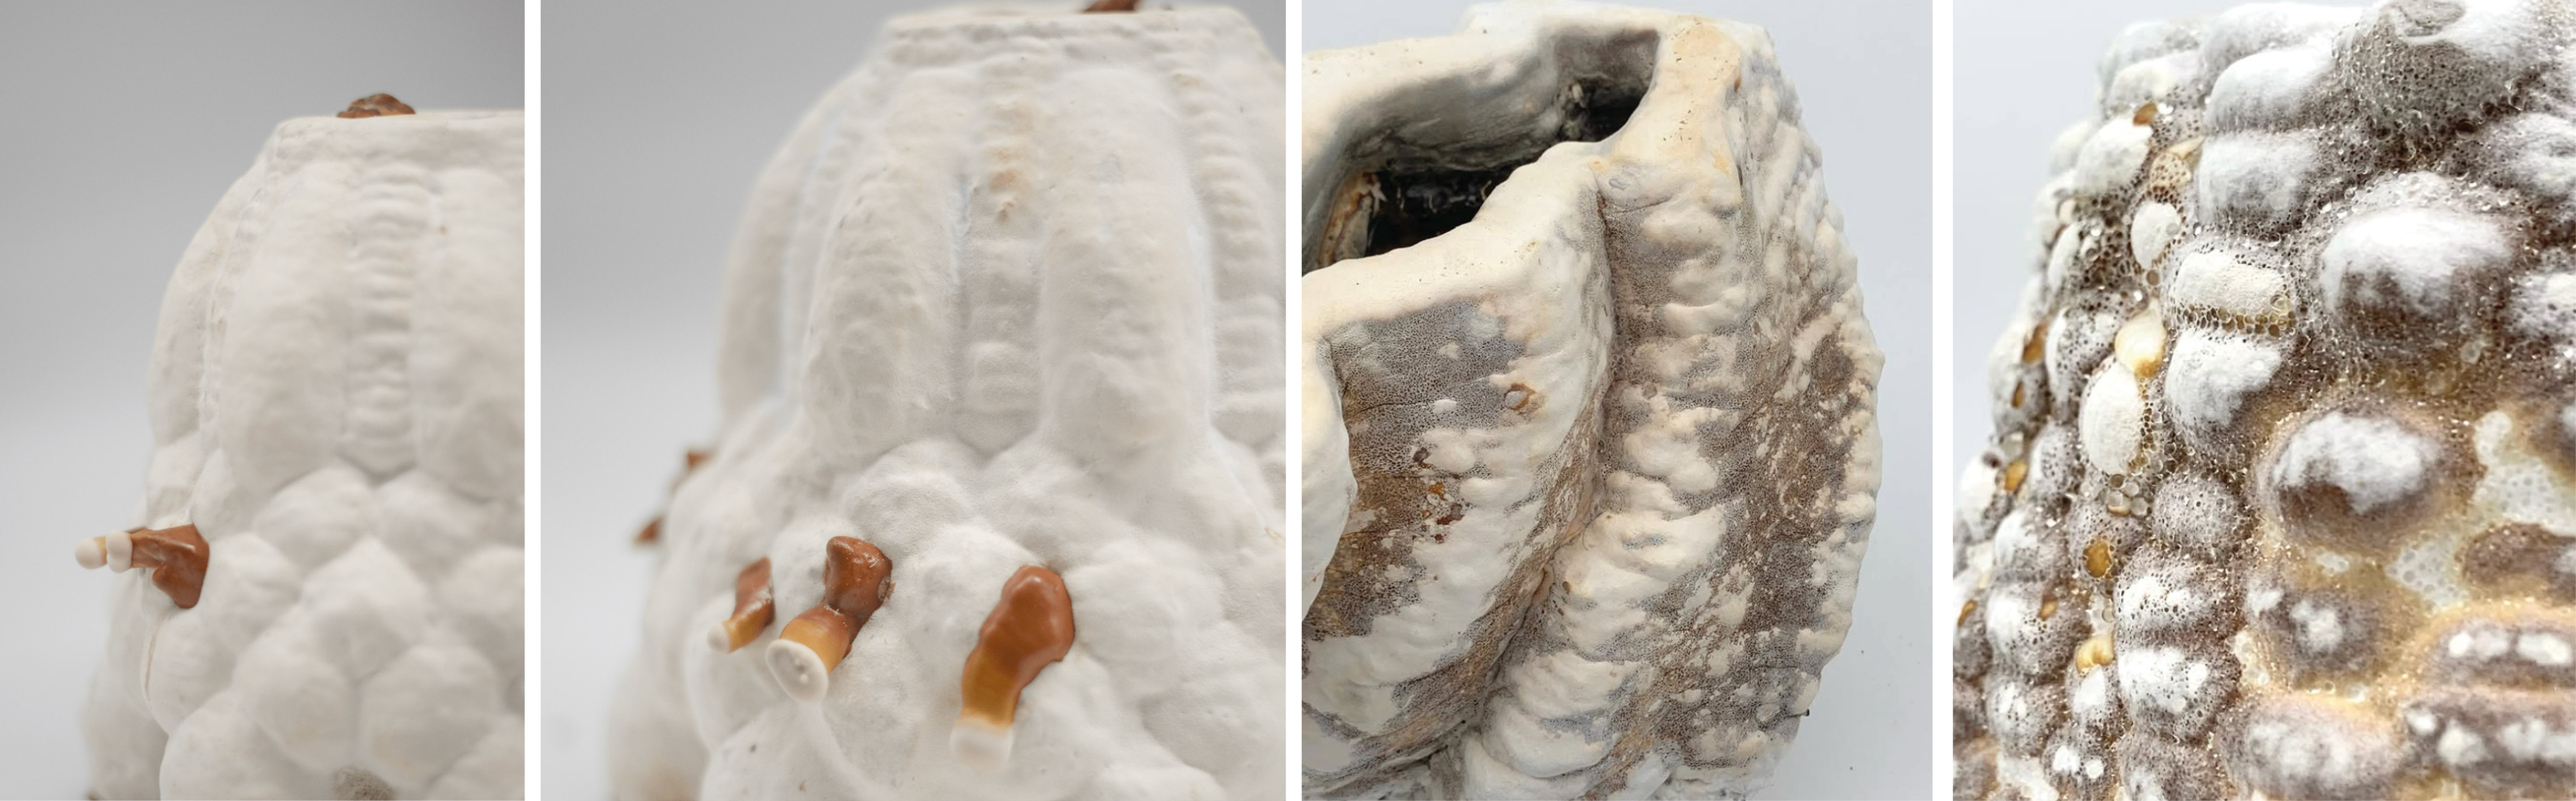
In our research, we explored multiple strategies to influence mycelial growth to achieve varied structural outcomes and to stimulate mushroom formation in specific, targeted areas, as shown in Figures 2–4. Although we were able to guide mushroom development with a relatively high degree of precision, further investigation is necessary to better understand the underlying mechanisms, improve control over these processes and ensure consistent reproducibility.
3D-printed mycelium objects with clean white mycelium growth.

Figure 2. Long description
A two-panel photograph showcasing the detailed texture of a 3D-printed mycelium vessel against a plain white background. The panel on the left shows a high-angle view of the complete, cone-shaped vessel, with 3D-printed basket-weave texture made of small. A small mushroom grows directly from its upper rim. The panel on the right is a close-up shot focusing on the upper portion of a similar vessel, highlighting the dense, bumpy, and organic textile-like surface created by the 3D-printing process.
3D-printed mycelium object with altered mycelium texture.

Figure 3. Long description
A two-panel photograph captures the organic, irregular form of a 3D-printed mycelium vessel featuring a marbled, skin-like texture against a plain white background. The left panel reveals the full, twisted shape of the asymmetrical vessel, while the right panel zooms in closely on its surface, highlighting a complex landscape of white folds interwoven with dark gray, vein-like patterns.
Induced mushroom growth and mycelium texture manipulations.

Figure 4. Long description
A: A two-panel photograph showing details of a cone-shaped, 3D-printed mycelium vessel featuring a scale-like pattern against a muted gray background. The left panel shows a side profile of the ribbed white structure, while the right panel zooms in closer to growing mushrooms out of the vessels. The white mycelium has a velvety texture to it, while the mushrooms are brown in the shape of Ganoderma fruiting bodies grown with low oxygen. B: A two-panel photograph details the porous, organic surfaces of 3D-printed mycelium vessels displaying natural color variations against a light backdrop. The left panel shows the upper rim of an asymmetrical vessel with wavy folds mottled in shades of white and earthy brown, while the right panel zooms in on a bubbly texture with water droplets on the growing mycelium.
Hardware setup for 3D printing
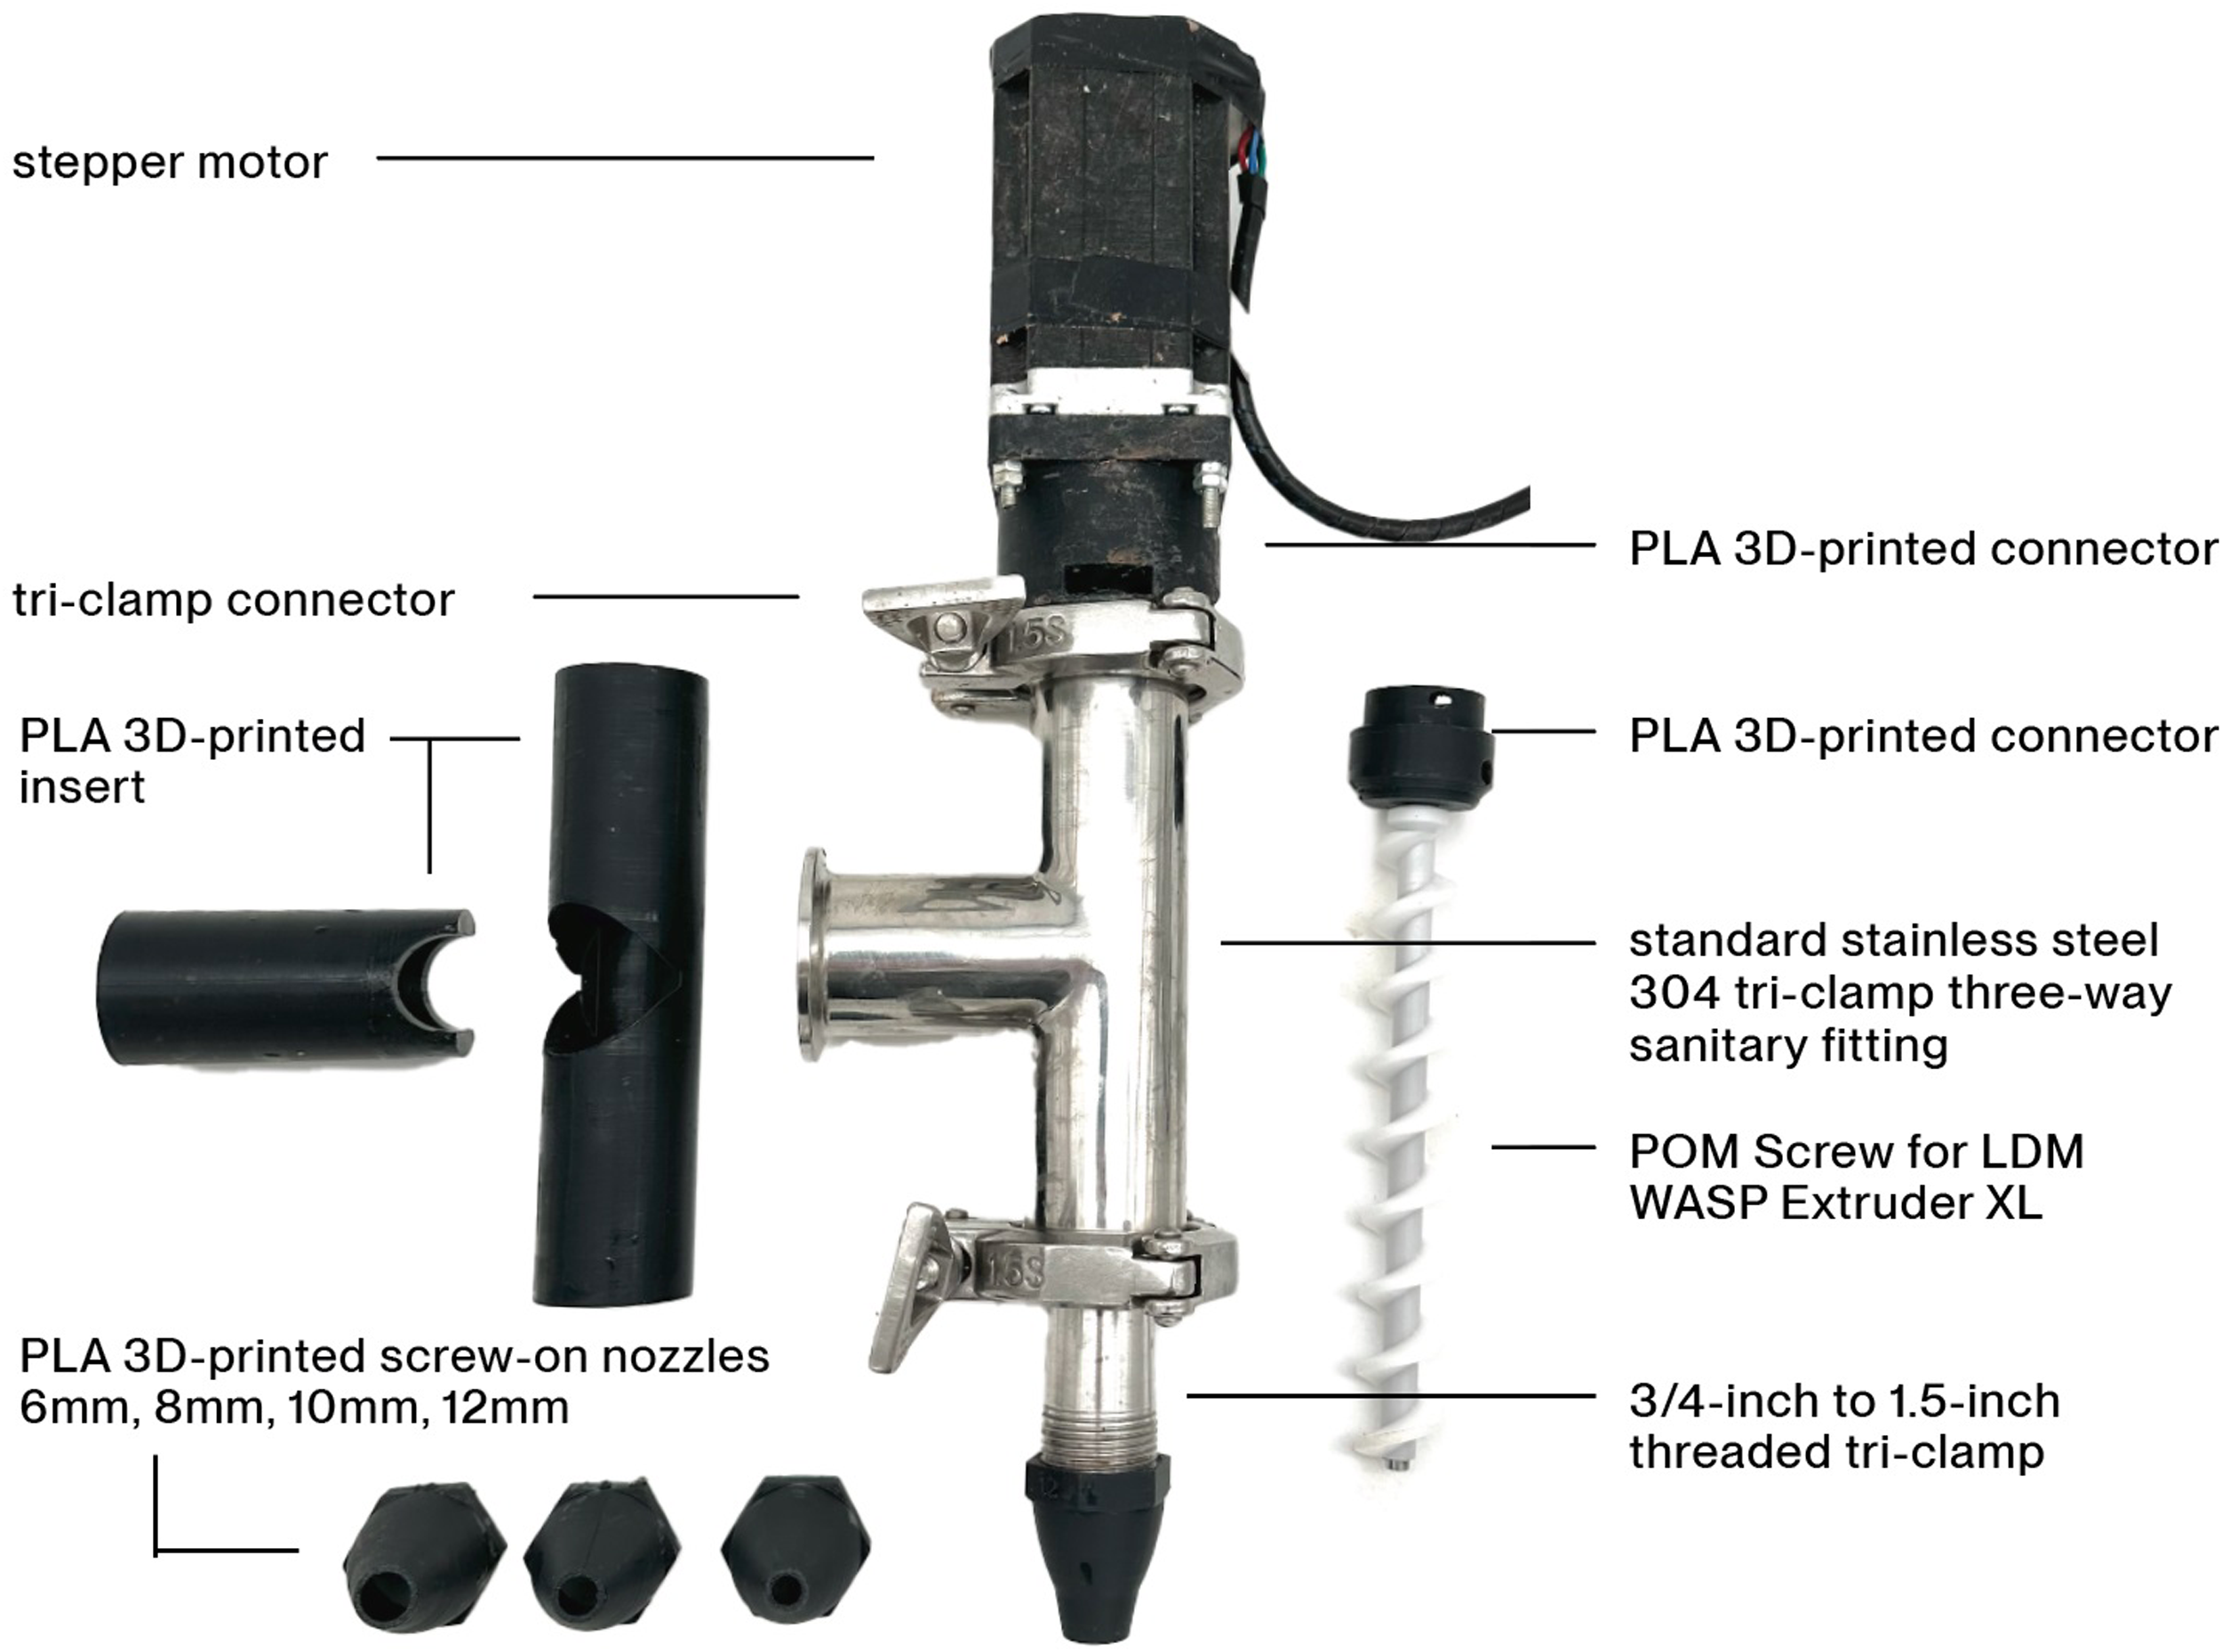
To keep the costs of digital biofabrication low and accessible while maintaining a high degree of independence, many of the components used in the 3D printer were specifically developed to be easily reproducible using a standard Polylactic Acid (PLA)-based 3D printer (Figure 5).
Extruder setup parts.

Figure 5. Long description
An annotated diagram layout showcases the disassembled and assembled components of a custom clay or paste extruder system against a plain white background. The central image displays the assembled metallic extruder mechanism vertically, featuring a black stepper motor at the top, a polished stainless steel three-way T-fitting in the middle, and an attached extrusion nozzle at the bottom, surrounded by loose parts such as black 3D-printed inserts, screw-on nozzles, and a white plastic auger screw.
For the movement of the printhead, any ceramic 3D printer equipped with sufficiently powerful stepper motors can be used. In this work, an Eazao M600 was used as the three-axis movement system (X, Y and Z). However, other commercially available ceramic printers, such as those produced by WASP or even custom-built systems, are also suitable.
Initially, the material reservoir consisted of a simple 4-inch tri-clamp spool with a capacity of approximately 5 L. A PLA 3D-printed piston was inserted into the reservoir, and compressed air of up to 0.6 MPa was used to push piston and therefore the sawdust paste toward the extruder. To enable the production of larger prints, the system was later upgraded to a 20 L glue-dispensing pressure tank equipped with an SC160 pneumatic pushing cylinder with a maximum operating pressure of 0.8 MPa. This system is used to feed the sawdust paste to the 3D-printing head.
To further reduce cost and minimize dependence on commercially available large-gauge extruders (e.g., the LDM WASP Extruder XL 3.0) and also allow rapid adaptation to design changes, a custom extruder was developed. The extruder is based on a standard stainless steel 304 tri-clamp three-way sanitary fitting with custom PLA 3D-printed inserts. A 3/4-inch to 1.5-inch tri-clamp connection was used to attach the self-printed PLA nozzles. We use 6 mm, 8 mm, 10 mm and 12 mm circular nozzles but also other sizes and shapes can be easy printed and threaded on.
As the pushing mechanism on the printhead a “POM Screw for LDM WASP Extruder XL” was used and connected to a stepper motor. The motor strength can be adjusted according to the properties of the specific paste being processed. A custom PLA 3D-printed adapter was designed to connect the stepper motor to the tri-clamp fitting.
Fabrication of mycelium objects
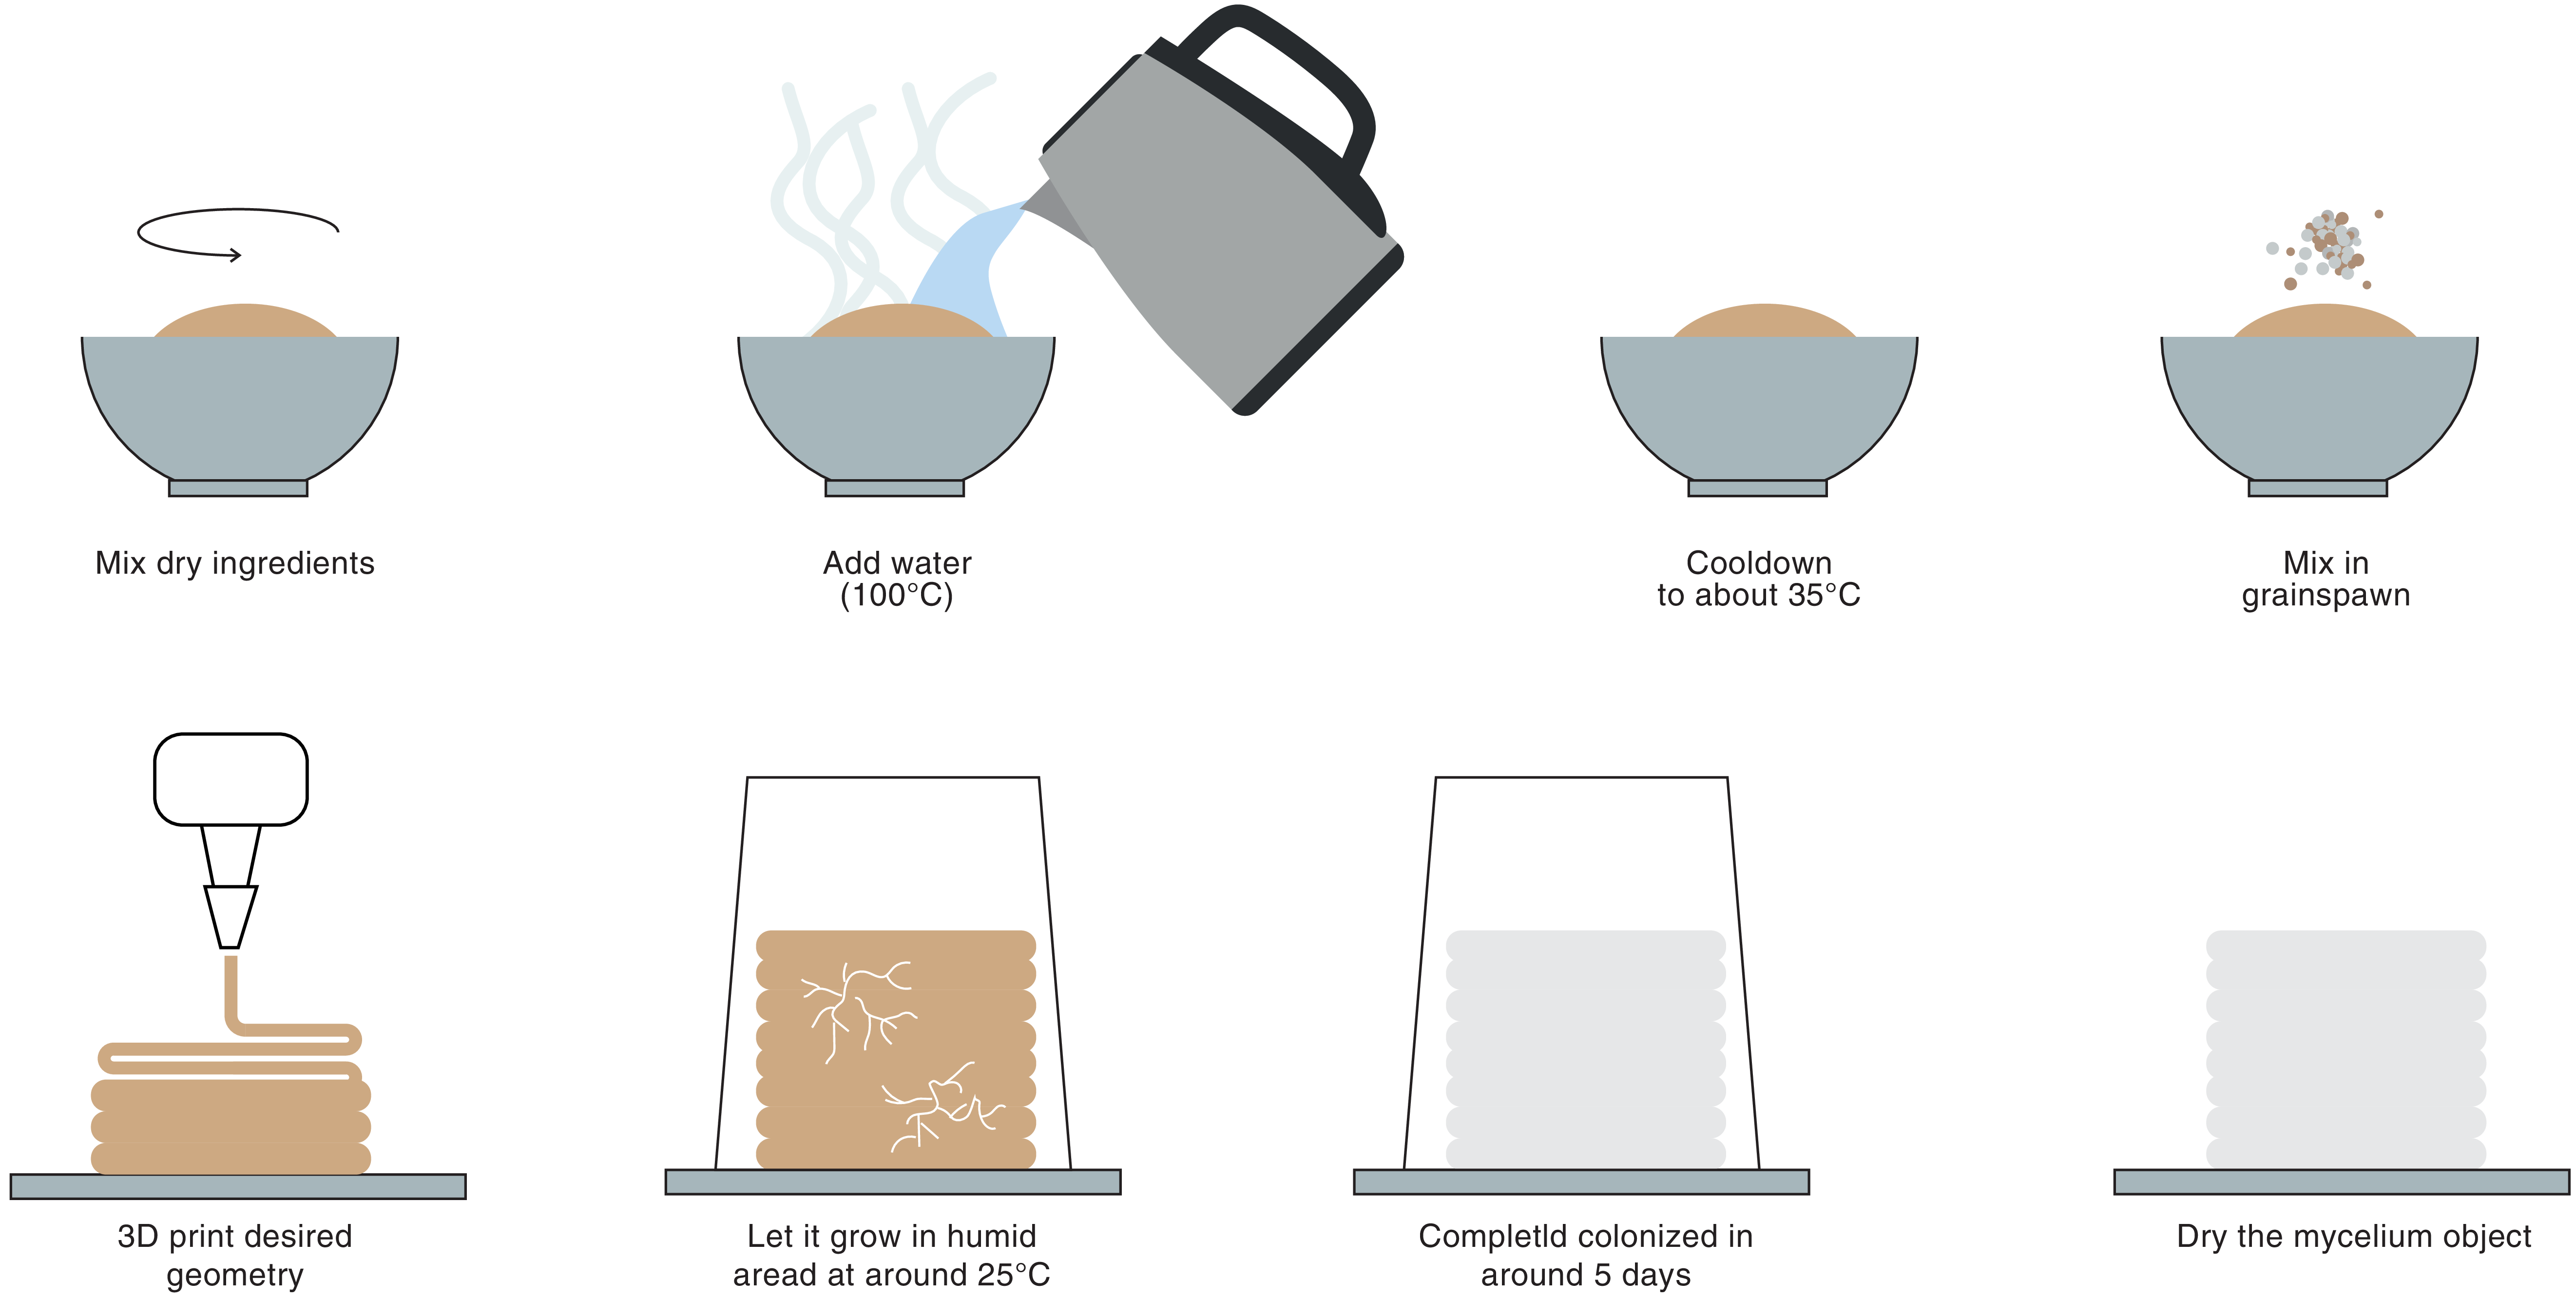
To fabricate the mycelium objects, we developed a paste-like, printable biomaterial that supports effective mycelial growth both within and on the surface of the printed forms. The preparation process is accessible and only requires equipment commonly used in kitchens (Figure 6).
Process to create 3D-printed mycelium object.

To produce a printable paste, a mixture of sawdust and binding agents was used. Additional materials, such as clay, cacao hulls or hemp fibers can also be incorporated to modify and optimize the printing properties of the paste. The following formulation was primarily used for the dry ingredients: Sawdust 85% // Xanthan Gum 6% // Flohsamenschalen 4% // Mehl 5%
-
1. Mix all dry ingredients thoroughly.
-
2. Add the required amount (2, 1 times the weight of the dry ingredient) of water at approximately 100°C to hydrate and partially sterilize the mixture
-
3. Allow the paste to cool to around 35°C to prevent thermal damage to the mycelium
-
4. Mix the grain spawn of the desired mushroom species directly into the cooled substrate
For our objects, we primarily use grain spawn (Ganoderma Lucidum) as inoculation medium, as it ensures even distribution of the mycelium throughout the paste, is easy to get and supports reliable colonization of the printed geometry.
Printing parameters
A wide range of printing parameters proved suitable for processing the paste. Nozzles with circular outlet diameters of 6 mm, 8 mm, 10 mm and 12 mm were developed and tested but based on our experience, both smaller and larger nozzle sizes are likely feasible. Future work will also explore the use of non-circular nozzle geometries. Layer heights were selected according to the nozzle diameter and adapted to the geometry of the printed object. As a general guideline, the layer height was set to approximately 80% of the nozzle diameter.
To achieve greater flexibility and control over the printing process, the toolpaths were primarily generated directly in Grasshopper for Rhino, allowing precise manipulation of the printing curves while remaining independent of conventional slicer software. Various strategies were explored to improve the stability of the printed objects during fabrication, including the adaptation of weaving-like printing patterns in which layers were interlaced rather than printed directly on top of one another. Experimental observations showed that the first 12 hours after printing are the most critical, as during this period the structures are particularly prone to collapse. Once the mycelium begins to colonize the printed sawdust substrate, the material progressively stabilizes and gains structural integrity till complete mycelial growth result in biological bonding between layers.
Demonstration
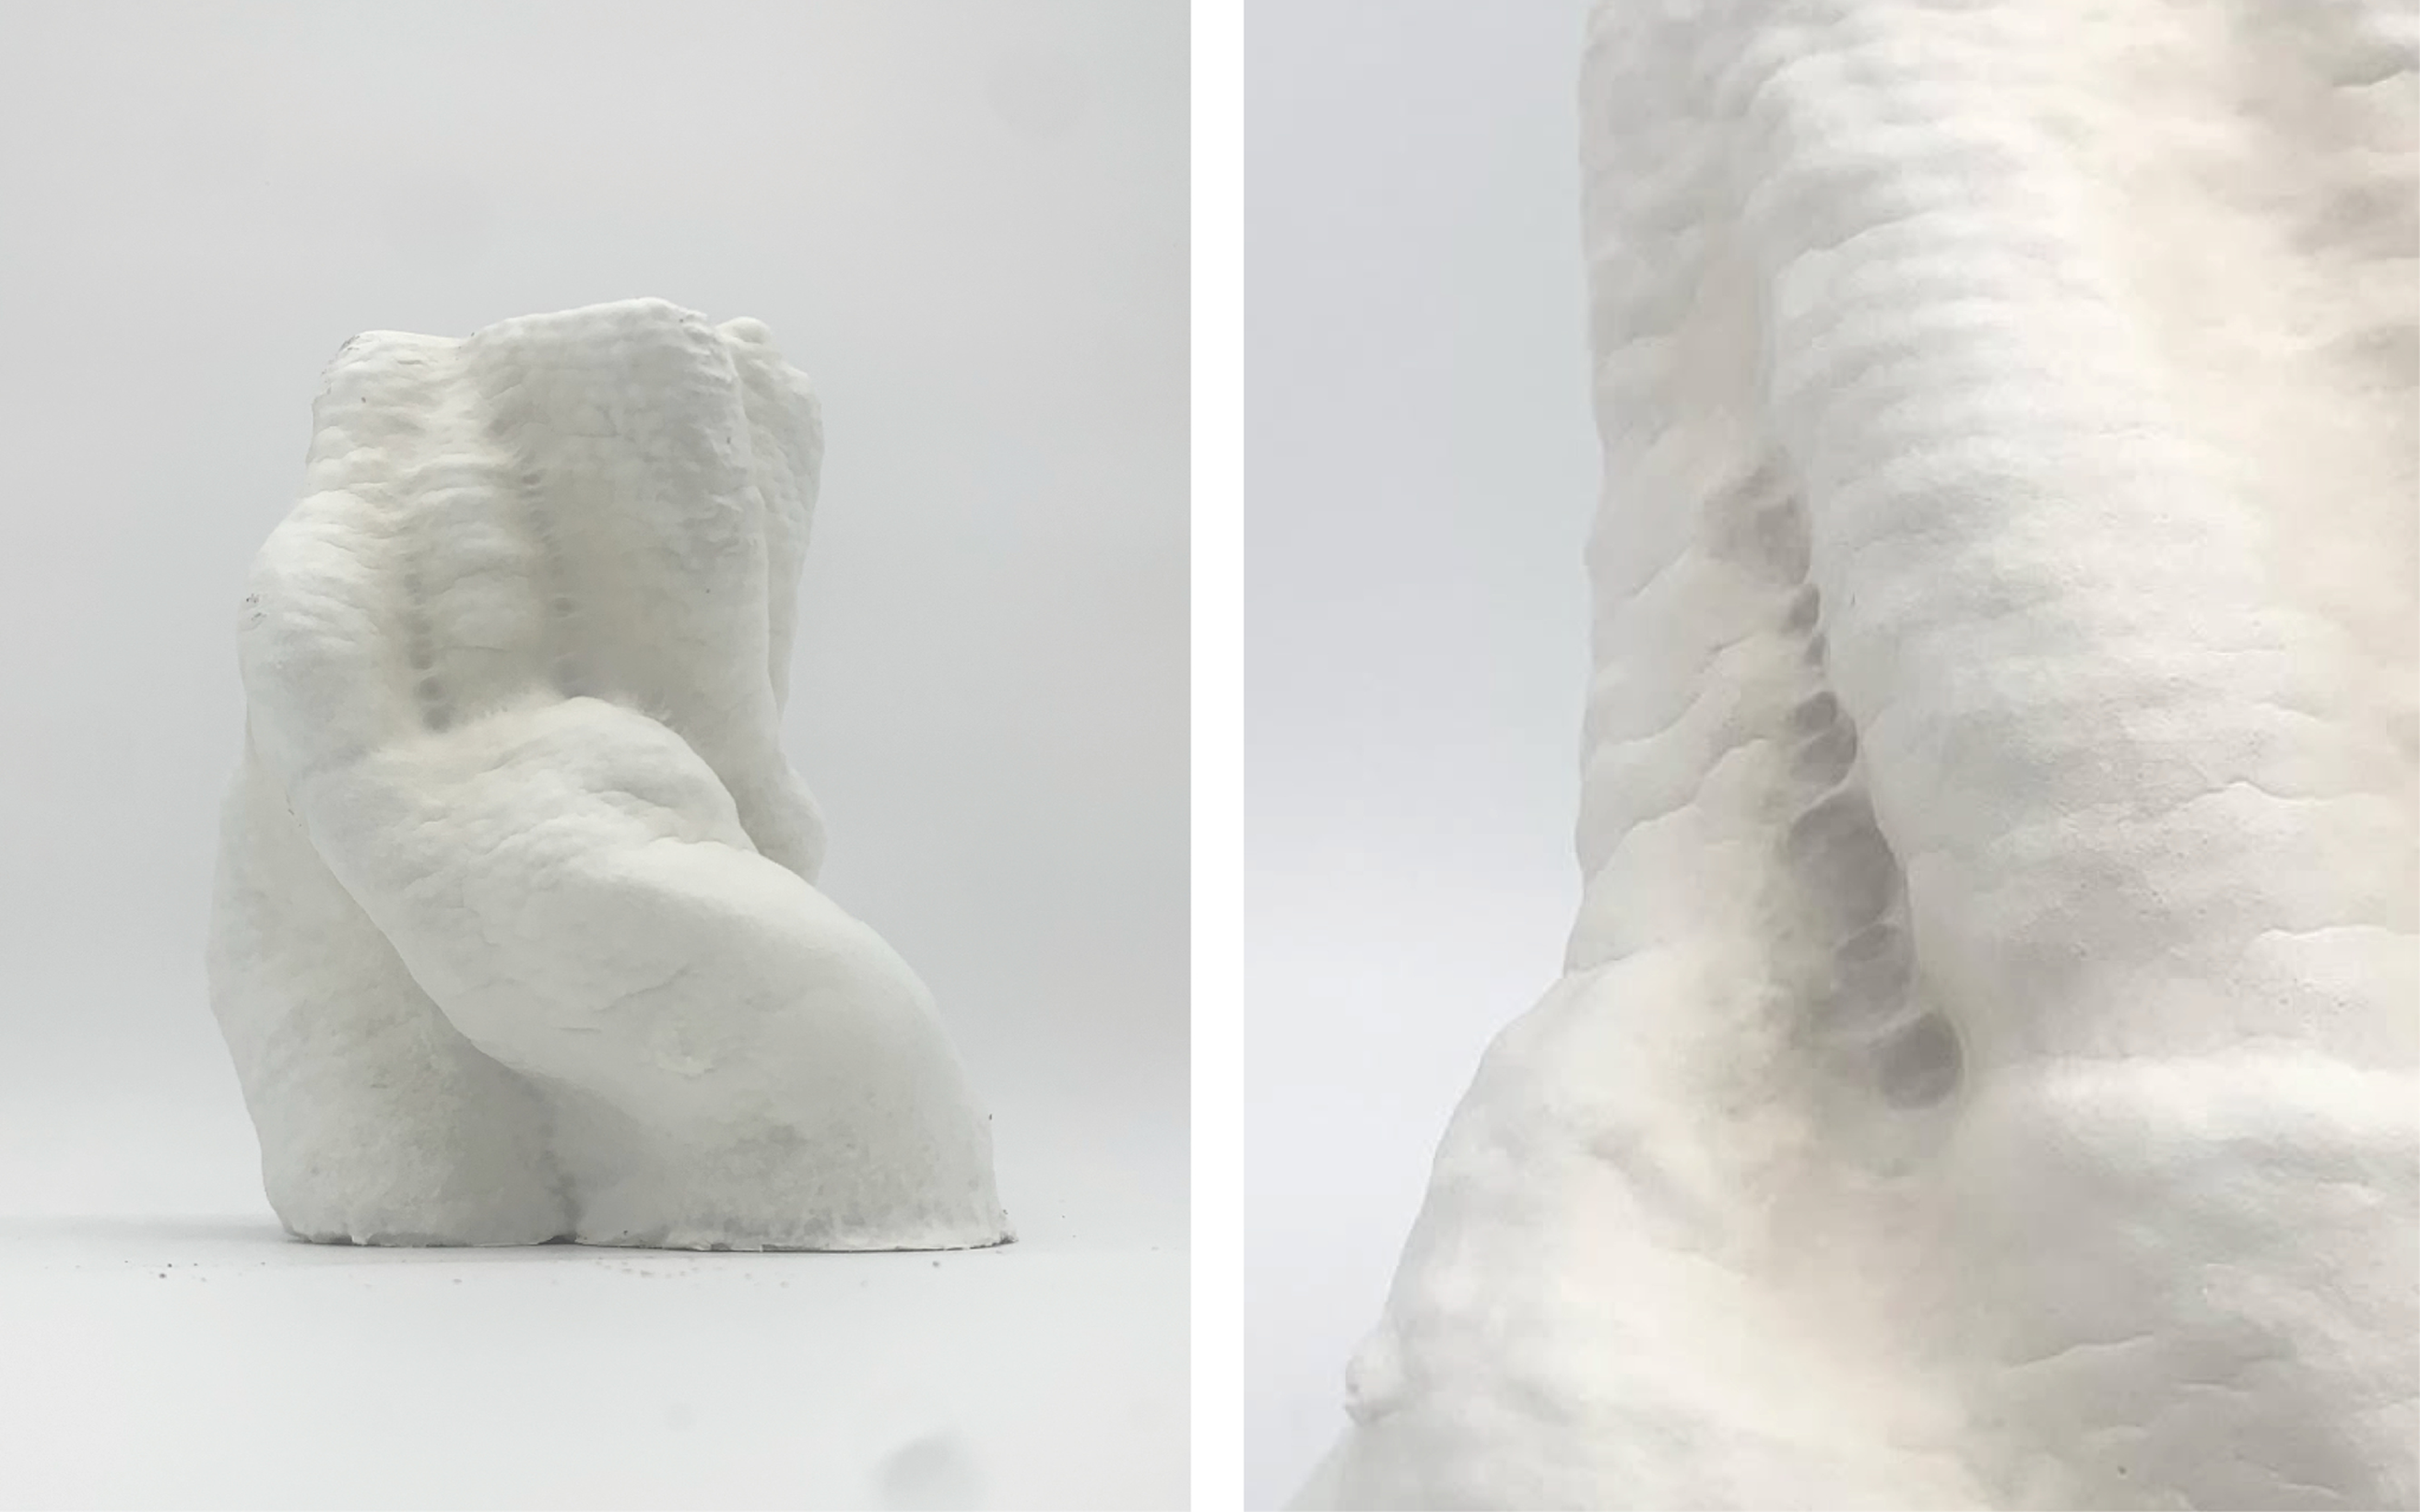
For the demonstration, a series of 3D-printed mycelium objects with varying geometries (Figure 7), surface textures and growth outcomes will be presented. Accompanying recipe cards will illustrate printing parameters, substrate composition and environmental conditions used for the specific outcome. These samples will highlight one of the key advantages of 3D-printed mycelium: the ability to create complex and highly differentiated geometries without the need for resource-intensive molds. Visitors will be encouraged to interact with the objects through touch and smell, fostering a multisensory experience intended to stimulate imagination and discussion around the potential applications of this fabrication technique.
Geometry tests of 3D-printed mycelium objects.

Figure 7. Long description
Two side-by-side photographs show a 3D-printed white 3D-printed mycelium object against a plain white background. The left photograph captures the full view of the small, abstract sculpture, which features organic curves, deep folds, and a layered texture. The right photograph offers a close-up of the object’s surface. Together, the images showcase both the overall organic form and the fine texture of the 3D-printed material.
In addition, we want to initiate a dialogue with visitors regarding future potential use cases. As our research is still in its early stages we are interested in gathering insights and ideas on how growth conditions, substrates or processing parameters might be adjusted to achieve specific aesthetic and material effects.
Conclusion
Existing work with biological fabrication often relies on specialized equipment and tightly controlled conditions. Rather than relying on biotechnological infrastructure, our work highlights how low-tech, DIY-oriented practices can enable meaningful experimentation with living materials. Through this work, we aim to contribute to the ongoing discourse on materiality within Human-Computer Interaction and design (Bell Reference Bell, Ofer, Frier, McQuaid, Choi, Alistar, Barbosa, Lampe, Appert and Shamma2022) while also trying to position DIY mycelium printing as an accessible entry point for artists, designers and researchers interested in biofabrication and contribute to broader discussions on democratizing living material technologies through open, adaptable and low-tech practices.
Data availability statement
For data sharing, not applicable; no new data generated: Data availability is not applicable to this article as no new data were created or analyzed in this study.
Author contributions
Conceptualization: Dominik Einfalt. Methodology: Dominik Einfalt. Writing original draft: Dominik Einfalt. All authors approved the final submitted draft.
Financial support
This research received no external funding.
Competing interests
None.
Ethical standards
Ethical approval was not applicable to this study, as no human participants or animals were involved in the research.
Declaration of AI use
A large language model was used for minor language editing and proofreading purposes only. The authors reviewed and verified all outputs and remain fully responsible for the content of the manuscript.

 Open access

