

This paper presents an analysis of the size and spatial organization of text segments and anthropomorphic figures on Classic Maya polychrome vases. Based on a sample of 110 vases that contain both text and images and are complete enough to measure the relevant variables, I demonstrate that a single set of canons for the sizes and placements of text segments and images, separately and with respect to one another, characterizes vessels throughout the polychrome-producing area. Both texts and images exhibit a three-level hierarchy of sizes, with standardized ratios of the primary-to-secondary level and of the secondary-to-tertiary level. Concurrently, significance is added to these sizes through vertical and horizontal arrangement on the vessel surface. This analysis confirms statistically what visual analysis has broadly speculated about in terms of proportion, scale, and similarities between styles. Data are also provided that illuminate issues in the method and meaning of scene layout and the representation of active and inactive figure illustration.
The complex texts and images presented on Classic Maya polychromes have driven research for more than 150 years. Maya ceramics were introduced in the travel commentary of the nineteenth-century explorer John Lloyd Stephens and drawings by his travel partner Frederick Catherwood, who provided the first insight into the art and writing of the Maya and produced the first sketches of a Maya vase (Stephens Reference Stephens1843:v2:270). Since then, scholars have increasingly addressed a variety of facets of the relationship between images and texts that occur together in Maya art. What was long suspected by early enthusiasts such as Eduard Seler and Sylvanus Morley—that texts often discuss the same individuals, involved in the same situations or events, as those depicted in the imagery—has now been established (see Berlin Reference Berlin1958; Proskouriakoff Reference Proskouriakoff1960; Spinden Reference Spinden1909). Further studies have addressed the function and ritualistic attributes of the vessels (see, e.g., Coe Reference Coe1973). Historians of art such as Miller (Reference Miller1986) and Reents-Budet and colleagues (Reference Reents-Budet, Ball and Bishop1994) have discussed the practice of rendering form and image in polychrome painting. Kerr and Kerr (Reference Kerr, Kerr, Benson and Griffin1988) have analyzed and identified the hands of individual scribes by isolating specific scribal practices in the rendering of elements, motifs, and glyphs. John Justeson (1977, Reference Justeson1989) and Wald (Reference Wald1994) have identified specific relationships between elements of text and of imagery. This paper does not deal directly with the content of the texts whose interpretation was pioneered by Stephen Houston, Barbara MacLeod, David Stuart, Karl Taube, and others. The work of these and many other scholars has, however, formed the foundation for this study.
Polychrome painting likely developed in the Maya Highlands during the Early Preclassic period, although it was not until the Late Preclassic that polychrome ceramics were used in both the lowlands and the highlands. The first polychrome decorative styles used basic geometric elements, after which crude human and animal forms were introduced (Grieder Reference Grieder1964; Rice 1987; Sharer Reference Sharer1994:691). The quality of stylistic uniformity and representations of human figures in the San Bartolo murals and Late Preclassic Highland Maya sculptures such as those at Kaminaljuyu and Takalik Abaj (where an early form of Lowland Mayan writing was in use) suggests that fully developed human representation and organizational canons were well established in monumental art by 100 b.c., although similar depictions of figures on the polychromes do not occur until the latter part of the Early Classic period (Grieder Reference Grieder1964). As Sharer (Reference Sharer1994:685) has noted, “The widespread adoption of polychrome decoration is the traditional marker for the beginning of the Early Classic in much of the Maya area.” Most fine polychromes, including all of the vessels discussed in this paper, date to the Late Classic period.
The artists responsible for the elaborate polychrome works (displaying text, intricate scenes, and the occasional scribal signature) were highly trained in their craft. The scribe 7aj tz'ihb', or “He of the writing or painting,” had to have been highly educated to produce readable hieroglyphic texts according to the rules that governed the writing system. Evidence provided in the following analysis demonstrates that a single set of shared canons can be seen in the organization and arrangement of scenes, figures, and texts throughout the workshops producing polychromes. It is probable that in at least some cases, the text and the accompanying scene were executed by two different scribes. In this paper, the term scribe identifies the artists who painted the text and/or image, although no separately labeled distinction is likely to have existed for the ancient Maya.
Distinctive painting styles often reflect regional styles, scribal schools, or workshops. In some cases, these differences may have highlighted economic or political differentiation between antagonistic cities, thus indicating that the Maya may have valued recognizable differences in style. Archaeological evidence suggests that some polychromes vessels were given by the k'uhul ajaw as tokens of political affiliation or participation in exclusive ritual events (Houston et al. Reference Houston, Stuart, Taube and Kerr1992; Miller Reference Miller and Kerr1989; see also Miller Reference Miller1986; Reents-Budet et al. Reference Reents-Budet, Ball and Bishop1994; Taschek and Ball Reference Taschek, Ball and Kerr1992). In his Relación, Fray Diego de Landa describes the gifting of ceramic cups to guests in attendance at special events (Tozzer Reference Tozzer1941:92–97). Several groups of vessels with very similar texts and images produced by the same scribe or school have been identified. These similarities in text and image—at least, in some cases—suggest mass-production in commemoration of an important event. The vessel's owner (or patron) is frequently mentioned, sometimes by name but usually by a generic description (kelem or ch'ok). An ongoing instrumental neutron-activation project conducted by Reents-Budet and Ronald Bishop (Reents-Budet et al. Reference Reents-Budet, Ball and Bishop1994) will ultimately identify the sources of the clay used in these vessels and the approximate location of production sites, thus making it possible to work out pathways of distribution of the vessels and, potentially, of gift-giving networks.
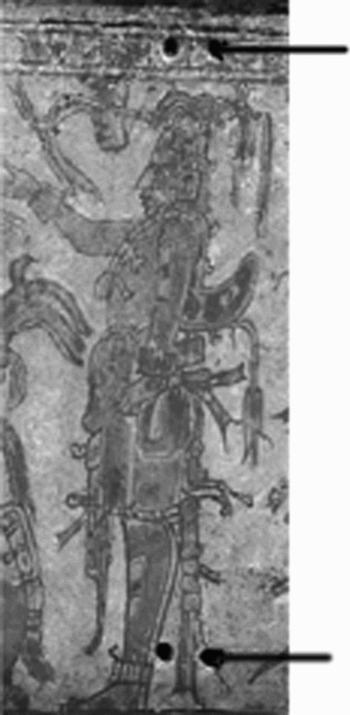
The shape of the polychrome vessels and their hieroglyphic texts indicate that they were meant to receive liquids such as cacao, pataxte, balche, or perhaps pulque. Ceramicists are still trying to determine the complete range of contexts and uses that were applicable to the vessels and the ways in which they were used. The available evidence suggests that some vessels must have been used for purposes other than holding liquids, because they were kept in antiquity after they had been damaged and repairs left them leaky. Repairs were made by drilling holes along cracks, which were then drawn together with fiber in a process called crack lacing. These holes can be seen in several rollout pictures available in the Kerr archive (Figure 1). In addition, chemical testing of interior residues has failed to confirm that most high-quality polychrome vases actually held the contents mentioned in the hieroglyphic text (see Hall et al. Reference Hall, Tarka, Hurst, Stuart and Adams1990; Hurst et al. Reference Jeffrey, Martin, Tarka and Hall1989). Even examples that could not have held liquid were prized; therefore, the objects themselves seem to have had an intrinsic value rather than being analogues to fine china. Such vessels are typically recovered in elite burials, and those that bear writing are found overwhelmingly in the very highest-status tombs and even among elite burials (Justeson Reference Justeson1978).
Example of crack-lacing repair. (Kerr archive number K8540. Photograph by Justin Kerr.)

This study focuses on a facet of the aesthetic practices of the scribes who produced the paintings on these works of art: the formal layout of texts and scenes on the vessels' surface. It has long been understood that texts often frame figures, portions of scenes, and full scenes. There are preferred orientations for figures as well as texts, but there are also departures that typically involve an adjustment of the orientation of one in terms of the orientation of the other. This paper provides a systematic description of the spatial canons followed by Maya scribes to arrange blocks of text and images in vessels' scenes and identifies organizational factors that underlie these canons. Statistical analysis suggests that Maya artisans adhered to a common set of principles of organization and representation of figures and text that underlie painting practices throughout the Classic-period polychrome-producing area.
This study draws theoretically on a Gestalt-based (Innis Reference Innis1994; Saint-Martin Reference Saint-Martin1990) interpretation or spatial analysis that highlights the arrangement of elements by their fundamental placement, invoking “tension” and “expression.” Kandinsky's (Reference Kandinsky1976) spatial assessments weigh the meaningful arrangement of “attributes involving proximity, similarity, enclosure within common regions, connectedness, alignment or directional continuation, and closure” (Lipson Reference Lipson, Hocks and Kendrick2003:110).
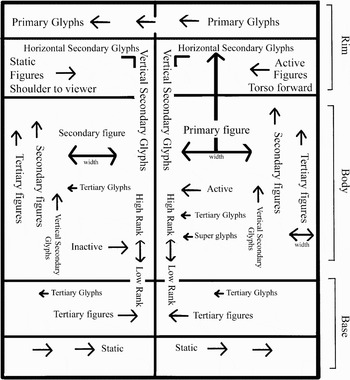
The results of the analysis are encapsulated in Figure 2, which presents a generalized spatial layout characterizing the painted surface of a polychrome vessel that depicts a single scene. This layout incorporates the spatial attributes considered here and reflects the results of the analyses reported later, as well as aspects of a broader study (Newman Reference Newman2004). The following discussions are presented from the perspective of the viewer and—perhaps most relevant—of the painter rather than that of the depicted actors.
Partition of a single scene displaying the conventional arrangement of figures and text. Arrows indicate: direction glyphs face, general placement of text and figures, relative size, and relative placement by placement and direction.

The vases analyzed in this study are from Kerr's (Reference Kerr1989, Reference Kerr1990, Reference Kerr1992, Reference Kerr1994, Reference Kerr1996, Reference Kerr2000) collection of rollout photographs as presented in the Maya Vase Books, volumes 1–6, which can be consulted on the online database at http://www.research.famsi.org/kerrmaya.html. To ensure representation of a broad range of styles, vases were selected by systematic rather than random sampling. Because I am focusing on the relationship between text and image, I considered only whole cylindrical (bowl or cup-like) polychrome vases with both hieroglyphic texts and anthropomorphic figures. This yielded a sample of 110 vessels. Each vase was categorized based on the presence or absence of numerous attributes, and precise measurements of figures and glyphs were taken using the Scion Image computer program. The measurements were based on the total extension of each figure and its main attire. In most cases, the measurement of each figure's width and height included all body parts, as well as the attire directly adjacent to the body—for example, the main body of a headdress was measured, but an extended feather was not. A similar measurement process was undertaken for the glyphs in each scene, and a number of other measurements, such as vessel height and diameter, were also recorded. Individual measurements taken within categories, such as width and height of figures and text, showed minimal variation, so their averages are appropriate for comparison.
This research was undertaken to identify fundamental shared canons across this corpus. The vases discussed in this paper are the 110 vessels from the original sample. The reason for this restriction is that this study is meant to discover or verify scribal practices that were widely followed by Classic Maya artists by establishing statistically significant relationships among visual features to which they lead. As with most artistic creations, not all variation can be accounted for. Regional style and personal preference undoubtedly influenced scribes' choices, but this is beyond the scope of this research, and while such local issues can be addressed on a case-by-case basis, the corpus is not large enough to control for these additional variables in the statistical analysis. Therefore, I do not address differences relating to the vases' painting styles, workshops of origin, and scribal hands.
FIGURES
A depicted individual's economic, political, social, or religious standing is often graphically represented along a gradient manifested through distinctions in the size, width, and height of the figure and in the number of its accoutrements. For instance, in a generalized depiction of the wealthiest elite person or deity, that figure is conventionally represented through large size; almost everything associated with the individual is great when compared with corresponding features of other depicted individuals. Further, if concepts of power were visually manifested in illustration, a powerful person or deity might be presented as large (in width and height) and overpowering, in a stance demonstrating the ability to dominate. These concepts are also manifested in the layout of the vessels. A social hierarchy relating depicted figures to one another and blocks of text to each other is reflected in the placement of glyphs as well as of divine and mortal figures. Although the size gradient and spatial arrangement that correlates with social ranking is in fact a trichotomy, as I will show, it does not follow that a three-level system of social ranking is thereby being represented.
Based on the artistic representations of “idealized” royal Maya life produced by the ancient Maya themselves, individuals holding the rank of ajaw ‘lord’ were often garbed in elaborate dress such as decorated huipils and cloth wraps, sandals, jewelry, pectorals, and headdresses. In contrast, the highest-ranking figure was adorned in the most elaborate clothing, including a grand headdress and/or back rack decorated with long, flowing feathers and figurines. Stelae and other monuments typically depict these significant figures at the height of important actions, clad in the appropriate traditional regalia. Royal retainers were less ornately dressed; however, they often wore specific items that declared their position or function, such as the reed-quill headdress symbolizing the office of a scribe (Coe and Kerr Reference Coe and Kerr1998; Inomata Reference Inomata, Houston, Inomata and Houston2001; Houston and Stuart Reference Houston, Stuart, Inomata and Houston2001). Deities were represented with defining characteristics and accoutrements that signified their role in the depiction. It should be noted that differentiating human from deity is rarely straightforward, as lords often adorned themselves in the guise of the gods (such as Pakal as the Maize God). Peasants and other non-ranked individuals likely wore humble and basic clothing items.
The extent to which an individual is dressed is not the only indicator of status. Vases typically show a less formal depiction of royal life than do monuments. For instance, unlike in the idealized depictions commonly shown on public monuments, in some vessel scenes an ajaw (or k'uhul ajaw) is shown preparing for or engaged in a specific ritual or political event that does not require full regalia. When costumes do not clearly indicate the main characters, other factors help to distinguish these figures. Depicted relative size appears to be a direct indicator of status or social importance. As will be shown later, a hierarchical structure exists in which important figures are depicted as proportionally wider than lower-ranked figures in the same scene. This arrangement reflects social distinctions, political affiliation, and, potentially, divine power. The term hierarchy will be used here to describe the variation in size of figures.
Quantitative and statistical analysis indicates that the width of a figure is the most salient spatial category for expressing hierarchy on polychrome vessels. On 61 of the total 110 vases (55.5%), figures were represented hierarchically in two or three distinct size categories. These scenes typically include one main figure, a variety of secondary figures (discussed later), and several tertiary figures. The categories reflect statistical trends apparent in the database in size and relative placement of the figure within the scene; the measurement of width is primary among them. The difference between the mean widths of the sample population of primary and secondary figures is 3.665 cm (the probability p that the means are drawn from different populations is significant at the .001 level); that between primary and tertiary figures is 5.664 cm (p < .001); and that between secondary and tertiary figures is 1.999 cm (.002 < p < .001). The mean heights are much less varied, and the groups are not strongly separable statistically. The difference between the heights of primary figures and secondary figures is –.222 cm (p > .50); that between primary and tertiary figures is 1.536 cm (.50 > p > .20); and that between secondary and tertiary figures is 1.758 cm (.50 > p > .20).
On any given vessel, figures of equal importance were given approximately the same amount of horizontal space, with little significant variation. This suggests that some form of measurement process was used. Overall, higher-ranked figures were typically wider than figures of lower ranks by a ratio of 3:2 (45.5% of hierarchical occurrences) or 2:1 (17%). However, on 42 (38.53%) of the 109 vases with two or more figures, all of the figures are shown as approximately equal (Figure 3), with their widths varying by less than 5%. This depiction suggests that there is no specific person of interest in the scene or that each figure is of equal importance. Figures of equal width are often seen on vessels depicting hunting parties or way entities.
Example of figures of approximately the same width. (Kerr archive number K4922. Photograph by Justin Kerr.)

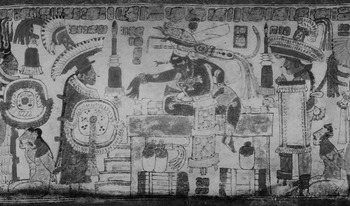
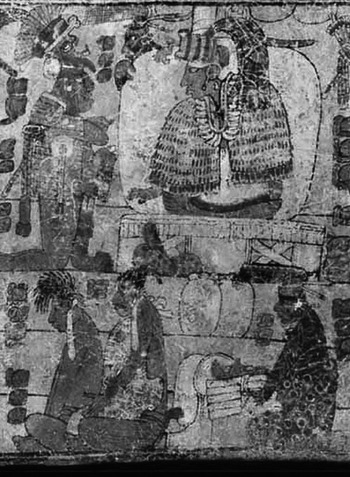
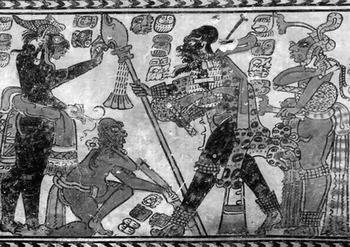
On 38 (62.3%) of the 61 vessels that depict a hierarchy of figures, the main figure is shown with his or her head turned to the side but the torso forward, facing the vessel's viewer (Figure 4; see Reents-Budet et al. Reference Reents-Budet, Ball and Bishop1994:22). This unnatural pose allows the full display of symbols of office, such as chest pectorals, scepters or serpent bar, body paint, and other symbolic dress. Torso-forward depiction also allows those individuals of the highest rank (typically but not exclusively ajaw or k'uhul ajaw) to occupy as much as twice the horizontal space as the other individuals in the scene. This orientation also creates the impression that the key figure (or figures) is interacting with the characters on either side of the body, as well as with the vessel's viewer. Figures shown in side profile (shoulder toward the viewer; Reents-Budet et al. Reference Reents-Budet, Ball and Bishop1994:22) typically face (interact with) the main figure, since he is centrally placed.
Example of the differences in figure width depicted according to rank. The warriors (figures with shields) are depicted as approximately half the width of the main figure seated on the dais and the captives (kneeling on the ground) are depicted as approximately a quarter of the main figure's width. (Kerr archive number K4549. Photograph by Justin Kerr.)

Typically, lower-ranked figures are displayed in side profile but may also occupy extra space by wearing large headdresses or by extending their arms in oratory or action. Figures given the smallest amount of total horizontal space are captives, servants, and children. While the side profile is typical for secondary and tertiary figures, the torso is sometimes displayed frontally to allow depiction of rank-identifying chest pectorals or tattoos (names or rank) or to reflect sacrificial activity (blood, piercing, or scars). In cases in which sacrificial activity has led to death, the deceased figure may be extended horizontally to emphasize the event depicted in the scene.
Distinctions in size were also confirmed by the aspect ratios of each of the figure-size classes (i.e., the width of each figure divided by its height). Primary figures produced a mean aspect ratio of .79, meaning that the area they occupy is nearly square. In 15 cases, the width of a primary figure was greater than its height; this occurred in situations where the main figure was depicted seated with the torso forward. Secondary figures had a mean aspect ratio of .51, which indicates a greater total height of body but relatively less width. Only in three instances did a secondary figure show greater width than height; these were seated figures directly facing the primary figure in courtly scenes. Width continues to decrease relative to height with tertiary figures, with a mean aspect ratio of .38. However, in two cases a tertiary figure was wider than it was high; these figures were seated and demonstrating some form of action, which increased the total width occupied.
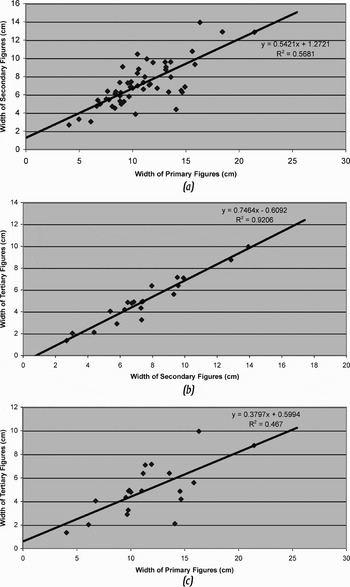
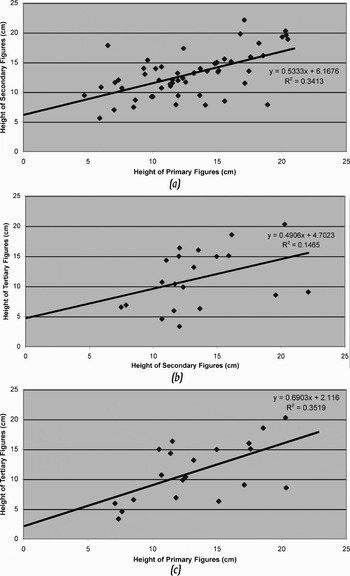
The degree to which these relationships between width and height followed clear proportional canons was tested using linear regression analysis. The relationship between the measurements of primary, secondary, and tertiary figures were calculated for each of the vessels in the sample that include multiple figures depicted hierarchically. For example, on each vessel, the widths of the primary figures were compared with the widths of the secondary figures. The linear equation that best expressed this relationship across all vessels in the sample was then solved for using regression analysis. The analysis revealed highly consistent use of width to distinguish between figure classes (Figure 5), though height less consistently distinguished between figure classes (Figure 6).
Point plots of the widths of figures of the three different size classes, together with the linear relationships and correlation coefficients that result from regression analysis: (a) the relationship between the width of primary and secondary figures; (b) the relationship between the width of secondary and tertiary figures; (c) the relationship between the width of primary and tertiary figures.

Point plots of the heights of figures of the three different size classes, together with the linear relationships and correlation coefficients that result from regression analysis: (a) the relationship between the height of primary and secondary figures; (b) the relationship between the height of secondary and tertiary figures; (c) the relationship between the height of primary and tertiary figures.

As can be seen in Figure 5, the width chosen for the primary figure or figures in a scene accounted for 57% (coefficient of determination or r Reference Boot2 = .5681) of the variation in the widths of the scene's secondary figures, while 92% of the variation in the widths of tertiary figures is accounted for by the width of secondary figures (r Reference Boot2 = .9206). Likely owing to the fact that primary figures, so frequently depicted in seated poses, tend to have decreased height measurements overall, and because there is little variation in the means of the height sample of secondary and tertiary figures, relationships between the height of various figures classes are both weaker (Figure 6). Only 34% of the variation in the height measurements of primary figures is accounted for by secondary figures in the same scene (r Reference Boot2 = .3413), and only about 15% of the variation in secondary figures' heights is attributable to tertiary figures (r Reference Boot2 = .1465).
Vertical arrangement of the figures as an indicator of status is often used in conjunction with the hierarchical representation of width. The importance of vertical placement has been widely recognized on other media, especially public monuments. Stelae (such as Uxmal Stela 14) and murals (such as Bonampak North Wall Room 2) typically display captives beneath or below the main figure or on the lowest register of the scene. A similar arrangement is used on the vases. Reents-Budet and colleagues (Reference Reents-Budet, Ball and Bishop1994:9–11) note that this arrangement exhibits Maya representation of dimensional space: “in Maya art, the imagery existed primarily within two-dimensional pictorial space, and, when present, the third dimension was extremely shallow. … To render a scene with many participants and the requisite three-dimensional space, Maya painters occasionally used multiple ground lines, spacing the figures vertically to render cubic space” (see also Grieder Reference Grieder1964; Reents-Budet Reference Reents-Budet and Kerr2000 and Reference Reents-Budet, Bishop, Taschek and Ball2001). Frequently, these ground lines imply temple or pyramidal structures (Reents-Budet Reference Reents-Budet and Kerr2000, Reference Reents-Budet, Inomata and Houston2001).
Hierarchy based on vertical order is established by relative placement in proximity to the top of the scene or top rim of the vessel, but not by the measurement of height (Figures 6 and 7). The figures follow a hierarchical continuum, with highest-status figures nearest to the top rim and lowest-ranking figures nearest to the base. Although vertical placement is diagnostic of rank and status, it relates mainly to the significance of the figure in the scene. A total of 63 (89%) of the 70 main figures on vases showing hierarchical arrangement are placed closer to the rim than any other figure.
Example of vertical arrangement according to rank and status. (Kerr archive number K767. Photograph by Justin Kerr.)

Typically, the main figure is seated on a dais (37 or 59%, of the 70 main figures), which occupies the highest line or horizon within the scene. Subordinate figures are generally depicted seated on the ground line or lowest level of the scene. Slaves and captives regularly appear seated below the main figure. In contrast to the monuments, on the vases bound live captives are never depicted lying supine. Rather, they are all shown seated.
While hierarchical vertical arrangement often complements hierarchical width, there is no indication that either width or vertical placement depends on the other variable to occur. Both hierarchical width and vertical placement do occur independently of each other in approximately 20% of the total occurrences.
How does all of this relate to the practices of artists? This discussion shows that the variation in the width of tertiary figures is explained almost entirely (92%) by the variation in width of the secondary figures. The size of the primary figure does not directly influence the variability of tertiary figures, although the width of primary figures indirectly constrains the width of tertiary figures. One possible explanation for this relationship is an effort by Maya artists to provide the greatest distinction in size between the main figure and all other figures. Separate evidence indicates that—at least, in general—primary figures are laid out before secondary figures and that secondary figures are laid out before tertiary figures. Given this sequence, the statistical analysis can be interpreted as indicating that artists consciously or intuitively attended to the size of primary figures when producing secondary figures and to the size of secondary (but not primary) figures when producing tertiary figures
The orientation and placement of figures within a scene is often considered meaningful across cultures. For example, Schapiro has noted hierarchy in the figural arrangements of Medieval Christian art with respect to rank and importance: “In pictures representing the hierarchy from bishop to acolyte the differences of rank are made visible through differences of position with respect to the center and through elevation, size, posture, and glance—ranging from the seated bishop, strictly frontal in the center, to the profiles of the lowest and outermost figures” (Schapiro Reference Schapiro1996:71).
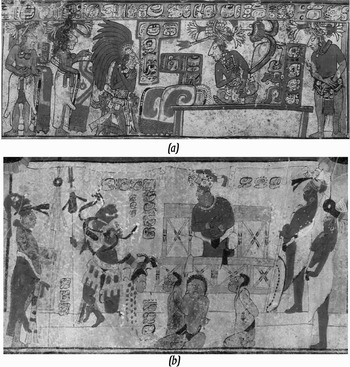
A similar order is applied in Maya courtly scenes. Main figures are proportionally wider and vertically higher and are almost always located at the center-right of the scene. Evidence suggests the following underlying arrangement of a single, non-continuous palace scene (whether or not part of a multiple-scene complex; see, e.g., Figure 8). The main figure is placed centrally in the scene. This figure typically faces left; his court usually faces the same direction and is arranged sequentially according to strength of relationship to the main figure, rank, or importance of these figures to the general scene. Facing right and directly across from the main figure is the second most significant figure of the scene. If this figure is a visitor, then his retainers are likewise arranged behind him. Captives normally face the same direction as their captor (or owner) and are located centrally, but they are typically depicted on the lowest horizontal plane of the scene below their captor. In summation, the primary figure is in the center facing left; the second most important figure is off-center and facing right; other secondary figures are also off-center and facing left or right (behind the primary figure and second most important figure); and tertiary figures are on the periphery of the scene to the left or to the right and toward the bottom.
Examples of single scenes that exemplify many of the canons used in figure and text arrangement: (a) Kerr archive number K558 (photograph by Justin Kerr); (b) Kerr archive number K680 (photograph by Justin Kerr).

TEXTS
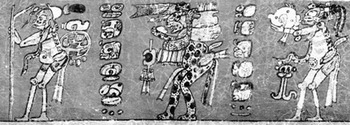
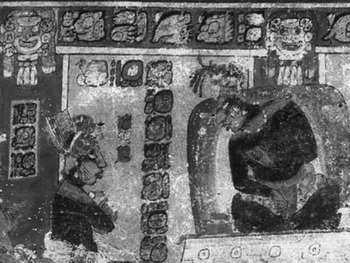
This section discusses the size of hieroglyphic blocks, referred to as glyphs, as opposed to larger-scale units of several glyphs (texts), which are discussed in the section on layout. Glyphs can be classified in up to four categories of relative width: primary, secondary, tertiary, and superglyphs (Figures 9 and 10). These categories of widths are quite consistent, showing very little variation within a given size category. In the rare instances where it appears that the scribe left insufficient room for the entire text and the last few glyphs are noticeably condensed or partially incomplete, these measurements were not included in the average size.
The size classes are statistically separable by both their width and height measurements. The difference between the mean widths of the sample populations of primary and secondary glyphs is 1.142 cm (p < .001); between primary and tertiary glyphs, it is 1.829 cm (p < .001); and between secondary and tertiary glyphs, it is .696 cm (p < .001). (Superglyphs are a special category and will be discussed later.) Strong significance is also demonstrated between glyph heights, as expressed in the following data: the difference between the mean heights of primary and secondary glyphs is .521 cm (p < .001); between primary and tertiary glyphs, it is .988 cm (p < .001); and between secondary and tertiary glyphs, it is .461 cm (p < .001). Such consistency suggests, again, that scribes rigorously maintained precise dimensions, which must have been the result of exact measurement.
Primary glyphs (Figure 9) are the most frequently used glyph-block size. They were employed a total of 1,071 times and make up 48% of the 2,236 total glyph blocks in the sample. Primary size is normally applied to the top-rim text; in this sample, 100% of the 88 vases with a rim text are at least partly composed of primary-size glyphs. The term primary as used here indicates the largest of the most frequently used glyph blocks. This term has long been used to describe such glyphs, as in the Primary Standard Sequence (PSS). As recognized by Coe, this prominent text is generally composed in the largest-size script (Coe Reference Coe1973; Stuart Reference Stuart, Houston, Mazariegos and Stuart2001:474). “Primary” also reflects the initial placement of the glyphs at the top rim of the vessel. On vases where only one size of glyph block occurs, these glyphs have been tabulated as the primary size by default (with exception of tertiary and superglyphs).
Example of the three main sizes of glyphs: primary along the rim, secondary in the middle and on the left, and tertiary (type A) in the middle. (Kerr archive number K2284. Photograph by Justin Kerr.)

Secondary glyphs are the second most frequent size category (n = 970, or 43.4% of glyphs) and are visually distinct from primary glyphs (Figure 9). Where two or more glyph sizes are used, secondary glyphs are approximately one-half to three-fifths the size of primary glyphs. The presence of secondary glyphs presupposes the presence of primary glyphs. Secondary glyphs are large enough to be read and are typically composed to be legible. Generally, these glyphs are used for titles, names, and other text written on the body of the vessel. Occasionally, specific secondary glyphs are framed or highlighted by a colored box or border (39 texts); 28 (73%) of all occurrences of boxed text are composed of secondary glyphs.
Tertiary glyphs are a small and infrequently used category (n = 191, or 8.5%). Most tertiary glyphs are about one-quarter the size of primary glyphs and are roughly one-half to three-fifths the size of secondary glyphs (Figure 9). Tertiary glyphs are the most variable in size and use. Tertiary glyphs can be also broken into several groupings, as discussed later. In a few instances, these glyphs are rendered finely enough to be read (type A). More typically, however, the tertiary glyphs are rendered as illegible or intentionally under-specified “pseudoglyphs” (type B)—that is, the general outlines of tertiary glyph blocks are consistent with the square/rectangular block forms typical of Maya glyphs. The individual signs, however, lack the diagnostic interior details or eccentric outlines that are criteria for their identification. In these cases, then, tertiary glyphs are not read but used to suggest a text or textuality. This usage is reminiscent of the depiction of a quarter-note emerging from a mouth to suggest song, but not a specific note. Illegible tertiary glyphs thus refer to speech, lesser titles, or writing itself. They suggest a category of information that is provided contextually by the placement of the text.
When used as personal identifiers placed adjacent to or on minor figures, tertiary glyphs indicate an unspecified person who might have tattooed glyphs or titles that potentially would be recordable but are not recorded because they are unknown, or are known but are (for example) not prominent enough to be specified in the given scene. Tertiary glyphs may also serve to depict a written text (such as on depicted vessels), the meaningful function of which is to show that the object is written on (with writing being a value-added association). Furthermore, tertiary glyphs are indexical, signaling the context of the occurrences of text segments. Hence, they refer to the context in a way that can be interpreted culturally and represent the context of something that is characteristically conveyed in some situations by written text: a text itself as an object (e.g., showing that a vessel has a text on it), or a linguistic utterance that is spelled out by a text (e.g., a non-specific depiction of speech), or a type of meaning that is represented by a text (e.g., titles).
It is not uncommon for vases to show both type A and type B tertiary glyphs. Type A and type B tertiary glyphs are likely fulfilling the same requirements; the rendering of the more specific type A glyphs suggests that the scribe wanted to leave no doubt about the interpretation of those specific glyphs. The occurrences are otherwise similar in all respects.
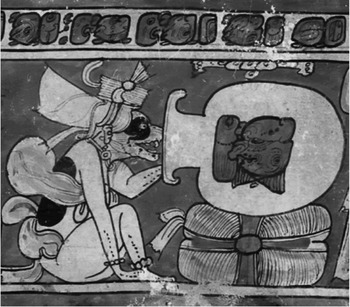
A final size represents a rare category of unusually large glyphs. The superglyphs are mostly infrequent, oversize glyphs typically used as labels on highly significant objects. The actual occurrence rate is quite low, with only four glyphs in the discussed sample. These glyphs are easily distinguished from primary glyphs, as they are approximately one-third larger. There is only one superglyph per vessel in this sample, when they are present at all (Figure 10).
Example of a superglyph. (Kerr archive number K505. Photograph by Justin Kerr.)

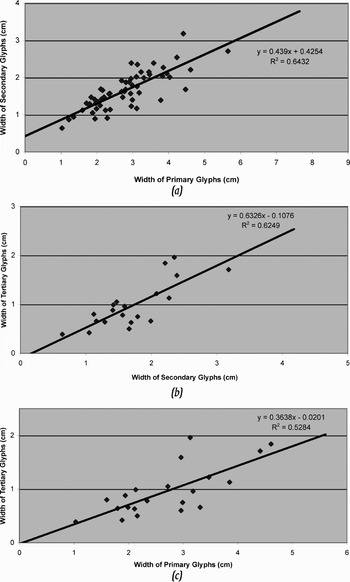
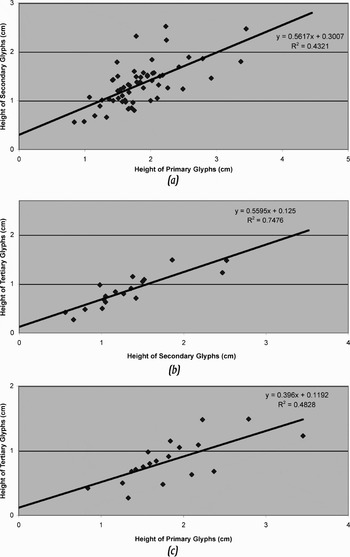
Regression analysis shows that both the width and the height of the glyphs in one size class (e.g., primary glyphs) were dependable predictors of the measurements of glyphs in one of the other size classes (e.g., secondary glyphs). In other words, there was consistency of measurement and proportionality in the construction of visual hierarchy across the vessels in the sample. Figure 11 shows the results of the analysis for the width of the three major size categories of glyphs, while Figure 12 shows the results for height (superglyphs were not included in the analysis). These analyses indicate that rather rigid canons of proportionality governed the presentation of texts, such that 43–75% of the variation in width or height measurement of a glyph in any size category can be directly attributed to the measurements of glyphs in another category on the same vessel.
Point plots of the widths of the three different size classes of glyphs, together with the linear relationships and correlation coefficients that result from regression analysis: (a) the relationship between the width of primary and secondary glyphs; (b) the relationship between the width of secondary and tertiary glyphs; (c) the relationship between the width of primary and tertiary glyphs.

Point plots of the heights of the three different size classes of glyphs, together with the linear relationships and correlation coefficients that result from regression analysis: (a) the relationship between the height of primary and secondary glyphs; (b) the relationship between the height of secondary and tertiary glyphs; (c) the relationship between the height of primary and tertiary glyphs.

Separate evidence indicates that primary glyphs were laid out before secondary glyphs, and that secondary glyphs were laid out before tertiary glyphs. Therefore, the results of multiple linear regression and initial layout analysis in total indicates that scribes attended to the size of the primary glyphs when they produced the secondary glyphs, and they attended to the size of both the primary and the secondary glyphs when they produced the tertiary glyphs.
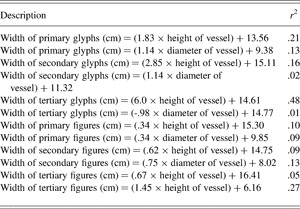
A multiple regression analysis yields almost no statistically significant relationship between the size of any glyph category and the size of any figure category. Representations are obviously constrained by the size and shape of the vessel surface, although analysis of the width or diameter of the vessel's contribution to the size of the glyphs or figures on the vessel does not demonstrate significant correlations, with one puzzling exception: the width and height of the tertiary glyphs weakly correlate to the height of the vessel (Table 1). Tertiary glyphs' dependence on the height of the vessel deserves further exploration.
This table displays the relationship between glyphs or figures and the height or diameter of the vessel

The mean aspect ratio of the three main sizes of glyphs (width divided by height) produced the following values: primary, 1.56 cm; secondary, 1.31 cm; tertiary, 1.15 cm. This reveals a trend in which width and height becomes less differentiated as the size of a glyph decreases—that is, glyphs become more square in shape at smaller sizes. The greater width of the primary glyph may be associated with the same concepts of prestige as expressed by the primary figure's width. The reduced width-to-height trend expressed in the secondary and, especially, the tertiary glyphs follows with the secondary and tertiary figures' reduced body width. Height (as with the figures) is most likely not a significant factor in the size of the script. Glyph blocks tend to be composed in square-like shapes, despite the size of the glyph. Similar to the figures, height has little impact on prestige; rather, status is expressed in vertical placement.
In many instances, the differentiation of glyph sizes functions to separate different types of textual content (in some cases, genre), providing additional means of interpreting dense pictorial scenes. In no cases do text segments mix glyphs of different sizes within them. For example, there are no examples of any other glyph size being substituted for any one of the primary-size glyphs as part of a rim text. This is not to imply that glyph sizes cannot be adjacent or coexist; rather, they never intermingle within a given text.
Further, the arrangement and general placement of the glyphs suggests a hierarchy in spatial arrangement not unlike the hierarchy of figures discussed earlier. Primary glyphs are generally used for the rim text, which often consists of the recurrent PSS (n = 77 occurrences on vases). While the entire PSS is not fully deciphered, it is known that the formal phrasing pertains to the vessel itself and, perhaps, to the vessel's contents. Non-PSS and some extended PSS rim text includes statements that pertain to political affiliation, titles, and epithets of the owner or patron (Coe Reference Coe1973; MacLeod Reference MacLeod1990a, Reference MacLeod and Kerr1990b; Stuart Reference Stuart and Kerr1989). Primary text (typically PSS text) often presents information that is not explicitly referred to in the scene or scenes depicted on the vessel; in orientation and content, these glyphs tend to be fully independent of the scene. Some primary texts, however, do occasionally contain parts of historical narratives, which include references to people and sometimes to events depicted in the accompanying scenes. Primary-size glyphs visually occupy prominent horizontal and vertical positions on the vases. Recent evidence has revealed an explainable pattern and reason for the alignment of the PSS and other rim text with the scene below it (Newman Reference Newman2007).
Secondary glyphs regularly convey a genre of information that pertains directly to the scene, such as explanations of names, titles, conversation, and actions of the figures depicted in the scene. These glyphs are generally constructed on the body or midsection of the vessel (n = 79 vessels) and rarely presented on the top rim (n = 10 vessels). In cases where secondary glyphs appear on the top rim, they do not compose the entire rim text; nor do they form part of the PSS. Rather, they are short segments or are part of a vertical text that starts along the rim. Secondary glyphs are regularly interspersed within scenes, suggesting that scribes used these glyphs with greater freedom.
Tertiary glyphs are generally associated with lesser elite titles, miniaturized script, and identification of iconography. Tertiary glyphs are rarely written on the top rim (n = 1 vessel) or base of the vessel (n = 1 vessel). Tertiary and superglyphs do not appear to carry information essential to the vessel or the vessel's scenes. The diverse placement and limited use of these glyphs appears to be linked to specific scribal preferences.
Not all vessel text contains information of the same significance. Differences in size and spatial placement indicate textual value. The total amount of horizontal space occupied by the primary glyphs is nearly double that covered by secondary glyphs (3,020 cm versus 1,600 cm, respectively). In other words, 62.7% of the total glyphic space is taken up by primary glyphs. Secondary glyphs take up 33.2% of the glyphic space; tertiary glyphs take up only 3.8%; and superglyphs take up only .3%. If size and prominence are indeed elements used by the Maya to convey meaning, then these glyph sizes reflect a meaningful arrangement that facilitates the transmission of concepts of prestige and social significance. As Rice (1987:251) has noted, “Those studying the meaning or content of styles address the many ways art expresses deep-seated characteristics or beliefs of the society that produced it … both visual images and spatial arrangements—[are] seen as a symbolic code reinforcing social and cosmological structures, beliefs and values.”
THE CYLINDRICAL SURFACE
Visually, the curved surface of the vases and perception of depth as the surface curves away from direct view provide the human eye with components that can be manipulated to enhance dynamic qualities of the figures. Whereas at any one time a specific portion of the vessel is prominent, other portions (peripheries) are less easily viewed or unviewable; accordingly, the eyes are drawn to focus on the center portion of the available scene (prominent) with anticipation of the following portions (subsequent periphery). The performative aspect of viewing the text and scene, by rotating the vessel, becomes the catalyst of visual dynamics, suggesting motion or action for depicted figures in the scene or reinforcing the sense of motion or action that is implicitly suggested or explicitly represented by pictorial conventions.
As has been widely noted, vessel scenes do not typically depict single moments; rather, they illustrate an event or occasion. “Vessel walls helped artists achieve new levels of narrative and story-telling … with amusing turns that force the viewer to turn the pot time and again” (Miller Reference Miller1999:200–201). Cylindrical vases require human interaction for the full surface to be viewed. Vases were likely turned clockwise, facilitating the reading of the horizontal text segments (by conforming with the typical left-to-right reading order on an exterior service) and the entirety of a scene. It is a general rule in Mesoamerican textual traditions—Mayan, Epi-Olmec, and Zapotec—that leftward orientation is the default, as is left-to-right reading order; that right-to-left reading order is associated with rightward facing signs; and that when figures are present adjacent to text segments, the reverse orientation (and reading order) occurs in text segments adjacent to rightward-facing figures. As Kaufman and Justeson (Reference Kaufman, Justeson and Woodward2004:1109) state, “Zapotec texts were generally written in columns from top to bottom. Columns were read from left to right, and the signs in these cases face leftward. Above rightward-facing animate beings in accompanying iconography, texts were read from right to left and their signs face rightward; this deviation also occurs when columnar text is adjacent to such figures.” Although reverse reading order is used, it is rarely found on Maya vessels (Boot Reference Boot2003). No vessel in this sample has reverse-reading-order text.
The dynamic effect of rotation in “animating” the figures is significantly increased with figures depicted in action such as speaking, dancing, or walking. “When the verticals are made oblique, the inner space changes to acute and obtuse angles giving an expression of dynamism” (Frutiger Reference Frutiger1989:51). In the Maya case, action is conveyed to the audience through artistic rendering of figures illustrated with extended appendages, hands, or complete body angled in performance. Scribes often enhance the frontal angle of the body to represent action by decreasing the static 90° frontal angle to about 80° for seated action (e.g., speaking), and further decreasing the angle to 70–75° for leaning figures in full body action (e.g., walking), emphasizing that action. Motionless figures, whether sitting or standing, are often rendered with their backs in an upright position perpendicular to the ground surface.
Maya scribes were well aware of visual differences between left- and right-facing figures displayed in action. A left-facing figure seems to move with the direction of rotation. His or her front and any depicted action are viewed first, while the figure's back is briefly viewed last. The action of that character becomes a focal point, which is visually stressed by the turning motion. Conversely, the back of a right-facing figure is viewed before his or her front and activity. Therefore, rightward orientation undermines any sense of momentum. Since figures in motion normally move forward, right-facing figures' movement is implicitly rightward, if at all, while the rotation of the vessel produces leftward movement. Right-facing individuals are regularly depicted in side view (shoulder toward viewer), further reducing their time-and-space duration on the prominent field. Significantly, figures presented with their torsos forward and with proportionally large widths are viewed on the prominent surface for a longer duration (and typically face left). The combination of width, depicted action, and orientation combined with status strongly suggests that scribes were aware of the effects of placement in design (Figure 13).
Example of a figure in motion (black figure facing left) and figures depicted in static poses. (Kerr archive number K593. Photograph by Justin Kerr.)

Maya artists showed a definite tendency to represent active figures facing left, while there is no evidence that they preferred any particular orientation for non-active figures. Of the 419 active figures, 272 (65%) face left. This is a statistically significant departure from equiprobability: with a χ2 of 37.29 and one degree of freedom, the probability of a difference this large is 1.02−9. In contrast, only 74 (45%) of the 163 non-active figures face left. This is not a statistically significant departure from equiprobability; with a χ2 of 1.83 and one degree of freedom, p = .24. The difference in the orientation of active versus non-active figures is itself statistically significant, yielding a χ2 of 18.54 (p = 1.66−5). In other words, the scribes were attentive to enhancing the presence of figures in a scene, and mathematical evidence highlights the frequency in the depiction of left-facing figures representing active poses versus the infrequency of those left-facing figures that are not depicted as active.
Even though most active figures face left, 35% of them face right. This raises the question of what differentiates the figures that face left from those that face right. In this sample, 64 vases show active right-facing figures (total 147 figures). Of these vases, 58 (90.6%) show the right-most–facing figure actively engaging the main figure; this accounts for 53.5% of the active right-facing actors. As suggested earlier, the second most important figure in a scene typically faces the main figure. Active engagement between the two centermost figures stresses the importance of the meeting and importance of the secondary figure to the event.
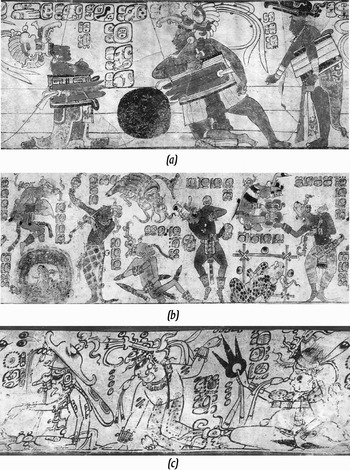
(a) Example of a single scene (Kerr archive number K4470. Photograph by Justin Kerr); (b) Example of a multiple scene delineated by back-to-back figures (Kerr archive number K791. Photograph by Justin Kerr); (c) Example of a continuous scene (Kerr archive number K2286. Photograph by Justin Kerr.)

Visually, a somewhat similar vertical and horizontal hierarchy and appreciation of dynamics is applied to the hieroglyphics. As mentioned earlier, most texts are read from left to right and from top to bottom. In the cases of horizontal text, the vessel must be continuously rotated from right to left (clockwise) so the text can be read. The horizontal rim text occurs on 89 (81%) of the 110 vessels of the sample, and in all 89 cases, the rim text is composed of only a single line of text. Rim texts tend to be the most prominent script on the vase, composed in the largest text, with the topmost placement, and often accounting for the greatest in number of glyph blocks. The placement at the top of the vessel and the width of the text (typically the entire rim) indicates the importance of the text, despite the frequent dissociation with the scene below. Other analyses have demonstrated a clear relationship between vessels located in elite contexts (burial, feasting, and palace archaeological contexts) and the presence of the PSS, implying the importance of this text (cf. Justeson Reference Justeson1978).
The reading of vertical texts requires that the vessel be held more or less stationary for a time, removing any dynamic flow. Vertical texts most often occur on the body of the vessel. The body consists of the midsection of the vessel, originating approximately 3 cm below the top rim, with 3 cm or more from the bottom rim; the body is the largest surface area of the vase. These vertical texts are generally composed of secondary and tertiary glyphs and contain 2–10 glyphs. Most body text includes name phrases and titles, labels for objects, dates, or depicted activity.
Infrequently, body texts are presented horizontally. The most notable use of horizontal glyphs is in an L-shaped arrangement that serves to frame figures. This arrangement includes two or more horizontal glyphs that share one “corner” glyph with a column of two or more vertically oriented glyphs—thus resembling an L. In this sample, there are 118 instances of L-shaped texts; every one of these instances frames a figure. Figures typically face in to the arrangement (n = 101, or 86%). In only 17 cases do figures face out of the arrangement, and in 11 (65%) of those cases, the arrangement is between two figures that are back-to-back. Horizontal text in these cases is not long enough to necessitate rotation of the vessel.
Two reading and viewing experiences are manifested by the vertical and horizontal glyphs in relationship to the scene or scenes and figures. Reading an extended horizontal text segment requires that the vessel be rotated and the accompanying scene viewed while in motion. Read a vertical text, in contrast, requires pausing or, at least, slowing the rotation of a vessel, so associated features of the scene are viewed at rest.
Scene Layout
Typically, the scenes on ceramic vessels are meant to capture an ongoing event, as is the case on 101 (91.8%) of the 110 vessels addressed in this study. (Rarely, if ever, is a completed event shown.) An event can be represented through the multiple actions expressed by the characters within a single scene, while other vases have multiple scenes that show the progression of events. From the 110 vessels analyzed, three styles of scene layout have been identified. The most frequently occurring is the single-scene layout (n = 47). These scenes wrap around the vessel, with the beginning and end demarcated by either the first and last figure standing or sitting back-to-back or the scene starting or ending at a vertical band of glyphs or decoration. Typically, these scenes contain multiple figures participating in one grand, centrally placed event focused on a main figure (Figure 14a).
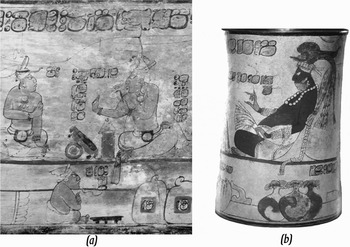
(a) Example of the main figure surrounded by accoutrements visible on one full side of the vessel (Kerr archive number K2914. Photograph by Justin Kerr); (b) Kerr archive number K1453 shows this arrangement in still view of vessel (photograph by Justin Kerr).

Vessels with multiple scenes or segments are delimited by individuals placed back-to-back or scenes delineated by vertical columns of glyphs or iconography. Two-scene vessels are the second most common multiple-scene vessel layout (n = 33). Double-scene vases tend to depict one event at two different times. Other multi-scene vessels observed in the sample include nine vases with three scenes, one vase with four scenes, and one vase with six scenes (n = 11; Figure 14b).
Vessels that do not have a specific beginning or end constitute the final type of scene (Figure 14c). The continuous scene (n = 19) is generally composed of figures in procession, such as hunting parties, warriors, or funeral attendants. In this study, all of the figures in processions faced left. A frequency of left-facing processional is as expected from the correlation between forward motion of depicted figures and the clockwise rotation fostered by the reading of rim texts and other long horizontal text segments.
Dominant Scene
The rollout photographs and drawings provide an essential tool for analyzing vessel scenes. However, the flat representations should not be used at the expense of appreciating and studying the scribal use of the curved surface. It is important to analyze scenes in terms of their actual appearance as viewed by the ancient Maya. As discussed earlier, the curvature of the vessel wall restricts viewing so that, at most, half of the vessel is visible at one moment. Approximately 50% of the vases in this study were constructed so that a specific display on the vessel walls could be seen from a fixed viewing angle; this can be considered a “static” display in that the vessel would be viewed without rotating it at all (52.5% of vases; n = 58). These specific ceramics, especially those showing historical events, show the main figure occupying a large proportion of horizontal and vertical space and text associated with the figure or event depicted. A significant portion, if not the entire prominent field and peripheries, is devoted to that individual. Typically, this main individual embodies all pictorial status elements: he or she is seated, vertically elevated, with torso forward and facing left. In addition, prestigious accoutrements and tribute items are arranged in proximity to the prominent individual. Typically, the main figure is engaged in conversation with another individual (n = 51 main figures) who is peripheral to the main scene as part of the subsequent periphery. This full prominent view displays the main figure with his significant titles, dates, and pertinent associations all on one visible side of the vase (Figure 15).
The frequency of the single predominant scene suggests a display function for this layout. Displayed vases are depicted within the vessel scenes themselves as shown where the main figure is seated on a dais surrounded by tribute items and including polychrome vessels (K2914 and K1775). The ancient restoration of vessels such as these, by way of crack lacing, indicates that vessels were preserved for purposes beyond serving ware, as repaired vessels no longer make practical containers (Coe and Kerr Reference Coe and Kerr1998:62). Such preservation might indicate that these vessels were repaired for display until internment with the deceased owner or family member.
As mentioned earlier, it is highly likely that certain polychrome vessels were presented as status markers or tokens of political arrangements (affiliations). The Jauncy vase, recovered in 1988 by Jennifer Taschek and Joseph Ball, is an example of such a vessel found in context. The text on this high-quality vessel suggests that it was given as a token of alliance from Naranjo (13.5 km distance). “Complex depositional configurations and context associations strongly suggest some relationship between this family and the late seventh–early eighth century establishment or reestablishment of a most likely unequal political relationship between the Buenavista center and its giant neighbor to the west, Naranjo” (Taschek and Ball Reference Taschek, Ball and Kerr1992:492). Certain polychrome vessels could have served to fulfill political interests. “As gifts, vessels could have helped confirm alliances, affirm agreements, and bind centers to peripheries of Classic polities” (Houston et al. Reference Houston, Stuart, Taube and Kerr1992:506). The Jauncy vase is representative of the Naranjo “Holmul dancer”-style vessel, a style that is widely recognizable and attributed to the artisans of Naranjo. An elaborate vessel such as this would have been a prestigious item worthy of display. Unlike most other vessels, the polychrome vessels were very visually distinct objects that communicated status, affiliation, and participation through text and image.
CONCLUSIONS
The analysis of 110 polychrome vessels with scenes that include both figures and text indicates important patterns in artistic deployment. Statistical analysis indicates that text and images on the vases were created in both predictable sizes and meaningful arrangements both overall and with respect to one another. Vessel scenes typically display figures in one of two modes: either all figures are of the same approximate width, or figures are represented with two or three different widths. Differential width closely correlates with an individual's (human or divine) status in that scene. The largest width is associated with prestigious central placement; dominant left-facing position; torso facing the viewer; and proximity to glyphs and accoutrements. The two proportionally smaller widths are associated with non-central placement; shoulder toward the viewer positioning; and proportionally few, if any, accoutrements. However, vessels that show all figures depicted with the same width lead one to deduce that each figure is of equal importance.
Where figures appear at different vertical positions, high-status figures are depicted closer to the top rim of the vessel, while lower-status figures are shown closer to the bottom. Equal height of body, however, does not signal similarity in status. Rather, in the majority of those cases, the artist indicated only one horizontal line of activity (such as the ground).
Hierarchical, vertical, and horizontal arrangements occur simultaneously or separately, but whatever the case, a visual manifestation of importance is implied. A detail analysis of conditions for vertical and/or horizontal arrangements (when used in courtly scenes) might further define the poorly understood political structure of Maya royal courts. Illumination of differences might further define regional or courtly styles.
Engaging the cylindrical surface requires rotation for the entire surface to be viewed. Right-to-left rotation, which is required to read the accompanying texts, was evidently seen as reinforcing a sense of motion and of activity generally in figures whose direction of action projected leftward and are inferring this sense in figures directed rightward.
The hieroglyphics show patterns similar to those found in the figures. Up to four distinct widths were used for the glyph blocks. Commonly, the largest (normal size category) and most prominent and distinct text is painted on the rim, and the smaller and less prominent text is painted on the body. Size differences appear to enhance or distinguish among different genres or separate texts. Furthermore, for text as for images, horizontal and vertical dimensions of placement convey meaning. Long segments of horizontal text and rim text often require the rotation of the entire vessel, revealing the entire pictorial imagery as the text is read. In contrast, vertical texts require the vessel to be held stationary while they are read, and focus is concentrated on individual sections of the artwork (typically adjacent to figures).
Maya polychromes are among the finest artistic creations known from the ancient world. A century of scholarship has demonstrated that the polychrome vases comprise a wealth of pictorial and textual information that gives scholars an emic record of elite life. There is still much to learn about ancient Maya life from these scenes—in particular, conceptions of social structure and whether these scenes depict real or idealized life. The widespread application of the canons discussed in this paper suggests that the ancient peoples now known as the Maya conceived and represented their social organization in similar ways. The manifestation of status and social organization as shown on the vessels is significant to cultural analysis, despite the over-representation of elite images and documentation. The conventions that determined the depiction of these figures may be an expression of where and how real individual status is increased or decreased by placement within a scene. Elites may have commissioned the vessels in attempts to depict themselves in the most flattering and power-bearing position possible and, conversely, to subjugate others in the scene into subordination. The corpus of rim texts frequently contains name phrases and titles, which may belong to the vessel's sponsor or owner. The propagandistic nature of elite art suggests that artisans, especially literate scribes, were highly valued for their abilities. This paper establishes that scribes were trained to adhere to specific canons. However, we can assume that scribes were also capable of executing the most advantageous arrangement for the sponsor of the work. Further analysis of vessel construction will likely provide a clearer understanding of scribal schools and shared practices defining the polychrome styles. These scribal creations illustrate not only palace life, but also myriad myths and history. We have much more to learn from the polychromes.
RESUMEN
El objeto de ésta presentación es de divulgar un análisis del tamaño e organización espacial de segmentos de texto y figuras antropomórficas en vasijas poli-cromáticas mayas, del periodo clásico. Se basa el estudio en 110 vasijas que muestran tanto texto como imágenes y que además son lo suficiente completas para poder medir las variables correspondientes. El resultado indica que existe un patrón específico en lo que se refiere al tamaño y colocación del texto e imágenes.
El patrón ocurre tanto al comparar una con la otra, como al hacer la comparación con todas las vasijas en área de producción de las vasijas poli-cromáticas. Tanto el texto como la imagen exhiben tres niveles jerárquicos de tamaño manteniendo una relación estandarizada entre el primer y segundo nivel y segundo a tercer nivel. Además se mantiene el significado de la jerarquía de tamaño por medio de ubicación vertical e horizontal en la superficie de la vasija misma.
ACKNOWLEDGMENTS
Sincere gratitude to John Justeson for his endless support and insight, and deepest thanks to Erik Boot, Roger Cooper, Kathryn Hudson, Robert Hutchinson, Justin Kerr, David F. Newman, Michael Smith, and C. Scott Speal for their comments and advice on earlier stages of this work. I also express gratitude to the reviewers of this paper for their thoughtful comments and suggestions.