

Introduction
A photograph is a documentation in time, and each can be worth a thousand words. Alfred Francois Donne, in 1845, published an atlas of photomicrographs titled Atlus du Course de Microscopie Exécutée d'après Nature au Microscope, which is the first book of photographic illustrations in the history of medicine.Reference Clode1 There has been a revolution in the process of photography over many decades, but the definition and spectrum of clinical photography still remains mostly undefined. According to Shropshire Community Health NHS Trust clinical photography guidelines, it is defined as ‘still or video photography undertaken by clinical staff to support the care and treatment of a patient’.2 Apart from clinical application, photographs have academic, research, medicolegal and commercial applications. Clinical photography is not only limited to photographing a patient but expands to photomicrographs and endoscopic photographs as well.
Photography in otolaryngology has a long history dating back to 1866 when Nikolaus Rudinger published the photographic representation of the tympanic membrane.Reference Clode1 Modern day otolaryngology has expanded beyond ENT to include head and neck surgery, facial aesthetics and plastic surgery procedures. Photographic documentation is important in this expanded horizon.
This article aimed to review standard guidelines, which are essential for obtaining, storing and disseminating clinical photographs, as well as review basic photography techniques in otolaryngology and look at the advances and innovation in the field of clinical photography.
Clinical photography: methods and requirements
A professional medical photographer is entrusted with the responsibility of obtaining a clinical photograph. But not all clinicians have the luxury of having a trained photographer by their side at all times. Since basic photography equipment is available to them, one can take a photograph and obtain a good outcome by following the standard country specific protocol.Reference Nayler3 A study on the patient perspective by Leger et al. describes that patients preferred being photographed by the treating physician rather than the photographer.Reference Leger, Wu and Haimovic4
Consent should be obtained prior to the procedure and after proper explanation of the need in a designated proforma in written format. If written consent cannot be obtained, this fact should also be documented.Reference PAC5 The consent2 should include a note on the confidentiality of the photographs and the mode of their dissemination, if any, such as publication in research papers or commercial use (e.g. before and after results) including fundraising activities and for social media dissemination. The patient has every right to withdraw the consent mid-way through the procedure.
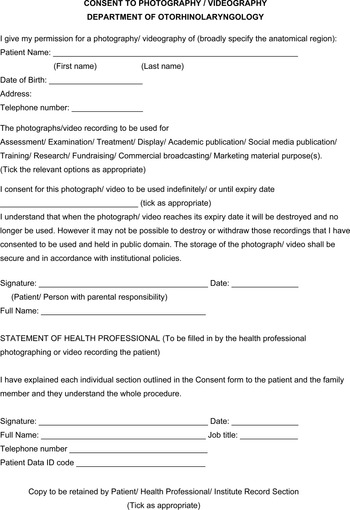
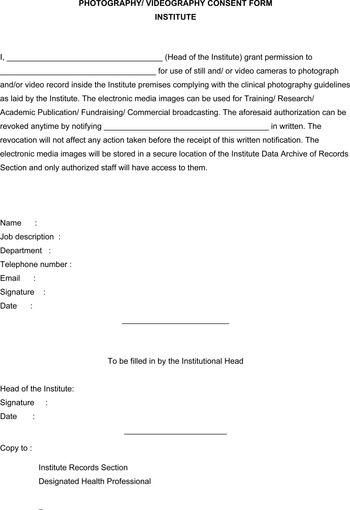
The consent form should be brief, use simple language and be non-ambiguous. It should be obtained in triplicate. One copy is retained by the patient, one by the treating doctor and the third is preserved in the institutional guard file. In cases of lack of consent, if a doctor feels that performing a procedure is not medicolegally justified without a clinical photograph, then the procedure should not be undertaken until after proper documented explanation to the patient (Figure 1).Reference Bhattacharya6 Blanket consent can be obtained from the institutional authority for photographing inside the institutional premises, such as in the operating room or indoor patient areas (Figure 2).
An example of a consent form to be filled in by the patient and the health professional.

An example of a consent form to be obtained from the institute administrator for recording digital media inside the institute premises.

Quality of a photograph dictates its utilisable value. Even in the hands of the clinician, it must be accurate, consistent and of high quality.Reference Archibald, Carlson and Friedman7 Professional grade cameras, a macro lens and proper lighting in a studio is the best setting.2 Small pocket digital cameras and smartphone cameras have the ability to produce images that are sharp, properly exposed and correctly white balanced when used in an illuminated environment. Minor changes in the examination room will enable a clinician to ensure the above conditions.Reference Meneghini8
It is preferable to use a dedicated device for the sole purpose of medical photography and that device should be available at all times in the clinic. The device should be properly encrypted. Transmission of the document over the internet in the form of messengers like WhatsApp is not desirable. Proper end-to-end encrypted applications for storage and transmission as per the national health guidelines should be utilised to maintain confidentiality.Reference Natarajan and Nair9 Patients do seem to accept the use of smart devices in clinical photography.Reference Nair, Potdar, Dadia, Aulakh, Ali and Shinde10
Patient identity protection is of utmost importance. Merely putting black plaques on the patient's face or eyes during post-processing of the photograph is not enough. Patients’ modesty should be valued by ensuring minimum skin exposure of the person photographed. The ethnicity and religious beliefs of the patient have to be respected as well. A chaperone should be included during the procedure, if required.
Patient preparation should not include heavy make up. The patient is placed against a neutral background in a lying, standing or sitting posture or another posture (standard anatomical position) as required in a completely relaxed state. Disposable paper scales may be used alongside the site photographed or a scale can be digitally attached later if the magnification of the lens is known.Reference Bartley11
Storage and dissemination of the photographs should be in accordance with the pre-set national guidelines. In today's world, most of these documents are stored electronically. Data can be transferred from photographing devices to specific folders or patient record entry applications either wirelessly or via data cables. Storage files should be of adequate size to ensure proper quality.
Folders should be named carefully as per the institutional guidelines to ensure easy searching across the library in future. Our institutional technique to attach nomenclature to a digital folder or a digital photograph includes ‘type/first and last name of patient/photo set/month and year of birth’: for example, CP/[Patient Name]/2/051995 (1). Here ‘CP’ denotes ‘clinical photograph’ of the patient, and this is photo set number 2. The month and the year of birth of the photographed person is May 1995. This is the first photo of the set, designated by ‘(1)’. Printed photographs should contain the same naming system. It should be signed by the clinician with mention of their name, designation, date and time.2 Attaching the photographs to other electronic records of the patient and early deletion from the capturing device is good practice.
Otolaryngology photographs by clinicians
Studio or clinic
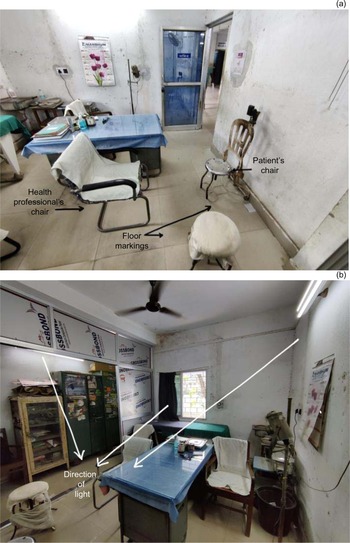
A small clinic is sufficient for basic photography. It should be properly lit either by natural light or artificial light, which are adjusted for daylight white balance. The room should be painted in neutral colours with the patient placed against a neutral background, such as featureless grey or medium blue.Reference Liu, Kinney, Nelligan and Gurtner12 During photography, patients should be lit from front and sides. Back lighting should be avoided. An ENT chair for the patient to sit in is sufficient if the patient is not standing (Figure 3).
Images showing setting a clinic up for clinical photography. (a) The patient's and doctor's chairs are placed at a fixed distance by following the floor lines. (b) The patient area is well lit from the front and either side. The background behind the patient is featureless neutral grey.

Equipment
A dedicated digital camera or smartphone camera at a fixed focal length should be used, and the magnification ratio of the lens should be known. Ultra-wide angle lenses are best avoided. The device should be used at a fixed distance (in terms of distance between camera, patient and background). Guide marks on the floor help to keep a constant relation between the patient and equipment to ensure a constant perspective across a series of photographs. A tripod mount for the camera can be helpful. Focusing is typically easy using modern smartphones. Macro function should be used and is available for most smart and digital devices. Adequate lighting, allowing an exposure time of at least 1/60th of a second or faster, ensures avoidance of blurry images.
Basic views
Full face
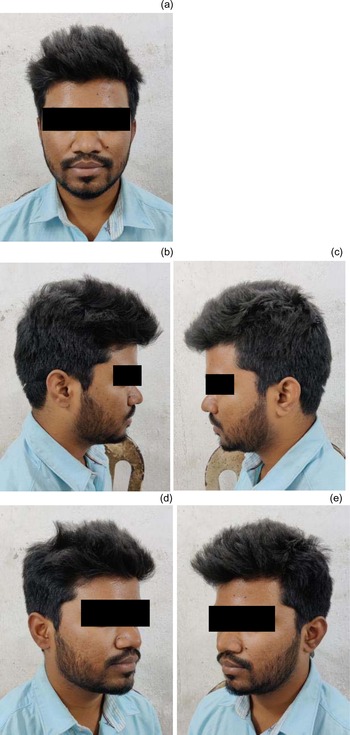
For the frontal or anteroposterior view, the patient faces forward, looking straight ahead (Figure 4).Reference Liu, Kinney, Nelligan and Gurtner12 The superior border of the frame must be just above the vertex. At least 10 per cent of the vertical height or 2 cm of the background above the vertex ensures this. The inferior limit is just below the suprasternal notch. The Frankfort horizontal plane (connecting infra-orbital rim to tragus) is placed parallel to the floor. The vertical line joins the midpoint of the hairline through the nose and philtrum, and the midline of the mentum is placed in the vertical midline of the frame. An equal border of the background should be visible on either side of the patient. Camera position should be at the same level as the centre of the face. The focus point is placed on either eye. The expression of the patient should be neutral.
Photo set named ‘CP/[Patient Name]/1/051995- 1,2,3,4,5’. Example of standard clinical views of the head showing: (a) full face frontal view, (b) full face right profile view, (c) full face left profile view, (d) full face right oblique view and (e) full face left oblique view.

For full face left and right profile views, the patient's head and the body is turned 90 degrees right and left, looking straight ahead in line with the body. Both eyebrows should lie in the same plane. Head alignment should be confirmed with the Frankfort plane.
For full face left and right oblique views, the patient's head and body should be turned 45 degrees. In this view, the nasal tip protrudes slightly beyond or rests at the contour of the distal malar eminence.
There are other full face views including: full face left and right rear oblique views (the patient turns 135 degrees left or right), full face rear view (the patient turns 180 degrees to the camera), a bird's eye view of the protruding malar eminences and the worm's eye view.
Full neck
For a full neck view, the upper limit of the photograph is at the base of the external auditory canal and the lower limit is just below the suprasternal notch. The photographs are obtained in a neutral state, with platysma contracted, with shoulder shrug, maximum flexion and extension of neck, left and right neck tilt and shoulder depressed. The views obtained should be the same as those for the full face: anteroposterior, left and right profile, and left and right oblique.
Glabella
For the glabella, the upper limit of the photograph should be at the anterior hairline, the lower limit is the mid-point between the radix and the nasal tip. Photographs are obtained in a neutral state and with the corrugator muscle contracted. In regard to the views obtained, usually only a close-up frontal view is required.
Eyes
For the eyes, the upper limit of the photograph is just above the eyebrows and the lower limit is the upper lip at the nasal spine. Photographs are obtained with eyes open and eyes closed (to see superior tarsal sulcus and fold), eyes tightly closed, upward gaze and eyes squinted. The views obtained should be the anterior-posterior view, anterior-posterior view with upward gaze, anterior-posterior view with eyes closed gently, anterior-posterior view with eyes closed tightly, right and left oblique view in forward gaze, and right and left lateral view in forward gaze.
Nose
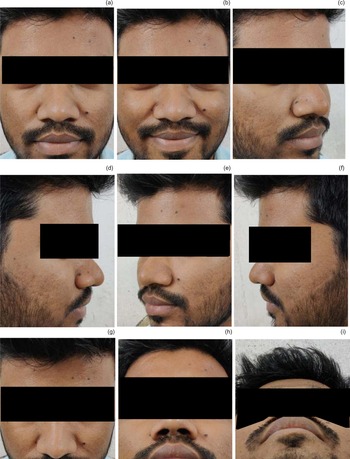
For the nose, close-up and full-face views are obtained. In a close-up view of the nose, the upper limit is the anterior hairline and the lower limit is the lower border of the upper lip. The nose should be centred. Full face view is an essential part of photographing the nose to correlate it with the other facial landmarks. Photographs should be taken in neutral, sniffing and smiling expressions.
The views obtained should be frontal, right and left oblique, right and left lateral, base view (patient faces directly forward, but extends the neck maximally), top-down view (patient faces away from the camera and the neck is maximally extended), and tip support view (full face profile view with patient gently compressing the tip of the nose posteriorly with the index finger) (Figure 5).
Photo set named ‘CP/[Patient Name]/2/051995- 1,2,3,4,5,6,7,8,9’. Standard clinical views of nose showing: (a) full-face close-up frontal view, (b) frontal view in smiling face, (c) right oblique view, (d) right profile view, (e) left oblique view, (f) left profile view, (g) superior bird's eye view, (h) inferior worm's eye view and (i) base view.

Ears
For the ears, a full-face view should be supplemented by close-up views of the ear. The hair needs to be tucked up for an unobstructed view to the pinna. Close-up views have an upper limit just above the helix and lower limit just below the lowest portion of the lobule. All images are centred left to right in the frame. The pinna can be retracted forward by the patient to obtain a view of the postauricular region.
The views obtained should be the left and right ear, frontal face view, right and left oblique facial view, right and left profile view, rear oblique view, and rear view.
Lips, nasolabial fold and mentum
Standard facial views should be taken along with a close-up view. The close-up view has an upper limit just above the nasal tip including the alar base. The lower limit is below the chin. Lips should be slightly parted, smiling, pursed, frowning and cheeks puffed in various standard views. Dental occlusal views are required before jaw surgery. Transparent cheek retractors can be utilised. The views obtained should be frontal, right and left oblique, and right and left profile views.
Oral cavity
Challenges for photographing the oral cavity are poor illumination from external light sources and difficultly with locking in the focus of the camera. Various views should be obtained including the dentition, buccal mucosa, anterior floor of the mouth, tongue, retromolar trigone, palate and posterior pharyngeal wall.
For dentition, anterior dentitions are photographed with teeth gently closed and lips retracted with a transparent smile retractor. The upper and the lower lip forms the upper and the lower limit of the photograph. Frontal, right and left oblique views should be obtained.
The buccal mucosa is visualised with the mouth maximally opened and the patient turned 30 to 60 degrees obliquely.
The floor of the mouth should be photographed in the frontal plane with the camera angulated slightly downward. The mouth should be maximally opened with the tongue touching the roof of the mouth.
The tongue should be photographed with the mouth maximally opened, tongue in neutral position followed by tongue protruded centrally, to the right, to the left and elevated. The camera should be angled slightly downward. Frontal and oblique views should be obtained.
The retromolar trigone should be photographed with a slight oblique view with the camera directed slightly downward and the mouth maximally opened.
The palate should be photographed in the frontal plane, with the mouth maximally opened and the patient's head maximally extended. The camera is angled slightly upwards.
The oropharynx should be photographed with maximal mouth opening, the oral tongue depressed with a spatula and the camera placed in the frontal plane.
Clinical photographs of basic endoscopic views
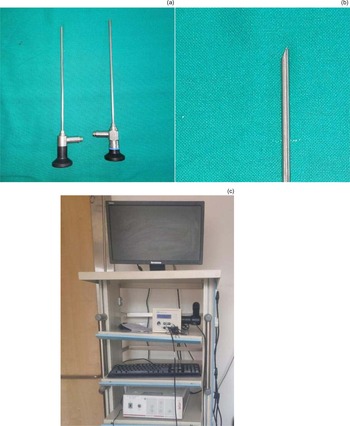
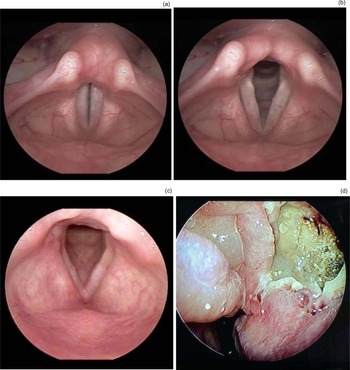
Endoscopes for endo-cavity visualisation of the ear, nose and throat have had a great impact. Zero-degree and 45-degree 2.7 mm telescopes are used for endoscopic examination of the ear. Laryngeal visualisation can be performed with either a rigid or a flexible endoscope. Rigid laryngoscopy is typically performed using a 10 mm telescopic laryngeal endoscope with a 70-degree forward angle. The flexible endoscope permits the clinician to evaluate the larynx while performing a greater range of dynamic phonatory behaviours.
Nasendoscopy is commonly performed with 4 mm 0-, 30-, 45- and 70-degree endoscopes. The newer ‘chip tip’ cameras have the charge coupled device camera positioned at the digital aspect of the endoscopes allowing a magnified view with greater resolution. Cameras attached to the endoscope head are used to view and record images. The camera shutter can be controlled at the head of the camera or from a remote control such as a foot pedal. Illumination of the depth enables the camera to record proper images. Typically, available light sources include halogen and xenon light sources (Figure 6 and 7).
(a) Hopkins rod telescope for endoscopic visualisation of ear, nose and throat. (b) Close up of the angulated end of a telescope. (c) Hardware including the light source and monitor for obtaining endoscopic images.

Photographs showing fibre-optic laryngoscopic view of the endolarynx with the vocal folds in various anatomical positions: (a) full adduction, (b) mild adduction, (c) full adduction and (d) endoscopic view (zero-degree 4-mm Hopkins rod telescope) of black crust in nasal cavity in a case of post-Covid-19 mucormycosis. The photographs were obtained with a 70-degree 10-mm Hopkins rod telescope.

Intra-operative photography
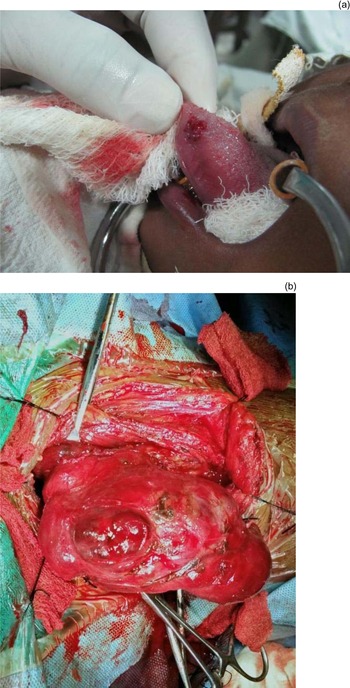
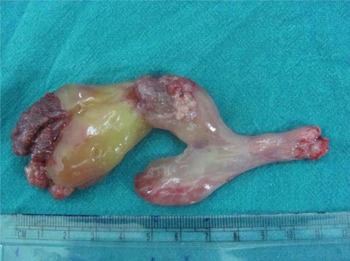
Intra-operative photography is useful for documentation, recording interesting findings and teaching remotely. An extra pair of hands of a non-operating surgeon is always helpful in this situation. The operating surgeon can use an extra pair of gloves, which can later be discarded, while holding a camera to take the photograph (Figure 8). Head mounted cameras and loop cameras can show the surgeon's point of view.Reference Nair, Kamal, Dave, Mishra, Reddy and Rocca13 Vitom®, developed by Storz, is an exoscope with a high definition video camera that helps to obtain an unobstructed view of the operative field for video recording and capturing still images while working in the depth of cavities.Reference Storz and Storz launches14 The head of the top surgical light in the operating room can house cameras which are important recording and demonstration devices. While photographing peri-operatively, patient only views are desired. Operative field exposure with maximal possible retraction, after adequate haemostasis and minimal operative instruments over the field enables an unobstructed view. Harsh light should be avoided. Multiple images from the same perspective are usually sought. Surgically excised specimen, operating room layout and instrument set photography is also an important part of photography during the operation (Figure 9).
Example of peri-operative photographs in the case of (a) a lesion of the tip of the tongue and (b) dissected neck in a hemithyroidectomy surgery.

An example photograph of a surgically dissected specimen of an antrochoanal polyp of the nose. The specimen is oriented in standard anatomical position with a measuring scale placed by its side.

Micro-photography in otolaryngology
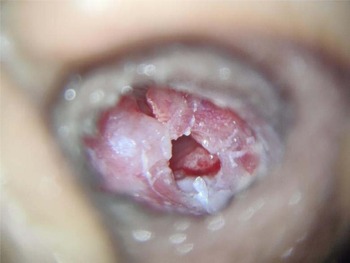
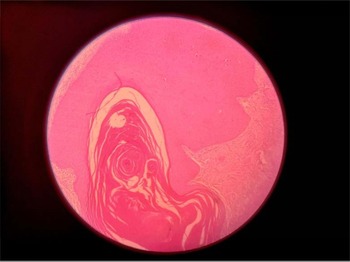
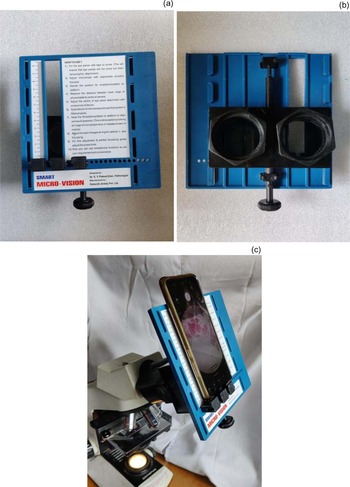
Digital cameras mounted on microscopes with adapters and connected to hardware via specific software help capture, save and store microscopic images. Automated scanning of whole glass slides and software-based stitching is called whole slide imaging or virtual microscopy. ENT clinicians who are not well trained in assessment of microbiology and pathological findings can record and share the microscopic finding with peers in the field of pathology and microbiology for discussion of the findings. Recently, accessory equipment that adapts smartphones to a microscope ocular pieceReference Morrison and Gardner15 has become available (Figures 10, 11 and 12).
Photograph of an infected ruptured right side tympanic membrane viewed through the lens of an operating microscope at ×10 magnification with 250 mm objective lens.

Haematoxylin and eosin staining of a squamous cell carcinoma with characteristic keratin pearl viewed at ×10 magnification.

Smartphone adapter for microscopes showing: (a) top view of the smartphone adapter, (b) microscope mount side of the smartphone adapter and (c) smartphone adapter for microscope in use. Designed by Dr S Y Patwardhan and manufactured by Robokin (India) Smart Micro-visionTM.

Clinical photographs during the pandemic
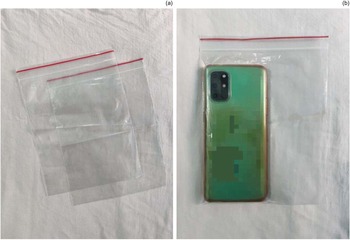
A proper disposable or washable covering for the photography gear can be used when photographing in coronavirus disease 2019 (Covid-19) care zones. Standard waterproof camera rain covers with a sleeve can be used. Smartphones and pocket digital cameras can be put in transparent plastic packets with a zipper (Figure 13). These are low-cost accessories and should be discarded after a single use.
(a) Disposable transparent plastic pouches with zipper sealing of 8 × 6 inch dimension with (b) smartphones put inside the pouch so it can be used for photography in coronavirus disease 2019 treatment facilities.

Medical social photography
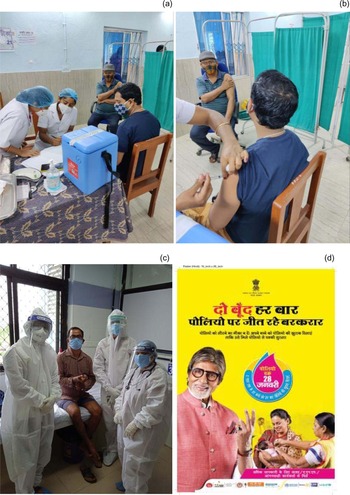
Photographing events, incidents and medical service delivery modules helps to propagate awareness, encourage health seeking attitudes, alleviate fear and raise funds. Propagation of such photographs in print and digital media, including social media platforms, have had the same effect (Figure 14). Consent is a matter of critical concern when photographing a crowd, such as those in a Covid-19 vaccination camp. A blanket consent form might be an option in such cases.
(a and b) Images of coronavirus disease 2019 (Covid-19) vaccination programme in India. (c) Healthcare professionals celebrating the discharge of a Covid-19 survivor. (d) Poster of pulse polio immunisation programme in India (source: Department of Health and Family Welfare, Government of India). These are examples of medical social photography.

Innovation with smartphones
Smartphones have a unique advantage of having a camera that is always available and is ready to take a photograph anytime anywhere. A sleek design, communicating port and wireless networking help adapt the phone to external devices. Telescope adaptors can be modified to attach the smartphone camera to the quick attach release coupling adapter of a Hopkins® rod telescope or a microscope. The endoscopically visualised image can be readily captured by smartphones.Reference Duvvi, Neelapala, Duvvi and Kumar16
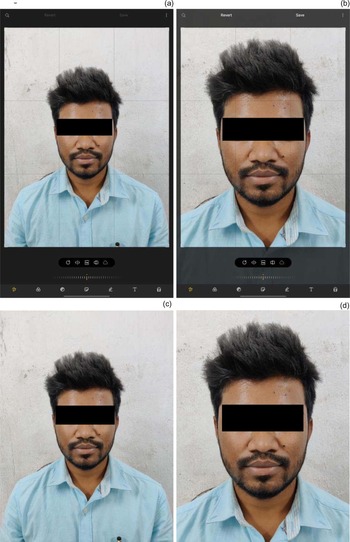
Editing a photo on a smartphone is also very easy. Unlike digital cameras, the photographs need not to be transferred to a computer for editing. In-built applications in a smartphone provide instant editing options. Editing should be minimal in terms of minor tweaks in brightness, sharpness and colour correction if required (Figure 15).
In camera editing in a smart device showing before and after photos. (a) Before photo opened in smart device software. (b) Cropping and aligning performed on the photo in the smart device software following assistive grid lines. (c) Before and (d) after photograph following editing. Easy cropping and alignment was performed with use of in-built applications.

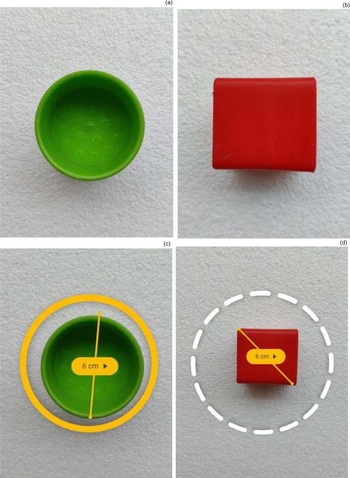
Smartphones allow use of artificial intelligence via specific applications on the device to obtain approximate measurements of various anatomical landmarks and surgical specimens (Figure 16) meaning instant and approximate information can be made available. Such applications can be further tuned to future medical use.
Smartphone application (MeasureTM Google®) based measurement of objects of various shapes and sizes showing (a) unmeasured green cup, (b) unmeasured red cube, (c) measured green cup and (d) measured red cube. This is an example of artificial intelligence based software used by smart devices.

Plagiarism in medical photography
Photographs are intellectual property and secure data. Manipulation of such data may breach the ethics guidelines and fall under plagiarism. To use these photographs, explicit permission should be taken from the copyright holder. ‘Creative commons’ images can be utilised free of such bound. Software such as Google® image search and Plaghunter can be used to check for plagiarism.Reference Kaliyadan17
Conclusion
Photographic documentation is an integral part of medical practice. It is important to understand the obvious need to adhere to the standard guidelines. Knowledge and regular practice of this by clinicians is imperative.
Acknowledgements
The authors would like to thank Prof Pitbaran Chakrabort (Principal) and Prof Sukamal Bisoi (Medical Superintendent cum Vice Principal) of Deben Mahata Government Medical College and Hospital, Purulia, West Bengal, India, for their support. Special thanks go to Dr Chiranjib Mukherjee and Dr Rahul Sarkar for their contribution and critical input.
Competing interests
None declared