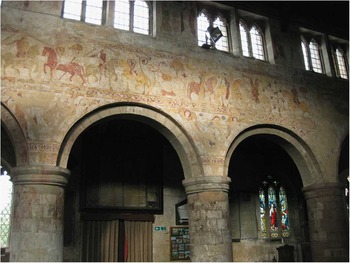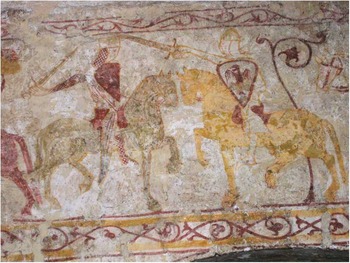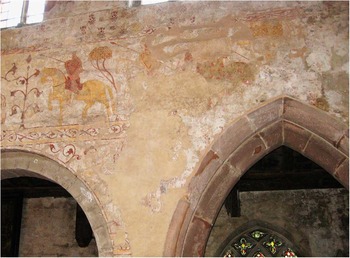


The wall painting of a row of at least fifteen mounted knights, which takes up the full length of the north wall of the nave of Claverley church, Shropshire (fig 1), was uncovered in 1902 under the supervision of Philip M Johnston.Footnote 1 The frieze, some 15.25m long and 1.5m high, is unique in England. In other parts of Europe there are murals, mostly from the period c 1175–1225, that share the imagery of a row of mounted knights. Those in Denmark (Ål, Skibet, Højen, Hornslet), Italy (Il Broletto di Novara), France (the Templar church at Cressac-sur-Charente and the scheme formerly in the church of St Jacques-des-Guérets, Loire-et-Cher) and in Catalonia (Castell d'Urgellet) are not, however, as extensive as the Claverley frieze.Footnote 2
Claverley church, Shropshire. The frieze of knights on the north wall of the nave is more than 15m long. The ceiling originally began at the top of the frieze. Photograph: author

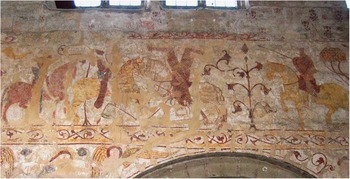
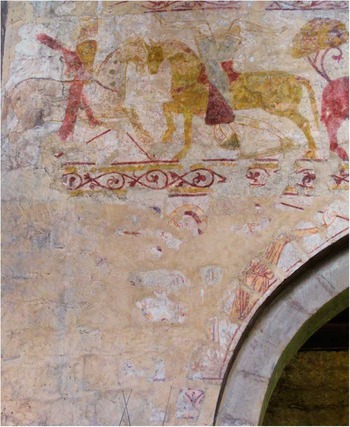
Discussion of the frieze has centred on whether the subject is secular or religious. Johnston looks for historical events, at first thinking it was a crusading scene involving St George at the siege of Antioch during the First Crusade. The idea he develops is that the frieze is of the battle of Hastings in 1066 and shows Roger, later earl of Montgomery, defeating a giant Englishman (fig 2) as described in Wace's Roman de Rou.Footnote 3 The identity of the gigantic falling knight, who appears towards the east end, is the focus of attention. J Charles Wall claims he is William ii at the siege of Mont St Michel in 1089; Richard Mann that he is Edwin, last of the Mercian earls, resisting Norman incursions into Shropshire in 1069.Footnote 4 W G Constable thinks the main interest of the painting is the secular subject matter, but offers nothing specific.Footnote 5 Borenius and Tristram reject these secular interpretations.Footnote 6
The falling knight is the focus of early interpretations, variously identified as Roger of Montgomery, William ii, Edwin of Mercia, St Paul and Pride. The symbolic tree cross also occurs on the south wall opposite. Photograph: author

W H St John Hope claims the support of C E Keyser in looking for a religious theme and identifies the giant falling figure as St Paul on the Road to Damascus.Footnote 7 The painting is not a battle scene at all; the horses are ‘gently trotting along in the mid-day heat’, not taking part in a confused battle, as Johnston claims. N H J Westlake agrees that the Conversion of St Paul is the subject.Footnote 8 The first mention of the theory that superseded all others, that the frieze represents a Psychomachia or Contest of the Virtues and Vices, appears in 1927. E W Tristram elaborates the idea in 1933, and with less confidence in 1944.Footnote 9 In this reading the falling knight is Pride being overcome by Humility and the knight on the ground is Avarice overcome by Beneficence. The Psychomachia theme, which originates with the poem by Prudentius, has been accepted for more than eighty years. A Caiger-Smith, E Clive Rouse and Anne Marshall all accept the theme of a battle between Virtues and Vices.Footnote 10 M D Anderson is unconvinced because of a lack of differentiation between the champions of good and evil, a point also raised by Roger Rosewell, who further rejects the Psychomachia theory also on the grounds that the number of combatants does not match the number described in the poem.Footnote 11
Claverley: A Royal Chapel
The status of Claverley church as a royal chapel has been overlooked. Claverley belongs to the most important prebend of the longest lasting of all royal colleges, the Royal College of St Mary Magdalene, Bridgnorth. The focus of the college was the royal castle at Bridgnorth, about 7km to the west of Claverley. The castle was an important royal stronghold, especially in the twelfth and early thirteenth centuries, serving as a base from which to mount military excursions into Wales, and as a defence against Welsh incursions. Between 1207 and 1216 the castle was the home of the sheriff of Shropshire, Thomas of Erdington, and it was also the county prison.Footnote 12
Following the rebellion of Robert of Belesme in 1102 the college (founded in 1086) became a royal college. For the next 446 years it retained the status of a royal castle-chapel with exempt parishes. Claverley formed part of the main portion held by the dean.Footnote 13 Later royal chapels, such as St George's, Windsor, and St Stephen's, Westminster, never possessed exempt deaneries or such extensive rights.Footnote 14 The college is very well documented as a royal chapel in Assize Rolls, Hundred Rolls, Patent Rolls, Plea Rolls, Calendar of Inquisitions, Papal Bulls and elsewhere (see Appendix 1). The Assize Roll of 1221, for example, states that ‘The church of St Mary of Bridgnorth is in the gift of the lord king and there are in it 6 prebends which six clerks hold of the gift of the lord king and his ancestors’, while the Plea Roll of 1241 makes clear that the church of Claverley ‘is the King's free chapel’. Claverley church was the most impressive of the churches belonging to the college. The chapel of St Mary Magdalene within the castle, later described as ‘rather a rough thing’, lacked ornaments and essentials in 1246.Footnote 15 Claverley, held by the dean, is unique even as a royal chapel in possessing its own dependent parishes.
Whilst the main value of royal chapels to the monarch was as a source of income for his officials independent of the control of the Church or local secular powers, ideas of royal sacrosanctity, and the current aspirations of the ruler could also be projected through them. Secular clerks appointed to St Mary's, Bridgnorth, personally by the king from his own court became quasi-bishops within their own prebends.Footnote 16 St Mary's was dominated by members of the king's wardrobe, which was the administrative arm of the court closest to the king. In the early decades of the thirteenth century, the wardrobe was at the centre of financial, military and ceremonial organization, as well as the day-to-day administration of the court.Footnote 17
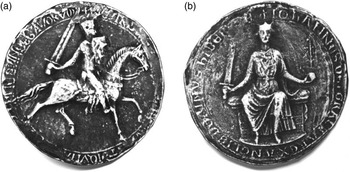
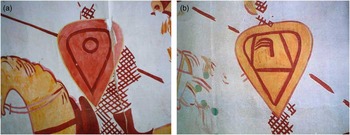
Once Claverley church is recognized as a royal chapel, the regal character of much of the imagery becomes apparent. A mounted knight with his sword raised – a repeated image at Claverley (knights 5, 6, 7 and 8; see figs 4 and 5 for a key to the numbering) – is an established sign of royal authority, found on royal seals, for example (fig 3a). The image of a seated king with a sword in one hand and an orb in the other, in a pose not dissimilar to that of the figure in spandrel C, is also found on royal seals. On the seal of Richard i (1189–90), a tall sprouting stem grows out of the orb, surmounted by a cross. This becomes more prominent on the seal of King John (1199–1216) (fig 3b) and grows even taller in Henry iii's first seal of 1218.Footnote 18 The divine authority of the king is being stressed, with the imagery of the Tree of Jesse blended with that of the tree cross. At Claverley the scroll-form trees facing each other on the north and south walls are very similar to these sprouting branches (see figs 2, 7 and 18) and suggest a possible unifying theme of the story of the Holy Cross for the whole painting scheme.Footnote 19 The cross in the form of a sprouting tree highlights the transformative and historical significance of Christ's Crucifixion. Christ is the second Adam restoring mankind to a state of grace, the Tree of the Fall becomes the Tree of Salvation. Examples of flourishing crosses from this period include the Crucifixion painted on the nave pier at St Albans (c 1225) and in the Psalter of Robert de Lindesey (c 1220). In the psalter the Crucifixion on a foliate cross is surrounded by roundels that refer to the transformation of the Old Law into the New, and of the Synagogue into the Church.Footnote 20 Close in design to the Claverley tree is one painted as the only image on the east wall of the nave at Radnage (Bucks). Although repainted, its origins may go back to 1227 when the ownership of the church by the Knights Templar was confirmed.Footnote 21
(a) Seal of King John (1199–1216), counterseal; (b) Seal of King John. Photograph: author, from replica

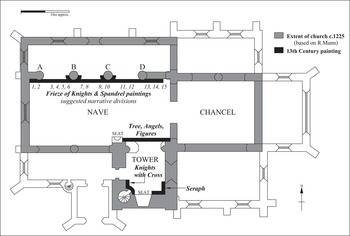
The scheme's extent and architectural context (figs 4 and 5)
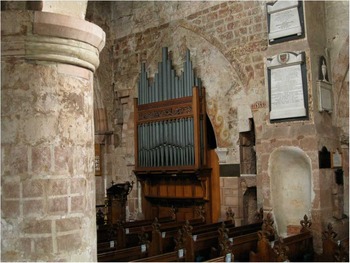
The frieze of knights is only part of an extensive painting programme.Footnote 22 The north and south walls of the nave, the nave columns and the spandrels above them were painted with figures. On the west wall six unusually large consecration crosses are painted, although their date is uncertain.Footnote 23 The nave ceiling began only just above the painted frieze, there was no south aisle and the chancel entrance was narrow, perhaps only 1.8m wide.Footnote 24 With limited natural light, this all gave an enclosed hall-like feeling to the nave. Tristram, even without considering the original architectural context and unaware of Claverley's links to Bridgnorth Castle, thought a spectator might imagine himself to be in the interior of a medieval castle.Footnote 25 Warm yellows, reds, pinks and creams were the dominant colours, with contrasting smaller areas of blue and bright green.Footnote 26 Entry to the church was most likely through the narrow door in the tower, which today links the east end of the south aisle to the tower room, now the vestry. This square room, dating from the 1170s when Henry ii was building the massive keep of Bridgnorth Castle, was painted with angels and knights, including a knight with a cross.Footnote 27 The opening between this tower room and the nave is now totally blocked by the organ but was originally large enough to form a single space with the nave (fig 6). Without obstructions the eastern half of the frieze of knights was visible from a seat (now hidden by cupboards) built into the south wall of the tower room.Footnote 28
Plan of Claverley church as it might have been c 1225, showing the extent of the surviving painting from a scheme that dramatically transformed the interior. The nave and tower room formed a single space. Drawing: author

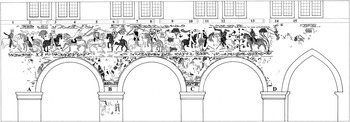
Sketch of the north wall of the nave, showing the Exaltation of the Holy Cross. There is no agreement on the narrative order and division of the frieze, or whether the spandrel scenes and knights are linked. Drawing: author

South wall of the nave. There are three tiers of painting around the arch, which was later reduced in size and is now totally filled by the organ. The seat, facing the frieze, is of unknown purpose. A masonry pattern of c 1130 is painted on column B. Photograph: author

Subject matter
A comprehensive reading of the mural scheme is impossible due to extensive losses. The south wall, already highly fragmentary, is further obscured by patches of lime-wash and darkened varnish.Footnote 29 The frieze of knights provides few clues to specific identification and so here too speculation is inevitable. However, a reading which sees the Story of Wood of the Cross on the south wall and the Exaltation of the Cross on the north wall is consistent with all surviving details and other examples of these themes. The south wall traces the journey of the tree from Paradise to serving as the Cross of Jesus. The role of the Cross as an inspiration and help to defenders of the Church is celebrated on the north wall.Footnote 30 Two church festivals are devoted to the Holy Cross theme: The Finding of the True Cross, on 3 May (also known as the Invention of the Holy Cross), and the Exaltation of the Holy Cross, on 14 September.
South Wall: The Story Of The Wood Of The Cross
Narrative painting cycles that take up both sides of a church often begin at the east end of the south wall. At Claverley, the lion and wyvern holding a shield and the red and yellow Vitruvian scroll-type pattern are later, perhaps painted after Elizabeth i sold the last remaining part of the royal college in 1579.
The Angel Michael and the Tree in Paradise (?) (south nave, east end, top left of blocked arch)
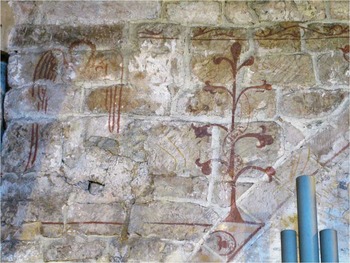
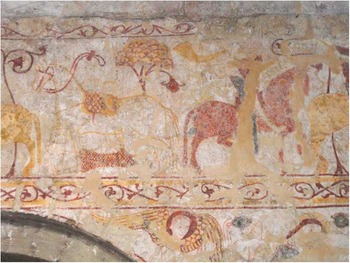
A serpent is wrapped around a stylized tree, very similar to the tree painted exactly opposite on the north wall. To the left is a standing angel, the wings painted with red lines and the head outlined in red, like the angel painted on the north nave column (see fig 21a). The Fall can be excluded as the subject since angels do not appear until the Expulsion, and at Claverley there is no room for Adam and Eve in their usual positions. The link between the Tree in Paradise and the Tree of the Cross is central to the Holy Cross theme. One source of the Holy Cross story is the Gospel of Nicodemus, or Acts of Pilate, the most influential of the Apocryphal Gospels. An Old English version, in an eleventh-century manuscript, makes the link between the two trees, as does Lambert of Saint-Omer in Liber floribus (1120) and John Beleth in his homily for the Exaltation festival in Rationale divinorum officiorum (c 1170). The full Holy Cross story is in the Golden Legend (1261–6).Footnote 31 The story is told by Adam's son, Seth. He recalls being sent to the gates of Paradise by his dying father to ask God for oil from the Tree of Mercy. Seth prays, the Archangel Michael appears and refuses the request (fig 7). This is the opening scene in the Story of the Holy Cross. In the murals by Agnolo Gaddi, in Santa Croce, Florence (1388–92), Cenni di Francesco di Ser Cenni, in the Chapel of the Cross, San Francesco, Volterra (1410), and Piero della Francesca, at Arezzo (1452–66), the Holy Cross cycle opens with a scene showing an angel speaking with Seth and occupies exactly the same position on the top left of the south wall as at Claverley. In the earliest of these versions, by Gaddi, Seth receives a scroll, which may also be the case at Claverley.Footnote 32
Several Holy Cross mural cycles begin here at the east end of the south wall. In the Holy Cross legend the Tree of the Fall becomes the Tree of the Cross. Photograph: author

Adam's Death (?) (east end, top right of blocked arch)
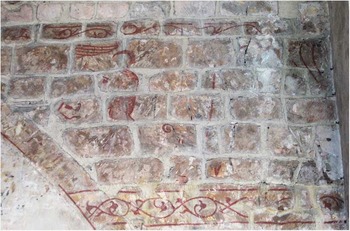
Near the top left, a wing can be made out, similar to the angel's wing in the previous scene. To the right of this, a figure in a red cloak faces an angel, whose wings can be made out at the top left. Near the centre of the composition is an upright line, to the left a scroll shape and below a red shape on an area of yellow ochre. On the right a shape comes down from the border; this may belong to another scene cut off by the later buttressing. Although Seth's request is refused, the angel gives him a branch from the tree with the instruction to plant it over the body of Adam and a promise that after 5,500 years Christ will come and lead Adam into Paradise to the Tree of Mercy.Footnote 33 The scene is known as the Story of Adam's Death and the key visual elements are Seth receiving from an angel a branch, which then sprouts up from the body of Adam. At Claverley (fig 8) an angel and figure are certainly present, and the red upright line could be the branch planted over Adam, as in Gaddi's version of the scene.
South wall of the nave, right-hand side of the archway, top tier. An angel and figure form part of the subject. Adam's son, Seth, speaks to an angel in the Holy Cross story. Photograph: author

Figure, scroll branch and building (middle tier, right side of arch) (fig 9)
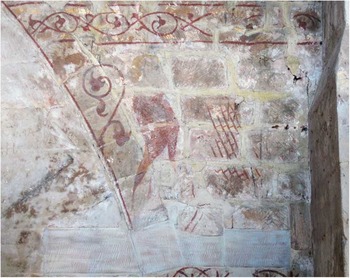
A latticework pattern of lines similar to those on the knight in the spandrel scene on the north wall may be the ‘traces of mail’ noted by Tristram.Footnote 34 To the left of this is a scroll-shaped branch, similar to the ones in the spandrel opposite on the north wall (see fig 19). An area painted with lines at an angle suggests stonework. A few other marks are to be seen towards the bottom and around the top right of the picture. The Holy Cross story continues by describing the fate of the tree which grew over Adam. One episode concerns Solomon, seen as a forerunner of the Christian emperor, who orders a beautiful tree to be cut down to build his palace in Jerusalem. But each time the workmen cut the wood it changes shape. In frustration Solomon orders the wood to be used as the Bridge over the Siloah Pond.Footnote 35
South wall of the nave, middle tier. Photograph: author

Unidentified subject (bottom tier, right side of arch) (fig 10)
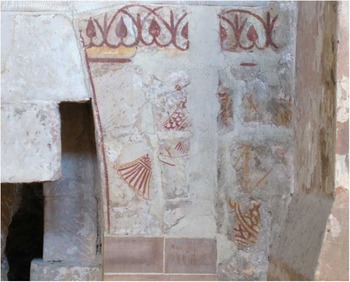
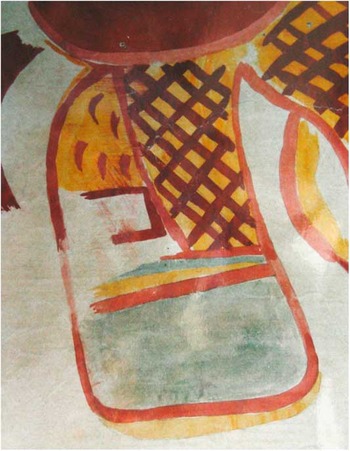
An extraordinary fan-like shape, possibly held by an arm, dominates what remains of this scene. To the right are yellow lines forming a diamond-shaped grid with a vertical division. Above this is a yellow shape overlaid with curved red marks. At the bottom of the picture is a double line with thistle-like forms on either side; these are similar to marks on the west wall of the tower room. A few marks near the top right may have been cut off by later buttressing. A border of inverted hearts is identical to those on the north wall opposite (see fig 20). One episode in the Story of the Holy Cross is the Visit of the Queen of Sheba to Solomon. She recognizes the special quality of the bridge and refuses to use it, instead crossing the water with bare feet. The painting of the subject in the Chapel of the Holy Cross, Stratford-upon-Avon (1500), as recorded by Fisher in 1807, has fan-shape and plant-like forms similar to those at Claverley.Footnote 36 A fan shape is used by Piero della Francesca for Sheba's headgear. Other scenes found in paintings of the Story of the Holy Cross are the Burial of the Wood, the Dredging of the Pool and the Fabrication of the Cross.
South wall of the nave, bottom tier. Photograph: author

North Wall: The Exaltation Of The Holy Cross
There is no agreement on the narrative order of the Claverley frieze. St John Hope and J Charles Wall think the narrative unfolds from east to west (that is, from right to left when facing the painting).Footnote 37 Tristram thinks knights facing east are conquering Virtues.Footnote 38 My reading is the reverse of these: the narrative sequence reads from west to east (left to right) and the ‘virtuous’ knight is the one on the right of each pair. Neither has there been any attempt to clarify where incidents begin or end. Here the frieze will be divided into distinct episodes separated by those trees whose trunks spring from the bottom border. The Claverley painter divided scenes in this way in his mural at Upton Cressett (Shropshire). The knights are mostly arranged in pairs facing each other; in medieval convention this can represent an incident in a battle or the whole of a battle.Footnote 39 The St Albans Psalter (1120–30) contains an image on the Beatus/Psychomachia page of two mounted knights riding at each other, while below is an image of King David. The text explains that they represent leaders engaged in ‘the holy war on earth in the church’. It is a divine battle foretold in scripture between the Holy Church and the Antichrist, a fight for original justice and for the angelic crown of life.Footnote 40
Destruction of Jerusalem (?) (knights 1 and 2, west end of north nave)Footnote 41 (fig 11)
The first two knights at the west end were not fully uncovered until Tristram's restoration of 1937. A pale horse dappled with spots on its neck, the rider in red surcoat and mail, faces a yellow mount whose rider falls headlong to the ground. Some areas of blue and green survive. Pride is shown as a knight falling off a horse on the twelfth-century tympanum at St-Foy, Conques, France. If, as suggested here, the spandrel scene immediately below is the Betrayal of Christ, the whole of this first part of the north wall scheme highlights the consequences of man's pride. According to the most popular medieval history book, the Historiarum libri septem, by Orosius, the Betrayal of Christ had immediate consequences – the Destruction of Jerusalem by the Emperor Titus (ad 79–81). An account of the Destruction of Jerusalem was often added to the Gospel of Nicodemus, and the subject was popular around the time of the Claverley painting.Footnote 42
The opening episode of the north nave frieze is a scene of defeat. The Betrayal is the suggested subject for the spandrel below. Photograph: author

Victory of the Emperor Constantine (knights 3–6, above second spandrel from east) (fig 12)
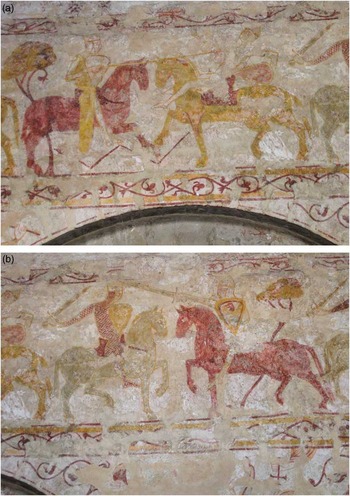
Four knights, representing two moments in a single battle, form the next episode. A key element in the Exaltation of the Cross festival is a celebration of the events in ad 313 that led the Emperor Constantine to make Christianity the official religion of the Roman Empire. According to Eusebius, whose Life of Constantine and Ecclesiastical History form the basis of all later versions, the Roman emperor, Constantine, is the new Moses, leading his people to Christianity. At Claverley, Constantine (knight 6) is placed in a dominant position above the spandrel which shows the hand of God holding a Cross. Marks around his helmet may be a crown.Footnote 43 His shield has an emblem of the head of a bird. Agnolo Gaddi paints an eagle's head on the shield near Constantine in his fresco in Santa Croce, Florence. A homily written for this festival tells the story:
a great foreign nation was assembled at the river which is called Danube and were ready to fight against the emperor and against the Roman race. Then it was immediately made known to the noble Emperor Constantine, and he immediately gathered a great army, and anxious in spirit, advanced against his enemy, and frequently looked heavenward, earnestly praying for divine support. Then when they came to the river, he saw there the mighty and innumerable armies of his enemies. Then he was very sorrowful and saddened unto death, because he thought that they must all perish.Footnote 44
(a) Emperor Constantine faces defeat but (b) goes on to victory the following day after a vision of the Cross. The hand of God holding a cross is part of the spandrel scene below. Photograph: author

At Claverley the first two knights (3 and 4) represent this initial moment of danger. The knight on the right (4) is about to be knocked off his horse, he reels back from the blows of his opponent's lance. Constantine is facing defeat.
Then on that same night that Constantine slept and rested himself, there came a certain very beautiful angel in white shining raiment, and roused him and said: ‘Constantine, don't you be sad, but look up into the heavens’; and there he saw the sacred sign of Christ's cross set opposite him and outlined in the brightness of a great light; and above the cross were written these words: ‘Constantine, in this sign you shall overcome and overwhelm all your enemy’.Footnote 45
Constantine's victory on the following day is represented by the next two knights (5 and 6). Constantine (6), in white, and riding an impressively elongated red mount, which contrasts with the shrunken horse of his opponent, Maxentius (5), goes confidently into battle, the sword of leadership raised.
Emperor Heraclius defeats Chosroes (knights 7 and 8) (fig 13)
The next grouping is of another pair of knights. The knight on the right (8) carries a shield with a spread-eagle device. At Cressac-sur-Charente and St Jacques-des-Guérets shields are painted with very similar eagles, but in conjunction with a cross. The emblem of the Roman Empire is combined with that of Christianity: imperial authority and divine justice are linked. In several Holy Cross murals the spread-eagle alone is used to identify the Holy Roman Emperor Heraclius (c 575–641), the central figure in the Exaltation of the Holy Cross festival. It does so in the wall painting (1240–50) in Brunswick Cathedral, and a huge eagle banner flies above Heraclius in Piero della Francesca's mural at Arezzo.Footnote 46 Heraclius recovers the Cross from the Persian king Chosroes, and returns it to Jerusalem. The Roman Empire becomes the Holy Roman Empire. At Claverley the idea of unfolding history may be suggested by the developing emblem on the shields (6 and 8) and also by the way the bushy tree begins here to unfurl into the fully formed scroll-tree further on.Footnote 47
Emperor Heraclius is the central figure in the Feast of the Exaltation of the Holy Cross and is identified in some mural schemes by the spread-eagle device. Photograph: author

Roland at the battle of Roncevaux (knights 9 and 10, above central nave pillar and spandrel) (fig 14)
The next two horses (9 and 10) illustrate the battle of Roncevaux in ad 778. Roland's actions, told in the Chanson de Roland and elsewhere, make him the example above all others of the warrior for Christ. The clue to the identification is the huge horn held up by the knight on the red horse (10). When uncovered in 1902 there was little to suggest a horn. Tristram is the first to note ‘what may be a horn’.Footnote 48 Only after the conservation programme of 1971 did the horn become completely visible. Roland would have sprung to mind to a medieval audience, and especially in this period. In this part of the mural at Claverley much more of the imagery associated with Roland appears than in many recognized Roland representations: a knight sounding a horn, a setting that includes a tree, a fallen knight, a prominent sword and angels raising a figure to heaven. The Brindisi cathedral floor mosaic of 1178 included a mounted Roland in a very similar pose and identical horn, with a descending angel and prostrate figures nearby.Footnote 49 The images at Claverley tell the Roland story as described in the Historia Karoli Magni et Rotholandi, known as the Pseudo-Turpin Chronicle.Footnote 50 The book was especially popular in English royal circles at this time. Richard i's crusading companion, Count Hugh de Saint-Pol, commissioned a French version and both Latin and French copies were brought to the English court in 1213. King John's chamberlain, Warin FitzGerald, had an Anglo-Norman version made around 1215, written to entertain and serve as an edifying exemplar.Footnote 51 The Emperor Charlemagne is returning from a victorious crusade in Spain where he has discovered the burial place of St James the Apostle at Compostela. Thousands of Saracen troops ambush Charlemagne's rearguard in a mountain pass near Roncevaux. Many Christians are killed but the survivors resist: ‘a fresh corps of 30,000 Saracens now poured furiously down upon the Christians, already faint and exhausted with fighting so long, and smote them from high to low so scarcely one escaped’.Footnote 52
Roland at the battle of Roncevaux. The Christians fall, Roland reaches higher ground at the edge of a wood, where he turns to sound his horn, as described in the Pseudo-Turpin Chronicle. Photograph: author

The survivors climb to a wood. At Claverley, the white horse of the Christians, whose bridle forms a cross (9), stands firm against the onslaught, but the Christian soldiers fall. The horse, originally painted with bright green spots, holds its ground. The reigns hang magically in the air as if waiting for a new rider. The quilted saddle is the most splendid of all those in the frieze, the decoration emphasizing that it is empty. From the wooded hill, Roland (10) ‘surveyed the Moorish army, and seeing also many Christians retreating by the Roncevalles road, he blew his horn, and was joined by about a hundred others’. At Claverley Roland pulls up his red horse and turns in his saddle. He sounds his horn and calls back those who are brave enough to return. A significant difference between this version and the Song of Roland is the sounding of the horn at this point in the narrative rather than later. Roland's very last act is to surrender his glove to God in token of the life he holds as a fief from him. The dark rectangular shape on the hanging reins is seen by Johnston, St John Hope and Tristram as a severed hand.Footnote 53
The falling knight (knights 11 and 12) (see fig 2)
The next two knights (11 and 12) are separated from the Roland group by a tree springing from the border, suggesting a new event, even though the broken sword might bring to mind Roland's breaking of his sword after his battle with Marsile. The falling knight (12), whose pose is that of a tau-cross, and the sprouting tree are the focus of the whole frieze. The emphasis shifts away from Roland to stress the heavenly destiny awaiting all Christ's martyrs. The falling knight is the ideal knight, sacrificing all for Church and King. The knight and his horse both have distinctive features: the knight has prominent spurs; the horse is the only one in the frieze to have a plaited tail (see fig 18). Johnston notes that the horse was pink, and the sword and helmet bright green, the only place these colours appear at this lower level anywhere along the frieze (fig 15).Footnote 54
Detail from P M Johnston's replica made in 1902 (cf Fig 17). Bright green and blue were among the original colours of the mural, though only the green is visible in this figure. Source: SRRC 2101/1

The cycle of history, which began on the south wall at the time of Adam, reaches the present day at this point. St Augustine's version of history, in City of God, is that it follows a divine plan to be completed at Judgement Day. Jacobus de Voragine (c 1229–98) sets out four historical periods. The time of deviation begins with the Fall of Adam, the time of renewal with Moses, the time of reconciliation with Christ and ‘The time of pilgrimage’, the final phase, ‘is that of our present life, for we are on pilgrimage and constantly engaged in warfare’.Footnote 55 At Claverley the south wall paintings represent the time of deviation and of renewal. The north wall shows the time of reconciliation initiated by Christ to the present time of pilgrimage: the Tree of the Fall is about to become the Tree of Victory.
Charlemagne leading the final crusade (?) (knights 13–15, east end of frieze) (fig 16)
In the final, and most damaged, part of the frieze, three knights ride from the east, with raised lances, towards the scroll-form tree. They ride out of a building painted with red cross-hatched lines on yellow, very like the painting fragment by the same artist at Heightington (Worcs). The saddle back of the red mount (15) is painted with yellow and white stripes. The leading knight (13) has an annulet on his shield (fig 17a) as on Charlemagne's shield in the Chartres window. The idea that Charlemagne would rise from the dead in order to lead the final crusade before the Last Judgement was current at this time. The Codex Calixtinus has a similar scene of Charlemagne riding out of a castle as he sets out on crusade. A pennon, symbol of victory, is flying from his lance.Footnote 56 A pennon is a prominent feature also at Claverley. The shield of the following rider (14) has a curious device painted on it, described by Johnston as a ‘flesh hook’ and by Tristram as ‘resembling a three-pronged fork’ (fig 17b).Footnote 57
North wall of the nave, east end. Knights ride out of a town to join the other knights at the tree cross. The Flagellation of Christ in spandrel D places the frieze in the context of the Passion. Photograph: author

Heraldic devices on the shields of (a) knight 13 and (b) knight 14 provide examples of early forms of heraldry. Source: SRRC, 2101/1

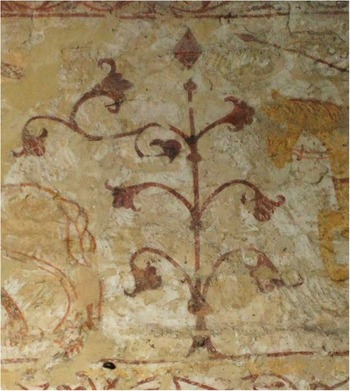
The sprouting lance (fig 18)
Charlemagne's possession of the Lance used by the Roman soldier Longinus to pierce the side of Christ on the Cross is mentioned in the Song of Roland.Footnote 58 Ideas associated with the lance relate to the Holy Cross theme. The eyesight of Longinus is immediately restored when a drop of Christ's blood touches him; Christ's blood is the oil from the Tree of Mercy promised to Seth at the Gates of Paradise. The theme is taken up in Queste del Saint Graal, written around the same time as the Claverley mural was painted. At Claverley the scroll-form tree has evolved in a subtle way from the tree on the south wall opposite. It has become a sprouting lance. The top of the tree is pointed and has a horizontal bar across it. The tip is painted with red marks. Twice in Pseudo-Turpin the story is told of how the lances of those soldiers destined for martyrdom burst into leaf overnight. It was clearly a popular story at this time since it is illustrated on the Charlemagne casket (c 1200–15) and the Charlemagne window at Chartres (c 1225). The imagery points to the idea of redemption through martyrdom for the sake of the Cross.
The pointed red tip of the Holy Cross tree transforms it also into a sprouting Lance of the Passion. Photograph: author

Spandrel Scenes
Four fragmentary subjects occur in the spandrels formed by the north nave arches. The paintings highlight the meaning of the part of the frieze above each spandrel, and do not form their own narrative sequence. The fighting knights are framed by the Passion (spandrels A and D), while the power of the Cross to inspire victory (B) and bring glory (C) are the themes of the central spandrels. The same technique, proportions and patterns are found in the frieze and south nave paintings, and details such as angels’ wings and almond-shaped eyes are also the same. T W Harvey saw angels and religious emblems, and P M Johnston figures of angels and saints, judges and executioners.Footnote 59 David Park is sure the Martyrdom of St Margaret is the subject of all four scenes.Footnote 60
Betrayal of Christ (spandrel A, north nave, west end) (see fig 11)
Park interprets the scene as St Margaret being scourged for her refusal to marry Olibrius or worship his gods.Footnote 61 Comparisons with images of the Betrayal show similarities with the fragments at Claverley. For example, the figure on the right with grimacing expression has his counterpart in the Winchester Psalter.Footnote 62 Christ, with inclined head and long robes, is placed slightly off-centre, leaving room for the embrace of Judas. This would explain the marks at Claverley close to the face, and the position of the hands faintly visible in the centre. The Betrayal of Christ is the cause of the defeat shown in the frieze above.
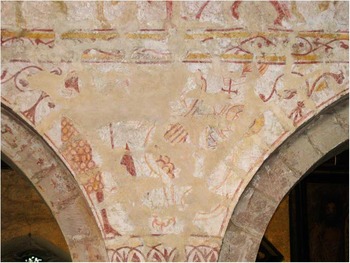
Defenders of the Church empowered by the Cross (spandrel B, north nave, above second pillar from west) (fig 19)
Although it is one of the better-preserved spandrel scenes, key parts are destroyed. From the sky the Hand of God reaches down with a cross. Hands reach towards it, the double lines suggesting a gesture of prayer. The haloed figure is fragmentary. Placed at an angle the figure seems to disappear into the body of a winged animal. The animal's head is now missing but must have dominated the composition. An impressive wing rises up from the proud chest. The position of a clawed foot immediately below this adds to the impression of stability. The other foot is raised up, one claw is still visible. To the left stands a knight with an axe.Footnote 63 He is the only soldier in the whole scheme to be wearing old-fashioned chain mail. Tristram identifies him as a female Virtue contending with a dragon on behalf of a figure under divine protection.Footnote 64 Park believes he is the guard outside the prison in which St Margaret is held.Footnote 65 In the story St Margaret prays and the cross she is holding expands and ruptures the dragon that has swallowed her and she is able to escape. This reading for the Claverley image explains the unusual angle of the haloed figure and the cut-off body, and complements the rest of the scheme as another dramatic example of the power of the Cross to help those in need, as it does for Constantine in the frieze above. However, the animal has all the characteristics of a griffin, composed of an eagle and a lion. A proud posture, upright wings, traces of ears and beak and markings around the broad neck are all visible at Claverley. The griffin's role as guardian of the Tree of Life and of the Holy Places links the animal directly to the Holy Cross theme.Footnote 66 No doubt the animal's role as a guardian lies behind its use on the cover of a book (c 1185) recording property grants to the Knights Templar. The griffin's royal and military associations led Edward iii to adopt it as his badge.Footnote 67 The power of the Cross to help defenders of the Church is the theme of this spandrel.
Spandrel B. Defenders of the Church are empowered by the Cross. Photograph: author

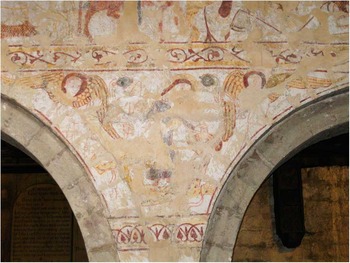
Apotheosis (spandrel C, north nave, above third pillar from west) (fig 20)
The spandrel space below Roland blowing his horn (10) is painted with two angels swinging censers on either side of a nimbed figure.Footnote 68 The whole group seems to float. Unlike the artist's practice elsewhere, the subject makes no contact with the base line. Tristram's reading is that the Virgin is giving succour to the wounded figure, while Park sees the battered figure as the devil being vanquished by St Margaret.Footnote 69 An image sometimes juxtaposed with scenes of Roland's death is of angels raising him to heaven. Roland is ‘borne by angels to Paradise, where he reigns in transcendent glory, united by his meritorious deeds to the blessed choir of martyrs’.Footnote 70 The Grandes Chroniques de France provides a scene with Roland, shown with a halo, being carried to heaven by two angels and the same subject is illustrated in the Chronique de l'Anonyme de Bethune.Footnote 71 In subjects such as the Coronation of the Virgin and the Risen Christ a heavenly context is implied by angels, especially censing angels, flanking a central figure.Footnote 72 At Claverley the heavenly destination of the haloed figure is the subject: ‘As the king's soldiers died for their faith, so should we die to sin and live in holiness in this world, so that we may receive the palm of glory in the next, which shall be the reward of those who fight manfully against their three grand adversaries, the World, the Flesh, and the Devil’.Footnote 73 The image also resembles the way the Aerial Flight of Alexander is usually shown. Alexander the Great's desire to reach to the heights of heaven led him to tie griffins to a golden chair, and by holding bait on stakes enticed the animals to fly. The frontal pose, outstretched arms holding a club or stick, the animal markings, wings, ropes and floating effect are typical of the Aerial Flight. However, the central figure is flanked by angels not griffins, and he has a halo, both significant elements which do not belong to Alexander iconography. Even so the image may still intend to suggest meanings associated with Alexander, especially the idea of reaching heaven through courageous action.Footnote 74
Spandrel C. The hero tramples on the devil, and is raised to heaven to join the blessed choir of martyrs. Photograph: author

The Flagellation of Christ (spandrel D, north nave, east end) (see fig 16)
All that can be made out in this spandrel is a leaf-scroll in the left corner, the remains of a figure wearing a hat who is pointing, and part of a whip.Footnote 75 A conventional treatment of the Flagellation of Christ is a possible reading. The seated figure with pointing finger is Pilate, the whip is being used on Christ who occupied the destroyed central area. The scene is a counterpart to the Betrayal at the west end. Here the final victory of the Cross is linked to an image of Christ's humility and suffering. Underlying both this scene and the narrative of the frieze above are ideas about Justice.Footnote 76
North Nave Pillars And Tower Room
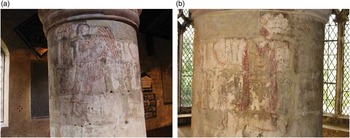
Johnston saw angels on the nave column supporting spandrel B.Footnote 77 Mann also saw more than one angel and a figure ‘looking upward & so cleverly is it drawn as to convey the very evident impression intended, that although a saint dwelling on earth, its upward look is longing for the better life above’.Footnote 78 A standing angel on the left remains identifiable (fig 21a). Less clear is a praying figure, to the right and facing right, in a dark red cloak and wearing a belt (fig 21b). The Annunciation with an angel holding a scroll is sometimes included in Holy Cross mural schemes.Footnote 79 At Claverley it may not be a scroll at all and the way the drapery falls is puzzling, as is mention of more than one angel. The next column (C) may also have been painted with a subject, since traces of red and yellow paint of the same character survive.
(a) and (b) angels on the column supporting spandrel B on the north side of the nave. In (b) at least one angel stands behind a praying figure in a red cloak and a belt. Photograph: author

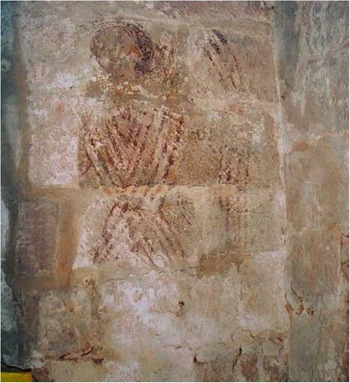
Paintings also covered the walls of the south transept under the tower, now the vestry (see fig 4). The subjects in the nave – knights, angels, the cross and scroll ornamentation – are also recorded here, suggesting a thematic as well as architectural unity with the nave. Traces of paint on the south wall, stylistically identical to painting in the nave, indicate two tiers of images separated by a border, with a double border at the base. Johnston records angels and six-winged seraphim together with scroll-work, ‘stoning’ and general ornamentation.Footnote 80 In 1944, Tristram notes a Seraph on the east wall and traces of a subject on the south wall. On the west wall he saw two subjects, ‘in one of which a knight in mail with a cross are to be seen, and in the other a similar knight’.Footnote 81 A seraph on the east wall can still be made out (fig 22).Footnote 82 In the upstairs room of the tower, in the apex of the east wall window arch, Johnston records angels and scroll-work.Footnote 83
Tower room, east wall. A seraph survives from other images of angels and knights, including a knight with a cross. The seraph's role is to inspire and transform. Photograph: author

Crusade Imagery
Exaltation of the Holy Cross masses often marked the start of crusade preaching campaigns and Holy Cross imagery is frequently used on objects associated with crusaders. Sometimes the Pseudo-Turpin Chronicle is found incorporated into sermon collections intended for Holy Cross festivals. A crusade connection has been sought for other murals in Europe that include a frieze of mounted knights. The paintings at Cressac, for example, are said to represent Hugh le Brun de Lusignan and Geoffrey Martel defeating the Saracens at Bocquée in 1163.Footnote 84 According to Pseudo-Turpin, Charlemagne commissioned paintings of his Spanish crusade in his palace, as well as ancient and modern histories in the royal chapel at Aix-la-Chapelle.Footnote 85 Pope Calixtus ii followed this example when, during the build-up to his intended crusade to Spain, he had murals based on Pseudo-Turpin painted in Santa Maria in Cosmedin, in Rome. In England commitment to the crusade also prompted wall paintings. After he had taken the Cross for a second time in 1250, Henry iii ordered murals of the Siege of Antioch, Saladin and Richard i, and the History of Alexander.Footnote 86 Edward i's crusading intent was proclaimed through wall paintings (begun in 1292) in the Painted Chamber, Westminster, illustrating the warfare of the Maccabees.Footnote 87 Claverley may provide a further example of this type of mural, in which warriors from history are presented in order to inspire action.
A crusade preaching manual, Ordinacio de Predicatione Sancti Crucis in Anglia, written for an Anglo-Norman audience for use in England around the time of the Claverley mural, has similarities in its structure with the painting scheme.Footnote 88 As at Claverley there is a repetitive character to the way examples are presented. The consequences of sin and the need for contrition and redemption in the light of Christ's sacrifice are the opening themes; at Claverley the falling knight and Christ's betrayal are the main images presented at the west end. The salvatory nature of the Cross is the next theme in the preaching manual, in the painting, the Hand of God holding a cross and Constantine's victory are the subjects. The universal significance of the Cross is then pointed out in the Ordinacio; at Claverley, Heraclius fights to recover the Cross. The focus in the manual then shifts to the sacrifice demanded of the individual, followed by the promise of rewards and glory to those who assume the Cross; at Claverley the focus also shifts away from great rulers to the sacrifice of individual knights as Roland's self-sacrifice is juxtaposed with angels taking a hero to heaven. Finally ‘The calling of men to the Cross’ provides examples from recent history; the knights at the east end at Claverley are the knights of today joining the fighters of the past at the Tree of the Cross.
The Mural's Date
There is no direct evidence to date the paintings. Wall is sure they were painted before 1189; Johnston gives a date of c 1170 in his 1903 article, ‘late twelfth century’ in 1904 and he inscribes the tracings ‘c 1190’; Tristram and Caiger-Smith give a date of c 1200; E W Anthony places the pictures into the early thirteenth century because of many traces of Gothic influence; more recently Park (in a passing reference), dates the paintings to c 1210, as does Rosewell.Footnote 89
Tristram's dating is based on a belief, not shared by others, that there was rebuilding at this time. According to Cranage, the first two stages of the tower were built, and alterations made to the north nave, during the first half of the 1170s.Footnote 90 The fabric of the church indicates a time for the paintings between the 1170s and the 1270s, when there were further changes in the nave. The painted border patterns of the mural are similar in character to those in St Mary's, Guildford (Surrey), of c 1200–20, and at Patcham (Sussex) of c 1220.Footnote 91 The scroll border is of a type with clove-shaped terminals still in use in the late 1230s or 1240s at Chester Castle.Footnote 92 The design of the bush-type trees in the frieze also had a long period of use; they are similar to those painted in a bestiary possibly produced in this region between 1240 and 1260.Footnote 93 The cursive quality of the Claverley paintings, the plain creamy white backgrounds used throughout the scheme and the simplified treatment of the drapery are all characteristics of the thirteenth century. The horses with their rounded forms are much closer to the horse on the first seal of Henry iii (1218) than the horse on the seal of King John (fig 3a).
Mural painting in this area in the early thirteenth century consisted almost entirely of decorative pattern work, so it is unlikely to have been at the forefront of stylistic developments.Footnote 94 Nor was the painter an innovator. Fragments of painting at Upton Cressett (Salop) and Heightington (Worcs) are almost certainly by the Claverley painter. Identical visual elements can be seen in all three murals, suggesting a stylistically conservative artist able to adapt a familiar repertoire for each new commission.Footnote 95 Claverley provides one of the most important visual documents of the armour of the period anywhere in Europe.Footnote 96 Any date between about 1170 and 1230 is a possibility for the armour, but around 1200 is favoured by experts, although the flat-topped kite-shaped shields are thirteenth-century in character. The Claverley armour can be compared to that on the Charlemagne casket (1200–15) and the Charlemagne window at Chartres (c 1225). A type of military tenant found exclusively in Shropshire and Staffordshire was the muntator, the major contingent of castle garrisons such as Bridgnorth.Footnote 97 Compared to a full knight, the equipment of the muntatores was simpler and more old fashioned; it consisted of a horse, a hauberk, an iron helmet or cap described as a cappa ferra and a lance – very much the equipment seen in the Claverley frieze. The Claverley mural probably belongs to the first quarter of the thirteenth century, but if the conservatism of the painter, Claverley's geographical position away from artistic centres and the historical background are taken into account, the earlier part of this period becomes less likely.
Historical Background
Royal concerns most directly match the paintings in Claverley during the ten years between 1215 and 1225. It was a period in England of civil war and foreign occupation. As Christopher Tyerman has shown, the survival of the Angevin dynasty depended to an unprecedented degree on crusade intentions.Footnote 98 King John's taking of the Cross in 1215 gave him papal protection from his enemies. His nine-year-old son, Henry, also took crusader vows shortly after he was crowned in the following year. Henry iii gained the full support of the Church, which at this time was driven by the need to unify forces across Europe for the Fifth Crusade. All those who opposed the king were threatened with papal excommunication, even those who had taken the Cross. Among these was Warin FitzGerald, the exchequer official who commissioned the Anglo-Norman Pseudo-Turpin. He had taken the Cross by 1214 in response to papal calls, but, having subsequently defected to the rebels, found himself branded by Innocent iii as worse than the Saracens and a renegade working to fulfil the pagans’ hopes by hindering the crusade. Now crusade vows were linked to an oath of loyalty to the king. Henry iii's status as a crusader under the pope's protection was the mechanism by which rebel forces, in control of more than half the kingdom, were weakened and loyalists supported, and the occupation of the country by Louis of France (later Louis viii) confronted. Royal forces became an army of crusaders. They signed themselves on the breast with the Cross. Royal officials promised the besieged garrison at Rye the support of ‘a great many crusaders’. Prince Louis was defeated at the battle of Lincoln in 1217 by an army that raised the standard of the Cross as it gathered around Henry iii. The crusade theme at Claverley seems highly appropriate, given this background, as does the emphasis of the imagery, in which the great leaders of Christian history proclaim the king's God-given legitimacy, authority and destiny in the royal chapel. At a time of civil war and foreign occupation resilience and loyalty were of the highest value. In the painting Constantine returns to battle, despite facing defeat, and Roland is shown returning to the fight even when victory is impossible.
Ranulf de Blondeville, earl of Chester
A forceful re-assertion of royal authority took place in the Bridgnorth area during the early years of Henry iii. The castle and royal chapel formed one of the few remaining royal centres where such a show of authority could take place.Footnote 99 Claverley's status as a royal chapel allows for some speculation as to who could have commissioned the painting. Although the dean of St Mary's College, Bridgnorth, and the canons under him, were held responsible for any ‘defects of ornaments and necessaries’ in the chapels they held, there are no records that any of them added anything to their churches; on the contrary, on many occasions the dean is called to account for the neglect of churches and parishioners.Footnote 100 Many deans had very limited or no local contact. Hugh de Taunay (dean 1214, mentioned in a record of 1221), for example, was appointed by King John only in order to bolster support in Charente and he probably never came to England. If the Claverley paintings do date from the early years of Henry iii's reign the influence of the young king's Council is likely, in particular that of Ranulf de Blondeville, the sixth earl of Chester. An obsession with crusading ideas united Council members: Earl Ranulf of Chester, who had the closest links to Claverley, the earl of Derby, and the bishop of Worcester all had their own crusade forces and Philip d'Aubigny was to die in Jerusalem fulfilling a second crusade vow. Peter des Roches, bishop of Winchester, organized crusade preaching in England. The Master of the Temple was also part of the king's Council. In 1216 Ranulf became Sheriff of Shropshire and Keeper of Bridgnorth Castle, where he made extensive repairs, including the building of a new barbican. Orders for the decoration of royal buildings are usually addressed to the sheriff of the area, and Ranulf certainly had the authority to commission the Claverley murals. He was well placed to do so from 1216 to 1218, when, having delayed his departure in order to support the king, he finally took his force on crusade to Damietta. His personal chaplain, Josceus, held a prebend of the Royal College of St Mary's, Bridgnorth, as did a papal official, John Sarracenus. The Claverley paintings functioned at a local level and were painted by a locally based artist, whilst giving powerful expression to far-reaching royal aspirations. They also vividly reflect Ranulf's own preoccupations.Footnote 101
Ceremony and visual display, 1218–25
Every opportunity was taken to build up royal authority in the following years. Henry iii's household had seven knights in 1218; by 1225 there were 123, with a similar marked increase in the number of sergeants, the main component of castle garrisons, such as Bridgnorth.Footnote 102 Henry iii's authority was also bolstered by a noticeable increase in the use of ceremony and visual effect. A new suit of armour was made for the king. New banners, pennons and fine robes were produced. Clerks of the king's chapels were ordered to sing hymns in praise of kingship increasingly often.Footnote 103 These Laudes Regiae, including Letare Jerusalem, Christus vincit and Vexilla Regis, focus on the same themes as the Claverley mural. It is certainly not impossible – although there is no evidence for this – that at some time the Claverley murals served as a backdrop to knighting ceremonies.Footnote 104 The king's wardrobe was involved in the administration of these initiatives. The senior wardrobe clerk from 1218 was Peter de Rivallis, nephew of bishop Peter des Roches, Henry iii's tutor and guardian. He was also dean of the college and held Claverley from 1223.Footnote 105 Repairs to the king's buildings in Claverley may have been completed by the time of Henry's visits to Bridgnorth later that year, and again in September 1224.Footnote 106 The murals in the royal chapel at Claverley would certainly have appealed to Henry iii, proclaiming as they do the elevated image of kingship which he developed under bishop Peter des Roches's influence.Footnote 107
Conclusion
Uncertainty remains about the wall paintings in Claverley church. Nothing is known about the date or circumstances leading to this extensive painting commission, which transformed the appearance of the church, possibly in a matter of weeks. Any comprehensive reading of the subject matter is open to some doubt, if only by reason of extensive losses. Even the better-preserved parts remain intriguing and open to interpretation. Some of this openness may be quite deliberate, with a single image alluding to several meanings. So little have the Claverley murals been studied that even fundamental questions such as how the frieze should be divided, and which direction the narrative should be read, are not settled. One can only guess at what the mural's original purpose was and how it functioned as part of the life of the royal chapel during the 250 years or so before it was painted over with stencil patterns in the fifteenth century. A crusading impetus is suggested by the imagery of knights in combat and knights with a cross, and angels flanking a haloed victor. A Holy Cross narrative, which includes both the Story of the Wood and the Exaltation of the Cross, is consistent with what can be seen at Claverley, pre-dating Agnolo Gaddi's Holy Cross murals in Florence by some 170 years. The Holy Cross theme celebrates great leaders of history – King Solomon, the Queen of Sheba, the emperors Constantine and Heraclius – making it an appropriate subject for Claverley, which was a royal chapel attached to the royal castle at Bridgnorth. The paintings are the earliest and most extensive of any surviving medieval English royal painting scheme.Footnote 108 The paintings can be dated to the first quarter of the thirteenth century on stylistic grounds, a period when royal authority and legitimacy were of desperate importance to both King John and Henry iii. Although the paintings are a local production, fulfilling local royal needs, they seem vividly to reflect ideas that were everywhere in Europe.Footnote 109 Claverley also provides the only medieval wall painting in situ of Roland to be found anywhere.Footnote 110 Roland is exactly where Lejeune and Stiennon predicted he might one day be discovered, and from a period when Roland's popularity in England was at its height. Despite failing to find a Roland mural in Romanesque or Gothic art anywhere in Europe or in the Kingdom of Jerusalem they are sure such murals were frequently painted and Roland may survive unrecognized among Christian knights waging war against the Saracens in a representation of the Psychomachia: ‘perhaps one day we shall find one or two cases in which Roland, as a new St George, has been painted in a church, or even, in the Gothic period, in a castle hall’.Footnote 111
ABBREVIATIONS AND BIBLIOGRAPHY
- Abbreviations
- BL
-
British Library, London
- BM
-
British Museum, London
- BNF
-
Bibliothèque nationale de France, Paris
- Bodleian
-
Bodleian Library, Oxford
- CUL
-
Cambridge University Library, Cambridge
- MM
-
Metropolitan Museum, New York
- NMR
-
National Monuments Record, Swindon
- SAL
-
Society of Antiquaries, London
- SPK
-
Staatsbibliothek Preussicher Kulturbesitz, Berlin
- SRRC
-
Shropshire Records and Research Centre, Shrewsbury
- SSG
-
Stadtbibliothek, St Gallen
- TNA
-
The National Archives, Kew
- V&A
-
Victoria and Albert Museum, London
Acknowledgements
I have received invaluable help from many individuals and institutions. In particular I wish to thank David Park, FSA, of the Courtauld Institute. I am grateful to David Carpenter, Simon Cawdell, Wendy Childs, D C Cox, Jane Croom, Richard Falkiner, Alison Healey, Martin Kauffmann, Maurice Keen, Richard Lithgow, Beverley Nenk, Richard Paine, Thom Richardson, Kathryn Ann Smith, Liz Smith, Sophie Stewart, Alan Tennant, David Vaisey and Malcolm Vale, and to the staff at Shropshire Records, the V&A Print Room and the National Monuments Record. All have gone out of their way to be helpful.
Appendix 1 A Selection Of Documentary References To Claverley As A Royal Chapel
Assize Rolls
Stenton, D M 1940. Rolls of Justices in Eyre Pleas of the Crown, for Gloucestershire, Warwickshire and Shropshire, 1221, 1222, Selden Society 59, 555–7
6 Henry iii, m. 9 dorso, no. 1324
6 Henry iii, m. 10, no. 1319
6 Henry iii, m. 0 dorso, no. 1320
These give details of the royal status of the college and of Claverley.
The Book of Fees (Testa de Nevill)
Maxwell Lyte, H C 1920. Liber Feodorum: the book of fees commonly called Testa de Nevill reformed from the earliest MSS, 1198–1293 PRO E 164/5–6, i (1198–1242), Rolls Series, London: HMSO
1342: Salop Assize Roll 733A, m. 10d
Record of the court at Shrewsbury in 1227: ‘The church of Claverley is in the king's gift’.
Calendar of Inquisitions
Cal Inq Misc 1916–2003. Calendar of Inquisitions Miscellaneous (Chancery), preserved in the Public Record Office, 8 vols, London: HMSO
Vol 5 (1962), no. 353. States the claim that the college was founded by Henry i
Vol 7 (1968), no. 413. Reference to the chancel of the king's free chapel of Bridgnorth
Chronicle of John Brompton, Abbot of Jervaulx
Twysden, R 1652. Historiae Anglicanae Scriptores Decem, 989
The abbot comments on the unusual freedom of each prebend of the college in ‘things spiritual as in things temporal’.
Councils and Synods
Powicke, F M and Cheney, C R 1964. Councils and Synods with Other Documents Relating to the English Church: AD 1205–1313, i (1), 1146, Oxford: Clarendon Press
The independence of the college from the bishop is confirmed.
Feudal Aids
Maskelyne, A S 1906. Inquisitions and assessments relating to feudal aids, with other analogous documents preserved in the Public Record Office. AD 1284–1431, iv, 234, London: HMSO
Confirms that Claverley is held by the king in 1316.
The Great Register of Lichfield Cathedral (Magnum Registrum Album)
Denton, J H 1970. English Royal Free Chapels, 1100–1300: a constitutional study, Manchester: Manchester University Press
Appendix xvii, 108–10 (fols 223v–224)
Hundred Rolls
Illingworth, W 1812–18. Rotuli Hundredorum temp Hen iii.et Edw.i , 2 vols, London: Record Commission of Great Britain, 61, 62, 88, 90–91
The royal free status of Claverley church is confirmed.
Papal Bulls
TNA, SC7 (Papal Bulls) 22/33
Clarke, A 1816. Rymer's Foedera, London: Record Commission of Great Britain, i (i), 261
Luard, H R 1864. Annales Monastici, i, 275–6 (Potthast no. 11797), Rolls Series, London: Longman, Green, Longman, Roberts & Green
These state royal claims that St Mary's College is a royal free chapel.
Patent Rolls
Hardy, T D 1835. Rotuli litterarum patentium in Turri Londinensi asservati, London: Record Commission of Great Britain
Vol i, Henry iii (1216–25), 372–3
Vol iii, Henry iii (1232–47), 495
Presentation of Peter de Rivallis to the king's chapel of Bridgnorth [8 May 1223]. The canons of the king's chapel are ordered to supply defects of ornaments and necessaries [26 Dec 1246].
Plea Rolls
Jenkinson, H and Fermoy, B 1932. Select Cases in the Exchequer of Pleas, Selden Society 48
Easter Term 25 Henry iii, m. 28 dorso
Enquiry into the suspension of ‘the church of Claverley, which is the king's free chapel’.
Appendix 2 Source Materials
Lithograph
Johnston Reference Johnston1903 includes a chromo-lithograph fold-out of the frieze based on the tracings and produced by W Griggs.
Photographs
National Monuments Record, Swindon
NMR AA46/9748, 9750, 9774 [1913]
NMR AA62/4022–4032 [1961]
NMR BB96/4575–4601 [1983]
Shrewsbury Museum Service
Lantern Slide SHYMS: P/2005/1950 [1937]
Replica
SRRC, 2101/1: ‘Tracing of wall painting in Claverley church before restoration by Tristram. Transferred by the Council for the Care of Churches (to whom the tracing had been lent by the National Monuments Record) collected from London 3 December 1968.’
Full-size replica made in 1902 of most of the frieze and referred to by Johnston (Reference Johnston1903, 64, n 1). It is on thin paper mounted on a canvas roll. It is now in a very fragile condition with the paper torn and separating from the canvas and signs of insect infestation on the wooden roller. A photograph of 1913 (NMR AA46/9748) shows it on display in the church. It was also exhibited in London from 14 May to 7 June 1968 in an Exhibition of Medieval Wall-Painting, held at All Hallows Church, London Wall, London. It could not be located in 1970 when conservation work was begun (Baker Reference Baker1972) and when blues and greens were removed because they were considered to be over-painting. It was only in 1999 that the replica came to light again, thanks to Alison Healey (see figs 15 and 17).
Tracings
Johnston 1902. London, Victoria and Albert Museum, MM6 E4764-4781-1920: ‘Tracings made in 1902 of the paintings in the church of All Saints, Claverley, Shropshire: battle scenes, possibly incidents in the battle of Hastings connected with Roger Montgomery, founder of this church, with a scourging scene, borders, spandrel decoration, &c. c 1190. 18 sheets watercolour various sizes. Presented by Charles E. Keyser. Esq. and the Artist.’
The tracings, made by November 1902, were coloured in ‘exact imitation of the originals’ by Johnston (Reference Johnston1903, 63–4). Johnston's pencil notes about the colours remain under the watercolour washes and reveal that the colours in the copy have altered. An area labelled purple is now brown, and a very bright green on the sword and helmet of the falling knight has turned almost entirely dull olive green. The tracings also show much more pink in many areas than is visible in the mural today.