

‘Hogbacks’ is an umbrella-term covering a diverse range of recumbent stone monuments broadly dating from the tenth or eleventh centuries ad from northern Britain.Footnote 1 These stones feature in many general and popular syntheses of the history and archaeology of Viking Age BritainFootnote 2 as well as specialist appraisals of the period’s stone sculpture.Footnote 3 Lang’s seminal studies of the English and Scottish hogbacks saw them as distinctive Hiberno-Norse ‘colonial’ monuments.Footnote 4 Hogbacks find no direct and singular precedent in either the Insular or the Norse worlds, but are widely regarded as reflecting Norse interaction with native Christian communities.Footnote 5
Various studies are now questioning not only the attribution of individual recumbent stone monuments to the category of hogbacks, but also the efficacy of the category itself as an index of Norse settlement and/or influence.Footnote 6 This is part of a growing trend to critique culture-historic frameworks for interpreting sculpture and instead explore the significance of individual early medieval sculpted stones within specific assemblages and local historical and topographical settings. This trend also reflects the growth of new theoretical approaches to the biographies, materialities and landscape settings of particular monuments and assemblages.Footnote 7 Rather than attempting to identify a single prototype or inspiration for all hogbacks, and a shared attribution to them in terms of their commissioners’ linguistic or cultural background, we might instead pay closer attention to the material qualities, life-histories and spatial settings of individual hogbacks (or groups of monuments) to reveal their variability in character and deployment alongside other sculptures. Such approaches aspire to create more refined interpretations of early medieval stone sculpture in their socio-political, religious and mortuary contexts, including the relationships between hogbacks, between hogbacks and other forms of recumbent stone monument and as freestanding stone monuments and architectural entities.Footnote 8
In particular, these developments have opened up an appreciation of the ways in which these ‘house-shaped’ tomb carvings operated as ‘technologies of remembrance’: material cultures that promoted social memories of the dead and the living through their creation and use, but also through their reuse.Footnote 9 These particular approaches further seek to consider how hogbacks could have operated in discursive and performative ways and affected those inhabiting and traversing early medieval places and landscapes.Footnote 10 Indeed, it might be argued that hogbacks have been left behind by these recent interpretative trends, despite sustained critiques over recent decades regarding the identification of ‘Scandinavian’ influence in Insular art and other material cultures of the tenth and eleventh centuries ad.Footnote 11
These recent research trends and perspectives build a context for reinterpreting one particular recumbent stone monument that is often called a hogback: West Kirby 4 (figs 1, 2 and 3).Footnote 12 It is part of the important assemblage of early medieval carved stones from West Kirby, on the Wirral peninsula, which comprises at least five, and possibly as many as eight, fragments from a wider collection of material discovered during the rebuilding of St Bridget’s Church in 1869–70. The assemblage includes fragments of tenth- or eleventh-century circle-headed crosses (West Kirby 1, 2 and 3), a form known from elsewhere on the Wirral peninsula, including close by at Hilbre Island, Neston, Bromborough and Chester, as well as neighbouring Lancashire and north-east Wales and Anglesey.Footnote 13 Also from West Kirby is a possible tenth-century recumbent stone fragment (West Kirby 5), which could be part of another recumbent stone or ‘hogback’.Footnote 14 There are further cross-slabs from the same assemblage (West Kirby 6–8), which Richard Bailey ascribes to the eleventh century or later.Footnote 15
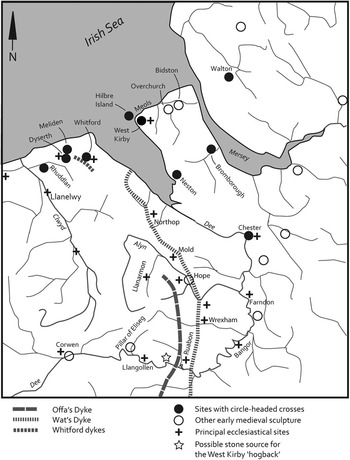
Map of the immediate context of the West Kirby site, showing the principal locations producing early medieval stone sculpture, possible early church sites and the linear earthworks of the Mercian frontier mentioned in the paper (incorporating information from Bailey Reference Bailey2010 and Edwards Reference Edwards2013). Map: © Howard Williams

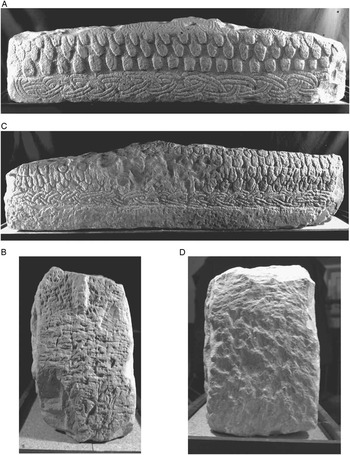
Black-and-white photographs of West Kirby 4, sides A to D. Photographs: K Jukes; © Corpus of Anglo-Saxon Stone Sculpture

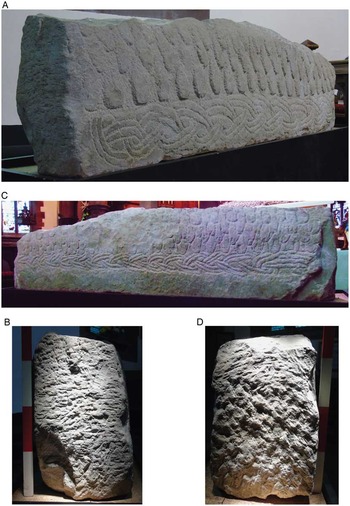
Colour photographs of West Kirby 4, sides A to D (the oblique angle for side C is unavoidable, given the monument’s current display position). Photographs: © Howard Williams

Together, this assemblage has been taken to indicate that an early medieval ecclesiastical and burial landscape developed at West Kirby with connections to other nearby church sites on the Wirral, including Neston and Hilbre Island. As explored below, this was part of a broader ecclesiastical network linking church sites along the Flintshire coast. From this evidence, West Kirby’s church might be one ecclesiastical locus with a burial site established by the tenth or eleventh century. Those wealthy patrons of the church commemorated by the monuments might have included landed elites, merchants and their followers operating within this strategic maritime corridor, guarding approaches to the burh at Chester and adopting Hiberno-Norse sculptural fashions (figs 1 and 4).Footnote 16 Notably, Everson and Stocker have recently advocated West Kirby’s church as controlling the trading place at West Kirby/Hilbre, Hoylake/Meols, under the jurisdiction of Chester.Footnote 17
The distribution of monuments traditionally defined as ‘hogbacks’. Map: © Patricia Murrieta-Flores and Howard Williams

West Kirby is itself a Scandinavian place-name (‘village with a church’). Its dedication to the Irish St Bridget has commonly been connected to Hiberno-Norse activity in the north west, including in Chester itself.Footnote 18 Therefore the West Kirby stones, including the hogback, have frequently been mobilised alongside a range of archaeological and historical evidence, place-names and church dedications to suggest a strong Hiberno-Norse presence on either side of the Dee Estuary (on the tip of the Wirral peninsula and the Flintshire coast) between the Anglo-Saxon burh of Chester and the trading settlement at Meols.Footnote 19 This narrative has been sustained by the relatively recent discovery of a miniature hogbacked stone regarded as broadly contemporary in its tenth-century date, located 7km east-north-east of West Kirby at Bidston,Footnote 20 while a rune-inscribed sculpted stone fragment from Overchurch close by hints at the importance of the region in the eighth/ninth centuries.Footnote 21
However, it has long been recognised that West Kirby 4 is not an accomplished and coherently executed monument. Lang regarded it as late in date, in particular because it was in his view ‘clumsy and illogical’ in its execution.Footnote 22 Despite this, the hogback has been afforded a special place in the local community and local history. Equally, West Kirby 4 is at the very south-western edge of the core distribution of hogbacks which straddles the Pennines from Cumbria to North Yorkshire;Footnote 23 for this reason it has repeatedly been used as a prominent dimension in debates regarding the settlement, social status, cultural affinities and religious conversion of the Irish Sea region during the Viking Age.
In the light of recent scholarship on the materiality and biography of early medieval stones,Footnote 24 the time is ripe for a reappraisal of West Kirby 4 in itself, in the context of its assemblage, and in terms of its parallels with sculpture elsewhere around the Irish Sea region and farther afield. To this end, this paper presents a new reading of West Kirby 4 as a mortuary monument, drawing upon close attention to the interpretative possibilities that remain, given the stone’s damaged nature.Footnote 25 The paper begins by outlining and critiquing past and present conventions of describing, depicting and displaying West Kirby 4 before exploring afresh its parallels, material composition, ornamentation, form and contexts. This leads to the suggestion that the stone is a unique, experimental and asymmetrical monument made of a distinctive imported stone. In all these regards West Kirby 4 stands in contrast to the rest of the West Kirby assemblage and sits awkwardly with its description as a ‘hogback’. Furthermore, it is ventured that West Kirby 4’s relatively poor execution might have a significance in relation to the mortuary context of its production, the practicalities of carving it in relation to its architectural setting, its reuse and/or the rapid tempo of the mortuary ritual for which it was made, rather than necessarily reflecting the results of poor and inconsistent design and execution per se.
This approach also casts doubt on the merits of regarding West Kirby 4 as a ‘hogback’. Instead of regarding West Kirby 4 first and foremost as a hogback outlier, the aim is to follow the lead of Fred Orton’s approach to Ruthwell and Bewcastle,Footnote 26 considering West Kirby 4 on its own merits as the distinctive material trace of a constellation of ideas and influences in Insular art operating in relation to a particular geographical and socio-political context. In other words, rather than portraying it primarily as a ‘clumsy and illogical’ object situated on the periphery of the hogback distribution, the aim is to recognise West Kirby 4 as a striking attempt to create a recumbent stone monument lacking any singular or direct parallel amidst the early medieval corpus of Welsh, English and Scottish recumbent stone monuments. Instead of downplaying its importance, the approach adopted hopes to open up the monument to new interpretative avenues.
WRITING ABOUT WEST KIRBY 4
As one among many traces of tenth-/eleventh-century material culture located around the Irish Sea region, the West Kirby monument has been heralded as a lithic indicator of Norse influence on the Wirral. Yet, like all such stones, West Kirby 4’s ‘Viking hogback’ status is very much the creation of generations of scholarly discourse, mediated by selective textual description, as well as the choices made regarding the physical contexts of the monument’s display, its restoration, replication and representation in art and photography.Footnote 27 The historiographical background for the interpretation of the monument can be located in the Victorian drive to identify evidence of the Vikings on the Wirral and across northern Britain more broadly. This context helps to explain why the ‘hogback’ attribution is so tenacious, but also how, in this case, it is so inherently misleading and has overlooked the inherent qualities of the stone’s ornament, form and material composition.
West Kirby 4 was already damaged along its top and narrow ends when discovered, perhaps during its architectural reuse in the later Middle Ages.Footnote 28 It was quickly recognised as being carved from non-local stone. Writing in 1887, Browne noted that it was ‘harder than any stone in the neighbourhood, and it has no doubt been brought from some distance and has been the memorial of some important person’.Footnote 29 Collingwood cited different views as to the stone’s possible provenance, but offered no interpretation of this key aspect of the stone.Footnote 30 More recently, both Lang and Bailey have highlighted this characteristic, and geological work by Bristow confirms that the monument is likely to be carved from Cefn sandstone, sourced to the west of Ruabon, some 43km to the south as the crow flies (see fig 1).Footnote 31
The interpretation of West Kirby 4’s form and ornament was fossilised in early accounts by focusing on its ‘good side’ with limited or no attention given to the other faces. Browne notes no difference between faces, beyond observing the Roman precedent for house-shaped tombs, with the tiles or shingles possibly representing the ‘roof of the last dwelling place of the departed man’. In doing so, Browne implicitly assumes a male-gendered association, as well as the idea that the monument was a tomb-cover marking a single grave.Footnote 32
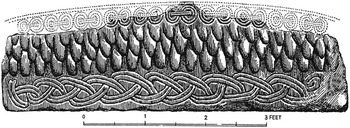
Collingwood took this further by distilling visual comparisons between hogbacks from across northern Britain.Footnote 33 His sketch of the West Kirby 4 monument incorporated a speculation as to its original hogbacked profile, drawing on parallels from Cumbrian and Yorkshire monuments.Footnote 34 It is notable how this was achieved despite only a tiny part of the original ridge surviving (fig 5). Collingwood regarded the monument as ‘later than most’. Here, as elsewhere in his work, he interpreted poor execution in chronological terms. The angle of the tegulae indicated to him that the ‘original meaning of the house-shape had been forgotten’.Footnote 35 He recognised that the tiles were on a vertical face and therefore ‘do not tell their tale’: in other words, they no longer evoke the profile of the canopy he regarded as the original inspiration for the ornament. Above the tegulae Collingwood described ‘cart-wheels’, which were ‘drawn as a child might draw it’.Footnote 36 The plaits below the tegulae were also regarded as late and having ‘lost’ their naturalistic appearance.Footnote 37 As well as indicating a late and derivative monument of poor execution, the monument’s form and ornament suggested to him links with Cumberland and the Isle of Man as well as Northumbria.
W G Collingwood’s illustration of side A of West Kirby 4. Image: after Collingwood Reference Collingwood1928

Significant for this discussion is the way that Collingwood treated the other broad side; he did not draw this and judged it to be ‘the back’, asserting that the ‘back of the stone is like the front’. He thus simultaneously assumed that the monument possessed a primary orientation while he refused to consider the differences between these broad faces.Footnote 38 He conceded that the patterns are ‘pushed higher up by the plain band, like a plinth, filling 4″ of the base’ but offered no explanation of this contrast. Collingwood, like Browne before him, asserted that the monument was ‘imported’, ‘late’ and had a ‘front’ and a ‘back’, while paradoxically regarding both sides as essentially the same. He noted differences in the arrangement of the decoration, which he did not interpret. The same lack of attention to the asymmetry of the ornament and execution applies to Lang’s discussion of the monument, where again poor-quality work was equated with a late date.Footnote 39
Richard Bailey’s full and comprehensive appraisal of Cheshire’s early medieval stone sculpture provided a rich and scholarly analysis focusing upon ornamentation.Footnote 40 Defining West Kirby 4 as a ‘type h scroll-type’ hogback (see below), Bailey interpreted the stone as high status, particularly because of the rarity of such monuments in the region and the evidently imported character of its stone.Footnote 41 He then outlined the history, location, material and ornamentation of West Kirby 4, but made no comment on its form, implicitly accepting that it was originally hogbacked: as a tall, narrow monument with vertical sides, it was seen as reflecting a trend seen in other hogbacks found west of the Pennines.Footnote 42 Bailey noted similarities in its ornament to monuments in Cheshire, Lancashire, the Isle of Man and Cumbria, including Whalley and Prestbury (see below). However, he emphasised Cumbrian (and thus also south-western Scottish and Govan)Footnote 43 links for the wheel-and-bar ornamentation, being akin to the stopped plait found upon monuments from these areas. Bailey thus regarded the monument in a fully Irish Sea context,Footnote 44 though Welsh parallels have to date received only brief, if important, comment.Footnote 45
With Bailey’s detailed study, we have a well-researched and rigorous description of West Kirby 4. However, Bailey showed the same implicit deference to the idea of a ‘front’ and ‘back’ inherited from Collingwood via Lang, with Collingwood’s ‘front’ becoming Bailey’s face A, and Collingwood’s ‘back’ becoming Bailey’s face C. Moreover, the idea that the differences between front and back, while accurately described, might represent a difference in date or significance, did not enter Bailey or any other recent commentator’s interpretation of the monument.
VISUALISING WEST KIRBY 4
The written historiography of West Kirby 4 was based both on first-hand observations of the stone and on drawings and photographs. Collingwood’s illustration of side A has been widely reproduced, up to the present day.Footnote 46 Published photographs of West Kirby 4 consistently show the same face as Collingwood and regard this as its ‘front’.Footnote 47 Only one book has included a photograph of the ‘back’ of West Kirby 4 prior to Bailey’s Corpus photographs; in this case without specific comment on the contrasts between the two broad sides of the monument.Footnote 48
This passive neglect of images of West Kirby 4’s side C (and, indeed, of its narrow ends and top) is matched by silence concerning the monument’s asymmetries. The high-quality black-and-white photographic plates in the Corpus make it possible to compare and contrast each face side by side upon the same page for the first time,Footnote 49 yet even this explicit juxtaposition of the faces has failed to provoke reflection on their striking differences.
DISPLAYING WEST KIRBY 4
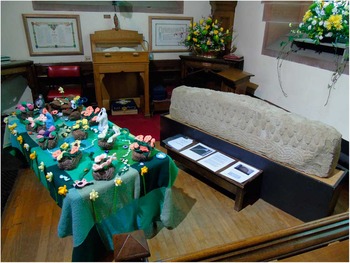
Unquestionably influenced by the single-faced accounts of Browne and Collingwood, and subsequently perpetuated in the relative silence of Lang and Bailey on the issue of asymmetry and execution, we find that the display of the stone has reinforced the sense of a symmetrical and coherent monument by prioritising its ‘good side’. Before its display in St Bridget’s Church, in 1990 (after a brief spell in Liverpool Museum on temporary display),Footnote 50 the monument had been on view in the extremely confined space of the Charles Dawson Brown Museum (named after the churchwarden who found the stones) located in the hearse-house next to St Bridget’s school on the south side of the churchyard. Here, it appears to have had its ‘front’ facing into the room. While visitors might have been able to look behind it, it was the ‘good side’ that was presented.Footnote 51 Visitors to St Bridget’s can now walk round the monument more easily and appreciate every face (except the base, which seems never to have been described and is presumably undecorated). Despite this improvement, the monument is still displayed with its ‘good side’ (side A) facing outwards into the church space and is thus more readily apprehended by visitors and worshippers (fig 6).Footnote 52 Side C may be accessible now, but it faces the wall and is relatively poorly lit.Footnote 53
West Kirby 4 in St Bridget’s Church, West Kirby, showing its busy setting around Easter and the war memorial behind. Photograph: © Howard Williams

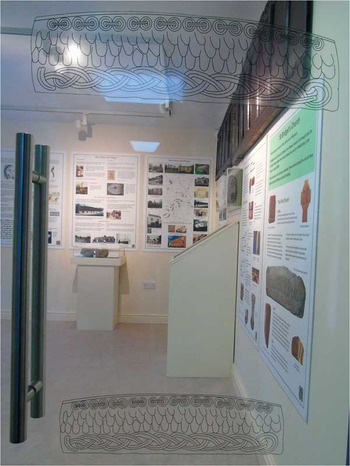
West Kirby 4’s side A has not only been more regularly depicted and prioritised in display, it has also been replicated without its other faces. When the Charles Dawson Brown Museum was reopened after renovation in 2013, the ‘front’ face A was inscribed four times on its new doors (fig 7). A cake was made for the opening ceremony in the form of a replica of the monument based on Collingwood’s speculative hogbacked profile. These media further emphasise the primacy of this face and its hogbacked form in the characterisation of the monument and its identity.Footnote 54
Side A of West Kirby 4 as represented on the glass doors of West Kirby Museum. Photograph: © Howard Williams

The single-sided display bias has been taken on tour: side C was not displayed to visitors when the monument was temporarily moved to the Grosvenor Museum in Chester for a display on the Vikings in 2010. Likewise, when National Museums Liverpool scanned and created a replica of West Kirby 4, face A was once again chosen for the permanent display in the Museum of Liverpool, opened in 2011. Visitors who try to see the back of this replica will find that it has been rendered as a smooth vertical surface (fig 8). The museum also emphasises the monument’s Viking credentials by juxtaposing it with a Danish Trelleborg-type hall reconstructed at Fyrkat, connecting it to a narrative of Viking raiding, trading and settlement.
The 3D-facsimile of West Kirby 4 on display at the Museum of Liverpool. Side A (top) faces visitors; side C (below) is just discernible from the side of the display case and is rendered blank. Photographs: Liz Stewart; © Trustees of National Museums Liverpool

This brief historiographical review of the monument’s treatment in text, image and display shows how each one has presented West Kirby 4 as a coherent Viking colonial hogback. Modern scholarship and heritage interpretation are directly descended from Victorian antiquarian approaches and modes of representation, which served to promote the monument’s form and ornament as ‘Viking’ in date, influence and significance. The emphasis on face A takes attention away from the damage to the top and ends of the monument, which actually obscures much of the detail of the monument’s original form and ornamentation. The assertion of symmetry has promoted a misleading perception of physical wholeness and interpretative certainty to this fragmented stone. Challenging this one-sided perspective prompts us to re-engage with the monument in the round, exploring afresh its shape and ornamentation, as well as reappraising its parallels and tackling its material composition in new ways.
REVALUATING THE FORM OF WEST KIRBY 4
As already noted above, the top and narrow ends of the monument have been damaged – presumably when it was reused as a building stone in the later medieval church nave’s south aisle. While there is heavy damage to the top of the monument, there are points where only a small amount is missing, suggesting that we have not lost a significant amount of the top (at its centre at least) nor of the length of the stone.
The ends of the monument are vertical and roughly finished. It could be argued that both original ends were lost when it was reworked for use in building the church; I would argue that face D looks as if it has been subject to crude tool marks to render it flat on its middle and lower surface, but the top looks original in comparison (and comparable to the marks on face B). This suggests that only a lens of stone has been removed.
The surface of face B is less crudely dressed and might be the original surface. Indeed, the protruding ridge at the top of face B is enigmatic and incomprehensible if the stone had been substantially cut back from its original form. This might be the surviving trace (a tail?) of a diminutive beast framing the ridge of the original monument: the kind of small beasts found on the roofs of such hogbacks as Gosforth 5.Footnote 55
The ornamentation supports the argument that little has been lost: the plaitwork terminates just before the ends of the stone, suggesting there was little or no additional stone at either end. Certainly, the length (178cm), width (21.5–23cm) and height (47cm at the centre) of the monument falls within the broad spectrum of other recumbent stones and the carving of these ends is far more precise and careful than the hacking of the top of the stone.Footnote 56
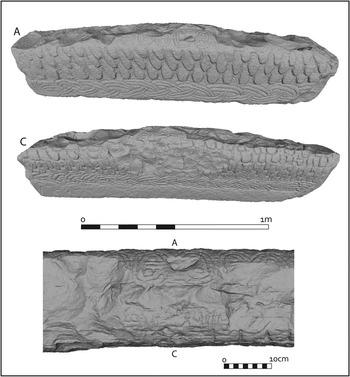
Alterations to the monument designed to facilitate its architectural reuse has created uncertainty about its ‘hogbacked’ profile: is this partly illusory, exaggerated by later damage to the top of the stone? With straight sides, the monument is far from the curved-walled structure of many hogbacks east of the Pennines.Footnote 57 While a tiny fragment of ridgeline survives at the very centre of the monument, the tapering towards either end is an illusion and the full height of the ridge at either end cannot be determined: Collingwood hinted at a possible hogbacked shape but Bailey does not explicitly come to a view. The top line of tegulae might be regarded as curving on side A but the lowest and middle lines of tegulae actually perform a ‘wave’ rather than a curve: from left to right they rise, then descend, then rise again (revealed in the oblique angle of fig 2). The wheel-and-bar ornament at the top of side A has a very slight curve to it, which might indirectly imply a hogbacked roof. There is a demonstrable change in angle of the top line of tegulae between those on the left and those on the right of side C but the bottom line of tegulae follow the straight plaitwork at the base of the decoration. On current evidence, West Kirby 4 probably had a subtle curve that has been exaggerated by later damage to the upper surfaces. Its hogbacked appearance is at best inconclusive: the bowed ridge is only tentative and it does not resemble the majority of hogbacked monuments, which bear demonstrably curving tops and sides. A diminutive end-beast (or beasts) and a relatively straight roof akin to Gosforth 5 is a feasible alternative interpretation.Footnote 58
HOGBACK PARALLELS
Similar challenges of classification face us if we try to regard West Kirby 4’s ornamentation as evidence of its hogback affinities. As noted above, the monument has been defined by Bailey as a ‘type h’ (Lang’s ‘type XI scroll-type’) hogback,Footnote 59 which leads us to seek parallels with Cumbrian monuments, notably Brigham 10Footnote 60 and Penrith 6 and 9.Footnote 61 There are also many examples of this type east of the Pennines. They include: Bedale 5Footnote 62 and Crathorne 4–6,Footnote 63 both in North Yorkshire, Gainford 22, Co. Durham,Footnote 64 Kirkdale 9Footnote 65 and Oswaldkirk 1,Footnote 66 both in East Yorkshire, St Mary Bishophill Junior 7, York,Footnote 67 and the now-lost monument from Repton, Derbyshire.Footnote 68 Together these constitute a widely distributed hogback type found across Northumbria and into Mercia, which might have taken inspiration from Anglian solid shrine tombs such as the house-shaped tomb-cover, Dewsbury 15, West Yorkshire, possibly dating to the ninth century.Footnote 69
Yet, West Kirby 4 is straitjacketed by this categorisation, which obscures its clear dissimilarities from these ‘type h’ monuments as well as overlooking possible parallels with other recumbent stones. The parallel with the poorly preserved Penrith 9 is noteworthy; however, even though it has four-strand plain plaitwork on its face A, it lacks wheel-and-bar ornament and instead has a strip of running spiral scroll that is lacking on West Kirby 4.Footnote 70 Skipping eastwards over the Pennines, one might note parallels with face A of Gainford 22, with its unpinned loop pattern above four-strand plaitwork.Footnote 71 A closer parallel still might be with Appleby 1, Westmorland,Footnote 72 because this stone is also tall and slender in form and possesses tegulae above a single decorative panel of three-strand plait and above a blank (uncarved) area.Footnote 73 However, with its tegulae situated beneath wheel-and-bar ornament and directly over plaitwork, the West Kirby monument does not closely resemble any of these stones in terms of layout or its form. A fundamental difference is that West Kirby 4 lacks the scrollwork that defines ‘type h’ hogbacks and so it is questionable why it (or indeed Appleby 1) was ever attributed to this category.
A range of monuments that Lang regards as ‘type k enriched shrine’ hogbacks provide further parallels to West Kirby 4. Given the later damage along its top, it simply is not clear whether or not West Kirby 4 has the diminutive end-beasts that characterise Govan I,Footnote 74 Kirby Stephen 8Footnote 75 or Gosforth 5,Footnote 76 but this is certainly possible. Indeed, if we entertain the possibility of one or more end-beasts, parallels might be sought in the largest single assemblage of recumbent monuments of early medieval date: that from the North Yorkshire coastal ecclesiastical site of Lythe. Here we find the closest parallels of tegulae immediately over interlace (if not plaitwork) to that found at West Kirby 4, namely upon Lythe 21 and 22.Footnote 77 Despite these possible parallels, there are no ‘type h’ or ‘type k’ monuments – or indeed any other hogback – that provide a close and convincing match to West Kirby 4.Footnote 78
BEYOND HOGBACKS: BINDING PARALLELS
An alternative possibility is to explore parallels beyond hogbacks and consider other sculptural parallels. Bailey noted parallels with the wheel-and-bar ornamentation with the four ‘buckle knots’ surrounding a vertically four-legged beast on Prestbury 1aFootnote 79 and the pairs of similar motifs on the now-lost Prestbury 3.Footnote 80 To these parallels can be added Thornton le Moors 1C (which, like Prestbury 1, is also associated with a beast)Footnote 81 as well as Whalley 8 B.Footnote 82 These might all be seen, following Bu’Lock, as derivative and degraded Norse-influenced Borre ring-chain.Footnote 83
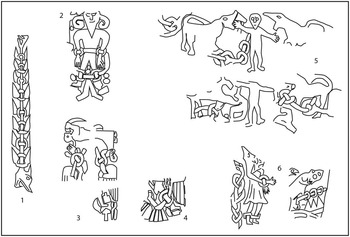
Certainly a link to the theme of binding leads us to consider relationships with other images of fetters on Viking Age stones. Upon the east face (face C) of the upper shaft of the Gosforth 1 cross, the body of the beast identified as the wolf Fenrir is composed of a four-strand plait with the same knots.Footnote 84 Especially given the lupine associations of this last example, the wheel-and-bar motif might also relate to the ‘chain-like’ feature found on the broad faces A and C of the ‘type g’ hogback Sockburn 21: a seemingly naked human figure threatened by bound wolves.Footnote 85 This is possibly a Christian adaption of a story from Norse mythology (the god Týr having his hand bitten off by the fettered wolf Fenrir). As Kopár insightfully observes,Footnote 86 this has parallels with the binding of Gunnar on side B of the Sigurd slab from Andreas, Isle of Man.Footnote 87 It also presents parallels with the depiction of Wayland bound into his flying machine on the Leeds crosses.Footnote 88 Of closest similarity is the way that the wheel-and-bar forms the shape created by the fetters that bind the figure (who is frequently interpreted as the Devil but who might equally well be Loki, or the damned in hell) on Kirkby Stephen 1A, Westmorland (fig 9).Footnote 89
Binding motifs from Viking Age stones: 1= Gosforth, Cumbria; 2= Kirkby Stephen, Cumbria; 3= Leeds Minster, West Yorkshire; 4= Leeds Museum, West Yorkshire; 5= Sockburn, Co. Durham; 6= Andreas, Isle of Man. Not to scale. Image: redrawn from photographs by Howard Williams

There is a further parallel for the wheel-and-bar ornament that needs to be considered. Within the right arm of the cross upon a slab from Bride, Isle of Man (97), is a scene likely to depict the legend of Sigurd the Dragon Slayer, roasting the dragon’s heart on a spit. The spit and dragon’s heart are depicted by two pairs of rings with bars connecting them.Footnote 90 Likewise, the interlace ornamentation on the Sigurd slab from Ramsey, Maughold 122 (96), might pertain to the same theme.Footnote 91 The bar with rings is most apparent as a representation of the spit with the dragon’s heart on the Malew 120 (94) slabFootnote 92 and the Andreas 121 (95A) slab,Footnote 93 where the dragon’s heart appears as two and three rings respectively. Thus one has to ask whether the wheel-and-bar on the West Kirby 4 monument is intended to evoke the spit of Sigurd?
For the purpose of this discussion, we do not need to speculate about a single iconographical interpretation for the wheel-and-bar motif. The associations with bound beasts might allude to the broader themes found throughout Viking Age art of protection from, and the defeat of, evil through binding and dissecting.Footnote 94 In this context, the wheel-and-bar along the roof of the recumbent West Kirby 4 might represent an apotropaic enwrapping of the monument’s occupant(s): a canopy to the grave(s), aiming to mark and protect the dead from physical desecration and spiritual attack. This relates to a broader theme in the design of Viking Age recumbent stones identified elsewhere, namely the striking creation of allusions of protected solid space, framed not only by end-beasts but also by skeuomorphic presentations of roofs and woven textiles.Footnote 95
LOCAL DISTINCTIONS
Despite the Manx and northern English connections, a case still cannot be made for an exclusive link between West Kirby 4 and any other one site or stone. This can be balanced against the fact that there is no evidence that any other stone at West Kirby shared its form, ornamentation or material. Likewise, the nearby Bidston monument is strikingly different from West Kirby 4 in its form and ornamentation. The only characteristic that the West Kirby 4 and Bidston stones have in common is that they are each equally unique and innovative monuments for the region. Bidston finds its closest parallels not with Irish Sea region monuments but with those Yorkshire monuments with ursine end-beasts. These examples serve to illustrate the rhizomatic, rather than dendritic, character of stylistic influence in tenth-/eleventh-century northern Britain: hogbacks are not found at every site producing early medieval sculpture, and even at the same sites many monuments of different character are frequently juxtaposed.Footnote 96 These examples also relate to the well-established importance of the Dee and Mersey estuaries and the vicinity of the former Roman city of Chester, a West Saxon burh from the early tenth century (see fig 1).Footnote 97 Together, these rivers were linked to long-distance overland communication routes across the Pennines, into the Peak District, the West Midlands and Wales, both before and during the Viking Age.Footnote 98
From a further perspective, and for direct ornamental parallels, we can indeed find striking local examples if we look beyond recumbent stones and tackle the hitherto neglected Welsh connections. Despite long recognition that both sides of the Dee Estuary were exposed to Hiberno-Scandinavian influence during the tenth and early eleventh centuries,Footnote 99 there has been little discussion of West Kirby 4 in this context. Dyserth 1 and 2, from Flintshire,Footnote 100 are striking local parallels for both the plait and the wheel-and-bar ornamentation upon West Kirby 4.Footnote 101 Dyserth was historically within the contested borderland district of Tegeingl (Englefield), just west of the undated Whitford dykes and the early ninth-century Wat’s Dyke (see fig 1). Therefore, like the Wirral, this area was exposed to Hiberno-Norse influence in the tenth and eleventh centuries.Footnote 102 Dyserth may have been an ecclesiastical site and its church has a double dedication to Cwyfan and Brigid. Both are Irish saints and Brigid hints at a relationship with West Kirby, whose church has the same dedication.Footnote 103 Both Dyserth 1 and 2 display plaitwork of comparable execution to West Kirby 4 (fig 10). Both also bear closed-circuit patterns almost identical to the wheel-and-bar motifs on West Kirby 4.Footnote 104 Less conclusive, but worthy of note, are the loops on the broad faces (A and C) of Whitford 2 (‘Maen Achwyfan’).Footnote 105 Yet, it is Dyserth 2, a pyramidal base of a now-lost cross, that shows closest links to West Kirby 4, where two of the wheel-and-bar motifs appear either side of a Latin ring-cross on face A.Footnote 106 The systematic compilation of the North Welsh sculpture by Edwards reveals that Dyserth is unique in using these motifs, just as recumbent stones are unknown from the North Wales corpus. Therefore, a direct connection between Dyserth and West Kirby 4, the same repertoire and perhaps the same carver(s), is a strong possibility.
Detail of the Dyserth 1 cross-slab (left) and Dyserth 2 cross-base (right). Photographs: © Howard Williams

The material from which these stones was composed is also revealing. West Kirby 4 was transported a long distance up the Dee from near Ruabon; the limestone used to carve Dyserth 1 and 2 came all the way (presumably by boat) from Anglesey.Footnote 107 Hence, while from different sources in opposite directions, the Dyserth and West Kirby monuments were both constructed by communities linked to long-distance maritime and riverine routes. One might postulate that Dyserth and West Kirby constitute part of an extended maritime ‘ecclesiastical landscape’ spanning the Dee Estuary.Footnote 108 The circle-headed crosses of Meliden, Dyserth and Whitford provide further evidence for this, since they mirror those from the Wirral, Chester and, possibly, from Walton-on-the-Hill, Lancashire.Footnote 109
West Kirby 4 is unquestionably a distinctive and unique recumbent stone for its locality and it is likely to have been apprehended by early medieval audiences in this way, rather than through precise parallels to other monuments witnessed in the environs. This is clearly the most important point: for those in the region, not only would West Kirby’s imported stone have made it stand out, but its form and ornamentation would have been distinctive and thus memorable as a personal statement of identity linking the living with the dead for communities enjoying far-reaching maritime and riverine connections.
ASYMMETRIES
This leads us to consider the distinctive nature of West Kirby 4’s ornamentation in relation to its form. Due to later damage, there is no surviving ornamentation upon its narrow ends, and only a tiny fragment of ridge survives; Bailey regards the latter as ‘plain’, but the extent of the damage makes it difficult to discern whether decoration was originally present or not.Footnote 110 Attention therefore focuses on the two broad faces, A and C.
Top-to-toe asymmetries
Very few early medieval stone monuments are fully symmetrical. Indeed, many freestanding crosses and recumbent monuments actively utilise asymmetries to juxtapose and oppose complex and contrasting figural scenes and abstract ornamentations. A good example of related but discrete broad sides on a hogback is Heysham 5.Footnote 111 Many recumbent stones also display a formal and/or ornamental medial asymmetry; the two ends differ significantly from each other in size, shape and/or ornamentation.
Subtle but perhaps significant asymmetry is found along the medial axis of the West Kirby monument (fig 11). The decoration slants on both faces A and C in the same plane of orientation, giving the D-end the sense of being a ‘head’ and the B-end as a ‘foot’ (if this was merely an ‘error’ by the sculptor, it was achieved consistently for both faces). On face A, the decoration reaches the bottom of the stone on the far left (adjacent to face B), but seems to rise slightly up above the bottom of the stone on the right (adjacent to face D). This slant to the decoration is more apparent on face C, where the area of undecorated base of the face becomes steadily taller as the plaitwork moves from right (adjacent to side B) to left (adjacent to side D). This slant might relate to another dimension to the asymmetry: the stone becomes slightly wider by the time it reaches face D: 230mm as opposed to 215mm on face B.
West Kirby 4: laser scans of the long face A (top) and C (middle) and the central ridge from above; the narrow faces B and D are shown lower left and lower right respectively. Image: © Patricia Murrieta-Flores and Howard Williams, courtesy of National Museums Liverpool

This asymmetry might be interpreted in the context of a wider theme in early medieval recumbent stone monuments suggested in ongoing work by Victoria Thompson; namely an allusion to the human body in the top-to-toe tapering, bowed or trapezoidal shape of recumbent stone monuments.Footnote 112 While this is quite subtle on West Kirby 4, it might be argued that the monument does indeed possess a ‘head’ (D) and a ‘foot’ (B) end, which might allude to the presence of the dead beneath the stone.Footnote 113 This hitherto overlooked aspect of the ornamentation speaks to the monument’s possible role as a grave-cover for one or more bodies (it need not relate to a single individual’s death and burial) and its significance as a commemorative monument. In which case, its narrow foot end (B) has a ‘tail’ upon it, while its ‘head’ (D) is broader and flat and the decoration rises up to it.
Front-to-back asymmetries
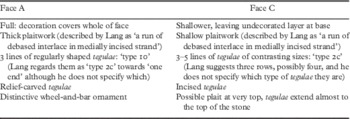
There are, however, greater and more significant asymmetries between the broad faces A and C relating to both form and execution (table 1).Footnote 114
Asymmetries in the ornamentation on West Kirby 4

There are two important aspects to this description that can be queried, and which help to emphasise the overall contrast between the two broad sides. First, it is unclear why Lang and Bailey identify ‘type 10’ tegulae on this monument (figs 11 and 12). While crude and varying in size and angularity, all the tegulae carved in relief on side A might be readily considered as either ‘type 2b’ or ‘type 3’. Looking to side B, the tegulae are all crude ‘type 3’ and none have demonstrably angular lines characteristic of ‘type 2’ or restricted stems as typifies ‘type 10’.Footnote 115 In summary, the striking distinctions in the tegulae on either side relate to the fashion of their execution, spacing and size rather than form per se.
Oblique views of West Kirby 4’s broad sides A (top) and C (middle) with details of the central ridge below. Image: © Patricia Murrieta-Flores and Howard Williams, courtesy of National Museums Liverpool

The second query is in the identification of what Bailey calls ‘possible plait’ above the tegulae on side C. First-hand examination and photographs supported by the laser-scanning data reveals that, although heavily damaged and difficult to discern, this area has cruder and smaller imitations of the wheel-and-bar ornamentation on the top of side A (figs 12 and 13).Footnote 116
The centre-top of West Kirby 4, with face A above and the damaged face C below. The wheel-and-bar ornamentation is demonstrably present on both sides of the damaged ridge. Photograph: © Howard Williams

Together, these two points reduce the difference in ornamental design and suggest there was a shared aspiration for both broad sides to possess three bands of decoration of similar motifs: plaitwork, tegulae and wheel-and-bar. Yet even if the aspiration was for the broad sides to mirror each other, the clearly contrasting arrangements and execution remain stark and demand further explanation.
Interpreting the asymmetries
There are numerous other examples of discernible asymmetry of this kind amidst early medieval recumbent stones from southern Scotland, notably the MossknoweFootnote 117 and the contrasting broad faces of the ‘type h’ hogbacks Gainford 22Footnote 118 and Gilling West 10.Footnote 119 Likewise, many of the ‘type g’ hogbacks with illustrative panels have contrasting designs, as with the Heysham hogback,Footnote 120 Bedale 6Footnote 121 and Sockburn 14 and 21.Footnote 122 Yet West Kirby 4 is distinctive in that the asymmetry relates to the size and arrangement of the ornamentation, which otherwise bears a similar arrangement of motifs. It might be suggested, following Lang,Footnote 123 that this is simply confused and sloppy work. Indeed, the poorer quality work is upon the side where the bedding of the stone interrupts the ornamentation, and so it might be regarded as a ‘hidden’ back-side. However, on reflection a more refined set of suggestions might be proposed:
-
1. West Kirby 4 might be a single-phased and single-authored monument, but the circumstances of commissioning gave its carvers little time to execute the design; perhaps this was a rushed monument, possibly dictated by the tempo of the funeral.
-
2. The stone might be a multi-authored monument, on which sculptors operated with different skills simultaneously or in succession, but with a clear aspiration that side C should mirror side A. If this is a single-phased but multi-authored work, could the relative expertise of the carving relate to their social obligations to the dead person and his/her family as much as their abilities as stonemasons?
-
3. West Kirby 4 might be a multi-staged monument, with side A carved effectively and side C later and in rushed circumstances and/or in an environment where the full stone was not fully accessible.
-
4. Not necessarily excluded by scenarios 1 to 3, a further possibility for consideration is whether West Kirby 4 was originally positioned in such a location that only one face, side A, needed to be carved, or where this side mattered most. There might originally have been no intention that side C should be viewed; it might only have been partly accessible to the carvers (hence the carving is higher up); part of the monument might have remained below ground.
In each case, the asymmetry of West Kirby 4 might relate to the biography and its multi-authored and/or multi-phased creation, rather than from clumsy or illogical design.
MATERIAL
This argument leads us to reconsider the importance of the material composition of early medieval stone monuments. Recent studies have drawn attention to the texture, patina, colour and lustre of the stone and to various enhancements (by addition and maintenance) employing metal, glass, jewels or paint.Footnote 124 It is also widely recognised that stone sculpture operated in a world of wood, in which boats, domestic and ecclesiastical architecture, portable vessels and containers (including coffins and burial structures) and ecclesiastical monuments all deployed carved wood in many ways. When stone was deployed, its specific qualities would profoundly affect the manner of its carving and the proficiency required to execute designs. In these contexts, the material qualities of particular kinds of stone can be considered as far from peripheral, but central to how monuments were distinctively made and apprehended.
There are interlinked dimensions that need to be considered here: namely the performative character of the transportation and carving of the stone, and the remembrance thereof. Various social and material agents and ceremonial dimensions might have been incorporated into this process.Footnote 125 There is also the significance of the distinctive material affordances of West Kirby 4 once it was installed in the church or churchyard at West Kirby, rendering it discernible as imported under specific circumstances and setting up contrasting qualities and forms with other stones. The olive-grey colour and texture of the monument rendered it in stark contrast to the pale red colour of the sandstone used to compose the other broadly contemporary stones found at the site.Footnote 126 It is notable too that West Kirby 1 has no motifs in common with the circle-headed crosses from West Kirby nor indeed those from any other location on the Wirral peninsula.
To explore these points further, we should consider the place from whence the stone originated. As noted above, the monument is made from Cefn sandstone, probably extracted from near Ruabon, near Wrexham (see fig 1).Footnote 127 Existing narratives regarding West Kirby 4, by focusing on individual decorative motifs, have tended to look towards Lancashire, Cumbria and Man.Footnote 128 In contrast, the stone’s source suggests links to the River Dee upstream from Chester, including to the postulated minster and royal villa at Farndon, to the Welsh monastery of Bangor on Dee, to the Vale of Llangollen and to the major territorial boundary that is represented by the eighth-century Offa’s Dyke and its successor, the early ninth-century Wat’s Dyke.Footnote 129 This provenance reminds us that West Kirby sits at the very tip of the Dee Estuary and the archaeological and historical evidence clearly demonstrates the importance of maritime trade and transport to Chester and beyond.Footnote 130 It is worth noting that the Walton-on-the-Hill 1 cross-shaft, just across the Mersey, is made of a Millstone Grit, a rare erratic in the vicinity. Therefore, the precise origins, but perhaps also the choice of imported stone, were both key dimensions to West Kirby 4.Footnote 131
A second point is that the early ninth-century Pillar of Eliseg, between the postulated early church sites of Corwen and Llangollen, is also made of Cefn sandstone. This important royal construction, with its now-lost Latin text commemorating the victory of Powys against the Mercians,Footnote 132 supports Bailey’s suggestion that the West Kirby stone has ‘high status’ because of the provenance of its stone. It derived from a Mercian borderland, from quarries between major church sites along the Dee valley.Footnote 133 Bailey’s inference regarding status is sufficient to suggest that the stone itself, as much as how it was carved, made a powerful statement of status and prestige for those commemorating and being commemorated. The stone’s display may have served to materialise remembrance of its actual transportation, but also any religious, social or political relationships involved in its transmission, including perhaps the story of its acquisition by the ecclesiastical community and its patrons.Footnote 134 While precise details of how the monument got to West Kirby and from whom it was acquired remain obscure, the texture and colour of West Kirby 4 draws attention to West Kirby’s riverine and overland links as much as its connections to the Irish Sea world.
A final point relates to the angle of the bedding of the Cefn sandstone, and the impact of this on side C, which was clearly the side that was more challenging to carve and hence asymmetry was thus written onto the stone on this side. Once it had reached West Kirby, perhaps its very material composition rendered it an asymmetrical monument, facilitating the different attention and engagement to its carving between sides A and C. This leads us to the final possibility that Collingwood was right to call side C the ‘back’, even if it is not correct to do so while ignoring this key dimension of the stone’s materiality.
DISCUSSION
Much remains uncertain about the precise dating, function, duration of creation and use of Viking Age recumbent stones from northern Britain. The consensus is that they should be regarded as mortuary monuments,Footnote 135 raised at ecclesiastical centres to commemorate elite families in death and establish their newly found status over landed and mercantile centres.Footnote 136 Because so few have been found conclusively in situ, it is not demonstrable whether they commemorated individuals or marked family or household burial plots, repeatedly being moved so as to inter additional burials over an extended period of time.Footnote 137 Another option is that they served as cenotaph-like memorials for families and households whose graves were found elsewhere in the churchyard or in the wider landscape. For the same reason, we cannot be sure whether recumbent stones were stand-alone monuments or whether they were components in more complex arrangements, which might have included a cross or a pair of crosses, like those found alongside hogbacks at Lythe.
Hogbacks cannot be taken primarily as an index for ‘Viking’ presence and influence, even if their maritime proximity is striking. Instead, they might be seen to encapsulate the complex flow of peoples, things, artistic ideas and commemorative strategies within the diasporic and trading world of tenth-/eleventh-century northern Britain.Footnote 138 Recumbent stone monuments communicated the elite identities of those commemorating and being commemorated to an ethnically and linguistically diverse set of audiences.Footnote 139
Of key importance to this discussion is Griffiths’ suggestion that the variability of hogbacks and related monuments was linked to their function as ‘primarily personalised statements’.Footnote 140 Without denying their public and ritual roles and their ecclesiastic contexts, this perspective helps us to recognise how each monument may have aspired to articulate idiosyncratic statements about the secular individuals, families and/or households commemorated. Hence, while created and installed in ecclesiastical funerary landscapes, these monuments spoke to secular worlds. Moreover, their diversity might perhaps be explained in terms of distinctive ritual performances linked to very specific circumstances afforded by the death of particular people.Footnote 141 In this fashion, they can be taken to be distinctive mortuary performances as much in their making as in their installation and subsequent use.Footnote 142
West Kirby 4 sheds light on these broader debates, and this paper’s attempt to bring the themes of monumental materiality and biography centre-stage serves to shift attention away from ‘origins’ and ‘function’ towards significance and context. The monument needs to be regarded in relation to the specific landscape and maritime context linking ecclesiastical sites at Dyserth and West Kirby, which are situated in close proximity upon opposing sides of the Dee Estuary. Rather than simply being interpreted as one of the south-westernmost manifestations of the broader epiphenomenon of ‘hogbacks’, they should be seen as indicating tenth-/eleventh-century connections with an estuarine network of religious locales, including Chester, Neston, Hilbre and Dyserth. Therefore, this dedicated study of a single hogback is justified, since it enhances our appreciation of how each recumbent stone monument operated within specific assemblages, localities and landscapes.Footnote 143
The West Kirby hogback is a distinctive and unique monument and while we can cite parallels with other tenth-/eleventh-century sculpture west and east of the Pennines in terms of specific motifs, it has no single specific parallel in the Irish Sea region. The other fragment of possible hogback from the site (West Kirby 5), and the Bidston hogback, are notably different from each other and, again, have no specific parallels in the region. Indeed, the passive insistence on calling the West Kirby 4 monument a ‘hogback’ without attention to its specific dimensions, including the asymmetries and likely provenance of its stone from the frontier district of Wrexham, might be taken to reflect the long-term inheritance of Victorian Viking literary romanticism and broader Anglo-Scandinavian artistic explorations that focus exclusively seaward and upon charting Scandinavian influence without necessary attention to landward and Insular connections.Footnote 144 As Foster explores, early medieval stones have a persistent agency through both their materiality and replication, affecting the experiences of those engaging with them.Footnote 145 A more nuanced approach to West Kirby 4 needs to be informed by its being part of a wider lithic assemblage at a putative ecclesiastical centre, but not to be drawn into regarding it as a cultural index of Viking presence. Instead, as Carver clearly puts it, we need to consider for West Kirby 4: why that, why there and why then?Footnote 146 In doing so, despite the challenges of later damage to the top of the monument, far greater attention can and should be given to West Kirby 4’s materiality, ornamental asymmetries and form.
What is more, this paper has presented evidence to show that, while the composition and clear asymmetries of West Kirby 4 have been accurately described in the past, these facts are absent from interpretations of the monument, including both academic discussion and heritage display. Some interpretative options can be discounted. It does not appear that the ‘poor side’ is a reworking of an earlier face that received damage; the shape of the monument in profile is equally vertical and therefore both long-sides appear to be primary sculpting of worked faces. There are a number of possible inferences, including the possibility of different craftspeople responsible for contemporaneous inscription, but there is a strong possibility that these craftspeople were not simply working with contrasting abilities, but also at different times and with different levels of expectation regarding the quality of execution. Added to this, we might speculate as to whether the ‘poor face’ was inscribed not only later, but in a different location. Arguably, it was carved a second time once the monument was already installed in its primary location (or indeed reused in a secondary position) and its base covered over, and hence the lower side of this face was no longer exposed to view or hidden by adjacent earth, stone or stones abutting the monument on this side. If so, this scenario raises the possibility that the monument was built up against another recumbent stone and, rather than serving as a lengthways arranged grave-cover, it was a monumental headstone, spanning multiple graves that ran off perpendicular to its alignment. This might at least chime closer to the diminutive form of the only other hogback from the Wirral: the Bidston monument.Footnote 147
There is a further dimension to the material, ornamentation and form that needs to be taken into consideration. Namely, whether the monument was not simply poorly executed, but whether it was constructed in a rush and never completed in its final phase. One convincing scenario for this would be to relate the monument to what little we can discern regarding elite funerals in the Viking Age; they were adaptable, fluid, dramaturgical events, but they could also involve rapid sets of actions in a time-pressured environment. Neil Price eloquently explores this argument for furnished burial practices, and in so doing identifies a range of ways in which funerary processes could involve both public and mythologically informed gestures and work.Footnote 148 Applied to stone carving, if time was pressured and the death was unexpected, a monument such as West Kirby 4 might constitute a compromise of time and available skill within a performance setting. Moreover, it might be the case that the relationship of the person doing the carving to the dead person(s) was more important than their craft skill. In such a situation, West Kirby 4 might be seen as ‘sloppy’ only by our criteria, not those of the creators and users of the monument. In raising this alternative scenario, we foreground the complex factors affecting the timing and construction of mortuary monuments in early medieval societies.Footnote 149 From this mortuary perspective, rather than ‘poor’ or ‘incomplete’, West Kirby 4 reveals work commissioned or executed by family members, perhaps without a detailed confidence in working stone, but in order to honour the dead loved one(s) within the confines of finite schedules of ritual action dictated by the presence of individual human agents and large numbers of observers. The specific identity of the dead person, and the circumstances of death, can therefore be foregrounded as key to interpreting Viking Age sculpture as expedient and experimental, not clumsy and illogical.
CONCLUSION
The interpretation of West Kirby 4 as a coherent single-phase ‘hogback’ is questioned by this study and a new set of observations and interpretations are presented so as to draw out its distinctive and innovative character as a mortuary monument. Having critiqued past scholarship and modes of illustration and display, which have sought to contrive and sustain West Kirby 4’s identity as a ‘hogback’, this paper has presented revised readings of West Kirby 4’s form, ornamentation and material composition. Despite later damage hindering interpretations, West Kirby 4 is here regarded as starkly different from the only other hogback from the Wirral, the uniquely diminutive Bidston example.Footnote 150 Furthermore, West Kirby 4 is dismissed as a ‘type h’ hogback and is shown to have no convincing parallels among the entire corpus of hogbacks and other recumbent stones of early medieval date found elsewhere in Britain.
This evidence does more than cast doubt on the prevailing view of the monument; it invites a new interpretation of the monument and of its local, regional and supra-regional importance. West Kirby 4 was a distinctive mortuary monument with its form, ornament and materiality operating together to set it apart from other monuments at the location and in the vicinity. Looking beyond hogbacks, we can see how these elements might have communicated the connections of the patrons, carvers and subjects of commemoration both throughout the Irish Sea region and also overland across the Pennines and upstream on the Dee into North Wales. In particular, the study suggests that the monument might reveal parallels with Flintshire sculpture, and thus a specific Dee estuarine identity to its creators. Moreover, West Kirby 4’s asymmetries are explored for the first time, and suggest that the monument was either rushed to completion, reflecting the quick tempo of the obsequies, or the possibility of a multi-staged monument made by hands of contrasting skill as its function and location changed. While a single scenario is not forthcoming, this evidence is certainly sufficient to propose that, rather than being a clumsy and illogical hogback, West Kirby 4 needs to be considered on its own terms. This asymmetrical and just possibly multi-phased monument created a protective membrane through which dialogues with the dead were maintained by the survivors;Footnote 151 a powerful commemorative means of creating a sense of a canopied and animated presence for the dead within solid stone. In this regard, we learn more, not less, regarding West Kirby 4 through a careful reading of its idiosyncrasies of composition and installation.
Acknowledgements
This paper has benefited from discussions with the delegates of the Runes, Monuments and Memorial Carvings symposium, held at the University of Chester, during their visit to St Bridget’s Church, West Kirby, in April 2013. I am especially grateful to Nancy Edwards, Joanne Kirton, Lilla Kopár and Victoria Thompson for discussions during this visit. I also wish to acknowledge the critical comments of the two audiences to whom I presented early versions of this paper: the ‘Monumental Failures’ session at the European Association of Archaeologists annual conference in Istanbul (September 2014) and the Merseyside Archaeological Society (January 2015).
Thanks are also owed to Paul Everson, David Griffiths, Stephen Harding, Joanne Kirton, Christine Longworth, Patricia Murrieta-Flores, Rachel Swallow, Victoria Thompson, David M Wilson and three anonymous referees for invaluable comments on earlier drafts of this article.
I gratefully acknowledge the support of the Heritage Together project and discussions with Ben Edwards and Seren Griffiths, who shared the preliminary results of their photogrammetric survey of the monument with me, and the Corpus of Anglo-Saxon Stone Sculpture for permission to reproduce its photographs of West Kirby 4. I very much appreciate and thank David Gillespie and National Museums Liverpool for permission to use their laser-scan of West Kirby 4, and Patricia Murrieta-Flores of the Past in its Place project (Universities of Exeter and Chester) for helping me to interrogate it. I would also like to thank Liz Stewart of National Museums Liverpool for photographs of the Museum of Liverpool display of the replica of the West Kirby hogback.
Finally, thanks are due to Christine Longworth and St Bridget’s Church, West Kirby, for facilitating visits to study the monument and to Patricia Murrieta-Flores and Ruth Nugent for help with my photography.