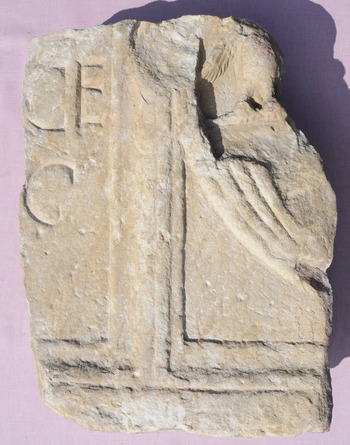


A. MONUMENTAL
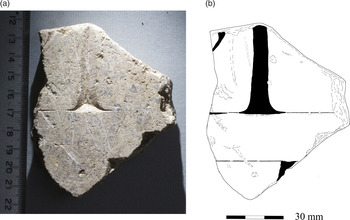
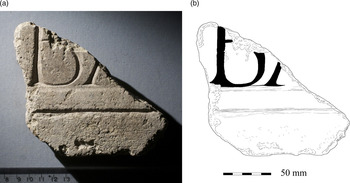
1. Silchester (Calleva Atrebatum, SU 64 42), Insula IX (fig. 1). Fragment of a Purbeck marble slab, 72 by 89 mm, 15 mm thick (but incomplete), foundFootnote 2 unstratified in 2001. Between setting-out lines 25 mm apart: […]P̣Ị[…] | […]Ṃ[…]Footnote 3
(a) and (b). Silchester, Purbeck marble fragment (No. 1). (Photographed and drawn by R.S.O. Tomlin)

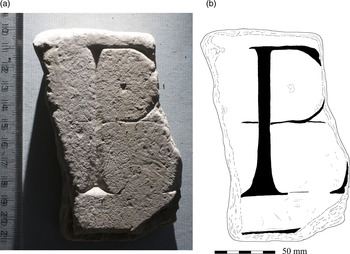
2. Ibid. (fig. 2). Fragment of a Purbeck marble slab, 58 by 100 mm, 29 mm thick (and original), found in 2002. Inscribed: […]P.[…] | […].[…]Footnote 4
(a) and (b). Silchester, Purbeck marble fragment (No. 2). (Photographed and drawn by R.S.O. Tomlin)

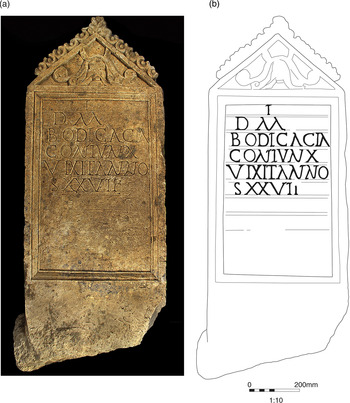
3. Cirencester (Corinium Dobunnorum, SP 019 017), Tetbury Road, outside the Roman west gate (fig. 3). Unweathered oolitic limestone tombstone, 0.54 by 1.34 m, 0.15 m thick, foundFootnote 5 in February 2015 re-used face-down to cover a later Roman grave.Footnote 6 The crested gable encloses a head of Oceanus, now defaced, below which is a recessed panel, 0.41 by 0.66 m, which reads: I | D M | BODICACIA | CONIVNX | VIXIT ANNO|S XXVII, | D(is) M(anibus) | Bodicacia | coniunx | vixit anno|s XXVII. ‘To the Shades of the Dead. Bodicacia, spouse, lived 27 years.’Footnote 7
(a) and (b). Cirencester tombstone (No. 3). (Photographed and drawn by Cotswold Archaeological Trust)

4. Elmswell (SE 996 583), parish of Garton-on-the-Wolds, Yorkshire East Riding. Fragment of a fossiliferous sandstone altar, 0.17 by 0.10 m, 0.10 m deep, foundFootnote 8 in 1950–52. Incised on the die: DIIO[…] | …[…] | […], Deo […] | … ‘To the god …’Footnote 9
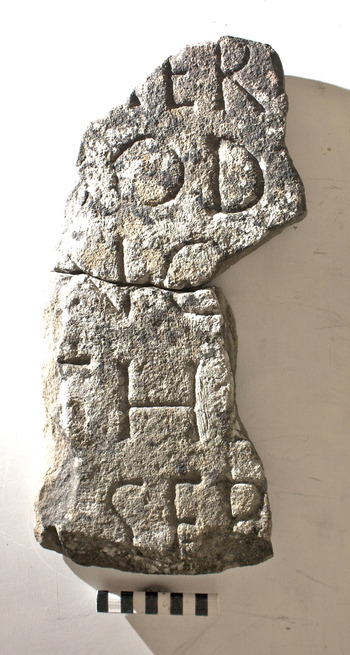
5. Catterick (Cataractonium, SE 225 992), North Yorkshire (fig. 4). Two conjoining fragments of a greyish sandstone slab, 0.19 by 0.42 m, 0.04 and 0.045 m thick, foundFootnote 10 in c. 1959. The lettersFootnote 11 are much worn and weathered: […].ER[…] | […].OD.[…] | […]NO[…] | […]TH.[…] | […] SEP̣[…], a dedication to Septimius Severus and his sons.Footnote 12
Catterick stone fragments (No. 5). (Photo: R.S.O. Tomlin)

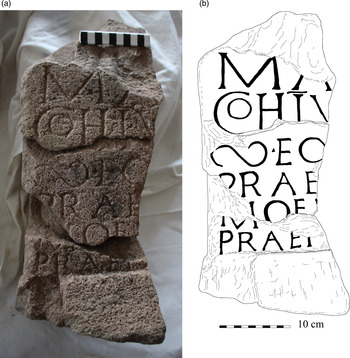
6. Papcastle (Derventio, NY 10941 30948), Roman fort south vicus (fig. 5). Four conjoining fragments of a red sandstone altar, 0.18 by 0.45 m, 0.15 m thick, foundFootnote 13 in 2014 (SF 75). They preserve part of the splayed base and part of the neatly squared die, on which is inscribed in well-formed lettersFootnote 14 now somewhat damaged: […] | MA[…] | CoH o Ī V[…] | ∞ o EQ̣[…] | P̣RAE[…] | MOE.[…] | PRAEF̣[…], [Deo] | Ma [rti] | coh(ors) I V [ang(ionum)] | (milliaria) eq(uitata) [cui] | prae [est ?A] |moe [nus] | praef […]. ‘To the god Mars, the First Cohort of Vangiones, one thousand strong, part-mounted, which the prefect Amoenus commands …’Footnote 15
(a) and (b). Papcastle altar (No. 6). (Photographed and drawn by R.S.O. Tomlin)

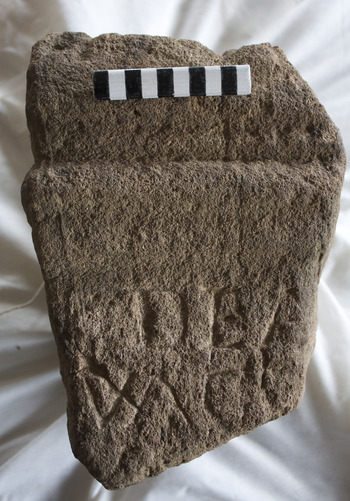
7. Ibid. (fig. 6). Red sandstone fragment, 0.21 by 0.31 m, 0.24 m thick, from the capital and upper die of a crude altar (SF 123). One bolster and part of the focus is lost, but it can be calculated that the capital was originally c. 0.28 m wide. The die is slightly recessed (by 6 mm on the left), so it would have been c. 0.27 m wide, implying that the first line was centred. Roughly incised: DEA[.] | VΛCV[…] | .[…], dea [e] | Vacu [nae] | … ‘To the goddess Vacuna …’Footnote 16
Papcastle altar (No. 7). (Photo: R.S.O. Tomlin)

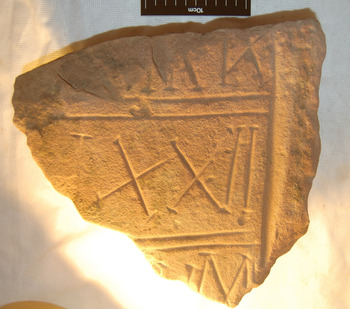
8. Ibid. (fig. 7). Red sandstone fragment of a tombstone, 0.26 by 0.24 m, 0.09 m thick (the back being unfinished but probably original) (SF 98). The right edge, with diagonal tooling-grooves, is original, but the other edges are broken. A broad vertical line marks the right border, and pairs of incised horizontal lines separate each line of text. The letters are finished by short serifs punched at right angles. They read: […] | […]M IX | […]Ṇ XXII | […]ṾM | […], […] | […] m(enses) IX | [… a]n(nos) XXII | [?titul]um | […]. ‘… aged 9 months … 22 years … set up this inscription.’Footnote 17
Papcastle tombstone (No. 8). (Photo: Wardell Armstrong Archaeology)

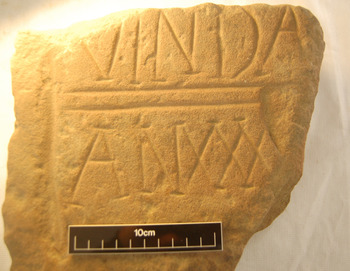
9. Ibid. (fig. 8). Red sandstone fragment of another tombstone, 0.26 by 0.28 m, 0.11 m thick (the back being rough-tooled but original) (SF 94). The left edge, with horizontal tooling-grooves, is original, but the other edges are broken. A broad vertical line marks the left border, and pairs of narrower horizontal lines separate each line of text. The letters are finished by short serifs punched at right angles.Footnote 18 They read: […] | VINDA[…] | AN XXXX[…], […] | Vinda [v(ixit)] | an(nos) XXXX […], ‘… Vinda lived 40 (or more) years.’Footnote 19
Papcastle tombstone (No. 9). (Photo: Wardell Armstrong Archaeology)

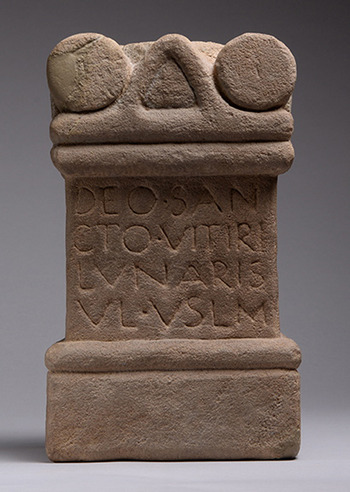
10. Durham area (fig. 9). Small buff sandstone altar, 147 by 243 mm, 127 mm deep, said to have been found ‘on the outskirts of Durham’ in the 1980s.Footnote 20 Inscribed in neat capitals on the die: DEO o SAN|CTO o VITIRI | LVNARIS | VL o VSLM, deo san|cto Vitiri | Lunaris | VL v(otum) s(olvit) l(ibens) m(erito). ‘To the holy god Vitiris, Lunaris … paid his vow, willingly, deservedly.’Footnote 21
Durham area altar (No. 10). (Photo: ArtAncient)

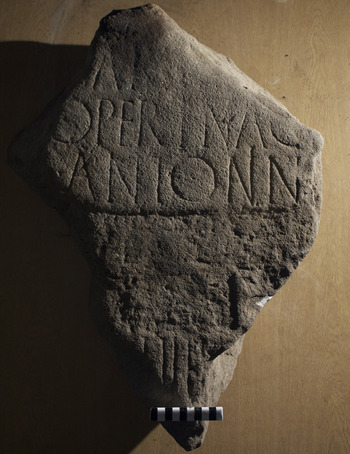
11. Vindolanda (NY 768 663), Northumberland (fig. 10). Fragment of a buff sandstone slab, 0.49 by 0.69 m, 0.162 m thick, foundFootnote 22 amongst building rubble at the west end of a fourth-century barracks, just to the south of the south-east corner of the third-century principia. There is trace of the upper border, which confirms that the first two letters belong to the original first line, but the whole surface is worn and the lettering (c. 70 mm high) quite shallow in consequence: […]AR[…] | […]OPERṬ͡ỊNAC̣[…] | […] Δ ANTON͡IN[…] | [///] | [///] | […]ḤIIII[…]. ?[imp(eratoribus) Caes] ar [ibus L(ucio) Septimio | Severo Pi] o Pertinaci [… | et M(arco) Aur(elio)] Antonin [o … et P(ublio) Septimio Getae | nobilissimo Caesari … co] h(ors) IIII [Gallorum …]. ‘To the Emperors Caesars Lucius Septimius Severus Pius Pertinax … and to Marcus Aurelius Antoninus … and to Publius Septimius Geta most noble Caesar … the Fourth Cohort of Gauls …’Footnote 23
Vindolanda stone fragment (No. 11). (Photo: R.S.O. Tomlin)

B. INSTRUMENTUM DOMESTICUM
CHESHIRE
12. Findspot withheld. Circular lead weight, 50 mm in diameter, foundFootnote 24 in 2014. Impressed: VIII, viii (unciae). ‘8 ounces.’Footnote 25
CUMBRIA
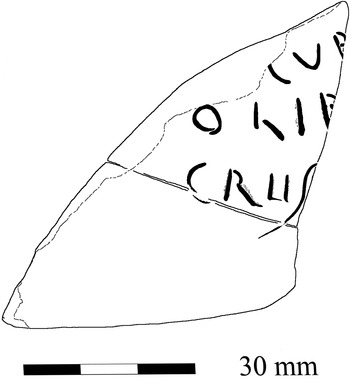
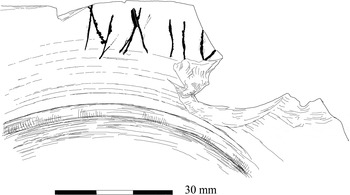
13. Carlisle (Luguvalium, NY 40 56) (fig. 11). Two conjoining wall sherds 5 mm thick of a vessel in reddish fabric with white slip, found in or before 1867.Footnote 26 Incised before firing: [1–2]CVṚ[…] | OLỊ[…] | CRIIS[…]Footnote 27
Carlisle graffito (No. 13). (Drawn by R.S.O. Tomlin from a photograph)

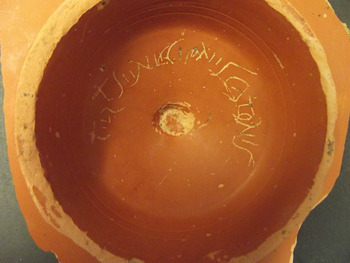
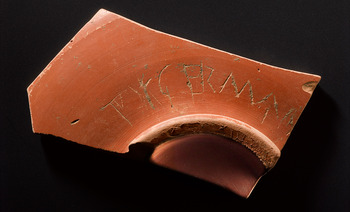
14. Papcastle (Derventio, NY 1134 3136), Roman fort east vicus (fig. 12). Complete samian base sherd, foundFootnote 28 in 2013. Scratched after firing underneath within the foot-ring, in cursive letters: TERT SENECIONIS CATONIS, Tert(ii) Senecionis Catonis. (i) ‘(Property) of Senecio.’ (ii) ‘(Property) of Cato.’ (iii) ‘(Property) of Tertius.’Footnote 29
Papcastle samian graffito (No. 14). (Photo: Wardell Armstrong Archaeology)

15. Ibid. (Derventio, NY 10941 30948), Roman fort south vicus. Samian wall sherd (SF 30, probably Drag. 18/31) foundFootnote 30 in 2014. Scratched after firing in capitals above the (now missing) foot-ring: […].AVḌ[…]Footnote 31
DEVON
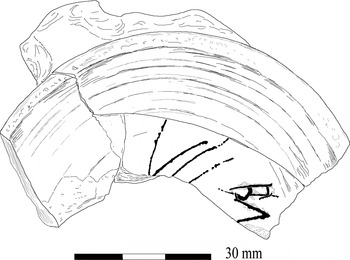
16. Exeter (Isca Dumnoniorum, SX 9223 9275), Princesshay, immediately north-east of the Roman legionary fortress (fig. 13). Base sherd of a samian dish (SG Drag. 18) probably stamped by Murranus (c. a.d. 45–90), foundFootnote 32 in 2005 with six other vessels apparently associated with a cremation of Neronian date which preceded the construction of a defended enclosure co-existing with the fortress. There are two graffiti made after firing. (i) Scratched underneath within the foot-ring, two intersecting lines: a ‘cross’, as a mark of identification. (ii) Scratched on the wall above the foot-ring: NAIIV[…], Naev [ius] or Naev [i]. ‘Naevius’ or ‘(the property) of Naevius’.Footnote 33
Exeter samian graffito (No. 16 (ii)). (Drawn by R.S.O. Tomlin)

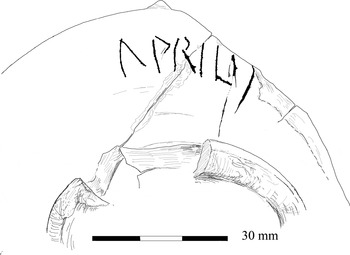
17. Ibid. (fig. 14). Conjoining sherds comprising much of a samian cup (SG Drag. 27) with illegible stamp, Flavian or earlier, found in a later feature cutting through the Roman levels. There are two graffiti scratched after firing. (i) Underneath within the foot-ring, two sets of intersecting lines in a ‘V’ figure: a mark of identification. (ii) On the wall above the foot-ring: APRILIS, Aprilis. ‘Aprilis’ or ‘(the property) of Aprilis’.Footnote 34
Exeter samian graffito (No. 17 (ii)). (Drawn by R.S.O. Tomlin)

ESSEX
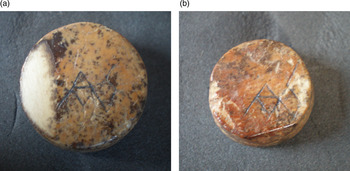
18. Elsenham (TL 546 249) (fig. 15). Two bone roundels, 17 mm in diameter, from a set of twelve found in 1990 in a rich cremation burial.Footnote 35 Each is incised underneath with a monogram consisting of M imposed upon A, to the right of which is an angular S; probably MAS.Footnote 36
(a) and (b). Elsenham bone roundels (No. 18). (Photo: J.C. Ford)

GLOUCESTERSHIRE
19. Cirencester (Corinium Dobunnorum, SP 0365 0250), Kingshill South, probable Roman villa outside the walls. Two conjoining black burnished (BB1) rim sherds, foundFootnote 37 in 2009. Incised after firing: VEN, perhaps Ven(ustus).Footnote 38
20. Ibid. Wall sherd from a flagon in North Wiltshire oxidised ware, crudely incised after firing: […]IIMIIḶ[…], perhaps [G] emel [lus].Footnote 39
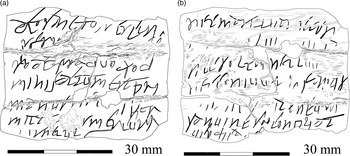
21. Uley (ST 789 996), West Hill, the Roman temple of Mercury (fig. 16). Rectangle cut from sheet lead, 47 by 38 mm, foundFootnote 40 in 1978. It is complete except for loss to the top edge of face (a) and the bottom edge of face (b), but it was badly stressed by being folded twice after it was inscribed. Face (b) is heavily coated with corrosion products in which the writing is rather faint. Both faces are inscribed in fluent New Roman Cursive of fourth-century date:

‘To the holy god Mercury. I, ?Carinus, ?implore you concerning the theft which has been done to me (by) Primanus. And Mercury is neither to permit him … nor … nor … neither sun nor moon, neither … of an infant … fulfil vengeance with his blood.’Footnote 41
(a) and (b). Uley lead tablet (No. 21). (Drawn by R.S.O. Tomlin)

HERTFORDSHIRE
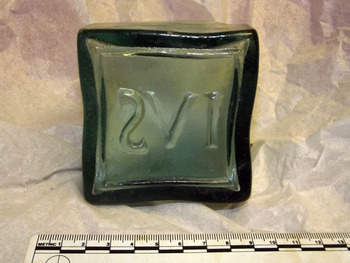
22. Kelshall (TL 3247 3697), Shiplands field (fig. 17). Moulded base of a green glass bottle foundFootnote 42 in 2014. Moulded retrograde: SΛIFootnote 43
Kelshall moulded bottle (No. 22). (Photo: North Hertfordshire Museum)

KENT
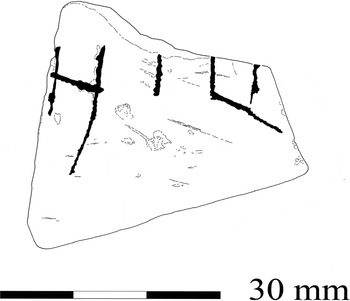
23. Canterbury (Durovernum Cantiacorum, TR 150 575), Whitefriars (fig. 18). Black burnished wall sherd foundFootnote 44 in 2000, scratched after firing in capitals: […]HILẠ[…], perhaps Hila [rus].Footnote 45
Canterbury graffito (No. 23). (Drawn by R.S.O. Tomlin)

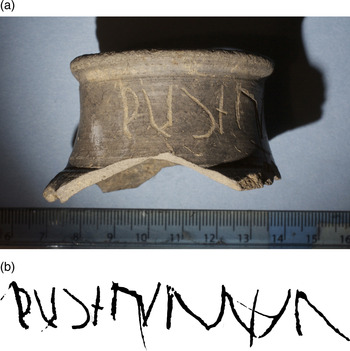
24. Ibid. (fig. 19). Complete black burnished rim sherd 54 mm in diameter, found in 2003, inscribed around the neck in badly-formed, ambiguous capitals: PVḌẸṆṢ…., perhaps Pudens Footnote 46
(a) and (b). Canterbury graffito (No. 24). (Photographed and drawn by R.S.O. Tomlin)

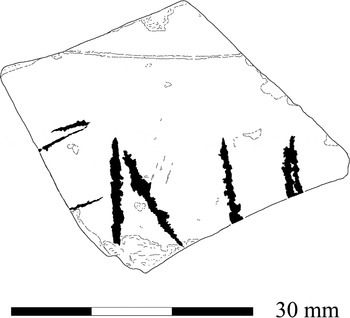
25. Ibid. (fig. 20). Black burnished wall sherd found in 2002, scratched after firing in capitals: […]ENI[…]Footnote 47
Canterbury graffito (No. 25). (Drawn by R.S.O. Tomlin)

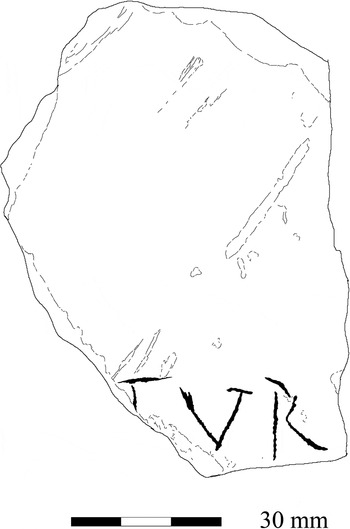
26. Ibid. (fig. 21). Black burnished base sherd found in 2000, scratched underneath after firing in capitals: […]TVR[…]Footnote 48
Canterbury graffito (No. 26). (Drawn by R.S.O. Tomlin)

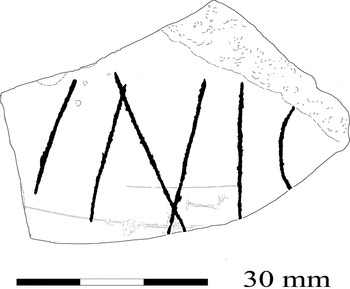
27. Ibid. (fig. 22). Black burnished wall sherd found in 2003, neatly scratched after firing in capitals: […]INIC̣[…]Footnote 49
Canterbury graffito (No. 27). (Drawn by R.S.O. Tomlin)

LINCOLNSHIRE
28. Caistor (TA 11 01). Copper-alloy finger-ring (Henig type XI), recordedFootnote 50 in 2014. Incised on the bezel within a rectangular panel formed by diagonal hatching: TOT
29. Dragonby (SE 905 138) (fig. 23). Two conjoining wall sherds of a South Spanish oil amphora (Dressel 20), foundFootnote 51 in 1964. Incised before firing in cursive letters: ṣ[.]c̣ụndi, S [e] cundi. ‘(Product) of Secundus.’Footnote 52
Dragonby amphora graffito (No. 29). (Drawn by R.S.O. Tomlin)

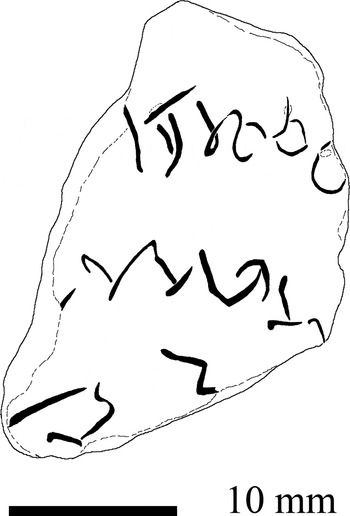
30. Ibid. (fig. 24). Flat coarseware sherd, found in 1972. Incised before firing with at least three lines of cursive letters, but they are too few and ambiguous for decipherment.
Dragonby graffito (No. 30). (Drawn by R.S.O. Tomlin)

31. Horncastle (TF 26 69). Incomplete silver finger-ring (Henig type XI), recordedFootnote 53 in 2014. Incised on the bezel within a square panel: TOT
32. Swinhope (TF 21 96). Silver finger-ring (Henig type VIII), 19.4 mm internal diameter, weight 4.73 gm, recordedFootnote 54 in 2014. Incised, perhaps stamped, on the plain oval bezel: TOT
33. Sudbrooke (TF 04 75). Incomplete silver finger-ring (Henig type VIII), recordedFootnote 55 in 2014. Inscribed on the circular bezel: ToTFootnote 56
34. Wragby (TF 13 78). Incomplete silver finger-ring (Henig type VIII), recordedFootnote 57 in 2014. Incised on the oval bezel: TOT
LONDON
City of London (Londinium)
35. 10 Trinity Square, EC3 (TQ 3450 0800). Wall sherd of an unsourced white-slip ware vessel, foundFootnote 58 in 2013. Deeply incised after firing: PA, Pa(…) Footnote 59
36. Ibid. East Gaulish samian rim sherd, scratched on the wall after firing: […]*ΛR[…], Ar […] Footnote 60
37. Ibid. Fineware beaker on a narrow base, neatly scratched on the wall after firing with three figures perhaps Greek letters: Δ □ IFootnote 61
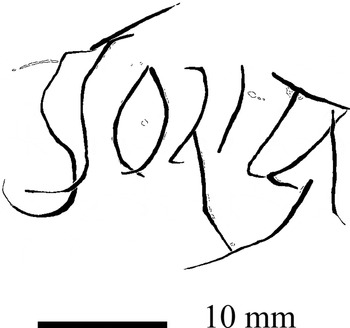
38. 24–26 Minories, EC3 (TQ 33660 81065) (fig. 25). Base sherd of a samian platter (SG Drag. 18) stamped OF PATRC (Patricius 1, a.d. 65–90), foundFootnote 62 in 2012. Scratched underneath after firing within the foot-ring: SOLITA, Solita Footnote 63
London, 24–26 Minories samian graffito (No. 38). (Drawn by R.S.O. Tomlin)

39. Ibid. Black wall sherd of ‘London Ware’, incised after firing: LẠ.[…], perhaps Lae [tus] Footnote 64
40. 70 Mark Lane, EC3 (TQ 33346 80893). Wall sherd of a South Spanish oil amphora (Dressel 20), foundFootnote 65 in 2013. Coarsely incised after firing: […] o VṂ[…], probably […] Um […] Footnote 66
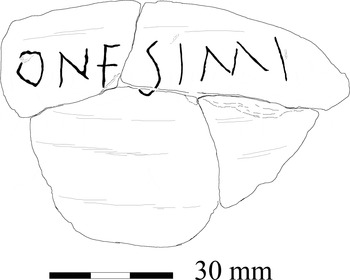
41. Ibid. (fig. 26). Nine wall sherds of a dark grey vessel, four of which conjoin and are incised after firing in neat capitals: ONESIMI, Onesimi. ‘(Property) of Onesimus.’Footnote 67
London, 70 Mark Lane graffito (No. 41). (Drawn by R.S.O. Tomlin)

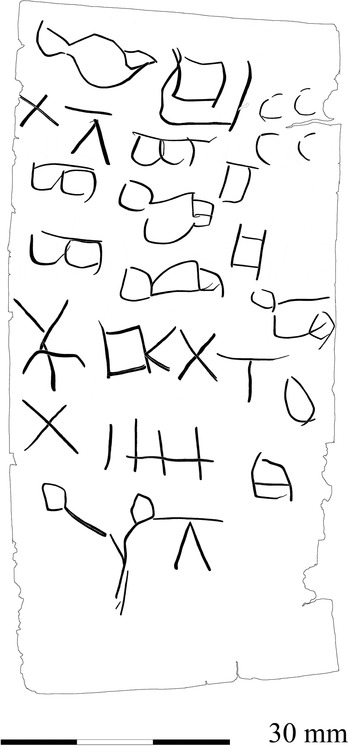
42. Upper Thames Street, EC4 (TQ 3236 8080) (fig. 27). Thin pewter strip (approximately Sn 55% to Pb 45%), 43 by 91 mm, foundFootnote 68 in 1989 on the site of the Roman Thames foreshore. Before being rolled up for insertion into an amulet case, it was inscribed with seven lines of magical signs (charaktêres) which cannot be deciphered, but their function would have been protective.Footnote 69
London, Upper Thames Street pewter tablet (No. 42). (Drawn by R.S.O. Tomlin)

Greater London
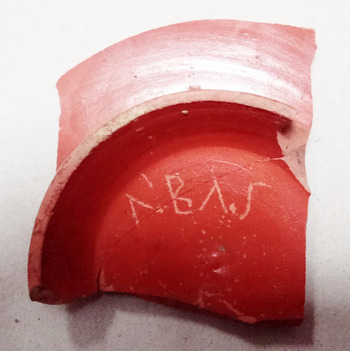
43. Southwark, Thameslink Programme (from TQ 32665 80229 (west) to TQ 32707 80244 (east)) (fig. 28). Samian base sherd, foundFootnote 70 in 2010. Scratched after firing underneath within the foot-ring: ΛBΛS, Abas(cantus).Footnote 71
Southwark samian graffito (No. 43). (Photo: Edward Biddulph)

NEWCASTLE UPON TYNE
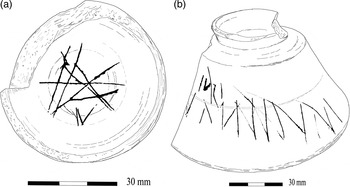
44. Benwell (Condercum, NZ 216 647), Roman fort (fig. 29). Sherd preserving the profile of a samian cup (Drag. 33, Antonine) stamped VXOPILLI o M, foundFootnote 72 in 1937. There are three graffiti made after firing. (i) Underneath within the foot-ring, a series of intersecting lines across the diameter, probably intended as a ‘star’-like mark of identification; and in small letters: IV, probably Iu(li).Footnote 73 (ii) Scratched on the wall while the cup was inverted: IVLI, Iuli. ‘(Property) of Julius’.Footnote 74 (iii) Scratched while the cup was held on its side, and thus inverted as to (ii) which it over-writes: IANỊỊỊẠṚỊ[…], perhaps Ianuari [us] or Ianuari. ‘(Property) of Januarius.’Footnote 75
(a) and (b). Benwell samian graffiti (i), (ii) and (iii) (No. 44). (Drawn by R.S.O. Tomlin)

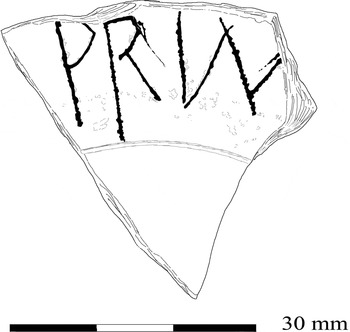
45. Ibid. (fig. 30). Samian base sherd (Drag. 18/31), from the berm in front of the south wall. Scratched after firing on the upper surface of the base: PRIM[…], Prim [us] or a cognate name such as Prim [itivus].Footnote 76
Benwell samian graffito (No. 45). (Drawn by R.S.O. Tomlin)

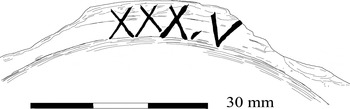
46. Ibid. (fig. 31). Samian base sherd (Drag. 38?). On the underside of the foot-ring, a series of diagonal incisions made after firing: XXXV, ‘35’.Footnote 77
Benwell samian graffito (No. 46). (Drawn by R.S.O. Tomlin)

NORFOLK
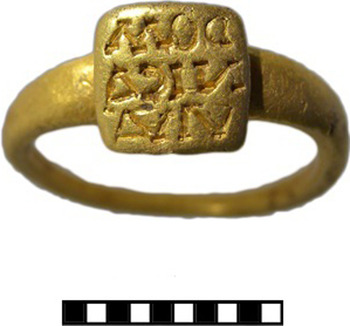
47. Fakenham (TF 92 30) area (fig. 32). Gold ‘Brancaster type’ finger-ring, 19 mm in diameter, weight 3.7 gm, foundFootnote 78 in 2014. Incised retrograde on the 7 mm square bezel: DOM|NICA | VIVA, Dom|nica viva(s). ‘Long life to you, Domnica.’Footnote 79
Fakenham gold ring (No. 47). (Photo: Portable Antiquities Scheme)

NORTHAMPTONSHIRE
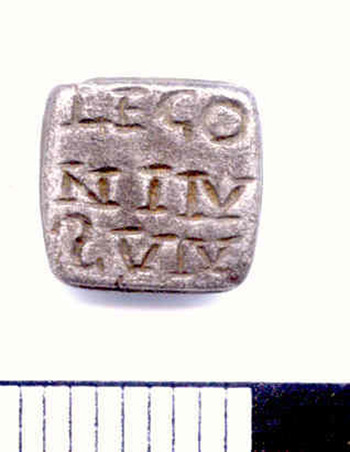
48. Tiffield (SP 69 52) (fig. 33). Rectangular silver ring-bezel, 8.2 by 8.5 mm, 2.5 mm thick, weight 1.5 gm, foundFootnote 80 in 2014. Incised in capitals: LEGO | N I IV | S VIVFootnote 81
Tiffield silver ring-bezel (No. 48). (Photo: Portable Antiquities Scheme)

NORTHUMBERLAND
49. Corbridge (Coria, NY 982 648) (fig. 34). Wall sherd of a South Spanish oil amphora (Dressel 20), foundFootnote 82 in 1971 north of Site XX. Inscribed before firing in cursive letters: […]ribus s[…] | ṃị ụ[…]Footnote 83
Corbridge amphora graffito (No. 49). (Photo: R.S.O. Tomlin)

50. Vindolanda (NY 768 663). Biconical lead weight (SF 18404), 32 mm in diameter, 20 mm thick, weight 179 gm, foundFootnote 84 in 2014. Inscribed in punched-dot letters: S, s(emis). ‘Half (a pound).’Footnote 85
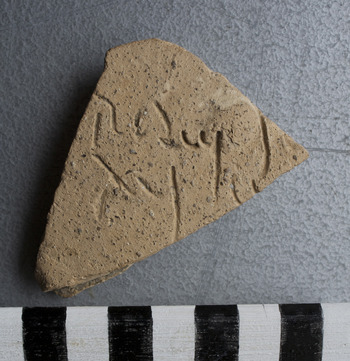
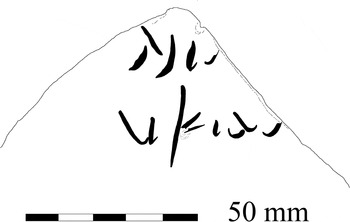
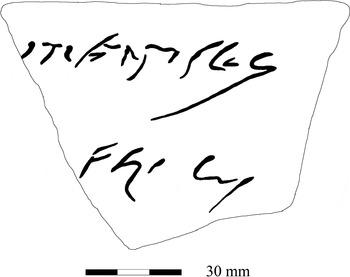
51. Ibid. (fig. 35). Wall sherd (SF 19409) from near the base of a South Spanish oil amphora (Dressel 20), inscribed before firing in cursive letters: ae.[…] | ukiaṇ[…], Ae […]| V K(alendas) Ian [uarias …]. ‘… on the fifth day before the Kalends of January’ (28 December).Footnote 86
Vindolanda amphora graffito (No. 51). (Drawn by R.S.O. Tomlin)

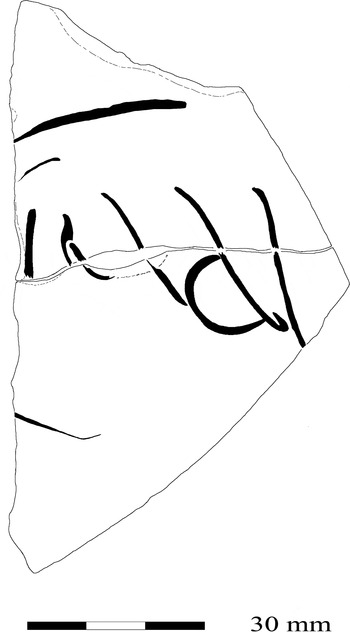
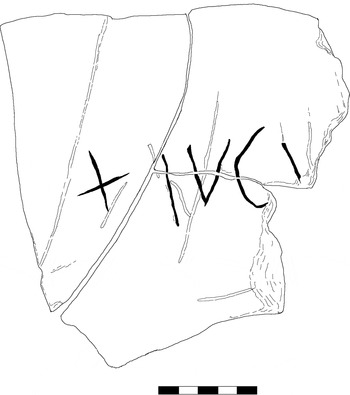
52. Ibid. (fig. 36). Three conjoining wall sherds (SF 19088) of a Dressel 20 amphora, crudely scratched after firing; the reading is complicated by earlier graffiti or casual scoring, but is probably: X IVCV[…], (mark of identification) Iucu [ndus] or Iucu [ndi]. ‘Jucundus or (property) of Jucundus.’
Vindolanda amphora graffito (No. 52). (Drawn by R.S.O. Tomlin)

53. Ibid. Two conjoining wall sherds (SF 18783) of a Dressel 20 amphora, incised after firing in large capitals (c. 70 mm): S Δ E[…], probably S(extus) E(…) […] Footnote 87
54. Ibid. (fig. 37). Shoulder sherd of a buff jar (SF 19471), inscribed vertically after firing, in quite elegant capitals: SOḶ[…], probably Sol [inus] or Sol [lemnis].
Vindolanda amphora graffito (No. 54). (Drawn by R.S.O. Tomlin)

55. Ibid. Two wall sherds of a black burnished vessel (SF 19361), not conjoining, both scratched after firing: (i) […]VI[…] and (ii) VIC̣[…], presumably Vic [tor] or a cognate name.
NOTTINGHAMSHIRE
56. Collingham (SK 84 62). Silver finger-ring (Henig type XI), recordedFootnote 88 in 2014. Incised on the bezel within a dot-punched square panel: ToTFootnote 89
SOUTH TYNESIDE
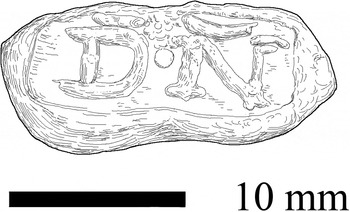
57. South Shields (Arbeia, NZ 365 679), Roman fort vicus (fig. 38). Oblong lead sealing impressed with a rectangular die 15 mm wide, foundFootnote 90 in 2010. In high relief: D N, d(omini) n(ostri). ‘(Property) of Our Lord (the Emperor).’Footnote 91
South Shields lead sealing (No. 57). (Drawn by R.S.O. Tomlin)

58. Ibid. Oblong lead sealing, its left-hand surface lost and corroded back to the channel left by the binding-cord in the middle, found in 2012. In high relief: […] N, [d(omini)] n(ostri). ‘(Property) of Our Lord (the Emperor)’.Footnote 92
SUFFOLK
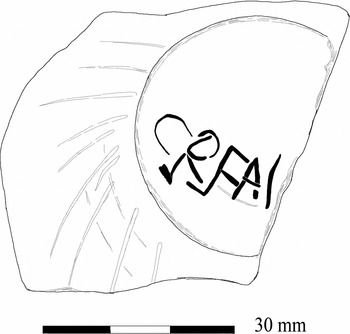
59. Wixoe (TL 708 431), Roman ‘small town’ (fig. 39). Grey base sherd foundFootnote 93 in 2011. Inscribed before firing on the underside: C̣RFẠ[…]Footnote 94
Wixoe graffito (No. 59). (Drawn by R.S.O. Tomlin)

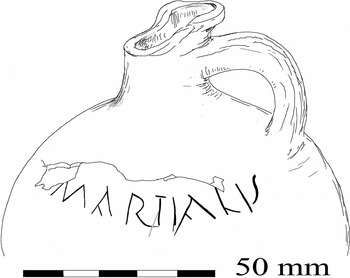
60. Ibid. (fig. 40). Complete buff flagon, now fragmented. Scratched after firing on the shoulder to the left of the handle, in capitals: MARTIALIS, ‘(property) of Martialis’.
Wixoe graffito (No. 60). (Drawn by R.S.O. Tomlin)

WEST SUSSEX
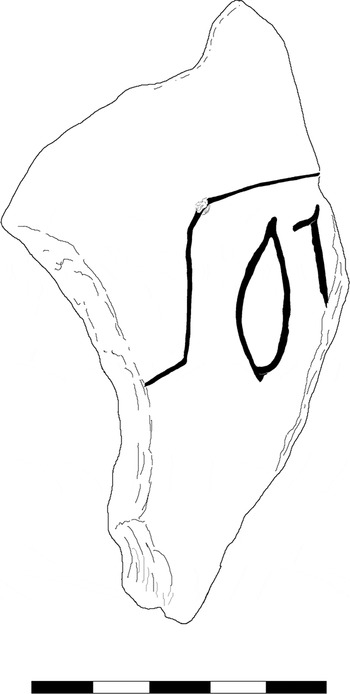
61. Chichester (Noviomagus, SU 864 048), Shippam's Factory site (fig. 41). Four conjoining base sherds of a samian vessel (Drag. 18/31?), foundFootnote 95 between 2004 and 2007. Underneath within the foot-ring are two graffiti made after firing, the incomplete names of successive owners. (i) In fine-scratched elongated letters: VII, probably Ve(…) Footnote 96 (ii) Coarsely scratched in small capitals: BΛ[…], Ba […] Footnote 97
Chichester samian graffito (No. 61). (Drawn by R.S.O. Tomlin)

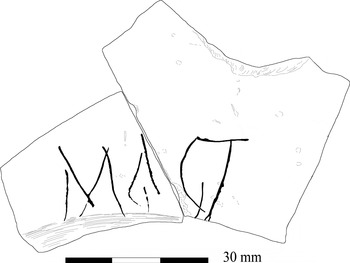
62. Ibid. Two conjoining wall sherds of a samian vessel (Drag. 18/31?) (fig. 42). Scratched after firing just above the carination: MAGI, Magi. ‘(Property) of Magus or Magius.’Footnote 98
Chichester samian graffito (No. 62). (Drawn by R.S.O. Tomlin)

63. Ibid. Base sherd of a samian dish (Drag. 31?). Scratched after firing on the inner face of the foot-ring: […]ỌṬṬFootnote 99
SCOTLAND
DUMFRIES AND GALLOWAY
64. Thornhill (NX 8805 9438), Campleburn, Templeland Bridge. Truncated conical lead weight with some damage to the edges, 25 mm in diameter, 13 mm high, foundFootnote 100 in 2014. Incised on top: II, (unciae) II. ‘Two ounces.’Footnote 101
EAST LOTHIAN
65. Inveresk (NT 34045 72235), Kirkpark (fig. 43). Samian base sherd (CG Drag. 18/31R), foundFootnote 102 in 2010. Incised after firing on the wall above the foot-ring: T F GERMAN[…], T(itus) F(lavius) German[us].Footnote 103
Inveresk samian graffito (No. 65). (Photo: National Museums of Scotland)

66. Ibid. Upper part of the handle of a South Spanish oil amphora (Dressel 20), incised after firing: MFootnote 104
STIRLINGSHIRE
67. Camelon (?Colania, NS 8640 8072), Glasgow Road. Part of the handle of a South Spanish oil amphora (Dressel 20), foundFootnote 105 in 2014. Coarsely incised after firing: LV, probably Lu(…) Footnote 106
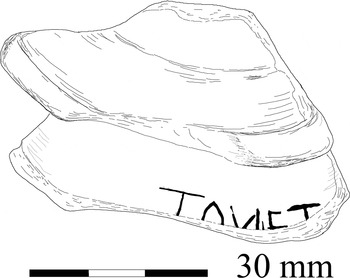
68. Ibid. (fig. 44). Samian base sherd (Dr. 18/31), incised after firing on the wall above the foot-ring when the vessel was inverted: TOX̣ỊẸT[…]Footnote 107
Camelon samian graffito (No. 68). (Drawn by R.S.O. Tomlin)

69. Ibid. Samian base sherd (Dr. 18/31R) stamped DAGOMA[ ] (c. a.d. 100–140). Scratched after firing underneath within the foot-ring, three letters apparently unrelated to each other: (i) […]M; (ii) C; (iii) VFootnote 108
ADDENDA ET CORRIGENDA
(a) RIB 76 (Silchester, Insula III west of the forum), fragment of a Purbeck marble slab found in 1891. Another fragment (fig. 45) of the same inscription, 110 by 107 mm, 30 mm thick (but broken and not original), was foundFootnote 109 in the same location in 2013, which reads: […]BA[…]. It does not conjoin, but matches in other respects.Footnote 110 It preserves two more letters of the bottom line, which can now be read as ATR[E]BA[TVM …], confirming that RIB 76 named the canton of the Atrebates.Footnote 111
(a) and (b). Silchester Purbeck marble fragment (Add. (a)). (Photographed and drawn by R.S.O. Tomlin)

(b) RIB 288 (Wroxeter). A line-break was omittedFootnote 112 from the transcript of lines 3–4, which should read: … ponti [fi]|ci maximo …
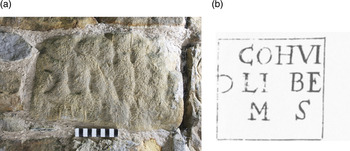
(c) RIB 1508 (Hadrian's Wall, near Tower Tye) (fig. 46). This centurial stone, seen in 1702 and ‘now lost’, has been rediscoveredFootnote 113 at Walwick Hall (NY 901 707) midway between Milecastle 28 (Walwick) and Turret 28a. It is buff sandstone, 0.34 by 0.23 m, thickness unknown. The lettering is badly worn and weathered, but supports the reading deduced from the drawings in Hunter (1702) and Horsley (1732): COH VI | 7 LIBER|ΛLISFootnote 114
(a) and (b). RIB 1508 (Add. (c)). (Photographed by R.S.O. Tomlin and drawn by C. Hunter)

(d) RIB 2308 (milestone west of Vindolanda). Gale's reading of TVNG probably preserves part of the primary text, now lost, which would thus have named the cohors I Tungrorum, which garrisoned Vindolanda from a.d. 105 to c. 122, as dedicating the milestone to Hadrian.Footnote 115
(e) RIB 2328* This imported altar-shaped tombstone, thought to have been found in Canterbury ‘about 1860’, was presented to Canterbury Museum in 1833 by William Henry Baldock.Footnote 116 In 1869 it was published independently as CIL ii 585 (Mérida). Since E is ligatured to A in line 3, the name of the deceased should be read in the dative: P(ubliae) Val(eriae) Maxi|minae.
(f) RIB 2324* This imported altar-shaped tombstone, ‘once in the possession of the late Dr H. Wacher, of Canterbury’, which is said by Watkin to have been found ‘about 1840 at Petham’, must also have belonged to William Henry Baldock (of Petham). Probably they both originated from Mérida.Footnote 117
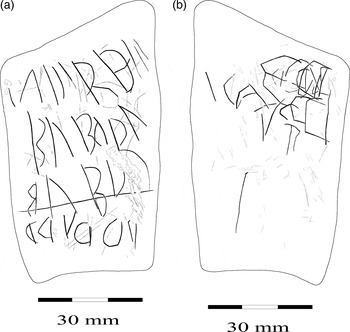
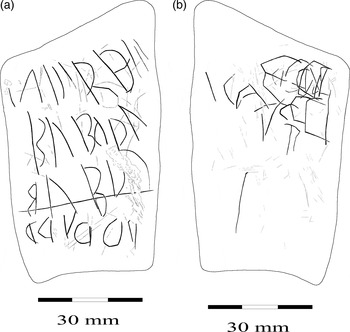
(g) RIB II.4, 2454.3 (Wroxeter) (fig. 47). The published drawingsFootnote 118 probably over-simplify the medley of scratches on this small piece of mudstone, but it is difficult to establish their sequence or to distinguish deliberate incisions from casual abrasion. Obverse: four lines of crude letters, Λ, B and D, the last line apparently inverted. Reverse: still more complicated, but angular C repeated. As RIB notes, this is apparently writing-practice.
(a) and (b). RIB II.4, 2454.3 (Wroxeter) (Add. (g)). (Drawn by R.S.O. Tomlin)
(h) RIB II.6, 2493.69 (Bearsden) (fig. 48). This sherd of a South Spanish oil amphora (Dressel 20) has been re-drawn to accompany the corrected reading in Britannia 28 (1997), 472, add. (e).
RIB II.6, 2493.69 Bearsden (Add. (h)). (Drawn by R.S.O. Tomlin from a squeeze taken by R.P. Wright)

(i) RIB II.8, 2502.51 (St Albans). The published drawing is accurate, but re-examination of the original shows that there is a tiny but deliberate nick in the broken edge to the right of the last (incomplete) letter in the last line (6). The penultimate line (5) should now be read as conticuere […], not CONTICVE[…], and 6 as intiq̣ […], the two being restored as conticuere [omnes] | int(ent)iq [ue ora tenebant].Footnote 119
CHANGE IN LOCATION
(a) RIB 1158 (Corbridge) (fig. 49). This fragment of a dedication slab has been removed from the cellar where it was originally found, and cleaned of adhering whitewash.Footnote 120 It is currently at Corbridge Roman Site, but its destination is not yet known.
RIB 1158 (Corbridge) (Change in Location). (Photo: Corbridge Roman Site)