

Introduction
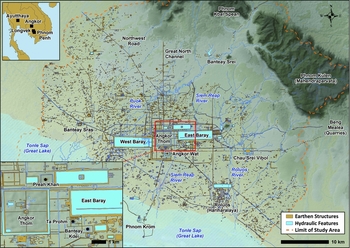
The role and function of Angkor Wat has changed significantly over the eight centuries since its construction in the twelfth century AD (Fletcher et al. Reference Fletcher, Evans, Pottier and Rachna2015: 1389–90) (Figure 1). Despite this varied history, research on Angkor Wat has largely focused on its art and architecture and its role as a Vishnuite temple during the twelfth and thirteenth centuries.
Map of Greater Angkor and its hydraulic features, including sites mentioned in this paper: (inset top left) regional view; (inset bottom left) detail of the central urban area; data courtesy of NASA-SRTM, JICA, Damian Evans and Christophe Pottier.

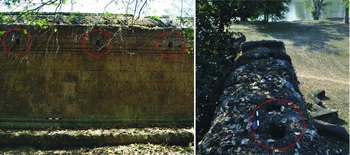
During the Angkorian period (ninth to fifteenth centuries), Angkor was situated at the heart of its empire but by the Middle Period or post-Angkorian period (fifteenth to nineteenth centuries), this location had come to be on the periphery of the Cambodian state. The kingdom of Ayutthaya was, at this time, expanding its influence and significantly encroaching on the former territory of Angkor. Meanwhile, Angkor Wat, originally built as a temple dedicated to Vishnu, had, by the sixteenth century, become hallowed by Theravada Buddhist monks as the religious practices of the Khmer changed. Over the centuries, Angkor Wat has undergone repairs; in addition to maintenance, it has been modified in several places, especially within the first (innermost) enclosure. These additions are significant because they reveal changes to the function of the monument. The fourth (outermost) enclosure wall also bears traces of a significant, and late, change in its function in the form of numerous holes and postholes (Figure 2), which supported substantial wooden structures that no longer survive. This paper highlights the radical nature of these changes and demonstrates that the wall was modified to fortify the enclosure.
The fourth enclosure wall of Angkor Wat showing the horizontal holes on the inside face (left) and vertical holes along the top (right).

Enclosure wall
The outermost enclosure wall, one of the largest walls at Angkor, was built in the early twelfth century as part of the original layout of the temple. As a freestanding, rectilinear enclosure, it measures 810 × 1030m and encloses more than 83ha. The surrounding wall is over 4m high and 1m thick, and creates an impressive boundary. The wall is primarily constructed of laterite, with sandstone used to create the four gopura (entrance pavilions) and coping stones.
The chaîne opératoire for Angkorian monuments involved the assembly of rough-cut blocks, the removal of uneven surfaces and, finally, decorative carving. Transport of masonry from quarry to site was facilitated by small manoeuvring holes in each block. Once lifted into position, the blocks were ground against each other to form a smooth edge (Nafilyan Reference Nafilyan1967). Wall surfaces were finished with the removal of uneven surfaces before the execution of the final stages of decoration, a sequence deduced from the presence of many incomplete examples. A lack of surface finish along the eastern half of the enclosure wall is very apparent. The entire wall to the east of the North and South Gopuras is unfinished in contrast to the western half, which was fully finished, suggesting that the completion of the western half was prioritised, perhaps because of the western orientation of the temple.
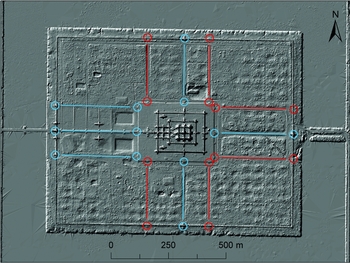
The enclosure wall clearly exhibits at least one obvious phase of alteration. One of a number of changes concerns the ‘gateway gaps’, which are now filled with masonry to form a continuous wall. There are six gateway gaps: two in each of the north, east and south walls. Their location is significant, as each is aligned with one of the 12 staircases that punctuate the naga (serpent) balustrade between the third and fourth enclosures (Figure 3). These staircases are symmetrically spaced around the balustrade, three on each side, with the central staircase aligned with its respective gopura. The staircases on the west side of the balustrade demonstrate the significance of the overall arrangement because the outer staircases align with the doorways in the two outer towers of the West Gopura. Similarly, the six gateway gaps in the enclosure wall align with the outer staircases of their respective gopura; their positioning therefore seems deliberate. An additional gap in the east wall is currently used for vehicular access to the enclosure. Although its location does not correlate with the symmetry of the gateway gaps, what little masonry remains in the gap clearly postdates the original construction phase.
LiDAR hillshade map, showing the staircases and their alignment with the gopura doorways (blue) and the gateway gaps (red) (LiDAR courtesy of KALC).

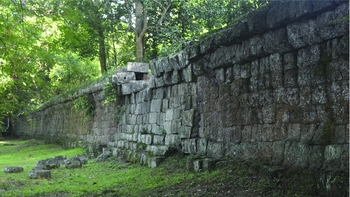
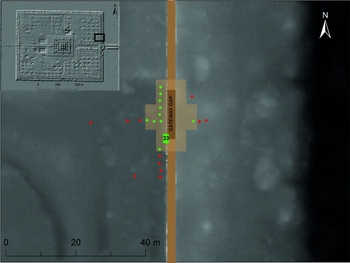
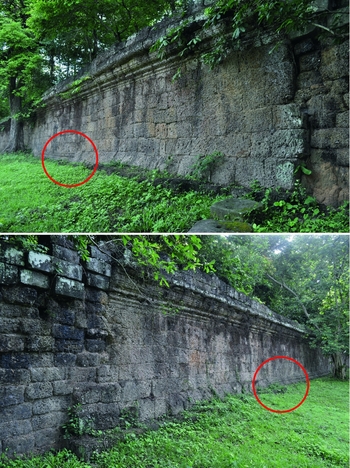
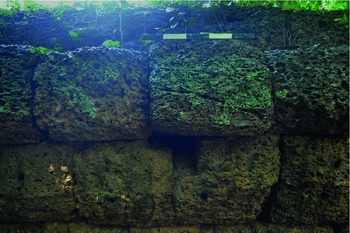
The nature of the masonry used to fill the gateway gaps is significant and distinct. Even though the rest of the wall was built almost exclusively in laterite, the gateway blockages make extensive use of sandstone (Figures 4 & S1–S6); moreover, some of these blocks have been recycled, featuring decorative carvings such as a dancing apsara (celestial nymph) and lotus motifs. It should also be noted that the windows of the South Gopura are filled by decorated blocks. The exact source of these blocks is not yet known, but the decoration on some of them resembles the style of later Bayon-era monuments. In August 2013, the author conducted a preliminary test excavation and targeted programme of coring, which focused on the substrata of the gateway gap in the north half of the east wall. The study identified this location as the intended position of a significant structure that was not subsequently built (Figure 5). The wall is built upon a foundation layer of hard, compacted, fine white sand beneath slightly coarser red sand that typically extends less than 1m from the base of the wall (Figure S8). At this location, however, the foundation layers widen significantly and, in the middle of the gateway gap, extend to around 6m from the wall on both sides—it does not continue farther into the interior and is thus unrelated to the road grid with which it is aligned. Following installation of this foundation layer, the original construction objectives appear to have changed. Evidence is provided by variations in the degree of surface finishing on the wall face. The more finished state of the western half of the enclosure is critical to understanding the sequence of events. Although the original construction phase of this part of the wall is surface finished, the degree of finished detail decreases as one approaches the gateway gaps (Figure 6). These parts of the wall, which were to frame the intended structure, were left in an unfinished state to allow the interlocking of the two components. The logical conclusion is that no masonry was present prior to the infill of the gateway gaps.
Gateway gap on the south wall, east side, exterior.

Plan of the gateway gap on the east wall, north side, showing cores that encountered foundation sand (green) and those that did not (red), and trench 33; a hypothetical foundation trench is shown in mustard brown.

Gateway gap in the south wall, west side, facing west (top) and east (bottom); note the unfinished surfaces along the bottom edge of the wall adjacent to the gateway gap and the finer detailed blocks located farther away.

The additional features that are the main topic of detailed attention here consist of a total of 6257 holes, notches and grooves cut into the surfaces of the wall. The features are of two main types: holes cut horizontally into the upper part of the inner face of the wall, and vertical holes, notches and grooves cut into the top of the wall. The holes were brought to my attention by Christophe Pottier. Preliminary survey was undertaken during December 2011 and January 2012, followed by an intensive study—between July and September 2013—using a Leica TPS 1200+ Total Station. The location of each feature was recorded using the Total Station and then measured with a hand tape. Along the western half of the enclosure this was a straightforward process because the holes were the only aberrations in an otherwise unmarked surface. Along the eastern half, however, the unfinished state of the wall required a more selective approach in which other marks and notches, related to the construction of the wall, were filtered out. Generally, these other marks are smaller and shallower, comprising: a) manoeuvring holes, which are always roughly circular (typically 30–40mm in diameter) and relatively shallow (50–100mm deep); and b) grinding notches (typically 100mm square in cross section and 50–100mm deep). The latter are always located on the upper edge of a block and in vertical alignment with the manoeuvring holes on the block above, making them suitable anchor points for the wooden levers that ground the blocks back and forth to make the adjoining edges smooth (Nafilyan Reference Nafilyan1967). Although the function of some of these markings is unclear, the critical point is that they are absent from the western half of the enclosure. The implication is that these features are related to the construction of the wall and their absence from the western side is due to their subsequent removal during the surface-finishing process. They are therefore unrelated to the wooden structure that was supported by the larger horizontal and vertical holes.
Form and distribution of the holes
Identifying the potential function of the holes required analyses of their size, distribution and relationships with one another. Three key aspects were examined: the morphology of the horizontal and vertical holes to assess whether they are standardised; the relationship between the horizontal and vertical holes; the relationship between these holes and the major architectural components of Angkor Wat, i.e. the wall, the gateway gaps and the symmetrical alignment of the complex.
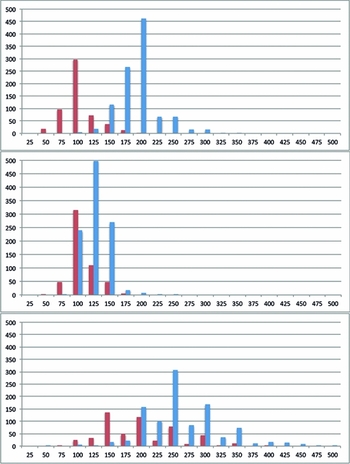
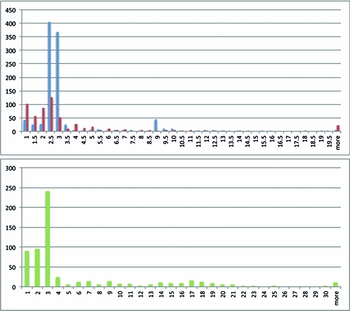
All horizontal holes are located on the inner face of the laterite wall, approximately 3.5–4m above the ground (the present-day ground level varies), but not along the walls of the gopura that punctuate the enclosure. The holes are highly consistent in their size, shape and distribution, and are classified as either regular or irregular. Regular holes are typically 200mm high, 100–150mm wide and 200–300mm in depth, with a cross section of ≥14 000mm2. Irregular holes are smaller in all dimensions—around 100mm high, 100mm wide and between 150 and 250mm deep—with a cross section of <14 000mm2 (Figure 7). The regular holes are overwhelmingly rectangular in cross section (98%), while the irregulars are mostly circular (54%). The regular holes are distributed around the entire enclosure, consistently grouped together in sets of seven with 2.5m spacing between each hole. Each set is divided from its neighbour by a gap of approximately 9m, yet in some parts of the east wall the spaces are not as regular. The irregular holes are distributed in a less orderly manner and are largely absent from the south-west quadrant. Some of the regular holes exhibit peculiarities in their installation as they are adjacent to shallow features with the same cross section. These holes are known as ‘re-carved’ pairs and consist of two holes with near identical cross sections, one of which is extremely shallow (50–100mm deep), while the other is 200–300mm deep. The vertical features are a more diverse set of shapes and sizes, but the vast majority are small circular holes (less than 100mm in diameter). Other larger vertical features include notches, located on either the inner or outer edge of the top of the wall, and grooves that run across the wall top. When the notches, grooves and larger vertical holes (larger than 100mm in diameter) are grouped together, a very clear pattern emerges in which these larger vertical features also form sets. Typically, these sets each consist of three large holes or notches, but at times grooves substitute or complement the arrangement. The three large features of each set are located towards the outside edge of the wall and are spaced approximately 3m apart (Figure 8). Another significant pattern is that the sets of large vertical features rarely overlap the distribution of smaller holes and, despite being located in between the large hole sets, the smaller holes are not as orderly.
Frequency histograms showing the height (top), width (middle) and depth (bottom) of horizontal holes: regular (blue), irregular (red); note that sometimes the true depth may be obscured by a compact deposit in the hole.

Frequency histograms showing the spacing of horizontal holes (top): regular (blue), irregular (red); and the spacing of large vertical holes (bottom, green).

The relationship between the horizontal and vertical features is also significant (Figure S7). A substantial proportion of the vertical feature sets (79%) correlate with the sets of horizontal holes, the rest are located within the wider spaces or the edge of a set. Recent acquisition of LiDAR data permitted further analysis of spatial patterning; the high-resolution topographic map produced shows the traces of a residential grid within the enclosure, made up of mounds, ponds and rectilinear recessed ‘roads’ (Evans et al. Reference Evans, Fletcher, Pottier, Chevance, Soutif, Suy, Sokrithy, Darith, Tina, Samnang, Cromarty, De Greef, Hanus, Bâty, Kuszinger, Shimoda and Boornazian2013: 12597). These Angkorian roads are most prominent in the east half of the enclosure, whereas those in the west are either disturbed by post-Angkorian activity or underlie the present-day roads. Nevertheless, the probable location of the Angkorian road grid can be adequately ascertained from the surviving traces and it does not correspond significantly with the positioning of holes. There are so many horizontal sets (125) and so few roads (22) that some (11) would probably coincide, at least partially, and such coincidences are probably not significant. Nor does a consistent correlation exist between the grid and the groups of large vertical holes. The key point here is that even though some roads come very close to corresponding to the spaces between sets of holes, they are not consistently aligned with them.
The most important relationship is between the holes and the later construction phases of the wall, where, crucially, both sets of holes are cut into the gateway gap infill. This phenomenon is exemplified in the north gateway of the east wall, which features both vertical and horizontal holes. This phasing reveals that both the gateway gaps and the holes postdate the original construction phase, with the holes representing the latest feature in the sequence. This association may, however, be underrepresented, as the masonry filling the gateway gap is unstable and most of the upper blocks have already fallen. Although bulky, these blocks are still moveable and further attempts to inspect them may prove fruitful.
Function of the structures
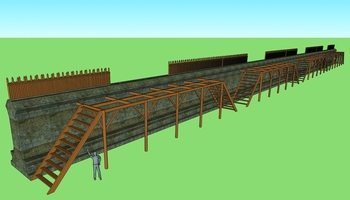
The parsimonious interpretation of the material evidence is that the holes supported a defensive structure. The horizontal and vertical holes are consistent with a defensive platform inside the wall and a palisade on top of the wall (Figures 9 & S9). The relationship between boundaries and defence is a complicated issue and far from self-evident (Coulson Reference Coulson1992; Samson Reference Samson1992). The case for the defence hypothesis is as follows. First, the horizontal holes supported a platform that provided a suitable surface to stand and walk upon. Second, the horizontal holes are located only on the inner face of the wall. The structure they supported was therefore situated on the inside of a substantial boundary and had a horizontal surface on which people could stand. The defence hypothesis holds that this platform gave the defenders the ‘higher ground’ over would-be attackers outside the enclosure. The third point is that due to the consistent correlation between the vertical and horizontal holes it is reasonable to suppose they are associated and therefore contemporary. The implication is that these regularities are intentional—they are consistent over a considerable distance—and that all the holes are related in some way. If the defence hypothesis is correct, the wide spaces between the platforms left room for stairs to access them, while a palisade provided a physical barrier on top of the wall. Furthermore, the association between the horizontal platforms and the large vertical holes suggests these holes supported a substantial structure that made use of the platform surface, such as a guard tower, but this is speculative. The final point is that both sets of holes are associated with, and postdate, the infill of the gateway gaps. Whatever was in the gateways previously—presumably wooden gates—was apparently more susceptible to forced entry than a solid wall. The blocking up of the gateways to form a continuous wall therefore helped secure these areas, and the platform was later built across them.
Reconstruction showing the relationship between the horizontal holes (platforms), the small vertical holes (palisade) and the large vertical holes (the breaks in the palisade); the structure supported by the large vertical holes is unknown and intentionally left out.

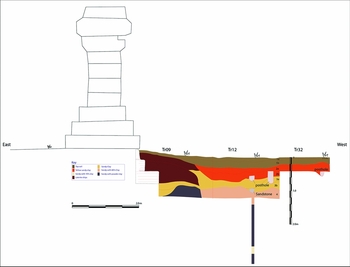
Further research is needed on the junction between the timber feature behind the wall, the gopura of the outer enclosure and any trace of superficial defensive features within the gopura such as the blocking up of windows and doors. The ‘platform’ construction also requires evidence for the posts that supported it. Excavations aligned with a regular horizontal hole in the upper parts of the enclosure wall have been undertaken in only three places (see Stark et al. Reference Stark, Evans, Rachna, Piphal and Carter2015: 1448, fig. 6). One posthole was located but it was 4m from the wall (Figure 10), which has led specialists such as Pottier to propose that these were not supports for a platform as 4m would be a very wide expanse for such an object (Christophe Pottier pers. comm.). Extensive excavation is needed to trace a line of supports before the engineering of the platform can be resolved. Given that the upright posts may have rested on stone blocks, as in traditional houses in the region from the nineteenth century to the present, the evidence for them could be ephemeral.
East–west elevation profile of east enclosure wall and associated strata within trenches 9-12-32; adapted from image drafted by Chhay Rachna.

Other hypotheses for the function of the structure can be envisaged but they are not sustainable. The primary alternative is that the structure supported a roof, providing shelter for people or animals. The shelter hypothesis holds that the horizontal holes supported a structure, similar in cross section to the defensive platform, which in turn supported a roof. There are, however, several problems with this hypothesis. First, it disregards the relationship between horizontal holes, vertical holes and gateway gaps; although it is conceivable that the three phenomena are unrelated, the connections between them strongly suggest otherwise. The defence hypothesis recognises all these features as an integrated entity. Second, if the horizontal holes simply provided shelter, why were the gateway gaps blocked up in such a manner? And if the blocking of the gateway gaps was unrelated to the function of the structure, why are they coincident? It is unclear in this proposal how the large vertical holes serve the shelter. If the structure made use of them, why do they not align with the small vertical holes, which are located between them? Furthermore, if the vertical holes were unrelated to the shelter, then what purpose did they serve? The shelter hypothesis also fails to consider why there are regular, large spaces between shelters. The defence hypothesis explains these spaces (typically 9m wide) as stairways at each end of the platform. A 9m gap would allow a staircase to climb at a comfortable 45° gradient to the platform height of 4m. Staircases would also have provided lateral support for the platforms.
It is also not clear what benefit would derive from having a shelter extend around the entire enclosure. A shelter could conceivably be that extensive, yet only a defensive installation would necessarily be so large. Horizontal holes do not exist in the walls of the gopura: a defensive installation would not need to extend behind the gopura because the additional height of the pavilion would provide an adequate barrier (between 9.2 and 11.2m in height) (see Nafilyan et al. Reference Nafilyan, Turletti, Than and Proeung1969: pl. LXXX & LXXXVI); the doors and windows of the gopura could be blocked readily by timber or re-used masonry. The core issues calling the shelter hypothesis into question are the unexplained need for regular interruptions in the structure and the unsolved function of the small vertical holes, which are distributed across them. Such a large residential complex would surely have made use of the vacant spaces between the sets, which offered as much as 1000m of additional shelter.
Finally, the epigraphic record reports that other Angkorian temples such as Ta Prohm (Cœdès Reference Cœdès1906) and Preah Khan (Cœdès Reference Cœdès1941) had populations resident within their enclosures, a premise consistent with road grids detected by the lidar survey, though their estimated resident populations were small compared with their workforces (see Evans & Fletcher Reference Evans and Fletcher2015: 1410). These urban layouts, also detected within Banteay Kdei, are structured less formally than Angkor Wat—while they do have a regular grid of roads, the moats and mounds within the grid are irregular in their arrangement. A preliminary inspection of these enclosures shows that while Banteay Kdei and Ta Prohm bear no markings or traces of ancillary structures, Preah Khan does feature a few dozen holes scattered sparsely around the interior. In general, these features are smaller than those at Angkor Wat and distributed irregularly, correlating neither with the roads nor other features, such as the monumental garuda (mythical bird-man). In summary, all these enclosures, which are known to have had resident populations, either have no trace of the regular wooden structures evident at Angkor Wat, or else display only sparse and scattered evidence of additional holes, suggesting that the Angkor Wat hole features had a distinct and different function unrelated to residential life.
Chronology of the structures
Although the case for the defensive hypothesis is strong, the dating of the structures, despite being relatively late, is open to discussion. A series of radiocarbon dates has been obtained from excavations within the Angkor Wat enclosure, which clarify its periods of greatest activity (see Stark et al. Reference Stark, Evans, Rachna, Piphal and Carter2015: fig. 7, 1450), but there is nothing by which to date the holes directly. A preliminary relative chronology can, however, be established on the basis of relationships between, for example, the holes and the residential grid, and the wall and its construction phases. The relative chronology is framed by a terminus post quem in the late thirteenth century, when the gateway gap infill was most probably assembled, and a terminus ante quem in the early seventeenth century, marked by a proliferation of weapons technology in Cambodia after the sixteenth century when cannon came into use. Indeed, a fort of this nature would not probably have been designed to resist heavy artillery and therefore almost certainly predates the use of cannon. Within these temporal limits, two potential scenarios exist; these are that Angkor Wat was fortified in conjunction with other defensive modifications made to the urban landscape, or that it was fortified independently.
There are two methods of establishing a relative chronology. The first is that regular and irregular holes in the inner face of the east wall are located at approximately the same height and the lines of irregular holes are often superimposed on the sets of regular holes, suggesting that the structures they supported could not have been coexistent. In several instances, however, the regular and irregular holes are conjoined to form an inverted L-shape (Figure 11). These coincident pairs demonstrate that the smaller irregular holes predate the regular ones, as the smaller cross section of the irregular beam would not fit securely if the larger hole were already there.
Irregular hole located to the upper left of a regular hole, forming an inverted L-shape.

There is no consistent relationship between the regular holes and the residential or road grid. The lack of correlation between the holes and grid suggests that the grid had fallen out of regular use by the time the defensive features were installed, and the holes are therefore relatively late.
The relationship between the holes, the original construction phase of the wall and the infilling of the gateway gaps is fundamental to understanding the chronology. Two key strands of evidence support a relatively late date for the construction of defensive works. First, the changes to coping stones and the relationship of horizontal holes to the masonry fill of the gateway gaps provides an approximate date after which these features were added to Angkor Wat. The coping stones along the top of the west wall have been modified in almost every instance by the features that used the vertical slots. The coping stones are decorative pieces that supported finials and are undoubtedly part of the original mid-twelfth-century construction as they are the same, stylistically, as other examples on the temple. Two types of modification to the coping stones can be seen: the holes cut vertically into the top of the laterite wall also cut through the outside edge of the blocks and, in some instances, are aligned with horizontal grooves cut into the top of the blocks. The consistent disregard for the fabric of the decorative coping stones indicates that the installation of the wooden structure postdates the main construction phase of the wall.
Two pieces of recycled stonework used among the masonry blocking the gateway gaps in the north wall offer a dating range for the alterations. A shallow relief apsara and an undamaged Buddha crête sculpture (part of a finial arrangement of Buddhas meditating in triangular niches) both date to the Bayon period (late twelfth to early thirteenth centuries) (Stern Reference Stern1965). The inclusion of the Buddha image means it escaped being defaced during the iconoclastic period (1240s–1290s), and dates the gap-filling to some time prior to the late thirteenth century.
The second strand of evidence for a later date relates to the introduction of artillery. Angkor Wat shows no signs of damage from cannon fire, nor could it have withstood such an attack. By the mid-seventeenth century, rival companies of European merchants had been engaged in aggressive competition in the Phnom Penh region for decades (Volker Reference Volker1954; Kersten Reference Kersten2006). The Dutch East-India Company was reluctant to share military technology with their Asian allies, but other companies were not so restrained (Reid Reference Reid1982: 2). By the mid-seventeenth century, any significant conflict would have featured cannon to some degree, and the fortification of Angkor Wat would no longer have been effective. The circumstances leading to its fortification must have occurred before this time.
Within this timeframe two alternative sets of circumstances can be considered. First, the fortification of Angkor Wat may have been contemporary with other large-scale defensive modifications associated with Angkor Thom. They comprise the installation of bastions on both sides of each of its five gopura and large earthen embankments—one of which includes a masonry wall—that extended defensive protection across the north and south sides of the residential area between Angkor Thom and the East Baray (Evans et al. Reference Evans, Fletcher, Pottier, Chevance, Soutif, Suy, Sokrithy, Darith, Tina, Samnang, Cromarty, De Greef, Hanus, Bâty, Kuszinger, Shimoda and Boornazian2013: fig. 3).
The Chinese trade emissary Zhou Daguan visited Angkor for one year in AD 1296/1297, whereas the report of Portuguese chronicler Diogo do Couto, detailing the account of Antonio da Magdalena, dates to around AD 1585. Zhou Daguan clearly had a brief to report military information, as his observations highlight the presence or absence of defensive structures. Specifically, he noted the lack of battlements along the city wall (Zhou trans. Reference Zhou and Harris2007: 47). He does not mention bastions or any other kind of defensive earthworks within the urban area. Diogo do Couto, however, does describe “superb bastions” at the city gates (Groslier Reference Groslier and Smithies2006: 53), and the addition of the bastions to Angkor Thom can therefore be dated somewhere between these two accounts. If Angkor Wat was fortified at the same time that would place it between AD 1297 and AD 1585.
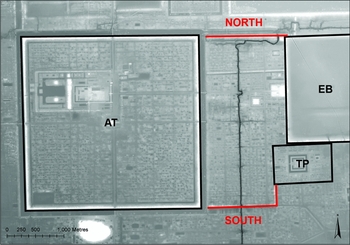
Two embankments connecting the Angkor Thom enclosure to the East Baray and the walls of Ta Prohm (Figure 12) are another security-related installation. Their chronology relative to the bastions is not yet known. The south bank aligns with and thus postdates the enclosure wall of Ta Prohm. The 2013 excavations by the Greater Angkor Project have shown that the north bank is built over the eastern edge of the moat of Angkor Thom and is therefore not from the eleventh century as previously thought (Jacques Reference Jacques1978: 312). In fact, these embankments most probably date to the thirteenth century (Roland Fletcher pers. comm.) or prior to the climatic instability of the mid-fourteenth century (Buckley et al. Reference Buckley, Anchukaitis, Penny, Fletcher, Cook, Sano, Nam, Wichienkeeo, Minh and Hong2010), which presumably would have brought construction to a halt.
LiDAR map showing the embankments (in red) that connect Angkor Thom (AT) to the East Baray (EB) and the enclosure wall of Ta Prohm (TP); note that this increases the enclosed space by around 50% (LiDAR courtesy KALC).

The second scenario attributes the defensive works of Angkor Wat to the late sixteenth century, independent of any other defensive operation and a final effort to protect part of Angkor behind a more easily defended, short, protective wall. The fortifications would hence belong to the period of Angkorian decline, perhaps even after Angkor Thom had been abandoned. In AD 1585 do Couto still referred to Angkor Thom as “the city” (Groslier Reference Groslier and Smithies2006: 53); this, and the advent of artillery warfare in the early seventeenth century, narrows this potential chronology to only a few decades. The defences could conceivably date to the late sixteenth century when Ayutthayan attacks on Cambodia, which were not aimed at Angkor, culminated in the sack of Lovek in 1594.
Conclusions
Angkor Wat is the first and only known example of an Angkorian temple being systematically modified for use in a defensive capacity. There is no reference to this event either in inscriptions (Cœdès Reference Cœdès1937–1966) or chronicles (Vickery Reference Vickery1977a, Reference Vickery1977b, Reference Vickery2004), which cautions against archaeological interpretations that rely heavily on historical sources. The available evidence suggests it was a late event in the history of Angkor, either between AD 1297 and 1585, along with other defensive works around Angkor, or perhaps sometime between AD 1585 and the 1630s, representing a final attempt to defend Angkor against the growing influence of Ayutthaya. Either date makes the defences of Angkor Wat one of the last major constructions at Angkor and is perhaps indicative of its end.
Acknowledgements
My thanks to the APSARA Authority, the Greater Angkor Project, the Carlyle Greenwell Research Fund and the Robert Christie Foundation, especially to So Malay in Siem Reap and Martin King in Sydney, for making my fieldwork possible and Roland Fletcher, Christophe Pottier, Mitch Hendrickson, Damian Evans and Martin Polkinghorne. Thanks also to Miriam Stark, Chhay Rachna, Alison Carter and Heng Piphal—particularly for the 2013 excavations—and Suy Pov, Moeun Lay, Han Chenda, Chan Reaksmey, Kasper Hanus and Lauren Wienckowski for their assistance in the field.
Supplementary material
To view supplementary material for this article, please visit http://dx.doi.org/10.15184/aqy.2015.140