

A. MONUMENTAL
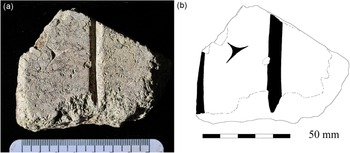
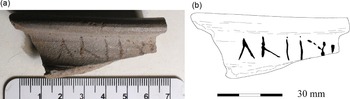
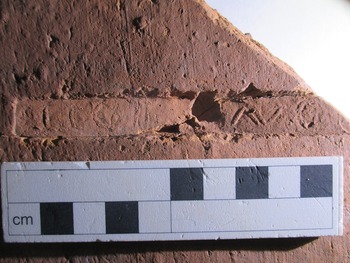
1. Silchester (Calleua Atrebatum, SU 64 62), Hampshire, Insula IX (fig. 1). Small fragment of a Purbeck Marble slab, 80 by 61 mm, 19 mm thick (but now incomplete), foundFootnote 2 in 2004 in a late-first/early-second century context. Skilfully incised, the middle part of two vertical strokes divided by a triangular medial point: […]..[…]Footnote 3
(a) and (b). Silchester, fragment of a monumental inscription (No. 1) (photo and drawing: R.S.O. Tomlin).

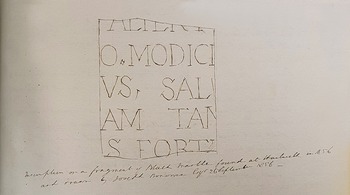
2. Hartwell House (SP 796 140), near Aylesbury (Bucks.) (fig. 2). ‘Inscription on a fragment of Black Marble found at Hartwell in 1856’, dimensions not recorded, now lost. The provenance is uncertain.Footnote 4 It reads: […]ALṬẸRỊ[…] | […]O Δ MODICI[…] | […]VS Δ SAL[…] | […]AM TAṂ[…] | […]S FORT.[…].Footnote 5
Hartwell House, inscription drawn by Joseph Bonomi in 1856 (No. 2) (photo: Michael Metcalfe).

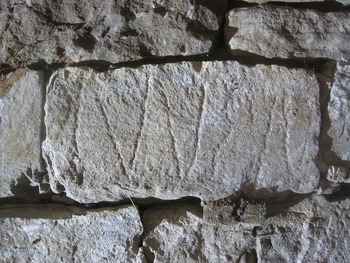
3. Caerwent (Venta Silurum, ST 4694 9056), Monmouthshire (fig. 3). Building-stone foundFootnote 6 in 2021, built into the east wall of Caerwent House which stands on the south-east corner of the Roman forum. This wall is seventeenth-century, but is built of squared rubble which by its location is probably Roman stone re-used. A crudely incised zigzag of diagonal strokes is interrupted by a sinuous line, which might be letters: perhaps NVSNFootnote 7
Caerwent, inscribed building-stone (No. 3) (photo: Mark Lewis).

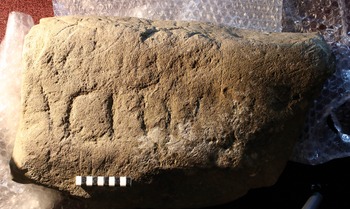
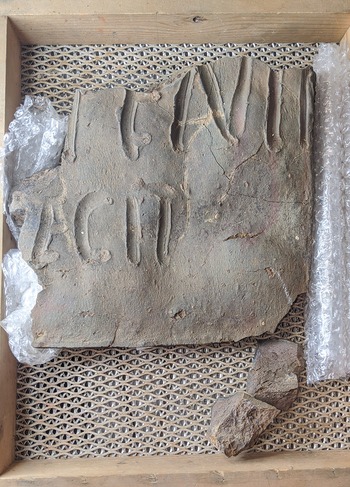
4. Vindolanda ((NY 678 663), Northumberland. (fig. 4). Irregular slab of buff sandstone, 0.59 by 0.35 m, 0.18 m thick, foundFootnote 8 in 2021. In irregular capitals c. 0.09 m high, coarsely incised with blows of a mason's point: […]ACITI, [T]aciti. ‘(The stone) of Tacitus.’Footnote 9
Vindolanda, building-stone with inscription (No. 4) (photo: R.S.O. Tomlin).

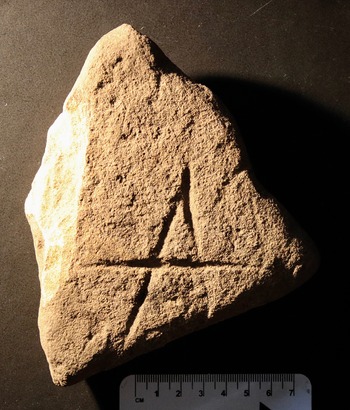
5. Ibid. (fig. 5). Triangular fragment of a buff sandstone slab, 125 by 120 mm, tapering in thickness from 35 to 32 mm. The edges are broken. Incised with two lines meeting at an acute angle, crossed horizontally by a third: probably the letter A.Footnote 10
Vindolanda, stone fragment with inscribed letter (No. 5) (photo: R.S.O. Tomlin).

B. INSTRUMENTUM DOMESTICUM
BUCKINGHAMSHIRE
6. Stony Stratford (SP 779 403) Windmill Field. Lower left corner of a thin silver plaque, 26 by 32 mm, foundFootnote 11 in 1789, which preserves the lower part of a spiral-fluted column. This would belong to a gabled shrine like that in a larger fragment which depicts Apollo standing within one; these two fragments are probably parts of the same plaque, but they do not quite conjoin. At the base below the column, lightly incised in capital letters: DVDR C · IIḄ[…]Footnote 12
7. Ibid. Fragment of a thin silver plaque, 33 by 50 mm, with one straight edge. Parallel with this edge, two incised capital letters now incomplete, which can be read on the other face in relief: […]OM[…]. Below them, indecipherable traces of two lines of dot-punched letters. Probably [I(ovi)] O(ptimo) M(aximo) | […] | […]. ‘To Jupiter Best and Greatest …’
CUMBRIA
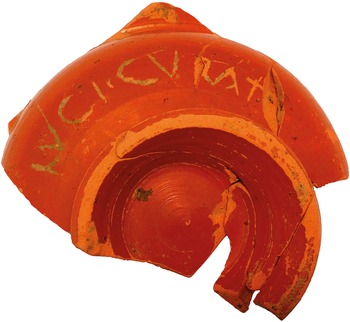
8. Carlisle (Luguvalium, NY 403 556), Botchergate (fig. 6). Two conjoining sherds preserving the profile of a samian cup (Drag. 27) with the incomplete stamp of Ioenalis (Les Martres-de-Veyre, c. a.d. 100–125), foundFootnote 13 in 2015. Coarsely incised after firing on the wall above the foot-ring: LVCI · CVRAT[.], Luci Curat[i]. ‘(The property) of Lucius Curatus.’Footnote 14
Carlisle samian sherd with graffito (No. 8) (photo: Wardell Armstrong Archaeology).

ESSEX
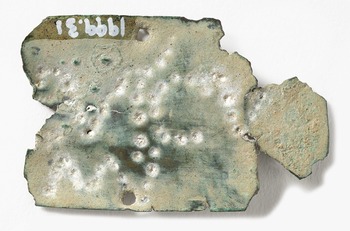
9. Colchester (Camulodunum, TL 99 25) (fig. 7). Right-hand portion of a copper-alloy ansate plaque with two holes punched for attachment, foundFootnote 15 before 1999. Inscribed in dot-punched capital letters: […].VSCV | […]M, probably [deo … F]uscu(s) | [u(otum) s(oluit) l(ibens)] m(erito).Footnote 16 ‘To the god … Fuscus paid his vow, willingly, deservedly.’
Colchester, copper-alloy ansate plaque (No. 9) (photo: Colchester Museum).

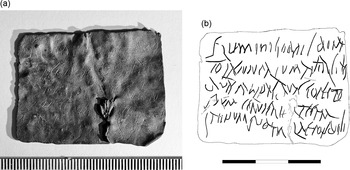
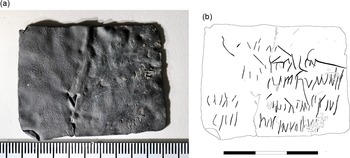
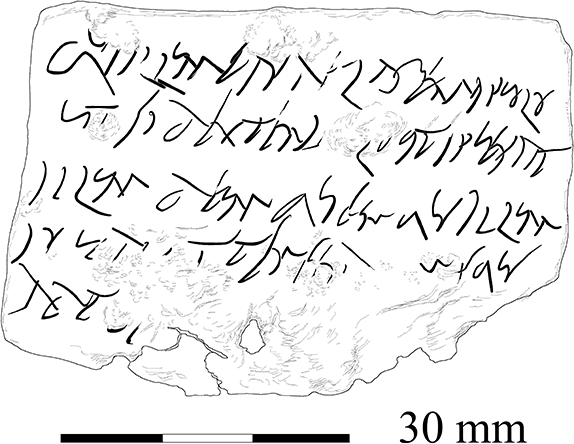
10. Ibid. (figs. 8 and 9). Rectangular tablet, 46 by 35 mm, cut from sheet lead c. 1 mm thick, foundFootnote 17 before 1999. After being inscribed, it was folded once, damaging both faces and exposing the left-hand portion of the outer face which is now badly corroded. Both faces are inscribed in fluent but idiosyncratic cursive letters, sometimes ambiguous, which are probably late third-century.Footnote 18 The inner face (a) reads: fluminiso…sdoṇạ | tolac..iup̣aḷium astaḷc̣ias | duas rahinas duas coperto|rium ceruical..[…]ltec̣am | sa..num rudem […]laep̣ondoṣi. The outer face (b): … | …tralem | … ịụm fluminis | …m ịp̣sius | q̣ụị hoc inuolau[it].Footnote 19 Probably ?flumini So(…) dona|t … | duas rahinas duas coperto|rium ceruical … | sa..num rudem … | […]tralem | […]…ium fluminis | … […]…m ipsius | qui hoc inuolauit. ‘?To the river So[…]s gives … two […], two wraps, a coverlet, a pillow, a ?cloak unused, … the […] of the river … the […] of him who has stolen this.’ The closing words identify this as a curse tablet against a thief, but apart from donat (‘gives’) at the beginning, no other formulas can be recognised. A few words can be resolved, suggesting a list of stolen property, probably clothing.Footnote 20
(a) and (b). Colchester, inscribed lead tablet (No. 10), inner face (photo and drawing: R.S.O. Tomlin).

(a) and (b). Colchester, inscribed lead tablet (No. 10), outer face (photo and drawing: R.S.O. Tomlin).

GLOUCESTERSHIRE
11. Barnwood (SO 386 219), Centre Seven. Fragment of a brick foundFootnote 21 in 2021, with an impressed stamp: RP[G], R(es) P(ublica) [G(levensium)].Footnote 22
12. Ibid. Fragment of a flat tile (probably a tegula), with part of an impressed stamp: RPG[ĪĪVR] | PA $\overbrace{{{\rm EL}}}$[FINITI], R(es) P(ublica) G(levensium) | [(duo)v(i)r(i)] | P(ubli) Ael(i) [Finiti].Footnote 23
13. Gloucester (SO 383 218), Kings Quarter. Fragment of a flat tile (probably a tegula) foundFootnote 24 in 2021, with part of an impressed stamp: [QQS]EN[ $\overbrace{{{\rm NI}}}$VT] | [
 $\overbrace{{{\rm ET}}}$VA
 $\overbrace{{{\rm RI}}}$]VAL[
 $\overbrace{{{\rm ERI}}}$A
 $\overbrace{{{\rm NR}}}$PG], [q(uin)q(uennalium) S]en[ni V(i)t(alis)]| [et ?Vari] Val[erian(i) R(es) P(ublica) G(levensium)].Footnote 25
14. Stoke Gifford (ST 609 776). Small fragment of tile foundFootnote 26 in 2017, with most of an impressed stamp: [T] Δ P Δ FFootnote 27
HAMPSHIRE
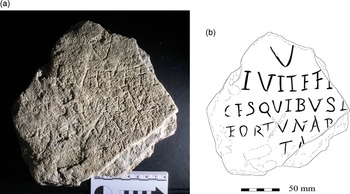
15. Silchester (Calleua Atrebatum, SU 6430 6240), Roman bath-house in Insula XXXIII (fig. 10). Fragment of a roofing tile of calcareous sandstone, 0.18 by 0.18 m, 15 mm thick, foundFootnote 28 in 2018. Shallowly inscribed in irregular capital letters with exaggerated serifs: V | IVITE FE[…] | CES QVIBVS .[…] | FORTVNA P̣[…] | T.[…], u|iuite fe[li]|ces quibus [est] | fortuna p[erac]|t[a]. ‘Long may you live and lucky, you who have accomplished your destiny.’Footnote 29
(a) and (b). Silchester, inscribed fragment of a stone roofing tile (No. 15) (photo and drawing: R.S.O. Tomlin).

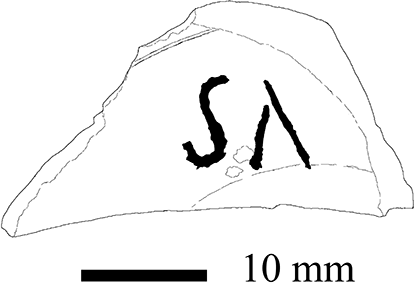
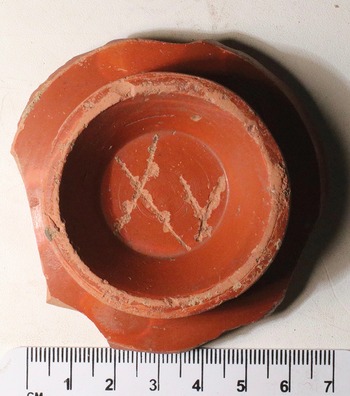
16. Ibid. (SU 64 62), Insula IX (fig. 11). Samian sherd (SG), probably from the base of a cup (Drag. 27), foundFootnote 30 in 2004. Incised after firing on the underside: SɅ, Sa(…).Footnote 31
Silchester, samian sherd with graffito (No. 16) (drawing: R.S.O. Tomlin).

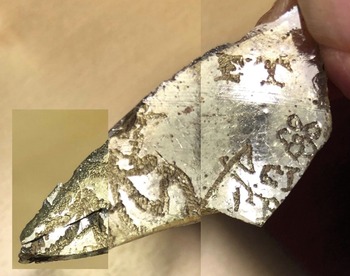
17. Warblington (SU 73 05) Roman villa (fig. 12). Fragment of a pale green glass bowl, 43 by 21 mm, 3 mm thick, foundFootnote 32 in 2015. Like the Wint Hill bowl (RIB II.2, 2419.45), it is engraved on the exterior so as to be seen from above. This small fragment carries part of two inscriptions engraved retrograde in serifed capital letters. (i) Below the (missing) rim: […] ET […]. (ii) To the right of a standing male figure, cloaked and perhaps holding a staff with triangular head or pennant; and below a five-petalled flower: CỊ[…] | P̣[…]Footnote 33
Warblington, inscribed glass fragment (No. 17) (composite photo: Denise Allen).

HEREFORDSHIRE
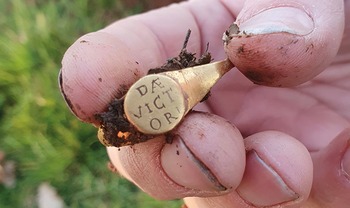
18. Putley (SO 645 361) area (fig. 13). Gold finger-ring (Henig type VIII) foundFootnote 34 in 2021. Incised on the circular bezel in irregular capitals: D $\overbrace{{{\rm AE}}}$ | VICT|ORI, d(e)ae | Vict|ori(ae). ‘To the goddess Victory.’Footnote 35
Putley, inscribed gold ring (No. 18) (photo: PAS).

HERTFORDSHIRE
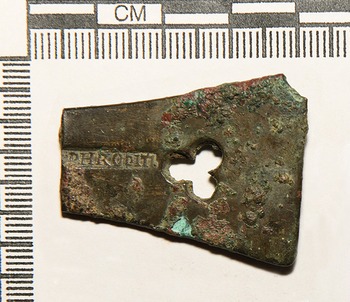
19. St Albans (Verulamium, TL 13 07) (fig. 14). End of the handle of a copper-alloy ladle (trulla), foundFootnote 36 in 1979. An impressed maker's stamp in raised letters reads: […]PHRODITI, [L(uci) Ansi Epa]phroditi. ‘(Product) of Lucius Ansius Epaphroditus.’Footnote 37
St Albans, copper-alloy handle with impressed stamp (No. 19) (photo: TimeLine Auctions).

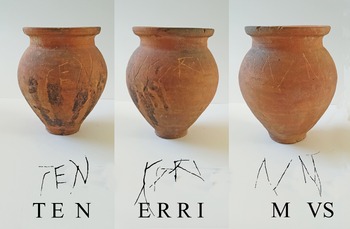
20. Ibid. (TL 139 077) (fig. 15). Complete coarseware jar, 115 mm in diameter, 165 mm high, foundFootnote 38 in 1974. Crudely incised after firing around the wall, in irregular capital letters: TENẸṚRIMVṢ, Tenerrimus.Footnote 39
St Albans, coarseware jar with graffito (No. 20) (drawing: R.S.O. Tomlin from photos by David Thorold).

21. Ashwell (TL 257 403) Roman temple. Silver-gilt figurine of a standing woman, 147 mm high, foundFootnote 40 in 2002. It stood on a silver pedestal inscribed in dot-punched capital letters: D o SENVNE FLAVIA o CVNORIS o V o S o L o M, d(eae) Senun(a)e Flavia Cunoris u(otum) s(olvit) l(ibens) m(erito). ‘To the goddess Senuna, Flavia Cunoris paid her vow, willingly, deservedly.’Footnote 41
22. Ibid. Gold plaque with a three-tiered finial, 182 mm high, depicting Minerva in relief standing within a gabled shrine. The ansate panel below is inscribed in dot-punched capital letters: CL CELSVS VOTVM FECIT DE | SENVN L B : M, Cl(audius) Celsus uotum fecit de(ae) | Senun(ae) l(i)b(ens) m(erito).Footnote 42 ‘Claudius Celsus has made his vow to the goddess Senuna, willingly, deservedly.’
23. Ibid. Gold plaque, tulip-shaped with a triple-lobed finial, 138 mm high, depicting Minerva in relief standing within a gabled shrine. The panel below is inscribed in dot-punched capital letters: CARIATIA | RESṢAVSL, Cariatia | Ressa u(otum) s(oluit) l(ibens).Footnote 43 ‘Cariatia Ressa has paid her vow willingly.’
24. Ibid. Gold plaque with a two-tiered finial, 151 mm high, depicting Minerva in relief standing within a gabled shrine, her image being struck from the same die as two other plaques, Nos. 25 and 27 below. It is inscribed in three places, on either side of the standing figure and across the lower margin, in irregular dot-punched capitals: (left field) ḌSỊỊ | (below) ḶẠMỊỊḶ | (right field) NỊỊRVS, d(eae) Se(nunae) | lamel(lam) | Nerus.Footnote 44 ‘To the goddess Senuna, Nerus (has given this) plaque.’
25. Ibid. Gold plaque with a three-tiered finial, 139 mm high, depicting Minerva in relief standing within a gabled shrine. It is inscribed in two places, to the right of the standing figure and across the lower margin, in dot-punched capitals: (below) D SE LɅMEL (right field) QVINTIɅṆVS, d(eae) Se(nunae) lamel(lam) | Quintianus.Footnote 45 ‘To the goddess Senuna, Quintianus (has given this) plaque.’
26. Ibid. Gold plaque with a narrow but elaborate finial, 118 mm high, depicting Minerva in relief standing within a gabled shrine. Inscribed with a blunt stylus by an assured hand across the lower margin and the basal tab, in capital letters: BELL o MEMORIɅNVS | VOTVM | F o D o SE|NVNE, Bell(…) Memorianus | uotum | f(ecit) d(eae) Se|nun(a)e.Footnote 46 ‘Bell(…) Memorianus has made his vow to the goddess Senuna.’
27. Ibid. Silver plaque with an ornate finial now incomplete, 184 mm high, depicting Minerva in relief standing within a gabled shrine. The ansate panel below is inscribed in dot-punched capital letters: DɅIIɅII SIINɅII | LVCILIɅ SIINɅ̣ | V S L M, d{a}eae Senae | Lucilia Sena | u(otum) s(oluit) l(ibens) m(erito).Footnote 47 ‘To the goddess Sena, Lucilia Sena has paid her vow willingly, deservedly.’
28. Ibid. Silver plaque with with an ornate finial, 181 mm high, depicting Minerva in relief standing within a gabled shrine. The panel below is inscribed with a stylus in ‘rustic capitals’ with exaggerated serifs: D o SENV|NɅE L L o | HERBONI|ɅNVS V S L | M, d(eae) Senu|nae L(ucius) L(…) | Herboni|anus u(otum) s(oluit) l(ibens) | m(erito).Footnote 48 ‘To the goddess Senuna, Lucius L(…) Herbonianus has paid his vow willingly, deservedly.’
29. Ibid. Silver plaque with an ornate finial now incomplete, 146 mm high, depicting Minerva in relief standing within an arched shrine. It is inscribed above and below the arch in dot-punched capital letters: D SE SERVɅNDVS hISPɅNI | V S L, d(eae) Se(nunae) Servandus Hispani (filius) | u(otum) s(oluit) l(ibens).Footnote 49 ‘To the goddess Senuna, Servandus (son) of Hispanus has paid his vow willingly.’
30. Ibid. Silver plaque with an ornate finial now incomplete, 161 mm high, depicting Minerva in relief standing within an arched shrine. It is inscribed above and below the arch in dot-punched capital letters: D SE SERVɅNDVS hISPɅNI | V S L, d(eae) Se(nunae) Servandus Hispani (filius) | u(otum) s(oluit) l(ibens).Footnote 50 ‘To the goddess Senuna, Servandus (son) of Hispanus has paid his vow willingly.’
31. Ibid. Silver plaque in the form of an eight-pointed star, originally c. 250 by 150 mm, of which only the central portion survives. Within two columned shrines side by side stand two figures, (left) Minerva and (right) largely lost. Below them is an ansate panel, broken to the right, which was incised from the rear in mirror-image capital letters: DEAE SENVṆ[…] | FIRMANVṢ[…], deae Senun[ae ..] | Firmanus [u(otum) s(oluit) l(ibens) m(erito)].Footnote 51 ‘To the goddess Senuna, [..] Firmanus has paid his vow willingly, deservedly.’
KENT
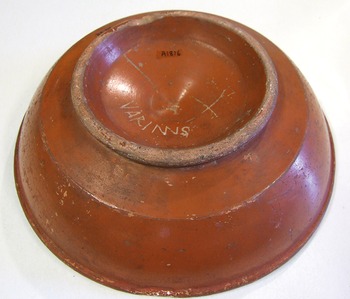
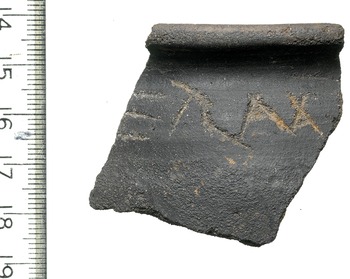
32. Rochester (Durobrivae, TQ 74 68) (fig. 16), exact provenance unknown.Footnote 52 Samian bowl (Drag. 18/31) incised underneath after firing in capital letters within the foot-ring: VARINVS, Varinus.Footnote 53
Rochester, samian bowl with graffito (No. 32) (photo: Guildhall Museum, Rochester).

LONDON
33. City of London (Londinium, TQ 32491 81607), 121–123 London Wall Place (fig. 17). Rim sherd of a black-burnished (1) jar, foundFootnote 54 in 2013. Incised after firing below the rim: […]ERṂ[…]Footnote 55
London, coarseware sherd with graffito (No. 33) (photo: R.S.O. Tomlin).

NORTHAMPTONSHIRE
34. Corby (SP 88 88) Roman villa and kiln-site (fig. 18). One corner of a flat square brick (bipedalis), foundFootnote 56 in 2019, inscribed before firing: […]ṬENṬỊ | […]ECIT, perhaps […] | [Po]tenti|[nus … f]ecit. ‘… Potentinus has made …’Footnote 57
Corby, fragment of brick with graffito (No. 34) (photo: Oxford Archaeology (East)).

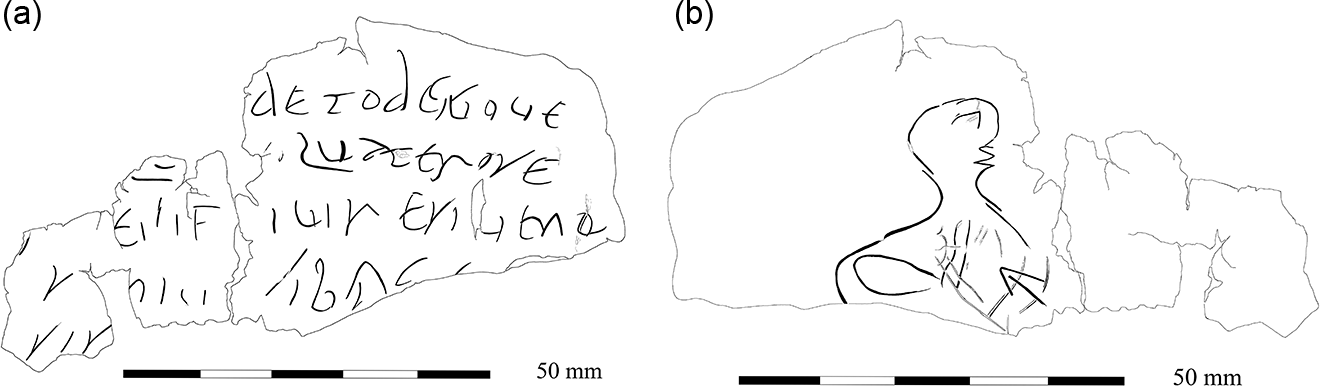
35. Piddington (SP 802 545) Roman villa (fig. 19). Two conjoining fragments, 87 by 38 mm, of an irregular strip cut from lead sheet c. 1 mm thick, foundFootnote 58 in 2015. After being inscribed long-axis, it was folded upon itself and is now incomplete, also ragged at the edges and corroded. Both faces are inscribed, the inner face (a) in New Roman Cursive of the fourth century; the outer face (b) with sinuous lines which are not lettering but a caricature head and shoulders facing right.Footnote 59 The inner face reads: […]detodeṣụoue | […]..[…].luaterose | […]e… ịuiresiḅeno | […]…ṣibrẹ.[…] | […]ṣịṣ[…]Footnote 60
(a) and (b). Piddington, inscribed lead strip (No. 35), both faces (drawing: R.S.O. Tomlin).

‘NORTHERN ENGLAND’
36. Small fragment of the first tablet of a copper-alloy military diploma, 48 by 30 mm, said to have been found in Northern England. It was issued by Trajan to a veteran of an auxiliary unit stationed in Pannonia under [Q. Gli]tius Atilius Agricola in a.d. 100/103, and by reference to CIL xvi 47 can be dated to 19 November 102.Footnote 61
NORTHUMBERLAND
37. Chesters (Cilurnum, NY 913 701), western bridge abutment (fig. 20). Body sherd of a south-Spanish oil amphora (Dressel 20), foundFootnote 62 in 1990/91. Incised before firing with a graffito in two parts: (i) In neat cursive letters made with a stylus: samṭae. (ii) Immediately to their right and in the same alignment, but in elongated letters taller and more coarsely made: I-I-Ṣ, II s(emis). Probably ‘(the work) of Samta, two and one-half (…)’.Footnote 63
(a) and (b). Chesters, amphora sherd with graffito (No. 37) (photo and drawing: R.S.O. Tomlin).

38. Ibid. (fig. 21). Base sherd of a samian cup (Dr. 33) stamped CLIIMIINS (Clemens iii of Lezoux, c. a.d. 160–190). Coarsely incised underneath after firing, within the foot-ring: XV, ‘15’.Footnote 64
Chesters, samian base sherd with graffito (No. 38) (photo: R.S.O. Tomlin).

39. Ibid. (fig. 22). Rim sherd of a local greyware cooking pot (late second- or third-century), found with two other rim sherds which do not conjoin it. Incised after firing on the wall, just below the lip: ɅLII ỊỊ[…], probably […] al(a)e II [As(turum)]. ‘[…] of the Second ala of Asturians’.Footnote 65
(a) and (b). Chesters, coarseware sherd with graffito (No. 39) (photo and drawing: R.S.O. Tomlin).

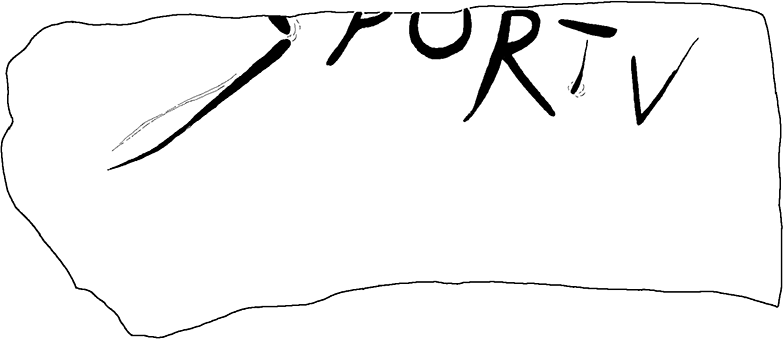
40. Housesteads (Vercouicium, NY 790 688) (fig. 23). Wall sherd of a south-Spanish oil amphora (Dressel 20), foundFootnote 66 in unrecorded circumstances. Inscribed on the shoulder in small (c. 20 mm) capital letters: 7̣ F̣ORTV, probably […] | (centuria) Fortu(nati). ‘[(The property) of …], century of Fortunatus’.Footnote 67
Housesteads, amphora sherd with graffito (No. 40) (drawing: R.S.O. Tomlin).

41. Ibid. Wall sherd of a Dressel 20 amphora, coarsely incised with the upper part of three letters, broken by the lower edge: G̣ɅV[…], perhaps Gau[o] or Gau[onis].Footnote 68
42. Ibid. Wall sherd of a Dressel 20 amphora, incised with three incomplete letters: […]LIɅ[…], probably a name ending in –lianus or –liatus.
43. Ibid. Wall sherd of a Dressel 20 amphora, inscribed in capitals: […]ṾTE[…]Footnote 69
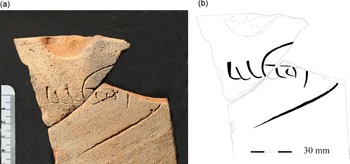
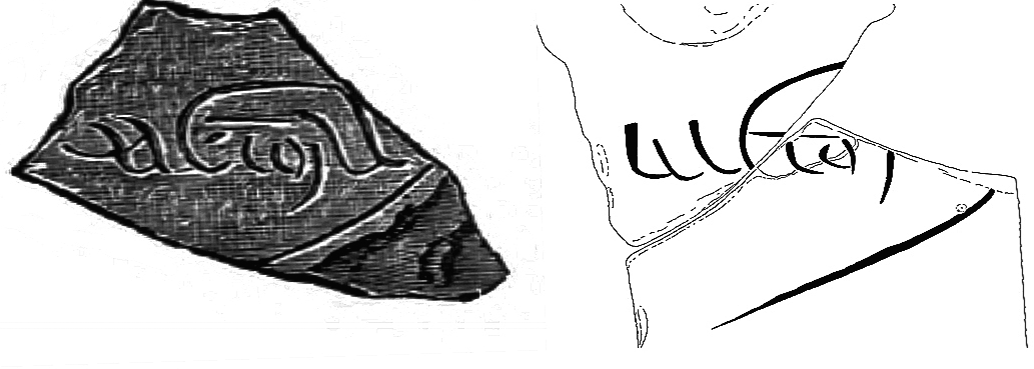
44. Vindolanda (NY 678 663) (fig. 24). Two conjoining wall sherds of an amphora foundFootnote 70 in 2021. Incised before firing in cursive letters: uictor[.]s. Victor[i]s, ‘(the work) of Victor’.Footnote 71
(a) and (b). Vindolanda, amphora sherds with a ‘signature’ (No. 44) (photo and drawing: R.S.O. Tomlin).

45. Ibid. Wall sherd of a Dressel 20 amphora. Coarsely incised after firing, in capital letters now incomplete: […]ṆVɅ[…], perhaps [Ia]nua[rius].Footnote 72
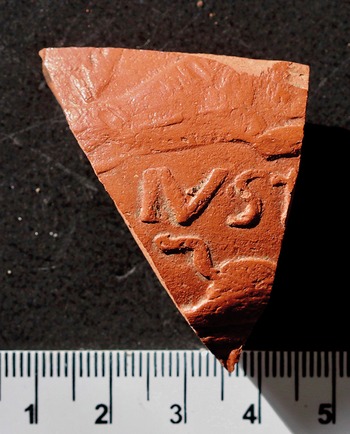
46. Ibid. (fig. 25). Wall sherd of a samian bowl with moulded decoration (Drag. 37). Moulded in relief above the waving tail of a quadruped heading right, presumably a lion in the arena, in capital letters: IVS $\overbrace{{{\rm TI}}}$[M], Iusti [m(anu)]. ‘By the hand of Iustus.’Footnote 73
Vindolanda, samian sherd with moulded decoration (No. 46) (photo: R.S.O. Tomlin).

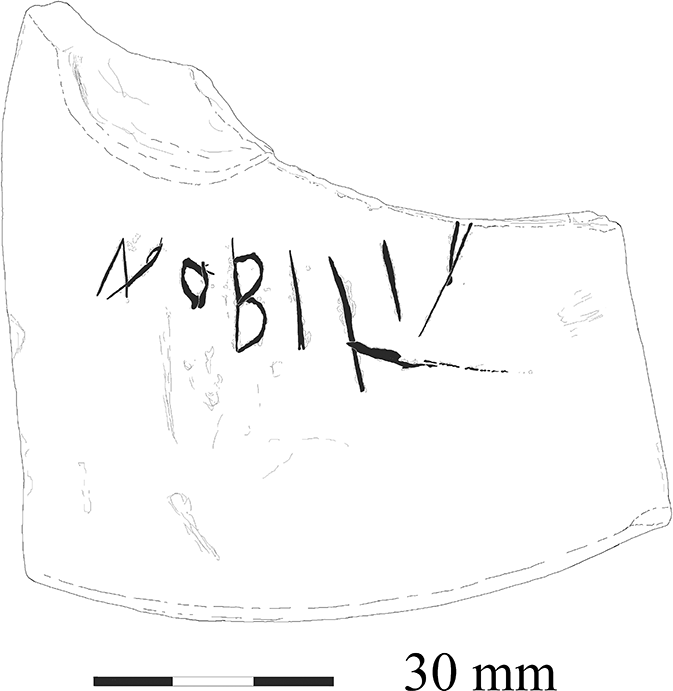
47. Ibid. Wall sherd of a samian bowl (Drag. 31) (fig. 26). Incised after firing in crude capitals when the bowl was inverted: NOBILIS, Nobilis.Footnote 74
Vindolanda, samian sherd with graffito (No. 47) (drawing: R.S.O. Tomlin).

48. Ibid. Two small conjoining sherds from the wall of a samian dish (Drag. 18/31), incised after firing in crude capitals at the junction between the floor and the wall: […]ṚIM[…], [P]rim[us] or a derived name such as Primigenius.Footnote 75
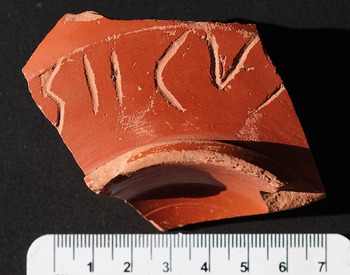
49. Ibid. Wall sherd of a samian dish (Drag. 18/31) with part of the foot-ring (fig. 27). Incised after firing in crude capitals on the wall above the foot-ring, with a broad point: […]SIICVṆ[…], Secun[dus] or a derived name such as Secundinus.Footnote 76
Vindolanda, samian sherd with graffito (No. 49) (photo: R.S.O. Tomlin).

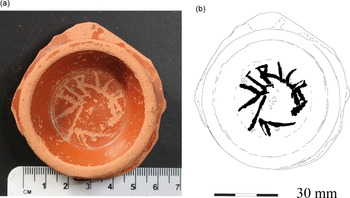
50. Ibid. Base sherd of a samian cup (Drag. 27) including the whole foot-ring (fig. 28). Coarsely incised after firing underneath within the foot-ring, in crude capitals round the circumference: ..VIRI… , probably .. Viri[lis].Footnote 77
(a) and (b). Vindolanda, samian base sherd with graffito (No. 50) (photo and drawing: R.S.O. Tomlin).

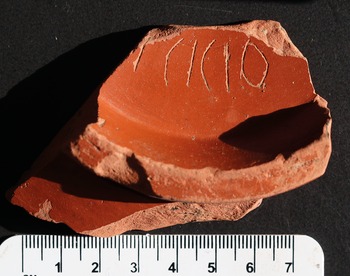
51. Ibid. Base sherd of a samian dish (Drag. 18/31R) (fig. 29). Coarsely incised after firing underneath within the foot-ring, in crude capitals: […]ỊCICIO.Footnote 78
Vindolanda, samian sherd with graffito (No. 51) (photo: R.S.O. Tomlin).

52. Ibid. Small samian wall sherd, scratched after firing with two or three incomplete letters. Perhaps […]VIL[…], perhaps [Ci]vil[is].Footnote 79
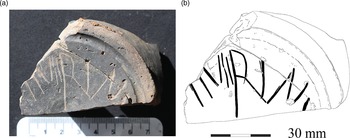
53. Ibid. (fig. 30). Two conjoining base sherds of a black-burnished vessel. Incised underneath in crude capitals: […]IIVIIRINṾ[…], [S]everinu[s].Footnote 80
(a) and (b). Vindolanda, coarseware sherds with graffito (No. 53) (photo and drawing: R.S.O. Tomlin).

SUFFOLK
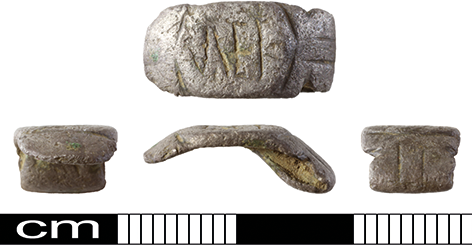
54. Long Melford (TL 586 246) (fig. 31). Bezel of a silver finger-ring foundFootnote 81 in 2021. Incised: MER, Mer(curio). ‘To Mercury’.Footnote 82
Long Melford, inscribed silver ring (No. 54) (photo: PAS).

WILTSHIRE
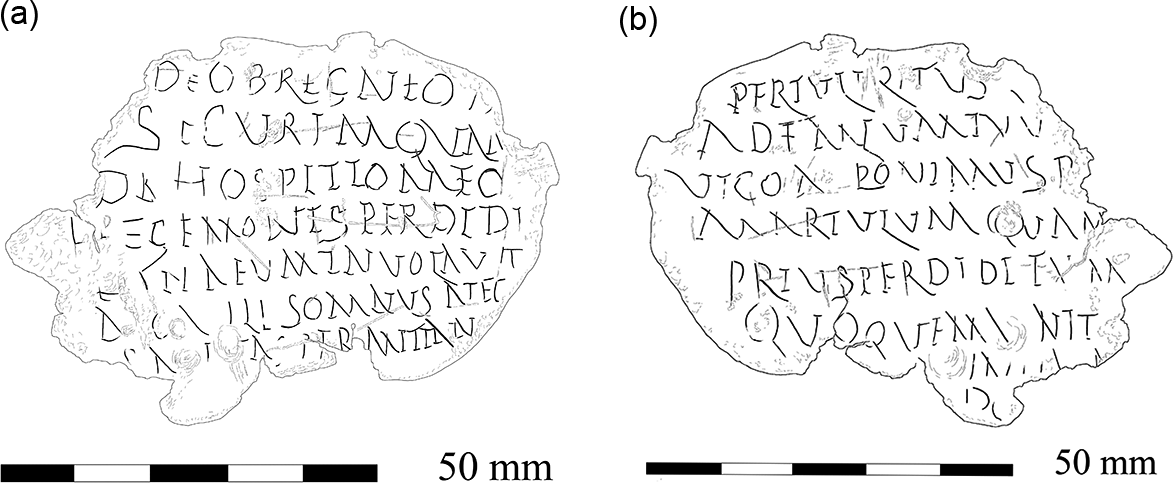
55. ‘South Wiltshire’ Roman temple (fig. 32). Irregular oval of hammered lead sheet, 73 by 50 mm, foundFootnote 83 before 2014. Despite surface corrosion and damage to the edges, it is almost complete. It was never folded. Both faces are inscribed with a continuous text in capitals defined by short horizontal serifs to their vertical strokes, serifs which have sometimes been lost in corrosion and can also make it difficult to distinguish between E, I and T. A is ‘open’ (without crossbar). There is little or no spacing between the words, but it has been supplied in this transcript for easier reading. Face (a): DẸO BRẸGNEO Ḍ[.] | SẸCVRIM QVɅṂ | DẸ HOṢPITIO MEO | ḤEGEMONIS PERDIDI | ..NɅEVM INVOLɅVIT | ṆỌṆ [.]ḶLI SOMNVS NEC | ṢɅ[.]ỊṬAṢ PERMITTɅTV[.] | face (b): PERTVLẸRIT VSQ̣[..] | ɅD  $\overbrace{{{\rm TE}}}$MLVM TVV[.] | VṬ COṂP̣OṆIMVS P[ ] | MɅRṬVLVM QVɅṂ | PRIVS PERDIDI ẸVM | QVOQVE MṾ[.]NIT | traces | DỌ
(a) and (b). ‘South Wiltshire’ temple, lead curse tablet (No. 55), both faces (drawing: R.S.O. Tomlin).

The text can be largely reconstructed: (a) deo Bregneo d[o] | securim quam | de hospitio meo | Hegemonis perdidi | (5) ..NAEVM inuolauit | non [i]lli somnus nec | sa[n]itas permittatu[r] | (b) pertulerit usq[ue] | ad tem(p)lum tuu[m] | (10) ut componimus P[ ] | martulum quam | prius perdidi eum | quoque MV[.]NIT | … | (15) ?do. ‘To the god Bregneus I give the axe which I have lost from my house, (the house) of Hegemon. […] has stolen, he is not to be permitted sleep or health (until) he has brought it to your temple as we ?arrange. The hammer which I previously lost, it also […] ?I give.’ The unnamed writer has ‘lost’ an axe, and asks that the thief be compelled to return it; and he refers to his previous ‘loss’ of a hammer.Footnote 84
56. Ibid. (fig. 33). Rectangle, 54 by 39 mm, cut from cast lead sheet tapering in thickness from 4 mm. The bottom edge is now broken and badly corroded. Close to this edge and almost mid-way is a hole 3 mm in diameter which may have been made by a nail; if so, it was driven into the face which was inscribed, as if to display the text. This consists of four complete lines and the beginning of a fifth, preserved in the surface corrosion products but damaged or lost in places. The text has been incised in Old Roman Cursive (c. a.d. 150–250) by a practised hand.Footnote 85 There is no word-separation, which has been supplied in the transcript: qui illum cana.larem inuolo|uit si dextẹṛ i[nuo]louit inueniat | iḷlum deum(!) qui eum qui illum | inuọ[l]a[ui]t perf̣ẹṛạ[t] usque | ad t[emplum ?tuum]. ‘Who has stolen that …(?), whether right (?or left) has stolen … let the god find him. Who has (stolen) it, stolen it, let him bring it to your temple.’Footnote 86 Like the previous item, this is a formulaic text against a thief, but obscure in detail.
‘South Wiltshire’ temple, lead curse tablet (No. 56) (drawing: R.S.O. Tomlin).

WALES
MONMOUTHSHIRE
57. Caerleon (Isca, ST 341 904), 18 High Street. Part of a flat tile (probably a tegula) foundFootnote 87 in 2021, with an impressed stamp (retrograde): [LEĪĪ] $\overbrace{{{\rm AV}}}$G, [Le(gio) (secunda)] Aug(usta).Footnote 88
58. Ibid. (fig. 34). Part of a tegula impressed with an almost complete stamp: LEGĪĪAVG, Leg(io) (secunda) Aug(usta).Footnote 89
Caerleon, tile with stamp (No. 58) (photo: Peter Warry)

59. Llanwern (ST 336 188), Newport. Fragment of a flat tile (probably a tegula), foundFootnote 90 in 2019/20, with an impressed stamp: LE[GĪĪAVG], Le[g(io) (secunda) Aug(usta)].Footnote 91
60. Ibid. Part of an arched tile (imbrex), with an impressed stamp (retrograde) over the arch which did not fully register: LIIGĪĪ $\overbrace{{{\rm AV}}}$G, Leg(io) (secunda) Aug(usta) Footnote 92
SCOTLAND
LOTHIAN REGION
61. Elginhaugh (NT 321 674) Roman fort. Bronze steelyard foundFootnote 93 in 1987 with two lead weights. An impressed stamp in raised letters reads: ADATVVCVS F, Adatuucus f(ecit). Footnote 94
C. ADDENDA ET CORRIGENDA
(a) RIB 215, 216 and 217 (Stony Stratford). These three votive plaques have been re-examined and compared with the drawings made before 1815.Footnote 95 In RIB 215, line 2 can be read as IOVI ET VoLCɅ (with O reduced in size); 7 as CONSERVɅ[R]E; and 9–10 as … PRO VO|TO ḶɅṂ[…] $\mathop{\Lambda}\limits_{\vskip-4pt.}\mathop{\rm P}\limits_{\vskip-4pt.}$, pro uoto lam[ell]a p(osita est)].Footnote 96 ‘This plaque is placed to represent my vow.’
(b) RIB 218, 219 and 220 (Barkway). These three silver votives have also been re-examined and re-drawn.Footnote 97 The new drawings (of the lettering only) confirm the accuracy of the RIB drawings, but improve the definition of the individual dots in the two dot-punched inscriptions, RIB 218 and 219. In RIB 218, a silver-gilt plaque dedicated to Mars Alator, DVM is probably a second, abbreviated title.Footnote 98 In RIB 220, a silver ‘leaf’ dedicated to Vulcan, the exact expansion of NVVLCO is uncertain.Footnote 99
(c) RIB II.6, 2493.5 (Wall), 6 (Lincoln) and 46 (Brough on Noe). Three amphora graffiti cut before firing: the potter's name in the genitive case, followed by a date. The Wall (5) graffito is already read by RIB as ɅSIɅTICI, Asiatici, ‘(the work) of Asiaticus’, which should now be read also in Lincoln (6) and Brough on Noe (46).Footnote 100 All three were cut on sherds of south-Spanish oil amphoras (Dressel 20), near the basal knob.
(d) RIB II.6, 2493.77 (Wallsend) (fig. 35). Amphora sherd, now lost, with a graffito made before firing. This should now be read, not as ‘Perhaps [A]uctoris’, but as Victoris, ‘(the work) of Victor’.Footnote 101
Wallsend, amphora graffito (Add. (d)) compared with one from Vindolanda (No. 44 above).

(e) Britannia 13 (1982), 408, No. 9 (Caistor St Edmund). Line 11 of the transcript of this curse tablet on p. 409 should beginFootnote 102 denarii xv (not sv), ‘fifteen denarii’, as translated on p. 408.
(f) Britannia 43 (2012), 403, No. 13 (Rothwell). This curse tablet is now fully published with transcript, line-drawing and commentary.Footnote 103 Its text, apparently cursing a thief (f[ur]em), is written in New Roman Cursive, damaged and incomplete. The inner face is the better preserved, and is largely a list of personal names in various cases (nominative, genitive or dative): Servandus, Hermo, Epinus, Tenera, Clarentius, Epinus (again), Serenella a woman (mulier), Melidone, Euopius.
(g) Britannia 46 (2015), 410, No. 50 (Vindolanda). This graffito cut before firing on a Dressel 20 amphora sherd is incomplete, but can now be seen as a fourth instance of the same ‘signature’ as in Add. (c) above: Asi[atici] | V K(alendas) Ian[uarias], ‘(the work) of Asiaticus on the fifth day before the Kalends of January’ (28 December).Footnote 104
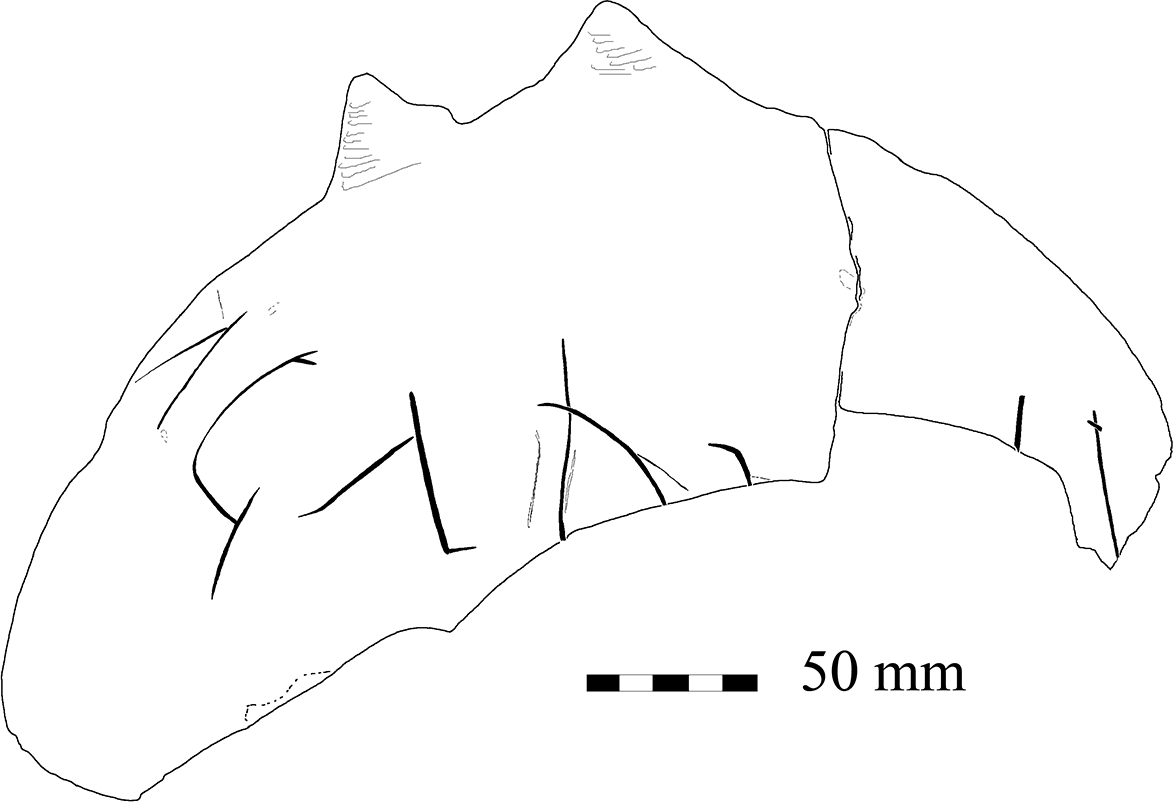
(h) Britannia 52 (2021), 479, No. 24 (Housesteads), Dressel 20 amphora sherd (fig. 36). A conjoining sherd has now been foundFootnote 105 to extend this graffito, in capitals coarsely incised after firing: ɅGɅDṾ.ỊṾ[… ], perhaps (T)agadu[n]iu[s].Footnote 106
Housesteads, two amphora sherds with graffito (Add. (h)) (drawing: R.S.O. Tomlin).

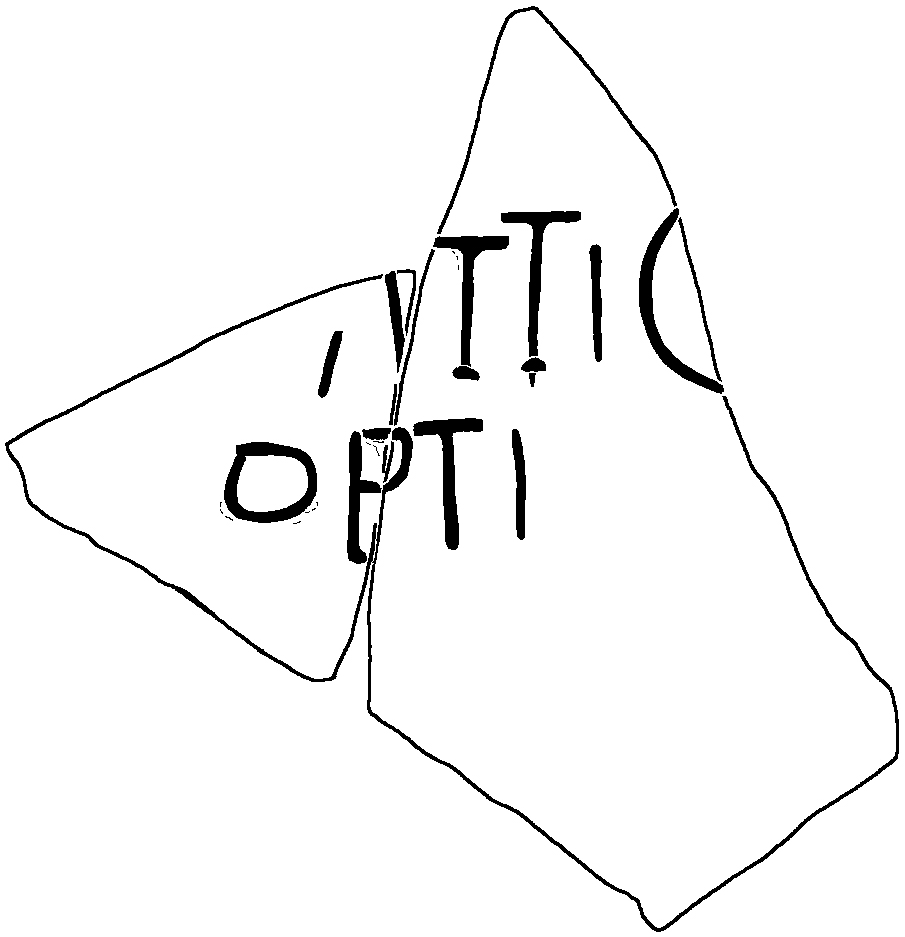
(i) Britannia 52 (2021), 479, No. 25 (Housesteads), Dressel 20 amphora sherd (fig. 37). A conjoining sherd now extends this graffito, in capitals coarsely incised after firing: ɅTTI $\mathop{\rm C}\limits_{\vskip-4pt.} }$[…] | OPTI, probably Attic[us] | Opti (filius). ‘Atticus, (son) of Optus’.Footnote 107
Housesteads, two amphora sherds with graffito (Add. (i)) (drawing: R.S.O. Tomlin).

D. CHANGES OF LOCATION
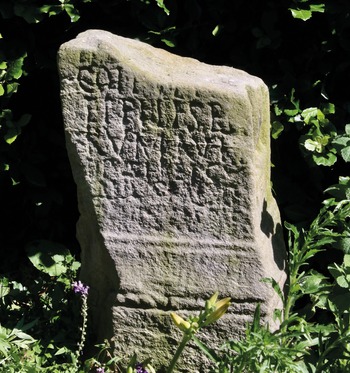
(a) RIB 806 (Burrow Walls) (fig. 38). This sculptured stone fragment, the lower part of an altar, was sold from the Lowther Castle collection in 1970 and now stands in the purchaser's garden at Claydon, north of Banbury (Oxon).Footnote 108
RIB 806 (photo: R.S.O. Tomlin).

(b) RIB II.4, 2446.23 (unknown provenance, but probably in Britain). Oculist's stamp, said to have been lost in 1778, but donated to the British Museum in 1878. It is now illustrated on its website.Footnote 109
E. ALIENA
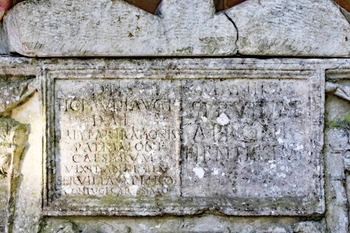
(a) Rousham House (Oxon.), CIL xi 3885 (Capena, Rome) (fig. 39). This marble ash chest inscribed for the imperial freedman Claudius Daus and his widow Servilia Aphro is not alienum in the sense of being ‘taken for Romano-British’ (RIB, p. 728), but its location should be recorded since it has been at Rousham since the eighteenth century.Footnote 110 It was thus not available to Bormann when he published CIL xi 3885 in 1888. Instead he relied on the readings of earlier scholars and a copy of the left-hand text incised ‘more recently’ (aetate recentiore) on a tombstone in Florence.Footnote 111 The Rousham chest is inscribed within a recessed panel, 270 by 127 mm, divided by a central margin. Under the heading DIIS MANIBVS, (left panel): TI CLAVDI AVG L | TABVLARI RATIONIS | PATRIMONI | CAESARVM | VIXIT ANNIS LIX | SERVILIA APHRO | CONIVGI CARISSIMO and (right panel): SERVILIAE | APRONI | PIENTISSIME. The Florentine copy of the left-hand text is correct, but Bormann cannot have known that his reading of the right-hand text incorporates two learned ‘corrections’ by previous scholars, Aphroni for APRONI and pientissimae for PIENTISSIME.Footnote 112 There is no longer any trace of medial points (puncta).
CIL xi 3885 at Rousham, inscribed panel (photo: R.S.O. Tomlin).

(b) Highbury, Birmingham. Limestone boundary marker, 1.16 by 2.15 m, 0.30 m thick, found in the mid-1960s in Uffculme Park and removed to Birmingham City Museum and Art Gallery, where it now is (Acc. 1341). It reads: C BAEBIVS C F | NIGER P XII, G(aius) Baebius G(ai) f(ilius) | Niger p(edes) XII. ‘Gaius Baebius Niger, son of Gaius, (his tomb(?) area for a distance of) twelve feet’.Footnote 113
F. FALSUM
Barcombe, Britannia 52 (2021), 465, No. 1. The lettering on this limestone slab was cut in c. 1966 by a student of Roman lettering and sculpture who had been a volunteer in the Fishbourne excavations.Footnote 114