

INTRODUCTION
Excavation of the Roman fort on Brough Hill at Bainbridge, in Wensleydale, North Yorkshire (SD 937 902), began in 1925 and continued intermittently in short summer seasons for a period of fifty years. Seventeen seasons were directed by Brian Rogerson Hartley who taught at Leeds University from 1956 to 1995 and continued the university's training excavations at the fort which had been started in 1950 by his predecessor at Leeds, William V. Wade. Hartley worked at Bainbridge in 1957–64, 1966–72, and in 1974 and 1977; he also excavated the forts at Adel (1957), Ilkley (1962), Bowes (1966–67 and 1970, with S.S. Frere), Slack (1968–69), and Lease Rigg (1976, 1978–80, with L.F. Fitts). This series of excavations was described by Frere as a ‘programme of research’ on the Pennine forts.Footnote 1 Hartley reviewed the results of this work in two influential articles,Footnote 2 and his last extended consideration of the problems of northern England under the Romans was his book, The Brigantes, which was written with L.F. Fitts and published in 1988.
Hartley published his first three seasons of work at Bainbridge.Footnote 3 The fourteen seasons after 1959Footnote 4 are the subject of the present study, which provides a full structural account of the remarkable sequence of three successive principia — Flavian, mid-Antonine and Severan — and a discussion of its implications for the history of the fort and for our understanding of the evolution of the principia as a building type from the later first to fourth centuries. Descriptions of the small finds are also included. All the coarse pottery has been spot-dated, although it is not published here; use has also been made of Hartley's notes on the dating of the samian ware recorded in the context books.Footnote 5 Other aspects of Hartley's excavations are incorporated in a brief summary of what is known about the other buildings of the fort, its defences and its walled annexe, which is based on the surviving records and finds. The Supplementary Material (see http://journals.cambridge.org/bri) contains detailed accounts of the excavations summarised here, together with finds reports and two unpublished studies undertaken independently of this project: the conclusions of a report on the animal bones by Caroline Middleton and a survey of the fort at a scale of 1:500 and a wider survey of its immediate landscape at 1:1000 carried out by RCHME in 1994 which are reproduced here as online figs 31 and 32.
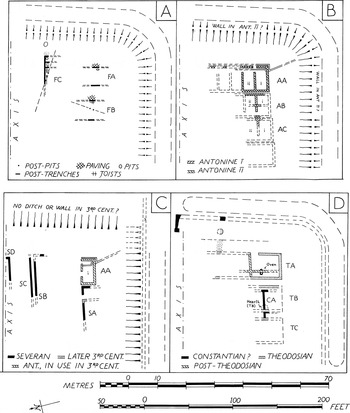
In 1975 or shortly after, Hartley began to write a full report on the Bainbridge excavations, working directly from the site records. He drafted the introduction and a summary of the Flavian–Trajanic fort and had started to describe its principia in detail when he set aside the project. The first and last of these sections are included below, omitting material which is no longer relevant, and the other section is included in the Supplementary Material. He also prepared a fine series of plans of the principia which were published in interim reports and are reproduced here as figs 7–8, 12 and 17, with some additions. There is also a general plan of the fort ( fig. 2) which was not published by Hartley and has likewise been amended. Most of the other illustrations have been prepared for this report. There is more in the Bainbridge archive that merits publication at some stage, but this article and the Supplementary Material have concentrated on the structural sequence, which is the most important contribution that Hartley's work on the fort can make to the archaeology of Roman Britain and of Roman forts in general.
THE SETTING OF THE FORT AND ITS HISTORY OF RESEARCH By B.R. HartleyFootnote 6
Brough Hill at Bainbridge (the name Brough-by-Bainbridge seems to have been coined by R.G. Collingwood) lies at the watersmeet of the Ure and the Bain, immediately east of the latter. The hill is a drumlin, but larger than most in Wensleydale. As such it has relatively steep flanks and an upstream (western) end broader and higher than its downstream one, which offers the only easy approach to the site. Geologically then, the hill is a mixed glacial deposit, though boulder clay predominates at its surface. This normally has an orangey-brown weathered (in effect rusted) surface, but is greenish-grey a few centimetres down, where it has been protected from oxidation. The solid geology below these glacial features belongs to the Carboniferous system, the hill resting on limestone of the Yoredale series, as may be seen from the gorge cut by the Bain. At Bainbridge the upper flanks of the Dale are sandstones and fine-textured grits. The limestone seems not to have been used much by the Romans until the later fourth century, except in the form of boulders from the river and, presumably, in preparing lime for the mortar. From the earliest occupation the sandstones were widely used. As well as yielding good ashlars for facing walls, they also offered beds producing slabs 0.05–0.07 m thick useful for flooring, and thinner slabs which made good roofing slabs, normally pierced for nails. Accordingly, tile was rarely used in the fort, except presumably in hypocausts. No definite evidence has ever been found of the water supply to the fort. The water table is so far down as to eliminate the possibility of wells and it follows that a piped supply would have been essential. Of the two possible sources — the Bain above the level of the fort and the springs which exist on the south side of the Dale just above its level — the Bain must be eliminated, since the cutting of an aqueduct would have been exceedingly difficult. Evidently, an inverted siphon is in question, using the causeway of the south gate to enter the fort (the east gate has no trace of a pipe-line). Presumably, branches, or separate lines, would have served the vicus and the fort's bath-house, which lay in the annexe to the east of the fort.
Under natural conditions the clays of the Dale's floor would have supported dense vegetation and in the Roman period would presumably have been more heavily wooded than now. No pre-Roman or Roman native sites are known in the bottom of the Dale. In the vicinity of Bainbridge, most sites are at or above the level of the fort on the flanks of the Dale. There is a heavy concentration up the Bain valley and on the slopes of Addleborough.
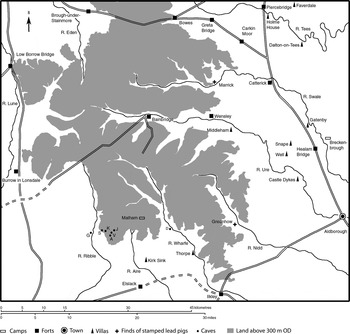
Comparatively little is known of the Roman roads approaching the fort ( fig. 1). Clearly one must have existed up the Dale. It has been usual to assume an approach from Healam Bridge along the south side of the Dale through Aysgarth, but one must admit that there is no certain trace of it on the ground, and in view of the discovery of a fort north of the Ure at Wensley, near Bolton Castle,Footnote 7 it now seems more likely that the present course of the north road up the Dale through Redmire and Carperby represents the Roman road. A ford or bridge crossing the Ure to the north-east of the fort is therefore to be expected. The road south-west from Bainbridge heading by Ingleton, and presumably linking with Lancaster, has long been known and is perfectly visible from the site (though only because it was re-used in the eighteenth century for a turnpike).Footnote 8 One point worth noting is that it appears to be aligned on the centre of the visible fort. The road over the Stake Pass into Wharfedale was traced in the early 1930s.Footnote 9 Although its precise course down Wharfedale is in doubt, there can be little question that it linked Bainbridge to Ilkley. It seems probable that there was a road higher up the Dale than Bainbridge. A strong case may be made for postulating one on the north side of the Dale, continuing the line of the road from Healam Bridge suggested above. It is tempting to suggest that this road swerved north up the Mallerstang to link eventually with Brough-under-Stainmore. (The course of Lady Anne Clifford's Way through the Mallerstang looks suspiciously like Roman engineering.) Finally, it is often conjectured that a road leading north from Bainbridge crossed Askrigg Common to Swaledale, where it is likely to have headed for a putative fort at Reeth.Footnote 10 The terrace of the road approaching the south gate of the fort is perfectly clear on the ground and the cutting at the foot of the hill must be Roman and have led to a crossing of the Bain, where a bridge would have been necessary.Footnote 11
Bainbridge and Wensleydale in their wider Roman setting. Camps, towers and fortlets omitted on the line of the road across Stainmore, from Brough to Bowes. Cave names as follows: Attermire Cave (A); Dowkerbottom Hole (D); Greater Kelco Cave (G); Jubilee Cave (J); Kinsey Cave (K); Sewell's Cave (S); Victoria and Albert Caves (V).

Antiquarian sources, and early editions of the Ordnance Survey, assign the name ‘Bracchium’ to the fort and they invariably talk about a ‘summer camp’ on the top of Addleborough. The name is a palpable nonsense owing to Camden's failure to understand RIB I, 722. Needless to say, the ‘camp’ does not exist.Footnote 12 Bainbridge escaped the attentions of eighteenth- and nineteenth-century antiquaries and it was not until 1926 that any archaeological excavation was done. At that time, Dr J.L. Kirk began work under the auspices of the Roman Antiquities Committee of the Yorkshire Archaeological Society. His work included a section through the west rampart north of the west gate. A copy of his drawing of the section exists at Bolton Castle, but it was never published. It was at this point that a curious episode intervened. The Committee invited R.G. Collingwood to act as ‘archaeological expert’ at the excavations. It is evident that Collingwood in effect took over from Kirk and it was his report which was eventually published. Attention was focused on the back of the principia and on the east gate, though sections were also cut through the rampart, and narrow trenches were dug in several parts of the interior. Subsequent work in 1928, 1929 and 1931 was done by Professor J.P. Droop of Liverpool. This added the enclosure wall of the vicus east of the fort and showed that the area inside the east gate had a complicated series of buildings which was not satisfactorily sorted out at the time. Droop, incidentally, wrote the standard text book on excavation current in the 1920s.Footnote 13 His work at Bainbridge scarcely lived up to his own standards. Note that both he and Collingwood sought to explain away the straightforward evidence for the late date of the east gate. We now know that the original gate was to the south, in the axial position. Many of the areas dug in 1925–31 were left open, with consequent damage to the surviving Roman walls. The finds from the pre-War excavations were kept at Cravenholme by the owners of the site (the Terrys). They were taken to Bolton Castle for safety during the 1939–45 war, but many (presumably including the inscription RIB I, 724) disappeared. Some of the pottery was salvaged, however, and this is now with the more recent finds. The University of Leeds acquired a lease of the fort for archaeological purposes in 1950 from Mr Leonard Scarr of Cravenholme Farm, and since then the site has frequently been used during the summer for training undergraduates, and others, in archaeological techniques. Most of the trainees came from the ranks of the Greek, Latin and History Departments until the creation of the Department of Archaeology in 1974.
THE DEFENCES AND INTERIOR BUILDINGS OF THE FORT (EXCLUDING THE PRINCIPIA)
THE EARLIEST OCCUPATION AND THE FLAVIAN–TRAJANIC FORTSFootnote 14
Casual use of the fort site in prehistory is suggested by the recovery of a few lithics. The fort platform, still visible as a prominent earthwork, preserves a Flavian–Trajanic defensive circuit which, though much rebuilt, remained until the end of the Roman period. However, there was an earlier period of Roman occupation represented by post-pits under the west rampart, principia and buildings in the praetentura of the Flavian–Trajanic fort; in addition, the post-trench of a building in the retentura cut earlier paving. The ramparts also incorporated Flavian pottery from earlier occupation of the site. The date of the samian ware from the whole site left no doubt in Hartley's mind that occupation began in c. a.d. 80, so the earliest remains must be associated with an Agricolan military presence. Hartley thought it possible that the earliest occupation represented a fortlet, but the extent of the remains strongly suggests a short-lived fort, its site at least partly overlapped by its Flavian–Trajanic successor. It might have replaced the fort at Wensley 15 km to the east, where Wensleydale opens out to a lower-lying landscape. The latter is known only from an aerial photograph and could date to the early a.d. 70s.
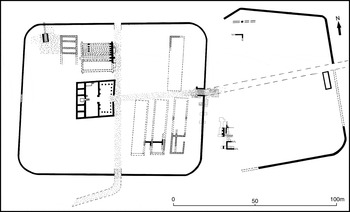
What appears to have been the second fort at Bainbridge had an area of about 1.1 ha (2.8 acres) measured across its ramparts ( fig. 2). None of its gates has been seen, but the position of the principia indicates that they were in much the same position as those of the mid-Antonine fort. The rampart was c. 5.3 m in width and was built of turf on a bottoming of flat stones. Later defensive ditches have removed any definite remains of the original ditches. The principia are described in detail below. Nothing is known of the Flavian–Trajanic praetorium, though it undoubtedly lay to the south of the principia, since the granaries occupied part of the area north of it. In 1951, under the north wall of the Severan principia and c. 4.5 m north of the Flavian–Trajanic principia, Wade found the south side of a stone building; it had two buttresses at its south-west corner and can be identified as a granary ( fig. 7).Footnote 15 Possible traces of a timber granary were found to the north. The stone granary was cut through a layer of carbonised grain, probably derived from the burning-down of an original timber granary. It seems then that there had been a pair of timber granaries north of the principia and that when the southern one had been destroyed by fire, it was rebuilt in stone. Between the granaries and the north intervallum street, there was another timber building fronting the via principalis. Barracks have been excavated in the southern part of praetentura ( fig. 3).Footnote 16 Their remains were fragmentary: they probably represented three barracks running north–south, which were not more than 26 m in length and just over 6 m wide, though other interpretations are possible. There were apparently two periods of construction.
Overall plan of the fort and annexe, with excavated features of mid-Antonine and later date. For enlargements of the areas of the Antonine and Severan east gates, and of the granary and overlying buildings to the south-east, see fig. 4 and online fig. 36. The evidence for the building in the northern part of the praetentura is uncertain. Scale 1:1250.

Virtually nothing is known of buildings outside the fort, though presumably the contemporary vicus lay to the east. A length of wall beyond the site of the Severan east gate might have been part of the fort baths.
The samian ware incorporated in the rampart makes it clear that the fort was built after a.d. 85. As the new fort was a complete replacement of its Agricolan predecessor, a unit of a different type was probably now at Bainbridge. The small size of the fort might indicate that the unit was a cohors quingenaria peditata. This change probably resulted from a general redeployment of the army. There are two likely historical contexts: the withdrawal from most of Scotland in c. a.d. 87 and the consolidation of forces along the Tyne–Solway isthmus in the years following c. a.d. 105. On balance the earlier date seems preferable because of the slight remains of the earliest structures which do not suggest a lengthy occupation of the first fort. Abandonment of the new fort came early in Hadrian's reign at the latest. According to Hartley, ‘the pottery from the fort includes no black-burnished ware, and the samian is largely South Gaulish, though pieces from Les Martres-de-Veyre are not uncommon. Lezoux ware has never been recorded. In view of this, the latest possible date for withdrawal would be a.d. 125 and a connexion with the building of Hadrian's Wall is evident. This puts Bainbridge in the same category as, for instance, Ebchester, Ilkley or Brough-on-Noe.’
THE MID-ANTONINE FORT AND ITS LATER HISTORY
Hartley's narrative ended with his description of the Flavian–Trajanic principia. The later periods of activity are described by him in brief interim statements, but the detailed sequence has been worked out by an analysis of the site records. For the most part, Hartley's interpretations of the structural sequences hold up well. The first two periods of construction were of mid-Antonine and Severan date, though a new interpretation of the history of the fort defences and the annexe walls is offered here. Hartley proposed two further periods of construction — Constantinian (shortly after a.d. 296–97) and Theodosian (shortly after a.d. 367) — which are seen most clearly in the principia. In broad terms, these are accepted here. All four periods, of course, correspond to the Wall-Periods IB, II, III and IV. They represent a historical framework which, although not entirely superseded (for example, three Severan inscriptions make it certain that Bainbridge was partly rebuilt at the beginning of Wall-Period II), needs to be viewed alongside longer-term trends, both in Britain and in other European frontier areas.Footnote 17 There is not enough dating evidence at Bainbridge to ascribe alterations in the principia and other buildings specifically to the Constantinian or Theodosian periods, but there are sufficient grounds to place them in the later third and later fourth centuries.
The identity of the unit or units in occupation during the Flavian–Trajanic period is unknown. Cohors VI Nerviorum was at the fort by a.d. 205 and in the Notitia Dignitatum it is placed at Virosidum, which is almost certainly Bainbridge. The unit might also have been present in the Antonine period, but, as will be seen, there was a period of reduced occupation before a.d. 205; following this hiatus, the Nervians could have replaced another unit, perhaps cohors II Asturum, its presence suggested by a lead sealing.Footnote 18
THE FORT DEFENCESFootnote 19
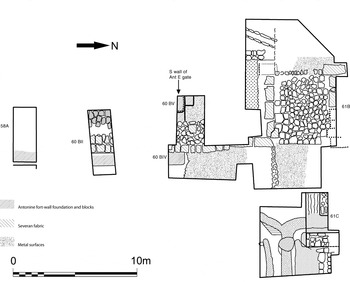
The rampart of the Flavian–Trajanic fort was heightened and widened at the rear with turf and clay. Hartley regarded the fort wall as a later insertion, but this is not shown with any certainty on the section drawings of the defences. Part of the original stone east gate was seen in 1960; it appears to have had a single portal with an overall width of c. 4 m and no flanking towers ( fig. 4). The east gate was rebuilt further to the north when the Severan principia was rebuilt, so the original building of the defences in stone would have had to have taken place by the end of the second century, if not when the fort was re-occupied in the mid-Antonine period. When the east gate was relocated, the east fort wall was also rebuilt on a line c. 0.8 m behind that of the original wall. Single ditches are still visible on the north and south sides of the fort, though excavations by Droop in 1928 traced a second ditch on the north side; traces of five ditches can be seen extending for a distance of 38 m beyond the west rampart. The arrangements on the east side were complicated by the presence of the annexe and are described below. Gaps still visible in the rampart mound mark the sites of the south, west and north gates, which have never been excavated.
The Severan east gate remained in use until the end of the Roman period. This small area produced a disproportionately large number (46 or 24.7 per cent) of the Roman coins (186) recorded from the whole site. They consist largely of issues dating from the later third century to the Valentinianic period. As at the Minor West Gate at Wallsend, the high level of coin-loss in this area can probably be explained by its use for transactions between the fort garrison and itinerant pedlars and traders when there was no longer a military vicus outside the fort.Footnote 20
THE INTERNAL BUILDINGS (EXCLUDING THE PRINCIPIA)
The main streets of the mid-Antonine fort were in much the same position as those of its predecessor. The southern part of the praetentura was once again occupied by barracks ( fig. 3). There were three, running north–south, which were divided from each other by narrow eaves-drips. If the remains have been correctly understood, the central building could only have been entered from its narrow ends and had a passage connecting its contubernia, an arrangement which is without parallel in any Roman barrack. The western barrack was demolished before the Severan period; the middle barrack was either split along its length by a spine wall or reduced in width. Pottery dating to the second half of the second century was stratified in deposits associated with these barracks. In the Severan period, the line of the via praetoria was shifted northwards and presumably cut across the ends of barracks in the northern part of the praetentura. New barracks in the southern praetentura were probably part of a general rebuilding that followed the realignment of the street. Their remains were fragmentary but perhaps represented free-standing contubernia (so-called chalet barracks) forming two barracks built back-to-back and aligned north–south. Two further periods of rebuilding followed, but again the remains were fragmentary. In the northern part of the retentura, the excavations of 1969–72 and 1977 were limited in scope. There was a latrine building in the north-west angle of the rampart with a drain which seems to have run under the fort wall. Most of the excavated area was occupied by two successive stone buildings, which were probably barracks running north–south. To their north was an open area which was paved with flagstones and rubble after c. a.d. 360.
The barracks in the praetentura, excavated in 1957 (after Hartley 1960, fig. 5); for their location, see fig. 2. Scale 1:1000.

The Antonine and Severan fort walls and east gates; for the position of the trenches, see fig. 2. In 60 BII, the possible timber raft is shown with hatching of vertical lines. Scale 1:250.

In the central range to the south of the principia, trenches dug in 1926 traced paving, a gutter and walls which probably formed part of the praetorium. North of the principia, in the angle between the via principalis and the north intervallum street, there was a granary with an overall width of c. 6.7 m; a wall running up to its south-east corner probably enclosed a yard, the southern side of which would have been formed by a second granary. In northern England, the same arrangement can be seen at Ambleside;Footnote 21 these yards might have provided secure storage for supplies such as timber, barrels and amphorae which did not need sheltering from the weather. In the Severan reorganisation of the fort, a double granary measuring 19.5 by 17.5 m was substituted for the mid-Antonine buildings. After c. a.d. 360 the southern part of the granary was demolished and its site paved with large slabs. The northern part apparently continued in use until the end of the Roman period and certainly until after c. a.d. 370.
THE ANNEXE AND SURROUNDINGS OF THE FORT
In 1928 Droop discovered the later northern wall of the annexe and in the following year traced it eastwards until he encountered its turn to the south. He connected the wall with the ‘bracchium’ or annexe wall mentioned in the Severan inscription RIB I, 722. In 1931 he traced the rest of the circuit which enclosed an area, measured across the walls, of c. 0.75 ha ( fig. 5). Two gates or entries were found: on the eastern side there was just a gap in the wall, but on the northern side there was a more complicated arrangement which might have incorporated a flanking tower, though this is very far from certain. Equally uncertain is the existence of a gate or entry on the south side which might have been indicated by a possible interruption of the wall noted by Droop.Footnote 22 In 1958–59 Hartley cut a trench across the annexe wall; behind it he found an earlier wall backed by a rampart and with a ditch in front of it, the northern edge of which was cut by the later wall. A rampart, not seen by Droop, was also found behind the later wall.Footnote 23
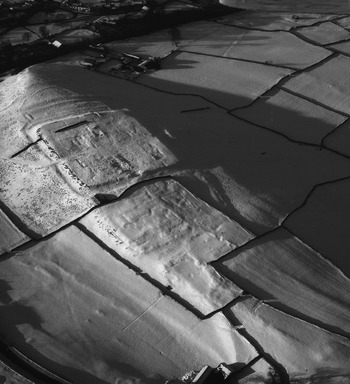
Aerial photograph looking north-west, showing the annexe (centre) and fort (beyond), with Cravenholme and the River Bain at the top. At first sight, the arrangement of the ditches on the west side of the fort might seem partly to preserve one side of an earlier fort, but this is illusory (see online figs 31–32). CIF 45, January 1979. (Reproduced with the permission of the Cambridge University Collection of Aerial Photographs)

Within the area of the annexe, Droop and Hartley uncovered parts of a number of buildings, and the RCHME survey recorded surface traces of others. In the north-east corner was a hypocausted building, probably the fort baths of mid-Antonine or later date and certainly not part of the possible baths of the Flavian–Trajanic fort immediately outside its east gate. South of the road leading to the Severan east gate, the north-west corner of a stone-built granary was seen; its long axis was aligned north–south and it was at least 14.5 m in length.Footnote 24 The granary was sealed by one or more buildings; from under what seemed to have been a primary floor of this later period of construction there was pottery dating to c. a.d. 250 or later. Droop uncovered the complete outline of a strip-house immediately south of the eastern entry into the annexe.
In 1960 Hartley regarded the earlier annexe wall as the Severan bracchium; its replacement on the north side he dated to the mid-third century.Footnote 25 Both Droop and Hartley noted the scarcity of fourth-century pottery in the annexe.Footnote 26
THE FUNCTION OF THE FORT AT BAINBRIDGE
Until the 1970s the function of the forts that remained in northern England after the Flavian–Trajanic period had seemed almost self-evident. The Roman occupation was disrupted, it was thought, by periodic barbarian incursions from the north, with their consequent trains of destruction which were apparent in the archaeology of the forts; besides which, there were always threats from the hill-folk. Forts were needed to control large areas of northern England and to defend those areas against internal and external enemies. This grim picture faded when doubts began to gather about whether there were destruction deposits in forts and whether this defensive system was needed. The new view — that the forts were primarily to hold reserve forces — was first expressed in connection with County Durham: ‘… the return of units in the a.d. 160s to Binchester and Ebchester need mean no more than that these sites were highly convenient for stationing units which could not be squeezed onto the Wall line but were part of the expeditionary force for activities north of the Wall …’.Footnote 27 This view was soon enlarged to encompass all the forts in northern England, but was explicitly rejected by Hartley who considered it still likely that there had been a Brigantian rebellion in the 150s and destruction of forts in a.d. 196–97.Footnote 28 In 2009 Hodgson and the present writer re-stated what were essentially the older beliefs about the significance of the Pennine forts, but justified them by a different line of reasoning.Footnote 29 Accepting doubts about the existence of destruction deposits and the Brigantian rebellion, the study concentrated on the settings and histories of the forts, which hardly seemed to accord with their use as bases for reserves. It was also questioned whether it was feasible to keep such large reserves in Britain during the later second century and beyond, given the grave military emergencies that confronted the Roman state elsewhere.
These matters are central to considering why there was a fort at Bainbridge. Its origin in the Agricolan period is unremarkable; it was one of a large number of forts which were established to control the recently conquered territories of the Brigantes. The re-occupation of the site in c. a.d. 160 took place in very different circumstances: northern England had been part of the Roman province for almost a century, and under Hadrian and Antoninus Pius the numbers of forts in the region had been progressively reduced. One particular aspect of the fort at Bainbridge which might shed light on its purpose is its small size (1.1 ha). Fort-sizes vary considerably at different periods, and also, to some extent, from province to province, but in second-century Britain they usually fall within the range of 1.5 ha to 2.5 ha, apart from smaller examples on the Antonine Wall where some units were apparently split between adjacent forts. Bainbridge is one of five markedly small forts in the Pennines and Lake District which had areas of between 0.92 ha and 1.2 ha: these other forts are at Whitley Castle (1.2 ha), Ambleside (1.18 ha), Low Borrow Bridge (1.16 ha) and Brough-on-Noe (0.92 ha). A sixth fort within this range of sizes, at Brough-under-Stainmore (1.16 ha), is possibly later Roman, replacing a larger fort.Footnote 30 All these forts were established in the late first or early second century and held until the end of the Roman period, though, except for Ambleside, with a period of abandonment c. a.d. 125–60. From the third century, or perhaps some decades earlier, cohors II Nerviorum was at Whitley Castle; cohors I Aquitanorum was at Brough-on-Noe from a.d. 158 until no later than the beginning of the third century. Bainbridge, as already noted, was occupied by a.d. 205 by cohors VI Nerviorum, possibly preceded from the mid-Antonine period by cohors II Asturum. The identities of the units at Ambleside and Low Borrow Bridge are unknown, though, as in the case of the other small forts, they will probably have been quingenary. Inscriptions and other written records of the units named above do not specify whether they were equitate or peditate, but the size of the forts they occupied is usually taken to indicate that they were peditate, requiring six barracks rather than the ten (four of them stable-barracks) needed for an equitate cohort.
However, a simple equation of the sizes of forts and units can be misleading,Footnote 31 especially from the earlier third century onwards when units began to be reduced in size,Footnote 32 and unfortunately, none of the plans of the barrack accommodation in the six small forts can be reconstructed. Another possible explanation for the small size of these forts is that they contained only parts of units. The smaller forts on the Antonine Wall have already been mentioned. Another fort comparable in size to our group is at Crawford (1.06 ha); originating in the Flavian period, it was re-occupied in the early Antonine period. As well as the principia and a granary, its interior contains barracks with a length of 19.8 m which were judged to be too short to contain complete centuries.Footnote 33 There was not enough accommodation for a complete quingenary unit, its remainder perhaps being posted at the fortlets and at least one tower which are known on roads to the south and north. A second possible example is Hardknott with an area of 1.3 ha, where the main occupation was confined to the Hadrianic period. It was held by cohors IIII Delmatarum, which, to judge by the size of its parade ground, was probably equitate. Part of the unit was probably stationed in a fortlet on the coast at Ravenglass, superseded by a fort with an estimated area of 1.46 ha when Hardknott was given up. However, these forts were comparatively short-lived, and it is doubtful whether a unit would have been permanently split between a fort and satellite fortlets. It seems best to accept that the units at our group of small forts in the second and third centuries were all probably quingenary peditate units, while admitting that there are other possibilities.
More can be learnt about the function of these forts by looking at their settings. Whitley Castle, Ambleside, Bainbridge and Brough-on-Noe can be described as remote forts, in the sense that they are on minor routes and are not links in a chain of forts, such as those on Dere Street or on the road which crosses Stainmore and runs up the Eden valley to Carlisle. These small forts are situated in valleys running through barren uplands; food from local agriculture would probably have had to have been supplemented from more distant sources. Brough-on-Noe was in an area ‘… on present evidence … very much less densely settled …’ than the river valleys in the White Peak to the south.Footnote 34 Field-systems and settlements have been mapped to the south of Bainbridge, but are far fewer in number than those known in and around Wharfedale and Malham.Footnote 35 Low Borrow Bridge, on a major route connecting Chester and Manchester with Carlisle and the western sector of Hadrian's Wall, is an exception to the remote positions of these smaller forts, but it is situated in the narrow, upper part of the Lune valley where it passes through the massive Howgills; local agriculture near by, particularly cereal production, must have been as limited as in the vicinities of the other small forts.
A possible connection between Whitley Castle, Bainbridge, Ilkley and Brough-on-Noe is their proximity to lead-mining districts. The association is strongest at Whitley Castle: from Brough-under-Stainmore there are lead sealings of cohors II Nerviorum inscribed ‘metal(la)’ on the obverse which probably date to the period when the unit was at Whitley Castle (RIB II.1, 2411.123–7), where possible by-products of lead smelting were used as aggregate in a mortar floor.Footnote 36 At Brough-on-Noe, galena was found in the principia.Footnote 37 The fort at Ilkley, which, with an area of 1.3 ha, is not much larger than the other forts considered here, is situated 16 km south of lead fields at Greenhow ( fig. 1), near which have been found lead pigs cast with inscriptions of Domitian and Trajan (RIB II.1, 2404.61–3). Bainbridge is also near lead fields, and the monks of Fors Abbey were granted the right to exploit them. Those rights were also to deposits of iron ore, which is a reminder that the Pennines were rich in other mineral deposits that might have been processed during the Roman period. In Britain, as elsewhere, the exploitation of valuable mineral resources did not in itself require the presence of the army. Military occupation at Charterhouse on Mendip in Somerset seems to have ended early in the Flavian period, even though lead-mining continued well into the second century and almost certainly much later.Footnote 38 Likewise, there are no clear indications of a military presence in the tin-mining areas of Cornwall after the early Flavian period. Any connection which Bainbridge, Whitley Castle, Ilkley and Brough-on-Noe had with lead-mining and other mineral extraction was likely to have arisen from a need to provide protection for the mines and the transport of their products in areas which were much less secure than south-west England.
The remoteness of these small forts in northern England might have been reflected in the size of their military vici. The annexe at Bainbridge contained vicus buildings, but it is uncertain whether there was also civilian settlement outside the defences. At Ambleside the vicus was extensive but seems to have been abandoned by the late Antonine period. Otherwise, very little is known about occupation outside the small forts. Their supply systems must have been more costly than those of forts on major routes, and, as suggested above, the upland settings of the small forts might have meant that they had to rely more on foodstuffs brought considerable distances than was usual for forts sited in less difficult terrain. At Bainbridge, recognition of the need for reserve stocks of grain much larger than at more accessible forts might explain the building of a granary in the annexe. The costs of servicing garrisons in these remote posts might explain their small size. On the other hand, the fact that these difficulties were accepted speaks of an imperative need to supervise and control a disaffected and troublesome population.
THE PRINCIPIA: FLAVIAN–TRAJANIC TO SEVERAN
A NOTE ON TERMINOLOGY AND THE RECORDING SYSTEM
The word ‘principia’ is a neuter plural noun, and R. Fellmann has recently deprecated its use as a single noun, which occasionally leads to the solecism of a plural ‘principiae’.Footnote 39 Not only this, but it also obscures the meaning of the word which refers to a number of different functional elements, only finally assembled in one building in the first half of the first century a.d. One of these elements was the shrine of the standards, or aedes principiorum, a term which occurs in RIB III, 3027 from Reculver and which is used here in preference to sacellum. The same inscription mentions a basilica, presumably the cross-hall. The English term is too well-established to abandon.
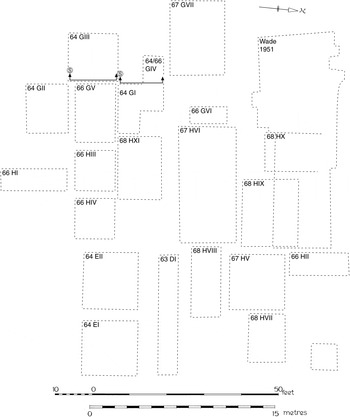
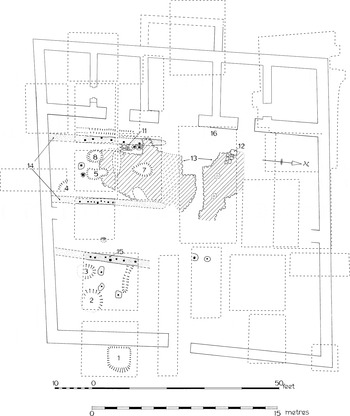
Hartley recorded his excavations in context books, usually one for each year, and by plans drawn to imperial scale. Usually, each area was given a letter preceded by the year of excavation, and each trench within that area was given a Roman number; all features and deposits were numbered continuously. Therefore, 64 GIII, 9 would be context 9 in Trench III, Area G, dug in 1964.Footnote 40 The trenches in the principia were generally of irregular size, their shape and position dictated by the need to answer specific questions ( fig. 6).
Trench numbers on the principia site and position of section ( fig. 9). The north-easternmost trench was not numbered. Scale 1:250.

THE FLAVIAN–TRAJANIC PRINCIPIA (FIG. 7) By B.R. HartleyFootnote 41
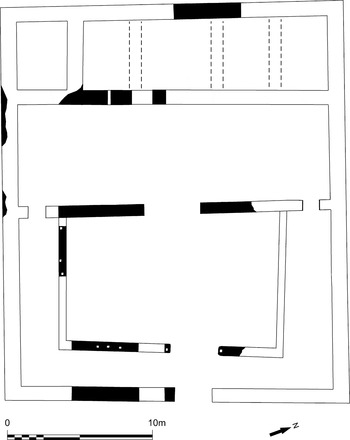
There were several post-pits and other features in the subsoil which bore no relationship to the plan of the Flavian–Trajanic principia, and were cut by its post-trenches and post-pits, or were sealed by the earliest via principalis.Footnote 42 Since subsequent work has revealed similar post-pits under the west rampart of the first fort on the visible circuit, it now seems increasingly likely that its Agricolan predecessor was nearer the west end of the hill. Of the sixteen features recorded as likely to belong to the Agricolan phase, twelve were certainly post-pits, one may have been a post-pit, and the residue consists of one post-trench and two gullies. All the post-pits had clean fillings, save for the occasional flecks of charcoal, and, with only one apparent exception, produced no occupation material. Three coarse pottery sherds of Flavian or Trajanic date were recorded from the possible exception. But, since it was only realised later that the post-pit was cut by the Flavian–Trajanic veranda trench, the pottery may have been in the filling of the latter. The early post-pits fall into two groups. Four were large pits holding massive posts some 0.22–0.26 m square, packed with clay and stone. The other series of post-pits give alignments of three and four smaller posts respectively, all with posts 0.10–0.12 m in major dimensions, but not carefully squared, it seems.Footnote 43 For what it is worth, the two series are approximately at right angles to each other, but their alignments are different from the posts recorded under the Flavian–Trajanic barracks in the praetentura.Footnote 44
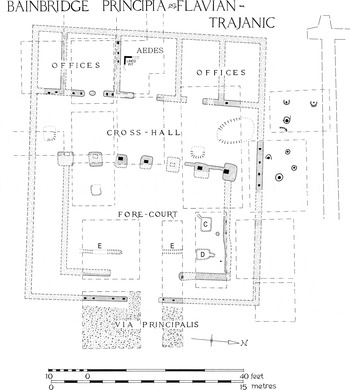
The Flavian–Trajanic principia with earlier post-holes to north and outline of granary wall recorded by Wade in 1951. Scale 1:250.

The main difficulty in tracing the plan of the Flavian–Trajanic principia Footnote 45 which succeeded these features was that many of its post-trenches had been partly or totally destroyed in later reconstructions in the Antonine and Severan periods, particularly the latter. Both the south wall and the west one had entirely gone. However, the position of the former could be deduced by symmetry and the latter could be placed within a few inches. Its surviving returns to the east, considered together with the negative evidence of its absence west of the rear wall of the Severan building, where the subsoil was undisturbed, show that it was dug away when the Severan foundations were put in. Accordingly, the general plan may be restored with confidence, but the precise dimensions at a slightly lower order of confidence. The building emerges as a standard principia with forecourt and surrounding veranda, giving on to a covered transverse hall with four offices ranged about the aedes, which had a pit lined with concrete for the pay-chest. The walls were parallel to, or at right angles to, each other within a few degrees.Footnote 46 They had squared timbers, normally of 0.10–0.12 m scantling, but as will be seen from the plan ( fig. 7), the front wall of the hall had larger posts (about 0.25 m square) set in individual post-pits. There was no suggestion of a towering roof to the aedes, nor can there have been a central door in the front wall of the hall (but cf. below, ‘The Bainbridge principia: discussion’).
No trace of metalling was found in the forecourt, and normally an occupation deposit of brown earth capped with burnt material, including fired daub, rested directly on the subsoil. It is, however, possible that the entrance had been at least partly paved with flat slabs, since some were found on the subsoil close to the north veranda; gravel was also found at the entrance. Elsewhere in the court, it seems likely that timber duckboarding was laid, since in one area in the south-west corner of the court slight traces of dark striations in the subsoil suggested joists similar to those found in the timber barracks in the praetentura. Complete boarding would be impracticable in an open court, since it would become very slippery in wet weather, but duckboarding would be perfectly sensible in this context, and its use probably explains the absence of eaves-drip gullies around the veranda. Pit C had a gully draining into its south-west corner, as if it were acting as a soak-away. The gully had been lined with stone slabs, of which one survived. Pit D was of generally similar nature, but was apparently connected with a gully (E) too far to the west to take the eaves-drip from the eastern veranda. It may be suggested that this too served to drain the forecourt below the suggested duckboarding. The alternative that the gully (E) could have housed a wooden water-pipe, with Pit D as a small cistern, seems unacceptable, for there is no provision for dealing with the overflow, since the short stretch of gully on its north side sloped into, rather than away from, it.
No definite evidence of reconstruction within the Flavian–Trajanic period was noted. The building had been systematically demolished, with burning of the wattles and burial of the debris in pits, four of which were detected. Nails removed with claws were evident everywhere in the debris.
THE MID-ANTONINE PRINCIPIA: A UNIQUE PLAN OR A CONVENTIONAL PRINCIPIA PARTLY CONVERTED INTO ACCOMMODATION? (FIG. 8)Footnote 47
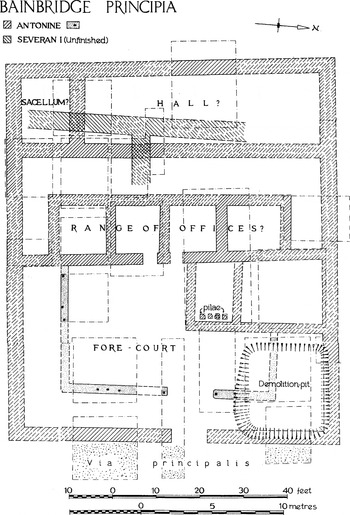
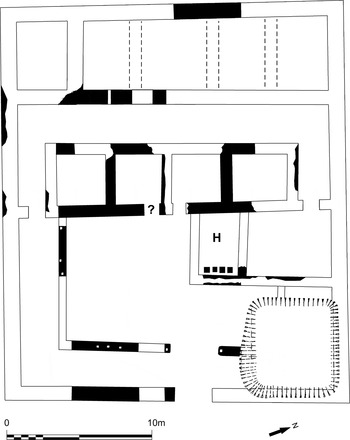
The mid-Antonine principia occupied the site of its Flavian–Trajanic predecessor, with its east–west axis 2.3 m farther to the north; its frontage was in roughly the same position as before, but it was a larger building and extended farther to the west as well as to the north, overlapping the Flavian–Trajanic stone granary. The new building was briefly described by Hartley as follows: ‘[it] was of unconventional plan, with a range of four small rooms taking up most of the space appropriate to the cross-hall, while the rear range appeared to contain one small room at the south end but otherwise to be undivided. The south half of the forecourt had a timber portico, but the north half was partly occupied by a stone structure, apparently involving a room with a hypocaust.’Footnote 48 The annotations on the accompanying plan ( fig. 8) label the four small rooms as ‘range of offices?’, the small room at the south end of the rear range as ‘sacellum?’ and the undivided remainder of the range as ‘hall?’. The only butt-joints shown on the plan are where the walls of the hypocausted room end against the east wall of the ‘range of offices’. Hartley clearly considered that all the elements of this curious plan were of one build, except presumably for the hypocausted room and its neighbour to the north. Yet, if this room and the ‘range of offices’ are extracted from the original plan, it leaves a conventional arrangement of forecourt, cross-hall and rear range, although the last apparently lacks the customary division into five rooms. It is therefore necessary to explore the possibility that the Antonine principia took the form of a conventional building which was later converted to serve other purposes by the addition of the ‘range of offices’.
The mid-Antonine principia. Scale 1:250.
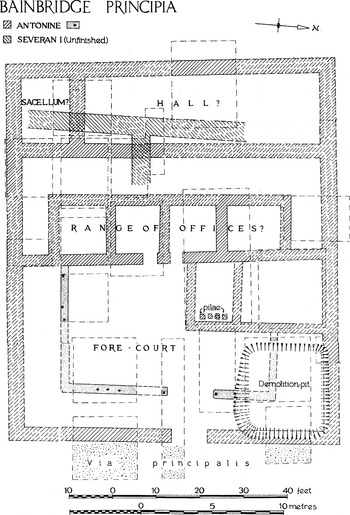
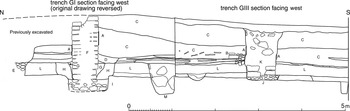
Hartley's plan implies the ‘range of offices’ were of one build with the longer wall which formed their eastern sides. If this longer wall formed the front of a cross-hall and the offices had been inserted subsequently, their walls would have abutted the longer wall. In fact, nothing more than the foundations of any of these walls survived, and it is impossible to be certain from the surviving plans and photographs (e.g. figs 18 and 20) whether or not they were all of one build. Re-examination of the records of the ‘Sacellum?’ and ‘Hall?’ to its north yielded more useful results. If these rooms had in fact been built as the rear range of a conventional principia, there should have been four cross-walls dividing up the area into the usual five rooms. The ‘Sacellum?’ would have formed the southernmost of these rooms. Just over 3 m beyond the north wall of this room, Hartley's plan ( fig. 8) shows a wide east–west foundation which was part of the initial work on the Severan principia, which was abandoned following alterations to its plan. This is shown clearly in a section ( fig. 9, H). Above the foundation is the south wall of the aedes of the completed Severan principia ( fig. 9, F with foundation-trench G). Below the foundation is a third wall ( fig. 9, I) which is pre-Severan and can only have belonged to the mid-Antonine principia where it presumably formed the north wall of a room next to, and of the same size as, the southern room in this range. Unfortunately, the next cross-wall to the north required in a conventional rear range would have been removed in the excavated area by the Severan strongroom, and the line of the fourth cross-wall would have lain entirely within an unexcavated area.
Section across Room 2 and parts of the aedes (to left) and Room 1 (to right). Redrawn from TWM 30 with GI section reversed to face west. A: plaster adhering to walls or preserved on side of robber trench; B: possible hypocaust wall; C: general debris layer; D: ‘interference’ (possibly a robbed hypocaust wall); E: filling behind strongroom wall?; F: south wall of Severan aedes; G: cuts for insertion of F; H: foundation trench for first (abandoned) attempt at building Severan principia; I: mid-Antonine foundation trench, probably for south wall of aedes; J: mid-Antonine wall and foundation; K: robber trench for Severan wall built on stump of Antonine wall J; L: brown clay dump sealing foundations of J but cut by H; M: pit? For position of section, see fig. 6. Scale 1:75.

It is, therefore, likely that originally there was a conventional rear range of five rooms, which strengthens the case for there having been a standard cross-hall to the south, the range of offices being a later insertion. Just as important is the absence of any parallels for Hartley's building plan and the difficulties in analysing its function. If it is seen to represent two periods of construction corresponding to the successive functions which the building served, most aspects of its plans in both periods make sense, as is shown later in this structural analysis.
However, before returning to what will from now on be described as the cross-hall and rear range, the forecourt area needs to be discussed. The south side of the entry from the exterior of the building is shown as certain on fig. 8, but its position corresponds exactly with the south side of the entry into the Severan forecourt. There is no record of two walls in this position, though Hartley might have assumed that the Antonine foundations were re-used for the Severan wall. The south side of the opening, as shown on the plan, is nearly in line with the north end of a post-trench, separated by a gap 3 m in width from a short length of another post-trench on the same line, most of it destroyed by a so-called demolition pit. On the south side of the forecourt was another post-trench and there were traces of one on the north side, cut by the west side of the pit. Hartley regarded the post-trenches as parts of a veranda surrounding the forecourt on its south, east and north sides. There were timber verandas in the forecourt of the stone principia at Old KilpatrickFootnote 49 on the Antonine Wall, where the front wall of the cross-hall was also of timber while the rest of the building was of stone. However, at Bainbridge three closely-spaced post-impressions in the first of the trenches mentioned above held the uprights of a solid wall rather than the widely-spaced roof supports of the usual open veranda. These post-trenches might have been part of the later adaptation of the building. They do not have to be regarded as part of the primary construction: the rebuilt north veranda of the Severan principia shows that the bases of such supports could be placed on the ground without any foundations, and this might have been the original arrangement in the Antonine principia.
Another feature on the site of the principia forecourt is the so-called demolition pit.Footnote 50 It was roughly 6.5 m square and 1.9 m deep with sides sloping at angles of about 60 degrees; it contained two layers of burnt roof slates, charcoal and gravel, but most of its filling was of clay and ‘black earth’ mixed with stones. The top of the pit cut the inner edges of the north and east forecourt wall-foundations, but the pit might originally have had vertical sides which subsequently eroded, undermining the foundations. Whether this feature was a demolition pit is doubtful: it was not filled entirely with demolition material, and there is no obvious reason why a pit should have been dug to dispose of material which could have been included in street metalling, wall foundations and cores, and levelling layers for floors. Also, the uncompacted filling of the pit caused the collapse of the Severan forecourt wall which had been built above it. The pit would hardly have been dug in this position if it was to have been immediately succeeded by the rebuilding of the principia. It was probably associated with modifications to the principia, perhaps serving as a crude form of water-tank.
At first sight, the plan resulting from what is regarded here as the adaptation of the cross-hall is puzzling. Why were the four rooms inserted in the cross-hall rather than adapted from the five rooms of the rear range and why were there passages around three sides of the new rooms? The passages provide the answer. Many stone principia are reduced to their foundations, but where walls and door openings survive, there are usually entrances into the cross-halls from the ends of the verandas, as at Benwell and Chesters on Hadrian's Wall.Footnote 51 Entrances in this position are more often apparent in timber principia because of the spacing of the post-pits at the front of the cross-halls (cf. fig. 7). Doors opening off the verandas at either end of the cross-hall at Bainbridge would account for the two east–west passages; the passage connecting with their eastern ends would have provided access to the five rooms of the original rear range ( figs 10–11). These rooms had to be retained for some purpose, but the cross-hall was redundant and, probably following the removal of its roof, could be used for the new rooms, provided that there was still access to the rear range from the forecourt. The hypocausted room and the room to its north were presumably added after the original adaptations, as indicated by Hartley (see above), because they blocked the entrance to the north passage.
The mid-Antonine principia probably as originally built; the positions of the forecourt entrance and veranda follow fig. 8, but are doubtful. Scale 1:250.
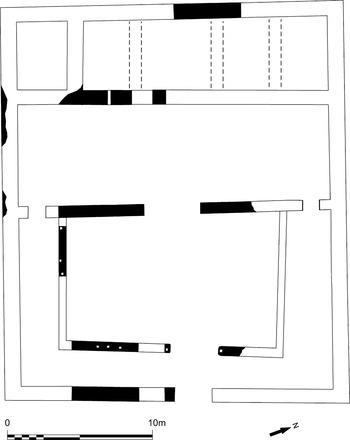
The principia, partly converted into living accommodation (H = room with hypocaust). Scale 1:250.

The conversion added four rooms to the building, and then a further two. The hypocausted room suggests that the accommodation was for an officer above the level of an auxiliary-cohort centurion. Until the later third century, it is unusual to find hypocausts in the living areas of forts, except in praetoria. The remainder of the principia could have functioned much as before the conversion, with access from the forecourt to the rear range provided by the passages around the range of new rooms, though the removal of the cross-hall would have taken away the place of assembly in front of the tribunal and much reduced the size of the area from which ceremonies in the aedes could be witnessed (see below).
There are early and late parallels for the combination of principia and praetorium. In Augustan legionary fortresses, the aedes was located in the praetorium and could be approached through the rear range of the principia, both buildings having an axial relationship; this arrangement perhaps continued through the Tiberian period.Footnote 52 In small forts of the later third century and beyond, there is a type of building, described by Mackensen as principia cum praetorio, which combines, on a small scale, office space and living accommodation for the commanding officer.Footnote 53 At Bainbridge, the conversion of the principia surely signifies a drastic reduction in the size of the unit in occupation. This was presumably expected to be temporary: otherwise there would have been a corresponding reduction in the size of the fort. The praetorium and possibly many other buildings in the fort were perhaps in need of repairs, and the limited manpower was concentrated on making a few of the buildings habitable.
THE SIGNIFICANCE AND POSSIBLE HISTORICAL CONTEXTS OF THE CONVERSION OF THE MID-ANTONINE PRINCIPIA
The mid-Antonine principia, partly converted into accommodation, was swept away in c. a.d. 205 and replaced by entirely new principia. The date at which the conversion took place is uncertain, but might well have been only a short while before the complete rebuilding. Something very similar occurred in the principia at South Shields before the construction of the supply-base in c. a.d. 205–7 or 208–9:Footnote 54 the partition between two offices in the rear range was removed and the resulting space used for iron-smithing, while a timber building was inserted in the forecourt following the demolition of part of the veranda. At least one side of what was almost certainly the praetorium was also demolished and replaced by a smaller building, which in turn was superseded by one of the granaries of the original supply-base; the porta decumana went out of use and, probably also at this time, two other gates were partly or entirely blocked.Footnote 55
These various modifications to the buildings at Bainbridge and South Shields clearly indicate that the units occupying the forts had been greatly reduced in size, or even that they had been replaced by a small holding force drawn from another unit. At Bainbridge the officer in command was content with what, in comparison with a conventional praetorium, can be described as a small apartment. There is nothing to indicate that the conversion of the principia at South Shields included accommodation for an officer, but parts or all of the praetorium were demolished. The period of reduced occupation at these forts ended shortly before the Severan campaigns in Scotland, or at South Shields possibly during the preparations for the campaigns or during their early stages. The reduced occupation probably lasted only a few years; otherwise, as noted above, it might reasonably be expected that the forts would have been reduced in size to reflect the smaller numbers in the units. The period thus indicated might well have encompassed the battle at Lugdunum in a.d. 197, where Septimius Severus defeated Clodius Albinus, and its aftermath.Footnote 56 In one of his last studies of the Roman occupation of Brigantia, Hartley stated that ‘there are hints at such sites as Bainbridge and Ilkley that some of the barracks were occupied at the time of the destruction [in a.d. 196–7] and the implication is that small detachments had been left to look after the forts, but that they proved insufficient to deal with determined attacks by the natives’.Footnote 57 At South Shields, however, there were no signs of destruction in the very extensive excavations, published and unpublished, of the levels immediately preceding the building of the Severan supply-base, and at Bainbridge there were likewise no signs of destruction on the principia site. In recent decades, the possibility of widespread devastation in a.d. 196–7, when the northern peoples might have taken advantage of the removal of much of the Roman army to fight under Albinus at Lugdunum, has commonly been discounted.Footnote 58 Whether the forts had been ravaged by enemy attacks — which is most unlikely at South Shields — or merely required extensive renovations some forty years after they were built, involves a debate which can be side-stepped here. What needs to be explored is the significance of the reduced size of the units in occupation at the beginning of the Severan period.
That a large part of Albinus' army was drawn from Britain can hardly be doubted, though it is not confirmed by the ancient sources, but how soon after the slaughter at Lugdunum the British units on the losing side were brought up to strength is uncertain. For a few years it may have been necessary or politically expedient to keep the army in Britain much reduced in numbers. In the immediate aftermath of Lugdunum, repairs were made to buildings at Ilkley (RIB I, 637) and Bowes (RIB I, 730, preceding 3 May 198) under Virius Lupus, Severus' first governor in Britain. Both forts are on vital cross-country routes, and the inscriptions perhaps signify repairs to buildings essential to keeping lines of communication functioning properly rather than the overall renovation of these forts. The identity of the building at Ilkley is unknown, but at Bowes it was a baths building, ‘vi ignis exustum’ (‘burnt by the violence of fire’), that was restored. The latter might seem inessential if it was the fort baths, but the inscription might equally refer to the baths of a mansio (so-called) or posting-station, a vital facility at Bowes; the fort was on a major Roman road, now the A66 which is still sometimes closed in winter where it crosses Stainmore, immediately to the west of Bowes. The highly unusual circumstances of the building work, which was under the supervision of the prefect of the ala Vettonum at Binchester for the unit at Bowes, cohors I Thracum, finds no parallels elsewhere in Britain; the prefect of the cohort was absent and perhaps had been killed at Lugdunum, as Frere has recently suggested.Footnote 59 The only other building inscription of Virius Lupus from northern Britain is from the western legionary compound at Corbridge (RIB I, 1163), and is not associated with the forces holding Hadrian's Wall. Between the governorship of Virius Lupus and a.d. 205 (the date of the inscription at Bainbridge citing Pudens as governor), there was probably a gap of five or six years; the absence of building inscriptions, the usual source of governors' names in the second and third centuries, means that we do not know the name of the post-holder (possibly more than one) during that gap.Footnote 60 From c. a.d. 205–7 onwards, assuming that this was the period of Senecio's governorship, there is a large series of inscriptions from the forts on Hadrian's Wall and also in northern England generally.
An army well below full strength, in terms both of overall numbers and its cadre of commanders, certainly fits the circumstances at Bainbridge, South Shields and Bowes, and might also have caused the problems which brought Severus to northern Britain. However, from other excavated forts there are no signs of reduced occupation in the late second or early third century, with the exception of Vindolanda where much of the site of Stone Fort 1 seems to have been occupied by circular buildings. Buildings to the west are currently interpreted as a fort which co-existed with the circular buildings, but this is doubtful.Footnote 61 In many instances, the excavation of forts took place in the nineteenth or earlier twentieth centuries and has not recovered their detailed structural histories. Also, it is likely that at many forts a period of reduced occupation would not be detectable; after all, the virtual abandonment of the forts on Hadrian's Wall which is assumed during the Antonine advance into Scotland at present figures only in the absence or scarcity of early Antonine samian ware. Existing buildings could have been used by much reduced numbers, only requiring adaptation or demolition if they were in disrepair or had been destroyed, which seems to have been the case at Bainbridge and South Shields.
THE SEVERAN PRINCIPIA (FIG. 12)
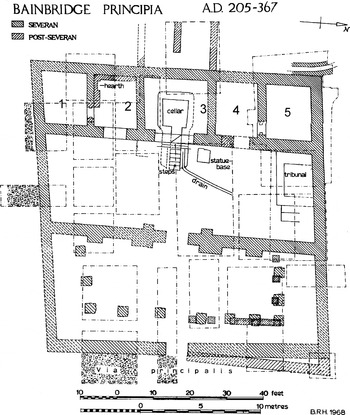
The new building occupied approximately the same site as the Antonine principia, but only the front walls of the earlier and later forecourts coincided exactly. A false start, represented by two wide foundations, had been made on its construction; the foundations were probably part of the intended rear range ( figs 8 and 9, H). The central axis of the completed principia was c. 1.5 m farther north than that of the earlier building; the new building was c. 0.8 m wider north–south, but c. 3 m shorter east–west. The reduction in the overall depth of the building resulted from the comparative narrowness of the forecourt, the widths of the cross-hall and rear range being much the same as those of the Antonine principia. The overall dimensions of the principia were 24 m north–south by 24.5 m east–west. Its north–south walls were on the fort alignment, but the east–west walls were deliberately aligned about 5 degrees farther to the south-west.
The Severan principia. Scale 1:250.

The cross-hall and rear rangeFootnote 62
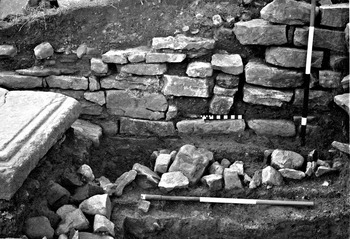
The cross-hall measured 21.3 by 7.3 m internally. Its west wall survived to a maximum height of nine courses or 0.9 m, but its other three walls had been reduced to foundation level. The original floor was of mortar laid over a layer of brown clay, but it only survived along the west side of the cross-hall and near the entrance from the forecourt. The brown clay, sometimes mixed with pebbles and tile fragments, was a levelling layer over the western part of the site which sealed the walls of the original and altered Antonine principia ( fig. 9, L). The north side of the entrance from the forecourt was seen and, assuming it was centrally placed, allows its overall width to be restored as c. 2 m. The projecting foundation on the west face to the north of the entrance is shown on fig. 12 as of one build with the east wall of the cross-hall; a second foundation is restored in the equivalent position south of the entrance. However, a site plan seems to show the north foundation abutting the wall, and its north and south ends are ragged, as if it had extended farther in both directions.Footnote 63 It was perhaps a plinth or bench.
The tribunal, excavated in 1951, was in its customary position at the right-hand end of the cross-hall as approached from the forecourt. It measured 4.6 m east–west by 2.4 m north–south. Its south and east walls were 0.7 m in width; its west wall was 1.4 m wide and abutted the west wall of the cross-hall. This wider wall no doubt incorporated a flight of steps leading up to the tribunal, the floor of which was probably c. 2 m above that of the cross-hall. Under the raised floor, there was a room measuring 2.7 by 1.7 m. There was a gap at the north end of the east wall which might represent a door. Rooms under tribunals are known at several principia, including South Shields (in the mid-Antonine and late third- or early fourth-century principia), Chesters and Carpow.Footnote 64 In principia without strongrooms, as at Chesters (assuming the tribunal to have been original and the strongroom to have been a much later addition), at Carpow, and in the mid-Antonine principia at South Shields, it is assumed that the room under the tribunal, which at South Shields took the form of a semi-basement, was built for the storage of bullion and valuables, as first suggested by R. Birley in his report on Carpow.Footnote 65 The later principia at South Shields also included a very large strongroom under the aedes, which the present writer suggested was for the storage of bullion in transit through the supply-base, while the room under the tribunal was for the unit's valuables.Footnote 66 A similar explanation can be proposed for Bainbridge, where the funds of the unit and other valuables might have been stored separately. The surface of the west cross-hall wall abutted by the tribunal was plastered, implying that the latter was built after the shell of the building was completed, but not that the tribunal was built at a much later date. To the east of the tribunal were the foundations of two steps, which were probably later additions. They cannot have extended up to the original height of the tribunal and were probably associated with a rebuilding which reduced its level.
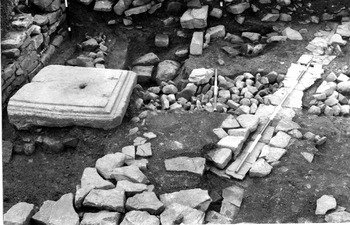
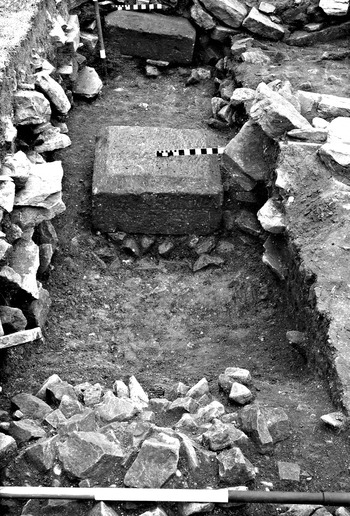
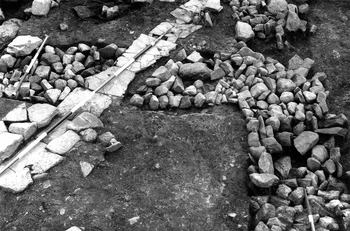
North of the entrance to the aedes, a sandstone statue base ( fig. 13) was found in 1926 and was described by Collingwood as follows: ‘… a base 4 ft. [1.22 m] by 3 ft. 6 in. [1.07 m], consisting of a single stone with mouldings round three sides … it had a dowel-hole in the middle, and in front two T-shaped cramp-holes, in one of which a bronze cramp, leaded in and broken off short at the base of the T, was still in place. This had evidently served as a stand either for an altar or for a statue, probably the latter, because it does not appear that altars were cramped into their bases, a precaution which would be more necessary in the case of a statue. There is no base symmetrically disposed to the south of the steps; presumably this represents an imperial statue … auspiciously placed on the right hand of one entering the sacellum [or aedes].’Footnote 67 Hartley's excavations confirmed that there had not been another statue base south of the aedes. In front of the aedes were one or two steps leading up to the threshold, which was 0.37 m above the level of the cross-hall floor.Footnote 68 However, the original floor in the aedes was at the same level as that in the cross-hall, which might suggest that the threshold was not part of the original construction and was inserted at the same time as a later floor, perhaps of timber, at a higher level.
The statue base placed against the west wall of the Severan cross-hall; foreground, fragments of the paving associated with the late Roman timber building; drain cutting through party wall of northern two rooms inserted in mid-Antonine cross-hall. Scale divisions in feet.

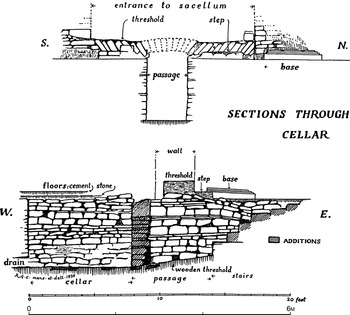
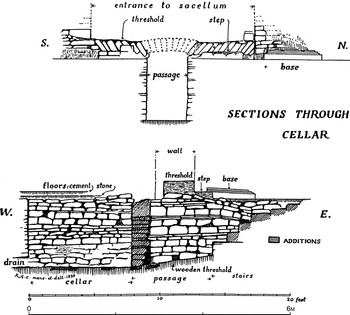
In the rear range, all five rooms measured 4.8 m internally east–west; the aedes (Room 3) was 5.25 m in width, Rooms 1, 2 and 4 were 3.5 m in width, and Room 5 3.8 m in width. The central three rooms opened onto the cross-hall: the aedes opening was 3.5 m in width, but that of Room 2 was only 2 m in width; the width of the opening in Room 4 is uncertain. There were doors 1 m in width between Rooms 1 and 2 and between Rooms 4 and 5. The floors in all five rooms were originally of mortar. There are full descriptions of the aedes and its strongroom by Collingwood and of Room 5 by Wade, which do not need to be repeated here, although Collingwood's plan and elevation of the strongroom are reproduced as fig. 14.Footnote 69 Painted wall-plaster fragments from late deposits in these rooms are unlikely to represent their original decorative schemes and are described in the subsequent section dealing with the later occupation of the rear range.
The Severan aedes and strongroom (after Collingwood 1928, fig. 4 ). Scale 1:75.
The forecourtFootnote 70
Its dimensions were 21.3 by 8.9 m internally. The south side of the east entrance was seen and established its width as 1.9 m. The supports for the veranda roofs were represented by eleven foundations of mortared rubble c. 0.9 m square. They were spaced unevenly; on the east side of the forecourt, there were three south of the entrance and four to the north. The builders were apparently unable to find a way of fitting the veranda supports neatly into the forecourt with its plan in the form of a parallelogram. The central and west foundations on the north side appear on an unpublished section: the former was 0.63 m in depth, and the latter rather deeper, at 0.85 m, because it was cut through the filling of the so-called demolition pit.Footnote 71 The foundations presumably supported the square bases with chamfered sides which were reused when the verandas north of the entrance were rebuilt ( fig. 15). The floors of the verandas were of mortar, and the forecourt had a gravel surface, in places with a few paving stones which might have represented later patching.
Chamfered blocks forming the bases of the northern veranda supports in the Severan forecourt, looking east (67 HV). The blocks were re-positioned following the subsidence and collapse of the eastern forecourt wall where it crossed the filling of the probable water-tank; further signs of subsidence can be seen at the top of the photograph. Ranging rods with one-foot divisions; smaller scales with division in inches.

Three foundations projected from the east face of the cross-hall wall. The south foundation was 1.3 m in length and 0.45 m in width; notes state that it was built against the wall, but that does not necessarily mean that it was not part of the original building programme. The foundation immediately north of the entrance was 1.8 m in length and also abutted the foundations of the cross-hall wall; its north and south ends were ragged. The excavation records refer to these projecting foundations as pilaster bases. This is not a plausible interpretation of their purpose: their spacing is uneven, and one is of a much greater length than the others. One possibility is that they were benches or platforms to support altars, reliefs or aediculae.Footnote 72
Dating evidence
Hartley connected the construction of the principia with the general rebuilding of the fort in c. a.d. 205–7 with which the three inscriptions erected by the prefect L. Vinicius Pius are associated (see below). The latest pottery from the construction levels of the principia or from activities preceding them is consistent with a Severan construction date:
64 EII, 14, described on the finds card as above Antonine and below Severan forecourt levels: form 31R, stamp 3a of Pottacus (CG, a.d. 160–200).
67 GVII, 26, from the robber trench of the west wall of the Antonine principia: late second- to early third-century group including a BB2 bowl or dish with a rounded rim and a form 37 in the style of the late Antonine potter Paternus v.
67 HV, 28, ‘demolition pit’, lower filling: form 33, stamp 4a of Mascellio i (CG, a.d. 160–200):Footnote 73 the same layer contained a sherd from a ‘colour-coated scroll beaker’, presumably Nene Valley colour-coated ware, which is not known on Hadrian's Wall before the Severan period, but which could possibly have reached forts further south a little earlier.
67 HV, 20, ‘demolition pit’, upper filling: Antonine samian ware and a Lezoux colour-coated base, no earlier than the late second century.
The Severan building inscriptions
The three building inscriptions already referred to are by far the most important evidence for an extensive Severan reconstruction of the fort. Two (RIB I, 722–3) were found shortly before the end of the sixteenth century. They were recorded by Camden shortly after their discovery, but were lost by the early eighteenth century. The third (RIB III, 3215) was found by Hartley in 1960 outside the Severan east gate, lying face downwards. The back of the slab had been exposed in Collingwood's excavations.Footnote 74 The inscriptions have been published in volumes I and III of Roman Inscriptions of Britain, but the readings of the two earlier finds were revised in the Addenda and Corrigenda to RIB I in the light of the inscription discovered in 1960. The texts of all three are given below.
RIB I, 722 + add. (cf. Birley, A.R., Reference Birley2005, 188–9)
Imp(eratori) Caesari L(ucio) Septimio [Severo]|Pio Pert[i]naci Augu[sto et]|imp(eratori) Caesari M(arco) Aurelio A[ntonino]|Pio Feli[ci] Augusto et P(ublio) S[eptimio|Getae nobilissimo Caesari vallum cum]|bracchio caementicium [fecit coh(ors)]|VI Nervio[ru]m sub cura L(uci) A[lfeni]|Senecion[is] amplissimi [co(n)s(ularis) institit]|operi L(ucius) Vin[ici]us Pius praef(ectus) [coh(ortis) eius(dem) Sen]|ecio[ne et Aemiliano co(n)s(ulibus)]
For the Emperor Caesar Lucius Septimius Severus Pius Pertinax Augustus and for the Emperor Caesar Marcus Aurelius Antoninus Pius Felix Augustus and for Publius Septimius Geta, most noble Caesar, the Sixth Cohort of Nervians built this [rampart] of uncoursed masonry with annexe-wall under the charge of Lucius Alfenus Senecio, senator of consular rank; Lucius Vinicius Pius, prefect of the cohort, had direction of the work (in the consulship of Senecio and Aemilianus [a.d. 206]?).
RIB I, 723 + add. (cf. Birley, A.R., Reference Birley2005, 189)
[Imp(eratori)] Caesari Augusto […|Marci Aurelii filio […|…sub cura L(uci) Alfeni]|Sen[ec]ionis amplissimi [co(n)s(ularis) coh(ors) VI Nerviorum|fecit cui praeest L(ucius]) Vinic[ius] Pius [praef(ectus) coh(ortis) eiusd(em)]
For the Emperor Caesar Augustus … son of Marcus Aurelius … under the charge of Lucius Alfenus Senecio, senator of consular rank, the Sixth Cohort of Nervians built this under Lucius Vinicius Pius, prefect of this unit.
RIB III, 3215
Imp(eratori) Caesari Lucio Septimio|Severo Pio Pertinaci Aug(usto) et|imp(eratori) Caesari M(arco) Aurelio|Antonino Pio Felici Aug(usto) et|P(ublio) Getae no|[[bilissimo Caesari d(ominis)]]|n(ostris) imp(eratore) Antonino II et|Geta Caesare co(n)s(ulibus) centuriam|sub cura G(ai) Valeri Pudentis|amplissimi co(n)sularis coh(ors)|VI Nervior(um) fecit cui praeest|L(ucius) Vinicius Pius praef(ectus) coh(ortis) eiusd(em)
For the Emperor Caesar Lucius Septimius Severus Pius Pertinax Augustus, and for the Emperor Caesar Marcus Aurelius Antoninus Pius Felix Augustus, and for Publius Septimius Geta most noble Caesar, in the consulship of Our (two) Lords the Emperor Antoninus for the second time and Geta Caesar [a.d. 205]; the Sixth Cohort of Nervians which Lucius Vinicius Pius, prefect of the said cohort, commands, built (this) barrack-block, under the charge of Gaius Valerius Pudens, senator of consular rank.
The consular date given in RIB III, 3215 is a.d. 205 and is the only epigraphic evidence for the date of Pudens' governorship. Alföldy thought it likely that the last line of RIB I, 722 also gave a consular date but could suggest nothing that would have included the remaining letters, which were ‘E’ (or ‘F’) CIO; however, A.R. Birley suggested Albinus and Aemilianus, consuls in a.d. 206, the first cited by another of his cognomina — Senecio — to avoid evoking the unpleasant memory of Severus' rival, Clodius Albinus.Footnote 75 The governor cited in this inscription and in RIB I, 723 was L. Alfenus Senecio, known from another inscription, at Risingham (RIB I, 1234 + add.), to have held this post at some date between a.d. 205 and 207. Epigraphically, there is nothing otherwise to suggest when during the joint reign of Severus and Caracalla he was governor of Britain, but the restoration of the consular date of a.d. 206 supports the view, originating with the discovery of RIB III, 3215 in 1960, that Pudens' governorship preceded Senecio's.Footnote 76 In any event, the building programme overseen by L. Vinicius Pius, prefect of cohors VI Nerviorum, overlapped two governorships.
Camden gives some details about the discovery of RIB I, 723: ‘… not long since there were digged up the statue of Aurelius Commodus the Emperor … he was portraied in the habite of Hercules, and his right hand armed with a club, under which there lay, as I have heard such a mangled inscription as this [text given], broken heere and there with void places betweene: the draught whereof was badly taken out, and before I came hither was utterly spoiled … this was to be seen in Nappa [Hall] …’.Footnote 77 The statue was taken by Birley and Richmond to have represented Maximinianus Herculis in the guise of Hercules and to have stood on the inscription which had been reused as a flagstone in the principia.Footnote 78 This reads far too much into Camden's description, which only places the find at the Roman site of Bainbridge and states that the statue was on top of the inscription; both could have been built into the wall of some later building.
Five ‘pila-tiles’ stamped ‘IMP’, with all three letters ligatured, were found in 1957 in the make-up for a late rebuilding of the barracks in the praetentura (RIB II.5, 2483, i–v). No mention of them was made in the publication of that excavation, but details of their context are given in the ‘Deposits’ book for 1957–59.Footnote 79 They were found in a layer of clay together with fragments of roofing- and box-tile, debris removed from a hypocausted room probably in the praetorium or fort baths; the layer in which they were found seems to have been part of the clay packing that preceded the building of the Theodosian or late fourth-century barracks.Footnote 80 Tiles with very similar stamps, though probably not from the same die, are also known from Carlisle and Housesteads; Swan associated them with Severan building programmes.Footnote 81
THE BAINBRIDGE PRINCIPIA: DISCUSSION
The plans of the principia
The three successive principia at Bainbridge — Flavian, mid-Antonine and Severan — are instructive additions to the corpus of such buildings from auxiliary forts.Footnote 82 Of all the frontier provinces, Britain has produced the largest collection of complete and well-dated principia plans, but they are dominated by two groups, one from the forts on Hadrian's Wall and the other from the Antonine Wall. There is also a small Flavian group of timber principia. The detailed plans of the principia not forming part of these three groups seem to be heterogeneous, though they display some general developments, touched on below, which probably resulted from changes in ceremonial activities.
The Flavian group, which has been discussed by Hanson,Footnote 83 includes the timber principia at Elginhaugh, Fendoch and Pen Llystyn. Each building had a forecourt surrounded on all sides by a veranda. Where the veranda ran across the front of the cross-hall, it seems to have represented a sort of front aisle. The post-pits of the front wall of the cross-hall were larger than those of the veranda, showing that they carried the weight of the main roof and suggesting that the veranda roof was at a lower level.Footnote 84 The cross-halls, excluding the verandas, were between 4 and 4.4 m in width. At Flavian–Trajanic Bainbridge, the width of the cross-hall was 4.3 m. There was no veranda running across its front. The front wall of the cross-hall was open and was represented by seven post-pits; that in the middle was on the long axis of the building, in line with the centres of the aedes and the entrance from the via principalis. In the other Flavian principia discussed here, there were six post-pits; a wider spacing between the two at the centre, corresponding to a wider space between the veranda posts in front, emphasised the approach to the aedes. In later principia with solid rather than open front walls, this emphasis is achieved simply by having a centrally-placed entrance to the cross-hall from the forecourt. The central post-pit at Bainbridge was perhaps a later repair, representing a post inserted to prop up a timber lintel which was giving way. A fourth Flavian principia which is cited by Hanson is at Strageath. As at Bainbridge, it had no veranda across the front of the cross-hall. The Bainbridge principia has an area of 378 m2 and is about three-quarters of the size of those at the larger forts of Strageath and Fendoch (both 1.8 ha as opposed to 1.1 ha at Bainbridge).Footnote 85
The second principia at Bainbridge is one of only two examples in Britain, the other being at South Shields, with complete plans which can be dated with fair certainty to the mid-Antonine period.Footnote 86 They are fifty or sixty years later than the Flavian group and display important developments in the architecture of the cross-halls. The front walls were represented by continuous foundations, as in all the principia of the forts on the Antonine Wall and elsewhere in Antonine Scotland. Presumably, the walls were solid and pierced only by central entrances and by smaller entrances from the forecourt verandas. At some of the Hadrian's Wall forts, for example at Benwell,Footnote 87 the open fronts typical of timber principia-plans survived their translation into stone. The mid-Antonine cross-halls were also much wider than the Flavian examples cited above: 6.6 m at Bainbridge and 6.5 m at South Shields.Footnote 88 The cross-hall of the Severan principia at Bainbridge was wider still, at 7.3 m. The earliest example in Britain of one of these wider cross-halls in an auxiliary fort was in the principia at Trajanic Gelligaer (6.4 m wide), built in stone but still with an open front.Footnote 89 The examples in Hadrian's Wall forts are even wider if the internal aisles at the front, which are a distinctive feature of their principia, are included. The cross-halls in all but the smallest forts in Antonine Scotland are also about as wide as those at Bainbridge and South Shields.
The increase in the widths of cross-halls from the Flavian to the mid-Antonine periods was matched by a greater emphasis on the aedes, which became larger and had various architectural embellishments such as apsidal ends and raised floors above subterranean strongrooms.Footnote 90 The wider cross-halls probably resulted from the need to provide a larger space for assembly in front of the aedes. fig. 16 compares the widths of the Flavian and Severan cross-halls at Bainbridge and shows how the greater width of the latter resulted in a more than threefold increase in the space from which ceremonies at the centre of the aedes could be witnessed:Footnote 91 the triangle in A has an area of 17.5 m2, while that in B has an area of 57.2 m2. Ancient sources provide glimpses of these ceremonies,Footnote 92 but at auxiliary forts it is uncertain who, in addition to the commanding officer, took part in them and what they involved. There were too many soldiers in an auxiliary cohort to be assembled in the cross-hall of a principia, and perhaps also too many to be drawn up in an orderly fashion in the forecourt. From the Severan period, if not before, the via praetoria could be used as an extension of the principia, as can be demonstrated at Bainbridge (see below). Only a fairly small number could have attended the ceremonies in and around the aedes, but the increase in the widths of cross-halls suggests that the number of those required to be present was larger from the Hadrianic period onwards than in the later first century. Of some significance is the narrow range of widths in these later cross-halls, which bear no relation to the more variable lengths of the cross-halls or overall sizes of the principia. Table 1 sets out the relevant dimensions of the two mid-Antonine examples already discussed and of another, of about the same date, at Krefeld-Gellep.
Areas of the Flavian–Trajanic (A) and Severan (B) cross-halls from which the interior of the aedes could be seen. Scale 1:250.

Dimensions and proportions of cross-halls in mid-antonine principia

It is clear from these and many other examples that, if small forts which probably accommodated only parts of units are excluded, variations in the size of principia depended on the lengths of the cross-halls and forecourts. In comparison, the widths of the cross-halls were broadly constant, and the implication is that whatever the size of the unit the same number of soldiers was expected to witness the ceremonies at the aedes.
At Bainbridge, the width of the Severan forecourt, at 8.5 m, was exceptionally narrow in comparison with earlier examples. The ratio of the widths of the cross-hall and forecourt is 1:1.16 at Bainbridge, whereas few of its forerunners had forecourts with lengths less than half as much again as the width of the cross-halls, and in many principia the lengths are often two times greater and sometimes much more. The only other Severan principia of conventional type with a complete plan is at Vindolanda, where the width of the cross-hall was 7 m and the length of the forecourt 10 m, giving a ratio of 1:1.43.Footnote 93 In the fragmentary plan of the Severan principia at Carlisle, a forecourt 7 m in width can be identified with reasonable confidence;Footnote 94 it was separated from the via principalis by a veranda, as at Vindolanda. There are other Severan principia in Britain, but they belong to a new type with no forecourt, which is considered below.
Amongst the most important results of the Bainbridge excavations was the recovery of large amounts of painted plaster from the principia, mainly from the rear range.Footnote 95 They provide a fuller impression of the decorative schemes used for the walls and ceilings than the small amounts of painted plaster from other principia in British forts. The only other buildings in auxiliary forts which often produce evidence of similarly-elaborate decorative schemes are the praetoria. Such schemes are scarcely known in barracks, even in the officers' quarters,Footnote 96 and they provide a strong link between the principia and praetoria: the offices in the rear range were probably seen as part of the accommodation for the commanding officer and his staff — as it were, an extension of the praetorium, with which in some circumstances the principia could be combined — and decorated accordingly.
The Severan principia and its relationship to the via praetoria ( fig. 2)
The walls of the Severan principia at Bainbridge form a parallelogram, meeting at angles of 85 and 95 degrees, and they are also at slight angles to the alignment of the fort walls. When the Antonine east gate was replaced in the Severan period by a new gate to its north, the line of the new via praetoria no longer coincided with the central axis of the fort. Instead, it ran from the new gate at an angle of 5 degrees to the central axis, the two lines meeting at a point situated at the entrance to the principia from the via praetoria. The axis of the new via praetoria was continued as the central axis of the principia, which ran through the entrances and cross-hall to the aedes. However, the front wall of the forecourt was parallel to the via principalis, as were the north–south walls of the cross-hall and rear range, and it was necessary to skew the east–west alignment of the building towards the south in order to bring the central axis through the aedes while maintaining its position at the centre of the rear range. Two aspects of the re-planning remain unexplained. The first, why it was thought necessary to build the Severan gate on a new site, has no obvious explanation. The second, why the axis of the via praetoria was continued through the principia, can be understood by looking at the emergence of new-style principia in the Severan period and the subsequent development of the cruciform type of fort plan.
Severan principia without forecourts have already been referred to above. An example at South Shields, which replaced the mid-Antonine principia on another site, had a cross-hall 6 m in width.Footnote 97 A second, less certain example is at Risingham, where the cross-hall was 6.5 m in width.Footnote 98 The units at these forts when the principia were built were respectively the cohors V Gallorum equitata and the cohors I Vangionum milliaria equitata, together with the vexillatio Raetorum gaesatorum and exploratores Habitancenses. The principia at Newcastle had a much smaller cross-hall, 4 m in width. However, the fragmentary plan of the fort, as at present understood, suggests that it was exceptionally small, with an area of c. 0.64 ha, despite being built for cohors I Cugernorum which was presumably a quingenary peditate unit.Footnote 99 Principia without forecourts also appear in the two legionary compounds at Corbridge. In 1996 the writer argued that where the forecourt was omitted, the via praetoria became a place of assembly for soldiers when ceremonies were taking place in the principia and that in effect the street reverted to the same purpose as the area termed ‘principia’ where soldiers assembled in front of the praetorium of a temporary camp.Footnote 100 The Severan principia at Bainbridge had a forecourt, though of small size, but, as we have seen, the praetentura and central range of the fort were re-planned to achieve a line of sight down the length of the street to the aedes.Footnote 101 This suggests that from the Severan period, even when principia were built in the old style with forecourts, the via praetoria was an integral part of their setting, presumably because it was a place of assembly from where, notionally, activities in the aedes were visible, although in reality very little could have been seen. This is probably an aspect in the planning of forts which originates in the earlier traditions of temporary camps. In a further development which represents a widespread type of late Roman fort plan, the principal streets in front of the principia had a cruciform rather than a T-shaped arrangement.Footnote 102 The via praetoria was divided into two parts, and the stretch running from the point where the two streets intersected to the principia entrance could be completely isolated from the secular life of the fort.Footnote 103 Finally, as noted above, the forecourt might have been too small to hold all the soldiers in a fort, and the via praetoria might have been used as a place of assembly in all permanent forts, this special function of the street only being indicated by the absence of forecourts in some Severan and later principia and by exceptional occurrences such as the planning of the fort at Bainbridge.Footnote 104
The iconography of the principia
Set into the stone base to the north of the entrance to the aedes were bronze clamps, which imply that the statue which they secured was also of bronze: in Britain, iron, lead or wood were used for clamping stone to stone ( fig. 13). The size of its base means that the statue, very probably of an emperor, was life-size or larger. It was the only vestige of the customary iconography found in principia, though the likely positions of other dedications are indicated by stone benches or platforms set on both sides of the front wall of the cross-hall. An unusual find in the cross-hall was the horn of an aurochs, dated by radiocarbon to the third millennium b.c.; it was recovered from ‘dark earth’ under the paving in the western part of the late timber building.Footnote 105 The horn was probably brought into the principia site as some form of trophy or object of curiosity. The aurochs, great beasts apparently extinct in Britain but which roamed the forests of some other Roman provinces in the West, would have been greatly prized by hunters, which included many officers.Footnote 106 Hunting nets were stored in the principia (‘ad signa’) in the fourth-century fort at Dionysias in Egypt.Footnote 107 Another connection with hunting occurs in the principia at Bewcastle (Fanum Cocidii), where the late third-century filling of the strongroom included two silver plaques dedicated to Cocidius (RIB I, 986–7), a local god associated with the chase along with military matters.Footnote 108 Dedications to deities other than those of the Roman pantheon are very rare in the principia,Footnote 109 but commanding officers might sometimes have considered hunting such an important part of their lives that trophies of the chase were added to the conventional iconography. If so, the aurochs horn, perhaps mounted above an altar, would have been an evocation of a powerful quarry.Footnote 110
THE OCCUPATION OF THE PRINCIPIA IN THE LATER ROMAN PERIOD
The cross-hall and forecourt ( figs 17–21)Footnote 111
Only a few modifications were associated with the continuing use of the cross-hall for its original purposes ( figs 17 and 19). The mortar floor was replaced by paving. A drain ( fig. 18) was built as part of this paving and seemed to flow towards the strongroom, which was perhaps used as a sump following its abandonment and before it was filled up in or after the Valentinianic period. Fallen wall-plaster, probably from the west wall near Room 2, was painted in imitation of marble with a green border. Plaster from near the south wall had lost its original finish, its surface having been pecked to receive another layer of plaster painted with red bands.Footnote 112
Hartley's plan of ‘Theodosian’ and later features in the cross-hall and forecourt of the Severan principia. Scale 1:250.

Drain associated with a later floor in the Severan cross-hall, above front wall of mid-Antonine cross-hall (to right) and party wall between the northern two rooms of the range built in the cross-hall. Ranging rods with one-foot divisions.

Very little activity connected with the original use of the forecourt was recorded. Scattered deposits of clay, mortar and brown earth were found above the mortar floors of the verandas. The north part of the front wall was rebuilt on a different line. It avoided the probable water-tank (‘demolition pit’); the original wall had overlapped the east edge of the pit and had presumably subsided into its filling. As noted above, the original arrangement of the veranda supports was irregular, because the forecourt took the form of a parallelogram rather than a rectangle. The northern supports were rebuilt when their original foundations in the north-east corner subsided into the filling of the pit. The new veranda was represented by square blocks with chamfered sides, probably bases for timber supports; they had probably been parts of the original Severan verandas. Three of the bases of the northern veranda and the northernmost base of the eastern veranda survived in situ ( fig. 15). They had no foundations of their own and, where they did not overlap the Severan foundations, sat directly on the forecourt surface. The line of the eastern veranda north of the entry was c. 0.25 m east of its original line, presumably to reflect the new line of the east forecourt wall. Subsequently, the spaces between the three bases at the northern end of the eastern veranda were closed up by walls; it is uncertain whether other parts of the veranda were also walled across.
Towards the end of the fourth century, three parallel post-trenches running north–south were dug across the southern part of the cross-hall and the forecourt ( figs 17 and 19, 14W, 14E and 15). There was a drip-trench immediately to the west of 14W, which indicates that the cross-hall roof had been removed and that 14W and E were not internal partitions. Furthermore, the central post-trench (14E) was only 0.5 m from the line of the front wall of the cross-hall. The latter had presumably been demolished: otherwise it would probably have been used to form the eastern side of the room formed by the post-trenches 14W and 14E. These two post-trenches, together with the one to the east (15), formed a building with two rooms 4.25 m in width at their northern ends, although the eastern post-trench is at a slight angle to the others and the width of the eastern room diminishes towards the south. The building seems to have abutted the southern wall of the principia. The northern end of the building, presumably closed off by an east–west post-trench, lies in an unexcavated area 8.75–10.25 m from the southern wall of the principia.Footnote 113 Paving of the same period showed that 14E had not continued any farther to the north. The building was apparently sited so as to allow access to the rear range by means of an unroofed alley 1.5 m wide running along the west side of the timber building. If the length of the building from north to south was not much more than 9.0 m, it would also have preserved a line of sight between the aedes and the entry into the principia from the via principalis. The west room had rough stone paving, which was also found to the north.Footnote 114 It sealed part of the western post-trench (14W), probably marking the position of a door.
Later fourth-century activities on the principia site. Scale 1:250.

The western post-trench (14W) was described as follows: ‘a wide strip c. 3 ft [0.9 m] broad was cut through the mortar floor and underlying layers down to natural. Deeper post pits [c. 0.45 m in depth] were then dug and posts packed in stones. The trench was then largely filled with large stones (boulders and sandstone slabs), but the west margin was left incompletely filled while the east half, including the posts, was packed higher with clay.’Footnote 115 The unfilled ‘west margin’ formed the drip-trench outside the building. The top filling of the central post-trench (14E) was of charcoal and burnt daub, and the lower filling was of clay. The eastern post-trench (15) was filled with ‘soft black earth’. There were a number of features in the west part of the building. Pit 8 cut a mortary layer containing wall-plaster with red paint; the pit was 1 m deep, and its lower and middle fillings contained ‘undiagnostic slag’. Pit 5 was described as a ‘stone-filled trench’. South of these pits were two un-numbered post-holes:Footnote 116 the southern example cut Pit 5 and its filling contained Crambeck Parchment ware dating to after c. a.d. 370. Pit 7 was filled with earth, ‘undiagnostic slag’ and much burnt limestone.Footnote 117 A ‘forge-base’ (11) formed of rectangular stones was built against the east side of the wall represented by the west post-trench (14W); the base was 0.6 m in width and at least 1.15 m in length, its south end continuing beyond the end of the trench. Metal-working debris was scattered around it. A ‘linear diagonal hole’Footnote 118 just east of the base contained a single fragment of hearth-lining and fragments of moulds for spurs and for at least one other type of object (cf. Moulds, Nos 1–2, 5–7, figs 28–29). The context book states that the ‘diagonal hole’ was found under the mortar floor of the cross-hall, but this must be an error for the floor is Severan and the spurs made in the moulds have later fourth-century parallels. Other fragments of moulds for spurs were found north of the ‘forge base’ and in the general debris layer over the timber building ( fig. 29, Nos 3–4).Footnote 119 A stone ingot mould ( fig. 30) was found just to the west of the timber building;Footnote 120 small amounts of metal-working debris were found in the topsoil elsewhere in the area of the former forecourt.Footnote 121
In the northern part of the cross-hall site, the two un-numbered post-holes and the stone feature to their west, probably a hearth or drain, cannot be identified in the context books. On the forecourt site, the southern veranda will have been demolished at this stage, though the part of the eastern veranda, which, as noted above, had been walled across to form one or more rooms, might have survived. Pits 2 and 3 were dug to rob the south veranda supports. There was also a scatter of un-numbered post-holes in the forecourt area which might have been associated with any of the periods of construction described above. However, the gully which terminates against the east side of post-trench 15 is clearly associated with the timber building.
Rear range
In Room 1,Footnote 122 a second floor, of brown mortar, sealed a layer of dark earth and charcoal; one context contained a fragment of ‘undiagnostic slag’.Footnote 123 In the north-west part of the room, the original mortar was heavily burnt and was covered by a layer of burnt roof-tiles; above there were layers of charcoal and ‘destruction debris’. There was no second mortar floor in this part of the room. In the south-east corner, the upper mortar floor was cut by a pit which was covered with layers of clay, charcoal and plaster. These layers were cut by another small pit which was sealed by a layer of mortar, plaster and roof-tiles. The door between Rooms 1 and 2 was blocked, but there was apparently nothing to show when this took place. The painted plaster included fragments from panels imitating marble and possibly from a dado. Other fragments were from a splayed window-opening painted in red and probably from a ceiling decorated with red circles.
The original mortar floor in Room 2Footnote 124 was burnt in places and was covered by layers of heavily burnt mortar, plaster and tegulae. The plaster still adhering to the north wall of the room ( fig. 9, A) was also burnt. In the south-eastern part of the room there was a second mortar floor. In the north-eastern part was a small pit cutting the debris layers over the original mortar floor. On the south and west sides of the room narrow walls 0.35 m in width were built against the original walls, immediately above the layers of burnt material; a feature labelled ‘interference’ which appears in section against the main north wall of the room might have represented the robbing of a narrow wall on the third side of the room ( fig. 9, D). A recess in the southern narrow wall accommodated what was described as a hearth. However, it is likely that the walling represents part of a channelled or pillared hypocaust, the remainder of which was robbed out; the hypocaust could have been served from a stokehole in the unexcavated area outside the building to the west. Only two courses of these walls survived; they were sealed beneath a layer of mortary debris and plaster 0.3 m in depth. No remains of a blocking or narrowing of the opening giving on to the cross-hall to the east were noted. The only metal-working debris recorded in this room was ‘undiagnostic slag’. The fallen wall-plaster included fragments from a dado with diamond-shaped panels and other fragments probably from a ceiling with a scheme of decoration similar to that found in Room 1.
In the southern part of the aedes (Room 3),Footnote 125 the original mortar floor was covered by burnt grain and dirty clay, which was sealed by a second mortar floor. Collingwood recorded a floor of ‘cement’ above a stone floor on the north side of room; the stone floor might perhaps actually have been the filling of the construction pit of the strongroom. There is no record of mortar floors in the north-west corner of the room; against the west wall were two small intrusions filled with stone, under a layer of roof-tiles and other building debris. Wall-plaster from this area was very fragmentary, but its matrix was distinct from that in Rooms 1 and 2, suggesting that it came from another episode of decoration. Collingwood suggested that the upper courses of the strongroom wall and the west end of the passage might have been rebuilt, the masonry of these parts being rougher than the remainder. On the floor of the strongroom were antlers, second- or third-century pottery, and window-glass. The filling of the cellar included ‘black pitted’ (calcite-gritted) ware and a coin of Valentinian (a.d. 364–75), the latter found in the remains of the west wall of the strongroom which had collapsed or was thrown down with the filling; it also included a penannular brooch and an iron axe-adze.
Most of the interior of Room 4Footnote 126 remains unexcavated. A mortar floor cut by a slab-lined post-hole was seen in the south-west corner. A wall across the opening onto the cross-hall is shown on fig. 12, which suggests plausibly that it represents a narrowing rather than blocking of the entrance. The ‘original threshold timber’ was preserved below the blocking ( fig. 20).
West wall of the Severan cross-hall showing blocked entry to Room 4 immediately north of the aedes; the earth above the stones on which the small scale (main divisions in inches) is resting presumably represents the timber threshold. On the left side, the thin slabs are associated with a hearth partly cut into the wall, probably in use at the same time as the twelfth-century lime kiln. In front of the wall on the left, part of the statue-base in the Severan cross-hall. The two foundations represent the west wall of the range of rooms in the mid-Antonine cross-hall and the wall dividing the two northern rooms of the range. Ranging rods with one-foot divisions.

The original mortar floor of Room 5Footnote 127 was covered with ‘dirt’ and burnt material which was sealed by a layer of fine gravel. Above this, was ‘dirt’, plaster (which does not survive), masonry and slates, representing the general debris level. A stylus and candlestick, both of iron, were found in topsoil and disturbed soil in or near this room ( fig. 26, No. 14; fig. 27, No. 21).Footnote 128
An extension of the aedes?
A trench dug in 1967, which was located over the back of the aedes and extended for a distance of 4.2 m west of the principia, yielded a complicated sequence.Footnote 129 Some features, such as the robbing trenches for the west walls of the Antonine and Severan principia were obvious enough. More difficult to interpret were two walls thought to have been later than the construction of the Severan principia and which appear on Hartley's publication plan ( fig. 12). The northern wall (labelled as II or 2 on unpublished plans), which was mortared, continued the line of the north wall of the aedes westwards for a distance of 2 m, beyond which point it had been robbed out (though it is uncertain how much farther the robber trench continued). The southern wall (I or 1) ended before it met the principia wall, leaving a gap 1.3 m in width. Most of the area between the two walls was covered with paving which included complete roof slates with nail-holes.Footnote 130 Unfortunately, the paving petered out before it reached the northern wall (II or 2), but it seems to have been level with the bottom of the surviving lowest course. There are indications on the left-hand side of a photograph ( fig. 21) that the wall, which apparently had no foundations, had a return to the south. The west side of the paving ended in a line corresponding roughly to the west end of the north wall, and three blocks west of that line and a flat slab with an unworn surface to their south could represent the remaining fabric of the return. The southern wall, which crossed the course of this possible return, probably belongs to a later period; it seems to overlie the paving, though this is not certain, and is unmortared and built of larger stones than the northern wall.
The northern wall might well represent one side of an extension of the aedes, projecting about 2.6 m beyond the west wall of the rear range. The earliest example of a projecting aedes in the stone-built principia of an auxiliary fort appears to be at Trajanic Gelligaer, and they are common from the late Hadrianic and early Antonine periods onwards, as on the Antonine Wall at Balmuildy and Cadder (where the projection is an addition to the original building).Footnote 131 Later examples in Britain are represented in the first phase of the mid-Antonine principia at South Shields, though the aedes of the completed building did not project, in the Severan principia at Vindolanda, and in the late third- or early fourth-century principia of Period 7 at South Shields.Footnote 132 Fellmann regarded these projections as a means of emphasising the importance of the aedes architecturally.Footnote 133
The date of the southern wall is uncertain. Immediately below the topsoil was ‘close-packed’ building debris, possibly the base for a later floor, now missing, at a higher level than those in the principia.Footnote 134
The via principalis
South of the entrance into the principia forecourt, a pit had been dug through the fourth street surface down to the natural clay.Footnote 135 Its filling contained Huntcliff-type jars and a Crambeck parchment-ware mortarium. Stone-packing under the road surface which sealed the pit included more Huntcliff-type ware and a Crambeck parchment-ware bowl or mortarium of Type 7. These two final stages of activity in the area of the via principalis can thus be dated to c. a.d. 370 or later. The filling of the pit also included much other pottery, box-tile fragments, bottle glass and the lower part of an Andernach quern. Another pit, the exact location of which is uncertain, was cut through the via principalis east of the granaries. It was 3 m in diameter and cut through the latest street surface; it was filled with ‘black earth, stones and bones’ sealed by very rough paving. These pits can be compared with a large intrusion north-west and north-east of the forecourt granary at South Shields which was dug to quarry street-metalling and which can be dated to after c. a.d. 400.Footnote 136 The Bainbridge pits were presumably dug for the same purpose; the pit outside the principia had removed four layers of metalling.
Dating evidence
In the rear range, the second mortar floor in Room 2 sealed a deposit containing Crambeck reduced ware of c. a.d. 260/70 or later.Footnote 137 This is the only dating evidence for structural alterations in the rear range following the original construction, excluding the aedes, though ‘pits’, or rather shallow scoops, which cut through the later mortar floors in Rooms 1 and 2 contained sherds of Huntcliff-type jars dating to after c. a.d. 360. A coin of Constans (Supplementary Material, Section 7, No. 21, a.d. 346–48, U/W) was recorded below the paving on the cross-hall site; the state of wear on the coin places the timber building firmly within the second half of the fourth century.Footnote 138 The most important evidence for the date of activity within the timber building are the moulds for spurs of a type which has a late fourth-century parallel ( figs 28–29, Nos 1–7).
The principia and fort at the end of the Roman period
The latest types of Roman pottery — mainly Crambeck grey and parchment wares and Huntcliff-type jars — are abundant in the fort, though represented by only a few sherds in the area of the annexe. Coins include six Valentinianic issues and one of the House of Theodosius, and there are two cross-bow brooches of Pröttel Type 3/4B dating to a.d. 350–410 ( fig. 24, Nos 1–2). In the second half of the fourth century, occupation clearly continued on a substantial scale. Early in this period, radical alterations were made to the principia and to the granaries, the former after c. a.d. 350 and the latter after c. a.d. 360. Less closely dated and more poorly understood are the demolition and partial rebuilding of barracks in the north-west and south-east parts of the fort at some date in the later fourth century. By the time of these activities, the principia and granaries had been standing for more than a century and a half and perhaps needed rebuilding in whole or part. Large-scale building in stone was rarely undertaken on military sites in Britain after the earlier fourth century, probably because of lack of manpower and scarcity of skills; the obvious exception in northern Britain is the construction of the Yorkshire signal stations. At Bainbridge, the alterations demonstrate changes in the use of these buildings, or at least a greater emphasis on certain uses, given that the principia, for example, were the setting for a number of functions. In passing, it is worth noting that the changes in the use of these buildings might have occurred some considerable time before they were altered, and that it is only the alterations, required by the decayed state of the buildings, that make the changes manifest in the archaeological record.
The late activities at Bainbridge are all paralleled at forts in the Hadrian's Wall zone and in north-east England, as enumerated by Collins: barrack and principia repair/refurbishment; increased use of timber; decreasing road quality; metalworking no longer restricted to purpose-built fabricae (but see below); horrea demolition/conversion; and changed use of principia space.Footnote 139 Activities in Collins' list but apparently absent at Bainbridge are probably to be explained by the limited areas excavated: for example, the east gate was not blocked, but it was the principal and most accessible gate, and the other unexcavated gates might well have had blocking walls. One amplification of Collins' list can be proposed: not only was there ‘decreasing road quality’, but also quarrying of earlier superimposed layers of metalling for reuse, the pits thus formed being filled with earth and rubbish and then roughly paved over. At Bainbridge quarry-pits have been found in front of the principia and the granaries in the via principalis, which was one of the two most important streets in the fort.
Although it is not unusual to find metalworking in forts at any period in areas other than purpose-built fabricae,Footnote 140 Collins is certainly correct in recognising these processes as more prevalent in the fourth century. The moulds for making spurs at Bainbridge are discussed in the Finds Section ( figs 28–29, Nos 1–7). Part of their importance is that they establish the date of the timber building where they were made and characterise the nature of the bronze-working that took place there.Footnote 141 Whether the western part of the building was constructed specifically as a workshop is doubtful: the only emplacement in the excavated area was the hearth-base and only small quantities of metalworking debris were recovered. This use of the building could have been short-lived. It may not be fanciful to suggest that the metalworking might actually have been a stage in the transformation of the principia. Set into the stone base to the north of the entrance to the aedes were bronze clamps, which imply that the statue which they secured was also of bronze (see above). If the statue, very probably of an emperor, was life-size or larger, as is suggested by the size of its base, the quantity of bronze which it contained would have had a considerable value. It would presumably have been regarded as part of the patrimony of the fort, but a time perhaps came when changing beliefs allowed it to be broken up and melted down without transgressing military discipline.
A stone ingot mould ( fig. 30) can also be associated with metalworking. In 1985, five ingot moulds from excavations in the fort at Vindolanda were published by the present writer.Footnote 142 At the time they were apparently the only examples known from Roman forts in northern Britain, even though a number had been recovered from native sites of Iron Age and Roman date; at Vindolanda they were all from medieval soil and stone clearance over the barracks in the north-east corner, and they were considered likely to have been of early post-Roman date. An example is now known from the fort at Newcastle, in an early Anglo-Saxon layer which was part of a level which contained much redeposited material from the later occupation of the fort,Footnote 143 and there are one published and five unpublished examples from South Shields, one from a context of the second quarter of the third century to the late third or early fourth century.Footnote 144 At other forts from which very large finds-assemblages have been published since 1985, such as Birdoswald, the Carlisle Millennium site (which included part of the principia and their environs), Piercebridge and Binchester, and at Catterick, where the later contexts were largely civilian, ingot moulds have not been found. Their occurrence at Iron Age and Romano-British native sites in northern Britain suggests that the examples from Roman forts represent metalworking using local techniques of pre-Roman origin, their earliest appearance in a military context being at South Shields in the third century. On Roman sites they are therefore not always of late Roman or early post-Roman date, even though most examples are from late levels.
If the timber building on the site of the cross-hall and forecourt was only used incidentally and perhaps briefly as a workshop, it might have been intended principally to accommodate some of the usual activities in the principia. It has no exact parallels but can be usefully compared with two later third- or early fourth-century examples of principia cum praetorio in Raetian forts which have been discussed by Mackensen and have already been noted above.Footnote 145 Both consist essentially of two large rectangular rooms side-by-side, as at Bainbridge. The earlier and larger of the two buildings, at Bettmauer bei Isny, had rooms 14 by 11 m and 12 by 5 m; the main walls were of stone, but the larger room was subdivided by timber partitions and had a small baths suite in one corner which was built in stone ( fig. 22, 3); the fort enclosed an area of 0.27 ha within its walls and was built in the second half of the a.d. 270s. The second building, again of stone, was in a small fort, probably of Tetrarchic date, built in one corner of the earlier and much larger fort at Eining; it consisted of a large room measuring 8 by 5 m and a smaller room 8 by 3.5 m which had been subdivided ( fig. 22, 2). In both buildings most of the rooms had concrete floors and channelled hypocausts, the major exception being the smaller room at Bettmauer bei Isny. The overall layout and dimensions of these buildings are similar to those of the timber building at Bainbridge, which has rooms measuring 8.75–10.25 by 4.25 m. The latter has no hypocausts and flagged rather than concrete floors, but there might have been partitions in the unexcavated areas of the eastern room. The Bainbridge building is much later than the Raetian examples, but might well represent the continuation of a building-type which developed in the later third century.
Probable extension of the Severan aedes, looking north (67 GVII). The wall at the top represents the northern side of the probable extension, with the partly-emptied robber trench of the west wall of the aedes to its right. Paving at centre, with to its left the possible robbed north–south return of northern wall. The wall in the foreground is possibly of early medieval date. Ranging rods with one-foot divisions; smaller scales with division in inches.

The timber building on the site of the principia forecourt and cross-hall at Bainbridge (1), compared with the examples of principia cum praetorio at Eining (2) and Bettmauer bei Isny (3) in Raetia (after Mackensen Reference Mackensen1994, Abb. 11). Scale 1:500.

Before considering what purpose the building served, the possible remains of the original principia need to be considered. Unfortunately, the archaeological record tells us little about the character of the late fourth-century occupation in the rear range. The only indication that these rooms were retained when the timber building was erected is the position of the latter, which left an alley along the front of Rooms 1 and 2 and probably allowed a direct approach from the via praetoria to the aedes. The probable remains of a hypocaust in Room 2 would mark its conversion into living accommodation. The rear range of the principia of Stone Fort 2 at Vindolanda was similarly transformed, and hypocausts were part of the original construction of the offices in the Period 7 principia at South Shields.Footnote 146 These rooms probably still served as offices, now combined with accommodation for the clerks. The underground strongroom in the aedes was not demolished and filled in until after a.d. 364, but, as in other British principia, nothing is known about the use to which the aedes was put in the later fourth century. In the European frontier provinces, the survival into the fifth century of all the main elements of the principia is best seen at the legionary fortress of Novae, and there are other examples of the survival of these buildings until similarly late dates.Footnote 147 There is as yet nothing to show that principia in Britain, no matter what alterations were made to them in the fourth century, did not continue to serve their essential functions until the occupants of their forts were no longer part of the Roman army. At late fourth-century Bainbridge the rear range probably continued to accommodate the administration of the unit and to provide a dignified lodging for the standards. Part of the timber building might have replaced the function of the cross-hall. Whether the other part provided accommodation for the commanding officer, as in the examples of principia cum praetorio cited above, is open to question. The antler tags from the topsoil on the site of the cross-hall are likely to have been displaced from a late level and are thus possibly evidence of administrative activities in the later fourth century ( fig. 25, Nos 6–13).
Continuity of occupation from the late Roman period, though possible, is not indicated by any structural remains. The only post-Roman object from the fort of any relevance is a bead of sixth- to seventh-century type (online fig. 45, No. 43), which might well have been a casual loss.
THE PRINCIPIA SITE IN THE NINTH TO TENTH CENTURIES: BURIALS AND A POSSIBLE CHURCH
The layers of fallen wall-plaster in the rear range and the latest occupation levels elsewhere in the principia were covered by layers of debris, consisting of rubble, roofing-slates, mortar and humus, which in places were almost 1 m deep, though more usually with a depth of 0.3–0.45 m (for example, fig. 9, C). On the site of the cross-hall were two burials ( fig. 17). The lower part of Burial 2 lay beyond the trench edge, so its relationship with the presumed northern continuation of the post-trench 14W was not seen. Burial 1Footnote 148 was cut through a debris layer into the Roman levels beneath, but Burial 2Footnote 149 was sealed by one of these deposits of debris. They are of approximately the same date (see below), and their different relationships with debris layers are probably to be explained by some of these layers having been worked over to obtain stone for reuse. The remains of the two adult individuals were identified as an unsexed old–middle adult aged 36–45 years (Burial 1) and a mature female of 46+ years (Burial 2); two disarticulated fragments of cranial vault were also recovered, and these were probably derived from an adult individual, either the unsexed adult or a burial that had been disturbed by stone robbing.Footnote 150 The female had suffered degenerative joint disease and osteoarthritis of her spine, probably associated with her age. Both individuals showed signs of dental disease. Radiocarbon dating of the remains of the two individuals showed that they were of eighth- to tenth-century date, and more probably of later ninth- or tenth-century date than earlier.Footnote 151 The strontium and oxygen isotope composition of the tooth enamel was also analysed. The results suggest that the sample from Burial 2 ‘is consistent with a local origin’, but that the sample from Burial 1 represented an individual from a western coastal area of Britain, possibly Wales or south-west England, or of the Continent.Footnote 152
Burial 1 is aligned east–west with its head at the west end, while the axis of Burial 2 is c. 30 degrees further towards the north-east. Their date, absence of grave-goods, and the alignment of Burial 1, suggest that they were Christian. The two burials appear to be isolated examples. Apart from the cranial fragments which were probably from Burial 1, no other fragments of human bone were mixed with the faunal remains on the site, so it is unlikely that there were other burials within the excavated areas which had been disturbed by stone robbers. It is of course possible that there are further burials in the unexcavated areas near by, for example on the site of the praetorium south of the principia. In England, lay cemeteries which were not associated with churches continued in use until around a.d. 900, but there are few later groups of burials which were not in churchyards.Footnote 153 The broad dating of the Bainbridge burials overlaps the period when lay cemeteries were abandoned. This raises the possibility that the burials were associated with a church.Footnote 154 There were no post-Roman structures on the principia site, but the pattern of robbing indicates that the walls of the aedes had a different history from those of the remainder of the building and might have still been standing in the earlier medieval period.
The front wall of the cross-hall had been demolished before the end of the Roman period. Most of the other walls in the principia had been robbed down to their foundations from above the post-Roman layers of debris and collapse; the tops of the robber trenches were usually visible as soon as the topsoil had been removed. As noted above, only the west wall of the cross-hall and the side-walls of the aedes, including its possible rearward extension, were preserved above their construction levels to a maximum height of nine courses, or 0.9–1 m. They seem to have escaped the general clearance of the principia site at some stage after the debris layers had accumulated. One possible explanation for the different treatment of these walls is that the room which had served as the aedes and its adjoining walls were still in use, or were selected for reuse and renovation, when the rest of the principia was reduced to its foundations. The former aedes, including its possible extension, measured 7.1 m east–west by 5.25 m north–south internally ( fig. 23). The rear wall of the cross-hall might have been retained in order to buttress the arch at the front of the aedes which, if the building was now free-standing, would have required a blocking wall. Hartley's trenches slightly overlapped the south side of the opening, where no features were noted. Collingwood opened much of this area but seems to have concentrated on investigating the steps leading down to the strongroom. Thus, no traces of a blocking wall have been seen, but any remains of it would probably have been just below the present surface if it was built on top of the layers of debris and collapse and might have been disregarded by Collingwood.
The burials, as noted above, could have belonged to a small lay cemetery of late date, and the adaptation of the former aedes as a small church in the ninth or tenth centuries can only be regarded as a possibility, but one that provides an explanation for the survival of the walls of the aedes when the remainder of the principia was cleared of masonry. Further investigation of this possibility should be a high priority when research is resumed at Bainbridge.
SMALL FINDS FROM THE PRINCIPIA, WITH SOME COMPARATIVE MATERIAL By A.T. Croom, with contributions by J. Bayley and C. Gardner
BROOCHES (FIG. 24)Footnote 155
1. Copper-alloy brooch (L: 64 mm; W: 37 mm; B: 25 mm). Post-Roman debris on the site of principia cross-hall, 66 GV, 10, SF 296. Developed crossbow with onion-shaped knobs. The terminal knobs are cast in one with the body, while the separate central knob is riveted on. At the top of the sheath there is a small copper-alloy pin set into a hole in the bow that must have formed some type of safety-catch for the pin, which is very loosely hinged. The foot is decorated with dot-and-ring decoration. This is a Pröttel Type 3/4B, with b4-type foot decorationFootnote 156 but, unusually, no bow decoration. Date: c. a.d. 350–410.
Burials on the principia site and possible church converted from the aedes. Scale 1:250.

Brooches and military fittings from the principia. Scale 1:1. (No. 2 after Wade Reference Wade 1952 ; No. 3 after Collingwood 1928)

2. Copper-alloy brooch (L: 84 mm; W: 51 mm; B: 25 mm). B50, topsoil above granary, SF 113. Published.Footnote 157 A complete type 3/4B crossbow brooch with dot-and-ring decoration. The form of the decoration (b2-type) is the most common form of foot decoration on this brooch type, but in Britain is found only on examples from sites in the extreme east of Britain.Footnote 158 The bow decoration is either type c1 (horizontal lines within a border) or e9 (slanted lines within border), neither previously noted in Britain,Footnote 159 but since Britain has one of the highest rates of variability in decoration, this is probably not significant.Footnote 160 Date: c. a.d. 350–410.
3. Copper-alloy brooch (L: 46 mm; W: 9 mm; B: 20 mm). B26, inside south-east corner of the fort. Published.Footnote 161 Terminal and bow of gilded crossbow brooch. Type 2, although as it is incomplete, further subdivision of the type is impossible.Footnote 162 Date: c. a.d. 300–50.
Collins lists 74 crossbow brooches from the North of England.Footnote 163 Of those that can be assigned to a dated type, 63 per cent belong to the late third or first half of the fourth century and only 22 per cent to the second half of the fourth century. Most crossbow brooches have been recovered from sites along Hadrian's Wall, and only one site, York, outside this zone has produced more crossbow brooches than Bainbridge.Footnote 164 York has a total of five, of which two certainly date to the second half of the fourth century.Footnote 165
Only two other brooches have been found in the principia; an incomplete Fowler type 2A penannular brooch from the aedes and an incomplete disc brooch with repoussé plate from the topsoil over the north-west corner of the building. They are earlier in date than the examples above and have already been published.Footnote 166
MILITARY EQUIPMENT (FIG. 24)
4. Enamelled copper-alloy belt-plate (L: 45 mm; W: 35 mm; B: 2 mm). Severan robbing of west wall of the mid-Antonine principia, 66 GIV, 11, SF 304. Fragment of enamelled belt-plate, with one surviving disc-headed shank on the reverse. The side bars and the projecting disc hold yellow enamel speckled with black, the arc has red and the triangle has turquoise blue. Date: late second to early third century.
5. Iron ring-mail loop (D: 8 mm; W: c. 1.5 mm; B: 1.5 mm). Severan construction, packing beneath mortar floor in Room 2, 64 GI, 16, SF 282. A single loop of ring-mail, which is the only piece of armour from the building.
ADMINISTRATION EQUIPMENT (FIGS 25–26)
6–13. Antler tags. Nos 6–12: topsoil on site of Severan cross-hall, 68 HIX, 1; No. 13: Room 6 or tribunal area:

Antler tags from the principia. Scale 1:1.

Seven rectangular antler tags, tapering towards one edge and pierced by a circular hole at the narrow end. The eighth example was found during Wade's excavations of the 1950s (No. 13), and although its exact provenance is unknown, the other tags were found close to the cross-hall tribunal which Wade excavated in 1951, so it is likely to be part of the same assemblage. The antler tags are roughly worked, with one (No. 7) still having the exterior surface of the antler visible on its front, and all having cancellous material visible on the back. Only one (No. 6) is complete, and none has any surviving writing. The rough upper surface would not have made writing easy, and the text could not be repeated clearly on the lower surface, a practice frequently found on examples of tags in other materials. Such labels, usually of lead but sometimes of copper alloy, have been found on a number of military sites, where they are usually inscribed with details of ownership or contents of material in transit. An inscribed bone example, more triangular in shape, was found at Chester, while another uninscribed tag from a probable mid-fourth-century context at Burgh Castle is more rectangular in shape.Footnote 167 Most of the Bainbridge tags were found in close proximity in the topsoil, suggesting a disturbed group that either had not been handed out, or had been removed from a consignment of material that had been processed in the building. Of the known examples of labels with surviving inscriptions, seven refer to the name of a century, suggesting communal property; a group of 13 from Usk identify numbered packages by weight and value; and only three name individuals (one of which mentions property transported ‘by baggage-animal’).Footnote 168 They were presumably commonly used for administrative purposes when the army was moving supplies around, but it is unclear why antler examples were used at Bainbridge.
14. Iron stylus (L: 130 mm; W: 8 mm; B: 5 mm; W(head): 15 mm). Topsoil over Room 5, SF 111.Footnote 169 Stylus with flat triangular head, rectangular cross-sectioned shank tapering to a circular cross-section point. It was found in topsoil close to the location of the tags. Styli were used on wax tablets, which tended to be used for legal and other important documents.
DISCS (FIG. 26)
15. Pottery counter (L: 21 mm; W: 19 mm; B: 5 mm). B51, SF 134.Footnote 170 Small oval counter, made from a samian body sherd. On one side the outer gloss is roughly removed from the centre, and on the other it is removed from the edges, leaving a central stripe. Similar reversible counters are known in samian from the forts at Wallsend and South Shields and in (red-slipped) Oxford ware from Bancroft villa.Footnote 171
Small finds from the principia. Scale 1:1.

16. Pierced pottery disc (D: 42 mm; B: 7 mm; hole D: 3 mm). Severan demolition of west wall of mid-Antonine principia, 67 GVII, 17, SF 338. Incomplete samian disc with an off-centre, unusually small hole.
The Hartley excavations produced four counters, while Wade's excavations in the area of Room 6 and the cross-hall tribunal produced another five. The assemblage consists of five bone, one glass and three pottery discs under 30 mm in diameter, and makes up half of all the counters recovered from the site. There are two bone counters of Greep's Type 2, three of his Type 4, one white glass counter, two black/grey counters and one samian counter (SF 137–9, 141, 283, 291, 340, 365 and No. 15). Comparatively large numbers of counters have also been recorded from the principia at South Shields (12 examples) and Wallsend (8). Professionally-made counters of bone or glass are known to have been used for board games, and discs of similar size in reused pottery or stone are assumed to have had a similar function. However, the recovery of large numbers from these principia might suggest that some examples might have been used as tallies or for some reckoning process. There are also four pierced discs cut from pottery sherds, mostly incomplete, some of which may have been used or intended as spindlewhorls (SF 278, 320, 339, No. 16), but the large numbers recovered from Roman sites suggest they may have had other uses as well, possibly even as tallies. One of the Bainbridge examples, with a small, off-centre hole, would certainly not have made a good spindlewhorl (No. 16).
DECORATIVE FITTINGS (FIG. 26)
17. Silver-gilt box-fitting (L (overall): 35 mm; W: 25 mm; B: 0.5 mm). Soil accumulation in forecourt of Severan principia; the deposit contains pottery of c. a.d. 370 or later, 68 HVIII, 4, SF 316. Incomplete silver fitting with slightly raised, hollow border and a single rivet-hole. Within the raised border the surface has been gilded. Traces of lead solder on the back.
Small finds from the principia. Scale 1:1.

18. Silvered copper-alloy box-fitting (L: 56 mm; W: 24 mm; B: 1 mm). Demolition level in forecourt of Flavian–Trajanic principia, 66 HIV, 20, SF 305. Rectangular plate with two raised hollow collars round central holes of 2 mm diameter to take decorative studs.Footnote 172
Fragments of copper-alloy plates and, especially, the studs used on boxes or chests are common finds on most Roman military sites. The fragment of gilt-silver fitting (No. 17) comes from a chest of some status, probably stored in the strongroom; excavations at South Shields have also produced a fragment of a silver box-fitting from the third-century strongroom.Footnote 173 There is also a silvered or tinned plate and a silvered stud that come from boxes (No. 18; SF 299) and possibly four other box fittings (SF 242, 289, 302, 307).
19. Silver-gilt fittings (A. L: 57 mm; W: 17 mm; B: 0.25 mm; B. L: 55 mm; W: 16 mm; B: 0.25). Stone-lined pit against west wall of Severan cross-hall, Severan to third quarter of fourth century, 66 HIV, 2, SF 295. Two thin sheet fittings, both with a slightly tapering recess cut into one end above two 2 mm-diameter holes, and both with a torn lower edge. Sheet B tapers slightly and the differing widths at the broken ends indicate they are not the two ends of the same object. Their exact function is unclear, other than being decorative. Paired holes were usually intended for attachment by thread or wire onto leather or cloth, so the sheeting may have been attached to some form of furnishing in the building.
ANALYSIS OF THE SILVER FITTINGS By J. Bayley
X-ray fluorescence (XRF) analyses show the fittings, Nos 17 and 19, and a triangle (online fig. 44, No. 32) are made of silver with some copper and minor amounts of lead. The surface analysis claims to have found 75–80 per cent silver, but the true value is likely to be less than this since baser metals will be preferentially lost. Traces of gold were detected in the back of each piece, which may mean that the silver contained minor amounts of gold or may just represent some of the gilding on the front getting onto the back of the pieces. There were no traces of mercury so the gold must have been applied as gold leaf. All three pieces have a similar composition. From about the third century onwards the common way of gilding silver was to use a gold-mercury amalgam,Footnote 174 so the nature of the gilding suggests these pieces are more likely to be early rather than late or post-Roman in date.
SHALE PLATTER (FIG. 26)
20. Shale platter (D: ?; B: 5 mm). Robber trench of drain west of mid-Antonine principia, probably Severan, 67 GVII, 19, SF 314. The sherd is small and distorted with deep cracks, but it is probably part of a very large flat platter with a low wall. Examples from Norden and Colchester have a diameter of 460 mm, and while the Bainbridge fragment is very small, it would appear to be from a platter of similar size.Footnote 175 The type seems to have been made from the first to the late third centuries. One end of the piece has been half sawn through and then snapped, presumably during recycling of the piece.
LIGHTING (FIG. 27)
21. Iron candlestick (L: 145 mm; W: 50 mm; B: 40 mm). Disturbed soil over the wall between Rooms 4 and 5, SF 232. Published.Footnote 176 The candlestick consists of a square cross-sectioned bar, apparently opening up into a socket, although almost none of this survives (the published reconstruction drawing shows a socket 60 mm tall, said to be 25 mm in diameter). At the other end a rivet attaches two sets of legs at right angles to one another, although parts of only three survive. The one complete leg has a rectangular cross-section, with a simple out-turned foot. The reconstruction drawing published soon after it was found shows a drip-pan above the legs, but the piece is in poor condition and any evidence for this feature is now very uncertain. Attached to the shank by an iron band there are the remains of four iron strips, both ends of which have been coiled into decorative spirals. On two opposing sides there are large, tightly curled spirals; only the lower two survive, but an out-curving of one bar at its incomplete end suggests it was forming another spiral. On the other two sides are bars coiled into smaller and looser spirals; three of these survive. The unusual use of spirals as decoration and the use of collars to attach strips and bars together are very similar to the methods used in the production of the Great Chesterford type of cauldron chains which date to the late fourth century. The Bainbridge candlestick is the most elaborate example in iron surviving from Roman Britain, with a high level of craftsmanship. Usually iron candlesticks have three rather than four legs, and little in the way of decoration, although a very delicate example from the Carrawburgh Mithraeum has out-curved leaves, and another thought to have come from Great Chesterford has a single spiral against the shank.Footnote 177 Iron tripod candlesticks became most common in the third and especially the fourth century, and are commonly found on ritual sites, so it is possible this example was originally associated with the shrine rather than the administrative offices.Footnote 178
MEDICAL AND COSMETIC IMPLEMENTS (FIG. 27)
22. Iron cautery (L: 93 mm; head W: 20 mm; B: 2 mm). Post-Roman debris west of west wall of principia, 67 GVII, 6, SF 348. Rectangular cross-sectioned shank tapering to circular cross-section. Incomplete flat, circular head.
23. Iron cautery (L: 87 mm; head D: 21 mm; B: 1 mm). Topsoil over northern veranda of Severan principia, 66 HII, 1, SF 297. Incomplete.
24. Iron cautery. North-west area of fort, post-Roman(?) debris, 69 II, 12, SF 422. (Not illus.)
25. Iron cautery. Robbing trench of north wall of north granary (with pottery of the late third century or later), 72 XVII, 11, SF 437. (Not illus.)
26. Iron cautery. North-west area of fort, topsoil, 69 III, 1, SF 475. (Not illus.)
There are five examples of possible cauteries from Bainbridge, two from the principia and three from elsewhere in the fort. All are from late or post-Roman contexts. Other examples of this object are also known from late contexts at Catterick, where they were identified as ‘plastering tools’.Footnote 179 However, they are similar in design to cauteries from Pompeii, including one example in iron.Footnote 180 Cauteries were used to close off wounds or destroy unwanted growths by burning.
27. Copper-alloy nail-cleaner (L: 56 mm; D: 3 mm; loop L: 20 mm; W: 15 mm; D: 1 mm). Topsoil, cross-hall site, 67 HVI, 1, SF 311. Cast nail-cleaner with unusually elaborate bead-and-reel decoration. Other nail-cleaners with moulded decoration are known from Piercebridge and Carlisle.Footnote 181
FEMALE ITEMS (FIG. 27)
28. Copper-alloy pin (L: 28 mm; D: 10 mm). Office immediately south of aedes, fourth century, 64 GIII, 8, SF 286. A pin with a circular-section shank that has been roughly cut down and re-pointed. There are traces of gilding on the shank, but not on the head. The flattened spherical head has the remains of an inlay set into its upper surface. A similar very short pin has been found at Malton, which also has an irregular shank.Footnote 182 This form of inlaid decoration is unusual: one found at Colchester is thought to be part of a group considered to be of local manufacture.Footnote 183
29. Glass bead (D: 3.9 mm; L: 4 mm). Post-Roman rubble accumulation on site of principia cross-hall, 66 GV, 2, SF 446. Small opaque dark blue ovoid bead. Late Roman type.
30. Glass bead (L: 17 mm; D: 5 mm). B68, HXI 5, SF 318. Long, dark green translucent cylindrical bead. Predominately a late Roman type.
31. Jet bead (D: 3 mm; L: 21 mm ). ‘Principia’, B51, SF 135.Footnote 184 Long cylinder bead decorated with fine grooves.Footnote 185 Probably fourth century.
There were five items of jewellery from the principia, plus a reused copper-alloy pin. In addition to the late Roman beads described above, there were a blue-green glass bangle and a blue-green annular bead (SF 269, 300), dating to the first or second centuries. Another bead, a fragment of a first- or second-century melon bead, may be a harness fitting rather than jewellery (SF 294).
MATERIAL ASSOCIATED WITH WORKSHOPS
Spurs and other copper-alloy items were made in the timber building erected on the site of the principia cross-hall and forecourt in the later fourth century. Antler waste was also found (SF 275, 343, 447). ‘Several deer horns’ were noted lying on the floor of the strongroom during the 1926 excavations; an iron axe-adze was found in the filling of the strongroom.Footnote 186
The moulds ( figs 28–29)
The moulds are made of a fine grey fabric with plentiful rounded opaque white inclusions, mostly very small, but some up to 0.5 mm in size. Black inclusions of similar size are present, but are less common. The context book refers to Nos 1–2 and 5–7 as coming from HXI, 30, an intrusion under a Severan mortar floor on the site of the late Roman timber building, but, as is explained above, the intrusion was probably associated with the late building.
Clay spur moulds. Scale 1:1.

Clay moulds. Scale 1:1.

1. Spur mould (L: 65 mm; W: 115 mm; W(across front): 88 mm; B: 10 mm). SF 618.1. Almost complete outer valve of a mould for a spur. It is trilobate in shape with a thin outer layer of clay over the whole of the exterior that was used to lute the two halves of the mould together. The sprue cup is at the top of the central disc of the spur.
2. Spur mould (L: 65 mm; W(across front): 75 mm; B: 9 mm). SF 618.2. Incomplete outer valve, made using the same spur model as used for No. 1 above. More of the outer layer of clay survives.
3. Spur mould (L: 36 mm; W: 22 mm; B: 9 mm). Rubble over late Roman timber building, 68 HXI, 2, SF 620. Fragment of valve showing part of one of the disc terminals of the arms. The colouration suggests it is not part of No. 2 above.
4. Spur mould (L: 33 mm; W: 30 mm; B: 1 mm). 68 HXI, 11, SF 619. Associated with slag on paved floor just to the north of the forge base in the late Roman timber building. Fragment of the inner valve for a spur, showing the impression of part of one arm and the lower decorative projection.
5. Mould fragments (max. L: 25 mm). SF 618.3. Three very small fragments, probably from spur disc terminals. (Not illus.)
6. Mould fragments. SF 618.4 and SF 618.5.
There are four fragments from two separate moulds of objects that were not spurs, but with similar fabric and luting to the spur moulds. Three of the four come from a circular object with an open or domed centre. There are 28 other very small fragments from moulds or luting.
7. Mould fragment (L: 54 mm; W: 34 mm; B: 13 mm). SF 618.6. Fragment of mould without the extra layer of clay for luting found on the other fragments. There is a vent(?) hole through the thickest part of the valve. (Not illus.)
The moulds were for a short-armed spur with three oval disc terminals (L: 23 mm; W: 18 mm). The left-hand disc (when looking at the mould) has a ledge at the junction between it and the arm (W: 5 mm), while on the central disc the ledge is slightly higher up, within the disc. The arms appear to be of equal length (20 mm), although the one surviving right-hand disc is poorly impressed. The arms are also recessed part way along, perhaps to form chamfered edges to the arms. Fragment No. 2 has traces of a central decorative projection below the arms, seen more clearly in the inner valve fragment (No. 4).
Three-disc spurs are related to the group of spurs which have disc-terminals to the two arms but a central hook in place of the third disc, which first appear in the late third or fourth century.Footnote 187 The three-disc type is Giesler Variant C,Footnote 188 identified as an eastern provincial form since at the time of the study more examples had been found in the eastern provinces than the West, but the five examples now known from Britain (plus the moulds for three further examples from Bainbridge) produce a more even distribution.Footnote 189 Of the three-disc spurs from Britain, the two closest parallels come from Silchester and Claxby with Moorby (Lincs.), and another, similar, one from Chesterton (Cambs.).Footnote 190 All are unstratified. A stratified example, with longer arms and smaller discs, comes from a context dated to the fourth century (possibly the second half) from Bay Meadow villa, Droitwich.Footnote 191 A pair of three-disc spurs has also been found in a late fourth-century burial at Lankhills, Winchester, along with a crossbow brooch.Footnote 192 Giesler dates the type from the first half of the fourth century to c. a.d. 400.Footnote 193 The surviving examples of this type of spur suggest the prick was made of iron and that the usual method of attachment was by large disc-headed rivets which could be fastened onto leather straps.Footnote 194 The short arms mean that they did not extend far round the heel of the boot, unlike many of the hooked examples.Footnote 195
Ingot mould By C. Gardner and A. Croom ( fig. 30)
Ingot moulds are most commonly found at late Saxon or Anglo-Scandinavian sites but are not unknown in other periods and occasionally are found on Roman sites in Britain, for example, Tower Knowe and Studland (for further discussion of their significance on Roman sites, see above).Footnote 196 They are usually made from one piece of stone, occasionally brick or tile, and have simple shapes carved into them like bars or discs.Footnote 197 Like the clay piece moulds, it is not possible to tell which metal was cast in the ingot moulds (however, it is known that bar ingots from other sites were made from a range of metals including precious metals).
Stone ingot mould. Scale 1:2.

8. Ingot mould (L: 190 mm; W: 140 mm; B: (max.) 60 mm). Site of principia cross-hall, near metalworking hearth, late fourth to early fifth century, 64 G1, 9, SF 260. Rectangular, incomplete, coarse red sandstone mould with two bars carved into it. One of the bars is complete (L: 118 mm; W: 17 mm), while the other is broken (L: 136 mm + ; W: 25 mm). Where the mould has been broken it is possible to see that the sandstone has reddened (oxidised) from the surface to a depth of c. 10 mm owing to the heat of the metal being poured into it. The very upper surface, in areas, is blackened; this is not uncommon.Footnote 198 At one end of the complete bar, the mould has been worn down and is very smooth on the surface and on the adjoining side resulting from some form of re-use. The stone currently tapers from one end to the other and has a very smooth lower surface, perhaps also as the consequence of re-use: when sitting on the current lower surface the top of the mould is at an angle and the bars are not level.
SUPPLEMENTARY MATERIAL: CONTENTS
For supplementary material for this article please visit http://journals.cambridge.org/bri
Note: the Supplementary Material includes online figs 31–48 and Tables 2–8.

ACKNOWLEDGEMENTS
Brian Hartley would have wished to acknowledge the many students from Leeds University who took part in the Bainbridge training excavations, together with other volunteers. He would also have thanked those who helped him in the direction of the excavations and also the late Mr Leonard Scarr of Cravenholme Farm for his co-operation in leasing the fort to the University for the duration of the excavations and for additional help. Publication of the excavations was funded by a donation from Elizabeth Hartley in memory of Brian Hartley. Paul Bidwell is very grateful to Elizabeth Hartley for locating various parts of the archive and negotiating access to them and for her encouragement and interest throughout the project. He would also like to thank his colleagues, particularly Alex Croom and Roger Oram, for their assistance and all the specialists for their contributions. Mark Bowden arranged for the inclusion of the RCHME survey in the Supplementary Material. Mr Mason Scarr of Cravenholme kindly allowed access to the fort during the publication project. Finally, Paul Bidwell is indebted to Elizabeth Hartley and Nick Hodgson for their comments on a draft of this report and to the two anonymous referees for suggesting further improvements.