

A. MONUMENTAL
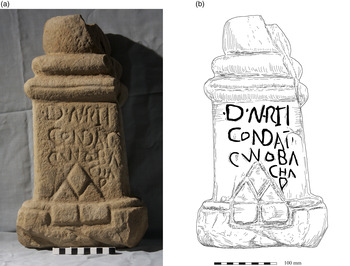
1. Moulton (NZ 21901 02886), North Yorkshire, Roman roadside settlement ( fig. 1). Buff sandstone altar, 0.22 m (at base) by 0.95 m, 0.15 m thick, foundFootnote 2 in 2015 in a large pit (Pit 5, Field 210) associated with the settlement. The capital, now broken and incomplete, consists of a cylinder on top of two roll mouldings, into which a shallow round focus has been neatly cut. On the front of the base two small rectangular panels are outlined which support a projecting triangular motif at the foot of the recessed die. Crudely incised on the die in irregular capitals: o D o MA͡RTI | CON͡DATỊ | CV͡NOBΛ|CHΛ | P̣, d(eo) Marti | Condati | Cunoba|cha | p(osuit). ‘To the god Mars Condates, Cunobacha set (this) up.’Footnote 3
(a) and (b). Moulton stone altar (No. 1). (Photographed and drawn by R.S.O. Tomlin)

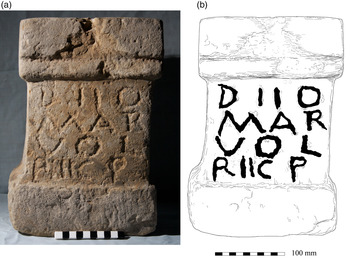
2. Ibid. (NZ 21874 03057) ( fig. 2). Buff sandstone altar, 0.205 by 0.318 m, 0.15 m thick, found in 2015 in another large pit (Pit 1, Field 209) associated with the settlement. Capital and base are squared and plain except for a simple moulding formed by a groove not extending to the sides, which distinguishes the capital from the slightly recessed die. Within the capital an oval focus has been crudely incised. Coarsely incised on the die with a mason's point: DIIO | MAR | VOL | RIIC P, probably deo | Mar(ti) | Vol(…) | Rec(eptus) p(osuit). ‘To the god Mars Vol(…)ius Receptus set (this) up.’Footnote 4
(a) and (b). Moulton stone altar (No. 2). (Photographed and drawn by R.S.O. Tomlin)

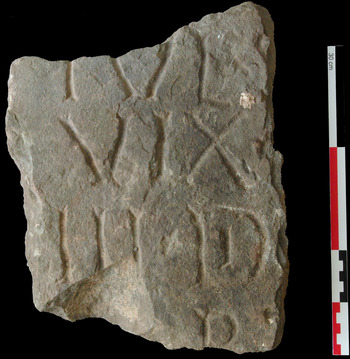
3. Caerleon (Isca, ST 34306 89877), Ultra Pontem, in the area of the Roman cemetery across the river Usk, 0.6 km south-east of the fortress ( fig. 3). Fragment of a buff sandstone slab, 0.26 by 0.34 m, foundFootnote 5 in 2015. Crudely inscribed: […] | IVL x Ṣ[…] | VIX x […] | III x D͡I[…] | […]P̣.[…] | […], [D)is) M(anibus)] | Iul(ius) S[ …] | vix(it) [a(nnos) … m(enses)] | III d(iem) I […]| […] p. […]. ‘To the Shades of the Dead. Julius S[…] lived […] years, three months, one day …’Footnote 6
Caerleon gravestone (No. 3). (Photo: Cardiff Archaeological Consultants)

B. INSTRUMENTUM DOMESTICUM
CHESHIRE
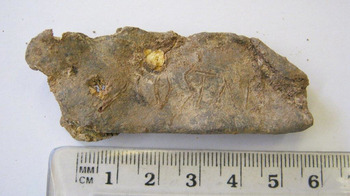
4. Chester (Deva), amphitheatre, north-west quadrant ( fig. 4). Oblong tag cut from sheet lead and pierced for attachment, c. 68 by 48 mm, foundFootnote 7 unstratified in 2004. Incised in crude capitals: 7 COSTAN|TIS, (centuria) Co(n)stan|tis. ‘Century of Constans.’Footnote 8
Chester lead tag (No. 4), upper half. (Photo: Cheshire West and Chester Council)

DORSET
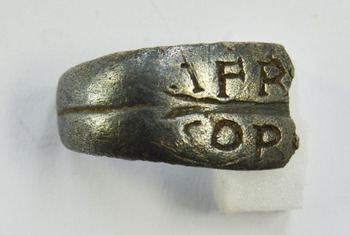
5. Long Bredy (SY 567 881) ( fig. 5). Fragment of a silver finger-ring (second/third-century), 19.3 mm long, 2.37 g in weight, foundFootnote 9 in 2014. It is rectangular in section, and would have been of ovoid profile expanding to a flattened bezel, but only one shoulder and perhaps two-thirds of the bezel survive. Inscribed in capitals: ΛFR[…] | CORO[…]Footnote 10
Long Bredy silver ring (No. 5). (Photo: British Museum)

DURHAM
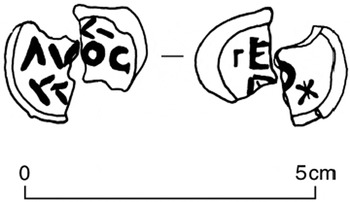
6. Chester-le-Street (Concangis, NZ 2752 5124), Auckland Cottage ( fig. 6). Incomplete lead sealing now in two pieces, foundFootnote 11 in 2005 in the upper layers of a Roman street within the fort. Obverse: palm branch | AVOC | palm branch, a(lae) Voc(ontiorum). ‘(Sealing) of the Cavalry Regiment of Vocontii.’ Reverse: E [ ] star.Footnote 12
Chester-le-Street lead sealing (No. 6). (Drawing: Paul Bidwell and Alex Croom)

ESSEX
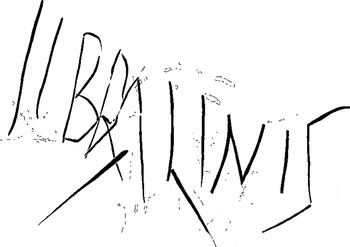
7. Colchester (Camulodunum, TL 99 25) ( fig. 7). Buff pitcher with handle, 0.32 m high, said to have been foundFootnote 13 here in the 1970s. Incised after firing on the shoulder in capitals: IIBRALINISFootnote 14
Colchester coarse ware graffito (No. 7). (Drawn by R.S.O. Tomlin from a photograph)

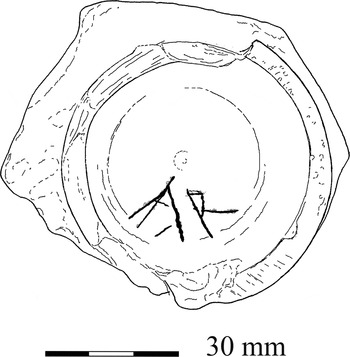
8. Heybridge (TL 84917 08226), 39–45 Crescent Road ( fig. 8). Samian base sherd (Drag. 33) stamped CALETIM (Caletus, Lezoux c. a.d. 180–220), foundFootnote 15 in 2002. Scratched underneath after firing, within the base-ring, in crude capitals: AR, Ar(…) Footnote 16
Heybridge samian graffito (No. 8). (Drawn by R.S.O. Tomlin)

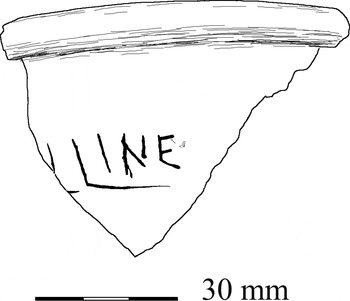
9. Ibid. ( fig. 9). Black burnished (BB2) rim sherd. Inscribed after firing in crude capitals: […]ḶLINE, […]llin(a)e. ‘(Property) of […]llina.’Footnote 17
Heybridge samian graffito (No. 9). (Drawn by R.S.O. Tomlin)

GLOUCESTERSHIRE
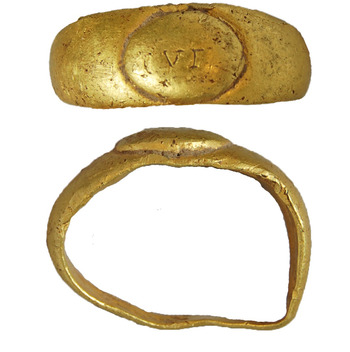
10. Lydney (SO 63 03) ( fig. 10). Gold ring (Henig type V, c. a.d. 150/200) foundFootnote 18 in 2015. Neatly incised within the integral oval bezel: V F, u(tere) f(elix).Footnote 19 ‘Use (this and be) happy.’
Lydney gold ring (No. 10). (Photo: Portable Antiquities Scheme)

11. Uley (ST 789 996), West Hill, the temple of Mercury ( fig. 11). Irregular oval of lead sheet, 53 by 88 mm, foundFootnote 20 in 1978. It was originally folded four times, and there is some loss to the edges. The surface is well preserved in a central band from top to bottom, but towards either side is rough and corroded since it was less well protected there. In consequence the beginning and the end of lines 3–12 have largely been lost. Inscribed on one face with eighteen lines of Old Roman Cursive: G̣enitus | Mercurio | [g]enio qui mihi | [?fru]ḍum fecerit aṇ|ụlụṃ involaverit | sa[?nct(um)] genium si […] | ạ[n]cilla si liber […] | [mu]ḷieris si puer si [pue]ḷḷạ | […] p̣ermitt(…) eụṃ | […]..ernạt pudoreṃ | […]iat pede […] | […]ṃbllat(!) […] | nec̣ manducat nec | sedit nec magiat ṇ [i]|si ad templum | tuum repraese|ntaverit op̣|tịḅeiụṣ. ‘Genitus to Mercury the genius. (He) who has done me ?wrong, has stolen (my) ?ring … holy genius that whether [?free woman] or slave-girl, whether free man […] of a woman, whether boy or girl […] you do not permit him … shame … with his foot … nor to eat nor to sit (?at stool) nor to ?urinate, unless he pay […] at your temple.’Footnote 21
Uley lead tablet (No. 11). (Drawn by R.S.O. Tomlin)

ISLE OF WIGHT
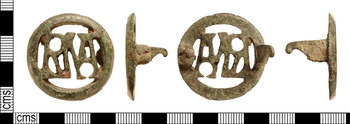
12. Location undisclosed, but c. 5 km west of Newport ( fig. 12). Main portion of a copper-alloy openwork brooch, 34 mm in diameter, foundFootnote 22 in 2015. Within a circular frame three serifed capital letters, R M A, combine to form the monogram RoMA.Footnote 23 Roma, ‘(the goddess) Rome’.Footnote 24
(Newport) copper-alloy brooch (No. 12). (Photo: Portable Antiquities Scheme)

LANCASHIRE
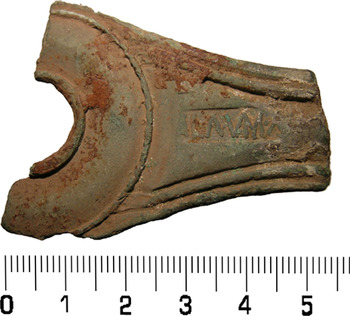
13. Yealand Redmayne (SD 500 757) ( fig. 13). Part of the handle of a copper-alloy skillet (trulla), recordedFootnote 25 in 2015. An impressed stamp, now incomplete, reads: ΛLΛ o VM o Λ̣[…]Footnote 26
Yealand Redmayne copper-alloy skillet handle (No. 13). (Photo: Portable Antiquities Scheme)

LEICESTERSHIRE
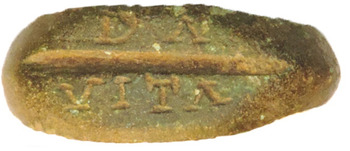
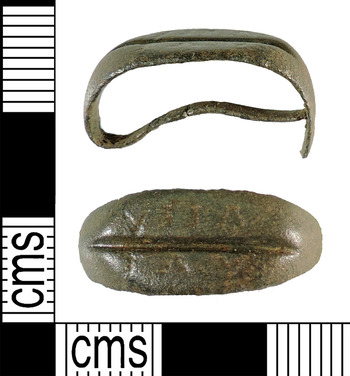
14. Woodhouse (SK 531 140) ( fig. 14). Expanded ovate bezel of a copper-alloy finger-ring, 19 by 8 mm, 1 mm thick, weight 1.36 g, foundFootnote 27 in 2015. Inscribed in capital letters above and below a horizontal groove: DΛ | VITΛ, da (mihi) | vita(m). ‘Give me life.’Footnote 28
Woodhouse copper-alloy ring bezel (No. 14). (Photo: Portable Antiquities Scheme)

LONDON
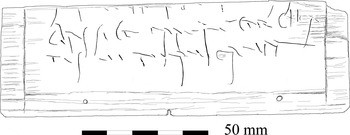
15. City of London (Londinium, TQ 532549 181002), Bloomberg Place ( fig. 15). The stylus writing-tablets foundFootnote 29 in 2013 have now been published. They include this item and the next two, which have been chosen as examples for inclusion here by virtue of their historical interest.Footnote 30 No. 15 (WT 33) is a fragment, 136 by 44 mm, from the bottom of a ‘page’: traces |Classico praefectọ c(o)họrtis | VI Nervịorum. ‘… Classicus, prefect of the Sixth Cohort of Nervii.’Footnote 31
London writing-tablet fragment (No. 15). (Drawn by R.S.O. Tomlin)

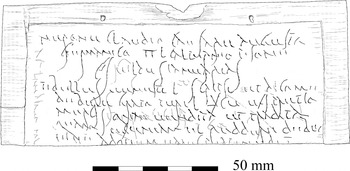
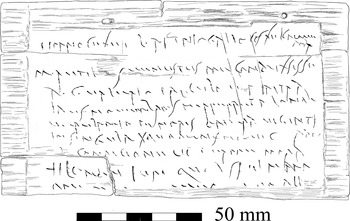
16. Ibid. (WT 44) ( fig. 16). Fragment, 137 by 56 mm, consisting of the upper half of a ‘page’: Nerone Claudio Caesare Augusto | Germanico II L(ucio) Calpurnio Pisone | cọ(n)s(ulibus) ṾỊ Idus Ianuarias | Tibullus Venusti l(ibertus) scripsi et dico me | debere Grato (S)puri l(iberto) (denarios) CV ex{s} pretio | mercis quae vendita et tradita (est) | quam pecuniam ei reddere debeo | eive ad quem ea res pertinebit | […]
London writing-tablet fragment (No. 16). (Drawn by R.S.O. Tomlin)
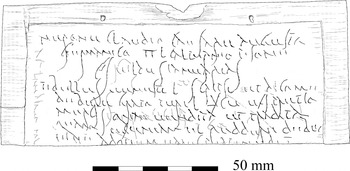
‘In the consulship of Nero Claudius Caesar Augustus Germanicus for the second time and of Lucius Calpurnius Piso, on the sixth day before the Ides of January [8 January a.d. 57]. I, Tibullus the freedman of Venustus, have written and say that I owe Gratus the freedman of Spurius 105 denarii from the price of the merchandise which has been sold and delivered. This money I am due to repay him or the person whom the matter will concern …’Footnote 32
17. Ibid. (WT 45) ( fig. 17). Three conjoining fragments, 142 by 81 mm, consisting of the upper half of a ‘page’: P̣(ublio) Mario Ce(lso) L(ucio) Afinio Gallo co(n)s(ulibus) XII Kal(endas) Nọṿembr(es) | M(arcus) Renṇ[iu]s Venustus me condux{s}isse | a G(aio) Valerio Proculo uṭ intra | Idus Novembres perferret a [[Londi]] | Verulamio penoris onera viginti | in singula (denarii) quadṛạns vecturaẹ | ẹa condicione ut per me ṃọra | (asses) I Lonḍịnium quod si ulnam | om[n]e[m] traces | […]
London writing-tablet fragment (No. 17). (Drawn by R.S.O. Tomlin)

‘In the consulship of Publius Marius Celsus and Lucius Afinius Gallus, on the twelfth day before the Kalends of November [21 October a.d. 62]. I, Marcus Rennius Venustus, (have written and say that) I have contracted with Gaius Valerius Proculus that he bring from Verulamium by the Ides of November [13 November] twenty loads of provisions at a transport charge of one-quarter denarius for each, on condition that … one as … to London; but if … the whole …’Footnote 33
NORFOLK
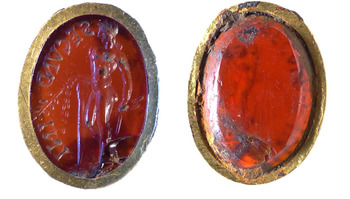
18. Billingford (TG 014 193) ( fig. 18). Oval cornelian intaglio, 10 by 13 mm, 2 mm thick, weight 0.5 g, foundFootnote 34 in 2015, which depicts Apollo leaning on a column and holding a laurel branch in his right hand. To the left, incised retrograde in capitals: SECVN͡D INI, Secundini. ‘(Seal) of Secundinus’.Footnote 35
Billingford cornelian intaglio (No. 18). (Photo: Portable Antiquities Scheme)

NORTHAMPTONSHIRE
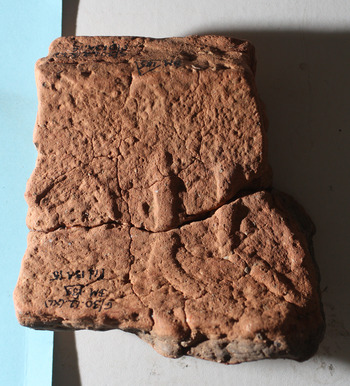
19. Piddington (SP 7965 5400), Roman villa ( fig. 19). Fragment of an arched roof-tile (imbrex, sf 185) foundFootnote 36 in 2015. On the underside in relief, the moulded letters: […]OLL[…]
Piddington tile (No. 19). (Photo: R.S.O. Tomlin)

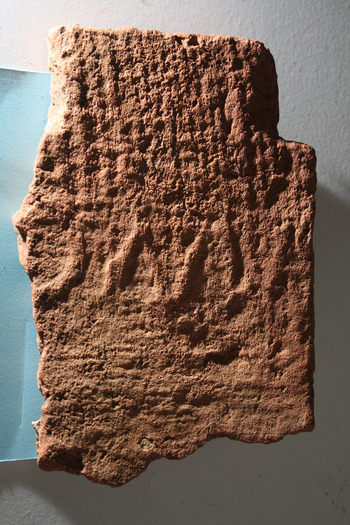
20. Ibid. ( fig. 20). Fragment of a flanged roof-tile (tegula, sf 184) ( fig. 20). On the underside in relief, the moulded letters: […]OMỊFootnote 37
Piddington tile (No. 20). (Photo: R.S.O. Tomlin)

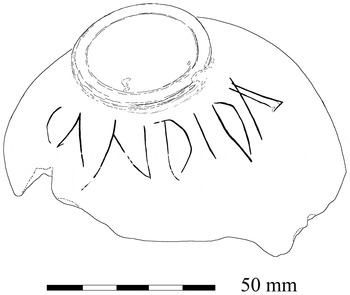
21. Ibid. ( fig. 21). Sherd comprising the base of a poppyhead beaker (Fabric C, Highgate Wood, c. a.d. 60–150), inscribed after firing in neat capitals inverted as to the vessel: CΛNDIDΛ, Candida Footnote 38
Piddington coarseware graffito (No. 21). (Drawn by R.S.O. Tomlin)

SUFFOLK
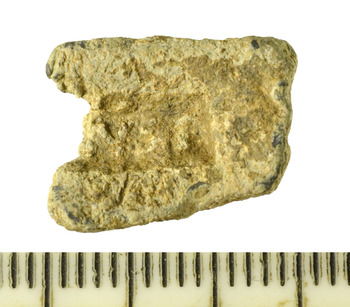
22. Barnardiston (TL 710 480) ( fig. 22). Right-hand portion of an oblong lead sealing, 15 by 11.5 mm, 4 mm thick, foundFootnote 39 in 2015. Deeply impressed by a rectangular die: […]ṾSỊFootnote 40
Barnardiston lead sealing (No. 22). (Photo: Portable Antiquities Scheme)

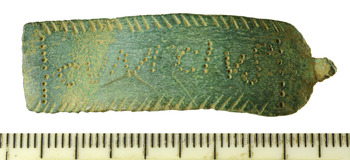
23. Ibid. ( fig. 23). Rectangular copper-alloy plate, 45.7 by 14.4 mm, 1.3 mm thick, rounded at one end with a projecting lug now broken, foundFootnote 41 in 2015. It seems to be a mount or strap fitting but of uncertain form or function. One face is inscribed in punched-dot capital letters within a decorative edging: CVNICIVS, Cunicius Footnote 42
Barnardiston copper-alloy plate (No. 23). (Photo: Portable Antiquities Scheme)

TYNE AND WEAR
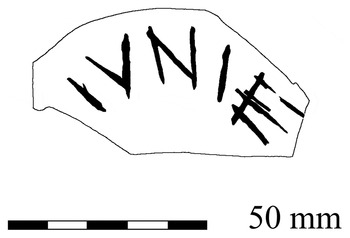
24. Newcastle (Pons Aelius), Roman vicus (NZ 2489 6380) ( fig. 24). Samian base sherd (Drag. 18/31–31, with an illegible stamp but likely to be early to mid-Antonine), foundFootnote 43 in 2014. Incised underneath after firing, in capitals within the foot-ring: […]IVNIE[…], Iuni(a)e. ‘(Property) of Junia.’Footnote 44
Newcastle samian graffito (No. 24). (Drawn by R.S.O. Tomlin from a rubbing)

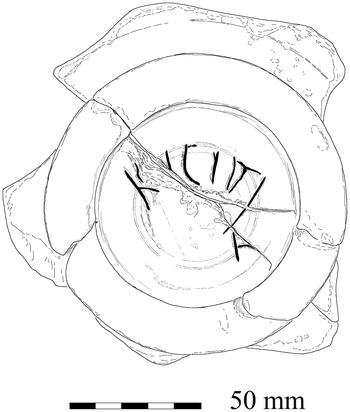
25. Benwell (Condercum, NZ 216 646), Vallum crossing ( fig. 25). Four conjoining sherds preserving the badly worn base-ring of a samian bowl (Drag. 30 or 44), foundFootnote 45 unstratified in 1938. Incised underneath after firing, in crude capitals within the base-ring: R[.]ICIITI, probably R[e]ce(p)ti. ‘(Property) of Receptus.’Footnote 46
Benwell samian graffito (No. 25). (Drawn by R.S.O. Tomlin)

WILTSHIRE
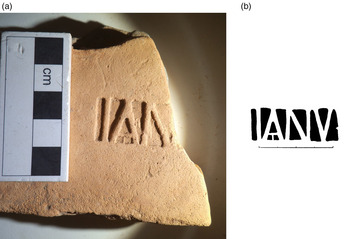
26. Wanborough (?Durocornovium, SU 19 85) ( fig. 26). Fragment of brick or tile, probably part of a tegula, foundFootnote 47 in the period 1966–76. Impressed by a rectangular die now incomplete, the letters in relief: IAN[…], probably Ian[uarius]Footnote 48
(a) and (b). Wanborough tile stamp (No. 26). (Photographed and drawn by Peter Warry)

YORKSHIRE (EAST RIDING)
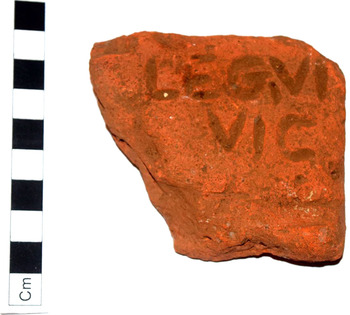
27. Roman site near Elloughton ( fig. 27). Small fragment of brick or tile, foundFootnote 49 in 2015. Crudely inscribed before firing: LEGVI | VIC, Leg(ionis) VI | Vic(tricis). ‘(Work) of the Sixth Legion Victrix.’Footnote 50
(Elloughton) tile graffito (No. 27). (Photo: Peter Halkon)

YORKSHIRE (NORTH)
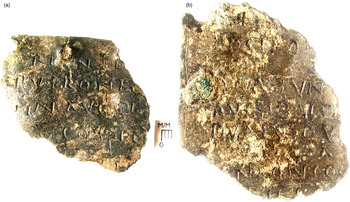
28. Healam Bridge (SE 323 835), Roman fort(?) and roadside settlement ( fig. 28). Fragment, 38 by 44.5 mm, of the first leaf (tabella I) of a copper-alloy military diploma, foundFootnote 51 in 2010. Both faces are inscribed. (i) Inner (intus) face: [imp caes divi ha]DRIAN F D[ivi traian pa]|[rth nep divi n]ERV PRONEP [t aelius] | hadrian anto]NIN AVG PI[us pont max] | [trib pot] COS III[ p p].Footnote 52 (ii) Outer (extrinsecus) face: MISS [quor nom subscript sunt ips lib] | POST EOR [civit dedit et conub cum uxor] | QVAS TVNC [habuiss cum est civit is data ]| AVT SIQVI CA[elib cum is quas postea] DVXISS DVM[tax sing sing] | A [ d ] | [.] ANTONIO [ ]| [co]H II GA[ll ].Footnote 53 Despite being such a small fragment, the diploma can be dated to a.d. 140, in what can now be recognised as the suffect consulship of Quintus Antonius Isauricus, former legate of the Sixth Legion at York (RIB 644). Its recipient, whose name is lost, served in the Second Cohort of Gauls, first attested in Britain by the diploma of a.d. 122.
Healam Bridge military diploma (No. 28), (a) inner face; (b) outer face. (Photos: Northern Archaeological Associates)

29. Flixton (TA 041 796) ( fig. 29). Copper-alloy finger-ring, now broken but 20.7 mm long, 8.5 mm wide, 1 mm thick, weight 1.8 g, foundFootnote 54 in 2015. The expanded ovate bezel is inscribed in capital letters, now very shallow and worn, above and below a horizontal groove: ΛVE | VITΛ, ave | vita (mea). ‘Greetings, my life.’Footnote 55
Flixton copper-alloy ring (No. 29). (Photo: Portable Antiquities Scheme)

WALES
MONMOUTHSHIRE
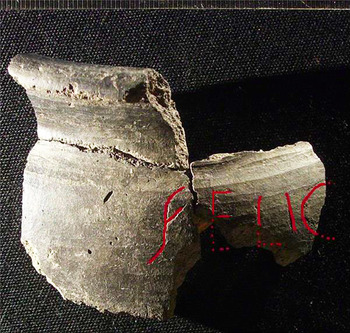
30. Caerleon (Isca, ST 340 906), Roman fortress, in a turret of the southern defences ( fig. 30). Three conjoining sherds of a black burnished (BB1) jar foundFootnote 56 in 1982. Incised on the wall after firing: FEḶIC[…], felic[iter …]. ‘Good luck!’Footnote 57
Caerleon coarseware graffito (No. 30). (Photo with drawing: Mark Lewis)

ADDENDA ET CORRIGENDA
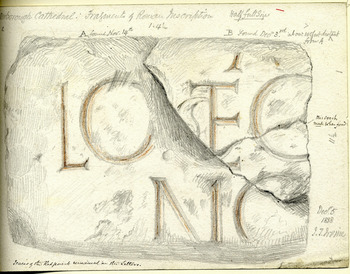
(a) RIB 231 (now in Peterborough Cathedral) ( fig. 31). This fragment has been re-examinedFootnote 58 with the help of a drawing made when it was found in 1888. To the left of L is the tip of another L, suggesting that the second line should read: […]ḶLO ♠ E͡T C[…], [Tertu]llo et C[lemente co(n)s(ulibus)]. ‘… in the consulship of Tertullus and Clemens’ (a.d. 158).Footnote 59
RIB 231 (Add. (a)). (Drawn by J.T. Irvine in 1888)

(b) RIB 1337 + add. Translate: ‘Fortunate is the First Cavalry Regiment of Asturians.’Footnote 60
(c) Britannia 42 (2011), 441–4, Nos 5 and 6 (Inveresk). These altars dedicated to Mithras and the Sun respectively have now been cleaned, and are published aboveFootnote 61 with new photographs and drawings, together with the mithraeum in which they were found.
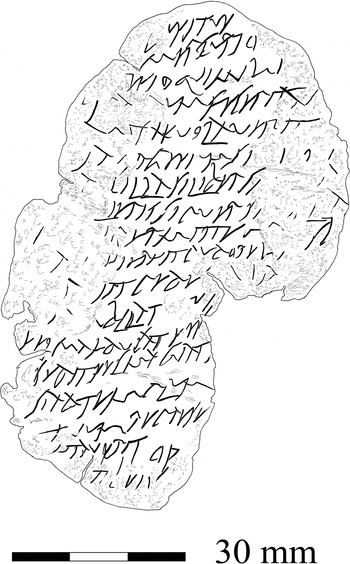
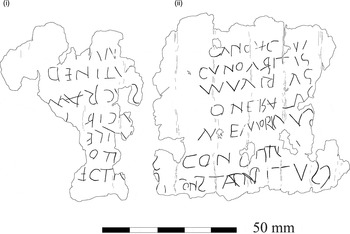
(d) Britannia 43 (2012), 402, No. 12 (East Farleigh) ( fig. 32). These two fragments of an inscribed lead tablet have now been fully opened and cleaned, making possible a revised drawing and transcript. The text is inscribed in capitals which are sometimes inverted or reversed.Footnote 62
East Farleigh lead tablet (Add. (d)). (Drawn by R.S.O. Tomlin)


A list of personal names: (i) … | ?Atiden[us] | Sacratu[s] | … | … | … | ?[Atr]ectus (ii) ?Cundac[us] | Cunoaritus | … | Oneratus | Memorinus | Constitu[tus] | ?Constantius
CHANGES OF LOCATION
(a) RIB 1100; III, 3265–67 (Ebchester). The site museum at Ebchester has been closed, and its stones have been transferred to the Bowes Museum, Barnard Castle.Footnote 63
(b) RIB III, 3402 (Greenhead). This centurial stone of Cocceius Regulus has been donated to the Vindolanda Trust and is now in the Roman Army Museum, Carvoran.Footnote 64