


INTRODUCTION
In many parts of the Maya area, carved stone monuments, painted murals, and elite ceramics feature captives in great numbers in the Late Classic (ca. a.d. 600–900) period. The prevalence of captives on carved stone monuments, in particular, has led scholars to interpret the taking of captives as a key part of Maya warfare—perhaps even its primary goal (Inomata Reference Inomata, Scherer and Verano2014:48; Rice and Rice Reference Rice, Rice, Demarest, Rice and Rice2004:129–130; Schele and Miller Reference Schele and Miller1986:212–213). Generally, it is understood that captives were taken in highly ritualized combat and transported to the victor's center, where they were presented before a crowd and eventually sacrificed. Images like the murals of Bonampak display these ceremonies with gruesome candor, while broad stairways present theaters where such spectacles could have taken place (Miller and Houston Reference Miller and Houston1987). Sacrifice would have been necessary for the accession of kings, calendrical rites, and other important rituals (Schele and Miller Reference Schele and Miller1986); it would have highlighted the achievement of warriors and allowed a wide swath of people to experience narratives of victory (Inomata Reference Inomata, Scherer and Verano2014:36–37).
Our understanding of warfare, however, is changing. Colonial-era accounts suggest that people did die on the battlefield. Warfare also involved significant destruction—not just in the Terminal Classic, but by the late seventh century, as illustrated by the burning events at Witzna (Wahl et al. Reference Wahl, Anderson, Estrada-Belli and Tokovinine2019). We know more, too, about the goals of warfare, which included the disruption of links with landscape and the ancestors, the desecration of ritual spaces, the capture of deities and sacred objects, and the control of labor and economic resources (González del Ángel Reference González del Ángel2015; Helmke Reference Helmke2019:1–2; Hernandez and Palka Reference Hernandez, Palka, Morton and Peuramaki-Brown2019:44–45; Martin Reference Martin2020:228–233; Tokovinine Reference Tokovinine, Morton and Peuramaki-Brown2019:92–97). The taking of human captives was crucial—but it was one goal among many.
Our understanding of the fate of captives is also changing. Warfare-related iconography from this time period privileges captive imagery and provides multiple examples of captive sacrifice. Recent hieroglyphic decipherments, however, combined with information from Colonial-era documents, suggest a variety of fates for captives taken in combat (e.g., Martin Reference Martin2020:207). Combined, this information reveals that the iconography of carved stone monuments is a poor indicator of historical outcomes for prisoners of war. This paradox drives the investigation I present here: if carved stone monuments were not transparent about the outcomes of warfare, then what was the function of captive imagery? I suggest that stelae in many Late Classic Maya centers were designed to prepare people for war—specifically, elite men. These sculptures constructed an embodied social identity for warriors by positioning them as potential winners and potential losers; and by emphasizing the role of the elite body in achieving local political goals and performing correct ritual action. Viewed in this light, these monuments demonstrate the ways in which Maya art messaged about people other than the ruler. The monuments allow a more nuanced understanding of diverse approaches to warfare at different sites, and suggest that context is key in using imagery to understand the practice of war.
Key to this discussion is the active role of sculptures in the ancient Maya world. As animated, potentially agentive beings, sculptures could take on elements of personhood through ritual action, and they would have interacted with viewers in myriad ways (Astor-Aguilera Reference Astor-Aguilera2010; Harrison-Buck and Hendon Reference Harrison-Buck, Hendon, Harrison-Buck and Hendon2018; Houston Reference Houston2014; Houston and Stuart Reference Houston and Stuart1998). Their placement in site centers facilitated the construction of normative identities for people who engaged with them, whether by seeing them, moving around them, or participating with them in rituals or performances (Bachand et al. Reference Bachand, Joyce and Hendon2003:239–240). Depictions of the human body, in particular, affected bodily practices: engaging with such sculptures worked to construct understandings of the body and its role in the world (Joyce Reference Joyce1998:148, Reference Joyce2005:141–142). The embodied identities facilitated by sculptures of captives incorporated both the lived experiences of individuals and the social and cultural structures in which those individuals operated (Berthelot Reference Berthelot, Featherstone, Hepworth and Turner1991:398; Meskell Reference Meskell and Rautman2000:13).
This article uses the captive body as a starting point from which to reassess the historical conflation of captive and sacrificial imagery. The first section examines representations of captives and captive sacrifice as well as varying outcomes for prisoners of war attested in textual sources. I then trace the ways in which imagery of captives constructed elite identities at selected sites in the Maya region, including Yaxchilan, Palenque, and Tikal. The case studies presented build on foundational studies of captive imagery by considering interactions between ancient viewers and carved stone captives within their specific historical contexts. Although captive imagery appeared on a variety of sculptural forms in the Classic period, this work focuses on depictions of captives on stelae, altars, and panels.
THE FATE OF CLASSIC MAYA CAPTIVES
The Late Classic period witnessed a veritable explosion of captive imagery. Generally understood as prisoners of war, captives on Maya sculpture often lack clothing and fine regalia. They are sometimes completely nude, and usually in a subordinate position. They may wear paper or cloth strips instead of earflares, and they are regularly bound by rope (Baudez and Mathews Reference Baudez, Mathews, Robertson and Jeffers1979; Dillon Reference Dillon1982; Schele and Miller Reference Schele and Miller1986). Artists at various Maya centers used different methods to represent captives. In the central Peten, for instance, captives were usually displayed under the feet of rulers, while in the western Maya area, they played a more active and emotive role (Houston Reference Houston2001).
Many individuals captured in war were sacrificed; this is attested in iconographic, textual, and archaeological information. The sacrifice of captives was generally not shown on public carved stone monuments (Miller Reference Miller, Ruiz, Ponce de León and Sosa2003:384; Schele Reference Schele and Boone1984:9). Instead, artists depicted captive sacrifice in more restricted contexts, often in murals or on painted vases and portable sculpture. At Bonampak, for instance, Structure 1 was ornamented with scenes of captive-taking on the exterior of the building, while the sacrifice of captives was the subject of interior murals. Because of the restricted access of this building, it is thought that viewers of the paintings would have been elite (Miller Reference Miller2002; Miller and Brittenham Reference Miller and Brittenham2013:94). Depictions of sacrifice on painted ceramics, meanwhile, represent more intimate contexts; their imagery would have been encountered by smaller groups of people, likely also elites. From the beginning, then, we can note the selective inclusion of sacrificial imagery in public Maya art.
The most famous epigraphic example of captive sacrifice comes from Quirigua, where Stela J records that Copan king Waxaklajuun Ubaah K'awiil was “chopped” by his vassal, K'ahk’ Tiliw Chan Yopaat of Quirigua (Martin and Grube Reference Martin and Grube2008:205). At Palenque, the Hieroglyphic Stairway of House C describes enemy captives and gods being eaten by the local patron deities (Guenter Reference Guenter2007:49; Stuart and Stuart Reference Stuart and Stuart2008:169). Data from archaeological excavations corroborate the notion that the Maya practiced human sacrifice. At El Coyote, for instance, 14 young adults were buried in pits near the central plaza in a deposition that likely represents the execution of war captives (Berryman Reference Berryman, Chacon and Dye2007:383). As Barrett and Scherer (Reference Barrett and Scherer2005:111) point out, however, the lack of mass deposits of human remains recovered archaeologically contrasts with the prevalence of warfare and sacrifice in epigraphy and iconography. In addition, the distinction between secondary burials, mass executions, and ritual sacrifice can be difficult to discern (Berryman Reference Berryman, Chacon and Dye2007:394; Tiesler Reference Tiesler, Tiesler and Cucina2007), and data from some mass deposits seem to indicate execution rather than ritual sacrifice (Barrett and Scherer Reference Barrett and Scherer2005; Suhler and Freidel Reference Suhler and Freidel1998).
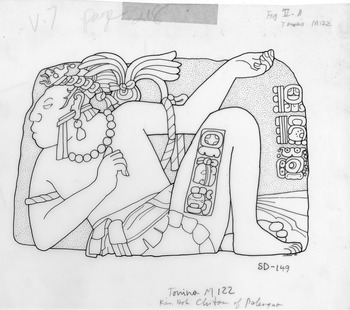
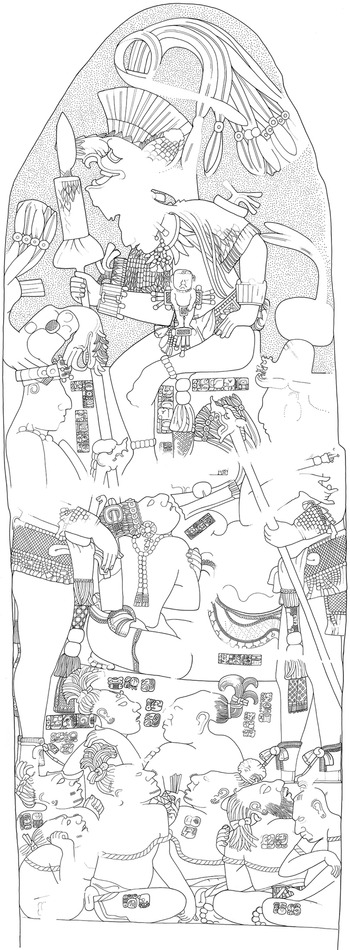
In other cases, evidence suggests complex biographies for prisoners of war. A good example of this comes from Tonina, where Monument 122 (Figure 1) depicts Palenque king K'inich’ Kan Joy Chitam II as a captive, presumably following an altercation in a.d. 711. Although it was assumed that K'an Joy Chitam met his end at Tonina (Schele and Freidel Reference Schele and Freidel1990:424), three inscriptions at Palenque that post-date the capture event on Monument 122 suggest that he was alive and well at his home site years later, overseeing the dedication of the north gallery of the Palace and the inauguration of a junior noble at Palenque (Stuart Reference Stuart2003; Stuart and Stuart Reference Stuart and Stuart2008:217). We lack further detail about how the Palenque king was able to return home and resume his rule. He may have been ransomed, either for a direct payment or pursuant to tribute obligations for Palenque.
Tonina Monument 122, showing Palenque king K'inich K'an Joy Chitam as a captive. Drawing by Linda Schele © David Schele. Photograph courtesy Ancient Americas at Los Angeles County Museum of Art (ancientamericas.org).

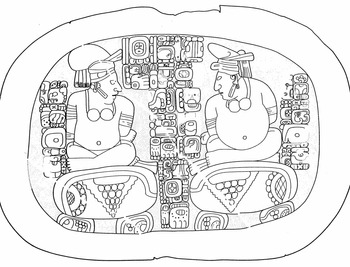
Another recent decipherment brings up an even more complicated captive biography: that of Xub Chahk of Ucanal (Stuart Reference Stuart2019). His capture in August 796 by the ruler of Yaxha is memorialized on Stela 31 from that site. Yet four years later, he appears—again as a captive—on Altar 23 from Caracol (Figure 2), where he is described as being captured again (Chase et al. Reference Chase, Grube and Chase1991; Stuart Reference Stuart2019) by a different individual, a man who may be the previous ruler of Caracol. Set against the backdrop of late eighth-century warfare between Naranjo, Caracol, and Yaxha, Xub Chahk's story remains murky: how did he end up at Caracol? Who is Tum Yohl K'inich, the “owner” of Xub Chahk on Caracol Altar 23, and how did Xub Chahk end up in his care? This is the only recorded instance of a captive being presented and captured at two different sites, and it presents intriguing hints that elite captives could be traded or transferred.
Caracol Altar 23, showing captive Xub Chahk on the right. The capture event is described in glyphs B3-B5. Drawing by and courtesy of Nikolai Grube.
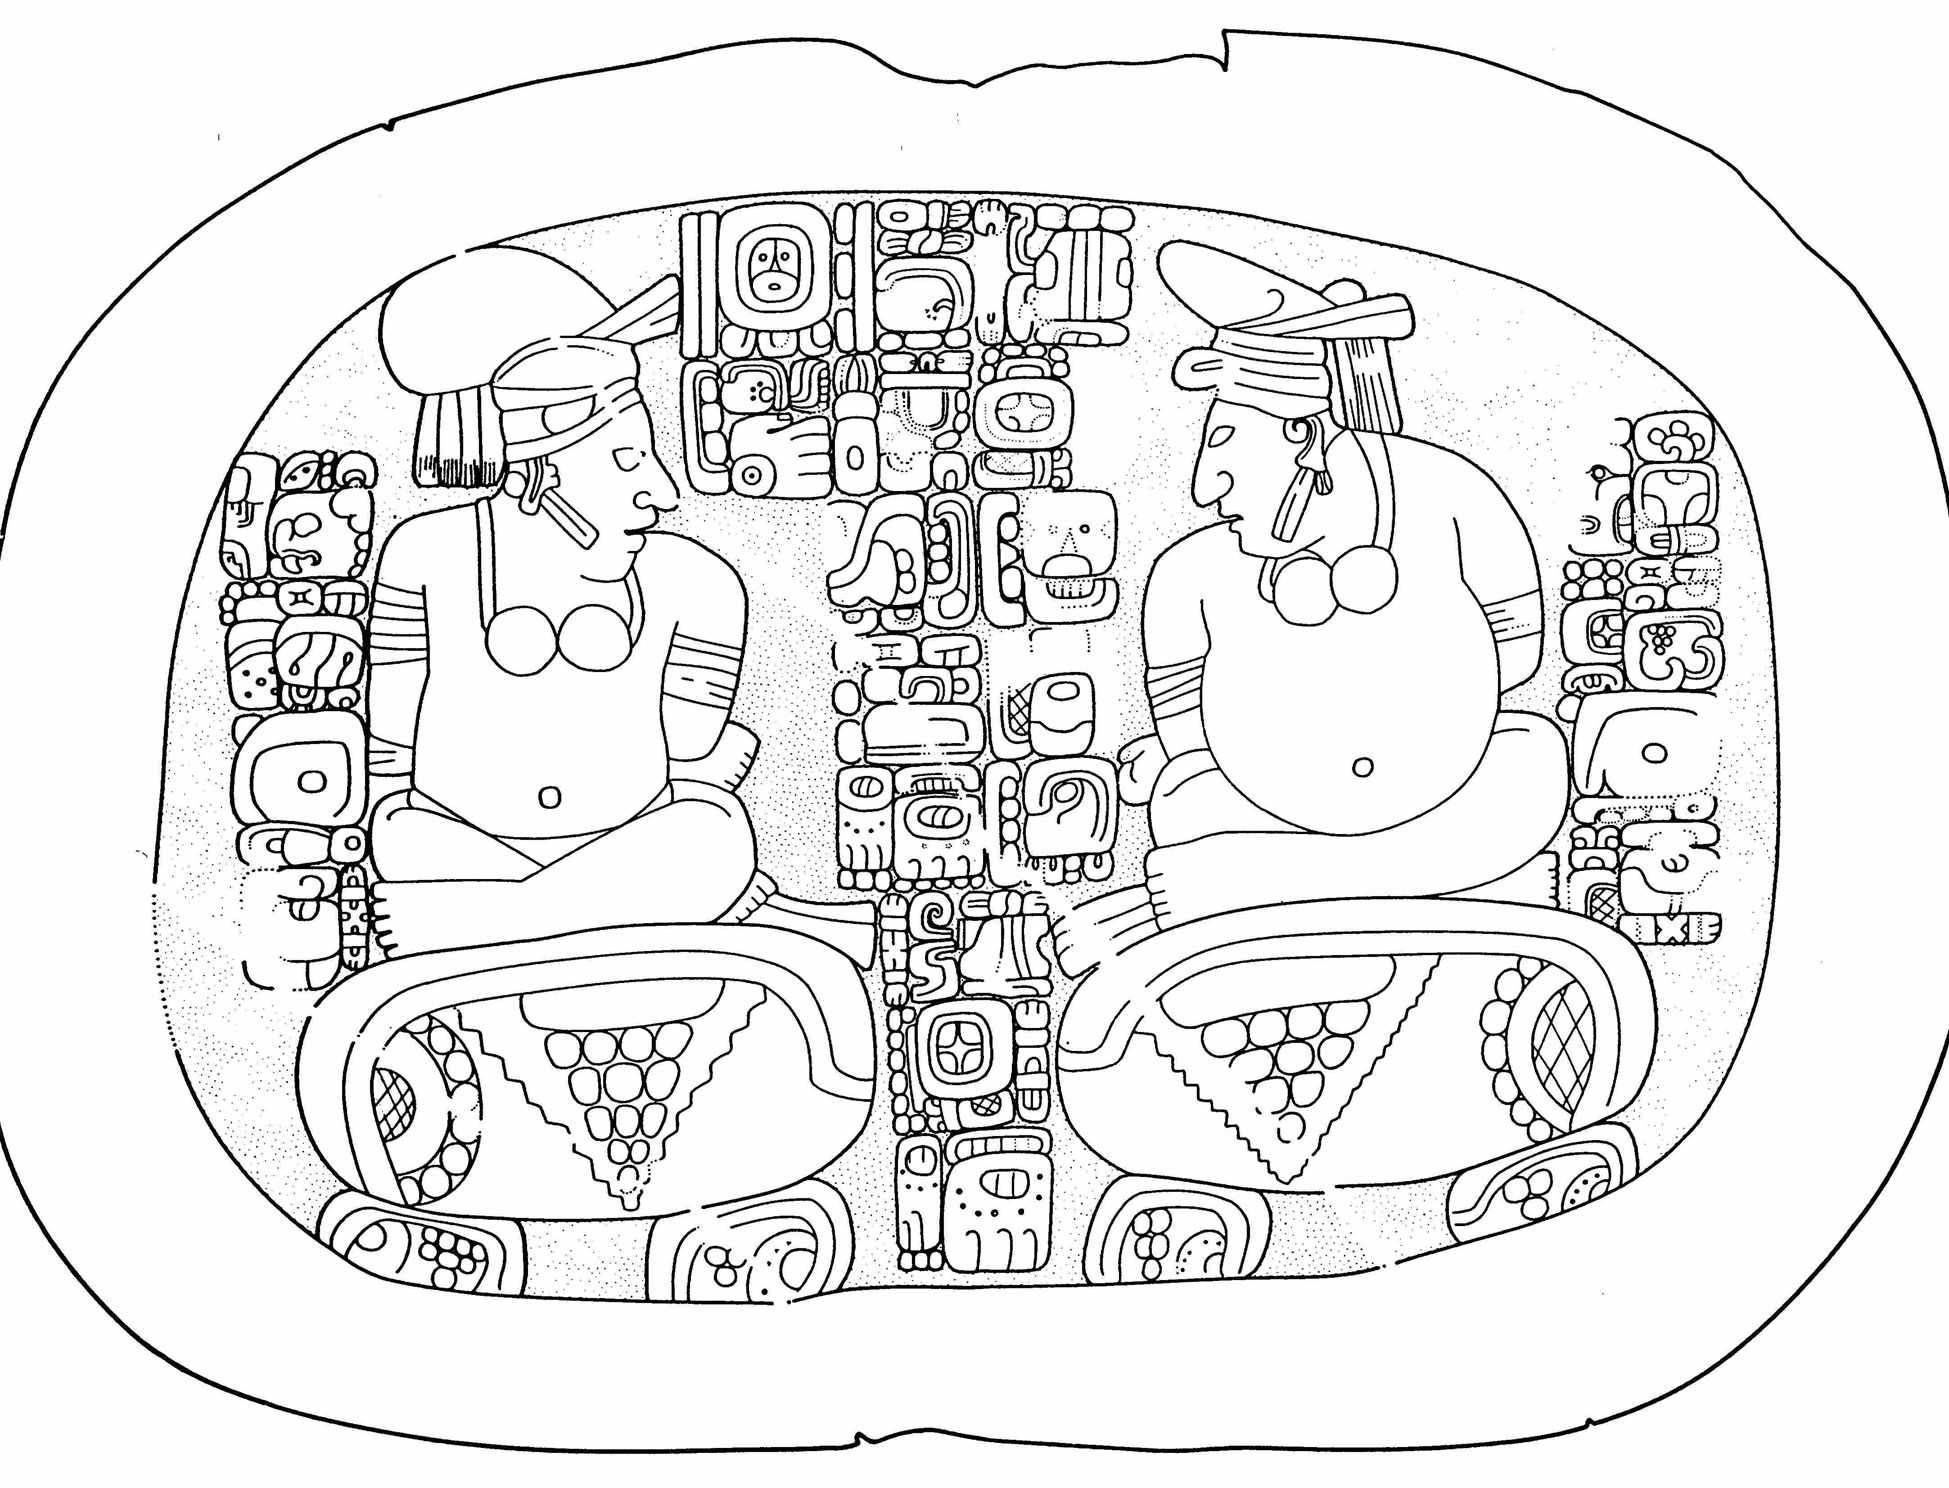
Later sources document still more outcomes for prisoners of war, such as enslavement. Malintzin, a Nahua woman who later served as a translator to Hernán Cortés, was enslaved by the Chontal Maya in Putunchan, a town on the Gulf Coast. Jerónimo de Aguilar, a Spanish sailor, was also enslaved by the Maya after shipwrecking in 1511 (Townsend Reference Townsend2006:35–37). Colonial-era sources indicate that slaves could be taken in war (Tozzer Reference Tozzer1941:63, 94, 232); the prospect of enslaving war prisoners helped to fuel hostilities between polities in Postclassic Yucatan, and slaves were one of Yucatan's most important exports (Farriss Reference Farriss1984:25). Language also provides clues about the practice of slavery: the Postclassic K'iche’ made distinctions between types of enslaved people, with a general word for slave, as well as words for those won in war, some of whom were sacrificed (Wallace and Carmack Reference Wallace and Carmack1977:7). The practice of slavery likely existed in the Classic period as well: a panel from Tonina shows a group of seated figures wearing collars known to bind enslaved individuals among the later Aztec (Houston Reference Houston2018:47).
Landa (Tozzer Reference Tozzer1941:123), too, describes various outcomes for those captured in battle, including trophy-taking, captive sacrifice, and a more ambiguous arrangement that may represent enslavement:
After the victory they took the jaws off the dead bodies and with the flesh cleaned off, they put them on their arms. In their wars they made great offerings of the spoils, and if they made a prisoner of some distinguished man, they sacrificed him immediately, not wishing to leave any one alive who might injure them afterwards. The rest of the people remained captive in the power of those who had taken them.
This account suggests that trophies were taken from those who died in battle, while the most important captives were sacrificed. It is vague about what happened to the rest, but it seems to indicate that some captives were under the control of their captors for long periods of time.
Combined, hieroglyphic and historical information suggests that sacrifice was not the fate for some—perhaps many—Maya war captives. Yet scholarly interpretations often assume that captives depicted on stone monuments were sacrificed (e.g., Schele and Miller Reference Schele and Miller1986:210). Acknowledging the breadth of potential experiences for captives enables the accurate reconstruction of historical events—but it is also critical for understanding how such monuments operated in the world. Peppered throughout urban centers, sculptures of captives interacted with ancient populations and would have conveyed specific messages to viewers.
CREATING WARRIORS, CREATING CAPTIVES
Scholars have long recognized that scenes of captives and capture are manipulated images. On the carved lintels of Bonampak, for instance, which depict three different rulers taking captives, the captives are already dressed as such—fine regalia removed, earflares replaced with strips of paper or cloth—even as they are being captured. This conflation of events emphasizes that the artists of Bonampak were not interested in capturing a photorealistic scene. Instead, such images represent “a carefully constructed universe, designed to evoke a rich world of symbols, events, and eras” (Miller and Houston Reference Miller and Houston1987:50).
If scenes depicting captives did not represent historical narratives, then what was their function? Previous analysis has focused largely on the messages such sculptures convey about the outcomes of warfare. This was, certainly, a central aspect of these monuments, which served to emphasize the power of dynastic rulers in subduing their opponents (Schele and Miller Reference Schele and Miller1986). Such images would also have memorialized and reiterated potentially fleeting victories in long-term confrontations between polities (Scherer and Golden Reference Scherer and Golden2014:60).
The context of captive imagery, however, suggests that images of captives did not just memorialize past events—they also worked to frame and facilitate future actions. At many Late Classic Maya centers, images of captives on carved stone monuments prepared people for warfare by constructing social identities for elite warriors. These identities stressed the role of elite bodies in maintaining polity resources, securing tribute, and appeasing the gods. Warfare was one of the primary duties of male Maya elites (Inomata Reference Inomata, Scherer and Verano2014:37; Miller and Martin Reference Miller and Martin2004:171). In the Classic period, courtly titles correlated with references to warfare, particularly sajals, a title found in close association with war events (Jackson Reference Jackson2013:66). The participation and achievements of elites in warfare, meanwhile, “probably constituted a significant part of elite identities” (Inomata and Triadan Reference Inomata, Triadan, Nielsen and Walker2009:65). Among the Aztec, the taking of captives correlated with social mobility, and warriors could increase their social standing by capturing enemies in battle (Berdan and Anawalt Reference Berdan and Anawalt1992:vol. 3, ff. 134–137). For the Maya, too, taking captives connoted prestige. Capturing enemies was a central part of the identity of warriors, as demonstrated by a title for warriors that reads “aj-baak,” or “person of captives” (Tokovinine Reference Tokovinine2013:58). The act of capture represented an economic opportunity for the victor as well by establishing new obligations of tribute, labor, or access to land (Graham Reference Graham and Sachse2006:118–119, Reference Graham, Morton and Peuramaki-Brown2019:228; McAnany Reference McAnany2010:278–284; Miller and Martin Reference Miller and Martin2004:166).
In societies that use warfare to accomplish political and economic goals, warrior identities must be constructed and maintained. A variety of avenues exist for this task, including imagery, actions, speech, and rituals, to name a few, and many leave traces in the material record (Dodds Pennock Reference Dodds Pennock2008:15; Tung Reference Tung, Scherer and Verano2014:230). At Aguateca, for instance, high frequencies of male warrior figurines in elite residences may represent the promotion of a warrior ideal. The use of these figurines during a time of political turmoil points to the importance of constructing identities to negotiate intense periods of warfare. Further, the presumed production of these figurines by women demonstrates that many people participated in the creation of warrior identities, beyond the captors and captives themselves (Triadan Reference Triadan2007:289).
Monumental sculpture also worked to construct and maintain warrior identities, and the representation of the captive body was an effective way to communicate information about the role of elite warriors. Some works may have served as a reminder about proper comportment. In the western Maya area in particular, the emotive depiction of captives highlighted their lack of self-restraint, emphasizing “their humiliation and drastically reduced status” (Houston Reference Houston2001:211). In this view, scenes of disgraced captives were a type of warning; they “implicitly admonished those who were unprepared for battle and its uncertain outcome” (Houston et al. Reference Houston, Taube and Stuart2006:203). “Tagging” captives with hieroglyphic captions, often on their thighs, also emphasized their lack of agency and worked to “visually intensify the condition of defeat” (Burdick Reference Burdick2016:33). The pitiful depiction of captives—nude or almost nude, trod upon, labelled, and contorted—certainly supports these interpretations.
The prevalence of captive imagery, however, suggests that these monuments were not meant solely as warnings against bad behavior. Instead, they conveyed deeply encoded messages about the role of elite warriors in protecting and nourishing their communities. Such communication would have become increasingly trenchant over the course of the Late Classic period, as nobles gained more responsibility in conducting acts of warfare (Miller and Brittenham Reference Miller and Brittenham2013:166), and with the increasing importance of intermediate social groups, as reflected in the archaeological, epigraphic, and artistic record (Arnauld et al. Reference Arnauld, Andrieu and Forné2017:47–49; Stuart Reference Stuart, Sabloff and Henderson1993). Those messages were historically contingent and site-specific; artists used a variety of strategies to communicate with elite men about their roles as warriors. They did this through the manipulation of captive iconography, and by creating interpretive possibilities that changed depending on the bodily position of viewers.
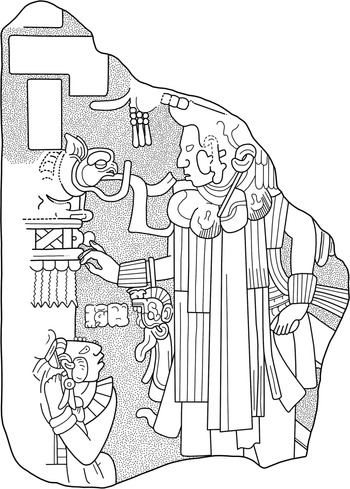
At Chinkultic, a site on the western edge of the Maya zone, artists used iconography to blur the distinction between captive and noble in a collection of Late Classic stelae found in Group C. All of the sculptures in this group of stelae depict a kneeling individual before a standing ruler of Chinkultic (Earley Reference Earley2020:293–303; Navarrete Reference Navarrete1984:57–60). On Monument 18, for example (Figure 3), a ruler in fine regalia towers over a figure on the left. This figure has been interpreted as a captive (e.g., Taube Reference Taube, Benson and Griffin1988:348), and he is clearly subordinate, as indicated by his smaller stature, kneeling position, and gesture of submission. Unlike captives on some other monuments, though, this person is fairly well dressed. His fine accoutrements have not been removed. His upper arms are not bound with rope, and the objects around his wrists appear more akin to bracelets, like those worn by the captive on Bonampak Stela 3 (Mathews Reference Mathews and Robertson1980:Figure 4). Together, these features suggest that the subordinate figures on monuments in this group may represent subsidiary nobles rather than captives (Earley Reference Earley2020:296). Sculptures from throughout the Maya area depict rulers with nobles, the latter often in similar deferential positions. Miller and Martin (Reference Miller and Martin2004:170–171) note this lack of clarity in sculptures from other sites, proposing that such individuals may represent “newly enlisted vassals rather than captives or slaves.”
Chinkultic Monument 18. Drawing by the author after field drawing by Eric Von Euw.

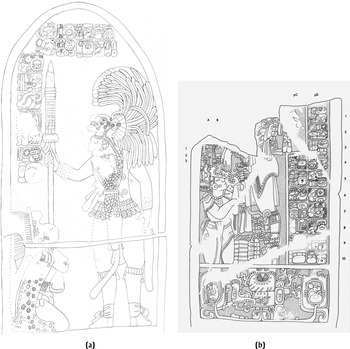
Stelae with subordinate figures at Yaxchilan. (a) Stela 20. Drawing by and courtesy of Carolyn Tate after field drawing by Ian Graham. (b) Stela 7. Drawing by Ian Graham © President and Fellows of Harvard College, Peabody Museum of Archaeology and Ethnology, 2004.15.4.5763.
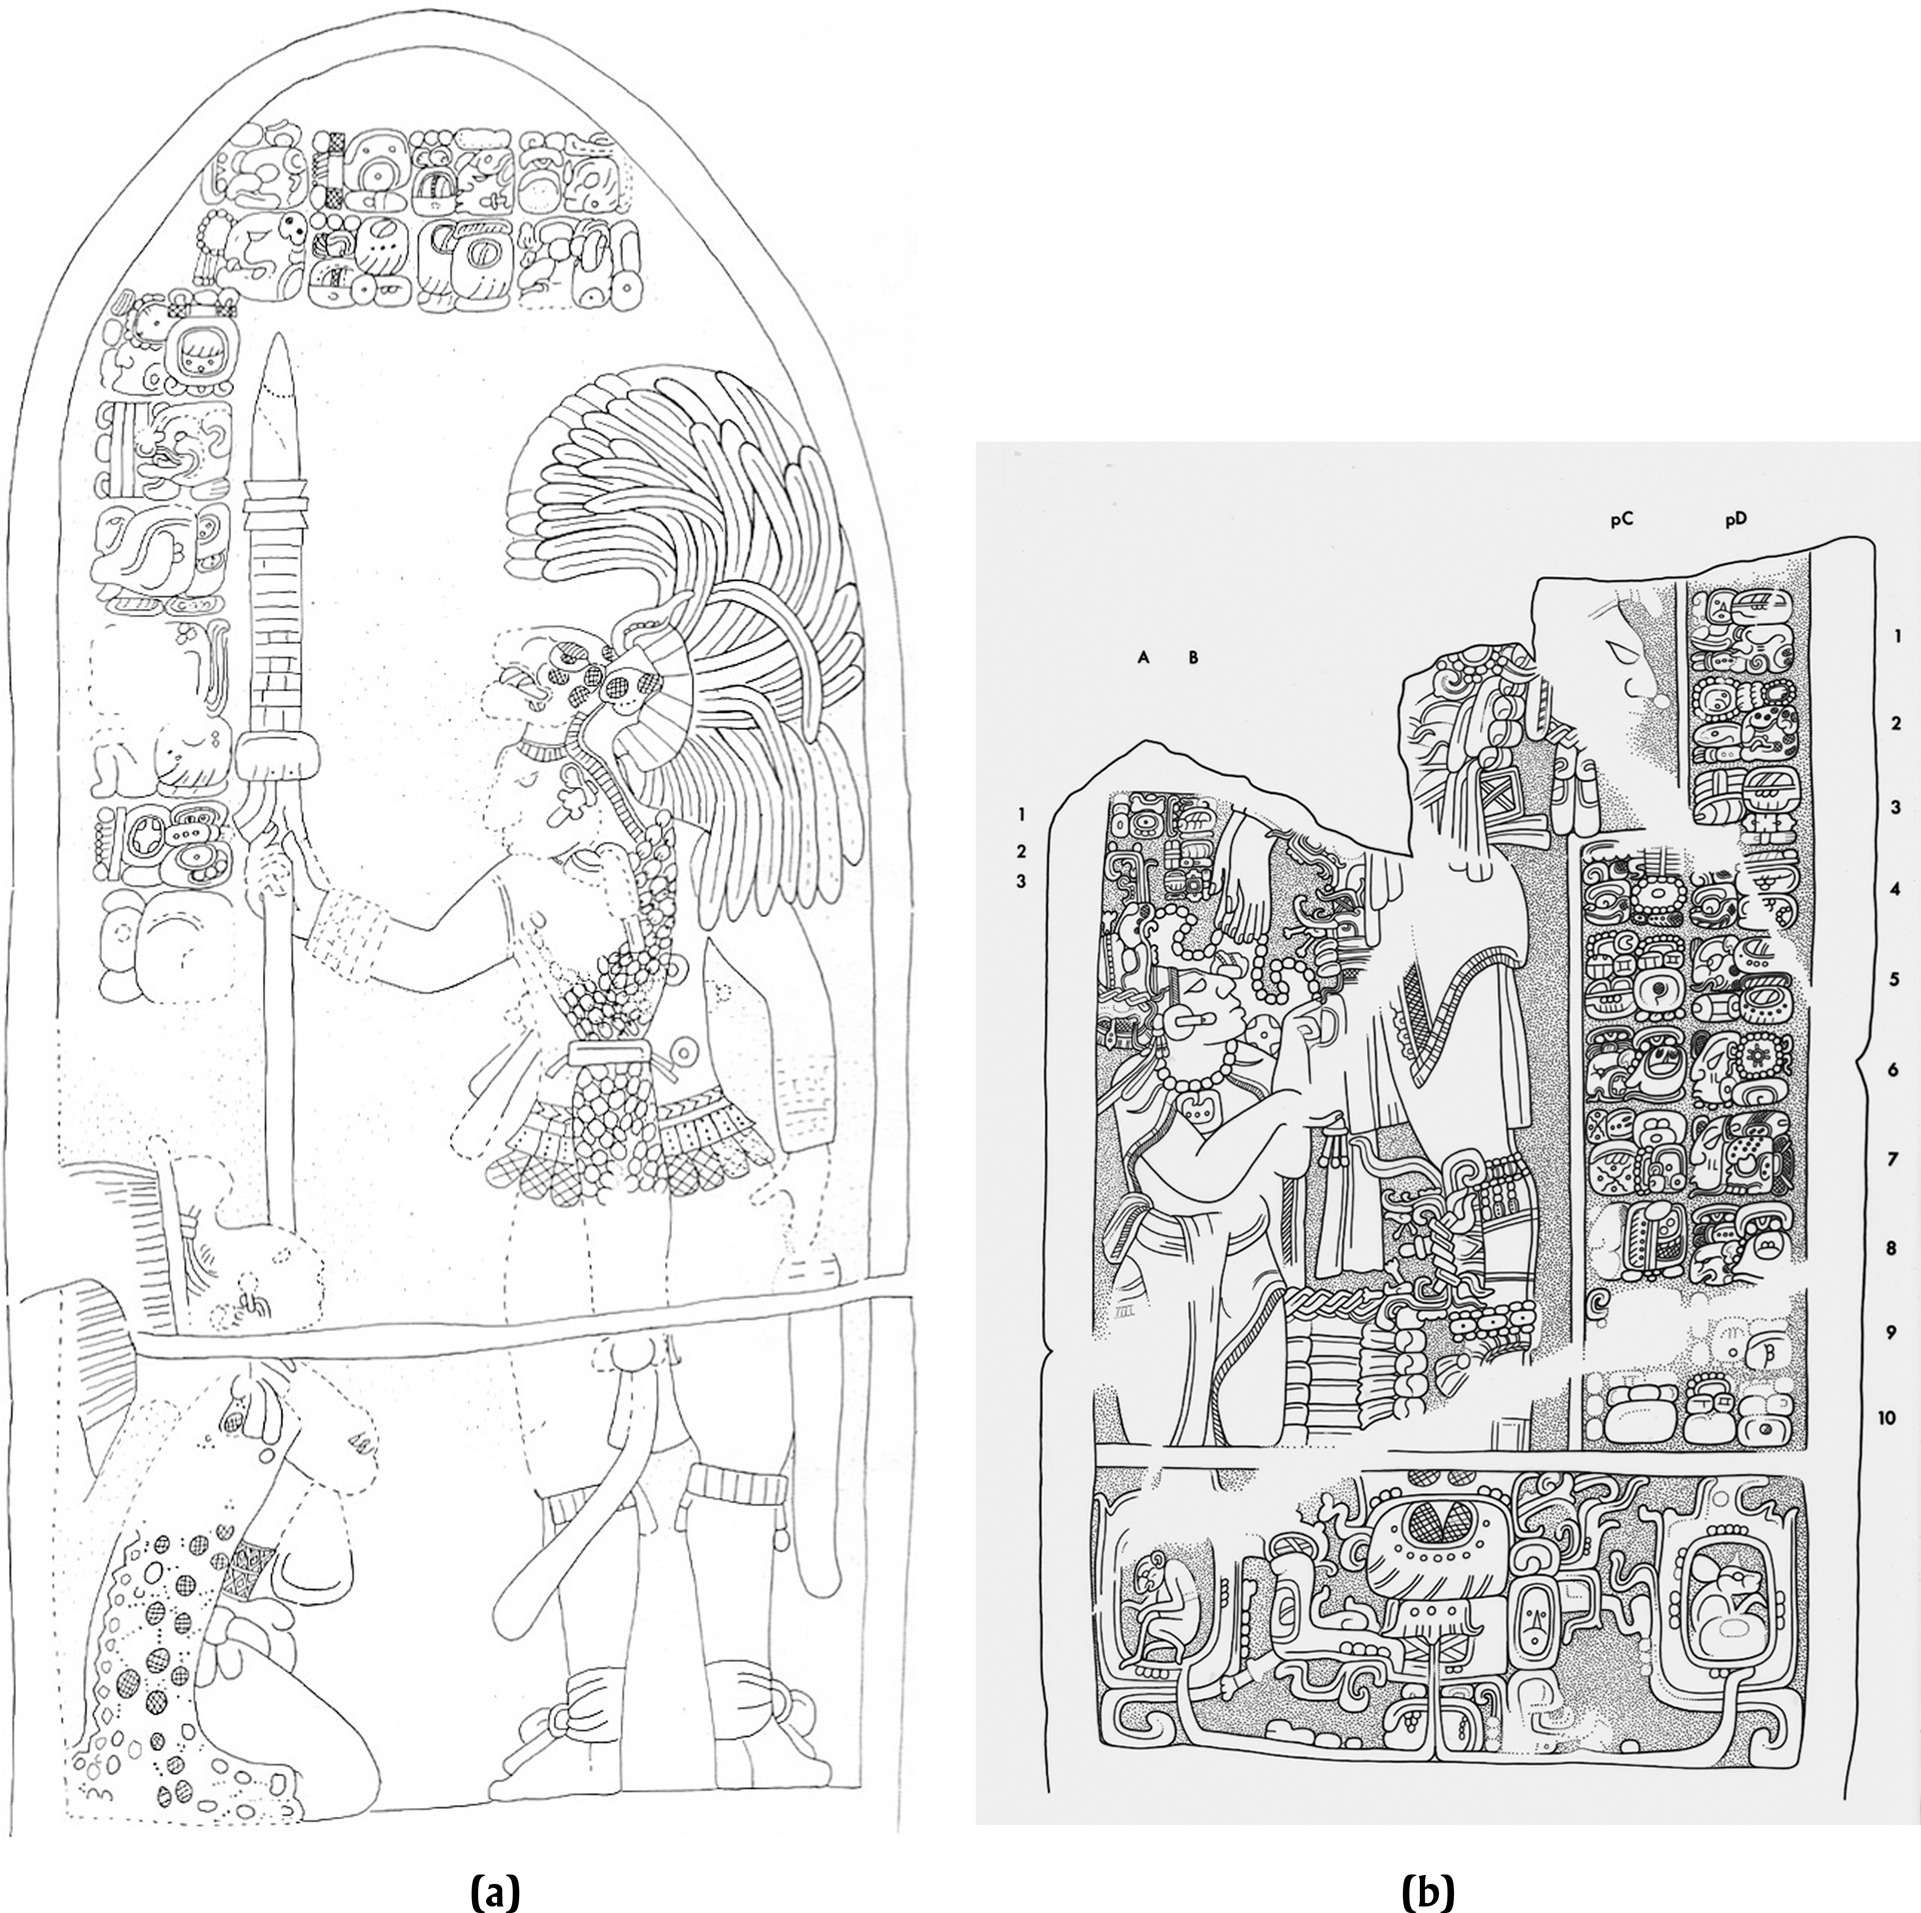
This visual overlap between captive and noble appears to be both deliberate and meaningful: artists at Chinkultic employed visual ambiguity to communicate with elite viewers. These noble viewers were not only responsible for waging war, but were themselves, simultaneously, potential captives. This dual identity was explicitly acknowledged by the Aztec, for whom captive and captor identities were “juxtaposed and overlaid” through ritual action (Clendinnen Reference Clendinnen1991:133; see also Carrasco Reference Carrasco1999:142; Dodds Pennock Reference Dodds Pennock2008:18). During the Feast of the Flaying of Men, the captor was ritually adorned with turkey down, because although “he had not died there in war or else he would yet go to die, would go to pay the debt” (Sahagún Reference Sahagún, Anderson and Dibble1981:49); the tears shed during the sacrificial rituals were not for the victim, but instead for the victor and his “putative fate” (Clendinnen Reference Clendinnen1991:133). Although operating in a Maya context rather than an Aztec one, the blurred line between captive and noble on the Chinkultic stelae suggests that elite warriors were encouraged to envision themselves in both positions—and to understand that, in both roles, they were subordinate to the power of the ruler.
Warrior and captive, in the ancient Maya world, were two sides of the same coin. This was envisioned quite literally at Yaxchilan, in a series of double-sided stelae placed in front of temples in the site center (Tate Reference Tate1992:98–101). These stelae consistently display two scenes: on the side facing the Usumacinta River, they show a ruler towering over a captive. On the side facing the temple, they feature bloodletting ceremonies, often involving a subordinate lord. Particularly impressive are sets of stelae in front of Structures 20 and 41. At the latter structure on the upper acropolis of Yaxchilan, a series of large stelae depicts rulers on the right side of each monument, facing a cowering captive on the left. Like the captives at Chinkultic, these captives are well-dressed: all wear headdresses, and the captive on Stela 20 wears a jaguar cloak (Figure 4a). On each sculpture, the ruler wears typical battle regalia and holds a large spear that intersects with the body of the captive, emphasizing the latter's captive status. On the “temple” side of monuments in this group, a ruler performs a period-ending ceremony, often in the presence of a subordinate lord. On Stela 7, for instance, a kneeling individual assists the ruler with the ceremony (Figure 4b). The top half of the ruler's body is missing, but the elite attendant is visible on the left, directly underneath the sacred substance falling from the ruler's hands.
The placement of these sculptures suggests an implied substitution of captive and noble bodies, a message activated by movement around the sculpture. As Tate (Reference Tate, Robertson and Fields1991:109) noted, the “temple” side—showing subsidiary lords assisting in a religious ceremony—would have been visible to people standing in and around the temple; in other words, elites. The “river” side, featuring the king and captive, would have been seen by a broader populace, including visitors to the site, who would have recognized “larger-than-life images of generations of kings as the vanquishers of enemies” (Tate Reference Tate, Robertson and Fields1991:109). These stelae literally presented both sides of the coin: subsidiary lords, perhaps also warriors, assisting with sacrificial duties on one side, and captives, their high status accentuated by their intact regalia, kneeling before the king, on the other. The interchangeable nature of those subsidiary figures would have been understood by elites, who were the only viewers able to see both sides of the sculptures. The action of moving from the river side to the temple side would have underlined the precarious balance faced by elite warriors, perhaps incurring a sense of cause and effect.
The same is true at other sites in the Usumacinta area, where artists created works whose messages changed with the position of the body. At Piedras Negras, for instance, the famous Stela 12 depicts nobles delivering 10 captives to the ruler, K'inich Yat Ahk II (Figure 5). The image is arranged to guide the eye from the dejected captives at the bottom to the ruler at the top—yet its placement, on the upper terrace of the O-13 pyramid, suggests a particular reading experience. As Miller (Reference Miller1999:122) has pointed out, viewers in the plaza would have seen only the ruler on top of the stela. Only elites, those able to climb the stairs of the pyramid, would have seen the rest of the scene: as they moved up the stairs, they would see victorious warriors, followed by the captives at the bottom of the sculpture. Caches designating a ceremonial pathway up the stairway confirm this movement, mapping social hierarchies onto the building itself (O'Neil Reference O'Neil2012:84–85). Like the stelae of Yaxchilan, the sculpture created a choreographed juxtaposition of noble and captive that would have enabled elite viewers to identify with both roles through the movement of their bodies.
Piedras Negras Stela 12. Drawing by David Stuart © President and Fellows of Harvard College, Peabody Museum of Archaeology and Ethnology, 2004.15.6.19.38.

At Bonampak, too, the murals in Room 2 positioned viewers as both captor and captive. The individuals seated in the room—presumably victorious warriors—sat atop captives painted underneath the bench. In doing so, they participated in the action of the murals, assuming the guise of victors who crush the captives beneath them (Miller and Brittenham Reference Miller and Brittenham2013:104). Yet, as Miller (Reference Miller2002:20) has explored, the arrangement of the murals privileges the captive body, ensuring that viewers would see mostly captives on the wall before them rather than the victorious elites and royal figures in the upper reaches of the wall. Anyone entering the room, moreover, entered as a captive: appearing on the threshold, they would be placed among the prisoners being tortured on the stairs (Miller and Brittenham Reference Miller and Brittenham2013:105). Looking into the room, they would see a fearful sight, “since the victorious warriors of the lowest level stand visually poised to crush any visitor who crosses the threshold” (Miller Reference Miller2002:20). In this conflation of identities, the murals reveal themselves as speaking directly to elite viewers, who could occupy both roles. Important here is the potential that the Bonampak murals were meant specifically for such viewers: noting their didacticism, Houston (Reference Houston2018:153) wonders whether the building was used for the education and training of young men.
CAPTIVE IMAGERY AND LOCAL POLITICS AT PALENQUE
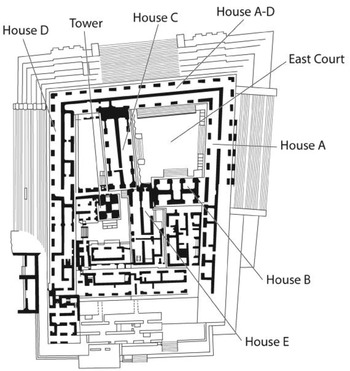
The linked relationship between noble and captive also emerges at Palenque. At this Late Classic center, there are few surviving depictions of warrior kings but there are plenty of captives. The majority appear in the East Court of the Palace, the largest building in the site center. Constructed over the course of several generations at Palenque, the Palace was significantly expanded under the reign of K'inich Janaab Pakal in the seventh century a.d. The East Court (Figure 6) is bounded by House C, which was dedicated in 661 (Schele Reference Schele, Robertson and Fields1994:7–8), and House A, which may have replaced an earlier structure and was dedicated slightly later, in 668 (Stuart and Stuart Reference Stuart and Stuart2008:160). In a structure known for its density, with warren-like subterranean chambers and interlocking houses, the sunken East Court represents the largest space for people to gather. Based on its structure, scholars have long posited its use for performance and spectacle (e.g., Miller and Martin Reference Miller and Martin2004:203).
Map of the Palace at Palenque. Drawing by and courtesy of Kaylee R. Spencer after Miller and Martin (Reference Miller and Martin2004:Figure 59).
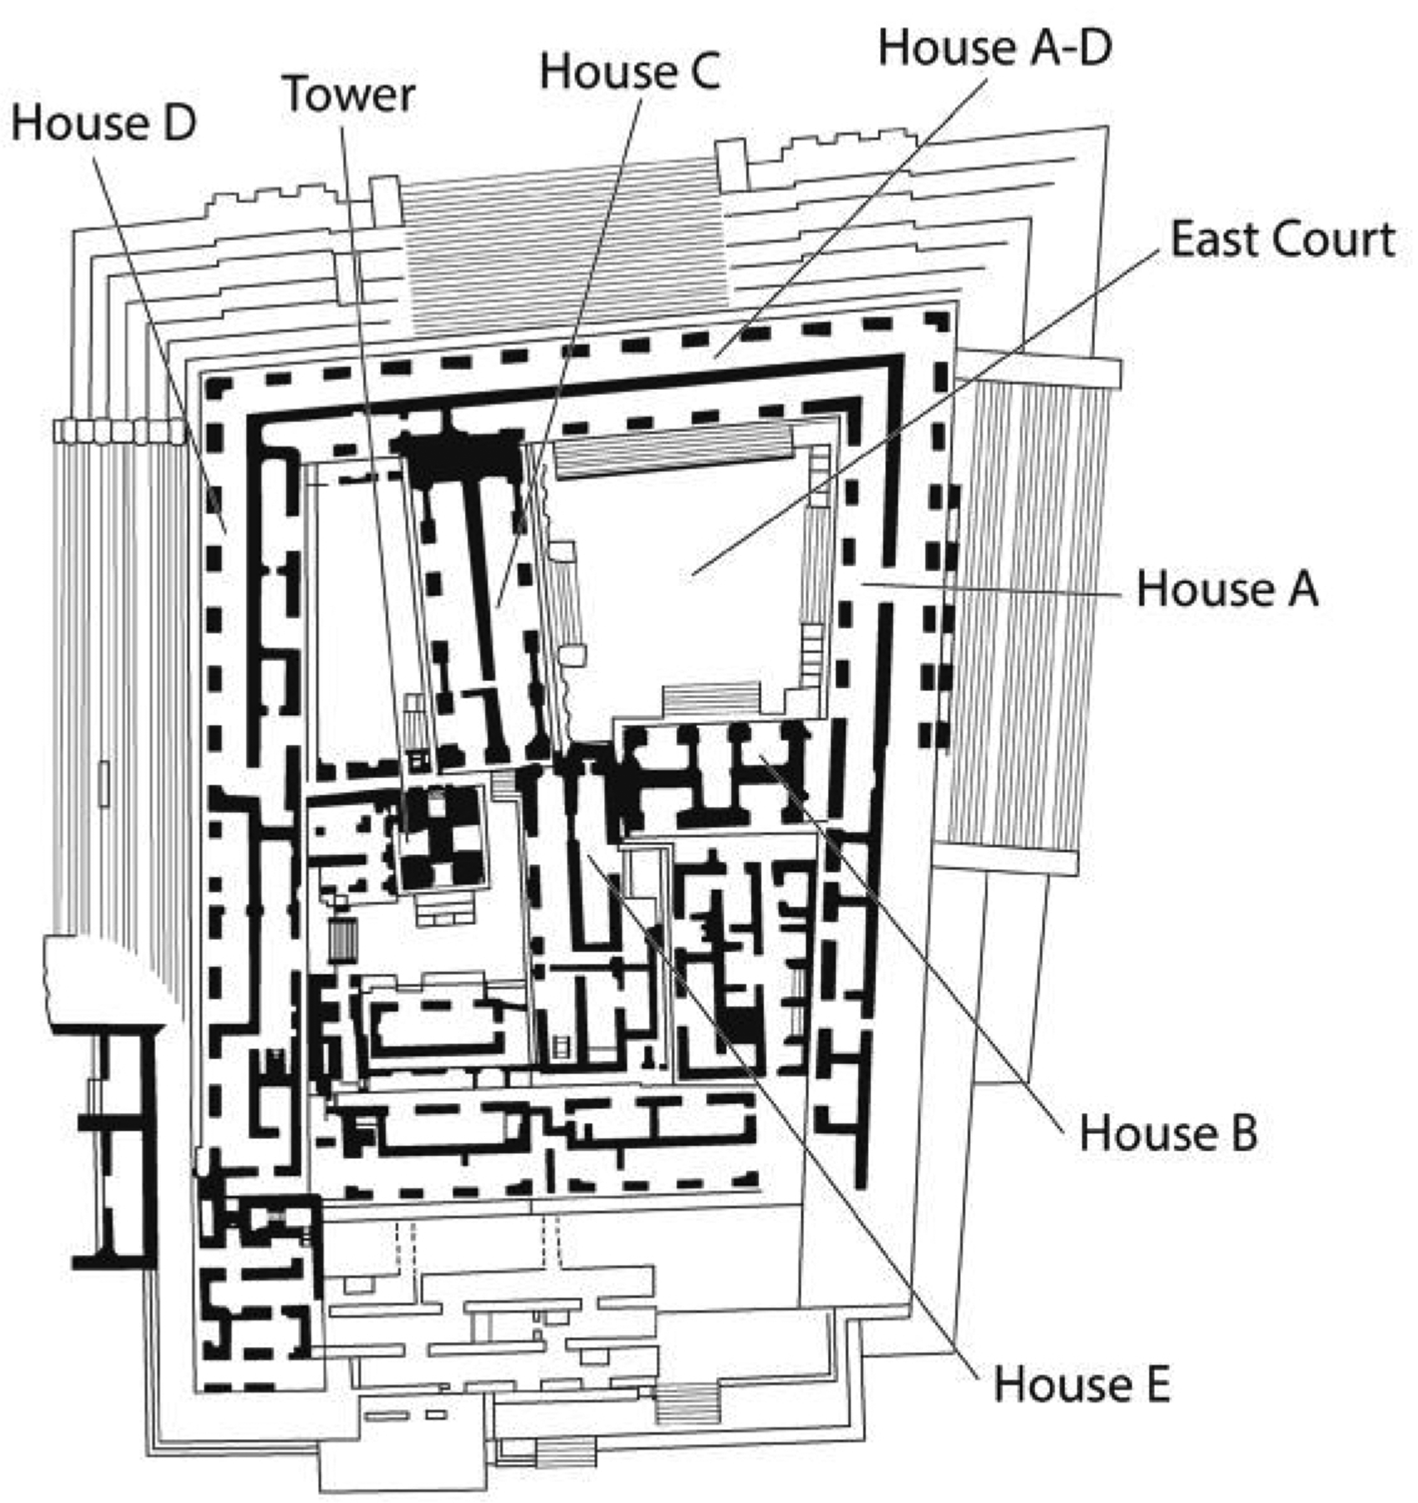
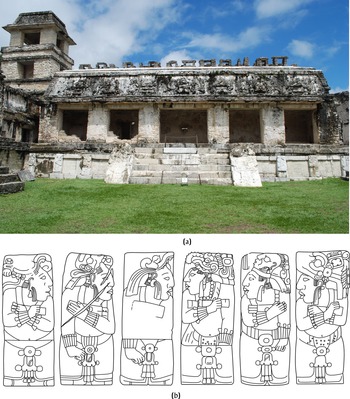
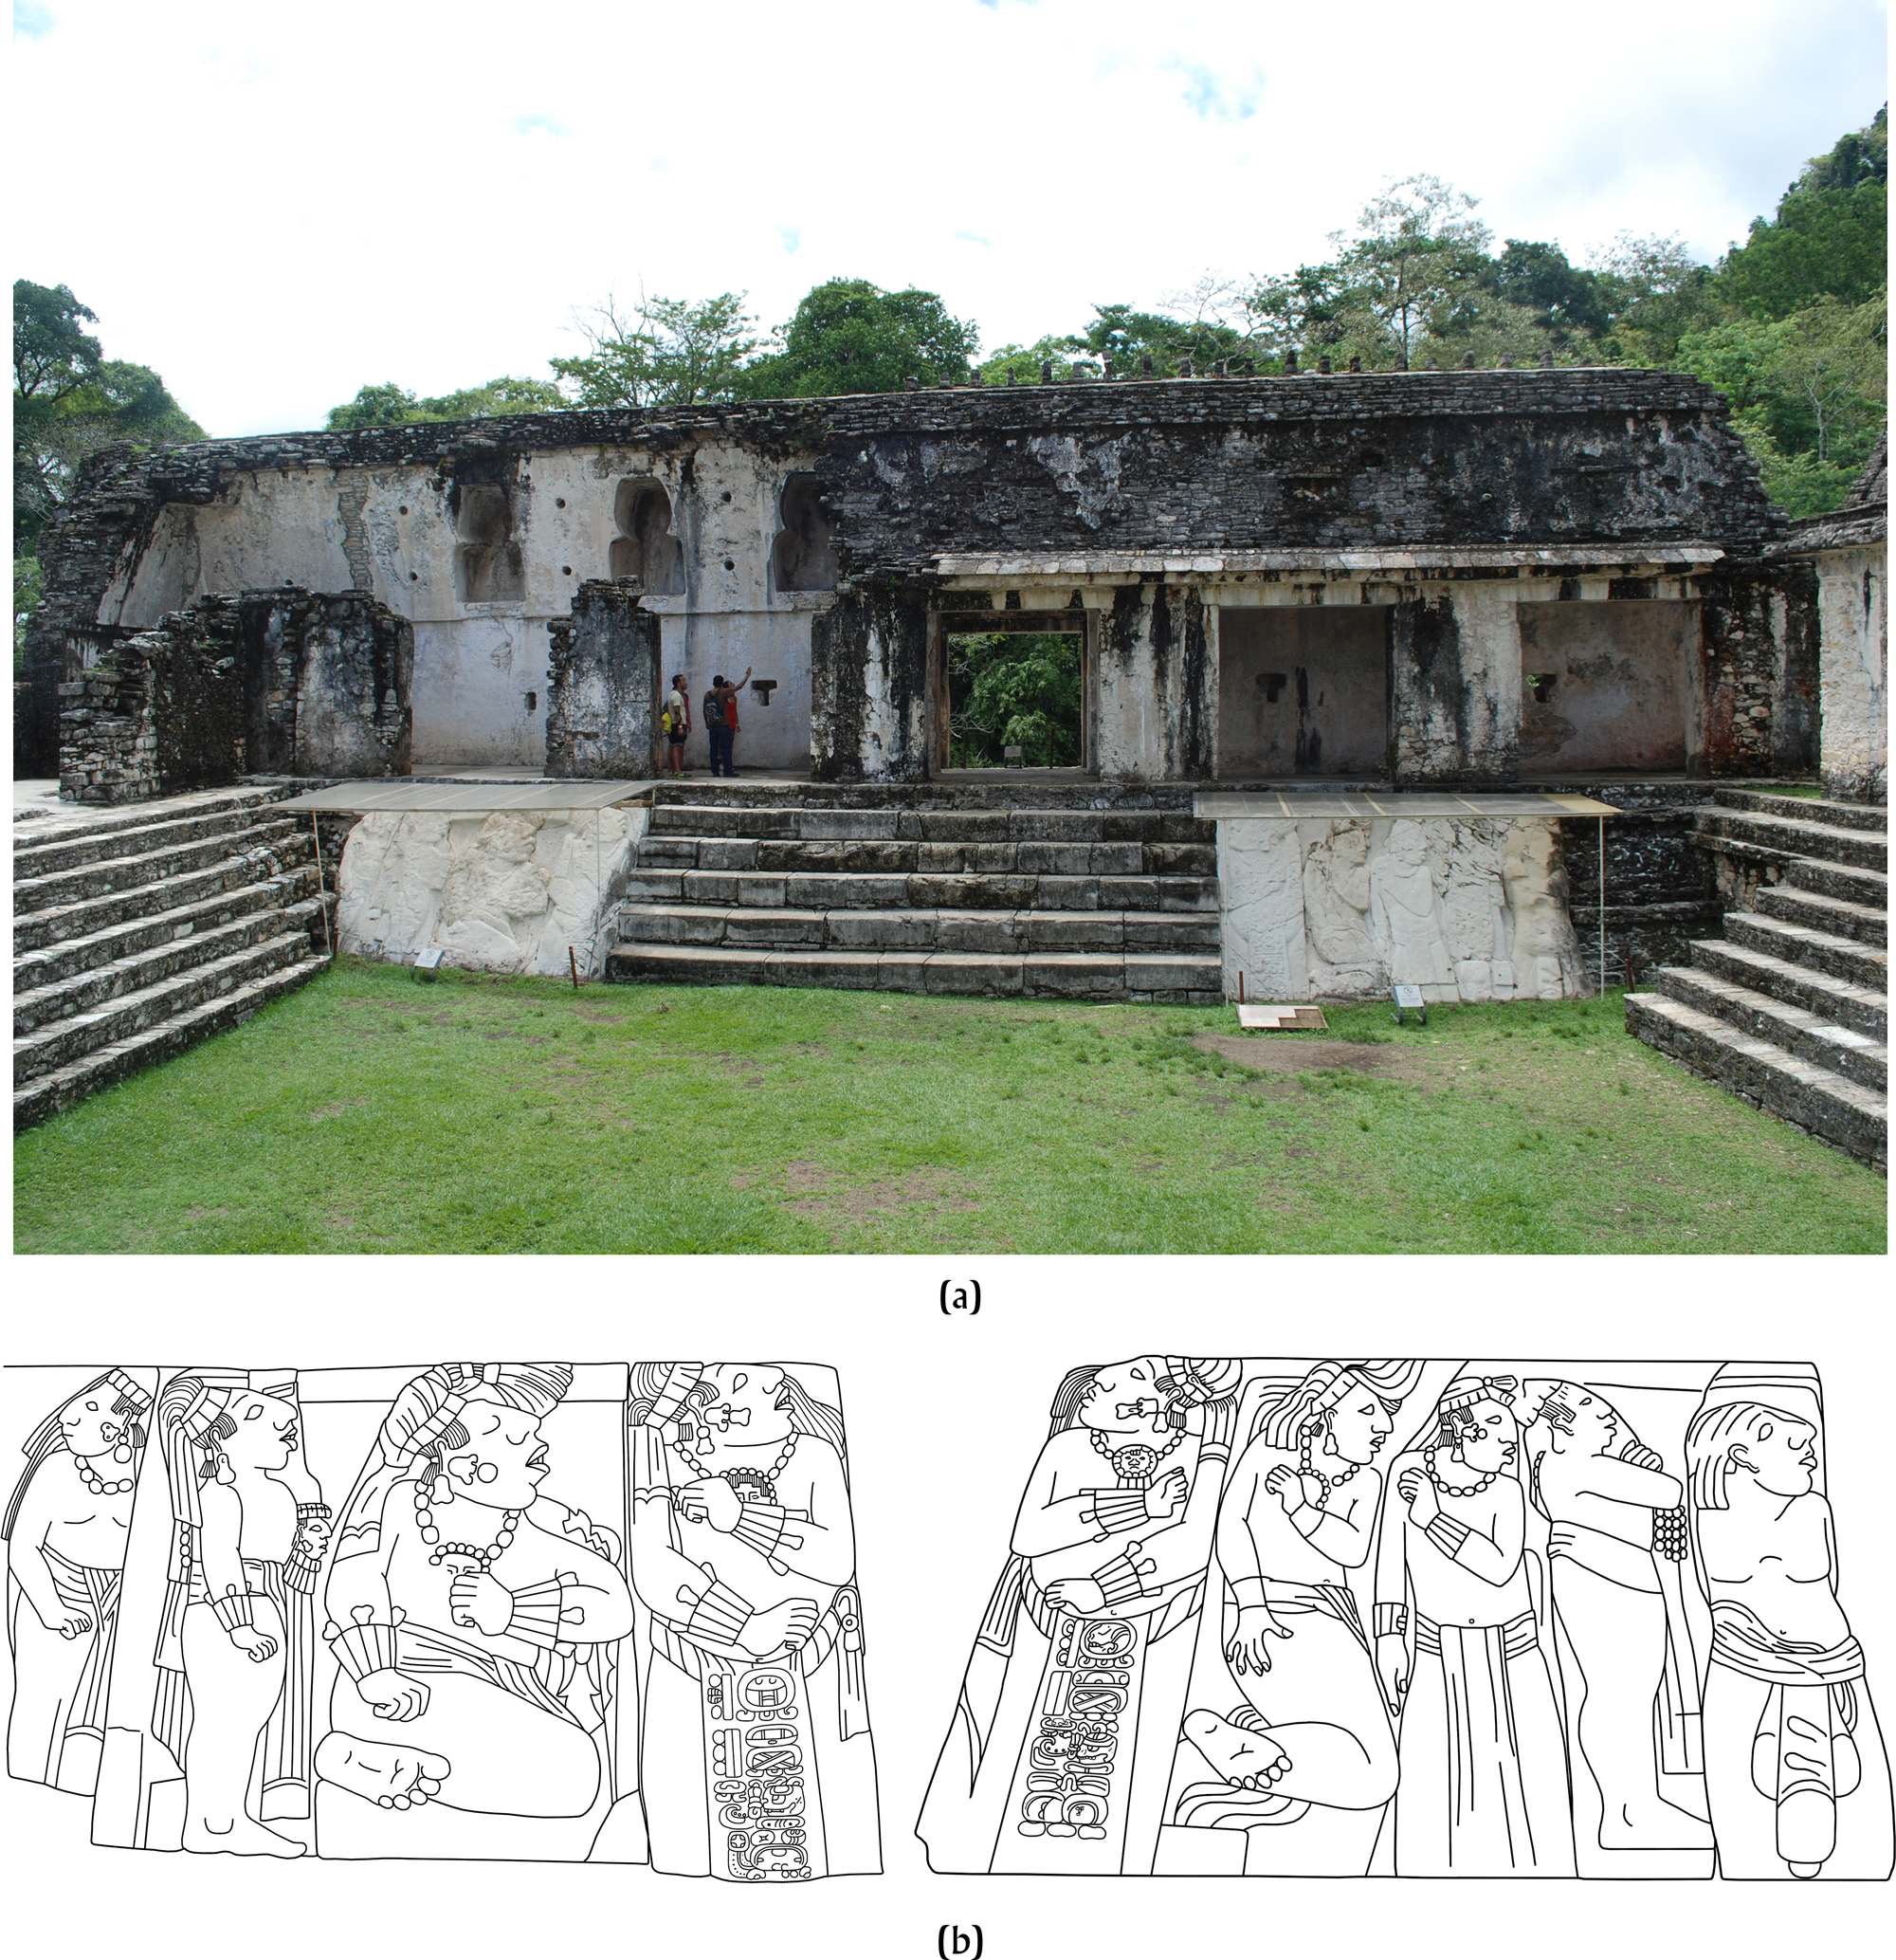
Two walls of the sunken plaza are lined with captives. On the west side of the court, along the base of House C, eight captives flank a hieroglyphic stairway (Figure 7a). Six of these captives mark foundation stones, while two occupy the balustrades. The text on the stairway situates these sculptures historically, describing Palenque's victory over nearby Santa Elena, and the arrival of six captives in the city after the battle. The sculptures that flank the stairway embody these six captives; they are named with hieroglyphic captions, and they wear their name glyphs in their headdresses (Schele Reference Schele, Robertson and Fields1994:4–5). Like the captives from Chinkultic and Yaxchilan, these bodies are not marked explicitly as captives. Their kneeling posture, subservient gestures, and lack of earflares identify them as prisoners, but they maintain a sense of dignity, with headdresses and necklaces intact. Three captives on each side of the stairway look toward the center, as if acknowledging the historical narrative that led to their defeat (Figure 7b). These captives are placed regularly, and they are similar in shape and style; in other words, they adhere stylistically as a group (Baudez and Mathews Reference Baudez, Mathews, Robertson and Jeffers1979:8).
(a) West side of the East Court (House C) at Palenque, showing captives from Santa Elena. Photograph by the author. (b) Captives on six foundation stones, three on each side of the stairway. Drawing by author after Robertson (Reference Robertson1985:Figures 323–328).
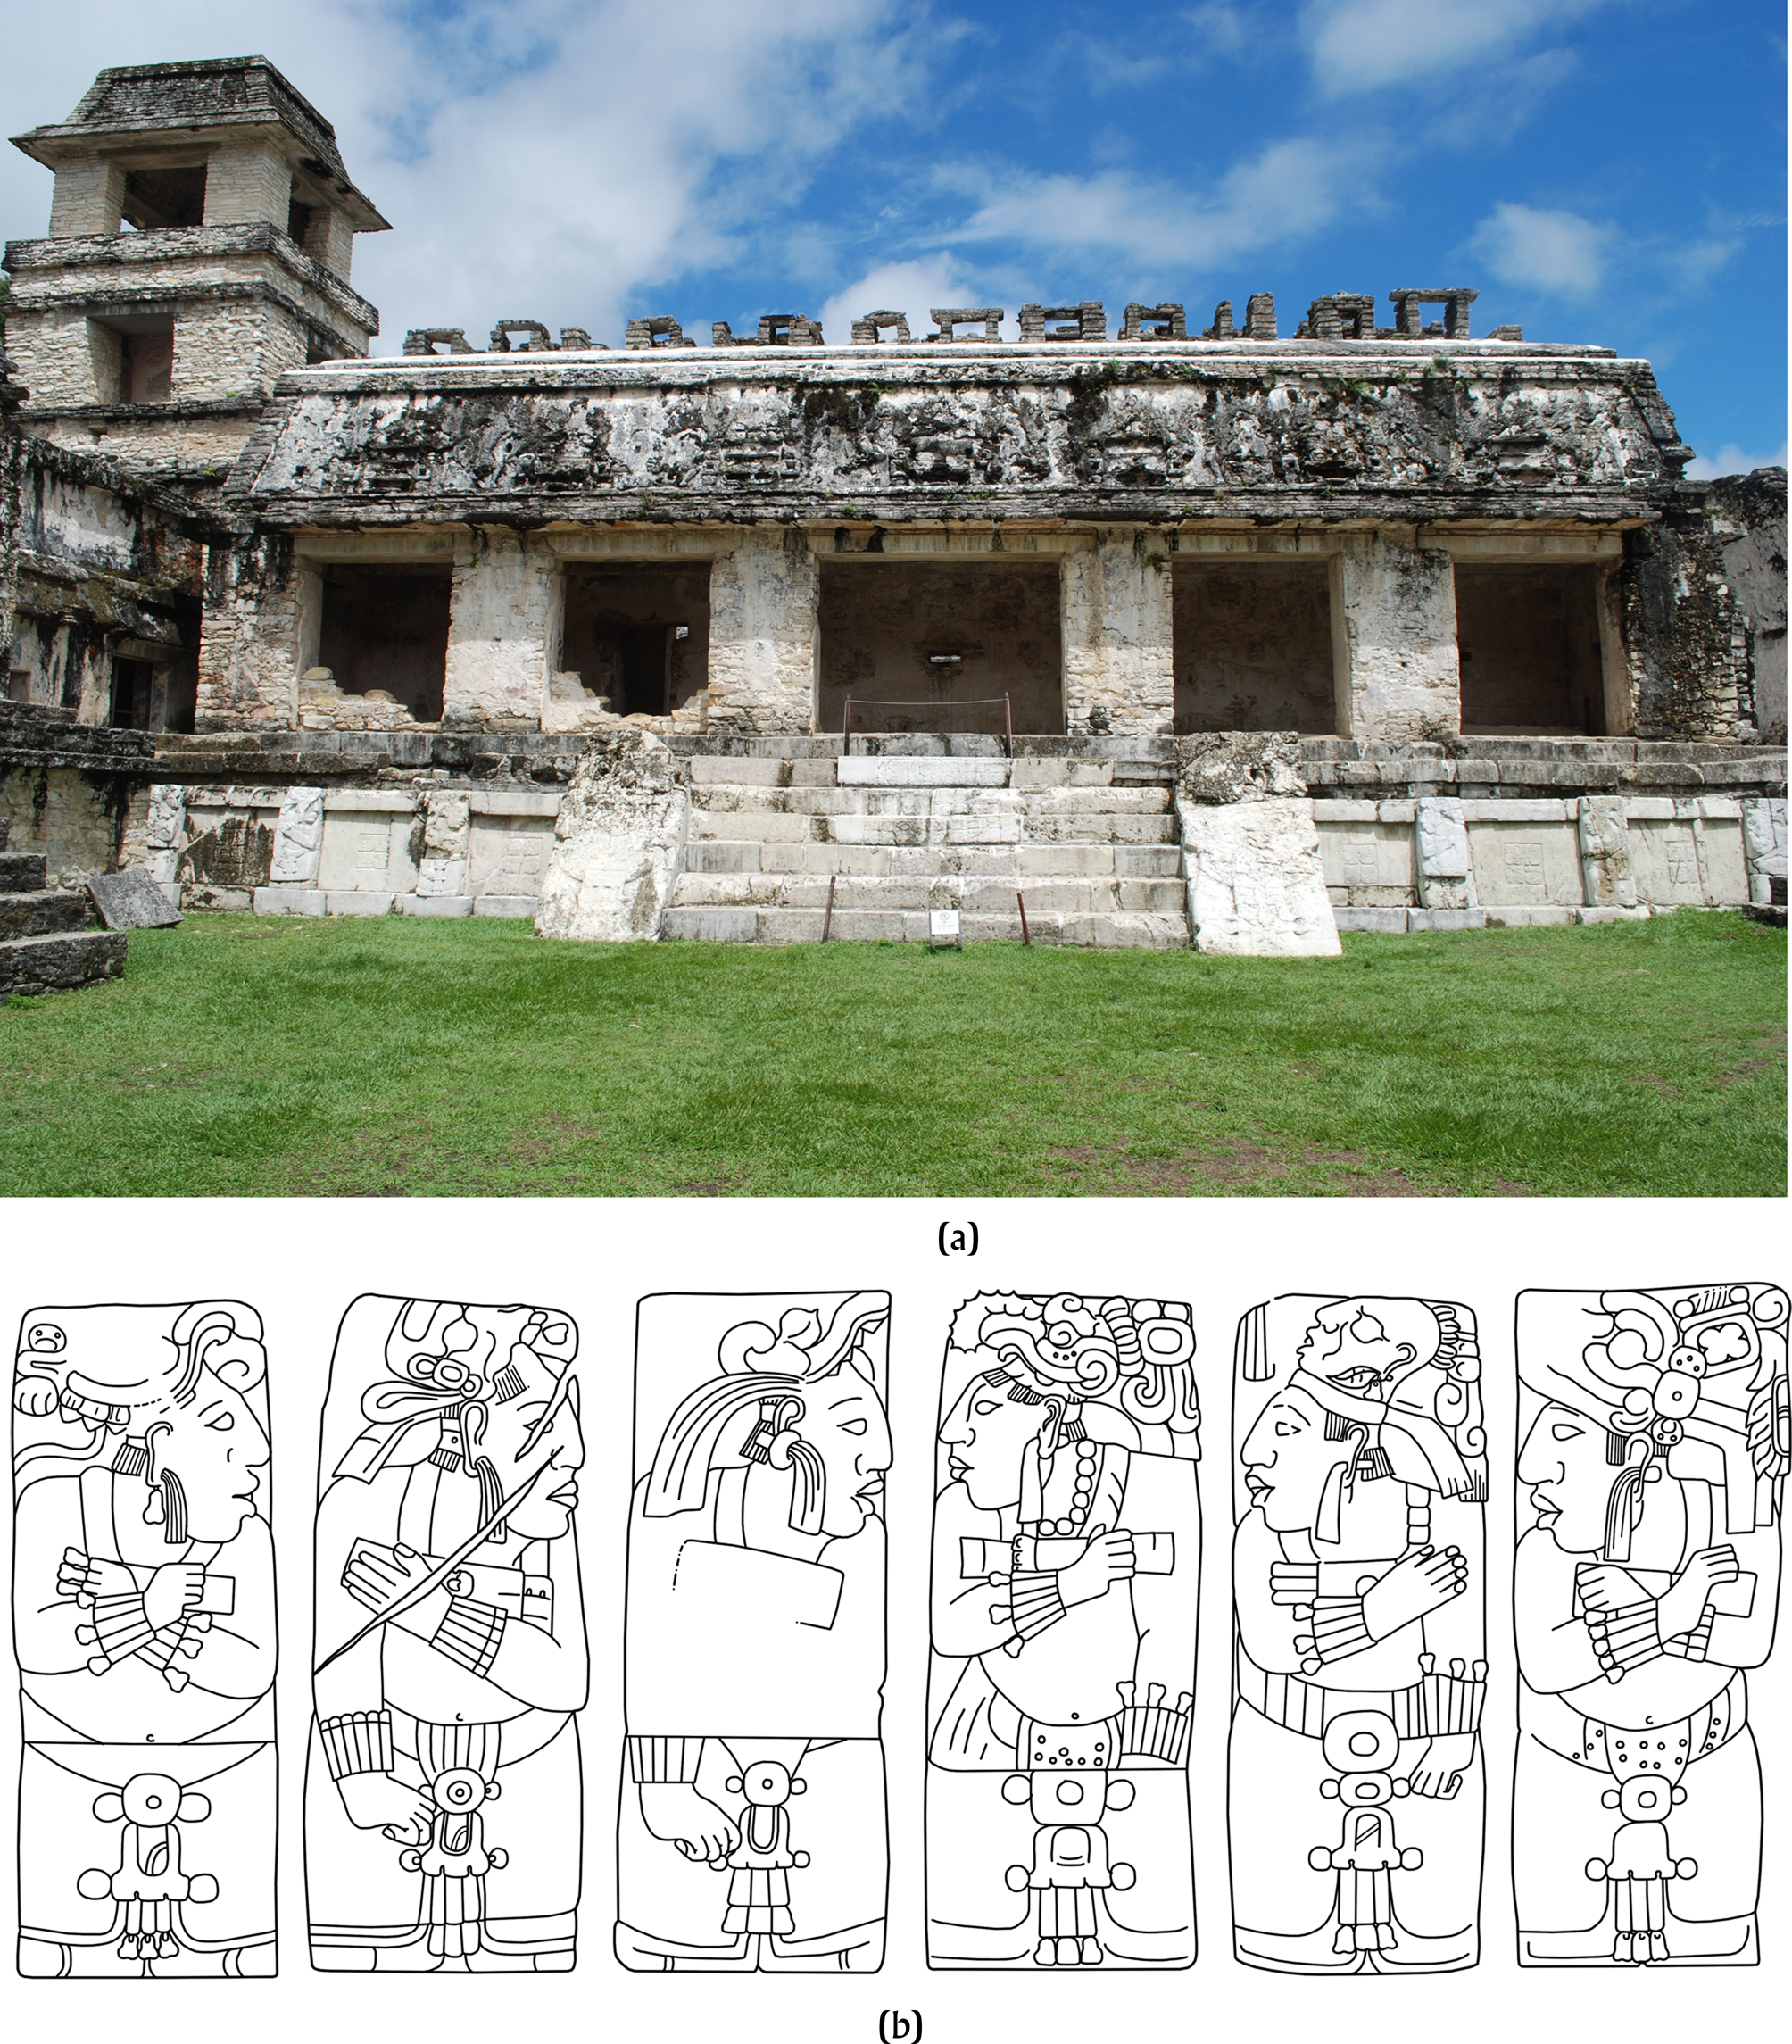
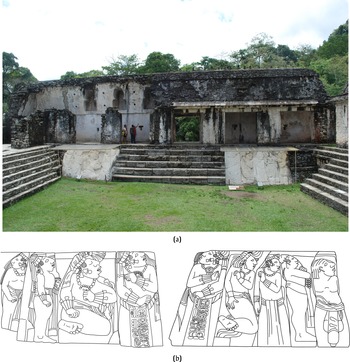
On the other side of the plaza, another set of captives lines the east wall—but these captives are something altogether different (Figures 8a and 8b). Instead of the orderly, homogeneous group on the west side of the court, this group consists of nine sprawling, contorted bodies, at a variety of scales and carved in a variety of styles. The composition is asymmetrical, with four slabs on one side of the stairway, and five slabs on the other. The sculptures have been modified to fit the space: as Robertson (Reference Robertson and Robertson1974:121) noted, the upper part of each sculpture has been removed to make the tops of the panels align. Combined, these factors suggest some of the sculptures were reset from another location. While the timing of their placement in this patio is unclear, hieroglyphs on the loincloths of the two captives facing the central stairs indicate the men were displayed in 662, connecting them to the warfare events detailed on the west side of the court. It is possible the other sculptures were reset from the western foundation of House C, where a textual account of captive sacrifice lacks visual accompaniment (Parmington Reference Parmington2011:98–99; see Martin Reference Martin2020:262–266).
(a) East side of the East Court (House A) at Palenque. Photograph by the author. (b) Two groups of captives flank the stairs, with four on one side and five on the other. Drawing by the author after Robertson (Reference Robertson1985:Figures 289 and 290).
Despite their differences, the captives of the East Court communicated in cohesive and specific ways. Many interpretations of this court have focused on how the captives communicated with outsiders who visited Palenque (e.g., Miller and Martin Reference Miller and Martin2004:204). But the sculptures would have interacted with local viewers as well, and it is in this context that the captives speak most clearly. Stuart and Stuart (Reference Stuart and Stuart2008:160) describe the events of the late 650s and early 660s at Palenque as a “burst of raiding and captive taking,” and this brief characterization is key to our understanding of how these sculptures interacted with elite Maya viewers. Palenque appeared rapidly as a regional power in the mid-seventh century under the reign of K'inich Janaab Pakal. This increased political role was accompanied by significant social and cultural changes in the Palenque court. Considered in this historical context, the new sculptural focus on captives reflects the changing role of nobles in the political affairs of Palenque. These sculptures spoke to Palenque's military ambitions, and of the role of elite bodies in attaining them. The captives of the East Court, in this view, were part of a rapid “re-programming” that redefined the expectations for Palenque nobles and the militaristic ambitions of the king and court around the year 660.
Hieroglyphic texts from Palenque support the idea that nobles played an increasing role in political affairs over the course of the seventh century. A noble named Aj Sul, for instance, became a yajaw kahk in 662. This title, translated as “fire's vassal” or “fire lord,” probably refers to a military office (Stuart and Stuart Reference Stuart and Stuart2008:163; Zender Reference Zender2004:195–210). The timing of this promotion coincides with the 659 altercation between Palenque, Santa Elena, and Pomona commemorated at House C, and indicates that nobles were being recognized in sculpture as key figures in this series of events. Within a few generations, elites would become even more prominent. One of the only other representations of captives at Palenque, the aptly named Tablet of the Slaves, was commissioned over 70 years later by a noble named Chak Suutz. Although the panel depicts the ruling king, Ahkal Mo Nahb, the text describes the victories of Chak Suutz, emphasizing his role as a military leader at the site (Martin and Grube Reference Martin and Grube2008:173).
Like the stone captives at Chinkultic and Yaxchilan, the Palenque sculptures participated in embodied interactions with viewers. Their placement in a sunken courtyard is particularly resonant: elites standing in the courtyard, whether visitors or locals, would have found themselves among the captives, a visceral reminder about their role as potential prisoners. Like the ambiguous figures on the Chinkultic stelae, they could be simultaneously warrior and captive. The House A captives suggest particularly uncomfortable embodied interactions. As Spencer (Reference Spencer, Spencer and Werness-Rude2015:251) points out, the inconsistent scale of the captives asks viewers to participate in a “perpetual renegotiation” of the space, in which their eyes must continually adjust to make sense of varying scale. The differently sized captives resist a cohesive narrative, and the twisted perspective and enlarged legs of some of the captives works both to emphasize their discomfort and draw attention to potential sites of violence on their bodies. The House A captives contributed to a disharmonic environment that created dynamic and uncomfortable relationships between viewers and stone sculpture (Spencer Reference Spencer, Spencer and Werness-Rude2015:249–255).
The captives in the East Court are a study in contrasts: small versus large, upright versus set back, and orderly versus disorderly. The representation of captives on opposing sides of the sunken courtyard may have been read as a type of morality narrative, in which one type of captivity—named, dignified, contextualized—was privileged over another. Study of the Classic Maya has indicated a strict code of conduct for kings (Houston Reference Houston2001:209). But Colonial sources suggest potential codes of conduct for captives as well. The Rabinal Achi, in particular, highlights the nobility of the captive who chooses to be sacrificed rather than switch his allegiance (Breton Reference Breton2007). Aztec sources also suggest that certain modes of captivity garnered greater respect. Captives who progressed to their deaths with courage, for instance, were thought to bestow greater prestige on their home cities than those who broke down or were forced to the sacrificial stone (Carrasco Reference Carrasco1999:142; Sahagún Reference Sahagún, Anderson and Dibble1981:48). The captives in the court at Palenque may refer to the contrast between the noble captive and the scurrilous one. Importantly, that difference is encoded in the body. The possibility that seven of the House A captives were placed in the courtyard after the initial dedication of the space (Parmington Reference Parmington2011:98), meanwhile, indicates an increasing focus on captive bodies over successive generations.
The art of Palenque is well-known for its focus on cosmological themes, and in some ways, the captives of the East Court seem to be an aberration. The context of these sculptures, however, makes it clear that they functioned to reframe Palenque politics and construct warrior identities for local elites. Captive sculptures, these works suggest, were as much about internal politics as they were about external affairs, useful for intimidating visitors but also for manipulating internal factions and clarifying expectations for elite warriors. The captives of Palenque appeared in a time of great change at the site, and they worked to mediate those changes through the representation of bodies that were both imprisoned and elite—and critical in the expansion of political power.
CAPTIVE IMAGERY AND RITUAL ACTION AT TIKAL
Thus far we have examined how sculptures depicting captives emphasize the role of warrior as potential victor and potential captive; and how the depiction of captive bodies worked to construct social identities for warriors by emphasizing their role in political conflicts between centers. In addition to these functions, depictions of captives constructed social identities by stressing the role of the captive body in ritual action and the maintenance of world order.
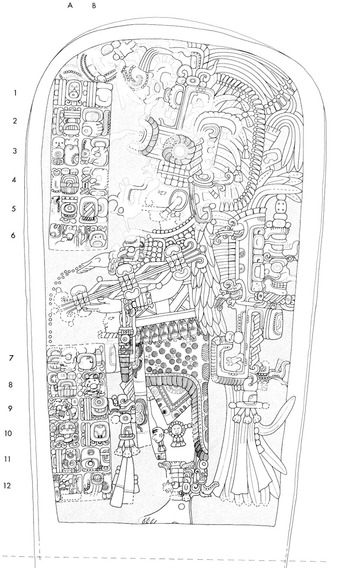
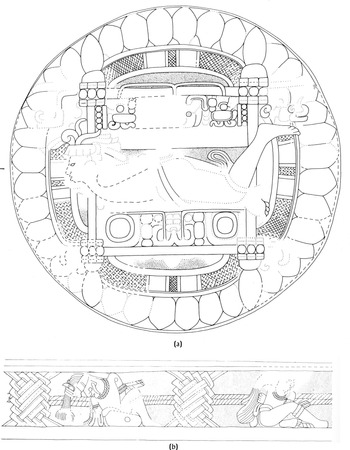
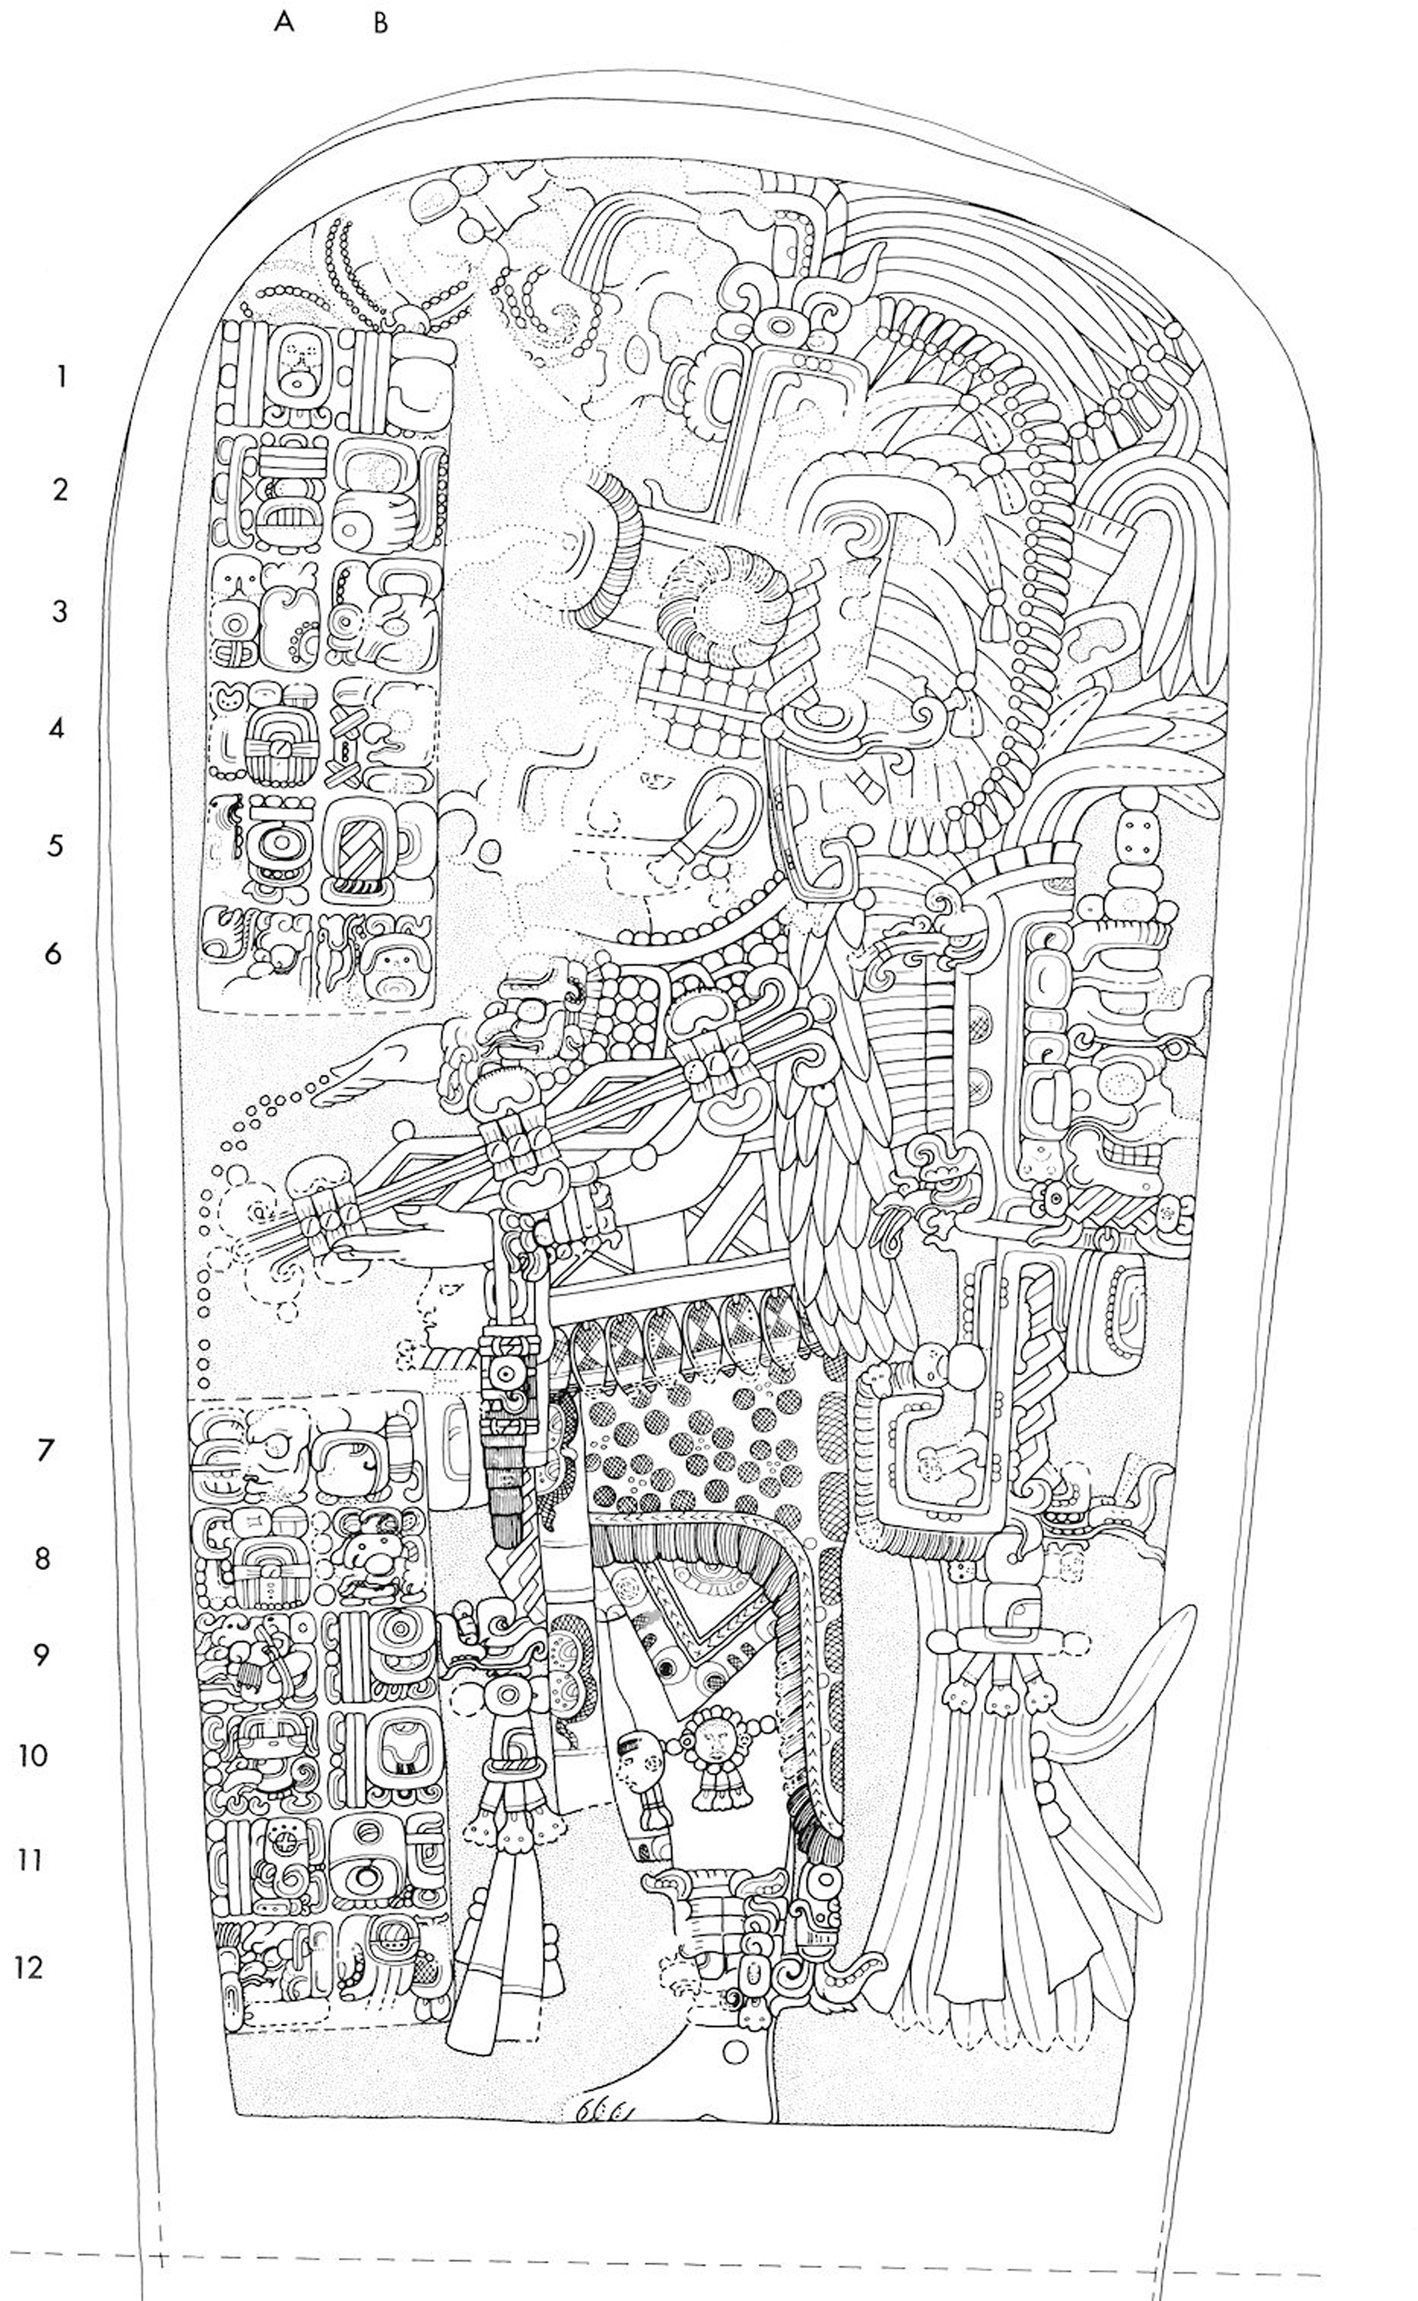
This role for captives is exemplified at Tikal, where captive imagery increased in the eighth century. Although examples of captive imagery occurred during the reign of Jasaw Chan Kawiil, including the well-known example from Burial 116 (Trik Reference Trik1963:Figure 9; see also Burdick Reference Burdick2016:42), depictions of captives in stone sculpture became increasingly prevalent during the subsequent reigns of Yikin Chan K'awiil and Yax Nuun Ahiin II. Many images of captives from this century are on stone altars paired with stelae that depict the king performing a scattering ritual. This format breaks from earlier captive depictions at Tikal, which depicted captive and ruler on the same stela (e.g., Stela 10; Jones and Satterthwaite Reference Jones and Satterthwaite1982:25–26), much like stelae from Yaxchilan explored above (Figure 4). In this new system, the captive body was located on a stone altar placed in front of a stela, which depicted the king. Stela 22, for instance, depicts Yax Nuun Ahiin II performing a scattering ritual in a.d. 771 (Figure 9). Beads of blood or incense descend from his extended right hand, falling metaphorically onto Altar 10, which sits in front of the stela (Figure 10a). On the top of the altar is a captive, lying on his stomach with hands bound behind his back. The iconography of this particular altar is ominous: the body of the captive is positioned above a scaffold consisting of two double-pointed spears, arranged vertically, and connected by two horizontal crossbars. The Classic Maya used such scaffolds for rituals related to sacrifice and accession (Taube Reference Taube, Benson and Griffin1988:349–350).
Tikal Stela 22. Drawing by William R. Coe, courtesy of the Penn Museum (Jones and Satterthwaite Reference Jones and Satterthwaite1982:Figure 33).
Tikal Altar 10. (a) Top of altar. (b) Side of altar. Drawings by William R. Coe, courtesy of the Penn Museum (Jones and Satterthwaite Reference Jones and Satterthwaite1982:Figures 34a and 34b).
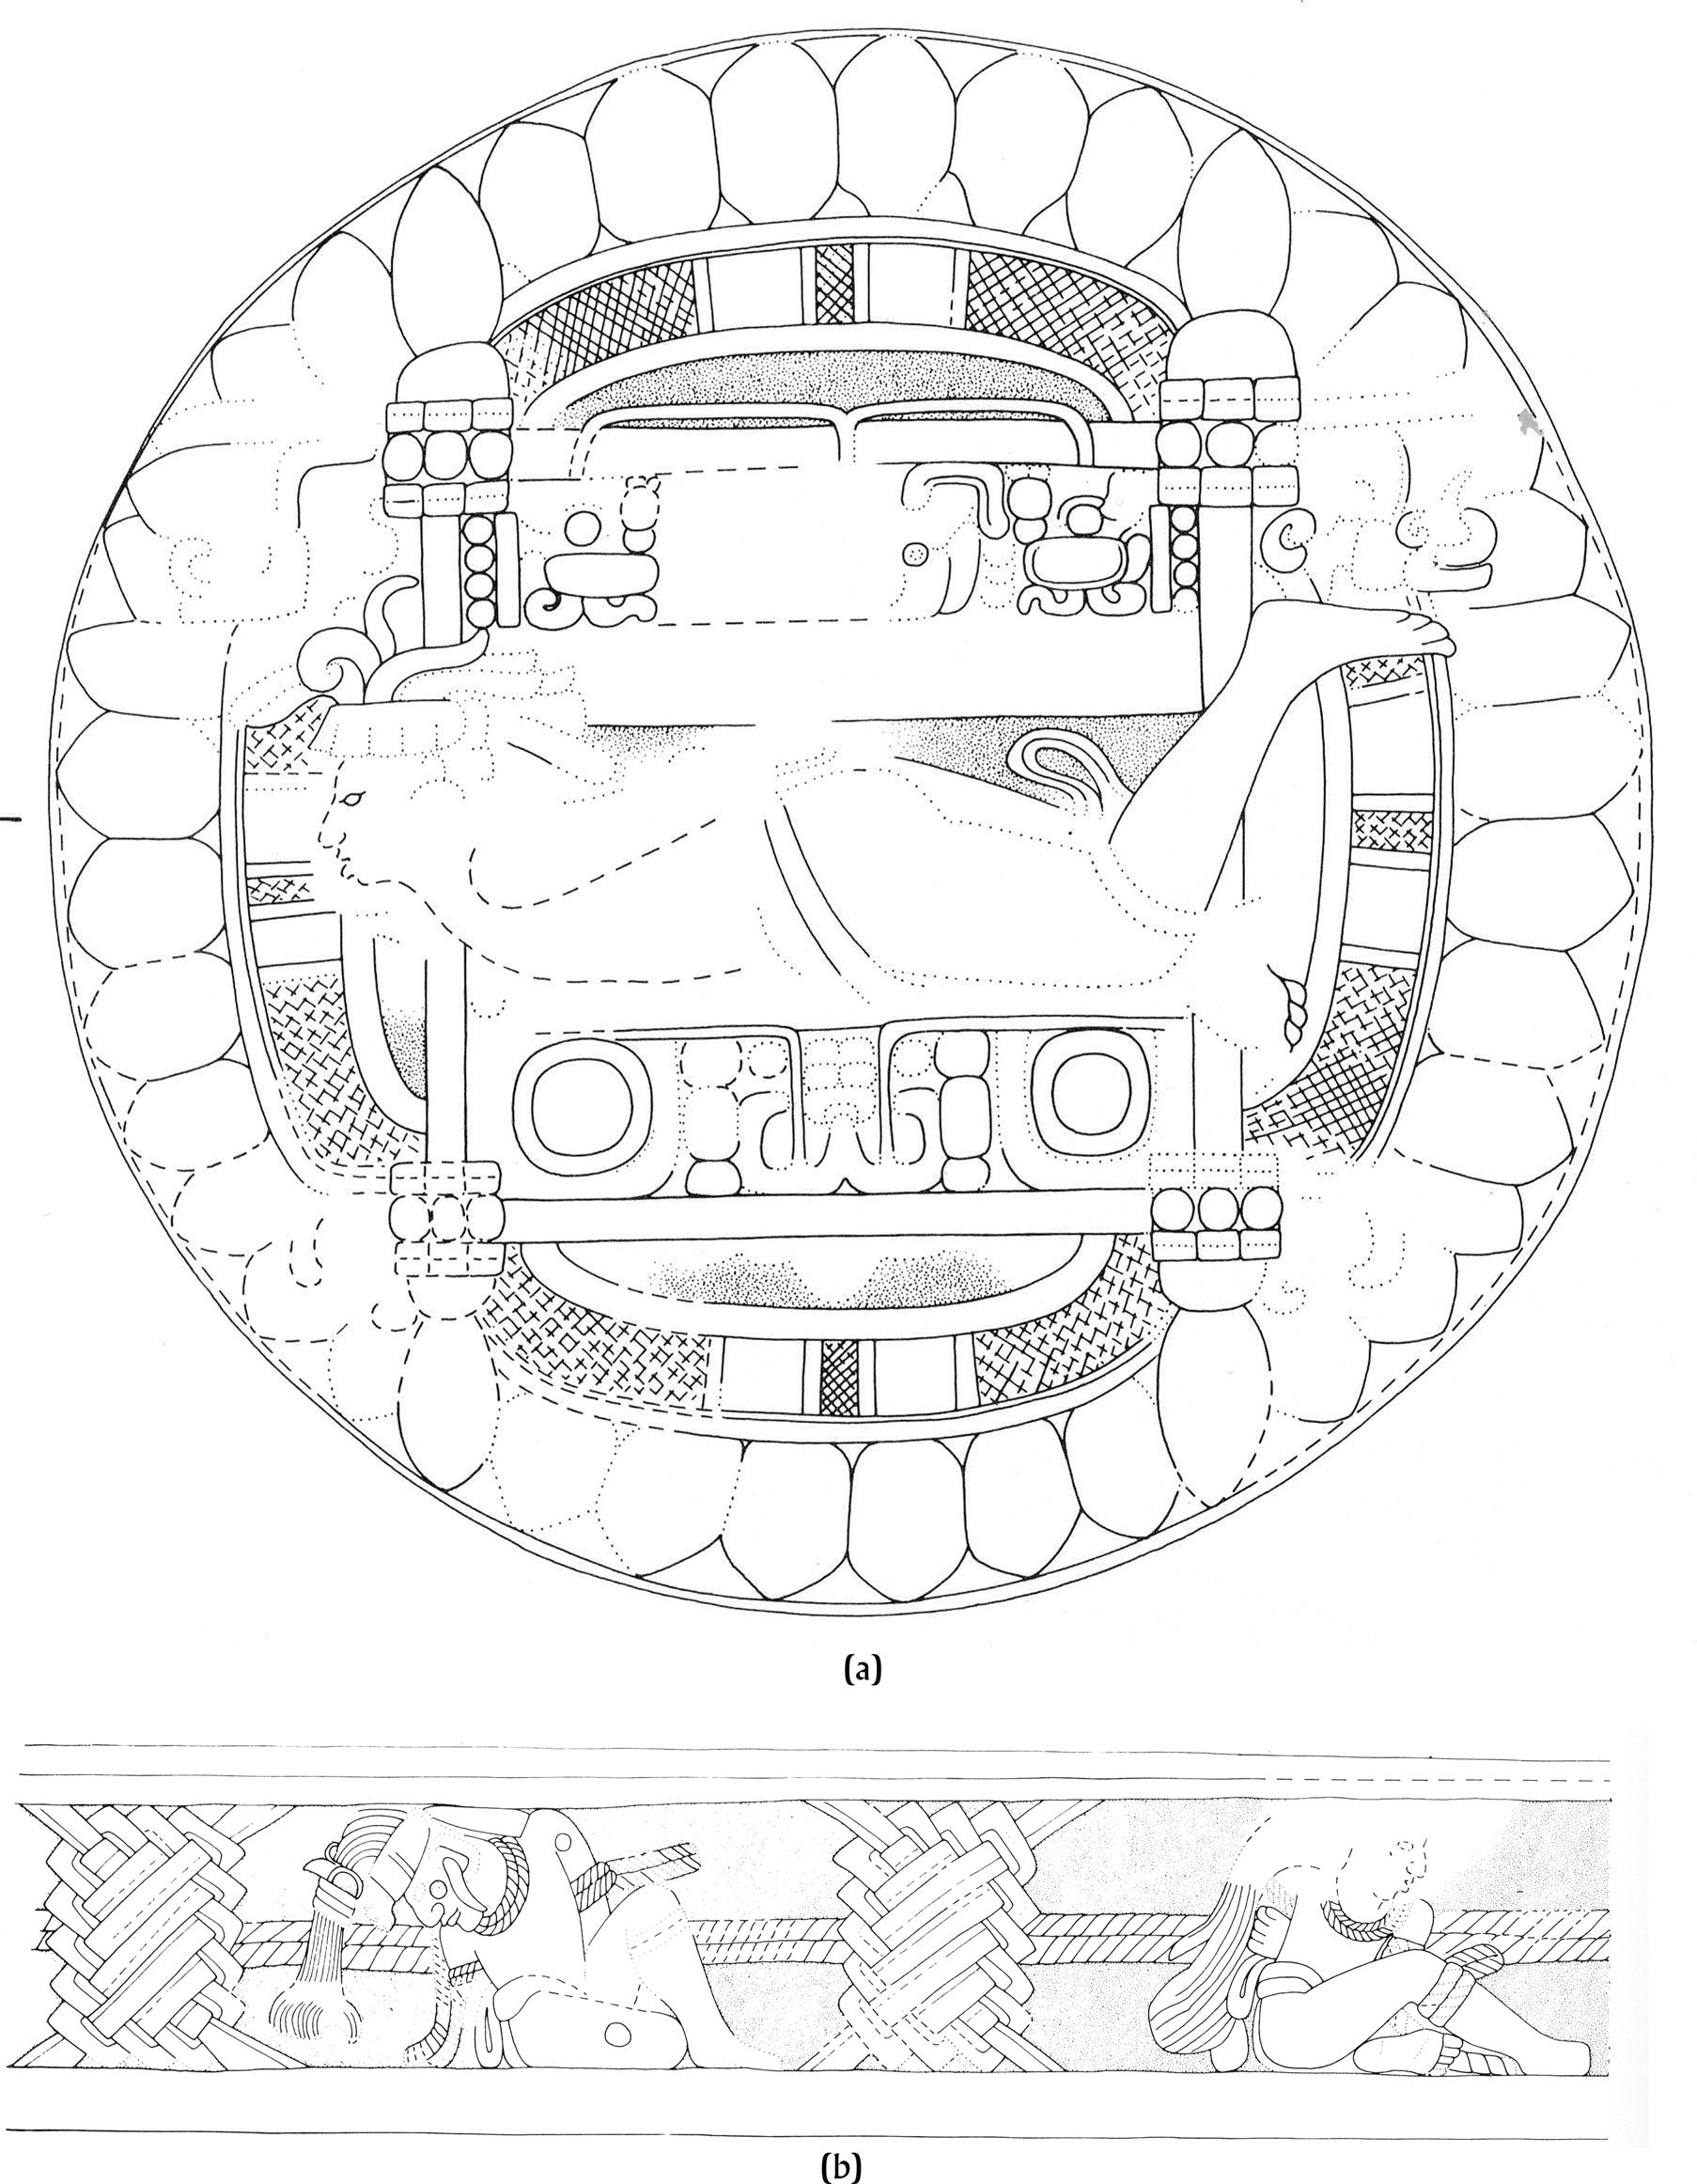
Here, the captive body becomes a locus of ritual activity. Burning, scattering, sacrifice, and other ritual actions typically took place on altars (Stuart Reference Stuart1996) and, on these examples, those activities would have been performed on top of the bound bodies of captives. Viewers of this pair would have understood the role of the captive body as a participant in the necessary rituals of rulership, including scattering and sacrifice. The sides of Altar 10, meanwhile, underscore the cosmological foundations of captive sacrifice: the altar depicts different versions of Juun Ajaw, a mythological figure who served as a model for Maya kingship (Stuart Reference Stuart, Golden, Houston and Skidmore2012:120–121). On the altar, Juun Ajaw is depicted as a captive, his arms bound behind his back (Figure 10b; Houston et al. Reference Houston, Taube and Stuart2006:204). Combined, the stela-altar pairs positioned captives not just as degraded political pawns but also as essential actors in ritual activity, connected to mythic history and the primordial sacrifices that enabled creation.
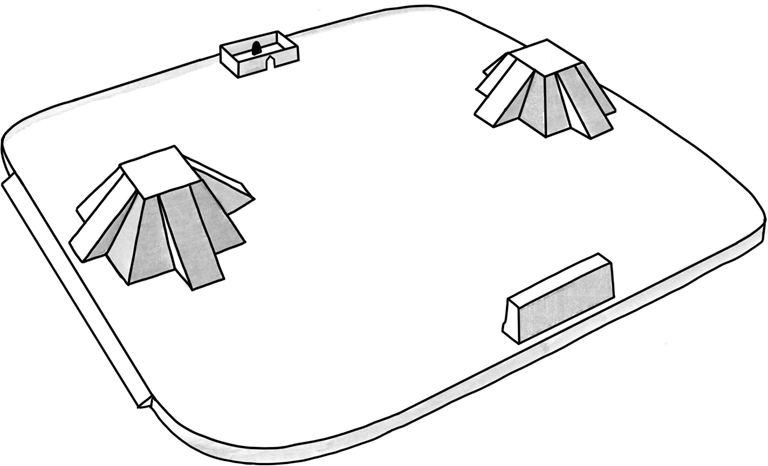
The context of these stela-altar pairs, meanwhile, demonstrates that the captive body was integral to the maintenance of grand cosmological cycles. At least three stela/altar pairs (Stela 20/Altar 8, Stela 22/Altar 10, and Stela 19/Altar 6) were placed in the northern enclosures of twin pyramid complexes (Figure 11; Jones and Satterthwaite Reference Jones and Satterthwaite1982). This type of complex was a specific feature of Tikal and Tikal's political orbit, and was constructed to celebrate the k'atun ending, an important moment in the Maya calendar (Jones Reference Jones1969). The quadripartite arrangement of space within these groups related to the movement of the sun, ancestors, and the underworld (Coggins Reference Coggins1980). As Stuart (Reference Stuart1996) has explored, the celebration of k'atun endings in twin pyramid complexes involved a variety of actions coordinated to ensure the continuation of time, including stone binding. Sculptures like Stela 22 and Altar 10 served as perpetual reenactments of the ritual act, reifying the role of the king—and the captive—in actions related to world renewal.
Twin pyramid complex, Tikal. Drawing by the author after drawing by Norman Johnson (Coe Reference Coe1967:85).

Unlike at Palenque, where captive bodies were collected in an elite space, the twin pyramid complexes and their associated sculpture were spread throughout the site center of Tikal. Depictions of captives were also erected in the North Acropolis (Stela 5/Altar 2) and Temple VI (Stela 21/Altar 9). The reign of Yik'in Chan K'awiil also saw the carving of an enormous bedrock sculpture, located on the Maler Causeway, that would have been visible to travelers approaching the North Group at the site (Coe Reference Coe1967; Martin Reference Martin and Trejo2000:111–113; Martin and Grube Reference Martin and Grube2008:50). This dispersed approach to the representation of prisoners suggests that dynasts wanted the captive body to feel omnipresent, visible not just to elites gathered in a courtyard but to people throughout the center.
At Tikal, the visual record reveals different strategies for the display of the captive body. Late Classic sculpture at this site depicts captive bodies as key players in political expansion but also in grand cosmological cycles and ritual sacrifice. Captive bodies at Tikal, in flesh and in stone, were sites of ritual activity, participants (albeit perhaps unwilling ones) in ceremonies designed to ensure world order. Elites interacting with these sculptures would have understood their embodied relationship to sacrifice, rulership, and the continuation of time—and their ultimate submission to the terrifying machinery of power.
CONCLUSIONS
Warfare among the Classic Maya is often described as ritualized combat, focused on individual engagement, the capture of prisoners, and their eventual sacrifice (Inomata and Triadan Reference Inomata, Triadan, Nielsen and Walker2009; Schele and Miller Reference Schele and Miller1986; see Webster [Reference Webster2000:104] for discussion of ritual warfare). The procession, presentation, and sacrifice of captives certainly happened in the ancient Maya world. These would have been awesome and bloody spectacles, and they have fascinated modern scholars, but sacrifice was not an automatic outcome. Not all captives were sacrificed, and the depiction of captives may be less about the recounting of historical outcomes than the development and maintenance of warrior identities. In many ways, this is similar to warfare-related imagery from other cultures. Among the Aztec, for instance, warfare-related imagery like the Stone of Tizoc is “more indicative of narrative strategies than of military organization” (Koontz Reference Koontz, Morton and Peuramaki-Brown2019:191; Umberger Reference Umberger1987:70). In Tenochtitlan, Chávez Balderas (Reference Chávez Balderas, Scherer and Verano2014:175, 190) notes that warfare was only one means of securing sacrificial victims, and that most sacrifices in the Templo Mayor were not warriors taken in battle. The sacrifice of captives was one outcome among many.
Such imagery is best understood, then, as one element in a dynamic matrix of warfare-related actions that was subject to broad cultural codes and specific historical contingencies. Carved stone monuments conveyed information about the outcomes of warfare—but they also helped to prepare for battle by communicating with elite viewers about their roles, both political and ritual. At sites like Chinkultic, Yaxchilan, and Palenque, sculptures of captive bodies helped to construct social identities for warriors by positioning them as both victor and victim. At Palenque, the representation of prisoners supported specific political goals and the messaging necessary to achieve them. At Tikal, meanwhile, artists stressed the nourishing potential of the captive body on sculptures that took part in rituals related to world renewal and political power. The meaning of captive imagery differed for various types of viewers, and the movement of viewers in space. At all these sites, sculptures actively engaged with humans, complicit in interactions that worked to shape embodied identities that encompassed lived experience as well as normative social roles.
The study of captives in stone sculpture highlights diverse approaches to the discourse and practice of warfare. These depictions varied over time and place—some centers did not display captive imagery at all. This analysis suggests that context is key to the interpretation of warfare-related imagery, from the placement of such works within site centers to the broader political goals of the dynasts who commissioned them. Interrogating how artists presented warfare—and the aftermath of warfare—at various centers offers a new perspective into the ways in which elite Maya envisioned their roles as warriors, community members, and participants in political and ritual action. Considered in context, these images offer a more robust understanding of how Maya art communicated with diverse audiences, constructed social identities, and conditioned the experience of warfare in the Classic Maya world.
RESUMEN
Las interpretaciones tradicionales de la guerra maya se han centrado en los aspectos rituales de la guerra, incluyendo la necesidad de tomar cautivos para el sacrificio. Los cautivos son un tema común en las esculturas mayas del período clásico tardío. Imágenes como los murales de Bonampak, sugieren que los cautivos capturados en la guerra fueron sacrificados. Sin embargo, información de textos jeroglíficos y de registros históricos sugiere una variedad de destinos para los prisioneros de guerra. Considerada a la luz de esta información, la iconografía de los monumentos del periodo clásico tardío no representa un indicador confiable del destino de los cautivos. Entonces, ¿cual era la función de la imaginería cautiva? En este artículo, sugiero que las imágenes de cautivos en monumentos de piedra tallada funcionaron para preparar a las élites para la guerra por la creación de identidades sociales. Las esculturas construyeron una identidad guerrera que abarcaba tanto al vencedor como a la víctima, y enfatizaba la importancia de los cuerpos de las élites en el mantenimiento del poder político y ritual. Comprender las formas en que se comunicaban las imágenes de los cautivos permite una visión más inclusiva de cómo la práctica de la guerra difería de una política a otra, y sugiere que el contexto es importante en el uso del arte para aprender sobre la guerra.
ACKNOWLEDGMENTS
I am currently Assistant Professor at School of Art, Art History, and Design at University of Washington. Thank you to Christopher Hernandez and Justin Bracken for coordinating this section and contributing comments and feedback. This article was first presented at the College Art Association Annual Conference, and I thank Victoria Lyall and Margaret Jackson for the opportunity to be part of their session and for their comments on the first draft and Mary Miller and Claudia Brittenham for their feedback. Initial research for this article was completed at the Metropolitan Museum of Art, which also provided funding for research travel. Thank you to Joanne Pillsbury and James Doyle for their comments and suggestions on the project. A Scholarly and Creative Activities Grant from the University of Nevada, Reno, funded additional research in Mexico. Three peer reviewers provided extensive feedback, and I thank them for their contributions; all remaining errors are my own.