

A. MonumentalFootnote 1
1. City of London (Londinium, TQ 318 814), 81 Newgate Street (Fig. 1). Small fragment of a thin white marble slab, 74 by 105 mm, 23 mm thick, foundFootnote 2 in 2021/22. The left edge is original, and so probably is the top edge.Footnote 3 Inscribed between double setting-out lines 22 mm apart, in well-cut capitals: .[…] | AE Δ T[…] | LIA[…] | A […] | […], probably [D(is) M(anibus) et memori]|ae T[…]|lia[…] | a(nn…) […], ‘To the Shades of the Dead and to the memory of T[…] […]|lia[…], aged …’Footnote 4
London, 81 Newgate Street (No. 1), inscribed marble fragment (photographed and drawn by R.S.O. Tomlin).

2. Benwell (Condercum NZ 21 64) Roman fort, Tyne and Wear (Fig. 2). Fragment of a thin buff sandstone slab, 0.264 by 0.143 m, 40–45 mm thick, foundFootnote 5 in c. 2025. Its inscribed face was defined by a groove incised just inside the edge, of which only the top-left corner survives. Incised capitals: IMP o C̣ẠE, Imp(erator) Cae(sar). ‘The Emperor Caesar …’Footnote 6
Benwell, inscribed sandstone fragment (No. 2) (photo: Great North Museum: Hancock).

3. High Rochester (Bremenium, NY 83228 98564) Roman fort, Northumberland (Fig. 3). Fragment of a buff sandstone slab, c. 0.71 by 0.51 m, foundFootnote 7 some years ago in the south-west part of the fort. Incised within a recessed panel: […]ẠẸ[…] | […]IXIT o […] | […] o N o D o […], […]ae[…] | [… u]ixit […] | … d(ies) […]. ‘… lived … days …’Footnote 8
High Rochester, tombstone fragment (No. 3) (photo: Richard Carlton).

B. Instrumentum domesticum
Berkshire
4. Hungerford (SU 336 682) (Fig. 4). Part of a copper-alloy finger-ring, foundFootnote 9 in 2023, with half its oval bezel. Incised: ɅṂ[…] | M […], am[a] m[e]. ‘Love me.’Footnote 10
Hungerford, inscribed ring bezel (No. 4) (drawn by R.S.O. Tomlin from a photograph).

5. Silchester (Calleua Atrebatum, SU 6430 6240), Roman bath-house in Insula XXXIII (Fig. 5). Oval leadenFootnote 11 sealing, foundFootnote 12 in 2018. One face, 16 mm wide, is impressed with a circular die, its reverse a hemispherical projection pierced by the hole left by the binding cord. The inscribed face has an imperial bust facing right, surrounded by four letters in relief to the left, and four to the right. They are almost illegible because the die was withdrawn while the metal was still plastic, allowing it to run and blur the impression; but perhaps: CONS ANVS, as if for Cons<t>an{u}s. Constans, emperor 337–50.Footnote 13
Silchester, leaden sealing (No. 5) (photographed and drawn by R.S.O. Tomlin).

6. Ibid. (Fig. 6). Large fragment of a tegula, 205 by 145 mm, with part of an impressed tile stamp, the letters in relief. Within a rectangular die: FR[…], probably Fr[…].Footnote 14
Silchester, stamped tile (No. 6) (photographed and drawn by R.S.O. Tomlin).

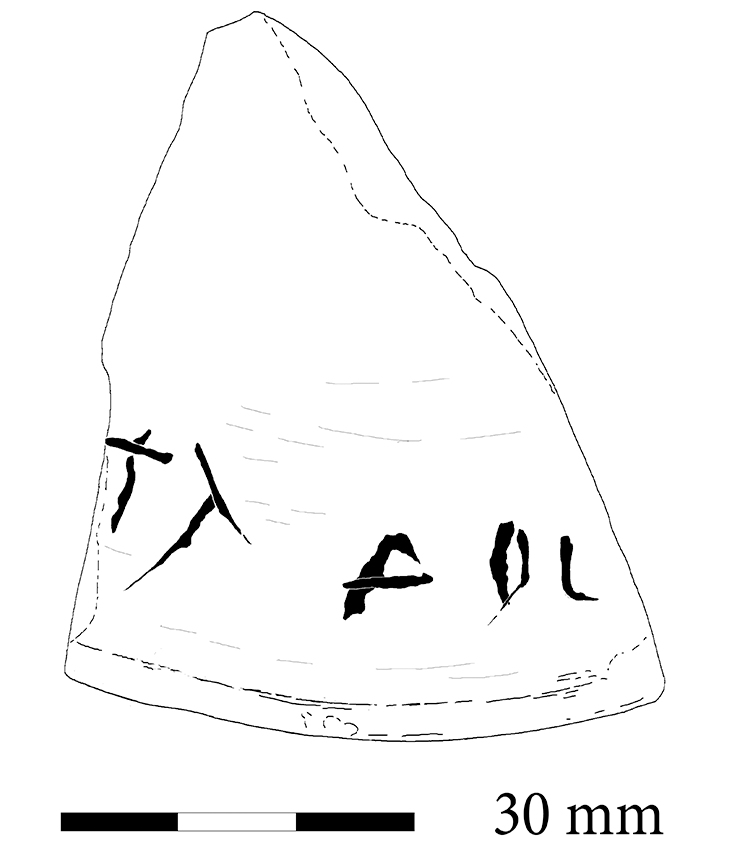
7. Ibid. (Fig. 7). Grey coarseware sherd with rim, from a plate or lid. Incised underneath after firing: […]TA P̣OL[…], […]ta Pol[…]. Two incomplete names, the first a woman’s. The difference in script suggests they are those of different owners.Footnote 15
Silchester, rim sherd with graffito (No. 7) (drawn by R.S.O. Tomlin).

Buckinghamshire
8. Hambleden, Yewden Roman villa (SU 784 855) (Fig. 8). Coarseware ‘saucer’ foundFootnote 16 in 1912. Shallowly incised underneath after firing: ɅNT | ỌNɅ̣, probably Ant|on<i>a.Footnote 17
Hambleden, coarseware sherd with graffito (No. 8) (photo: Discover Bucks Museum).

9. Ibid. (Fig. 9). Coarseware base sherd, inscribed underneath after firing: SIITOMINɅ, Setomina.Footnote 18
Hambleden, coarseware sherd with graffito (No. 9) (photo: Discover Bucks Museum).

10. Ibid. (Fig. 10). Wall sherd of a black-burnished platter, inscribed after firing below the rim: […]ỌRINE, probably [Vict]orin(a)e.Footnote 19 ‘(Property) of Victorina.’
Hambleden, coarseware sherd with graffito (No. 10) (photo: Discover Bucks Museum).

11. Ibid. Wall sherd of ‘light brown ware’, inscribed after firing: VIR[…], Vir[ilis].Footnote 20
Cumbria
12. Stanwix (Uxelodunum, NY 399 567) Roman fort and uicus (Fig. 11, sf 5813). Leaden sealing foundFootnote 21 in 2025, impressed on both faces with letters moulded in relief. Obverse: LEG |  ${\mathrm{\overline{VI}}}$, leg(io) VI. Reverse: Ʌ̣LR Ↄ̣ above a palm branch, A(ulus) L(…) R(…) (centurio). ‘Sixth Legion, A(ulus) L(…) R(…), centurion.’Footnote 22
Stanwix, leaden sealings (Nos. 12–20) with small-find numbers (photo: Anna Giecco for Wardell Armstrong Archaeology).

13. Ibid. (Fig. 11, sf 5562). Leaden sealing impressed on both faces with letters moulded in relief.Footnote 23 Obverse:  PE, al(a)e Pe(trianae). ‘(Sealing) of the ala Petriana.’ Reverse: ANC, A(ulus) N(…) C(…).Footnote 24
14. Ibid. (Fig. 11, sf 5666). Leaden sealing impressed on both faces with letters moulded in relief. Obverse:  PE, al(a)e Pe(trianae). ‘(Sealing) of the ala Petriana.’Footnote 25 Reverse: ANC, A(ulus) N(…) C(…).Footnote 26
15. Ibid. (Fig. 11, sf 5778). Leaden sealing impressed on both faces with letters moulded in relief. Obverse: ͡AL· PE|T, al(a) Pet(riana). Reverse: FLM | *D below a palm branch, Fl(avius) M(…) | d(ecurio). ‘The ala Petriana, Flavius M(…) decurion.’Footnote 27
16. Ibid. (Fig. 11, sf 5736). Leaden sealing impressed on both faces with letters moulded in relief. Obverse: ALP A above a palm branch, al(a) P(etriana) A(ugusta). Reverse: [F]Ḷ FEL | + D +, [F]l(avius) Fel(ix) d(ecurio). ‘The ala Petriana Augusta, Flavius Felix decurion.’Footnote 28
17. Ibid. (Fig. 11, sf 5747). Leaden sealing impressed on both faces with letters moulded in relief. Obverse: ALP A above a palm branch, al(a) P(etriana) A(ugusta). Reverse: [F]L FEL | + D +, [F]l(avius) Fel(ix) d(ecurio). ‘The ala Petriana Augusta, Flavius Felix decurion.’Footnote 29
18. Ibid. (Fig. 11, sf 3833). Leaden sealing, obverse only, but made by impressing a die, the letters moulded in relief: Ʌ̣ḶP, al(a) P(etriana).Footnote 30
19. Ibid. (Fig. 11, sf 5807). Leaden sealing, the obverse with letters moulded in relief: C̣͡NER above a palm branch, c(ohors) (II) Ner(viorum).Footnote 31 Reverse: impressed with the die of a standing bird facing left.Footnote 32
20. Ibid. (Fig. 11, sf 5788). Leaden sealing, reverse only, impressed with letters moulded in relief: CẠH below a palm branch(?), C(aius) A(…) H(…).Footnote 33
21. Ibid. (Fig. 12, sf 5581). Bone roundelFootnote 34 incised with two graffiti. (i) COCCVS, Coccus.Footnote 35 (ii) Five straight lines, three of them made twice, forming a zig-zag. Perhaps the letters ɅVI.Footnote 36
Stanwix, five bone roundels (including Nos. 21–23) with small-find numbers (photo: Anna Giecco for Wardell Armstrong Archaeology).

22. Ibid. (Fig. 12, sf 5580). Bone roundel incised with two graffiti. (i) In clumsy capitals: PRIṆ, perhaps Prin(ceps).Footnote 37 (ii) COCCVS, Coccus.Footnote 38
23. Ibid. (Fig. 12, sf 5579). Bone roundel incised with two graffiti. (i) Horizontal line cut by three vertical lines, but not a letter.Footnote 39 (ii) COCCVS, Coccus.Footnote 40
24. Ibid. (Fig. 13). Samian base sherd, incised after firing just above the foot-ring: ɅPRILIṢ, Aprilis.Footnote 41
Stanwix, samian sherd with graffito (No. 24) (photo: Wardell Amstrong Archaeology).

25. Ibid. (Fig. 14). Samian wall sherd incised after firing just above the foot-ring, inverted as to the vessel: […]ṆOBILIṢ, Nobilis.Footnote 42
Stanwix, samian sherd with graffito (No. 25) (photo: Wardell Amstrong Archaeology).

Essex
26. Colchester (Camulodunum, TL 9878 2487), Royal Grammar School (Fig. 15). Iron die, 118.3 mm long but now incomplete, foundFootnote 43 in 1961 or 1964. The broken octagonal shaft ends in a rectangular striking-head, 22.2 by 16.6 mm, bearing in relief the letter M retrograde, now damaged. M(…).Footnote 44
Colchester, iron die with ‘M’ (No. 26) (photo: Colchester Museum).

North Essex
27. Finchingfield (TL 683 327), near Braintree (Fig. 16). Copper-alloy handle for a knife or razor foundFootnote 45 in 2022, cast in the form of the head and long neck of an open-mouthed imaginary beast. Incised across its top end: XII, ‘12’.
Finchingfield handle with incised numeral (No. 27) (photo: PAS).

South Gloucestershire
28. Near Pilning (ST 553 843) (Fig. 17). Wall sherd of a samian bowl (Dr. 31R, Trier, dated 140–200), foundFootnote 46 in 2022. Incised lightly after firing on the wall below the rim, in capitals: […].TỊṾ[…], perhaps […t]tiu[s].Footnote 47
Near Pilning, samian sherd with graffito (No. 28) (photo: Worcestershire Archaeology).

Kent
29. Woodnesborough (TR 310 568) (Fig. 18). Gold ‘keeled’ finger-ring, late second- or third-century in date, foundFootnote 48 in 2023. The oval bezel, 7.83 by 7.35 mm, is incised: SISCI, Sisci. ‘(Property) of Siscus’.Footnote 49
(Woodnesborough), gold ring (No. 29) (photo: PAS).

Lincolnshire
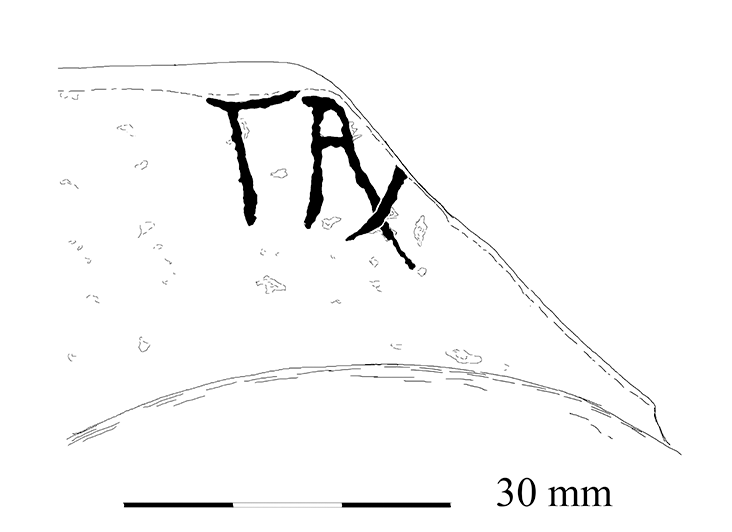
30. Bracebridge Heath Roman villa (SK 977 662) (Fig. 19). Black-burnished (BB1) rim sherd foundFootnote 50 in 2023. Coarsely incised after firing on the wall just below the rim: TAVR.[…], probably Taur[us].Footnote 51
Bracebridge Heath, coarseware sherd with graffito (No. 30) (photographed and drawn by R.S.O. Tomlin).

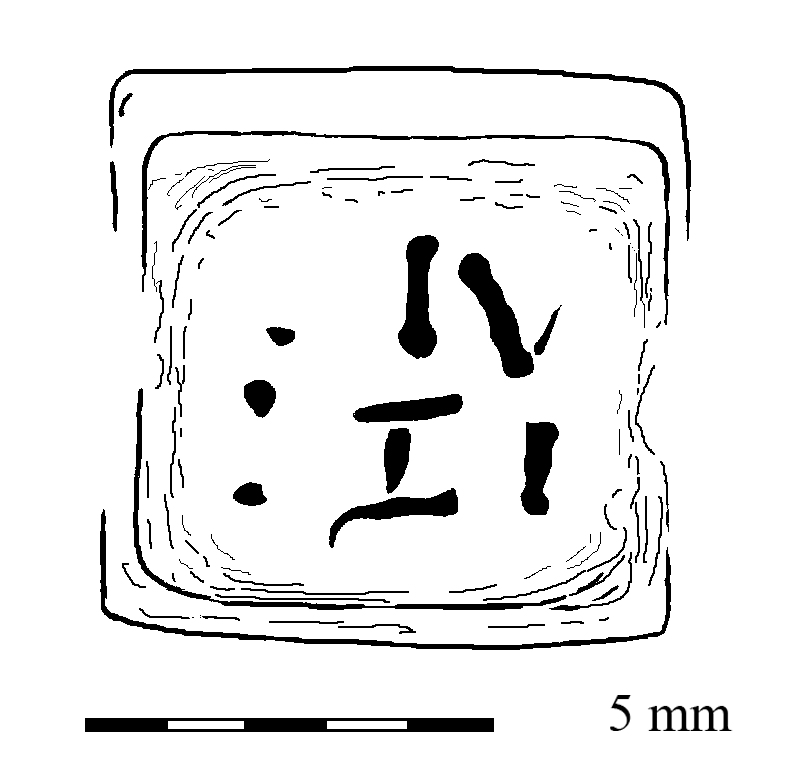
31. Scawby (SE 98 05). Gold finger-ring, weight 5.6 g, foundFootnote 52 in 2005 (Fig. 20). On its stepped rectangular bezel, 7.1 by 6.9 mm, is incised: IV| ḶI, Iuli. ‘(Property) of Iulius.’Footnote 53
Scawby, gold ring bezel (No. 31) (drawn by R.S.O. Tomlin from a photograph).

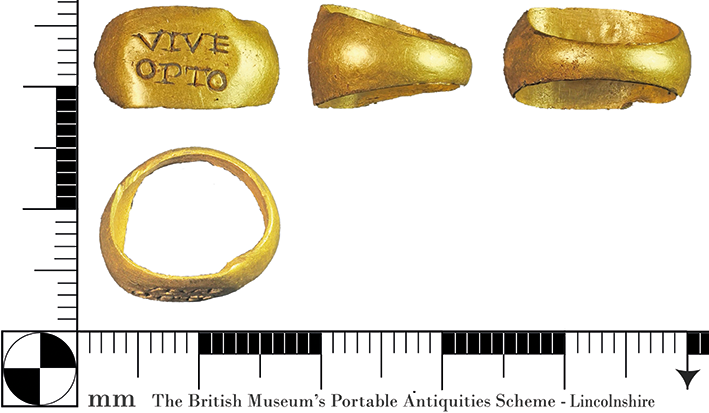
32. Thimbleby (TF 235 699) (Fig. 21). Gold finger-ring, foundFootnote 54 in 2015. On its oval bezel is incised: VIVE | OPTO, ‘Long life to you, I pray’.Footnote 55
Thimbleby, gold ring (No. 32) (photo: PAS).

London
33. City of London (Londinium, TQ 532549 181002), Bucklersbury/Walbrook, Bloomberg Place (Fig. 22). Iron stylus, 132 mm in length from conical writing-point to wedge-shaped eraser, foundFootnote 56 in 2013. It is octagonal in section, and alternate facets are inscribed with dot-punched capital letters c. 2 mm high, in four lines with spacing between the words thus formed.Footnote 57 They read: AB VRBE V.Ṇ[.] ṂVṆVS TIBI GRAṬVṂ ADFẸRO | ACVL[2–3]VM VṬ HABE.S MẸMOR[2–3]M NOSTṚ[.]Ṃ | ROGO SI FORTVNA DAṚ[.]Ṭ QVO POSSEM | LARGIVS VT[.] LONGA VIA CEN[.] SACCVLVS EST [.]ACVVS | This may be restored: ab urbe u[e]n[i]. munus tibi gratum adfero | acul[eat]um. ut habe[a]s memor[ia]m nostr[a]m | rogo. si fortuna dar[e]t quo possem | largius ut[i]! longa uia Cen[i] sacculus est [u]acuus. ‘I have come from the City. I bring you a welcome gift with a point. I ask that you remember me. If only Fortune would grant what I could use more lavishly! From the long journey Cenus’ purse is empty.’ The stylus is a present brought from Rome as a memento of the donor Cenus, who apologises humorously to the unnamed recipient that it was too far for him to afford anything more expensive.Footnote 58
London, inscribed stylus (No. 33) (photo: MoLA. Drawn by R.S.O. Tomlin).

34. Ibid. (TQ 318 814), 81 Newgate Street (Fig. 23). Wall sherd of a south-Spanish oil amphora (Dressel 20), foundFootnote 59 in 2021/22. Inscribed before firing with two graffiti, (a) and (b), both incomplete but apparently aligned and made with the same stylus-point, so probably related.Footnote 60 (a) is the end of a long stroke, most likely the tail of S, extended to mark it as the final letter of a word, probably a personal name in the nominative or genitive: […u]s or […i]s.Footnote 61 (b) is certainly the end of a word: […]ṂAR, probably […] Mar(tias) abbreviated, part of a date from mid-February to mid-March.Footnote 62 They can be taken together as part of the usual graffito towards the base of a Dressel 20 which recorded the potter’s name and date.
London, 81 Newgate Street, amphora wall sherd with graffito (No. 34) (photographed and drawn by R.S.O. Tomlin).

35. Ibid. (Fig. 24). Rim sherd of a south-Spanish oil amphora. Lightly incised after firing: M VII S III, m(odii) vii (sextarii) iii. ‘7 modii, 3 sextarii.’ A note of capacity.Footnote 63
London, 81 Newgate Street, amphora rim sherd with graffito (No. 35) (photographed and drawn by R.S.O. Tomlin).

36. Ibid. (Fig. 25). Coarseware base sherd in Nene Valley colour-coated ware, perhaps a cup, incised underneath after firing in capitals: VICTO, Victo(r). The owner’s name.Footnote 64
London, 81 Newgate Street, coarseware base sherd with graffito (No. 36) (photographed and drawn by R.S.O. Tomlin).

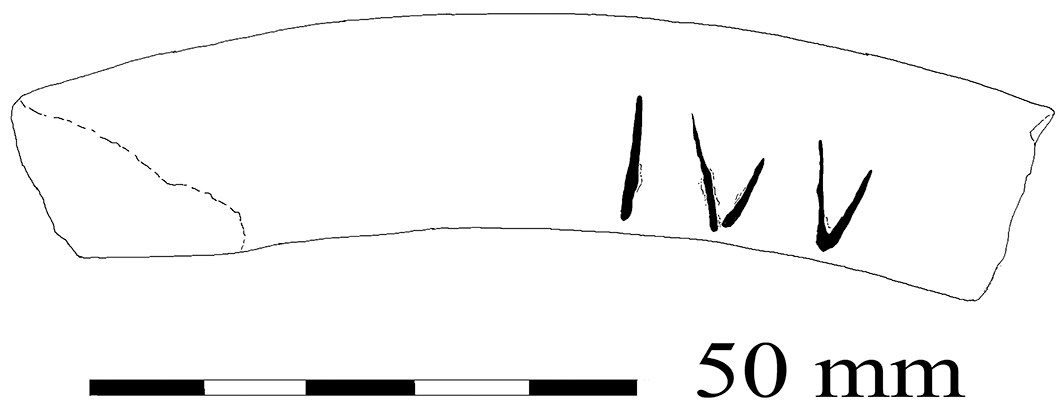
37. Ibid. (Fig. 26). Rim sherd of a black-burnished (BB2) vessel, incised after firing: IVV, probably Iuu(…). The owner’s name, abbreviated.Footnote 65
London, 81 Newgate Street, coarseware rim sherd with graffito (No. 37) (drawn by R.S.O. Tomlin).

38. Ibid. (TQ 333 811), Leadenhall Court (Fig. 27). Rectangular copper-alloy belt plate, 35 by 62 mm, foundFootnote 66 in 1985. Moulded in relief, the figure of a mounted trooper with lance, and in a panel to the left: ṂO͡NTANVṢ, Montanus (fecit). ‘Montanus (made this).’Footnote 67
London, Leadenhall Court, belt plate with maker’s name (No. 38) (photo: Museum of London).

Norfolk
39. East Anglian provenance, perhaps near Diss (TM 116 802) (Fig. 28). Copper-alloy ‘keeled’ finger-ring, foundFootnote 68 perhaps in 1990. It is probably third-century in date, but incorporates a much earlier convex agate gemstone, probably first-century b.c., in the centre of which is incised the composite figure (gryllos) of a dolphin with the head of Silenus. Incised in capital letters anti-clockwise from right to left: C . ͡MAN | NAI, C(ai) Manna(i)i. ‘(Signet) of Gaius Mannaius.’Footnote 69
Near Diss (?), copper-alloy ring with inscribed gemstone (No. 39) (photos: Marisa Neel).

40. Field Dalling (TG 013 390) (Fig. 29). Silver finger-ring foundFootnote 70 in 2021. There is a dot-punched inscription in two places. (a) on the rectangular bezel: MER | MARTI, Mer(curio) | Marti. ‘To Mars (and) Mercury’.Footnote 71 (b) on the hoop below: NI ACIFootnote 72
Field Dalling, silver ring with dot-punched inscriptions (No. 40) (photo: PAS).

Northamptonshire
41. Towcester (Lactodurum, SP 688 495), Old Tiffield Road (Fig. 30). Wall sherd of a samian bowl (Trier Dr. 31R, c. a.d. 160–220/30), foundFootnote 73 in 2024. Incised after firing on the wall just above the foot-ring, in capitals: TRɅ[…], probably Tra[nquil–]. The owner’s name, now incomplete.Footnote 74
Towcester, samian sherd with graffito (No. 41) (drawn by R.S.O. Tomlin).

Nottinghamshire
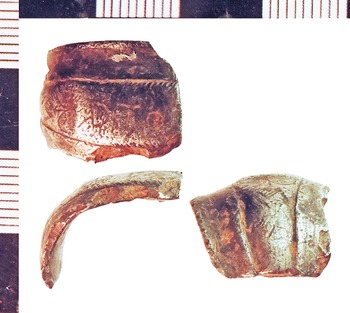
42. Stokeham (SK 78 77) (Fig. 31). Part of a silver finger-ring foundFootnote 75 in c. 2018. Incised on the sub-rectangular bezel: DTO.[…], d(eo) To(u)[t(ati)]. ‘To the god Toutatis.’Footnote 76
Stokeham, silver ring bezel (No. 42) (photo: Martin Foreman).

Somerset
43. Shepton Mallet (ST 624 421), Cannard’s Grave (Fig. 32). Three conjoining sherds of a samian cup (Dr. 33) stamped SCOPLI . M (Lezoux, mid-second century), foundFootnote 77 in 1995. Crudely incised after firing on the wall above the foot-ring, when the vessel was inverted: G̣ɅMMI SɅḄ[…], probably Gammi Sab[in…]. ‘Sab[inus or –ina], (son or daughter) of Gammus.’Footnote 78
Shepton Mallet, samian cup with graffito (No. 43) (photographed and drawn by R.S.O. Tomlin).

Suffolk
44. Near Bury St Edmunds (TL 85 64) (Fig. 33). Copper-alloy pan (trulla), now incomplete, foundFootnote 79 in 2024. Stamped within the disc of the handle, letters in relief: C̣ẠRATVS F̣, Caratus f(ecit). ‘Caratus made (this)’.Footnote 80
(a). Near Bury St Edmunds, stamped pan handle (No. 44) (photo: PAS); (b) CIL xiii 12301, 11, the same stamp on another pan handle (Archaeologiai értesítö 5 (1885), 26).

45. Long Melford (TL 862 456), Orchard Place, Roman settlement (Fig. 34). Conjoining sherds of an incomplete Colchester colour-coated beaker, foundFootnote 81 in 2016. Its moulded figures include a man with a whip confronting a long-eared animal, perhaps a bestiarius in the arena. Incised on the wall above his head, after firing: ṚɅLỌNɅTA, apparently Ralonata.Footnote 82
Long Melford, colour-coated beaker with graffito (No. 45) (photo: Wessex Archaeology).

East Sussex
46. Eastbourne (TV 608 991) (Fig. 35). Copper-alloy finger-ring foundFootnote 83 in 2025. The bezel is inscribed retrograde: G̣IH, G(aius) I(…) H(…); probably G(aius) I(ulius) H(…).Footnote 84
Eastbourne, inscribed ring (No. 46) (photo: PAS).

Tyne and Wear
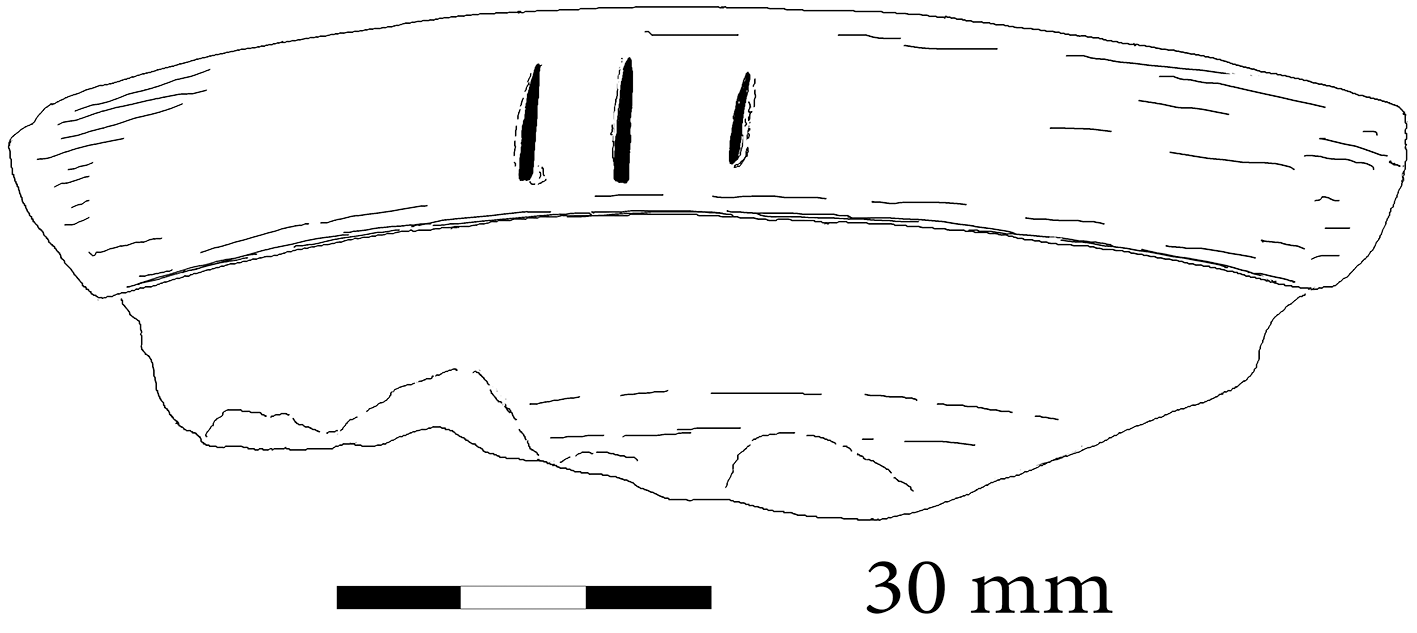
47. Benwell (Condercum NZ 21616 64987) Roman fort (Fig. 36). Rim sherd of a white mortarium foundFootnote 85 in 2017–19. Incised after firing on the outer edge, three short vertical lines: III, ‘3’.Footnote 86
Benwell, mortarium sherd with graffito (No. 47) (drawn by R.S.O. Tomlin).

48. Ibid. (Fig. 37). Wall sherd of a samian dish (Dr. 31). Coarsely incised after firing just below the rim, inverted as to the vessel: […].LLINI, probably [Marce]llini. ‘(Property) of Marcellinus.’Footnote 87
Benwell, samian sherd with graffito (No. 48) (drawn by R.S.O. Tomlin).

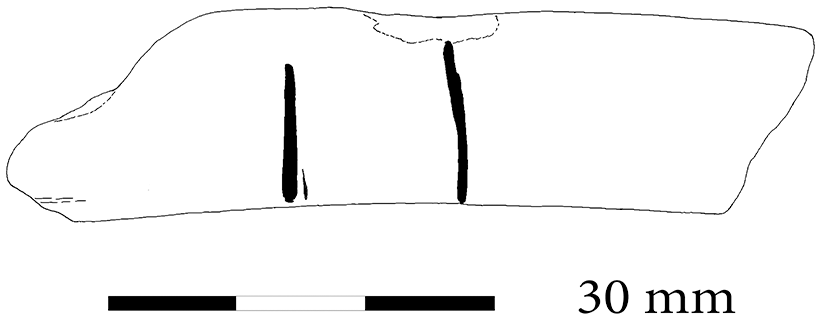
49. Ibid. (Fig. 38). Rim sherd of dark grey coarseware, incised after firing on its upper surface with two lines across its width: II, ‘2’.Footnote 88
Benwell, coarseware sherd with graffito (No. 49) (drawn by R.S.O. Tomlin).

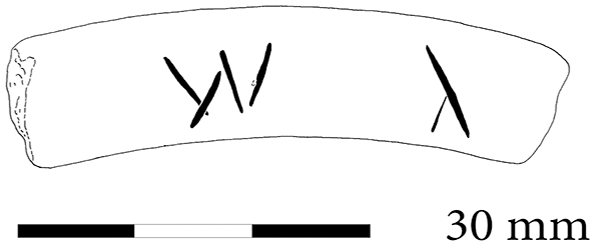
50. Ibid. (Fig. 39). Rim sherd of dark grey coarseware, incised after firing on the outside of the rim with three straight lines: III, ‘3’.Footnote 89
Benwell, coarseware sherd with graffito (No. 50) (drawn by R.S.O. Tomlin).

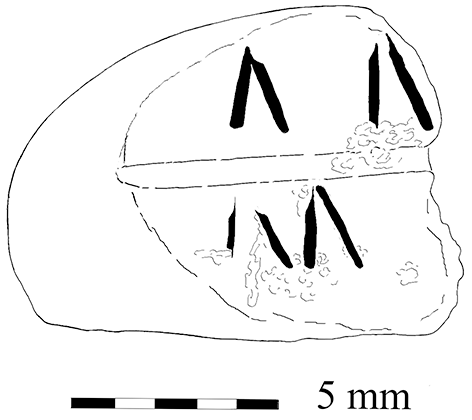
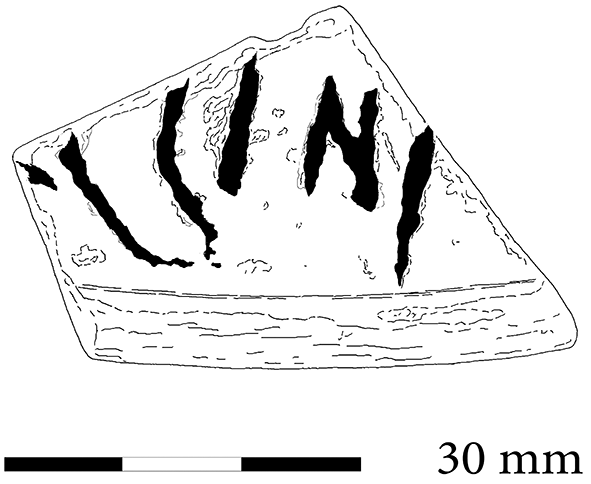
51. Ibid. (Fig. 40). Rim sherd of dark grey coarseware, incised after firing on its upper surface with four diagonal lines, with a fifth diagonal line to their right apparently enclosing a very short diagonal: ṾV Ʌ̣Footnote 90
Benwell, coarseware sherd with graffito (No. 51) (drawn by R.S.O. Tomlin).

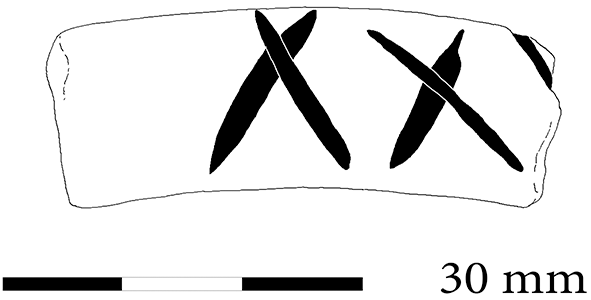
52. Ibid. (Fig. 41). Rim sherd of dark grey coarseware, incised after firing on its upper surface with at least three pairs of crossed lines: XXX̣[…], perhaps ‘30’ or more.Footnote 91
Benwell, coarseware sherd with graffito (No. 52) (drawn by R.S.O. Tomlin).

South Yorkshire
53. Doncaster (Danum, SE 5744 0361) Roman fort (Fig. 42). Fragment of stamped tile, foundFootnote 92 in 1975, with letters impressed within a rectangular die: LEG[…], Leg(io) [IX Hisp(ana)]. ‘Ninth Legion Hispana’.
Doncaster, tile-stamp (No. 53) (photo: Paul Buckland).

North Yorkshire
54. Aldborough (Isurium Brigantum, SE 40846 66934) (Fig. 43). Fragment of a round leaden sealing with attachment tag, foundFootnote 93 in 2025, impressed on both faces with letters moulded in relief: (i) DɅNI, Dani. (ii) perhaps V[.]. ‘At Danum, V[…]’.Footnote 94
Aldborough, leaden sealing (No. 54) (photos: Martin Millett).

55. Ibid. (SE 407 668) (Fig. 44). Rim sherd of a south-Spanish oil amphora (Dressel 20), foundFootnote 95 in 2023. Incised after firing: […]VIVS VII […], […]uius vii […]. ‘[…]vius, 7 (modii) …’.Footnote 96
Aldborough, amphora rim sherd with graffito (No. 55) (photographed and drawn by R.S.O. Tomlin).

Unknown provenance
(a) No provenance, but probably British (Fig. 45). Fragment of tile, probably a tegula, 0.11 by 0.16 m, found before 1986.Footnote 97 Impressed with a rectangular die, the letters in relief: ṂATIF̣L, probably Mati Fl(auiani). ‘(Stamp) of Matius Flavianus.’Footnote 98
No provenance (a), fragment of stamped tile (photo: Peter Scott Gallery).

Addenda et corrigenda
(a) RIB II.1, 2401.6, Stannington diploma. The date of discovery is April 1761, not 1760.Footnote 99
(b) RIB II.2, 2415.12, River Witham, Lincolnshire. Bronze pan (trulla), now lost, said to be stamped: C.ARAT. A better reading is suggested by the stamped pan found in 2024 near Bury St Edmunds: CARAT[VS F], Carat[us f(ecit)].Footnote 100
(c) RIB II.2, 2419.6, Carlisle, Annetwell Street. More fragments of this moulded glass chariot-cup have been identified, and fully published.Footnote 101 With the help of Continental parallels, the moulded letters identifying the four charioteers can now be read: [OLY]MPEVA [FOENI]XVA [E]VTYCHEVA MV[S]CLO[SAE]. [Oly)mpe ua(le), [Foeni]x ua(le), [E]utyche ua(le), Mu[s]clo[s(e) a(u)e]. ‘Olympus, farewell. Foenix, farewell. Eutychus, farewell. Musclosus, hail!’Footnote 102
(d) RIB II.4, 2446.32* alienum, oculist’s stamp. The reference to the physician Paccius should be to Paccius Antiochus (PIR 2 vi P 15).
(e) Britannia 56 (2025), 501, No. 15 (Stanwix) (Fig. 11 above, sf 3320). The new photograph suggests a better reading of this leaden sealing. Obverse:
 | VC*Ↄ, uex(illatio) V(…) C(…) (centurio). Reverse ḶVI, l(egionis) VI. ‘Detachment of the Sixth Legion, V(…) C(…) centurion.’Footnote 103
 | VC*Ↄ, uex(illatio) V(…) C(…) (centurio). Reverse ḶVI, l(egionis) VI. ‘Detachment of the Sixth Legion, V(…) C(…) centurion.’
Falsum
(a) RIB III, 3192 (Bardsey), quarry-face graffito at Hetchell Crag read as CRVTC|VS. ‘The letters look Roman, but not necessarily so.’ In fact, although much weathered, it is modern and refers to ‘Crutch’, one of the many climbing-routes on this feature, each of which has its own name.Footnote 104















 Open access

