

INTRODUCTION
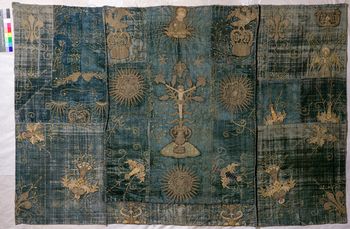
Objects of belief often go through numerous stages of transformation as their religious contexts change and their altered physical forms reflect liturgical, legal and cultural changes. This paper focuses on a textile described when sold in 2014 as an ‘altar frontal made from fragments of a deep blue velvet cope, with embroidered motifs in coloured silks and couched gold and silver thread’,Footnote 1 probably made sometime in the late 1400s (fig 1). The frontal, then described as the Morton cope, was acquired by The Auckland Project, Bishop Auckland, County Durham, for their new Faith Museum and is here called the Auckland frontal. Unusually, this textile can be firmly associated with Archbishop John Morton (c 1420−1500) as it bears his rebus, a visual pun on his name comprising a bird known as a ‘mor’, his monogram (MOR) and a barrel (a ‘ton’ or ‘tun’). It is also connected to an elite recusant Roman Catholic family, the Huddlestons, through its provenance at Sawston Hall, Pampisford, in Cambridgeshire.
Frontal, front face. Photograph: Jeff Veitch. Prepared for publication: Tom Sparrow. Photographs of the frontal are © The Zurbarán Trust/The Auckland Project.

This study demonstrates that not one but at least two vestments are present in the frontal. It maps their transformation, through fragmentation, removal and re-modelling, into an expression of suppressed faith, proposing changes which probably took place in a concealed liturgical context during the repression of the Roman Catholic faith in England between about 1559 and 1829. This provides fresh insights into material expressions of faith before and after the English Reformation as well as during the penal period and its gradual relaxation.
FRAGMENTS OF FAITH: AN INTERDISCIPLINARY APPROACH
Diarmaid MacCulloch notes that it has taken some time for evidence from material culture to be integrated into histories of the Reformation.Footnote 2 However, a powerful case has been made for the ‘materialised study of religion’ based on ‘the assumption that things, their use, their valuation and their appeal are not something added to a religion but rather inextricable from it’.Footnote 3 This view underlies the approach taken here to unpick the frontal’s complex ‘biography’ to demonstrate how ‘materialised study’ may contribute to enhanced understanding of changing religious practices and hence the significance of these altered vestments. The methodology for this study is therefore deliberately interdisciplinary, drawing on both material analysis and the object biography model: Igor Kopytoff’s ‘the cultural biography of things’.Footnote 4 Jules Prown argued that the effective study of material ‘transformed by human action as expressions of culture’ requires interpretation based on ‘as full an understanding of the artefact as possible’.Footnote 5 Detailed analysis of the frontal considered the evidence of its construction, use, fragmentation, modification and degradation, linked with contemporaneous textual and visual evidence, including that of comparable vestments. Learning from things clearly has huge potential but depends on the objects in question surviving. John Chapman’s stress on ‘parts and wholes’, the processes of division and the ‘absence’ of pieces which are no longer part of the whole is particularly relevant here.Footnote 6 This frontal comprises divided artefacts remade into a new whole, so both Chapman’s fragmentation and Alexander Walsham’s recycling models are here applied to a single artefact to illuminate its changing religious significance, social life and patterns of use during possible concealment and re-use.Footnote 7
ARCHBISHOP JOHN MORTON
To understand the religious significance of the components of the Auckland frontal, it is necessary to summarise Morton’s turbulent but relatively understudied life. Both his nineteenth and twenty-first century biographers made this point: ‘He has almost been squeezed out of history, although few men ever made more history than he did’ and ‘history has, in large part, forgotten him’.Footnote 8
Morton rose from a relatively modest gentry background to the great offices of church and state. An Oxford University graduate, ordained in 1485, Morton became a highly efficient lawyer, diplomat and statesman rather than a theologian.Footnote 9 His commitment to the Lancastrian cause meant he fled the country to save his life twice, joining Queen Margaret’s court in exile in Flanders, was attainted twice (1461 and 1484) and was imprisoned in the Tower of London twice (1461 and 1483). After the Lancastrians’ defeat at the Battle of Tewskesbury (1471), Morton took either a pragmatic or an opportunistic step and submitted to the Yorkists. He was pardoned and the attainder against him reversed in 1472. Edward iv’s appreciation of his talents can be seen in Morton’s rapid rise; he became Master of the Rolls (1472) and Bishop of Ely (1478). Morton officiated at Edward’s funeral in 1483 and was an executor of his will and guardian of his children. A rapid reverse followed. Under Richard iii, Morton was again in exile on the Continent, working in support of the Lancastrian claimant to the throne, Henry Tudor. Finally holding power, Henry vii summoned Morton back to England, where he assisted at the coronation (1485) and swiftly became Archbishop of Canterbury (1486), Lord Chancellor (1487) and, eventually, Cardinal (1493). Morton was one of Henry’s most trusted Privy Council advisers, influencing England’s international and fiscal policies as well as managing civic and religious administration.Footnote 10
Despite his status, surprisingly little of Morton’s personality is known and his character is hard to read. He left no statement of faith, no theological reflections or sermons and few private papers.Footnote 11 Morton recognised family connections in his will and seems to have had an almost paternal relationship with Thomas More, maintaining him first as a page in his household and then as student at Oxford. More repaid this debt by memorialising the cardinal in Utopia.Footnote 12 When Richard iii imprisoned Morton in the Tower, Oxford University scholars wrote pleading for his release but seem to have been more inspired by Morton’s support as a ‘liberal patron’ and ‘staunch defender and ready helper’ than by personal affection.Footnote 13
Work pressures may have meant Morton had no time for ‘sustained intellectual pursuits’.Footnote 14 Claims for Morton as a translator have proved unfounded.Footnote 15 Literary activities linked to his circle demonstrate an interest in civil and canon law, classical literature and rhetoric with some leanings towards humanistic ‘new learning’.Footnote 16 Drama was part of the life of Morton’s household. More is said to have joined the players in such entertainments.Footnote 17 Henry Medwell, one of Morton’s chaplains, wrote the first known secular English play, Fulgens and Lucrece, which was possibly staged at Lambeth Place in 1497.Footnote 18 The published version (c 1512) was dedicated to Morton. John Holt, tutor to the boys in Morton’s service, dedicated his Erasmian grammar book Lac Puerorum or Mylke for Chyldren to Morton, while More provided the framing Latin verse epigrams.Footnote 19 Morton’s ‘fine, eloquent and pithie’ conversation seems to have left no paper trail beyond More’s testimony.Footnote 20
The visual record is equally barren. No painting of Morton survives among portraits of early Archbishops of Canterbury at Lambeth Palace.Footnote 21 It is unclear how far the effigy on Morton’s splendid cenotaph in Canterbury Cathedral is a portrait.Footnote 22 Two other possible representations are both contested. Morton is thought to have paid for a carved and painted roof (c 1485) for St John the Baptist, Bere Regis, in Dorset, possibly his birthplace.Footnote 23 Next to Morton’s coat of arms is a rather crudely carved boss reputed to be his likeness, although no known evidence supports this.Footnote 24 Mozley, a nineteenth-century rector at St John the Baptist, Plymtree, Devon, argued that the painted chancel screen in this church depicted Morton as the ‘patriarchal-looking man’, basing this identification on the ‘vessel made in the form of Morton’s rebus, a ton or cask, with M upon it’ carried by a younger man.Footnote 25 Unfortunately, Mozley had misinterpreted the evidence – there is no such ‘M’ and no other reason to identify the older man with Morton.Footnote 26
Morton’s reputation has been mixed, coloured by suspicions about his conspicuous change of allegiance and early biographies that often reflected their authors’ political agendas and prejudices. The writer of the Chronicles of London considered that ‘in our time was no man like to be compared to him in all things; albeit that he lived not without the great disdain and great hatred of the commons of this land’.Footnote 27 Sir George Buck’s heavily rewritten 1619 account presents Morton as one of Richard iii’s traducers and the source of much malign activity, going so far as to suggest Morton’s involvement in the death of the Princes in the Tower.Footnote 28 Morton’s reputation has not been helped by Francis Bacon’s assertion of his responsibility for the infamous tax strategy known as ‘Morton’s fork’.Footnote 29 Nevertheless, even Bacon acknowledged that Morton was a ‘wise and eloquent man’ although ‘harsh and haughty – that he was much accepted by the King, but envy’d by the nobility, and hated by the people’.Footnote 30 More, not unnaturally, defended Morton as ‘not more honourable for his authority, than for his prudence and vertue’.Footnote 31 Morton’s nineteenth-century biographer, John Budden, provides anecdotes of his interactions with politicians and churchmen and praises his care for the poor, summing him up as ‘famous for religion, pollecy and Integrity of life’, renowned in Oxford as ‘a fortunate determiner of causes, a punisher of guilty and obstinate delinquents, an equall servant of iustice, to administer every man his right’.Footnote 32 The consensus seems to be that Morton was an austere, sometimes harsh, but fair man who was a consummate politician. Mozley asserts that ‘Morton made no direct appeal to posterity. He wrote nothing that has come down; he raised no mighty fabric to enshrine his memory’.Footnote 33 However, this is to ignore not only Morton’s legacy of building works but also the material and spiritual evidence of the vestments he so clearly marked as his. The lack of textual and visual evidence makes the evidence of the Auckland frontal, and what the vestments suggest about the man who commissioned them, even more significant. These show Morton to be a man of sacred and secular power and wealth who clearly was willing to engage with vestments for their liturgical significance, authority and visual drama and, possibly, personal spiritual meanings.
MORTON’S USE OF VESTMENTS
Morton seems to have made good use of the opportunities offered by liturgical theatre, although his performance in such rites also seems to demonstrate genuine devotion, as evoked in Walter Hook’s version of a contemporary account of Morton’s enthronement as Bishop of Ely:
After a night passed in prayer, [Morton] set out … to walk from Downham to Ely. He was arrayed only in his rochet; his head was uncovered; his feet were exposed to the hard ground; … he devoutly uttered his Paternosters … The great west door, as he drew near, was thrown open … The bishop’s sedile was as splendidly decorated as the throne, and contrasted with the unadorned, travel-stained man, who, instead of seating himself, bent the knee … He was still barefooted, and clad only in his rochet … [when] he entered the vestry, and the cathedral clergy washed his feet; with due ceremony and prayer they arrayed him in his pontificals. Then there was silence for a space … The procession came forth. Last of all appeared, in all the magnificence of his pontificals, his jewelled mitre on his head, his rich pastoral staff in his gloved hand, his feet clad with sandals, and treading the rich carpet, the Lord Bishop of Ely.Footnote 34
These ‘pontifical’ vestments are evident in both Morton’s memorials in Canterbury Cathedral. His elaborate cenotaph shows Morton’s ‘monumental body’ in full episcopal vestments, including a pallium, stole, maniple, chasuble and dalmatic with a jewelled mitre, embroidered gloves and his cardinal’s hat and rebus of a monogrammed barrel in the canopy above.Footnote 35 In his will, Morton asked to be buried simply under a plain marble slab in the Cathedral’s undercroft, where his body could lie in front of the statue of the Virgin Mary known as Our Lady of the Undercroft.Footnote 36 Despite his request, this slab was ornamented with a memorial brass. Only the indent now remains, showing the Archbishop in his mitre, surmounted by his cardinal’s hat.Footnote 37
MORTON AND VESTMENTS AS GIFTS AND LEGACIES
Morton is known to have used vestments as gifts, which would have reinforced his presence and authority, especially when his coat of arms or rebus were present. Typically, copes and chasubles were designed as sets, each having different liturgical functions. Copes were generally worn for processions rather than by the main celebrant during Mass. Chasubles were a Eucharistic vestment, so often had religious imagery on the back that was visible when the priest faced the altar. After becoming archbishop, Morton gave Canterbury Cathedral eighty white copes, vestments (probably chasubles) and a funeral pall, all with his coat of arms.Footnote 38 The cathedral may actually have received fewer copes than this, but even so this was a costly gift.Footnote 39 The loss of these copes can be traced, as the Commissioners visited the cathedral to remove its material goods and the Canterbury clerics were obliged to dispose of their vestments. The 1540 inventory recorded fifty copes of ‘white golde baudekyn wth golde of Moreton’s gifte wt Orpheras [orphreys] of velvet golde baudekyn’, vestments for a deacon and subdeacon, three stoles and two phanons (maniples).Footnote 40 The ‘riche hersecloth of blacke and white golde baudekyn’ is probably the funeral pall given by Morton.Footnote 41 The 1563 inventory showed the number reducing radically. The first draft lists ‘Item of my lorde Mortons suyte x copes’, but the final version only has ‘foure Copes’ from Morton’s gift.Footnote 42
Others also received vestments from Morton. Within the Canterbury diocese, the 1509 inventory of St Dunstan’s Church, Cranbrook, recorded ‘ii whyte copys, an awbe [alb] ii tewnyklys [tunicles]. White brawdered with fflwrys of my lord Cardylnall Mortymer’s [Morton’s] geft’.Footnote 43 Lincoln Cathedral received ‘a red cope of Cloth of Gold with costly orphreys … the gift of Mr John Morton, Archbishop of Canterbury’.Footnote 44 Morton also used vestments as gifts for political or diplomatic purposes. In 1498, Erasmus reported Morton’s ‘present of a magnificent vestment’ to Hendrik van Bergen, Bishop of Cambrai.Footnote 45
Morton also seems to have supported churches that needed to replace vestments where a public statement of identity would not have been visible. He authorised a period during which indulgences could be granted to ‘Christians within the province of Canterbury … who contribute to the relief of the parish church of St Michael Queenhithe in the city of London, the most part of whose vestments and ornaments were lately destroyed by fire’.Footnote 46
Morton’s will underlines his engagement with episcopal accoutrements. He left Ely Cathedral his best mitre and the mitre he had received from his predecessor at Ely in return for Requiem Masses.Footnote 47 He does not seem to have left vestments, or funding for vestments, for these Requiem Masses. No further mention of vestments that Morton wore, or might have regarded as personal possessions, has yet been found.Footnote 48 In addition to the Auckland frontal, four vestments bearing elements of Morton’s rebus survive, but none corresponds to the vestments described in the textual evidence.Footnote 49 St Mary’s College, Oscott, Arundel Castle, West Sussex, and the Statens Historiska Museum, Stockholm, each have one such cope. A chasuble, probably originally a cope, is at St Mary’s Roman Catholic Church, Monmouth.
CHANGING ATTITUDES TO VESTMENTS: PHYSICAL CONSEQUENCES
Henrician claims on church property were followed by more systematic removals under Edward vi. Attitudes were obviously different under Mary i, but vestments remained controversial under Elizabeth i. The 1559 Act of Uniformity made vestments subject to the authority of the monarch and parliament, although the 1566 vestiarian conflicts demonstrated continuing theological differences expressed through the choice of liturgical dress.Footnote 50 The practical consequence was the continuing reduction of the role of vestments in liturgical practice. Duffy and Ashton have mapped their removal from parish churches and cathedrals along with the strong emotions and protective or iconoclastic actions and reactions produced by things of faith.Footnote 51 Most vestments had gone from the majority of parish churches by the 1570s, but copes lingered on and were still used in cathedrals as processional vestments.Footnote 52
The valuable textiles used for vestments, particularly copes with their generous lengths of loom-width fabrics, were often repurposed.Footnote 53 Given the adaptability of cloth, some vestments were given new functions within the church. At St Peter & St Paul, Steeple Ashton, Oxfordshire, a cope was reconfigured as an altar frontal and dossal.Footnote 54 The table carpet at St Margaret’s, Lyng, in Norfolk, was constructed out of parts of two copes along with embroidered orphreys to make the ‘carpet, silk or other decent covering’ required for the communion table.Footnote 55 Not all vestments and textiles remained inside the church. At St Sebastian’s Church, Great Gonerby, in Lincolnshire, ‘all the priest’s apparel that he was wont to wear at mass’ was cut up and sold to William Carter, a local tailor.Footnote 56 Some found new life in a domestic setting. In 1566 churchwardens Richard Arnold and Nicholas Colbie of Harlaxton, in Lincolnshire, recorded the sale of two chasubles and other textiles to a Mr Blewet who ‘haithe defaced and cut theim in peces and made bed hangings of them and cusshinges’.Footnote 57 Such defacement was a necessary mutilation to de-sacralise the images. Lack of defacement was a concern for those seeking out recusants who might be keeping sacred things whole in the hope they would be needed again. In 1605, Bishop Richard Vaughan instructed his London clergy to establish if ‘there be any in your parish who are noted, knowne, or suspected to conceale or keepe hidden in their houses … copes, vestments, albes, or other ornaments of superstition, uncancelled or undefaced’.Footnote 58 Possession of vestments became evidence of adherence to the ‘old faith’. Suspicions deepened as missioner priests started to arrive in England. Those suspected of harbouring priests and their Mass equipment could be arrested, imprisoned and even executed. Changing attitudes to the cult of the Virgin Mary intensified such risks. England was once renowned for Marian devotion, but Henrician reforms rejected Mary’s intercessory role.Footnote 59 Devotion to the Virgin was effectively banned from 1538 and her statues removed, part of a longer iconoclastic process that continued under Edward vi and Elizabeth i.
A RECUSANT PROVENANCE
The Auckland frontal is known to have come from Sawston Hall, although the date of its arrival there is unknown. Bradley speculates that the original cope might have been a gift to Sawston church from Morton while he was Bishop of Ely.Footnote 60 However, the Edwardian Commissioners’ listing does not include a cope or chasuble corresponding with those now making up the frontal.Footnote 61 Ironically, John Huddleston was one of these Commissioners, although he later became a Privy Councillor under Mary i. John’s widow Bridget (b. 1515) remained a Catholic under Elizabeth i. His son Edmund (d. 1606) was a partial conformer, so it was his grandson Henry (d. 1657) who continued the Roman Catholic tradition. The family paid recusancy fines and sent their children abroad to be educated; nine entered Roman Catholic orders. Henry was a friend of the English Jesuit priest John Gerard (1564−1637), offering him sanctuary at Sawston in 1594.Footnote 62
Sawston Hall became a centre for recusants, with carefully constructed hiding places to protect the priests in residence, who were often Jesuits.Footnote 63 ‘Prayers’ were held in the hidden attic chapel during the penal period.Footnote 64 In operation by at least 1584, this illegal chapel was later described as ‘a gloomy Garret and no ways ornamented; it is quite out of the way by Design, and in case of any Confusion, the Tabernacle and Altar may be easily removed’.Footnote 65 After the 1791 Relief Act, Ferdinand and Richard Huddleston were quick to register a legitimate chapel on Sawston Hall’s ground floor.Footnote 66 The Huddlestons acquired numerous Catholic Mass artefacts, including chalices, altar frontals (frequently made of remounted fragments) and chasubles with remounted orphreys.Footnote 67
THE AUCKLAND FRONTAL
The evidence from the fabrics and threads making up the frontal is key to understanding the stages of its ‘object biography’. The importance of these changes – extended ‘use-life’ in Chapman’s terminology – will be discussed after the frontal’s composition and iconography has been considered.Footnote 68
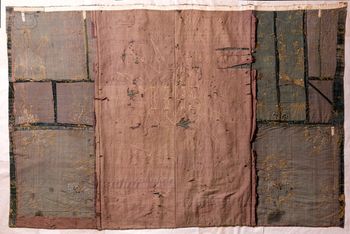
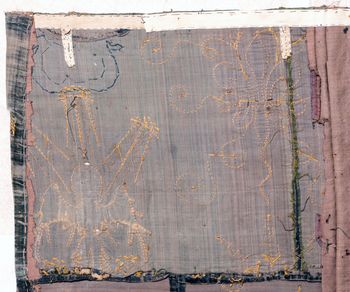
The frontal is an oblong panel measuring approximately 1,560mm × 1,010mm, consisting of twenty-six rectangles and triangles cut from blue silk velvet fabrics (see fig 1). There are twenty-five appliqué motifs worked in polychrome silk and gold or silver threads with other details embroidered directly onto the velvet. The backing, now faded and incomplete, was made of four loom widths, each approximately 800mm (31½ in), of a plain weave wool fabric with a white warp and red weft, embroidered at its centre with an IHS Christogram (fig 2).
Frontal, reverse. Photograph: Jeff Veitch. Prepared for publication: Tom Sparrow.

SACRED AND SECULAR ICONOGRAPHY
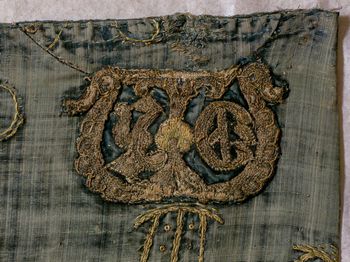
The most important sacred motifs of God the Father and a Lily Crucifix are in the centre of the frontal above a rose-en-soleil motif with two further rose-en-soleil motifs flanking the crucifix. Morton’s rebus with all three elements − the bird, monogram with the O and R enclosed by the M in the form of a stylised tree, and barrel – are on either side of God the Father. There are two other monograms, one centre left and one top right, with two wings from another bird above the former and an angel below the latter. Comparable to seraphs on many medieval vestments, this has a halo, six peacock feather wings and an ermine collar, and is surrounded by small groups of rays. Other secular motifs include four fleur-de-lys motifs towards the corners of the frontal and ten elaborate appliquéd stylised flowers of four different types. This embroidery is typical of the second half of the fifteenth century, when appliqué tended to replace more complex overall stitching. Workshops seem to have produced variants on a range of standardised motifs, such as angels and flowers.Footnote 69 Motifs such as Morton’s rebus and the Lily Crucifix were probably specially commissioned and are higher quality work. The IHS enclosed in a sun on the backing is worked as a simple outline in thick couched cord. The highly stylised lettering is similar to some eighteenth-century renditions of this Christogram.
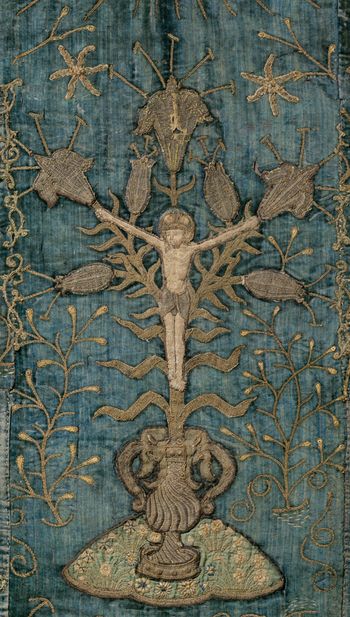
The Lily Crucifix is a very unusual motif, which appears to be exclusively English. Christ is depicted crucified on a lily, Mary’s symbol, rather than a wooden cross. The lily became a regular element in Annunciation scenes from the thirteenth century, evoking Mary’s purity while also possibly referencing the idea that lilies aided conception.Footnote 70 The fusion of the Annunciation with the Crucifixion arose from the belief that the Feast of the Annunciation, celebrated on Lady Day (25 March), was the same day as Christ’s crucifixion.Footnote 71 This idea was current from as early as Augustine (354−430) into the seventeenth century when John Donne wrote Upon the Annuntiation and Passion Falling upon One Day (1608):
… this day hath showne,
Th’Abridgement of Christs story, which makes one
… Of the’Angels Ave,’ and Consummatum est.Footnote 72
Nineteen representations of the Lily Crucifix are known in various media, dating from the mid to late Middle Ages, frequently shown between Mary and Gabriel in an Annunciation scene.Footnote 73 Cervone argues that these representations are dissimilar, suggesting ‘this is not the case of one craftsman or his workshop using and re-using a design’.Footnote 74 Some features, such as the number of flowers and the ornate vase, appear fairly consistent but none is sufficiently close to the frontal’s version to be considered as a source. Nevertheless, the designer of this embroidered version seems to have been familiar with all the motif’s key elements. As Morton was in Oxford as a student and then, after 1435, as principal of Peckswater Inn (now Christ Church) and, finally, as chancellor from 1495, he may have seen the Lily Crucifix stained glass window in St Michael-at-the-North-Gate, in Oxford, dating from 1410−80.Footnote 75 His cenotaph includes carvings of ‘a large and well carved lily, in a vase’ and there was probably a statue of the Virgin and an Annunciation on the east jamb.Footnote 76 The high-quality and sensitively detailed Lily Crucifix on the frontal appears to be unique as a motif on vestments (fig 3).Footnote 77 Walter Hildburgh and Christopher Woodeforde, both pioneering writers on Lily Crucifixes, observed that no examples had yet been found on medieval church embroidery.Footnote 78
The Lily Crucifix. Photograph: Jeff Veitch. Prepared for publication: Sonia O’Connor and Tom Sparrow.

PERSONAL AND POLITICAL MOTIFS
Both his rebus and the rose-en-soleil motif may have had a more personal resonance for Morton as assertions of his identity and allegiances.
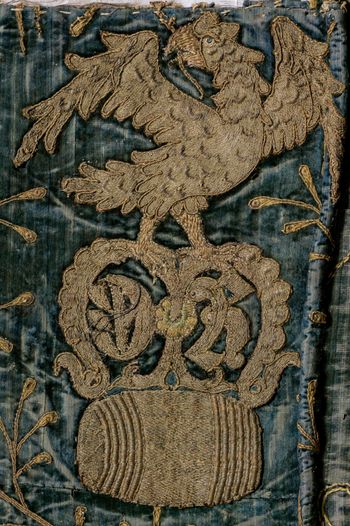
William Camden describes Morton’s rebus as a ‘Mor upon a Tun, and sometime a Mulberry tree called Morus in Latine, out of a Tun’.Footnote 79 The bird could reference a falcon or the eagle of St John the Evangelist, who could have been Morton’s name saint. Morton’s rebus was clearly recognised within the ecclesiastical community. An eagle on a tun appeared as one of the ‘subtleties’ made from sugar paste, marzipan or wax at the banquet celebrating Morton’s enthronement as Bishop of Ely.Footnote 80 Morton used his rebus as a mark of ownership in his books; the MOR on a barrel appears in his copy of Bartolus de Saxoferrato’s Lectura super prima parte Codicis.Footnote 81 Two versions appear in Richard Pynson’s 1500 edition of the Sarum Missal, signifying Morton’s patronage.Footnote 82 His rebus identified his building works at Croydon Palace and Canterbury Cathedral, where it also appears on his cenotaph.Footnote 83 In Oxford, it could once be seen in the Divinity School and St Mary’s Church.Footnote 84 Budden summarised the not so subtle message: ‘he hath adorned her [Oxford’s] monuments wth his armes and diuises … all wch make full demonstration of his learning, vertue, high descent, and munificence’.Footnote 85 The barrel, generally on its own but sometimes with the initial M, gained wider circulation on the coins Morton was licenced to mint as Archbishop of Canterbury.Footnote 86
Two appliqué versions of the rebus on the frontal have all three elements: the bird, MOR monogram and barrel (fig 4). When present on a vestment, the rebus could function as a reminder of the Archbishop’s authority, ownership or gift. It may also have reminded those wearing the vestments or seeing them used during Mass after Morton’s death to pray for him.Footnote 87 Abbot Thornton seems to have intended his rebus, now on the back of a funerary chasuble, to evoke prayers for his soul’s repose.Footnote 88
Morton’s rebus. Photograph: Jeff Veitch. Prepared for publication: Sonia O’Connor and Tom Sparrow.

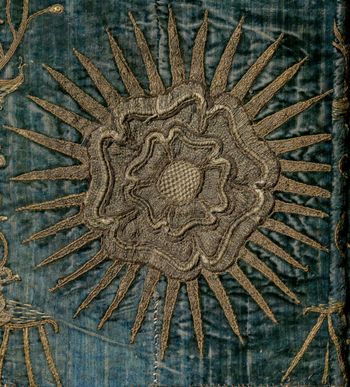
The rose-en-soleil motif adopted by Edward iv combines the white rose of the House of York with the sunburst emblem of his predecessor Richard ii (fig 5). The presence of this symbol on the frontal suggests a vestment made sometime between 1471 to 1472, when Morton began to serve Edward, and the King’s funeral in 1483.Footnote 89 This, combined with blue’s association with royal mourning, may have led to the belief that the frontal included parts of a cope worn by Morton at Edward’s funeral.Footnote 90 However, blue was actually worn as mourning by royalty rather than by those mourning royalty, who wore black.Footnote 91 The rose-en-soleil may also be read as a Marian symbol.Footnote 92 The two interpretations are not mutually exclusive as Edward was a devotee of the Virgin, visiting her Walsingham shrine in 1469.
The rose-en-soleil motif. Photograph: Jeff Veitch. Prepared for publication: Sonia O’Connor and Tom Sparrow.

UNPICKING THE FRONTAL
This research was initially undertaken to test the hypothesis that the frontal comprised a cope belonging to Morton. Attention focused on investigating and capturing material evidence about making and re-making to gain as full an understanding as possible of the original vestment and the stages in its transformation. Every aspect, from the threads upwards, was considered using detailed visual examination (stitches, seams, direction of warp, wear patterns), chemical analysis (dyes and metals), microscopy and photo-microscopy (fibres, weaves, sequins) and X-radiography (construction). It rapidly became clear that the frontal’s biography was more complex than first supposed. Dye analysis showed the presence of natural plant dyes throughout. These are consistent with fifteenth-century western European textiles, but, because their use continues into the nineteenth century, this did not help to distinguish the dates of the different phases of forming and reforming.Footnote 93
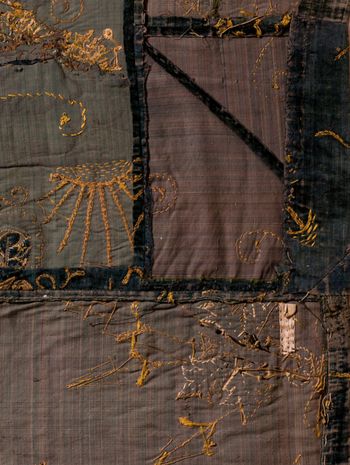
The study revealed the frontal to be made from pieces of two distinctly different blue silk velvets. Despite the surface similarity of the blue pile, one velvet has a predominantly pinkish/blue ground weave and green selvedges (Velvet A) while the other, Velvet B, has a predominately blue ground and creamy-white selvedges (fig 6). Such silk velvet was an expensive imported luxury. For Henry vii’s coronation in 1485, a year before Morton became Archbishop of Canterbury, Lord Dudley was supplied with 11 yards of blue velvet at 14 shillings (about £484) a yard, while the crimson velvet for my Lord of Oxford’s robe was a startling 30 shillings (about £1,037) a yard, more than the purple velvet bought from the mercer John Mafthewe for the king at 20 shillings (about £691) a yard.Footnote 94 The price variations presumably reflect differences in the quality of the fabric and dyes.
Reverse of the frontal showing the different colour ground weaves; Velvet A (right), Velvet B (left). Photograph: Jeff Veitch. Prepared for publication: Sonia O’Connor and Tom Sparrow.

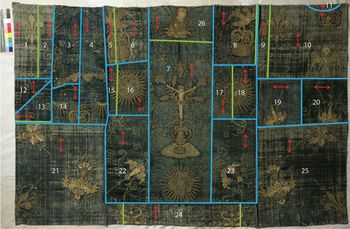
The twenty-six pieces are stitched together using a variety of construction threads and different seam types (fig 7). Where embroidery motifs continue across one piece to another, these seams can be safely attributed to source vestments. For instance, the seam joining Pieces 1 and 2 runs beneath an appliqué. These seams can be seen to have selvedges where they are visible on the reverse. The single selvedges visible on the turnings of Pieces 8 and 13 show these pieces incorporate unpicked vestment seams. X-radiography was particularly useful in clarifying different seam structures and stitching as well as revealing cut or selvedge edges, especially where these are obscured by the partial backing. Original vestment seams are neatly sewn with an evenly sized backstitch. Later seams are mostly in coarser, unevenly sized running stitch and poorly aligned to the seam direction, with roughly cut, uneven or excessive turnings.
Diagram showing the individual pieces of the frontal: red arrows indicate the grain direction of the fabric; blue lines are seams between the pieces; green lines are seams original to the vestments. Photograph: Jeff Veitch. Prepared for publication: Sonia O’Connor, Rachel Kershaw and Tom Sparrow.

The appliqué motifs were first embroidered with silk and metal threads onto a plain weave undyed linen fabric, using mainly split stitch and laid and couched work, then cut out and stitched to the velvet. The full rebuses and the Lily Crucifix are composites, the latter having eighteen separate appliquéd elements. Some elements, such as the vase and barrels, are in raised metal thread work. The curved ray motifs, curlicues and other direct embroidery are worked in couched metal threads and simple stitches such as back and chain stitch. The threads are typical of the period: silk floss and metal threads made from narrow gilded metal strips wrapped on fibre cores.Footnote 95
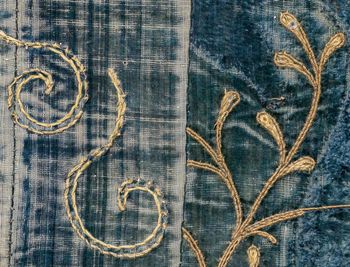
The angel, floral and fleur-de-lys appliqués are on Velvet A. The figure of God, the Lily Crucifix, rebuses and rose-en-soleil motifs are all on Velvet B. The directly embroidered spikes extending from the stylised flowers on Velvet A are accentuated by rows of domed sequins with punched central holes. These have a silver-copper alloy base with a very thin fire-gilded gold layer on the upper surface.Footnote 96 These spikes and the other directly embroidered curlicues and trails are in metal threads shadowed by lines of yellow silk split stitch embroidery. The directly embroidered elements on Velvet B are quite different. These depict branching plants made of paired couched metal threads that form leaf-like ends infilled with yellow silk (fig 8). There are exceptions, but these fragments of direct embroidery have been repositioned, probably when the twenty-six pieces were stitched together. Some appliqué motifs have also been moved. The Morton monogram in the frontal’s top right corner has been cut out with some of its original ground velvet and re-attached across the seam between Pieces 11 and 10 with the letters up-side-down (fig 9). The two bird wings stitched across Pieces 3 and 4 are also no longer in their original locations. This evidence shows that Velvet A and Velvet B were not used in the construction of a single vestment but are from separate vestments.
Detail of direct embroidery on Velvet A (left) and B (right). Photograph: Jeff Veitch. Prepared for publication: Sonia O’Connor and Tom Sparrow.

Morton’s inverted monogram stitched across Pieces 10 and 11. Photograph: Jeff Veitch. Prepared for publication: Sonia O’Connor and Tom Sparrow.

There are two crudely made vertical tucks forming raised ridges on the front, dividing the frontal into approximate thirds. Sewn with a thick cream thread and large, uneven running stitches, the tucks pass through all the frontal’s layers except for the white tape reinforcing the reverse top edge. There are also four narrow white tape loops stitched vertically onto the back, three towards the top edge of the frontal (fig 10). The fourth loop is halfway down one side below the major horizontal seam (see fig 6). The turning of both parts of this seam conceals a blue tape. X-radiography indicates the same, or a very similar tape, hidden under the white tapes at the top of the frontal on Pieces 1/2, 9/10 and 11.
Reverse of Pieces 9/10 and 11 showing the white tape reinforcement and a tape loop. Photograph: Jeff Veitch. Prepared for publication: Sonia O’Connor and Tom Sparrow.

Silk is particularly prone to photodegradation; both velvets are weak and their pile powders easily. Both show wear along the original seams, but wear along the frontal’s bottom edge suggests it was used for some time in this form. Velvet A seems to be considerably more degraded than Velvet B, but there are exceptions that indicate that individual pieces and groups experienced different biographies. Soiling includes wax deposits, mainly along the bottom portion of the frontal. There are many roughly mended tears and holes. The frontal’s top reinforcing tapes and sides have a variety of holes, frequently associated with iron staining indicating the use of nails and tacks for display. Moth frass suggests that insect activity may have been a factor in the removal of much of the wool backing, which now only covers the central third of the reverse. What remains is faded due to light exposure; the colour is much stronger on its reverse and in the protected seam turnings. This light exposure will also have weakened the wool, probably causing tearing and consequent disintegration of the backing, which was then both cut and torn away, leaving only traces of its original extent.
REVEALED AND HYPOTHETICAL SACRED IMAGES
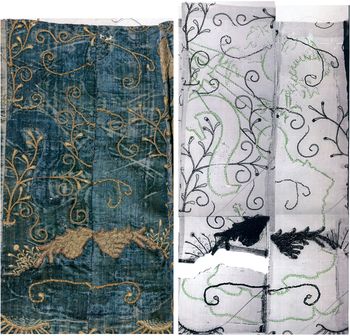
X-radiography revealed previously unsuspected appliqué motifs and associated direct embroidery, including a depiction of the Annunciation on Velvet B, Pieces 3 and 4. Outlines of the missing motifs appeared when the empty stitch holes were highlighted on the enlarged digitised radiographs. They show the Holy Ghost as a dove descending on rays towards the figure of the Virgin with a bird from Morton’s rebus above (fig 11). Ragged cuts, one vertically through the location of Mary, seem to be a deliberate act of destruction and contrast with the apparent care taken in the removal of the Annunciation motifs from the velvet. Morton’s bird was also removed, while the monogram below the Annunciation remained in situ. These velvet pieces were later re-sewn, but slightly out of register. The stitch holes also delineate a scroll next to Mary, reinforcing the existence of a complete Annunciation and making it a reasonable hypothesis that the Angel Gabriel once appeared on an adjoining piece that is no longer extant. Remaining thread tufts suggest this scroll was once worked with a text. There are similar text-bearing scrolls in the Annunciation on a repurposed cope dated to the second half of the fifteenth century in St Augustine’s Church, East Langdon, Kent.Footnote 97
Detail of Pieces 3, 4 and 14 (left) and a diagram of the missing motifs revealed by the empty stitch holes (right) based on a composite positive image of the radiographs. In the diagram, Piece 3 has been moved to its original position in relation to Piece 4 and the obvious stitch lines are marked in green. Photograph: Jeff Veitch. X-radiography: Jason Revel. Prepared for publication: Sonia O’Connor, Rachael Kershaw and Tom Sparrow. Diagram: Sonia O’Connor.

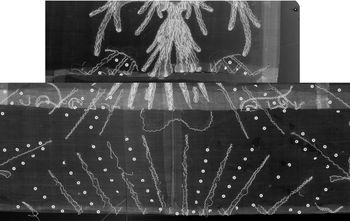
Another lost figure is suggested by the partial nimbus on Piece 24 at the frontal’s bottom centre. This nimbus stands out clearly at the lower edge of the radiographs in figure 12. Given the Marian imagery elsewhere on the frontal, it is tempting to suggest this may have surrounded a figure of the Assumption of the Virgin. These radiographs also show the metal thread work now concealed by the seams and folds, confirming that Pieces 10 and 24 were once a single length of fabric (fig 12). This is clearly seen in the rays that emanate from the angel on Piece 10 and terminate on Piece 24. The radiographs also show the positioning of the feet of the angel directly above the figure in the nimbus. The single strand of metal thread work forming a looped ‘W’ on Piece 24 delineates the location of the angel’s feet, confirmed by empty stitch holes where the embroidery thread once was.
A composite image from three radiographs showing that Piece 10 (above) was originally continuous with Piece 24 (below). X-radiography: Jason Revel. Prepared for publication: Sonia O’Connor.

Images of the Virgin are known to have been purposefully removed from church textiles. In 1567, the motif of Our Lady was removed from a blue velvet altar cloth at Great St Mary’s Church, Cambridge, by command of the archdeacon and sold for 6 shillings (approximately £71.47) to ‘a singing man’.Footnote 98 Such removals might parallel the defacement of the faces in two Lily Crucifixes in other media. There could also have been political resonances as links were made, explicitly or implicitly, between Mary, Queen of Heaven, and Mary, Queen of England. Thomas Tallis’s antiphon Gaude gloriosa Mater honours the Virgin but may also have referenced an earthly Queen.Footnote 99 In his 1553/4 poem, An Ave Maria in commendation of our Virtuous Queen, Leonard Stopes integrates his praise of Mary Tudor within the framework of the Ave Maria.Footnote 100 Anti-Marian fervour might encompass both queens and made it doubly politic to remove her image.
PHASES OF USE, FRAGMENTATION AND RE-MAKING
Four phases of use, fragmentation and re-making are proposed.
Phase 1: original vestments
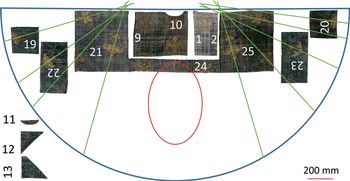
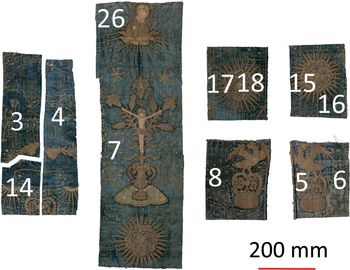
The evidence of fabrics, seams, selvedges, imagery, stitching technique and materials described above indicates that the frontal was once at least two vestments. Pieces 1/2, 9/10, 11, 12, 13 19, 20, 21/24/25, 22 and 23 are in Velvet A. Pieces 3, 4, 5/6, 7/26, 8, 14, 15/16 and 17/18 are in Velvet B.
Velvet A made up a cope. The alignment of the warp shows how the floral motifs and two fleurs-de-lys were arranged radially at the sides of the semi-circular cope, while the angel, two more fleurs-de-lys and the hypothetical image of the Assumption were arranged vertically down the back (fig 13). The positions of the original seams and the size of the pieces suggest the motifs on Velvet B formed two groups. The long oblong panel with God the Father, the Lily Crucifix and a rose-en-soleil motif (Piece 7/26) form the first group. The second group (Pieces 3, 4, and 14) are all part of the Annunciation scene, originally with the bird and monogram of Morton’s rebus above and below respectively. The scene is now partly obscured by two relocated bird wing motifs, probably derived from the missing bird motif. Either group may have been flanked by the remaining rose-en-soleil motifs and full rebuses (Pieces 5/6, 8, 15/16 and17/18) (fig 14).
Phase 1: Pieces forming the cope (Velvet A). The green lines show the axis of the motifs and the red oval marks the location of the hypothetical Assumption motif. The orientation of the numbers indicates the rotation of the piece in relation to its positions in the frontal. The original location of Pieces 11, 12 and 13 remains uncertain. Photograph: Jeff Veitch. Prepared for publication: Sonia O’Connor, Rachael Kershaw and Tom Sparrow.

Phase 1: Pieces forming the presumed chasuble (Velvet B). Photograph: Jeff Veitch. Prepared for publication: Sonia O’Connor, Rachael Kershaw and Tom Sparrow.

There is no evidence for Morton’s rebus on the cope made from Velvet A nor is there any evidence to suggest that the vestment made from Velvet B, which does have at least three versions of his rebus, was a cope. Given the linear positioning of the important imagery, it could well have been a chasuble. The Lily Crucifix would not have been out of place on the back or the front of a chasuble, but the discovery of the Annunciation motif on Pieces 3, 4 and 14 complicates the situation. Annunciation motifs are known to have been placed on the back of chasubles rather than the more customary Crucifixions, as on the Lucca chasuble (1450–1500).Footnote 101 The possibility cannot be ruled out that the Annunciation motif came from yet another vestment. If this was the case, this vestment would have to have been part of a set with the Lily Crucifix chasuble from the same workshop because they are made from the identical velvet (Velvet B) using the same direct embroidery techniques and motifs. For the sake of clarity, as the existence of a third vestment cannot be proved, this paper continues to assume a single chasuble.
Phase 2: intermediate hanging
At this stage, Piece 11 has been inserted into Piece 10 to infill the curved neckline of the cope. The edges and probably the lower part of the cope, with the speculative image of the Assumption, have been cut away to leave a rectangular hanging featuring the more innocuous angel, flowers and fleur-de-lys motifs (Pieces 1/2, 9/10, 11 and 21/24/25) (fig 15). The top edge has been reinforced with the narrow blue tape and the white tape loops added to enable suspension. This hanging might have been used as an altar dossal in a sacred space or as a decoration in a secular context such as a bed or wall hanging. It cannot yet be determined how the other fragments of the cope and the chasuble were stored or used at this time, but the velvet pile of these pieces is much better preserved, suggesting less light exposure.
Phase 2: Hanging made from the top central section of the cope (Velvet A). Photograph: Jeff Veitch. Prepared for publication: Sonia O’Connor, Rachael Kershaw and Tom Sparrow.

Phase 3: frontal
By this point, the chasuble had also been cut into pieces, some of which were then united with the Phase 2 hanging and the other parts of the cope producing the Auckland frontal (see fig 1) The possible Annunciation motif, too, had been removed from the chasuble and the gaps this left disguised with scraps of scavenged metal thread work. The frontal represents perhaps a third of each of the original vestments, but further pieces were clearly extant at this time as elements from both were salvaged and applied to camouflage areas of damage, loss and disfigurement or to help balance the motifs in this new arrangement. A patch on the back of Piece 4 (chasuble) has the pink ground of Velvet A (cope). On the front, the inverted monogram sewn over the seam between Pieces 10 and 11 and the bird wings at the junction of Pieces 3, 4, and 14 match those of the chasuble. That more of the cope and chasuble were not incorporated in the frontal may indicate that these areas were more badly degraded. However, the frontal’s size appears to have been determined by the dimensions of the backing, explaining why the side turnings are so uneven and why the centre of the Phase 2 hanging (Pieces 1/2, 9/10 and 11) has been cut out and relocated to the sides of the frontal to accommodate the height of the Lily Crucifix. As noted above, the backing has clearly been exposed to light leaving its embroidered face far more faded than its back. When the frontal was in use, the backing fabric would have been protected from the light so this fading must relate to a previous use. The backing seems to have had a separate biography, possibly as an altar frontal or dossal, before it became part of this frontal.
Phase 4: display
Finally, the vertical tucks were created, presumably to adjust the frontal to fit a specific space, and white tapes were added to the top edge to strengthen it for vertical hanging using nails.
DISCUSSION
The following proposals are conjectural and reflect work in progress, but are based on the evidence of the artefact in its historical context and knowledge of the archbishop’s engagement with vestments. The key questions are when were these vestments made, where did the various transformations occur, who undertook them and why? The ownership and location of the vestments in their original forms remains unknown. Nothing in the Canterbury or Ely inventories appears to correspond to a suite of blue velvet vestments bearing a Lily Crucifix and an Annunciation. These are the only known blue vestments associated with Morton to survive. Suggestions that the cope was worn by Morton at the funeral of Edward iv seem to be recent and dependant on the association of the rose-en-soleil motif with Edward. However, this motif and the rebuses belong to the chasuble, not the cope. It is possible that both vestments were part of a set, albeit made to different standards reflecting different costs and time input. The cope bears entirely standard motifs, whereas the chasuble has unique, customised imagery of a very high quality. If the hypothetical motif on the cope was an Assumption, the possibility of a set is strengthened. The rebus indicates that the chasuble was commissioned by Morton while the rose-en-soleil motif could reference his secular authority during his period serving Edward. The elaborate rendition of the rebus, the distinctly Marian imagery of the re-discovered Annunciation and the Lily Crucifix and the quality of this work suggest that the chasuble was, arguably, also used by him.Footnote 102 Morton clearly had a special devotion to the Virgin. His will not only specified that he should be buried in the crypt dedicated to Mary but he bequeathed his image of the Virgin to Margaret, the king’s mother.Footnote 103 This suite of vestments, with its unique imagery, could be read as further evidence of his personal beliefs.
The pathway of fragmentation, loss and retention for the chasuble pieces was different from that of the cope. Our supposition is that, following fragmentation, the phases of re-making and re-use took place at Sawston Hall. Phase 2 might relate to use in Sawston’s hidden chapel through the sixteenth and seventeenth centuries, during which time the better-preserved portions of the cope and chasuble were concealed. Various theological, political or even practical flash points might have led to the removal of the Marian imagery. The Annunciation motifs could have suffered various fates: defacement, destruction, donation elsewhere or re-use on another vestment. That the velvet from which this motif was removed was kept and reconstructed suggests this retained some sacred significance, even though the fabric had been cut up, and remained meaningful at the time the frontal was constructed (Phase 3). The continuing sacredness of all the pieces incorporated in the frontal is attested by the reluctance shown to cut them further to fit the backing as demonstrated by the large turnings and overlapping of pieces on the back and finally the addition of the tucks to the front (Phase 4) to reduce its width, presumably to fit the space in which it was hung.
Similarly, various changes might have been catalysts for the re-formation of the vestment pieces as a frontal. The IHS Christogram is particularly associated with the Jesuits, so at either stage of the backing’s life (ie before or after the backing became part of the frontal) this might relate to the Jesuit priests at Sawston. The eighteenth-century style of lettering could be consistent with its use in the legitimate 1791 chapel. While the construction and working of the source vestments have all the hallmarks of professional work, the later reconstructions of the cut pieces were clearly done by hands untutored in needlework. This would rule out the ladies of Sawston Hall and their maids or nuns, as women of any standing would have been skilled in the use of a needle from a young age. Was this dangerous work of devotion perhaps carried out by hidden priests in the long hours between private prayer and service to their recusant congregation?
CONCLUSIONS
This research has corroborated the existence of a cope within the Auckland frontal along with at least one other previously unsuspected vestment, possibly a chasuble. The latter can be directly associated with Morton through the presence of his rebus, but the cope’s links to Morton are more tenuous. However, the use of similar materials, techniques and possibly Marian imagery suggests the chasuble and the cope formed part of a set of vestments. These vestments probably moved from an overt liturgical practice to covert use by recusant Roman Catholics before returning once more to overt use. Morton’s use of the power of vestments has become clearer, indicating authority as well as, potentially, a personal statement of belief. The dates of the fragmentation of the vestments and transitions between various re-makings remain unclear. What is clear is the on-going power and agency of these fragments and the importance of giving the processes of fragmentation and re-making equal weight.
ACKNOWLEDGEMENTS
Mary Brooks undertook historical research and carried out detailed physical examination of the frontal with Sonia O’Connor, who also led the interpretation of the X-radiographic and photographic images and prepared the figures. Anita Quye analysed the dyes and Chris Caple conducted the study of the sequins and metal threads. We thank the Society of Antiquaries of London for the award of the 2016 Janet Arnold Grant, which was led by C Pamela Graves, and The Auckland Project for making the frontal available for research and funding. We thank Jeff Veitch (Durham University) for the original photography and Jane Colbourne and Jason Revel (University of Northumbria) for facilitating X-radiography. We are particularly grateful to archaeological illustrator Rachael Kershaw and imaging specialist Tom Sparrow for preparing these images for publication. We also thank colleagues who attended the 2016 workshop for their thoughtful reflections and stimulating ideas, as well as the peer reviewers and Lavinia Porter for their helpful feedback and guidance.
ABBREVIATIONS AND BIBLIOGRAPHY
Abbreviations
- BL
-
British Library, London
- Bodl
-
Bodleian Library, Oxford
- LPL
-
Lambeth Palace Library, London
- TNA
-
The National Archives, London
- V&A
-
Victoria and Albert Museum, London