

Introduction
Throughout the reliefs of the Neo-Assyrian period soldiers, officials, kings, and gods are depicted wearing swords at their sides. These swords were carried in one of two ways: either hanging from a cross-body shoulder strap or integrated into the clothing with the sword held under a shawl worn across the body. This difference has been noted in secondary literature but the reasons for this difference have not been directly addressed. Investigating every one of the hundreds of depictions of sword-bearers in Neo-Assyrian art showing these two methods of sword carry would be a painstaking task, and as a result this study will focus on the palace art of Ashurnasirpal II in order to identify the possible reasons behind the two different methods of sword carry.
These two methods can be respectively categorized as “outdoor” and “ceremonial” carry methods. The throne room reliefs of Ashurnasirpal II depict soldiers and king sutilizing the “outdoor” method in scenes of battle and hunting. When figures are depicted wearing swords under decorated shawls, however, the sword-bearers are never engaged in physical conflict and therefore can be considered to be wearing the sword in a “ceremonial” fashion. Given the placement and occurrence of these two methods in the palace reliefs of Ashurnasirpal II, in this study I show that method of sword carry constitutes an additional variable in the visual formulas of the palace reliefs of Ashuransirpal II. I also argue that depictions of an “outdoor carry” method of sword carry in the palace reliefs of Ashurnasirpal II were intended to communicate the divinely-sanctioned use of military force whereas the “ceremonial carry” method represented the restrained, latent divine power of the wearer as a warrior-priest.
Methodology
The following analysis primarily relies on the surviving reliefs from the northwest palace of Ashurnasirpal II and, to a lesser extent, the Balawat gates. The goal is not to reconstruct the behavior of Neo-Assyrian soldiers in regards to how, where, and when they carried swords in reality as presenting this information would not have been the intent behind the reliefs. The reliefs instead present idealized, propagandistic,Footnote 1 and ideological portraits of reality, portraying Assyrians in the best light and their enemies in the worst (Reade Reference Reade and Larsen1979; Cifarelli Reference Cifarelli1998: 223; Karlsson Reference Karlsson2013: 12–16). The portraits of the king likewise are idealized, realism not being the primary goal of the artisan even though some elements of realism were certainly adopted in such portraits (Winter Reference Winter, Parpola and Whiting1995: 368–365; Karlsson Reference Karlsson2013: 10). Similarly, even if certain postures, clothing configurations, or apparent behaviors could be portrayed in a realistically accurate manner pragmatism was still secondary to the intended ideological messages (Cifarelli Reference Cifarelli1998: 221; Collins Reference Collins, Brown and Feldman2013: 637–638).
Furthermore, Neo-Assyrian art of course did not exist in a vacuum of time and space and certainly borrowed motifs from earlier time periods combined with each period's own particular developments (Winter Reference Winter1981: 26–29; Russell Reference Russell and Frahm2017). Recognizing these factors of Neo-Assyrian iconography, the artistic conventions in the northwest palace of Ashurnasirpal II are especially appropriate for the analysis of sword carry due not only to its abundance of material covering a wide range of scenes including battle, ritual, and hunting, but also because they form identifiable “visual formulas”Footnote 2 which are particularly manifest in the art of Ashurnasirpal II (Ataç Reference Ataç2006: 69). As a result, possible reasons for the particular methods of sword carry depicted in Neo-Assyrian art may surface based on how the two methods of sword carry fit into these formulas. However, there must also be a recognition of the complex object of the sword itself, in regards to both its physical and cognitive dimensions such as its invention, manufacture, effect on the owner, effect on the overall society, and especially the effect on an individual seeing the sword depicted in an image (Malafouris Reference Malafouris, Robb and Boric2008: 7).
The Sword as a Prestige Weapon
In addition to the surviving art and texts of Ashurnasirpal II, a cognitive understanding of the sword is best understood by comparison to Bronze Age Europe due to its relative abundance of archaeological examples of swords compared to Assyria. The sword was certainly not the only weapon in a warrior's arsenal and perhaps not even the primary one, but the sword was “the first object clearly designed for combat instead of simply being adapted from an existing tool form” (Treherne Reference Treherne1995: 109), while other weapons such as spears and bows were used for hunting, and knives and daggers were used for dressing game and other tasks. However, in addition to a significant investment of materials in the making of a sword which could have been costly depending on a society's access to of metals such as iron, tin, and copper (certainly moreso than, say, a spearhead mounted on a wooden shaft), the technical ability needed to make a sword surpassed those of other weapons requiring less metal (Molloy Reference Molloy2010: 413–414). In addition, proper use of the sword required finesse and specialized training specifically for the mechanics of the sword (Fontjin Reference Fontijn, Parker Pearson and Thorpe2005: 147; Osgood et al. Reference Osgood, Monks and Toms2000: 23; Molloy Reference Molloy and Molloy2007: 94–96; Molloy Reference Molloy2010: 413–415). This was an especially important aspect of owning and caring for the sword as improper use would not only render a strike ineffective due to improper edge alignment or impact angle but could also result in blade damage (see Gentile and Gijn Reference Gentile and van Gijn2019) or even catastrophic failure of the weapon as evidenced by torn rivet holes in surviving examples of bronze “rapiers” (Fontjin Reference Fontijn, Parker Pearson and Thorpe2005: 146–148; Molloy Reference Molloy2010: 413–414).
Indeed, the acquisition of sword materials, the making of the sword, and the training of the swordsman together would have been a significant investment for the entire community (Molloy Reference Molloy2010: 413–414). This phenomenon seems to have led to the formation of a “warrior aristocracy” in Bronze Age Europe where the warrior's weapons (especially the sword) were a fundamental part of the warrior's identity (Treherne Reference Treherne1995: 106; Fontjin Reference Fontijn, Parker Pearson and Thorpe2005: 152; Molloy Reference Molloy2010: 414; Malfouris Reference Malafouris, Robb and Boric2008: 5). The warrior's training with the sword combined with the fact that a sword could be customized and personalized with decorations on both hilt and scabbard further strengthen the notion of a personal bond between the warrior and the sword. It is therefore of no surprise that the physical value of sword is hinted at in Sennacherib's valuation of his newly-discovered alabaster: “In the uplands of Mount Ammanâna they (Assur and Ishtar) disclosed to me the location of alabaster, which in the time of [the king]s, my ancestors, was too expensive (even) for the pommel of a sword.”Footnote 3 But even more fundamentally, the sword can be understood as a “psychological weapon” where it does not merely symbolize or represent power but is in itself a “message” which communicates the status and identity of its wielder (Malafouris Reference Malafouris, Robb and Boric2008: 7–8).
The Neo-Assyrian Sword
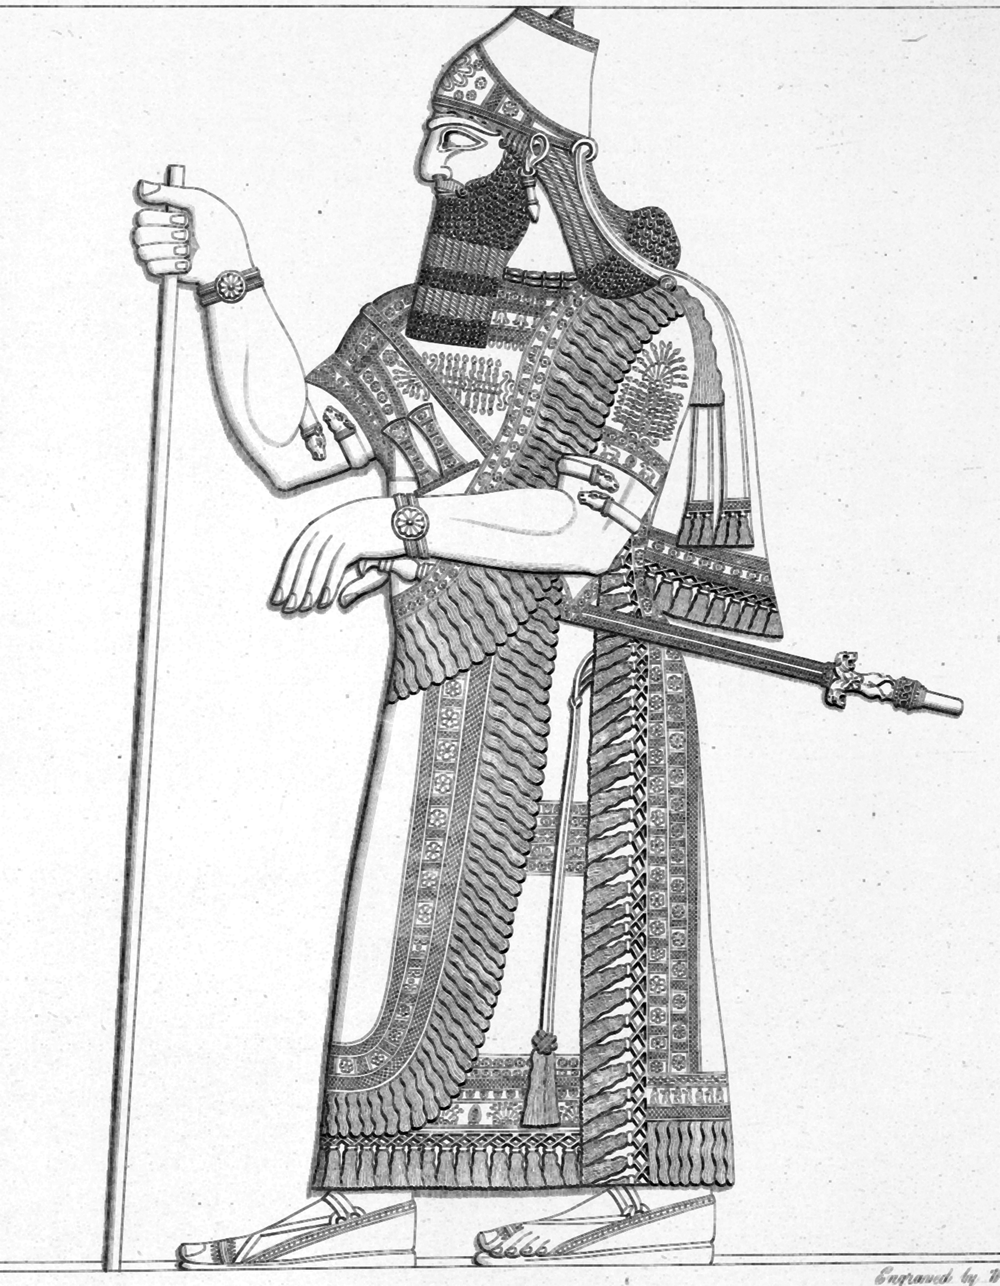
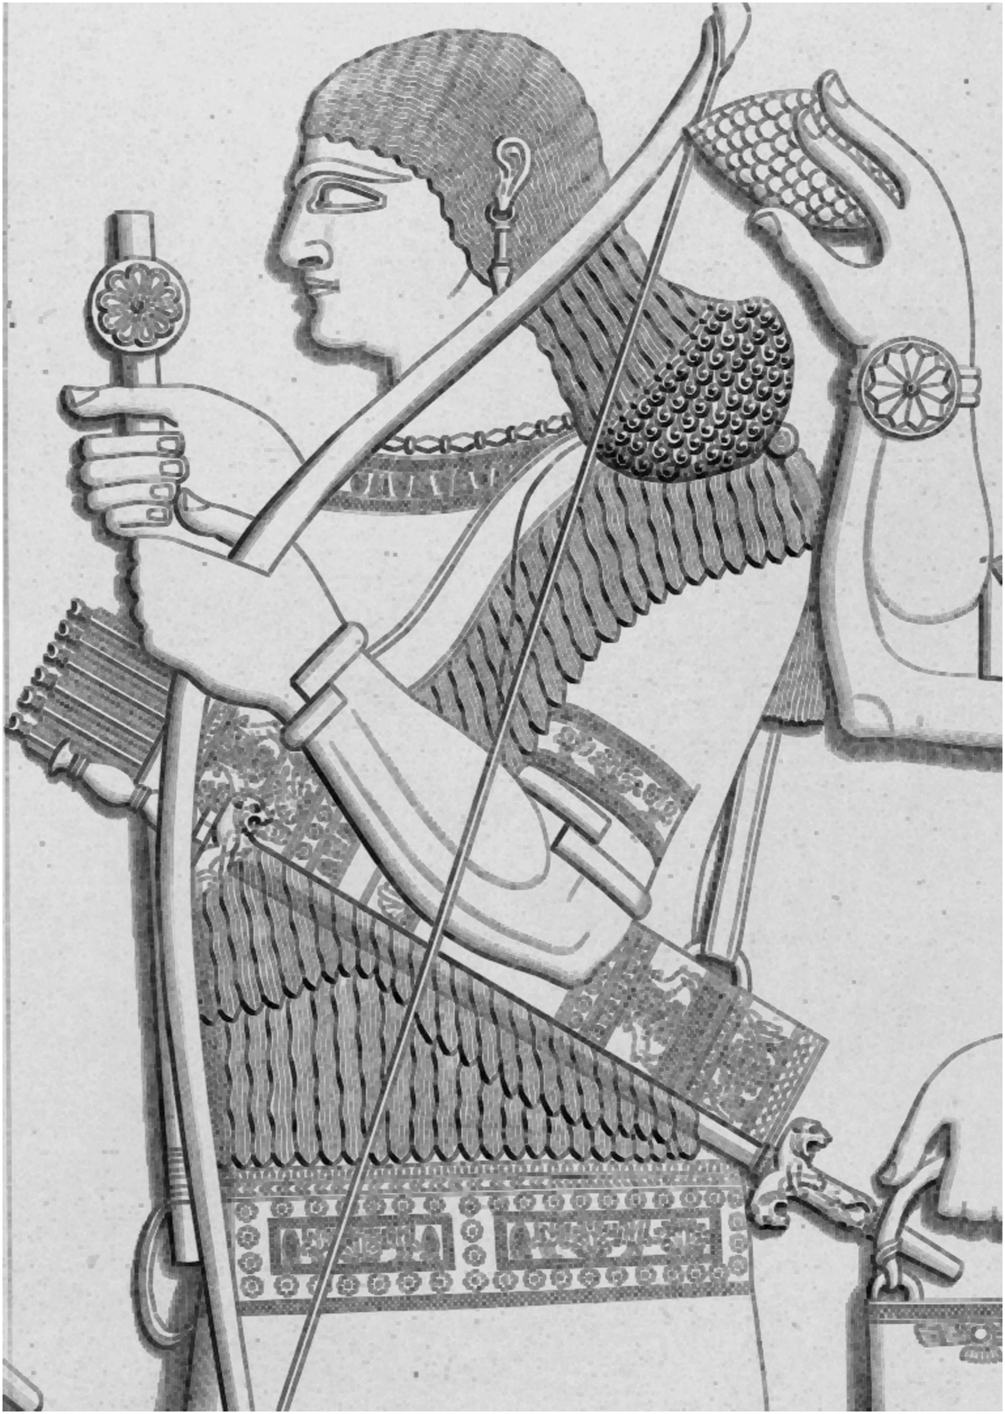
For the sake of discussion the distinction between the “sword” and “dagger” in this analysis will not be determined based on arbitrary lengths but rather on their method of carry as defined by Tariq Madhloom (Reference Madhloom1970: 44) who states that “swords were kept in sheaths with a cord or strap for suspension…daggers were worn at the waist, kept in place by a narrow belt.”As a result of utilizing these distinctions as a means of categorization in this analysis the term “sword” will refer to the bladed weapons that are hung on the hip from a shoulder strap whereas the term “dagger” will refer to the small double-edged blades that are tucked hilt-up into the belt around the waist (Fig. 1).
Drawing of a relief depicting Ashurnasirpal II wearing daggers and sword. North-West Palace at Nimrud of Ashurnasirpal II (c. 865–860 BC), Room B panel 12 (Layard Reference Layard1853a: pl. 34).

Madhloom (Reference Madhloom1970) established a typology of Neo-Assyrian swords, identifying a dozen types of swords from Neo-Assyrian iconography. As Barron (Reference Barron2010: 61) notes, however, Madhloom's typology is based mainly on “decoration on the sheaths, not any significant changes to the swords themselves” and as a result it is unnecessary to discuss the sword variations in detail for the purposes of analyzing sword carry methods. It is sufficient to state that throughout Neo-Assyrian art by far the most common type of sword depicted is a straight, double-edged or slightly leaf-shaped blade with a sharp point and is always wielded with one hand in what appears to be either a stabbing or slicing motion (Madhloom Reference Madhloom1970:46; Barron Reference Barron2010:62).Footnote 4 Scabbards can generally be divided into two types: plain, undecorated scabbards and scabbards with either one or two sets of protruding decorations which could be lion heads, bull heads, or “volutes.” These protruding scabbard decorations may have facilitated drawing the sword with one hand by means of catching the protrusion behind one's leg as the blade is drawn (Barron Reference Barron2010: 69),Footnote 5 but there is no Neo-Assyrian artistic evidence showing swords being drawn in this manner.
In the absence of written records detailing sword lengths combined with the ambiguity of artistic depictions of swords, the few surviving archaeological examples as well as a single bronze scabbard found at Nimrud all suggest that the Neo-Assyrian sword was relatively short, perhaps similar in length to other ancient swords of the Mediterranean (Barron Reference Barron2010: 50–51, 56). It should be noted that the artistic evidence showing drawn swords often depict the sword blades shorter than the scabbards, suggesting either artistic error or that the scabbards do not always match the length of the blades. Barron (Reference Barron2010: 61) is likely correct to assert that the latter interpretation is a valid hypothesis given the archaeological finds. Variations in the depictions of sword (or at least scabbard)lengths seem to exist as some high-ranking officials and deitiesFootnote 6 depicted in the reliefs of Ashurnasirpal II and Shalmaneser III appear to carry blades that are longer, more slender, and less tapered (Madhloom Types 1 and 2) than the more common type seen in later periods (Barron Reference Barron2010: 61).Footnote 7 From a functional perspective a shorter sword would have been much more convenient to carry which may have contributed to the greater frequency of the shorter, more tapered type sword in later Neo-Assyrian art, but more extravagant decorations such as lion or bull motifs and decorated hilts (as opposed to simple volutes) would likely be better indicators of higher status than sword or scabbard length since both kings and officials are sometimes shown to wear the shorter and more tapered variants on the reliefs of Tiglath-pileser III and Ashurbanipal.Footnote 8 Such decorated swords were often presented as rewards for distinguished soldiers and were standardized, indicating their “longevity and widespread recognition of their symbolism” (Radner Reference Radner, Fisher and van Wees2011: 48). Furthermore, all soldiers and scribes depicted in ninth century reliefs may have also worn the same length of swords as the kingFootnote 9 but were merely not depicted in the same detail as higher ranking individuals. As a result, it is unclear whether the depiction of the longer sword indicated higher rank or was merely the result of a change in the aesthetic choices of the artists through the Neo-Assyrian period.
Weapons as Symbols of Divine Authority in the Royal Inscriptions of Ashurnasirpal II
In the inscriptions of Ashurnasirpal II weapons are considered representations of military might and their use (at least in the symbolic, representational sense) carried with them divine authority and blessing.
On a relief inscription from the Ishtar temple Ashurnasirpal II refers to an unspecified “weapon” (gišTUKUL) granted by the gods: “When the gods An, Enlil, and Ea chose me and named me for the shepherdship of Assyria, granted to my dominion the weapon, the sceptre, the crown, and the staff, (and) sternly commanded me to rule and subdue all the lands insubmissive to Ashur.”Footnote 10 Ashurnasirpal II even frequently describes himself as the “destructive weapon of the great gods.”Footnote 11
The sword in particular carried this sense of divine authority. The Standard Inscription of Ashurnasirpal II interestingly reads, “When Ashur, the lord who called me by name (and) made my sovereignty supreme, placed his merciless weapon in my lordly arms, I felled with the sword the extensive troops of the Lullumu in battle.”Footnote 12 Perhaps wholly symbolically, Ashurnasirpal II's royal inscriptions frequently refer to the sword as the primary means by which the king fells enemy soldiers in war in a formulaic manner (e.g. “and I felled …with the sword”) no less than eighteen times in a single inscription.Footnote 13 The sword carried with it associations with masculinity throughout Mesopotamian culture as well,Footnote 14 so the numerous references to and appearances of the sword on reliefs would likely have communicated this sense of masculinity in connection with military might.Footnote 15
“Outdoor” Carry: Battlefield Scenes
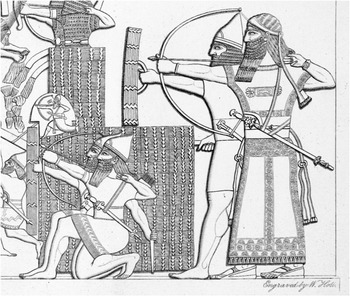
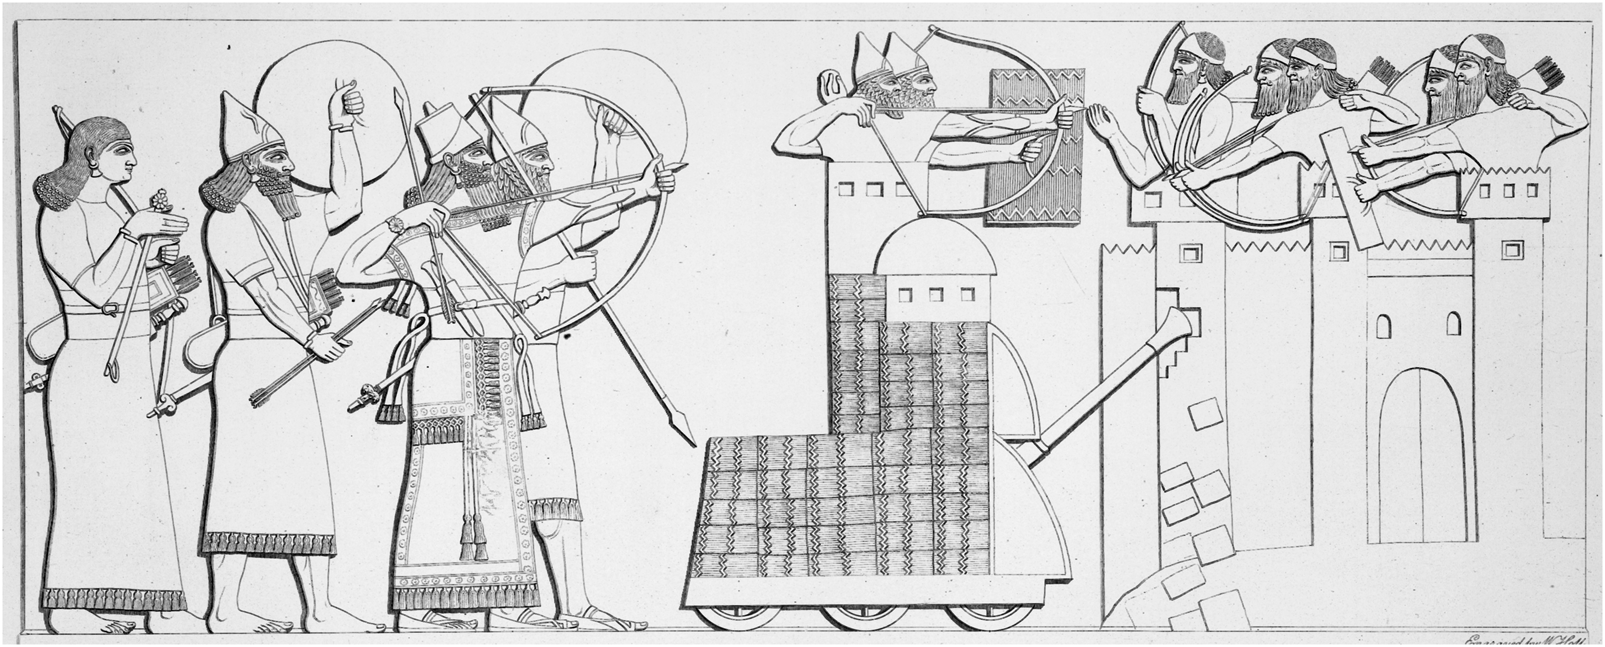
Neo-Assyrian soldiers are always depicted wearing the sword by means of a cross-body shoulder cord or strap which attaches to the scabbard near the hilt of the sword (Fig. 2).Footnote 16 The belt or strap goes over the right shoulder and behind the back, making the sword worn in a manner similar to how one might wear a purse or laptop bag across the body.Footnote 17 Since all reliefs depicting this manner of sword carry in Ashurnasirpal II's palace involve outdoor scenes such as battle or hunting, this method of carry can be labeled as “outdoor carry.”
Drawing of a relief depicting Assyrian soldiers with visible sword belts attacking a city. North-West Palace of Ashurnasirpal II (c. 865–860 BC) at Nimrud, Room B panel 4, lower register (Layard Reference Layard1853a: pl.19)

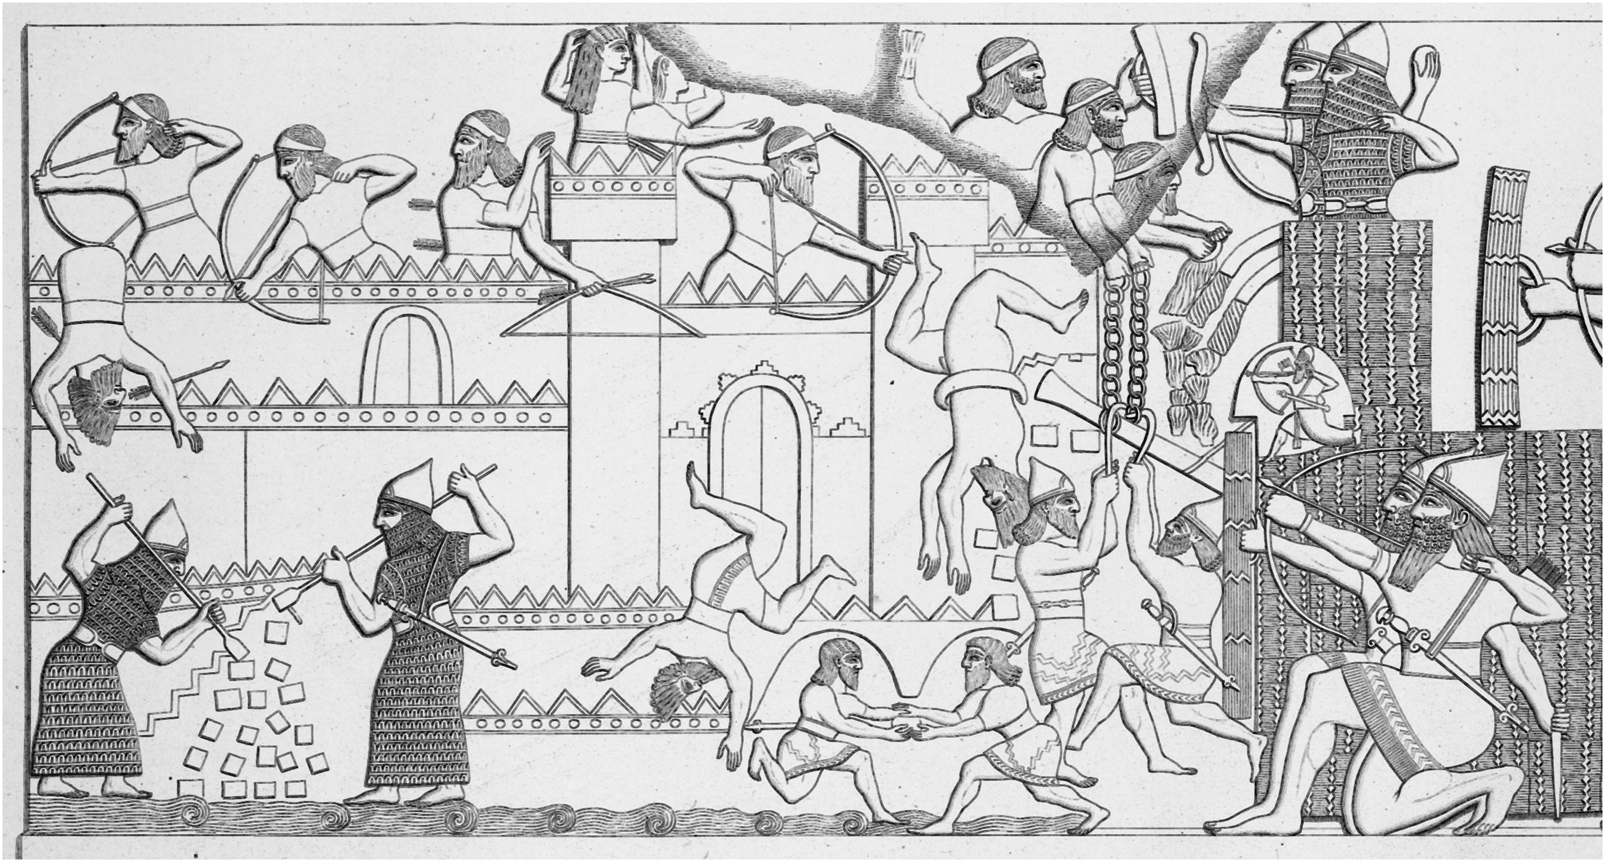
The throne room reliefs (Room B)Footnote 18 of Ashurnasirpal II prominently display Neo-Assyrian soldiers wearing swords in battle performing a variety of tasks such as demolishing city wallsFootnote 19 and handling siege equipment(Fig. 3).Footnote 20 Despite this, the depicted soldiers only use the sword to give the coup de grace against defeated or fleeing enemiesFootnote 21 rather than in engaging in melee like the “heroic symbolism of a lightly armed warrior using a personal sidearm to defeat a heavily armored opponent” depicted on three Aegean seals.Footnote 22 In Molloy's (Reference Molloy2010: 410) view such scenes represent the motif of the “hero vs the horde,” but since in Neo-Assyrian art the goal was to prevent rebellion there would not have been any depiction of possible defeat of an Assyrian soldier (Cifarelli Reference Cifarelli1998: 223) and therefore it would be unlikely that the reliefs would depict an Assyrian soldier engaged in hand-to-hand combat with a better-armed opponent. During the reigns of later Neo-Assyrian kings the reliefs similarly only show the drawn sword being employed on the field to execute or disable captives,Footnote 23 dress animals,Footnote 24 or dislodge bricks from walls.Footnote 25 Apart from some shield-bearers who carried no other weaponFootnote 26 the sword seems to have been mainly depicted as a secondary weapon whereas the primary weapon would have been the bow, sling, spear, or in the case of gods some manner of divine weapon like the thunderbolts of Ninurta.Footnote 27 It is therefore reasonable to conclude that the overall effectiveness of the Assyrian army would not have been substantially compromised if a number of the soldiers did not wear swords in addition to their primary weapons, but then this raises the question of why the swords are nevertheless frequently (although not universally) depicted being worn by soldiers if the sword was not an essential battlefield weapon.Footnote 28
Drawing of a relief depicting Assyrian soldiers wearing swords dislodging bricks, handling siege equipment, and wielding bows. North-West Palace of Ashurnasirpal II (c. 865–860 BC) at Nimrud, Room B panel 4, lower register (Layard Reference Layard1853a: pl.19).

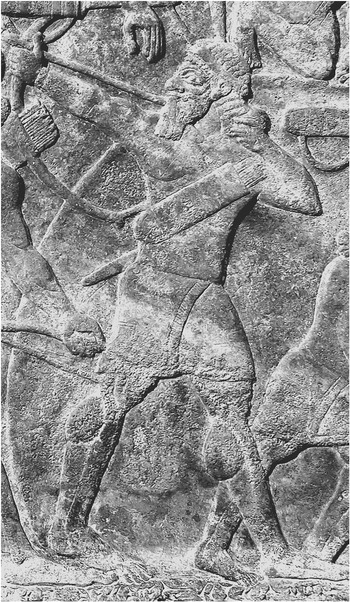
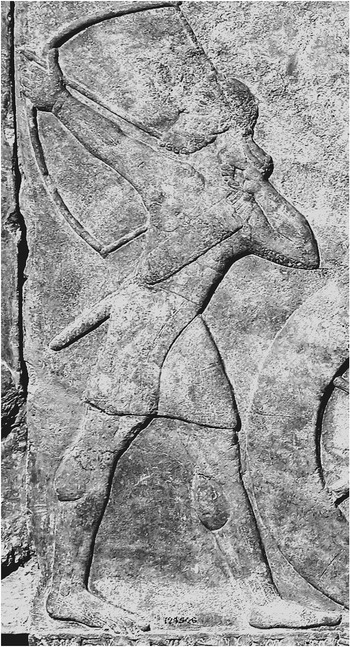
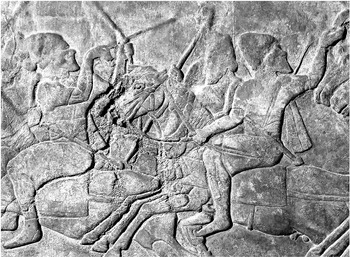
A significant part of the reason for displaying swords in such frequency would likely have been related to how the sword may have been perceived as a prestigious weapon. If the aforementioned concept of the “warrior aristocracy” applies to the Neo-Assyrian period, then it is possible that the artistic depictions of Neo-Assyrian soldiers carrying swords with such frequency was a matter of propaganda and the display of Assyrian superiority. First, on an individual level the reliefs depicting Neo-Assyrian soldiers with swords could suggest the elite status of every individual soldier as their depiction would imply that each one would have had the specialized training necessary to employ swords effectively. It could also serve to display the wealth of each individual soldier, as the expense of the sword would have been prohibitive for a warrior of lesser standing. The fact that every Neo-Assyrian soldier's sword in the reliefs of Ashurnasirpal II and Shalmaneser III is depicted with a decorated scabbard with volutes while the two throne room panels display foreigners with swords showing them with simpler scabbardsFootnote 29 supports this notion of superior individual wealth.Footnote 30 In panel B-8 (upper) only two of the fleeing soldiers (one on the far left, the other on the far right) are depicted with scabbards at their sides (Figs. 4–5), and in panel B-27 (lower) the mounted foreigners’ scabbards (Fig. 6) only possess rounded tips, clearly in contrast to the volutes and lion motifs of Neo-Assyrian scabbards. Second, the plentiful display of swords could also display the wealth and powerful infrastructure of the Assyrian empire as a whole, illustrating sufficient access to valuable metals and technological prowess capable of sustaining the costs of allowing so many warriors to wear swords. The frequent depiction of spears wielded by Urartian soldiers from the bronze band of Ashurnasirpal II and Shalmaneser III as opposed to the bow depicted being used by Assyrian soldiers (Cifarelli Reference Cifarelli1998: 224) would further suggest that displaying Assyrian technological achievements on the reliefs was desirable in the portrayal of Assyrian might. Third, the idealized portrait of the Neo-Assyrian military in the reliefs also includes the depictions of gestures and postures by its mighty soldiers and subjugated enemies. Neo-Assyrian soldiers in formation are never depicted being defeated, frightened, or in any way inferior to their enemies. They are universally (or perhaps formulaically) depicted in an upright, regimented fashion,Footnote 31 unless they are performing a particular task such as executing a supine enemy or working siege equipment.Footnote 32 It is therefore difficult to ignore the fact that this depiction of organization also seems to apply to the uniform angles at which scabbards hang from the sides of Neo-Assyrians soldiers (see Fig. 2),Footnote 33 which may have been intended to further express the organization and discipline of the Assyrian army to the viewer.
Detail of foreign soldier with sword. North-West Palace of Ashurnasirpal II (c. 865–860 BC) at Nimrud, Room B panel 8, upper register. Image edited by author. ©Trustees of the British Museum.

Detail of another foreign soldier with sword. North-West Palace of Ashurnasirpal II (c. 865–860 BC) at Nimrud, Room B panel 8, upper register. Image edited by author. ©Trustees of the British Museum.

Detail of fleeing horsemen wearing swords. North-West Palace of Ashurnasirpal II (c. 865–860 BC) at Nimrud, Room B panel 27, lower register. Image edited by author. ©Trustees of the British Museum.

Why certain Neo-Assyrian soldiers were not wearing swords in Ashurnasirpal II's palace reliefs, however, is a more difficult question to answer. In panels B-5 (lower register) and B-8 (upper register)Footnote 34 a soldier on the bottom-right is depicted wielding a sword in his right hand but without a scabbard. In panel B-5 (upper register)a pair of archers holding maces are not depicted wearing swords either,Footnote 35 but in all other scenes depicting similar archer pairs with macesFootnote 36 they do carry swords. These cases of missing swords could be merely the result of artistic shortcuts given the already crowded scenes, but this reason may not apply to every case where a soldier is not wearing a sword. For example, chariot drivers are frequently not depicted wearing swordsFootnote 37 and while this could be a matter of practicality (assuming the artist was aiming for realism in these scenes) as they would have been responsible for holding the reigns rather than fighting, it does not explain why in some cases the chariot driver does carry one.Footnote 38 What is clear is that in depictions of battle, the Neo-Assyrian army is well-equipped with swords while its enemies are not.
“Outdoor Carry” in the Royal Hunt and Libation Scenes
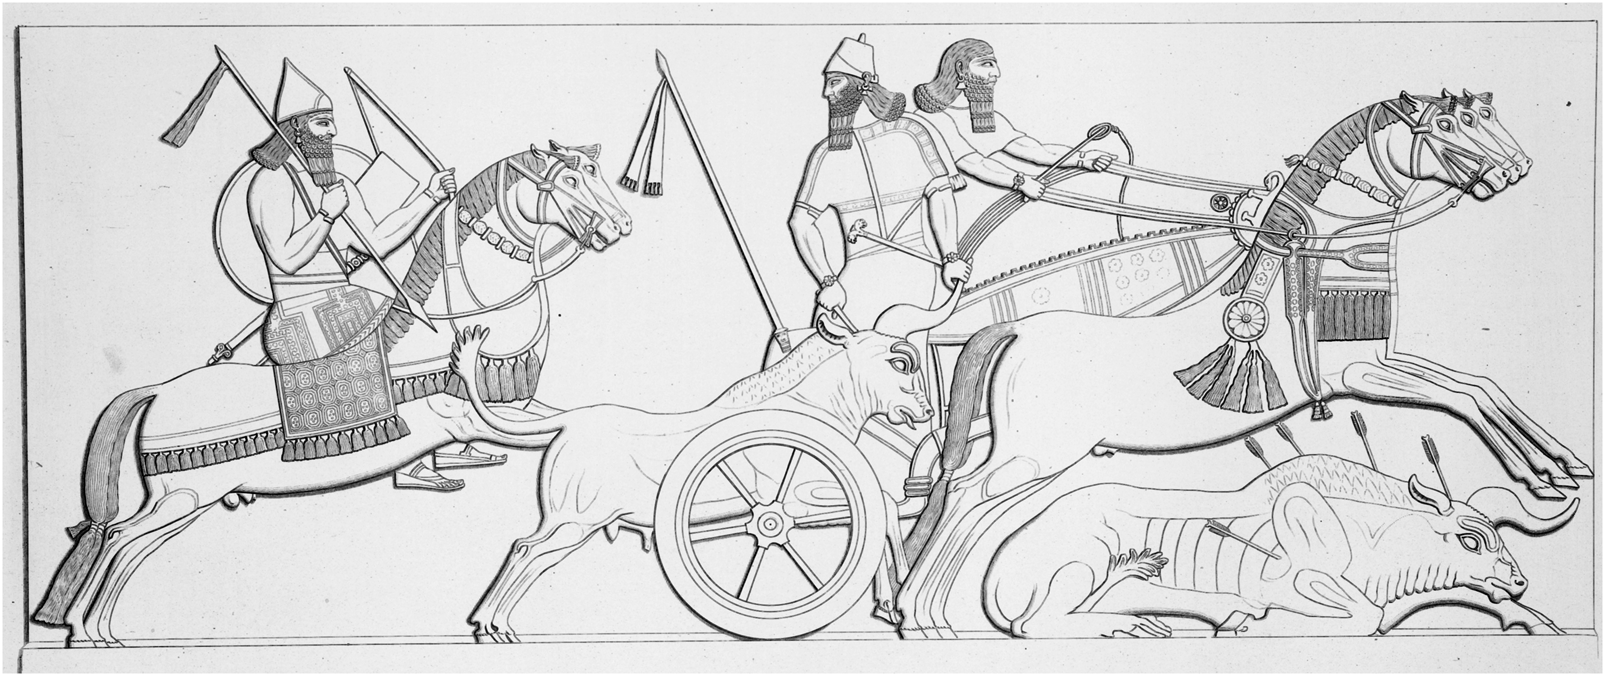
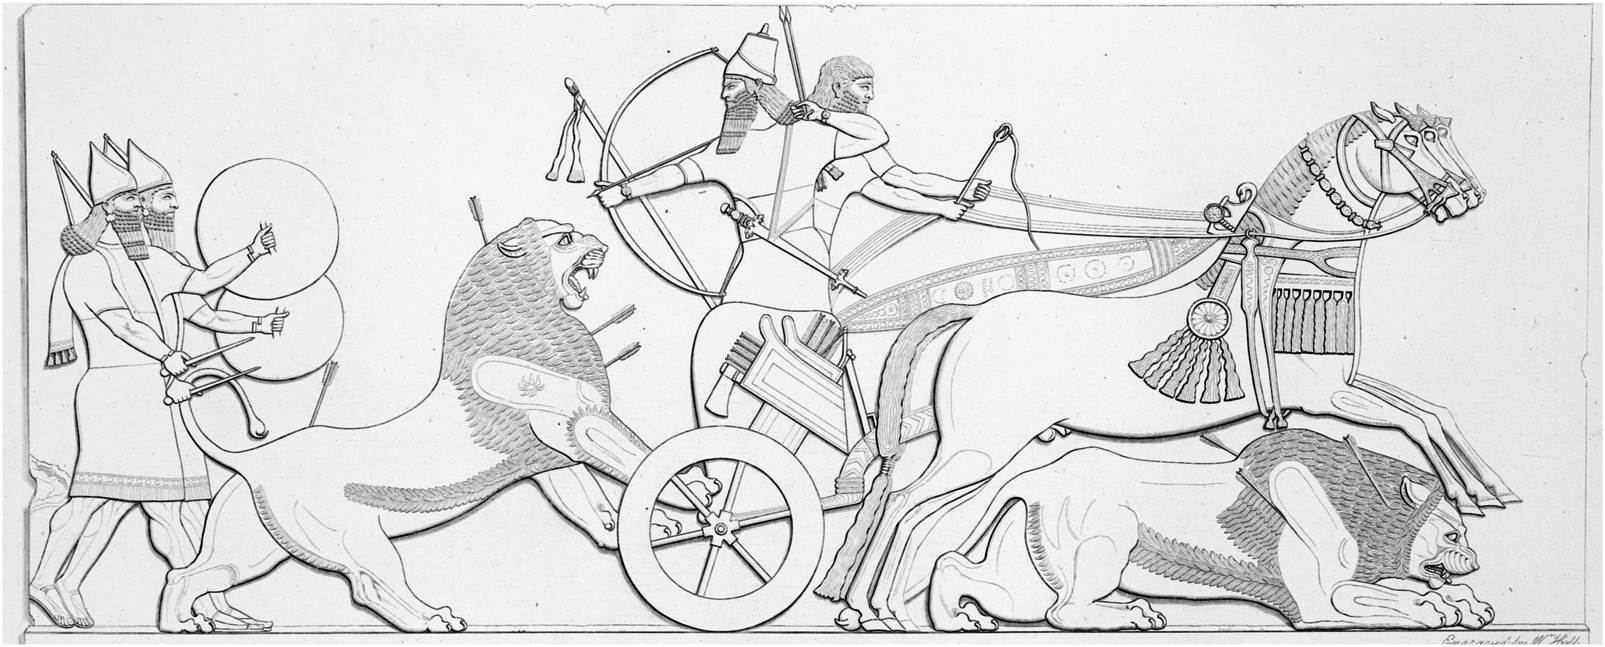
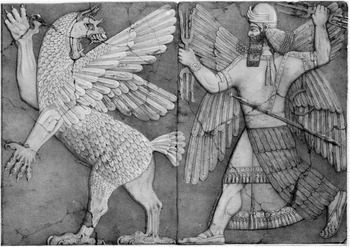
Apart from battle the sword is also worn in this “outdoor” carry method with the shoulder strap outside the tunic in the royal hunt reliefs of Ashurnasirpal II on the southeast side of the throne room closest to the throne itself.Footnote 39 The royal bull hunt relief (B-20, upper register) features the king grasping a bull's horn with his left hand while plunging his sword into the bull's head, his scabbard noticeably empty (Fig. 7).Footnote 40 On the famous lion hunt throne-room relief (B-19, upper register) the king looses arrows at lions while wearing a sheathed sword at his side with two bodyguards on foot armed with round shields and drawn short swords behind the lion in the throne room relief.Footnote 41 It may be significant that the inscribed monumental bulls and lions at his palace in Nimrud describe the king killing bulls with the sword and lions with the spear,Footnote 42 but the surviving reliefs only depict the king slaying lions with arrows (Fig. 8).Footnote 43 In any case the lion hunt scenes of Ashurnasirpal II may have held ritual significance as a reenactment of Ninurta slaying Anzû,Footnote 44 a scene found in the temple of Ninurta at Nimrud where Ninurta wields thunderbolts and wears a sword at his side in the “outdoor” manner described above (Fig. 9).Footnote 45 By slaying the animals the king commits “mythical sacrilege” which is why the libation scenes (see Figs.13 and 14)Footnote 46 can be considered an “expiation for this religious offense” (Ataç Reference Ataç2006:93–94).
Drawing of a relief depicting Ashurnasirpal II thrusting sword through a bull's head. North-West Palace of Ashurnasirpal II (c. 865–860 BC) at Nimrud, Room B panel 20, upper register (Layard Reference Layard1853a: pl.11).

Drawing of a relief depicting Ashurnasirpal II hunting lions. North-West Palace of Ashurnasirpal II (c. 865–860 BC) at Nimrud, Room B panel 19, upper register (Layard Reference Layard1853a: pl.10).

Drawing of a relief depicting Ninurta battling Anzû. Temple of Ninurta, Ashurnasirpal II c. 865–860 BC (Layard Reference Layard1853b: pl. 5).

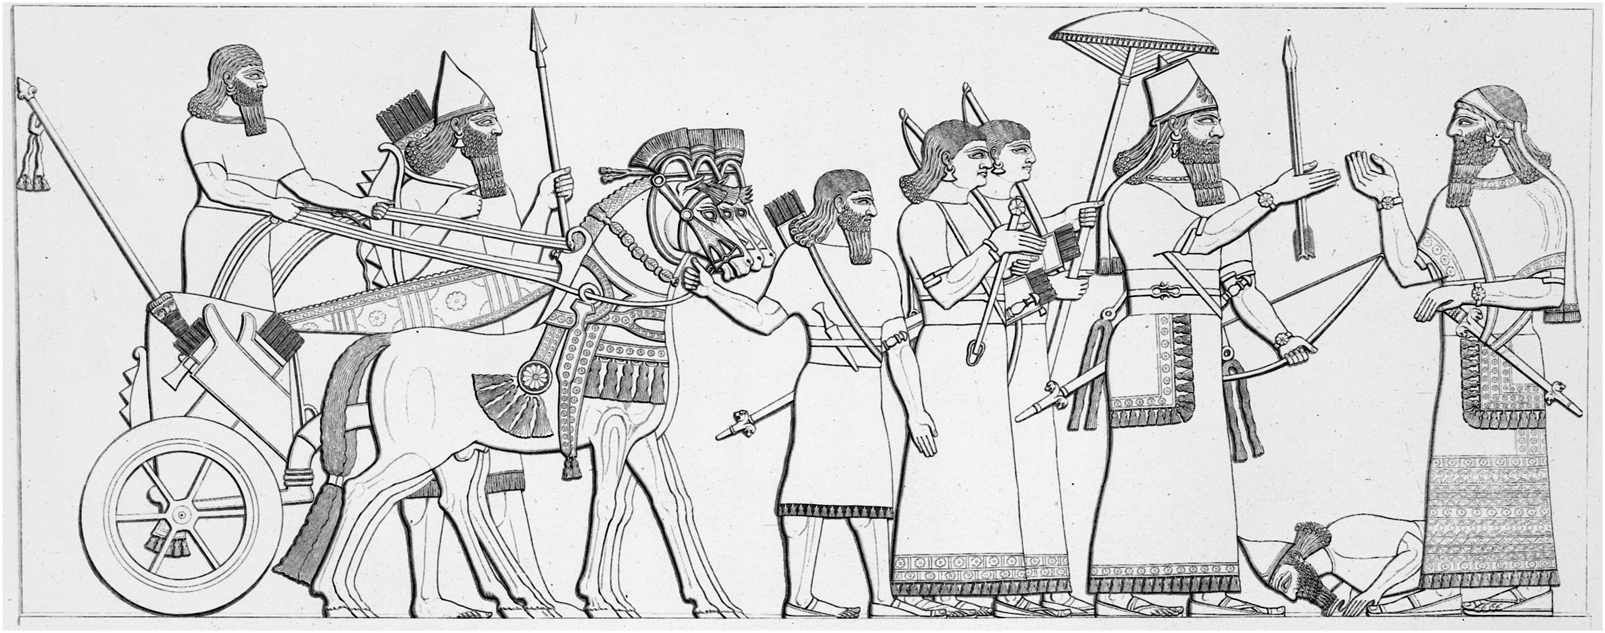
For the purposes of analyzing sword carry, however, the placing of each relief is more significant. Just as each libation scene is placed directly below the corresponding royal hunt, the scene of the enemy prostrating before the king (the “prostration scene”) is placed underneath a battle scene (Figs. 10 and 11).Footnote 47 This in effect displays how the royal hunt was analogous to battle and how the slain animal was analogous to the subjugated enemy (Ataç Reference Ataç2010: 19). However, while swords are all worn in the “outdoor” manner in these scenes on the reliefs of Ashurnasirpal II, in later period prostration scenes the beardless officials with long kilts reaching their ankles wear a shawl (similar to the ones worn by the harpists in the libation scenes of Ashurnasirpal) over their swordsFootnote 48 while they do not in the reliefs of Ashurnasirpal II. Although the artistic formulas and intended messages in similar scenes may differ between the reliefs of different kings,Footnote 49 the combination of the shawl and sword in the reliefs of Ashurnasirpal II nevertheless constitutes a second form of sword carry in Neo-Assyrian art which may have held its own particular symbolic meaning in his particular time.
Drawing of a relief depicting Ashurnasirpal II besieging a city. North-West Palace of Ashurnasirpal II (c. 865–860 BC) at Nimrud, Room B panel 18, upper register (Layard Reference Layard1853a: pl. 17).

Drawing of a relief depicting a prostrate ruler between Ashurnasirpal II and a bearded official. North-West Palace of Ashurnasirpal II (c. 865–860 BC) at Nimrud, Room B panel 18, lower register (Layard Reference Layard1853a: pl. 23).

“Ceremonial” Carry: Wearing the Sword Under the Shawl
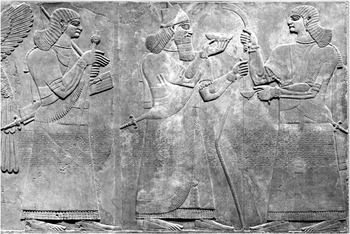
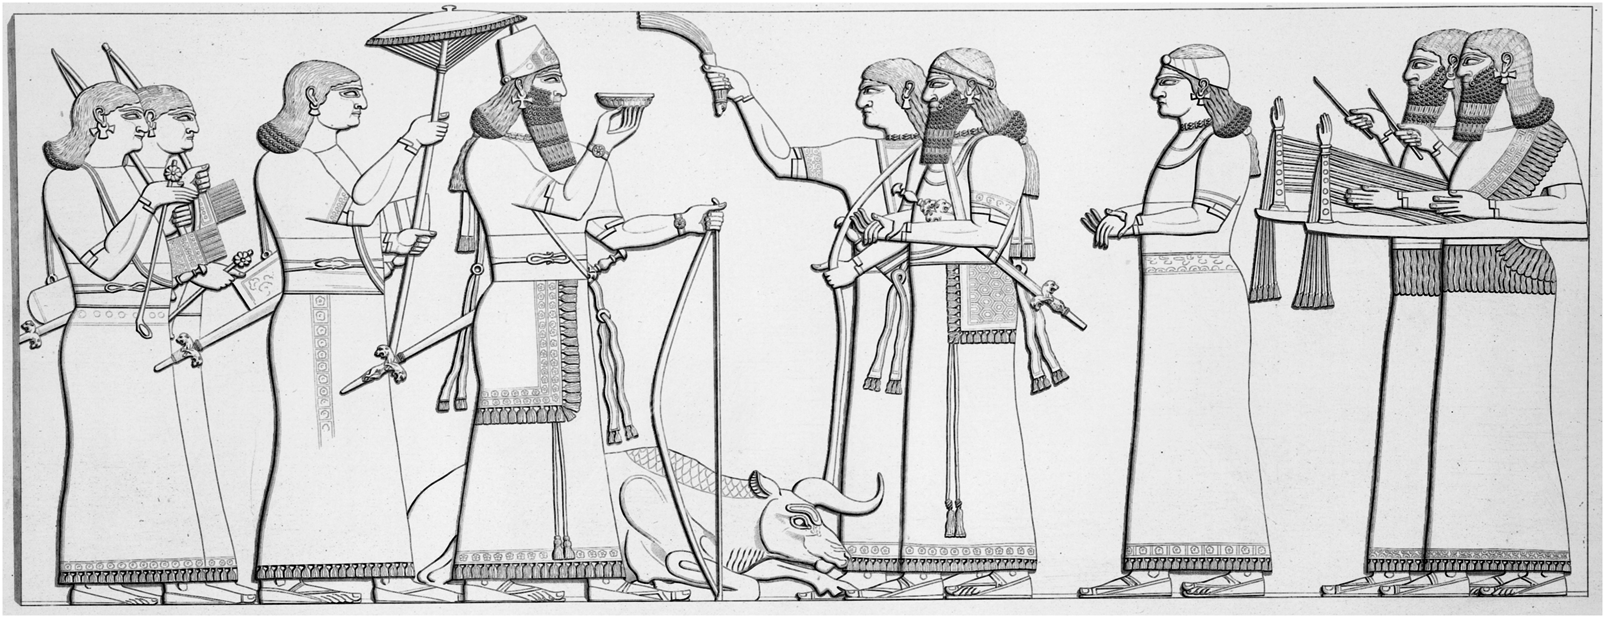
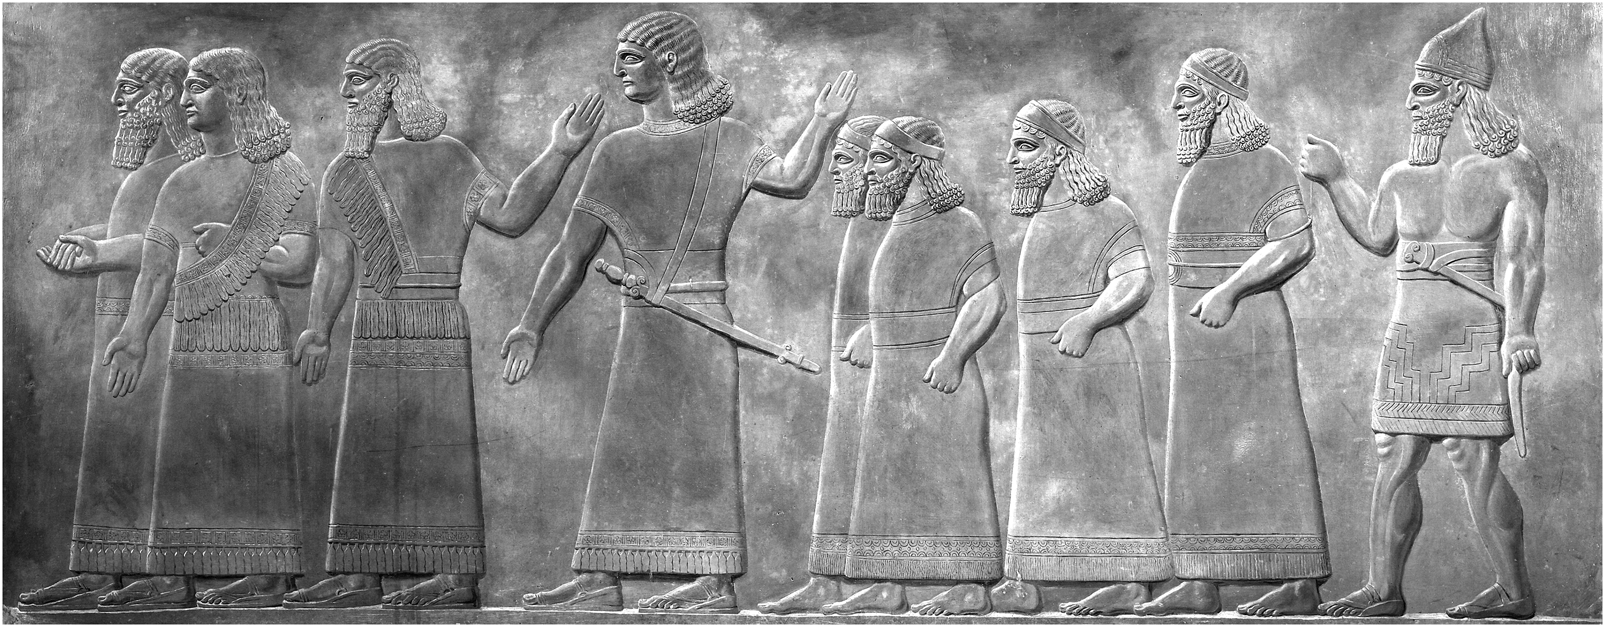
The second method of sword carry attested in the reliefs of Ashurnasirpal II is similar to sword carry on the battlefield, utilizing a cross-body strap but with the addition of a fringed shawl possibly known as an elēnītu (Postgate Reference Postgate and Soldt2001: 380). It is clear that this decorative shawl is worn over the swordFootnote 50 on top of the tunic and over the left shoulder down towards the right hip, leaving the user's right shoulder covered only by the sleeve of his tunic (Figs. 12 and 1).Footnote 51 This method of carry is utilized by the king and his courtiers as seen in both the palace at Nimrud and the Balawat Gates.Footnote 52 Madhloom (Reference Madhloom1970: 68–70) points out that in the reliefs of Ashurnasirpal II sometimes a second shawl is worn over the torso and that the single fringed shawl is longer in later periods.Footnote 53 This appears to be the same general style of dress from ninth century depictions of Neo-Assyrian nobles from Ashurnasirpal II through to Tiglath-pileser III and even as late as the time of Sennacherib, although the kings have a variety of decorated outfits that also accommodate the carrying of the sword under a shawl or fabric.Footnote 54 For example, the bronze bands of Shalmaneser III show the fringed material of the king's robe further extending behind the king's body, looping downward before connecting with the tip end of the king's scabbard.Footnote 55
Relief depicting Ashurnasirpal II between two attendants armed with swords. North-West Palace of Ashurnasirpal II (c. 865–860 BC) at Nimrud, Room G. (Public Domain. Image by the Metropolitan Museum of Art).

In all configurations of wearing the shawl over the sword throughout the Neo-Assyrian period the sword is tucked into the opening of the upper shawl and either extends behind the upper shawl (Figs. 1, 12, and 13)Footnote 56 or protrudes through the shawl's fringed material as clearly depicted on the reliefs of Sargon II and Sennacherib.Footnote 57 Functionally speaking, in this method of carry (double or single shawl) the scabbard would be secured by the material of the shawl, restricting the sword's movement as the wearer moves and goes about his business. This would in effect prevent the sword from swiveling and shifting into the various positions and angles seen with soldiers and hunters wearing the sword in the “outdoor” manner. This restrictive function of the sword may also reduce the rattling noise the scabbard makes when the user is moving and reduce the chances of the sword coming into contact with another object. However, this method of carry would certainly hinder the wearer from comfortably sitting on chairs with backstops so it may have been preferable to remove the shawl and disconnect the sword from the belt as seen in Assurbanipal's banquet scene where his (sword?) belt is hanging loose from his robe while his sword, bow, and quiver are placed on the table behind him (Barnett and Foreman Reference Barnett and Foreman1959: 105).Footnote 58 For stools without backstops the sword is shown to be worn while seated.Footnote 59
Drawing of a relief depicting an attendant wearing a sword under a shawl. North-West Palace of Ashurnasirpal II (c. 865–860 BC) at Nimrud, Room G, panel 4 (Layard Reference Layard1853a: pl. 5).

Purpose of the Shawl over the Sword in Visual Formula
The purpose of wearing the shawl and sword together is likely related to the apparent duality of and union between the “martial” and “sacerdotal” throughout the reliefs of Ashurnasirpal II as discussed in detail by Ataç (Reference Ataç2006; Reference Ataç2010: xix, 90–124). Ataç's determinations of “martial” elements and “sacerdotal” elements in his analysis essentially rely on the placement of figures and their implements. For example, in Room G of the palace the king holding the bowl represents his sacerdotal aspect whereas weapons (especially the sword) represent the martial aspect of the king (Ataç Reference Ataç2010:113). It is important to clarify that no single “martial” and “sacerdotal” implement depicted in the reliefs possesses one quality to the complete exclusion of the other. Fighting enemies is certainly one part of serving the gods, clearly demonstrated by the aforementioned divine blessings bestowed upon the king, the presence of the winged disk in battle scenes of the throne room (panels B-3, B-5, B-6, and B-11, upper registers) and the many references to the ritual cleansing of weapons (especially in the texts of Ashurnasirpal II).Footnote 60 Furthermore, the scenes which establish a portrait of this duality should not be seen as “black and white” representations as, for example, in some cases the “sacerdotal” side possesses implements which would indicate martial elements instead (Tugendhaft Reference Tugendhaft2012: 314).Footnote 61
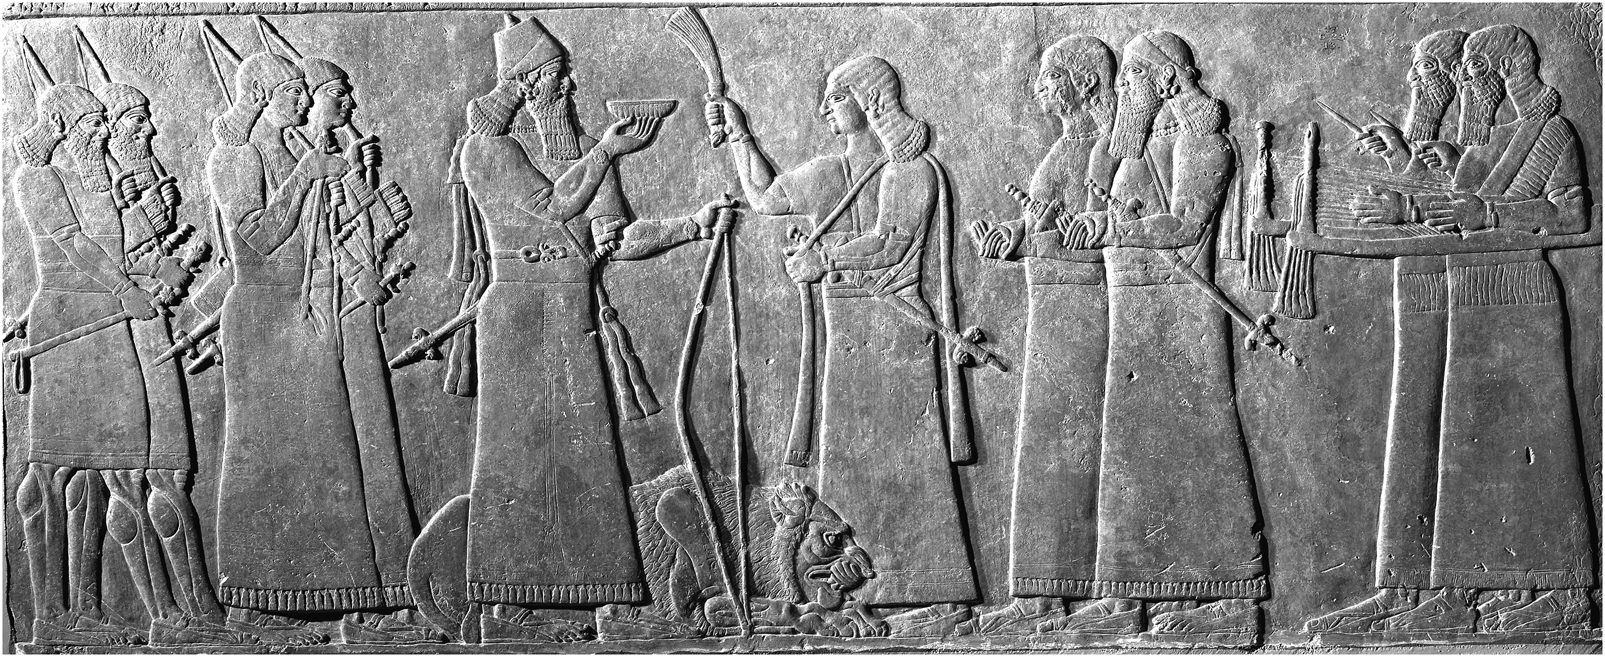
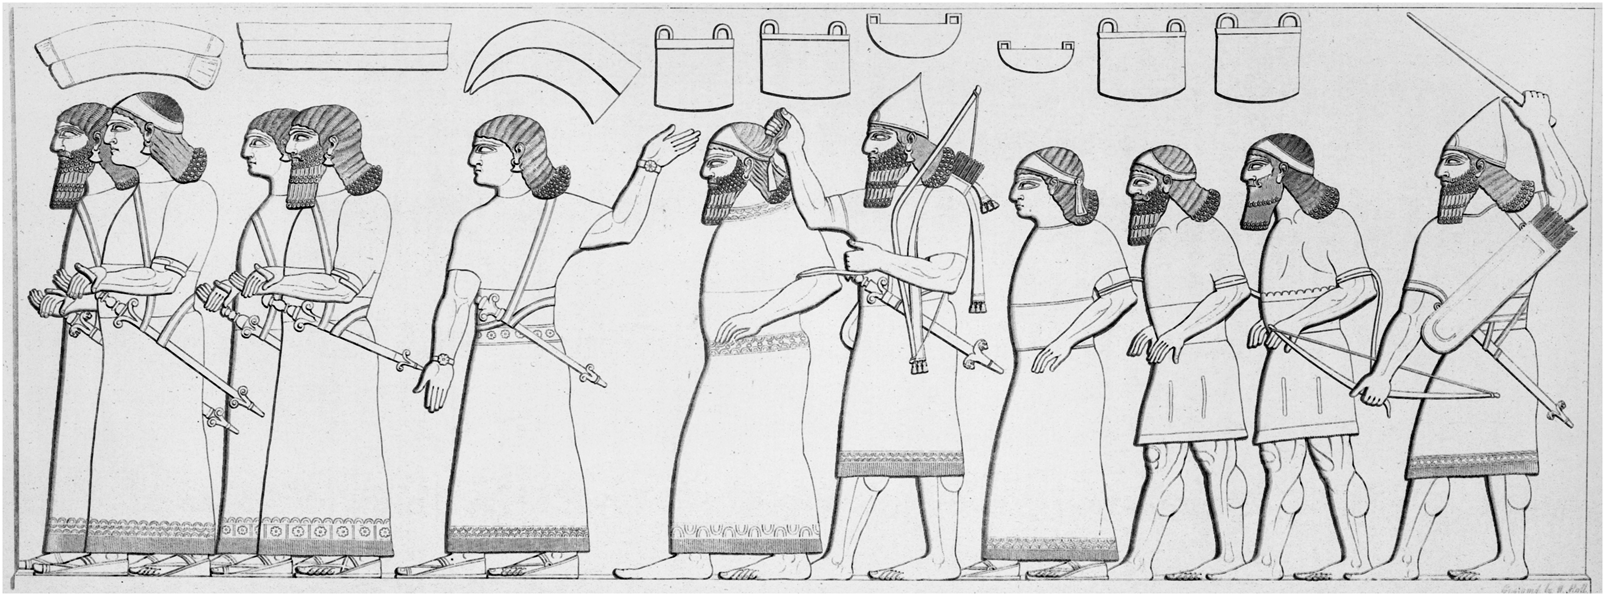
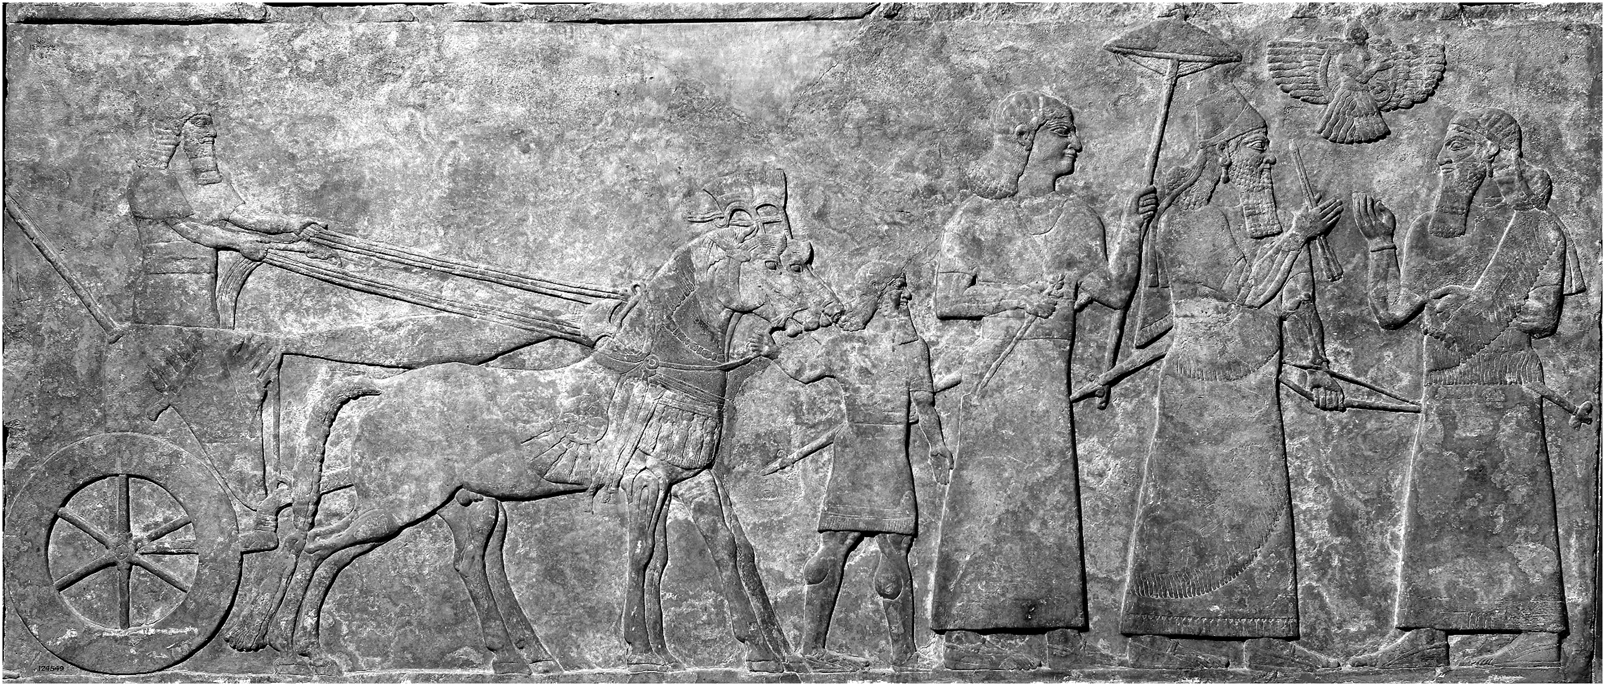
Nevertheless, a degree of intentional contrast is clearly visible in the visual formulas utilized in the three types of “encounter scenes” identified by where the Assyrian king and a bearded official wearing a headband (possibly the crown prince)Footnote 62 stand face to face. The first type of encounter scene consists of the two animal libation scenes in the lower registers of panels B-20 and B-19 (Figs. 14 and 15).Footnote 63 Both libation scenes are divided between a martial (king's side on the left) and a sacerdotal (right) side,Footnote 64 and the placement and number of soldiers in addition to the animal subject effectively establish the lion libation scene as holding greater martial character than the bull scene (Ataç Reference Ataç2006: 71–75; Ataç Reference Ataç2010: 92–93, 130–131). The second type, consisting of the aforementioned scene with the prostrate ruler and the scene in the throne room where the winged disk appears between the king and the prince (panel B-7, lower register),Footnote 65 similarly reflects this contrast in martial character. The prostration scene is certainly more martial than the winged disk scene given the greater number of bows and armed individuals as well as the absence of the winged disk, which certainly suggests a hieratic nature (Ataç Reference Ataç2006: 75). Ataç did not point out in detail that the captives in panel B-17 (lower register) behind the prince in the prostration scene are threatened by a soldier at the end of the procession with a raised, drawn sword (Fig. 16).Footnote 66 They are led by five officials without shawls,Footnote 67 armed with swords accompanied by another Assyrian soldier in the center of the scene. In contrast, the captives in the lower register of panel B-6 (Fig. 17)Footnote 68 behind the prince in the lower register of panel B-7 (Fig. 18) are led by only three unarmed officials (two are wearing shawls), one official with a sword, and only one soldier with an empty scabbard standing in the rear of the line in a more relaxed pose with his sword in his right hand pointed toward the ground. It is also noteworthy that both the bearded official in panel B-7 (lower register) and the beardless official in the lower register of panel B-6 wear the shawl over the left forearm. Two officials standing before Ashurnasirpal II depicted on the Balawat gates also appear to be wearing the shawl in this mannerFootnote 69 and likely indicates some degree of submission to either the king, the winged disk, or both.
Drawing of a bull libation relief. North-West Palace of Ashurnasirpal II (c. 865–860 BC) at Nimrud, Room B panel 20, lower register (Layard Reference Layard1853a: pl. 12).

Lion libation relief. North-West Palace of Ashurnasirpal II (c. 865–860 BC) at Nimrud, Room B panel 19, lower register. Image edited by author. ©Trustees of the British Museum.

Drawing of a relief depicting a soldier threatening a procession of captives. North-West Palace of Ashurnasirpal II (c. 865–860 BC) at Nimrud, Room B panel 17, lower register (Layard Reference Layard1853a: pl. 24).

Relief depicting a procession of captives. North-West Palace of Ashurnasirpal II (c. 865–860 BC) at Nimrud, Room B panel 6, lower register. Image edited by author. ©Trustees of the British Museum.

Relief of a winged disk between Ashurnasirpal II and a bearded official. North-West Palace of Ashurnasirpal II (c. 865–860 BC) at Nimrud, Room B panel 7, lower register. Image edited by author. ©Trustees of the British Museum.

In addition to the absence of bows, then, it appears that there is once again a lesser degree of martial character in panels B-6 and B-7 compared to the captive scene adjacent to the prostration scene (B-17 and B-18). The third type of encounter scene is found on the throne room façade facing the inner courtyard (Room D) where the elements of both previous types are combined :in this scene (panels D-2 and D-3)Footnote 70 the bearded official (wearing a sword but no shawl) holds his hands clasped instead of gesticulating, and the king holds a pair of arrows instead of a bowl while both he and the whisk-wielding attendant behind him wear shawls and swords (Ataç Reference Ataç2006: 75).
The scenes in Room G likewise display this duality between the martial and the sacerdotal but utilize a display of alternating opposites instead of the encounter formula consisting of the king and prince facing each other. In these alternating reliefs the king either holds a bowl and bow yet wears a sword while surrounded by human attendants, or else he holds a pair of arrows and a bow without a sword while surrounded by winged apkallu figures (Ataç Reference Ataç2006: 79–80). Each combination of implement and company respectively corresponds to the king's priestly or martial aspects (Brandes Reference Brandes and Finet1970: 151–154; Ataç Reference Ataç2006:79–80). In both capacities the king is not only serving as the link between gods and humans but he is also displaying “divine service and divine sanction as the legitimation of royal might” by receiving divine power in his weapons as a result of his libation offerings. The libation scenes in Room G also depict the king standing in exactly the same pose as in the libation scenes of the lion and bull (Russell Reference Russell1998: 686–687). The room as a whole therefore displays the king in both martial and sacerdotal aspects, but it can be considered dominantly sacerdotal since the room's main reliefFootnote 71 displays the unarmed, seated king holding a bowl (Ataç Reference Ataç2006: 79).
Several observations concerning the shawl and sword can be made from the scenes displaying the duality formula. First, among the four encounter scenes the winged disk scene (B-7, lower register) is the only case where both the king and the bearded official are clearly wearing shawls. In the throne room façade scene (D-2 and D-3) the king and his attendant behind him wear swords and shawls but the bearded official before the king does not appear to wear the shawl. Unlike the other three scenes the bearded official in this scene has clasped hands which indicates “obeisance without abasement” (Cifarelli Reference Cifarelli1998: 216) as well as a non-martial connotation compared to gesticulation (Ataç Reference Ataç2006: 75). In keeping with the visual formula, even though the king and the attendant on the left wear shawls their full array of weaponsFootnote 72 would likely place them as the “martial” side to the prince's “sacerdotal” side on the right. Since the prince wears a sword without a shawl the “sacerdotal” side is not without martial elements either, essentially forming another “yin-yang” configurationFootnote 73 (Ataç Reference Ataç2006: 80). Second, the shawl (with or without the sword) is only worn either in the presence of deitiesFootnote 74 or in the aftermath of a battle,Footnote 75 indicating at least some degree of connection to the divine as well. Third, when directly in the presence of deities (be it the winged disk or the genii) the sword scabbard is never exposed and is rather worn under the shawl when not engaged in combat. The fourth observation concerns the appearance of the sword. Ataç is correct to state that “the presence of a sword in the king's attire as the [emphasis his] sign for his military involvement,” but I would argue that the sword was a sign of not only the military but the sacerdotal as well.
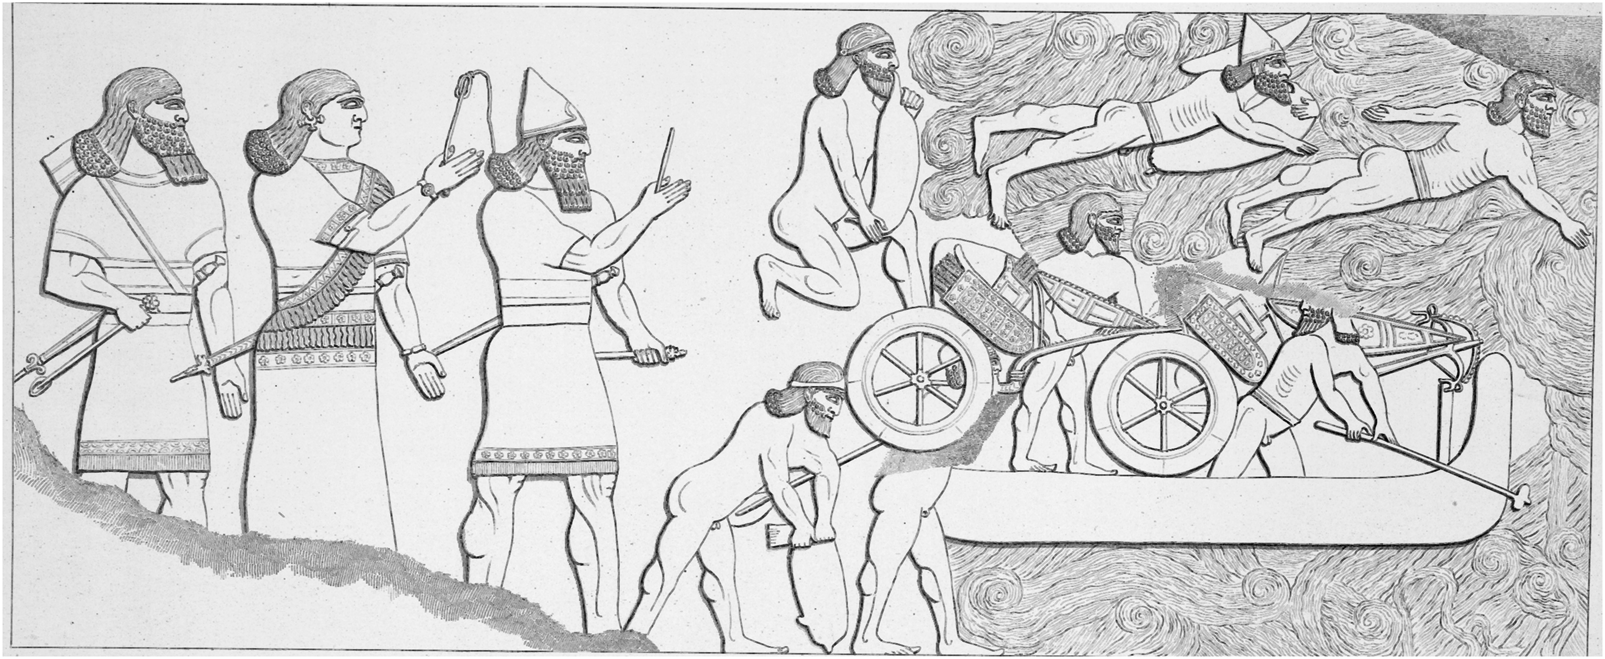
The aforementioned act of slaying troops is frequently described as being performed with the sword, but this military action was preceded by the god's calling of the king as well as the bestowment of weapons upon the king.Footnote 76 In addition, while the bow is used by the king to kill the carnivorous lion which holds “greater martial character” than the bull,Footnote 77 the sword is the weapon he uses to kill the bull. Combined with the lower register of panel B-11 (Fig. 19)Footnote 78 which depicts a beardless official wearing shawl over his sword, the combination of the shawl and sword therefore suggests a sacerdotal element to the individual if not the whole scene. In this scene the official wears earrings, arm bands, and holding what appears to be a knotted ropeFootnote 79 while facing a body of water where a chariot is being placed in a boat in the midst of nude individuals swimming to the right using inflated skins. Like every single depiction of the shawl worn with the sword, this official is not in any situation where he might need to actually draw his sword. However, despite the overall “militaristic” context given the accompanying soldiers and their weapons, he is holding what appears to be a ritualistic rather than militaristic implement, perhaps related to overseeing the naked swimmers’ possible state of “liminality” between safety and danger (Ataç Reference Ataç2010: 22).
Drawing of a beardless official overseeing swimmers. North-West Palace of Ashurnasirpal II (c. 865–860 BC) at Nimrud, Room B panel 11, lower register (Layard Reference Layard1853a: pl. 16).

Concluding Thoughts
Based on the placement of depictions of the shawl and sword within the visual formulas in the palace reliefs of Ashurnasirpal II, I would argue that the combination of the sword and the shawl is a blending of martial and sacerdotal elements which constitutes an additional variable in the visual formula. However, the fact that the shawl is worn over the sword rather than under it results in half the scabbard being hidden by the shawl, which could be interpreted to indicate a sense of submission to the divine. The sword, being a decorated, prestigious, and divinely-blessed object would be flaunted before the enemy using the “outdoor carry” method as seen in battlefield scenes, but in the case of “ceremonial carry” the sword is in a symbolic sense “restrained” or “sheathed again” by virtue of it being integrated into the formal costume worn for priestly roles in Ashurnasirpal II's palace. The outfits of the king and his attendants which integrate the sword into the shawl form the composite image of a “warrior-priest”Footnote 80 with varying degrees of martial and sacerdotal aspects depending on the sword-bearer's position in each scene and the other implements he bears in them. The combination of the sword and shawl is unique among all other implements depicted in Neo-Assyrian art as unlike other implements of martial or sacerdotal nature which are “held” (such as the bowl or pair of arrows) the sword and shawl are both “worn,” forming essential and fundamental parts of the person's entire visual representation. The king's similarly-equipped attendants reflect this same understanding, albeit to a lesser extent as evidenced by their simpler and more uniform outfits. In principle this composite image also functions as a reminder that its wielder is an agent of the gods and, as Ashurnasirpal II's own inscriptions say of himself, an embodied weapon of the gods. In other words, when wearing the shawl over the sword this latent divine power is contained but ready to be unleashed for when the gods determine that order needs to be restored and “Anzû” needs to be slain again.
Acknowledgements
An early version of this paper, titled, “The Sword as a Dress Accessory in the Neo-Assyrian Empire” was presented at the 2018 annual meeting of the American Schools of Oriental Research in Denver, Colorado. I am especially grateful to Megan Cifarelli for her invaluable comments and suggestions for this paper.