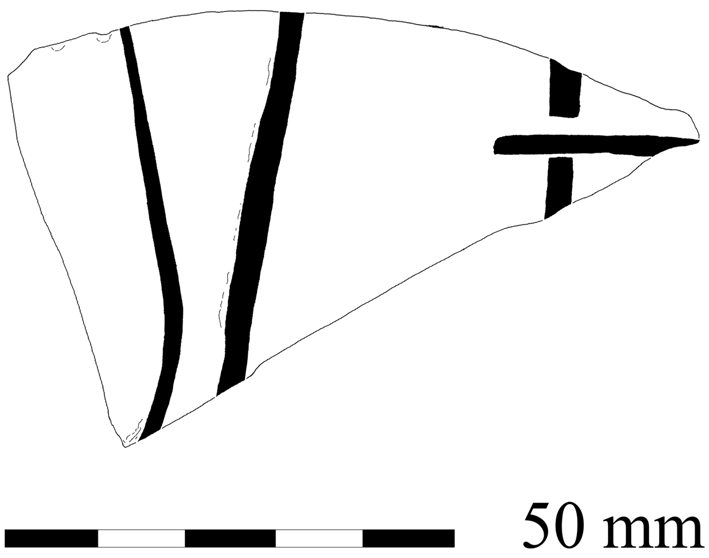


A. MONUMENTAL
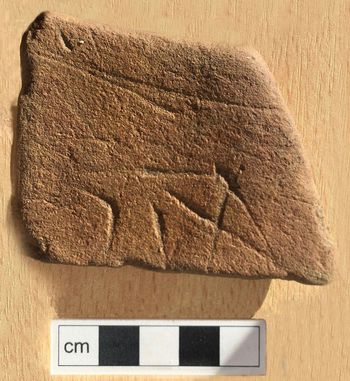
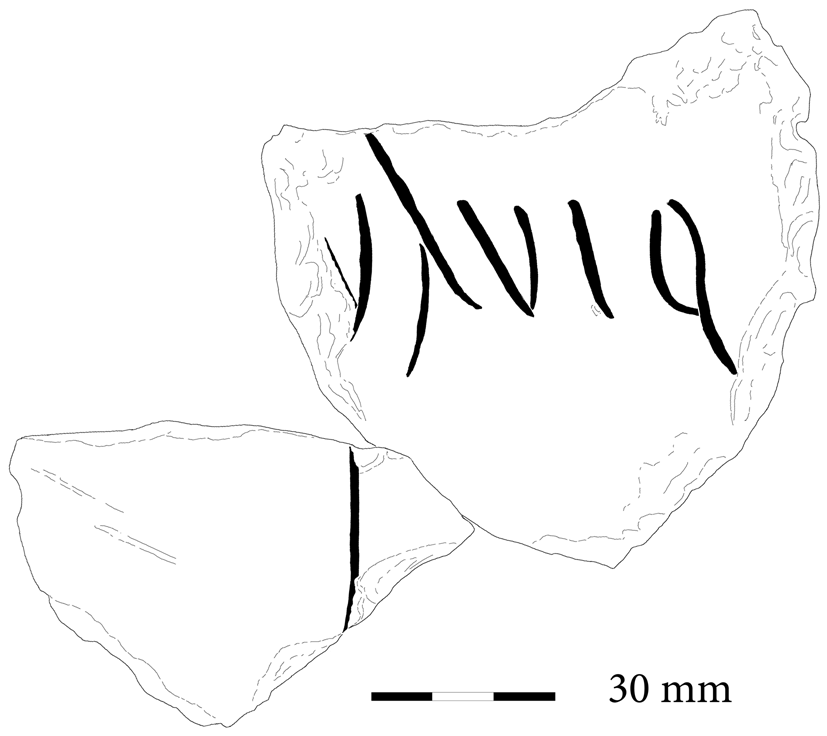
1. Matford near Exeter (Isca Dumnoniorum, SX 92686 88857), Devonshire (fig. 1). Very small slab of buff sandstone, 0.08 by 0.06 m, 14.5 mm thick, foundFootnote 2 in January 2020. Crudely incised: ḶIX, either ‘59’ or ‘L(…) 9’.Footnote 3
Matford, stone graffito (no. 1). (Photo: AC Archaeology)

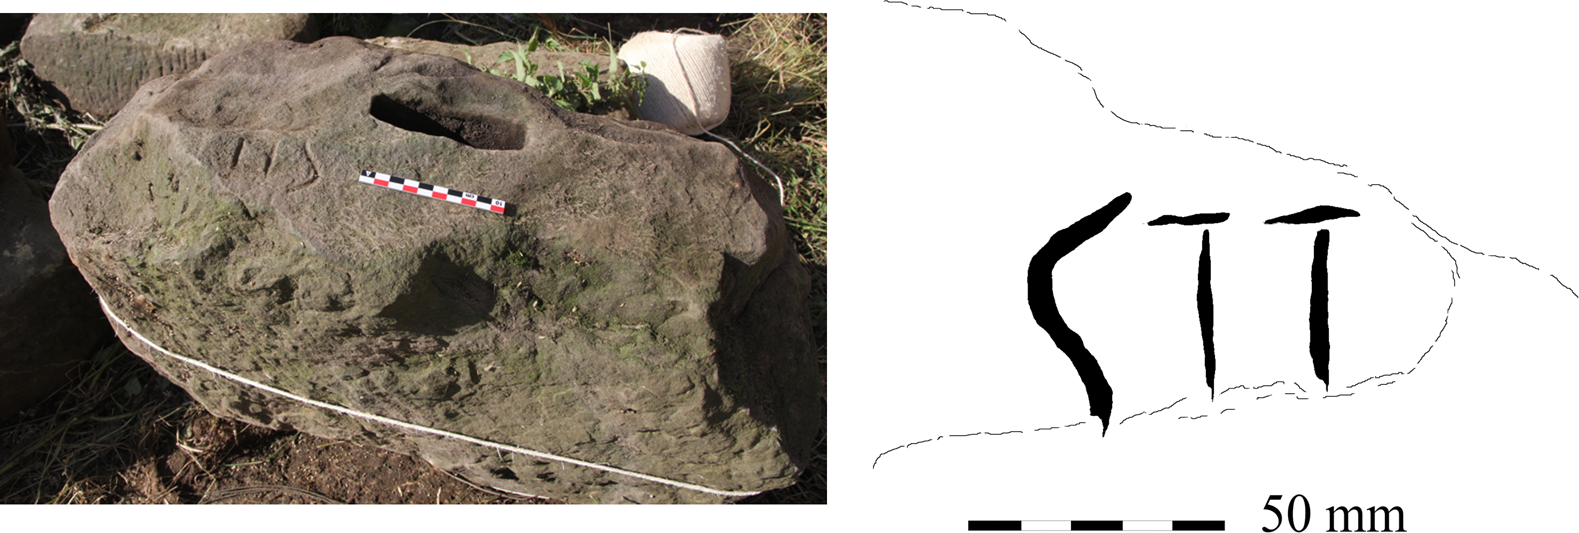
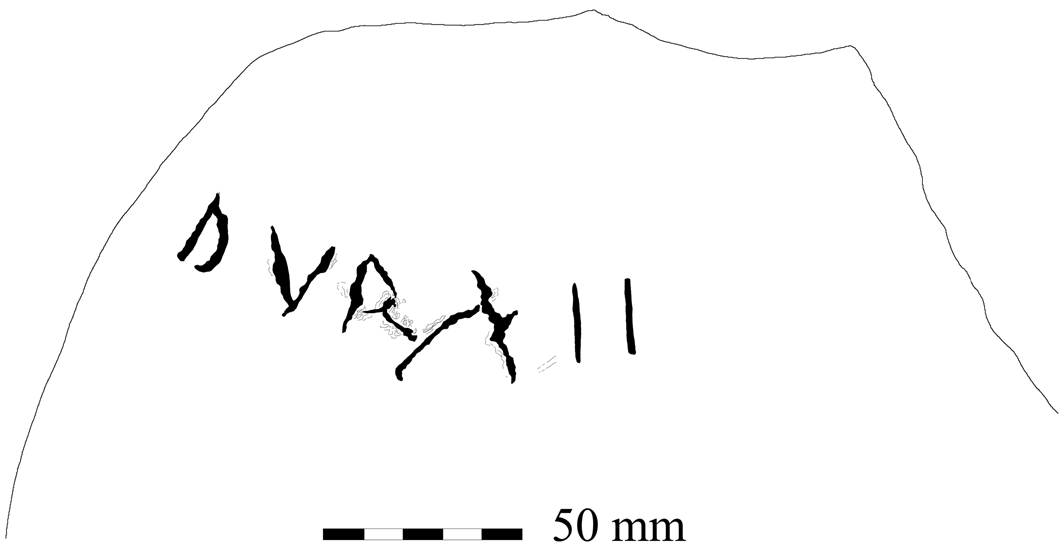
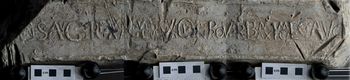
2. Catterick, Agricola Bridge (Cataractonium, SE 2248 9922), North Yorkshire (fig. 2). Irregular block of buff sandstone, the inscribed face 0.50 by 0.28 m, 0.70 m thick, foundFootnote 4 in 2013–17. This face is more or less flat but untooled, and into it has been cut a rectangular lewis hole. Nearby, three letters have been incised with a gouge: SII[…], probably s(inistra) II[…]. ‘On the left, 2 (or more)’.Footnote 5
Catterick, inscribed stone (no. 2) and detail of lettering. (Photo: Northern Archaeological Associates; drawn by R.S.O. Tomlin from photographs)

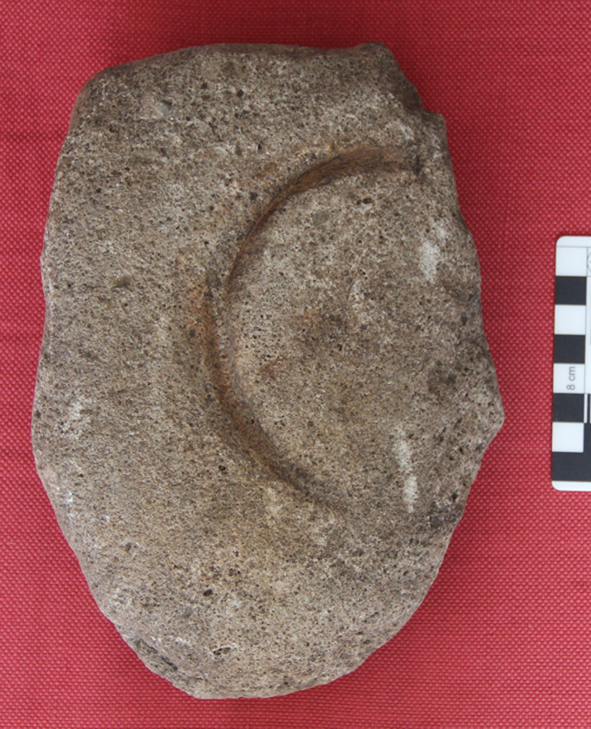
3. Aldborough (Isurium, SE 40686 66657), North Yorkshire (fig. 3). Irregular fragment of coarse millstone grit, 0.15 by 0.21 m, 0.08 m thick, foundFootnote 6 in 2019 face-up in a late Roman surface near the North Gate. Neatly incised: C[…].Footnote 7
Aldborough, inscribed stone (no. 3). (Photo: Martin Millett)

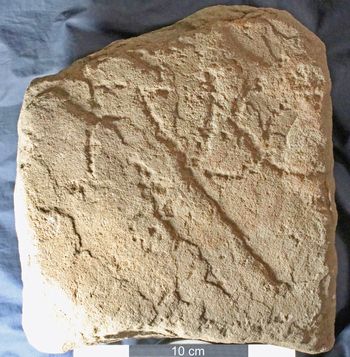
4. Vindolanda (NY 768 663), Northumberland (fig. 4). Buff sandstone building stone, its squared-off face 0.25 by 0.11 m, 0.24 m deep, foundFootnote 8 in 2019. The inscribed upper surface, 0.25 by 0.24 m, is more or less flat but untooled. Shallow letters have been pecked into it with a mason's point: FVSC[…], Fusc[us] or Fusc[i]. ‘Fuscus’ or ‘(stone) of Fuscus’.Footnote 9
Vindolanda, inscribed stone (no. 4). (Photo: R.S.O. Tomlin)

B. INSTRUMENTUM DOMESTICUM
BERKSHIRE
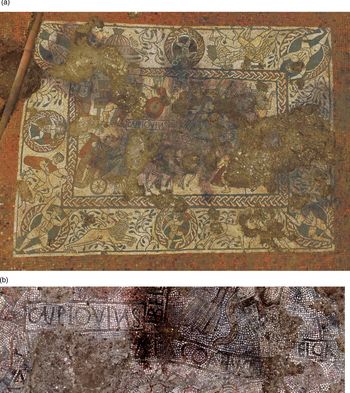
5. Boxford Roman villa (SU 428 716) (fig. 5). Fourth-century mosaic pavement foundFootnote 10 in 2017 and 2019. Within a wide border inhabited by human and animal figures, a rectangular band of guilloche defines the inner field of three mythological scenes divided by captions; these are white-tessera panels edged with a single line of dark-blue/grey tesserae, having capital letters similarly formed with a single line of dark-blue/grey tesserae. The three scenes are above (left) a royal audience and (right) Bellerophon killing the Chimaera; below, a chariot race. It is not certain how to identify and relate them to each other. Captions (a) and (b) which interrupt the guilloche above the ‘audience’ scene are too fragmentary to resolve the question; they read: […]ỊɅ and […]ṆI.Footnote 11 (c) Between the two scenes above and the scene below is a two-line caption in two panels: C͡Ʌ͡LPIO VIV͡ɅS | C[….]Ṛ[..].ɅTɅ CONIVG̣͡Ị, perhaps C(ae)pio vivas | c[um Fo]r[tun]ata coniug(e), ‘Caepio, may you live (long) with Fortunata (your) wife’.Footnote 12 This identifies the owners of the villa and its mosaic. (d) At right angles to (c), the first of two captions to the scene of Bellerophon and the Chimaera; above his head: BELLẸ..FONS, Belle[re]fons.Footnote 13 Then (e), below the winged horse: PEG̣..[…], Peg[asus].Footnote 14 (f) At right angles to (e), above a standing male figure to the right of the horses: .ELOBṢ, [P]elobs. ‘Pelops’.Footnote 15
Boxford mosaic (no. 5), overall view and caption (c) with adjoining parts of (d), (e) and (f). (Photos: Boxford History Project)

CAMBRIDGESHIRE
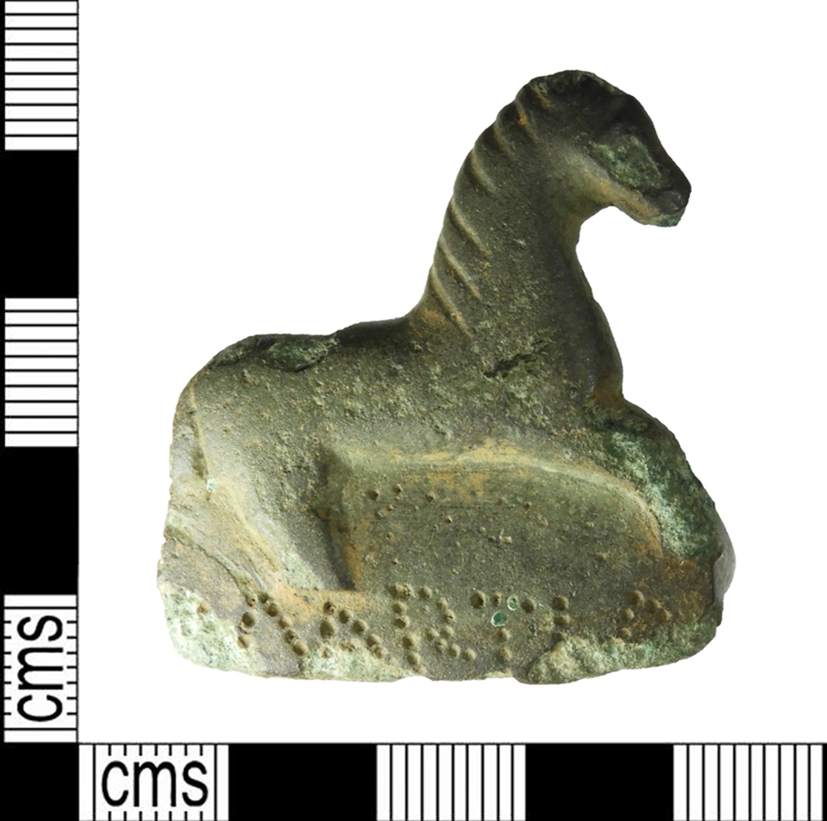
6. Knapwell (TL 33 60) (fig. 6). Copper-alloy mount, possibly a strap fitting, 31 by 33 mm, weight 23.9 g, recordedFootnote 16 in 2019. It represents a horse facing right, modelled in low relief with the legs cut short to admit an inscription on the base, in dot-punched capitals: MARTIA, probably Martia(lis).Footnote 17
Knapwell, copper-alloy mount (no. 6). (Photo: PAS)

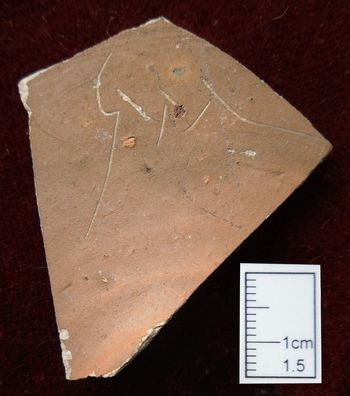
7. Water Newton (Durobrivae, TL 123 968) (fig. 7). Base sherd of a locally made third-century coarseware vessel, perhaps a flagon, foundFootnote 18 in 2019. Neatly incised underneath after firing: CMA, G(aius) M(…) A(…). Footnote 19
Water Newton, coarseware graffito (no. 7). (Photo: Albion Archaeology)

CHESHIRE
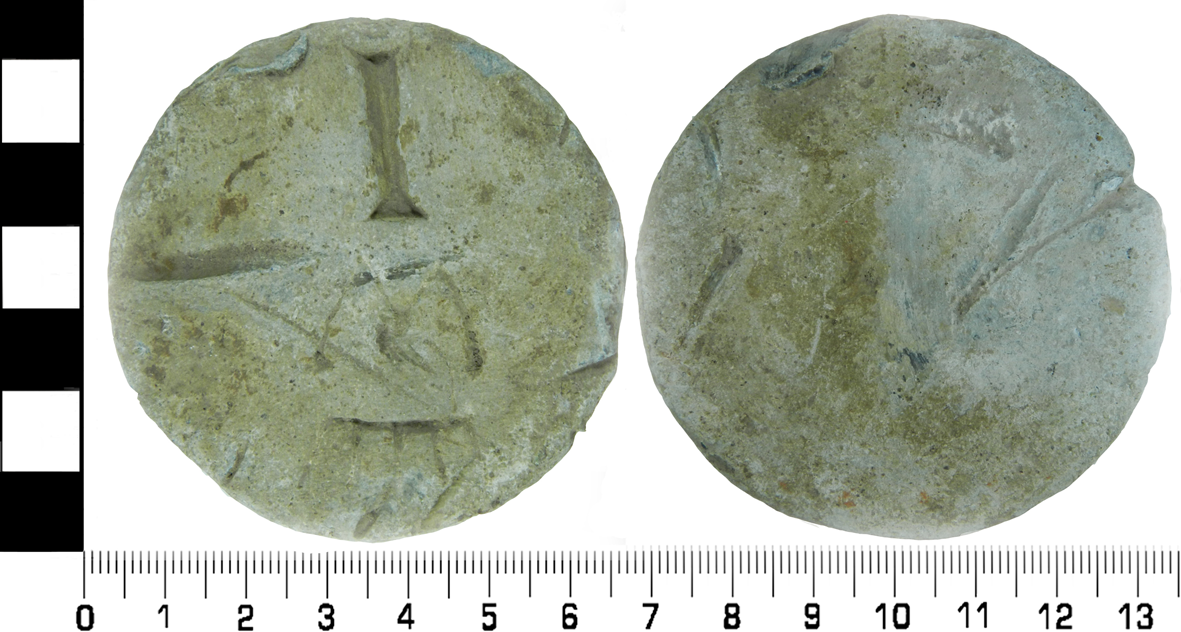
8. Grappenhall and Thelwall (SJ 63 85) (fig. 8). Cylindrical lead weight, diameter 55 mm, height 14 mm, weight 432.6 g, recordedFootnote 20 in 2018. Neatly incised towards the top of one face: I, ‘One’. A graffito has been scratched below it on the same vertical axis: M, above a ‘comb’-like figure consisting of a cross-stroke with four or five short vertical strokes descending from it.Footnote 21
Grappenhall and Thelwall, lead weight (no. 8). (Photo: PAS)

DORSET
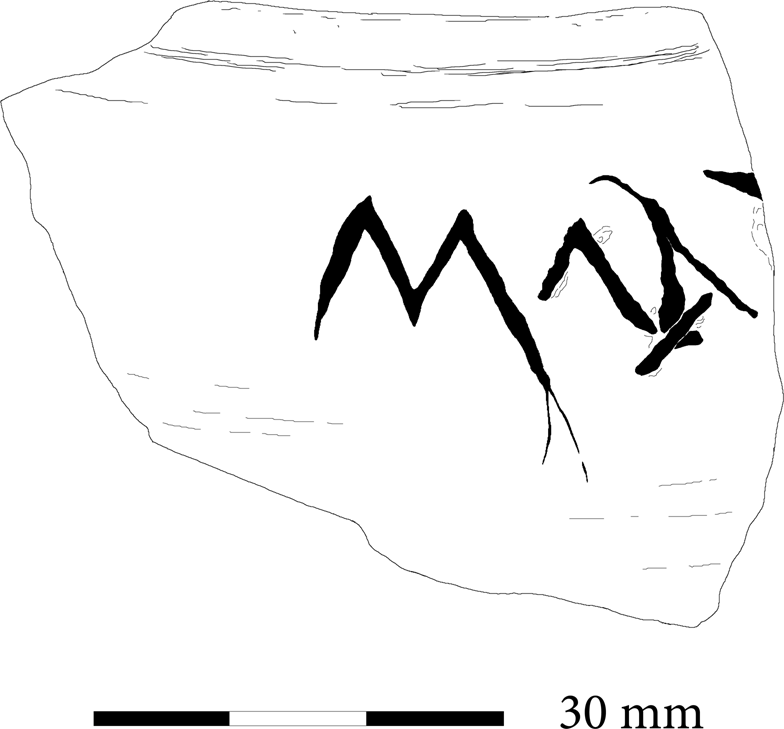
9. Druce Farm Roman villa, Puddletown (SY 7330 9540) (fig. 9). Rim sherd of a pre-Flavian black-burnished bead-rim beaker, foundFootnote 22 in 2017. Deeply incised after firing, in cursive letters: MɅRṬ[…], probably Mart[ialis].Footnote 23
Druce Farm, coarseware graffito (no. 9). (Drawn by R.S.O. Tomlin)

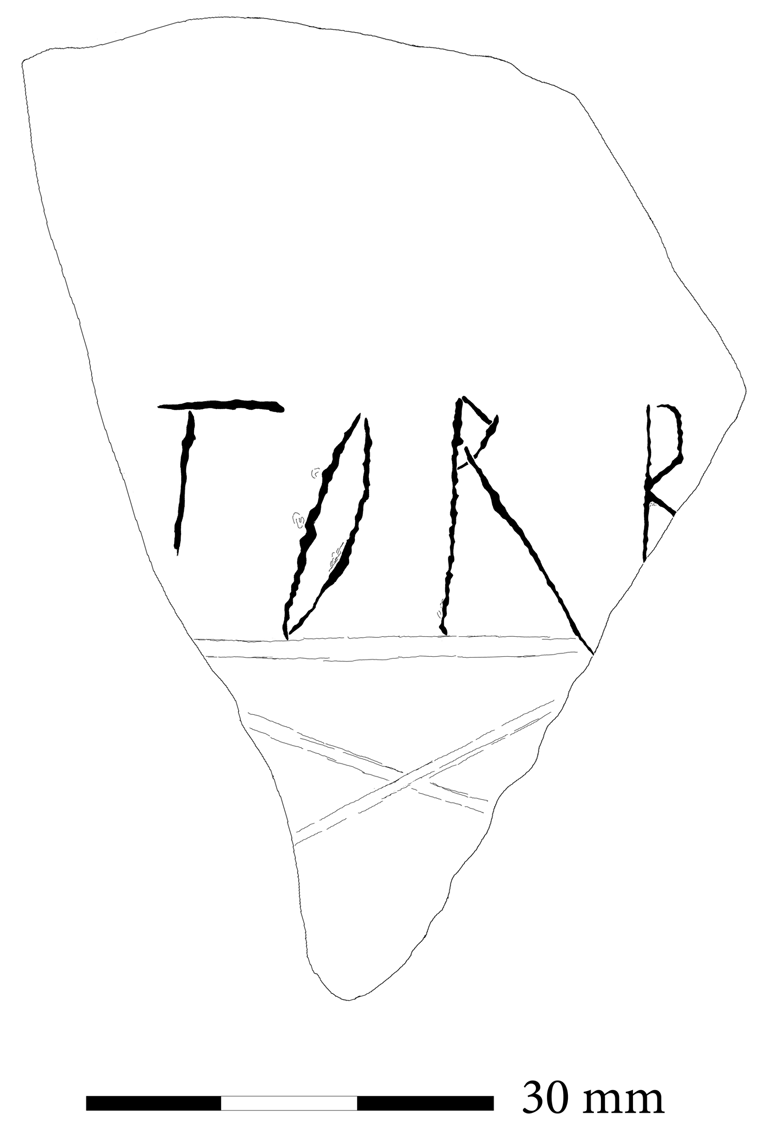
10. Ibid. (fig. 10). Wall sherd of a black-burnished everted-rim cooking jar found in 2014. Scratched after firing just above the lattice decoration, in tall, narrow capitals: […]TORḄ[…].Footnote 24
Druce Farm, coarseware graffito (no. 10). (Drawn by R.S.O. Tomlin)

ESSEX
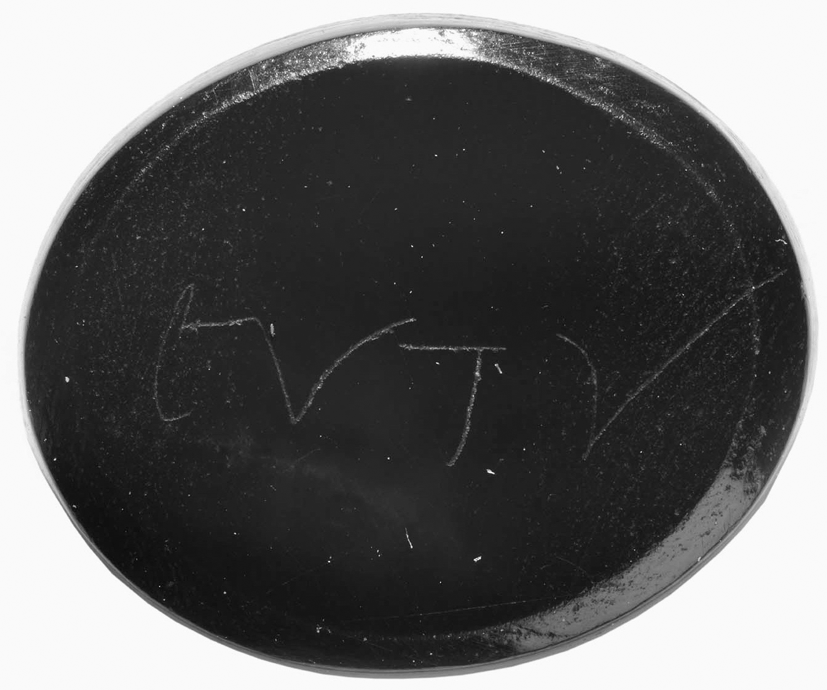
11. Heybridge (TL 847 082), Elms Farm (fig. 11). Oval nicolo intaglio, 9 by 11 mm, found in 1993–95. The obverse depicts a satyr walking to the right holding a bunch of grapes in his left hand and a pedum in his right. Scratched on the reverse in Greek cursive: ευτυ, Ευτυ(χηϲ), ‘Eutyches’.Footnote 25
Heybridge, intaglio (no. 11). (Photo: Colchester Museum)

GLOUCESTERSHIRE
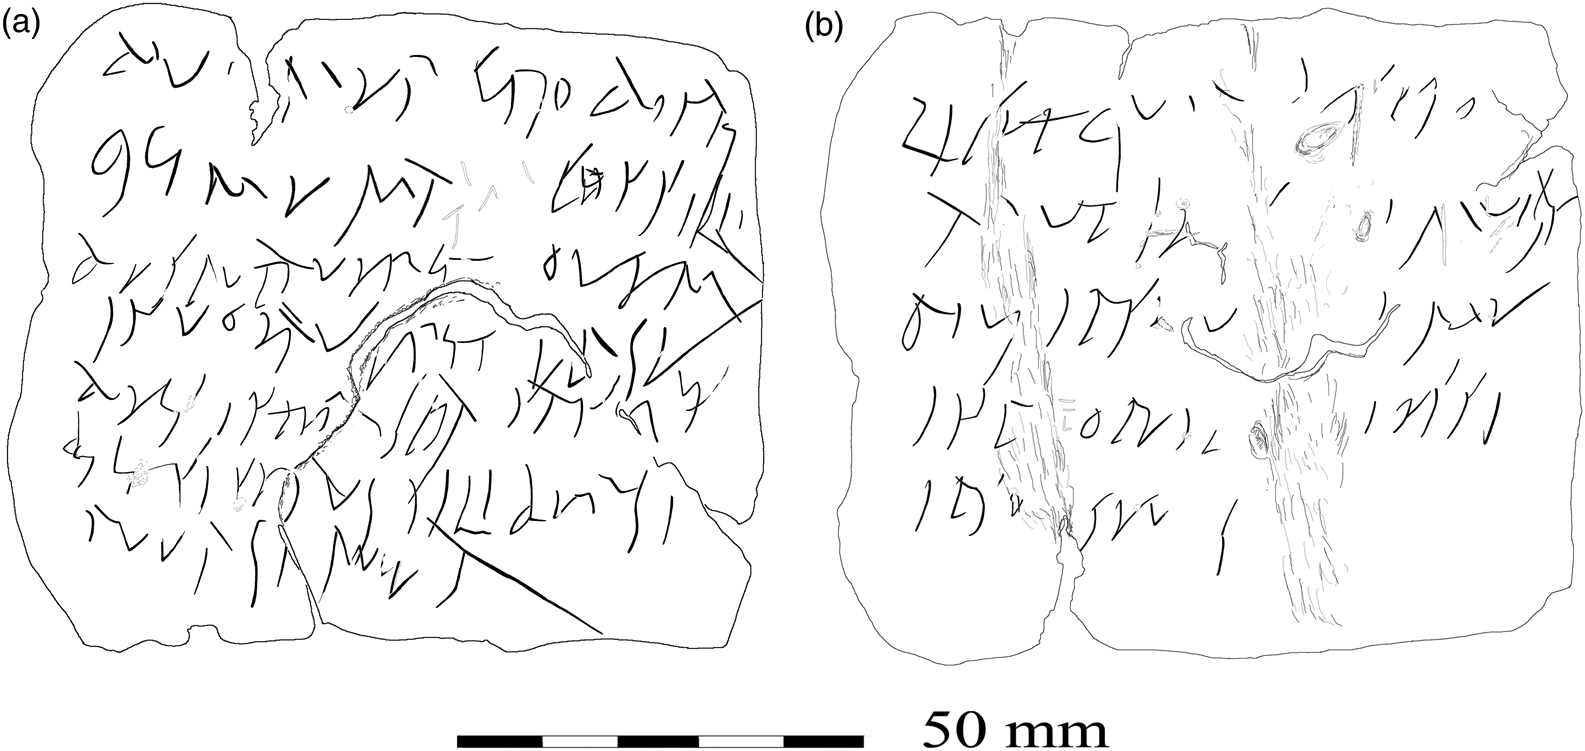
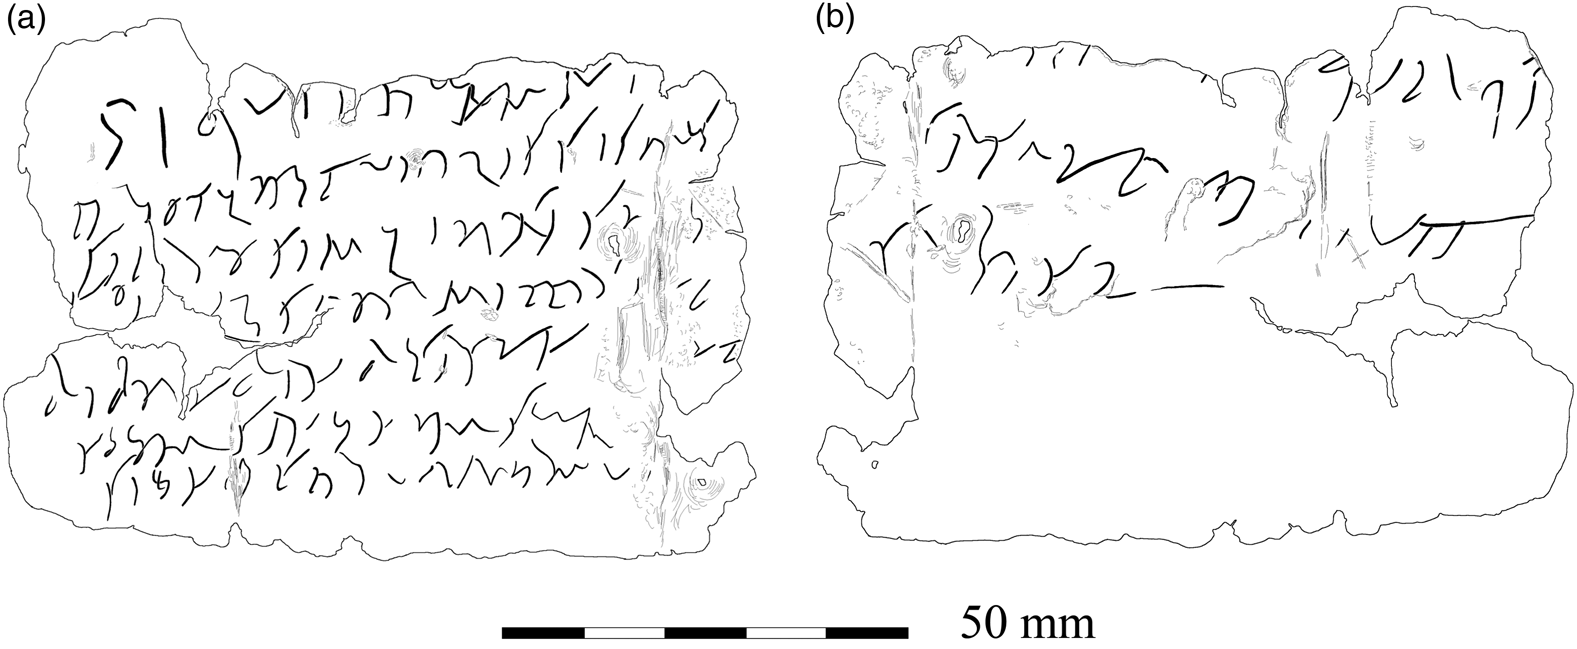
12. Uley (ST 789 996), West Hill, the temple of Mercury (fig. 12). Irregular rectangle cut from hammered lead sheet, 92 by 79 mm, foundFootnote 26 in 1978. After both faces had been inscribed in cursive, it was folded up twice, which has stressed and damaged the writing, especially on the corroded outer face. It reads: (inner face) diu[o] Merc̣urio dọnaui | qui me ma[li] cọnsil<l>i | desputauerit ouem | inuolauerit ipse | deus interscia(t) sangu(i)ṇ[e] | ụili si ser(u)us si liber si | puer si puẹḷ(l)a | (outer face) licet qu[o]ḍ [n]ẹṣcio | ap̣ut .e[…].ṃuic̣an | diui ipsẹu[s …] me | inp[.]ope..[…] ṇessi | ips.[.]seụ[.]s[…]. ‘To the god Mercury I have given (the man) who of evil intent has ?robbed me (and) has stolen (my) sheep. Let the god himself ?kill (him) with his vile blood, whether (he is) slave or free, whether boy or girl, even if, which I do not know, at the … of the god himself … me … unless …’.Footnote 27
Uley lead tablet (no. 12): (a) inner face; (b) outer face. (Drawn by R.S.O. Tomlin)

13. Ibid. (fig. 13). Irregular rectangle cut from lead sheet, 89 by 61 mm, now ragged at the edges and badly damaged at one of its two folds. The outer face is much corroded, and its left edge is broken; this corresponds to the right edge of the inner face, where the width lost (c. seven letters) can be estimated from the restoration of si liber at the end of line 2. The left and bottom margins largely survive, and enough remains of the top-left corner to show that line 1 is the original first line. Except for the first two letters in capitals, both faces are inscribed in cursive, the inner with seven lines, the outer with three. They read (inner face): si quis <h>ouem su[um de pro]|prio tulerit Virilis, si ser(u)us [si liber] | si baro si mulier, si se[r](u)us [si liber ?ut] | ṇoṇ [i]lis permittas ṇẹc [… ?nec] | bib(e)re (nec m)anducare n[ec ante dies] | nouem san(g)uinem suum [… ni]|si uindictam meam u.[…] (outer face) […] … qui … […] | […]ṣan.ep..[…]uit | […] s[an](g)uine. ‘If anyone … has stolen his sheep … from the property of Virilis, whether slave [or free], whether man or woman, whether slave [or free], may you not permit them […] nor to drink nor to eat […] nor [before] nine [days] … his blood unless … my vengeance … who … has … with (his) blood’.Footnote 28
Uley lead tablet (no. 13): (a) inner face; (b) outer face. (Drawn by R.S.O. Tomlin)

HAMPSHIRE
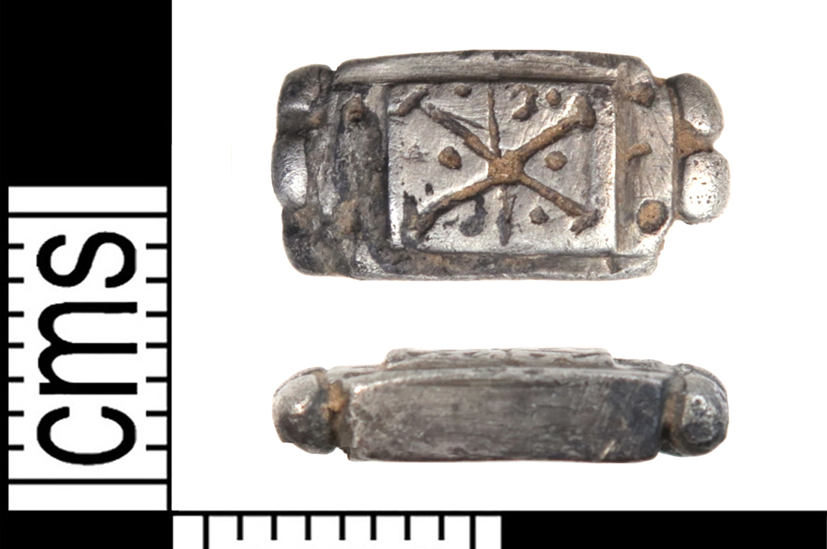
14. Amport (SU 30 44) (fig. 14). Rectangular bezel of a ‘Brancaster’-type silver finger-ring (late fourth/fifth century), foundFootnote 29 in 2019. Within the raised central area, 6.9 by 5.3 mm, is incised a bold ‘X’ cross, its four arms terminating in serifs and divided by pellets, superimposed upon a less bold vertical stroke. Probably (Greek capitals) X͡P, Chi-Rho.Footnote 30
Amport, silver ring bezel (no. 14). (Photo: PAS)

HERTFORDSHIRE
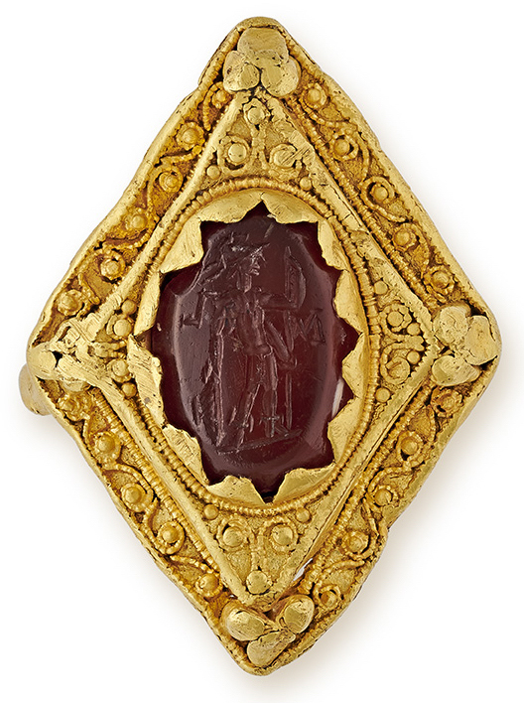
15. Hitchin (TL 18 29) (fig. 15). Oval cornelian intaglio, probably of third-century date, mounted in a ninth-century gold ring, foundFootnote 31 in 1977. It depicts (in impression) Mars standing, facing left; incised in the field: (left) M, (right) L. Probably M(arti) L(eno) or L(oucetio), ‘To Mars Lenus or Loucetius’.Footnote 32
Hitchin, gold-mounted intaglio (no. 15). (Photo: Wartski's)

KENT
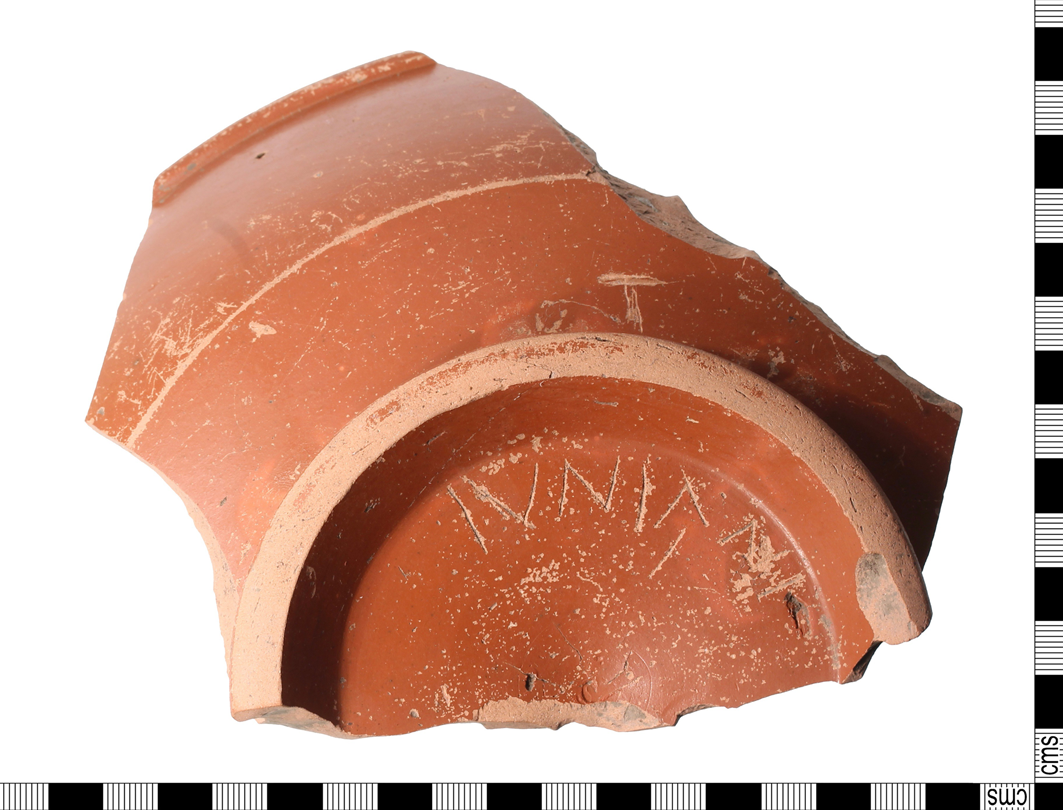
16. Thames foreshore east of Gravesend (TQ 69 75) (fig. 16). Base sherd of a Samian platter (Dr. 18/31R) stamped VXO[PILL]I M (central Gaulish, Antonine), foundFootnote 33 in 2019. Scratched underneath after firing: IVNIANI, Iuniani, ‘(Property) of Iunianus’.Footnote 34
Thames foreshore, Samian sherd (no. 16). (Photo: PAS)

LINCOLNSHIRE
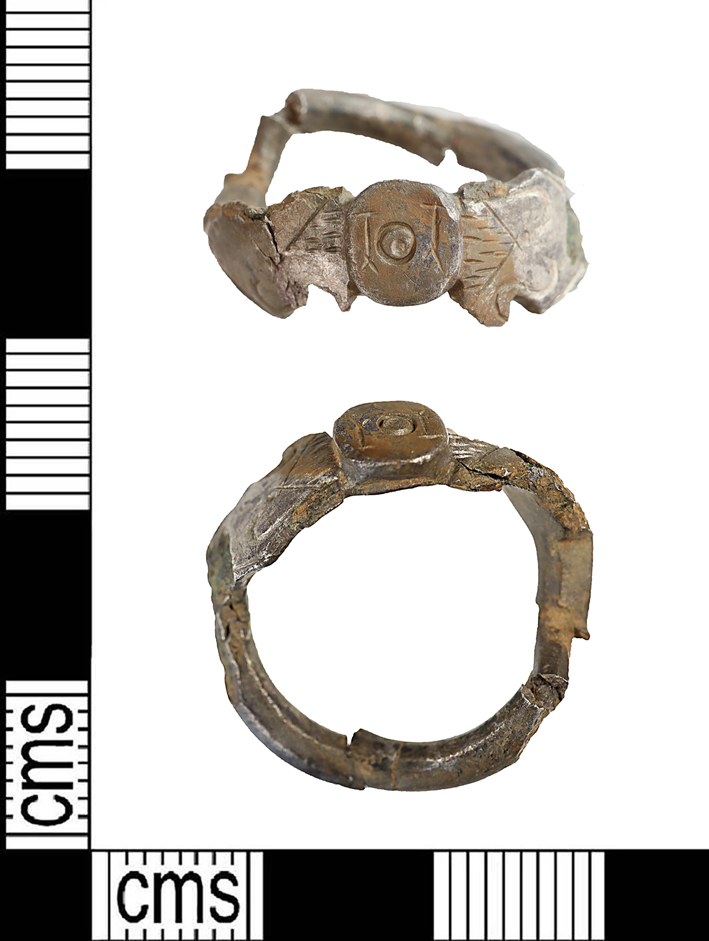
17. Candlesby with Gunby (TF 45 67) (fig. 17). Incomplete silver finger-ring (Henig type VIII), diameter 23.6 mm, weight 4.06 g, recordedFootnote 35 in 2019. The integral bezel is a disc 6.3 mm in diameter, 2.7 mm thick, incised: TOT, To(u)t(atis).Footnote 36
Candlesby with Gunby, silver ring (no. 17). (Photo: PAS)

LONDON
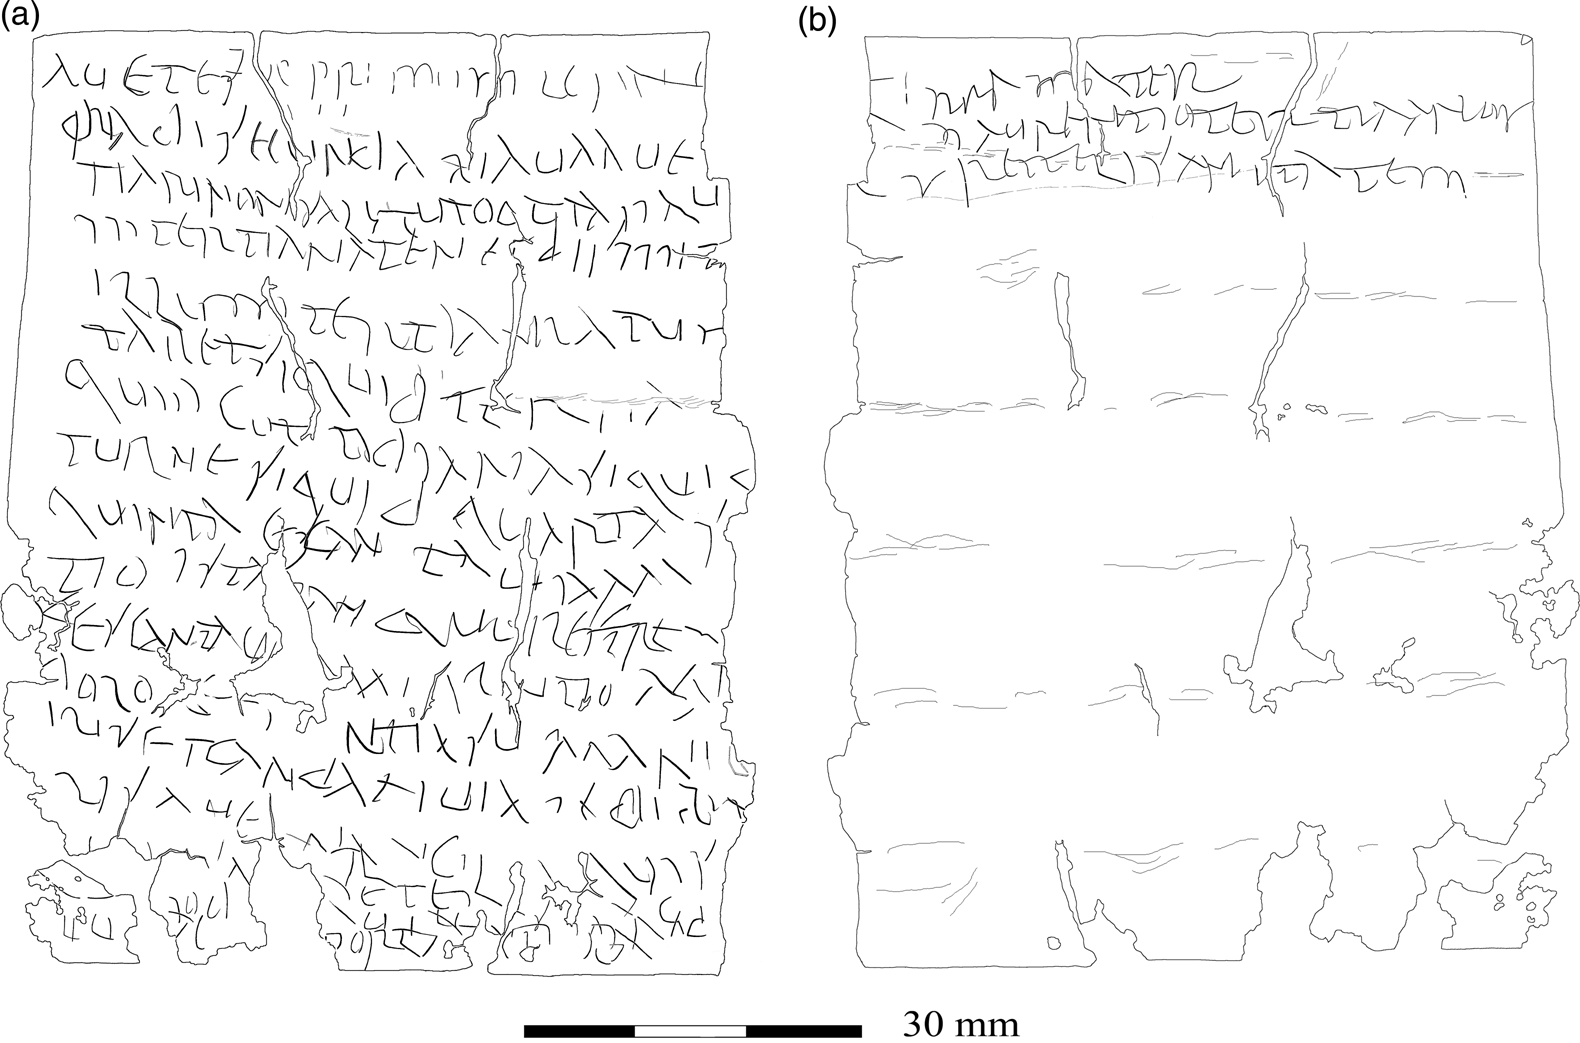
18. City of London (Londinium, TQ 3236 8080), Upper Thames Street, EC4 (fig. 18). Rectangle cut from thin pewter sheet (approximately Sn 52 per cent to Pb 48 per cent), 60 by 84 mm, foundFootnote 37 in 1989 on the site of the Roman Thames foreshore. Both faces are inscribed in cursive letters of later third-century date.Footnote 38 After being inscribed, it was folded upon itself at least three times vertically and then six times horizontally, probably for insertion into an amulet case. The resulting network of creases and cracks intersecting at right angles has fragmented the text, and one vertical strip has been lost entirely, taking with it the ends of all 17 lines of the inner face and the beginnings of the three lines of the outer face. They readFootnote 39 (inner face): auetes.. prịmum uịdị ..[…] | .ria di secundaṇa uaaueṭ[…] | tiari nọṇ salut uto.tta …u[…] | m tertiana teneṭ dis miṭ[…] | illum tertiaṇa tur[…] | ṭaṛet si quid tertia.[… si] | quid cottidiana si quiḍ […] | turne si quid quarta s[i quid] | quinta es(t) cantaui aṃa[…] | tio ista. aṇ qui ref.re.[…]|f̣es cantauị [.] ṃạụr[.]ntio ..[…] | ..olo e[…]ntiasu..a…[…] | ṛịṣ et candaṭi uiạ p̣ẹdiḅ.[…] | ṛịṣ aue … cil[.]q̣uis[…] | … | … | … | (outer face) […] ṭ[e]rra mater | […]ạ ṃaurentio tertia <a>nus | […].ṣ retteli sanitatem, ‘… first … second … tertian … tertian … whatever tertian, whatever quotidian, whatever … whatever fourth, whatever fifth … Mother Earth … from Maurentius … health’. It is apparently a textual amulet against intermittent fevers such as ‘malaria’.Footnote 40
London, pewter amulet (no. 18): (a) main face; (b) concluding text. (Drawn by R.S.O. Tomlin)

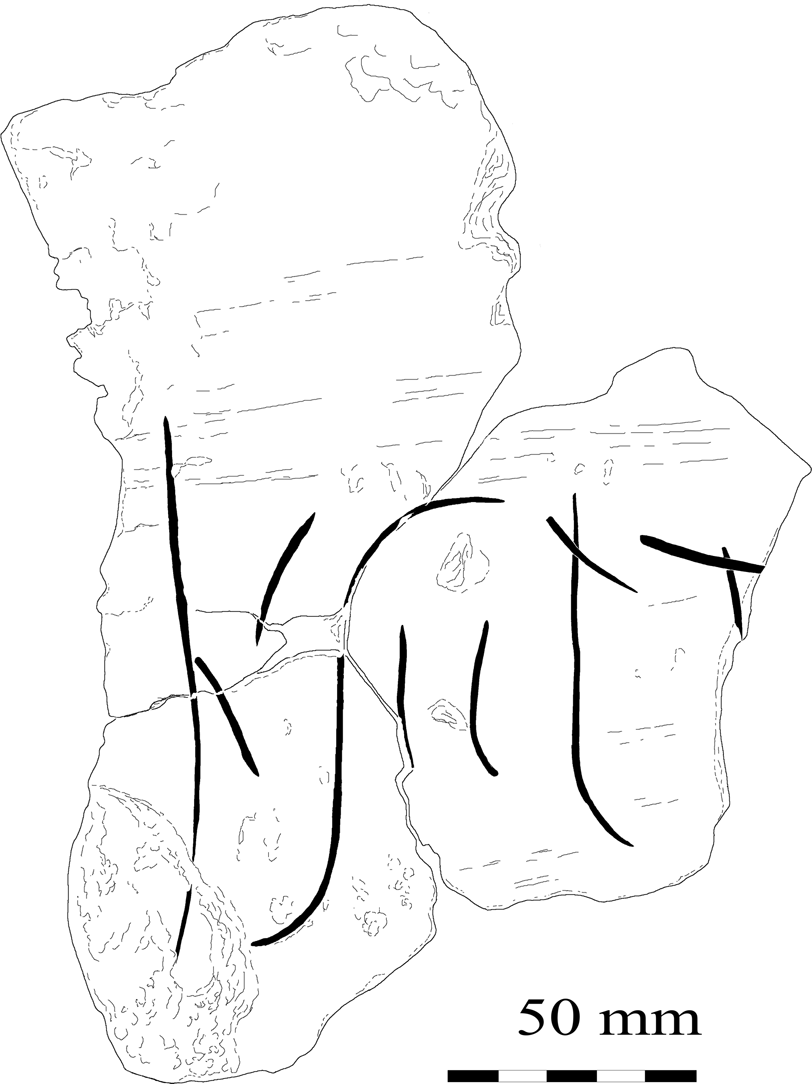
19. Ibid. (TQ 33478 81065), 78–87 Fenchurch Street, EC3 (fig. 19). Three conjoining fragments of a brick with all edges broken, 125 by 190 mm overall, up to 50 mm thick, foundFootnote 41 in 2015. Incised before firing in tall cursive letters: […]KSEPT[…], […] K(alendas) Sept(embres) […]. A date in the second half of August.Footnote 42
London, brick (no. 19). (Drawn by R.S.O. Tomlin)

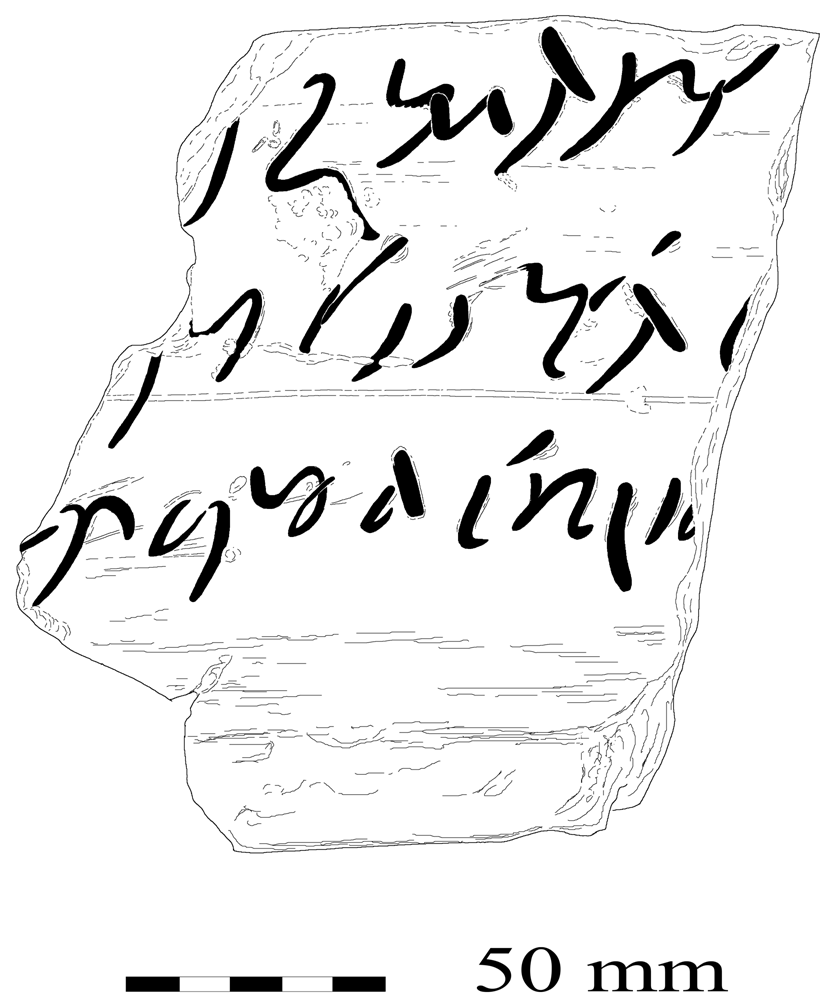
20. Ibid. (fig. 20). Fragment of a flanged roofing tile (tegula), 125 by 150 mm, 27 mm thick. It retains part of one flange, but the other three edges are broken. Inscribed before firing in fluent cursive: [… | …]ṣ humanus [… | …]q̣ui c̣irca .[… | …]ẹr quod cẹịḷi.[…]. Evidently a long ‘literary’ text, but beyond recovery.Footnote 43
London, tegula (no. 20). (Drawn by R.S.O. Tomlin)

NORFOLK
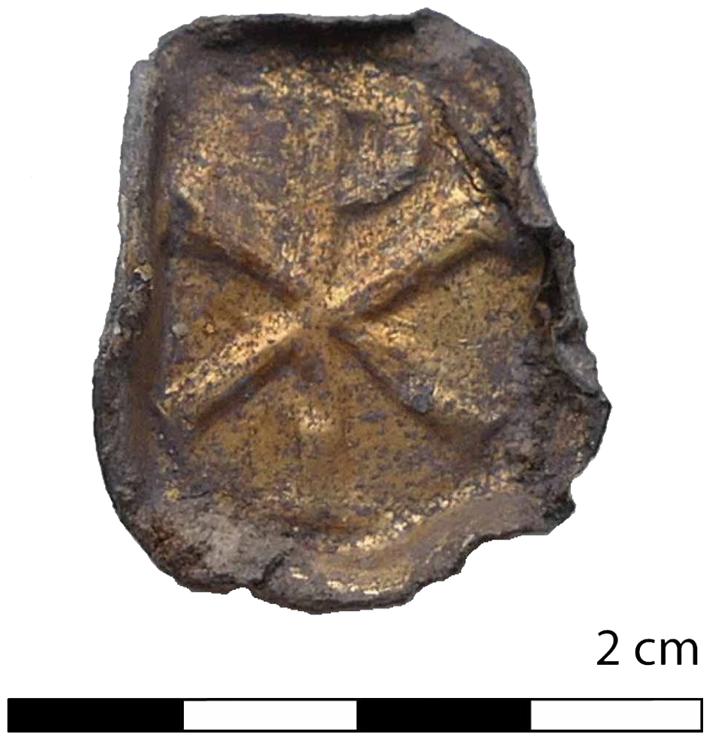
21. Caistor-by-Norwich (Venta Icenorum, TG 2326 0381) (fig. 21). Gilded lead casting, c. 15 by 18 mm, weight 0.47 g, foundFootnote 44 in 2017. Moulded in relief: (Greek capitals) X͡P, Chi-Rho.Footnote 45
Caistor-by-Norwich, lead casting (no. 21). (Photo: Caistor Roman Project)

NORTHUMBERLAND
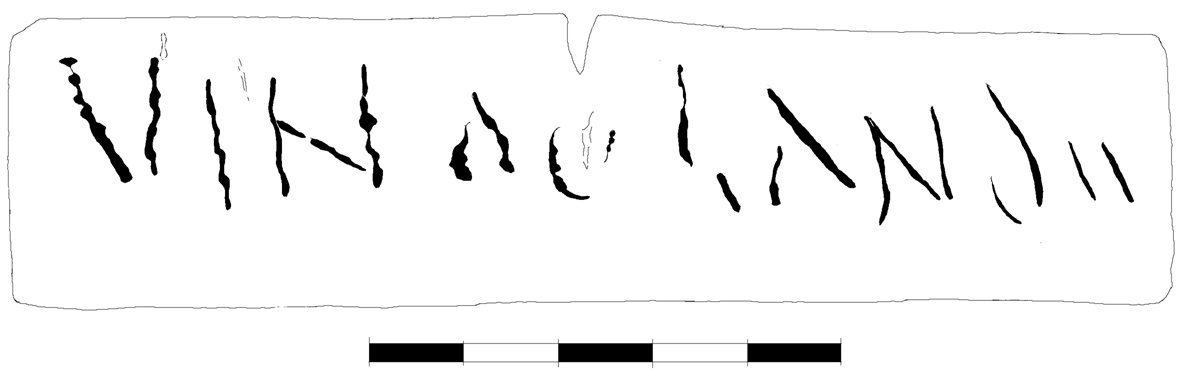
22. Vindolanda (NY 768 663) (fig. 22). Fragment of a wooden stylus tablet, 120 by 30 mm, foundFootnote 46 in 1995. The outer (unrecessed) face, with a notch in the top edge for the binding cord, is scored in capitals with the beginning of the ‘address’ of a letter: VINḌỌLANDII | […], Vindoland(a)e …, ‘At Vindolanda, [to …]’.Footnote 47
Vindolanda, stylus tablet (no. 22). (Drawn by R.S.O. Tomlin from photographs)

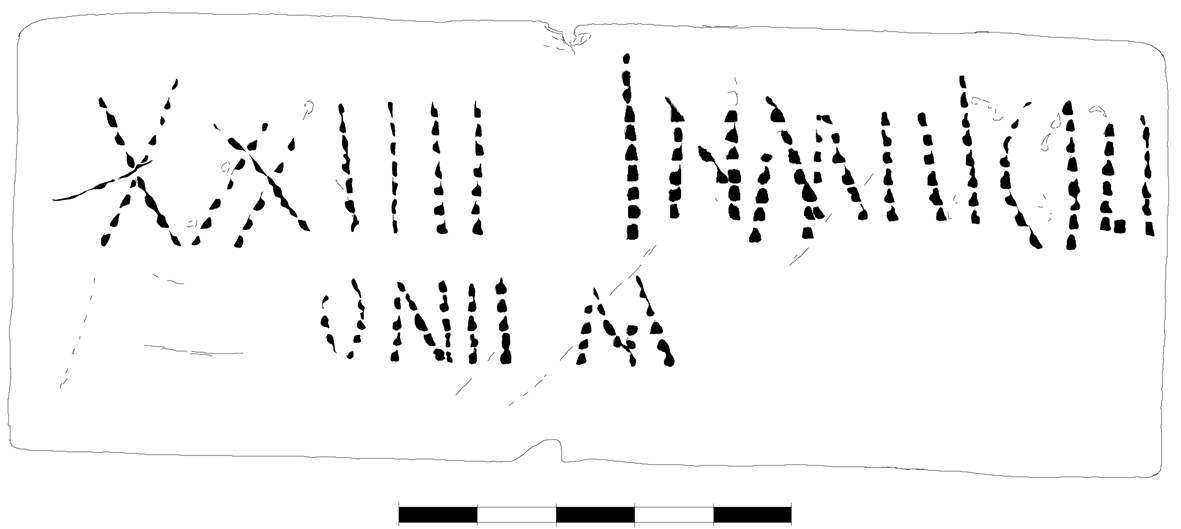
23. Ibid. (fig. 23). Fragment of a wooden stylus tablet, 140 by 60 mm, with a notch in the top and bottom edges, showing that the original tablet was broken in half to be folded like an envelope for correspondence.Footnote 48 The outer (unrecessed) face is scored with two lines of capitals: (denarius symbol) XXIIII INMII.CIII | ONII M, (denarios) xxiiii in me[r]ci[m]|oni[u]m, ‘24 denarii, for merchandise’.Footnote 49
Vindolanda, stylus tablet (no. 23). (Drawn by R.S.O. Tomlin from photographs)

24. Ibid. (fig. 24). Base sherd of a Samian bowl (Dr. 31) stamped BELINICI (Lezoux, Hadrianic/early Antonine), foundFootnote 50 in 2018. Incised after firing underneath within the foot-ring: […]Ʌ̣RṬ[…], probably [M]art[ialis].Footnote 51
Vindolanda, Samian graffito (no. 24). (Photo: R.S.O. Tomlin)

STAFFORDSHIRE
25. Rocester, Eyes Farm (SK 1121 3950) (fig. 25). Wall sherd of a southern Spanish oil amphora (Dressel 20), foundFootnote 52 in 2018. Incised before firing in cursive letters: […].auio.Footnote 53
Rocester, amphora graffito (no. 25). (Drawn by R.S.O. Tomlin)

26. Ibid. (fig. 26). Sherd from the shoulder of another Dressel 20 amphora, its rim suggesting a date in the later second century, incised after firing in clumsy capitals: DVRΛII, Durae, ‘(Property) of Dura’.Footnote 54
Rocester, amphora graffito (no. 26). (Drawn by R.S.O. Tomlin)

27. Ibid. (fig. 27). Base sherd of a Samian platter (Dr. 18/31) stamped AVSTRI M (Austrus of Lezoux, a.d. 120–45). Two graffiti were made after firing. (a) Incised underneath, within the foot-ring: traces ].INI, […].ini, ‘(Property) of […]inus’. (b) Notched into the under-surface of the foot-ring, two intersecting diagonals and a single transverse cut.Footnote 55
Rocester, Samian graffito (no. 27). (Drawn by R.S.O. Tomlin)

28. Ibid. (fig. 28). Base sherd of a Samian platter (Dr. 18/31R, south Gaulish). Incised after firing underneath, within the foot-ring: […]ṾɅTI, […]vati, ‘(Property) of […]vatus’.Footnote 56
Rocester, Samian graffito (no. 28). (Drawn by R.S.O. Tomlin)

YORKSHIRE, EAST RIDING̣
29. Hayton (SE 84 44) (fig. 29). Silver finger-ring (Henig type XI) recordedFootnote 57 in 2019. The flat, rectangular bezel is incised with a linear border enclosing dot-punched letters: TOT, To(u)t(atis).Footnote 58
Hayton, silver ring (no. 29). (Photo: PAS)

NORTH YORKSHIRE
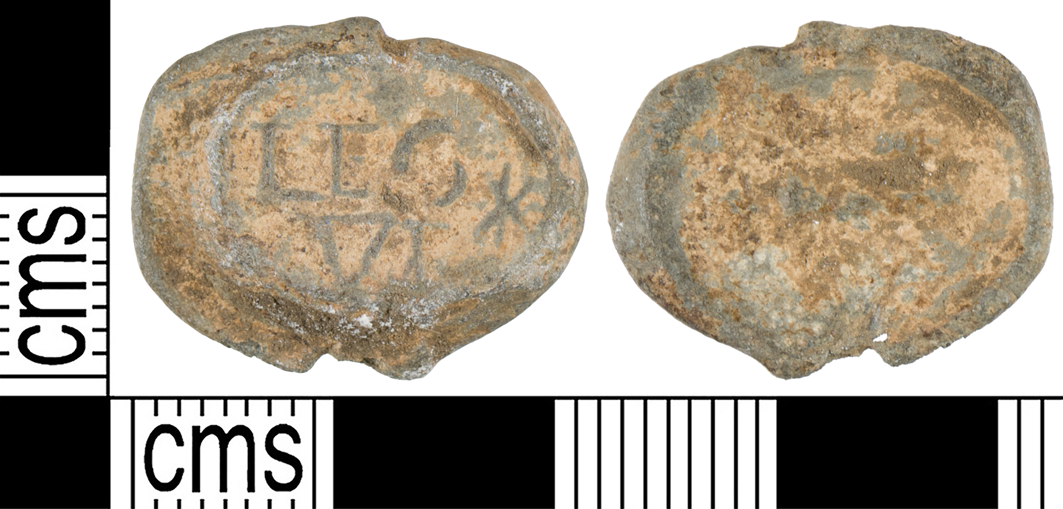
30. Tadcaster (SE 48 43) (fig. 30). Oval lead sealing, 20.7 mm in diameter, 3.8 mm thick, weight 6 g, recordedFootnote 59 in February 2020. Obverse: LEG | VI | star, Leg(io) VI. Reverse: MCS, M(arcus) C(…) S(…) (centurio).Footnote 60
Tadcaster, lead sealing (no. 30). (Photo: PAS)

31. York (Eboracum, SE 5875 4978), 26–8 Tadcaster Road (fig. 31). Three conjoining sherds preserving the profile of a Samian platter (Dr. 18/31), foundFootnote 61 in 2019. Incised underneath after firing, within the foot-ring: ṾIṚỊ[…], probably Viri[lis].Footnote 62
York, Samian graffito (no. 31). (Drawn by R.S.O. Tomlin)

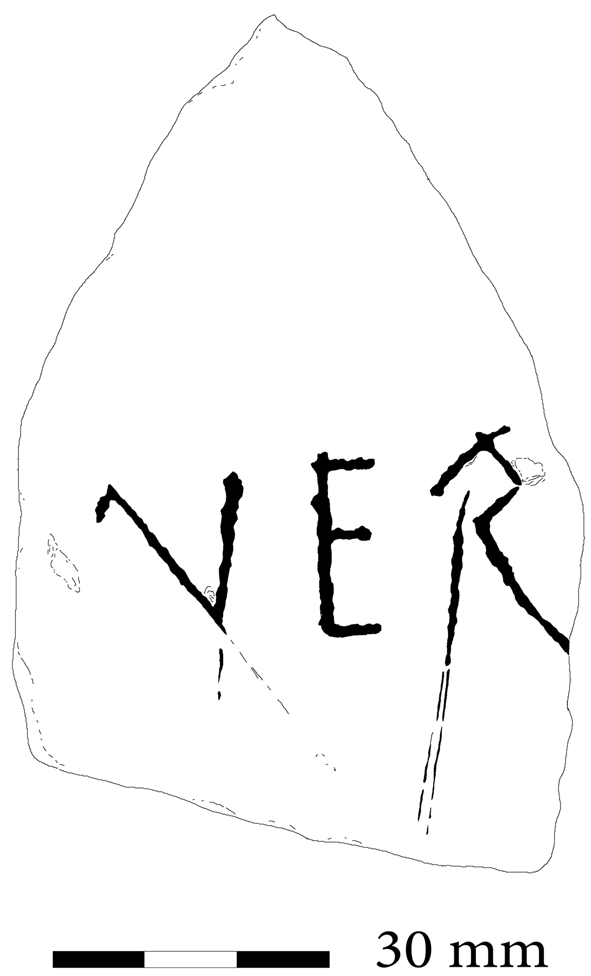
32. Ibid. (fig. 32). Thin flat sherd of a grey coarseware vessel, probably a plate or shallow bowl. Neatly incised after firing on one face, presumably the underside of the base, in capitals: VER[…], probably Ver[us].Footnote 63
York, coarseware graffito (no. 32). (Drawn by R.S.O. Tomlin)

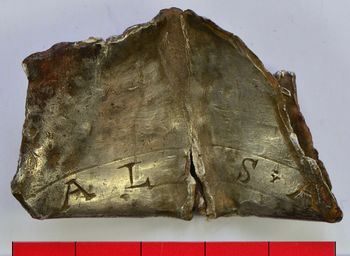
33. Wheldrake (SE 68 44) (fig. 33). Irregular fragment cut from a silver dish or plate, c. 50 by 55 mm, 1.1 mm thick, weight 25.2 g, foundFootnote 64 in 2018. It was folded (as illustrated) before being folded again to enclose seven silver coins (siliquae) dating from a.d. 360–402 but in circulation later, since most are clipped.Footnote 65 The dish, which is probably of fourth-century date, was incised with a circular double-banded ring enclosing capital letters: […]ALỊS x A[…], […]alis A[…].Footnote 66
Wheldrake, silver dish (no. 33). (Photo: British Museum and PAS)

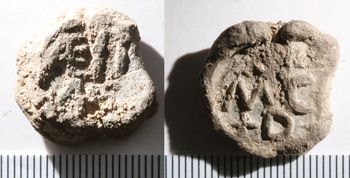
34. Catterick (Cataractonium, SE 22 99) (fig. 34). Oval lead sealing c. 20 mm in diameter, with a small piece missing, foundFootnote 67 in 2013–17. Obverse: A͡L͡E ĪĪ | AS, al(a)e II | As(turum). Reverse: MC[.] | +D+, M(arcus) C(…) [I(…)] | d(ecurio), ‘(Sealing) of the Second Ala of Asturians. Marcus C(…) [I(…)], decurion’.Footnote 68
Catterick, lead sealing (no. 34), obverse and reverse. (Photo: R.S.O. Tomlin)

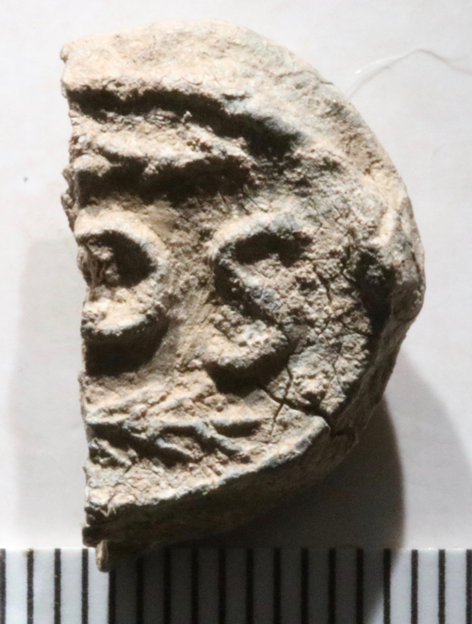
35. Ibid. (fig. 35). Part of an oval lead sealing c. 20 mm in diameter, preserving the right-hand half of the obverse: palm branch | [.]Q̣ S | palm branch, [e]q(uites) s(ingulares consularis), ‘Mounted Guards of the Governor’.Footnote 69
Catterick, lead sealing (no. 35), obverse. (Photo: R.S.O. Tomlin)

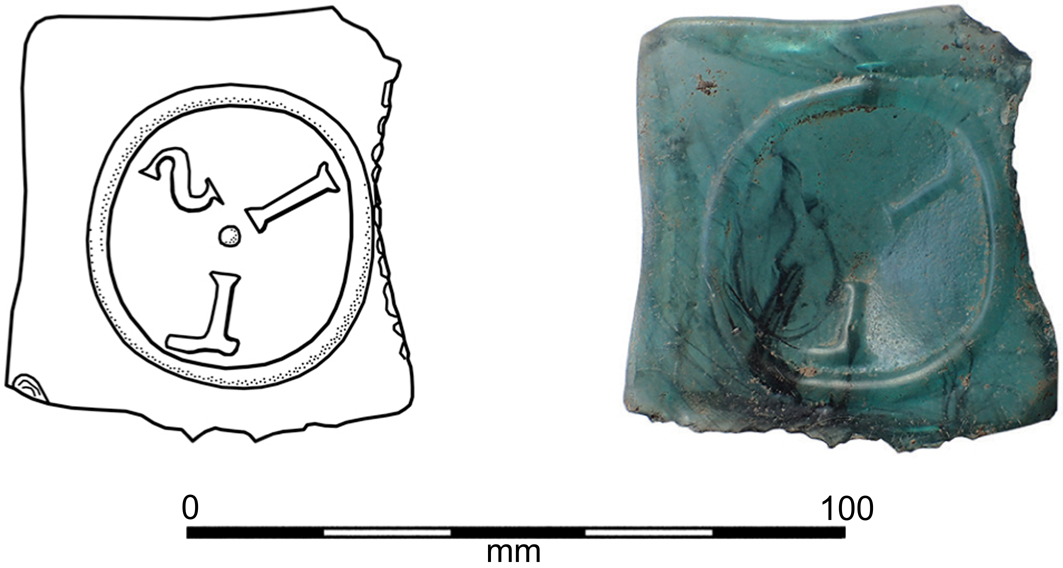
36. Ibid. Fort Bridge (fig. 36). Almost complete base, 63 by 60 mm, of a square bottle in blue/green glass.Footnote 70 Moulded in relief underneath within a circular frame around a central pellet, three capitals retrograde: S I L.Footnote 71
Catterick, bottle base (no. 36). (Photographed and drawn by Hilary Cool)

37. Ibid. Brompton East. Base fragment of a square glass bottle 68 mm wide. Moulded in relief within two concentric circles: V or Ʌ.
38. Ibid. Brompton East. Fragment of the base or side of a square glass bottle with moulded letters in shallow relief: […]IOɅ̣[…] or […]ṾOI[…].Footnote 72
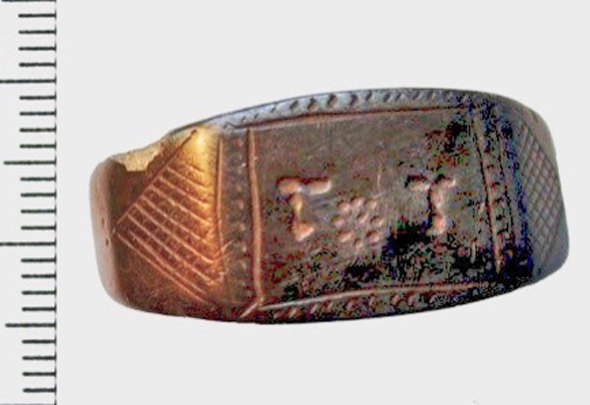
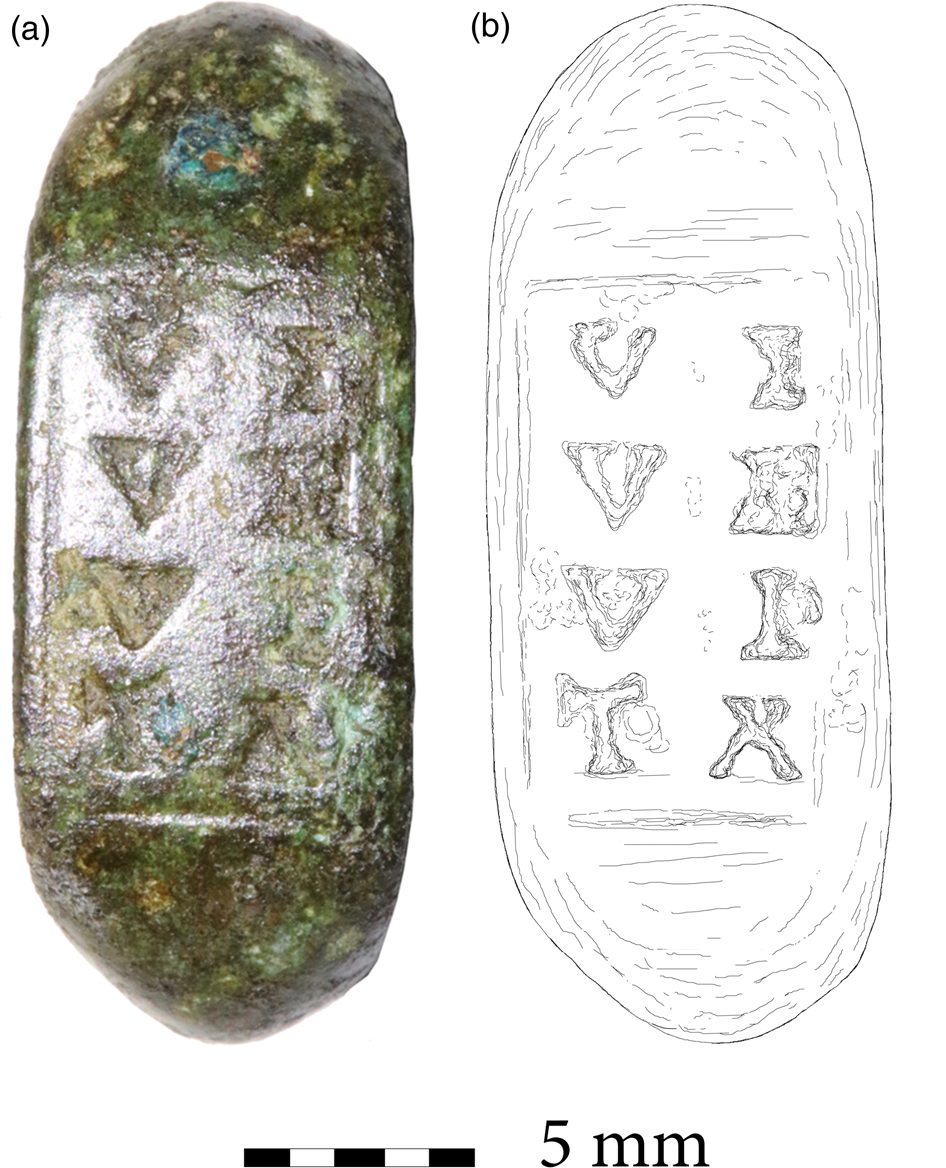
39. Ibid. (fig. 37). Small copper-alloy finger-ring, ‘D’ in cross section, widest diameter 20 mm. A rectangular panel, 11 by 6 mm, within the integral bezel carries two columns of incised capitals, reading downwards: (i) VVVT (ii) I͡FE͡LIX, probably <uu>uti felix, ‘Use (this and be) happy’.Footnote 73
Catterick, copper-alloy ring bezel (no. 39). (Photographed and drawn by R.S.O. Tomlin)

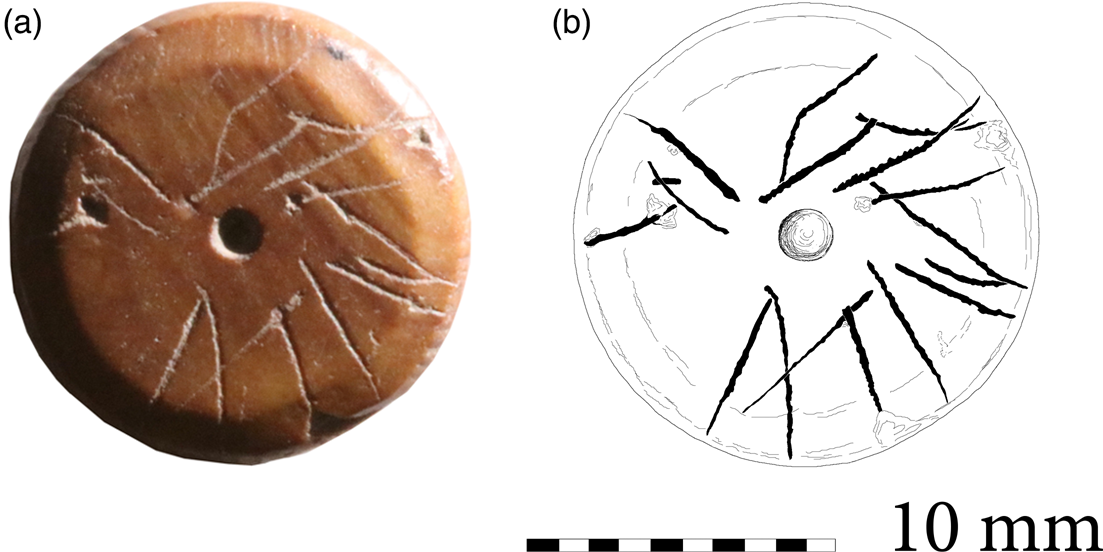
40. Ibid. (fig. 38). Bone roundel, 15 mm in diameter, with bevelled edges.Footnote 74 Incised around the circumference: IV͡L MIMVS, probably Iul(ius) M(ax)imus.Footnote 75
Catterick, bone roundel (no. 40). (Photographed and drawn by R.S.O. Tomlin)

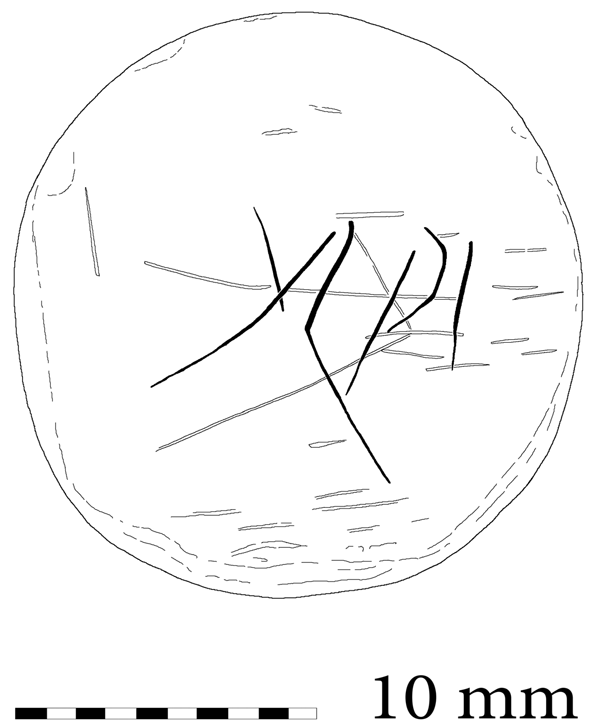
41. Ibid. (fig. 39). Bone roundel, 19 mm in diameter, incised on the reverse: VLPI, probably Ulpi, ‘(Property) of Ulpius’.Footnote 76
Catterick, bone roundel (no. 41). (Drawn by R.S.O. Tomlin)

42. Ibid. (fig. 40). Lower wall sherd of a southern Spanish oil amphora (Dressel 20), inscribed before firing in cursive letters: […].[.]RMEROṢ[…], [He]rmeros.Footnote 77
Catterick, amphora potter's signature (no. 42). (Drawn by R.S.O. Tomlin)

43. Ibid. Lower wall sherd of a Dressel 20 amphora incised before firing with three capital letters, all incomplete: […]ỌP̣Ṭ[…], probably Opt[atus].Footnote 78
44. Ibid. (fig. 41). Small sherd of a Dressel 20 incised before firing, probably from the lower wall and thus the potter's signature. Four incomplete strokes, two intersecting at right angles, which look like part of three tall capitals: […]ṢP̣Ḥ[…].Footnote 79
Catterick, amphora potter's signature (no. 44). (Drawn by R.S.O. Tomlin)

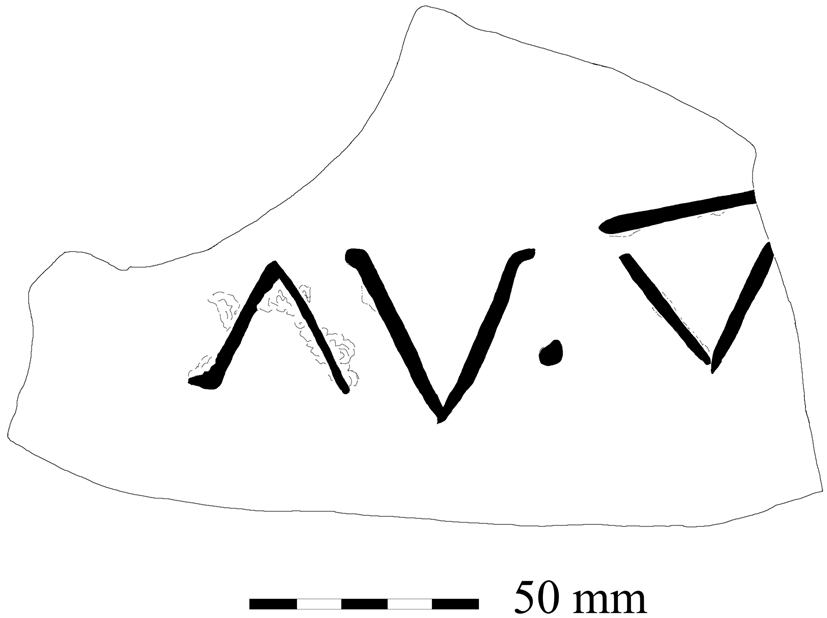
45. Ibid. (fig. 42). Upper wall sherd of a Dressel 20, carefully incised after firingFootnote 80 in capitals: ɅV o V̅[…].Footnote 81
Catterick, amphora graffito (no. 45). (Drawn by R.S.O. Tomlin)

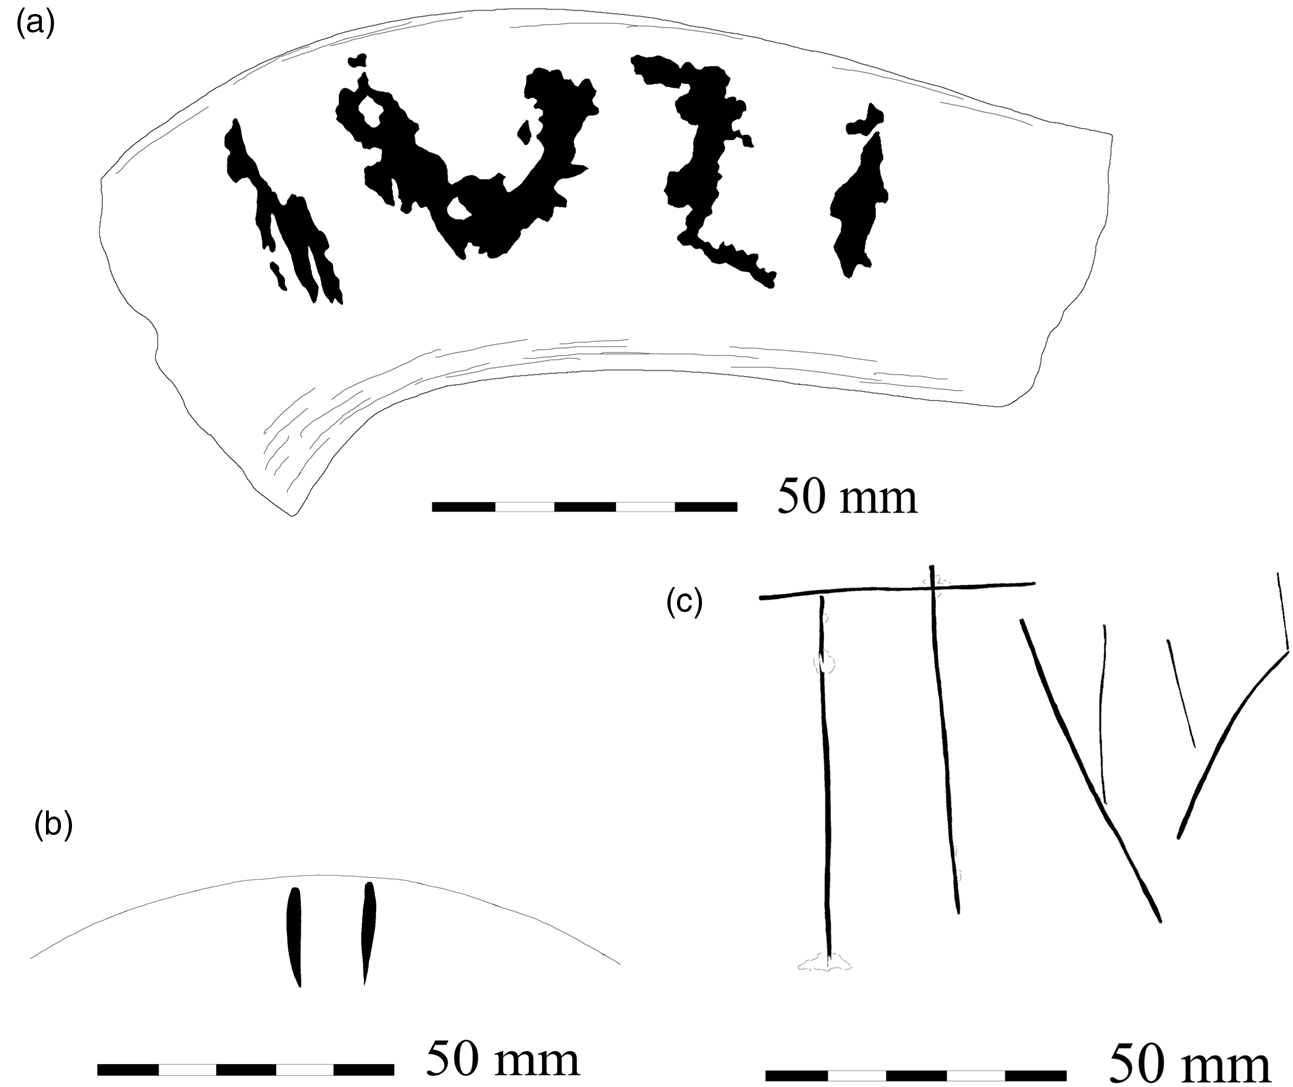
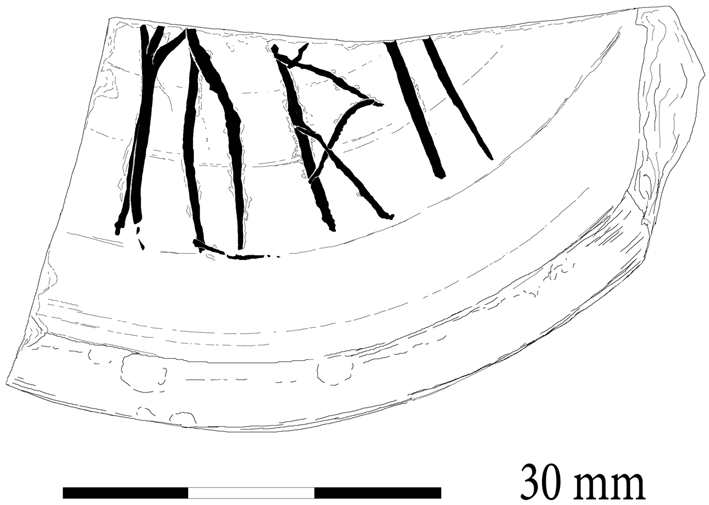
46. Ibid. (fig. 43). Conjoining sherds preserving the entire rim and most of the neck and handles of a Dressel 20, with a large sherd from the upper shoulder. There are three graffiti. (a) Roughly incised on one handle: IVLI, Iuli, ‘(Property) of Iulius’.Footnote 82 (b) Neatly incised on the outer circumference of the rim: II. (c) Finely incised on the shoulder: I̅I̅V. Taking (b) and (c) together: (modii) VII (retrograde), (sextarii) II, ‘7 modii, 2 sextarii’.Footnote 83
Catterick, amphora handle (no. 46(a)), rim (no. 46(b)) and shoulder (no. 46(c)). (Drawn by R.S.O. Tomlin)

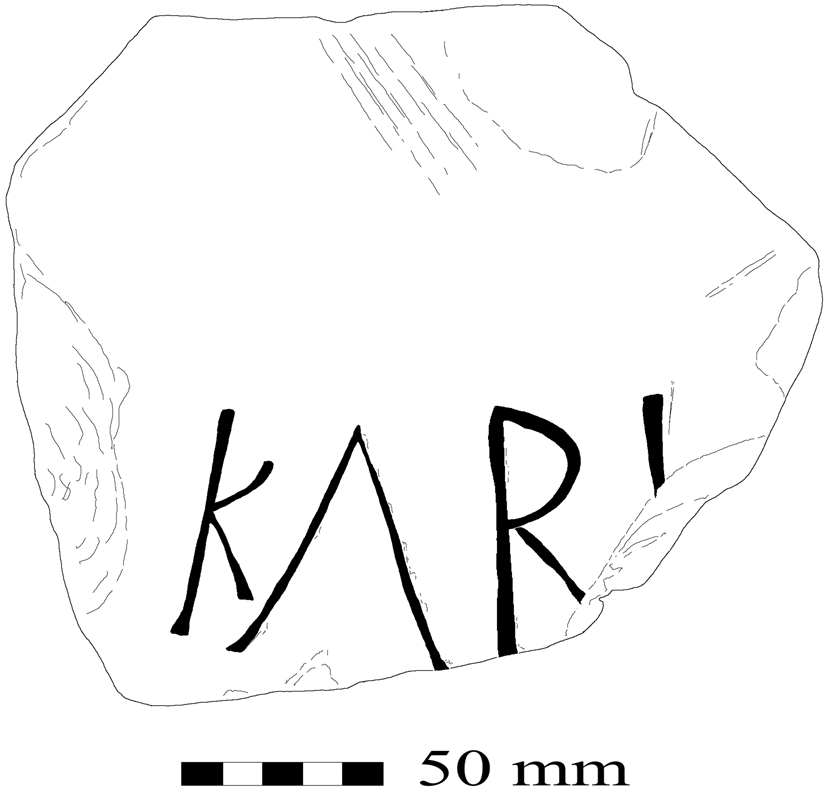
47. Ibid. (fig. 44). Wall sherd from the shoulder of a Dressel 20, neatly incised in capitals: KɅRI, Kari, ‘(Property) of Karus’.Footnote 84
Catterick, amphora graffito (no. 47). (Drawn by R.S.O. Tomlin)

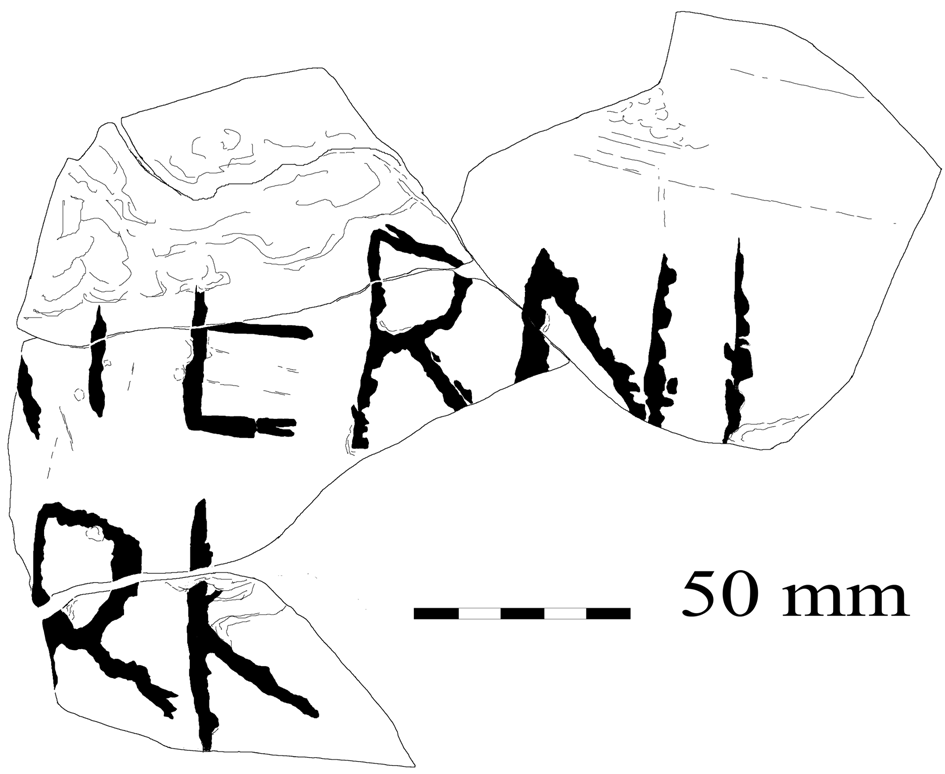
48. Ibid. (fig. 45). Five conjoining wall sherds from the shoulder of a Dressel 20, coarsely inscribed in capitals: […]ẠṬERNI | […]RK[…], [M]aterni or [P]aterni, perhaps [(centuria) Ma]rk[i], ‘(Property) of Maternus (or Paternus), century of Markus’.Footnote 85
Catterick, amphora graffito (no. 48). (Drawn by R.S.O. Tomlin)

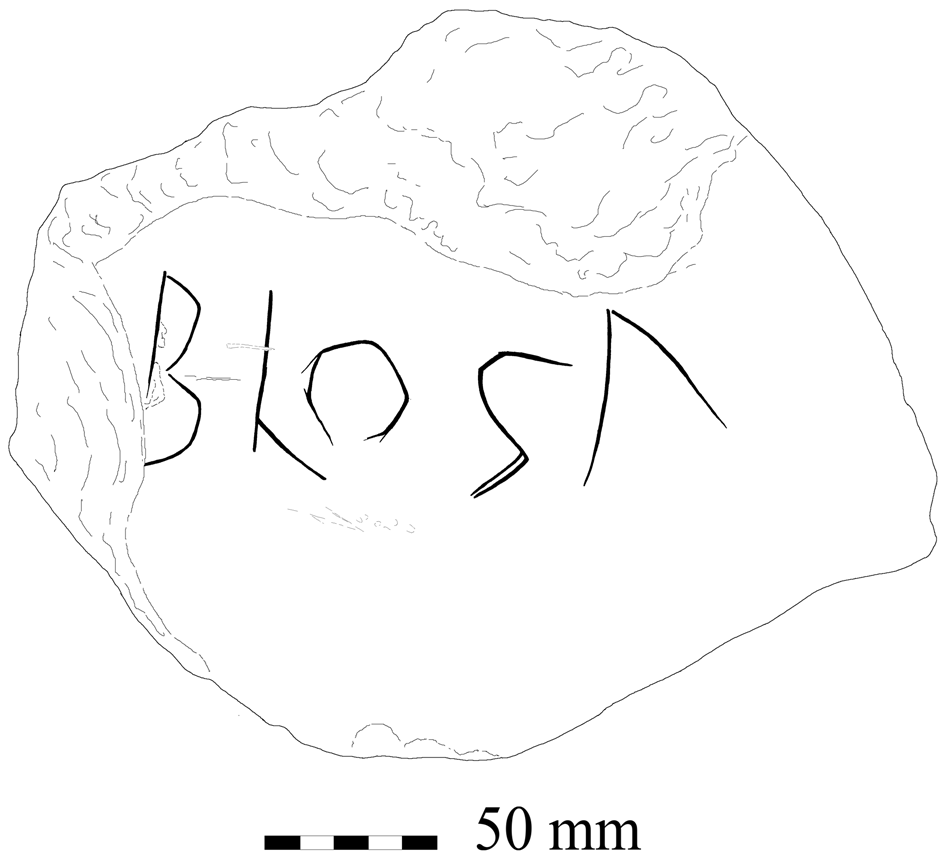
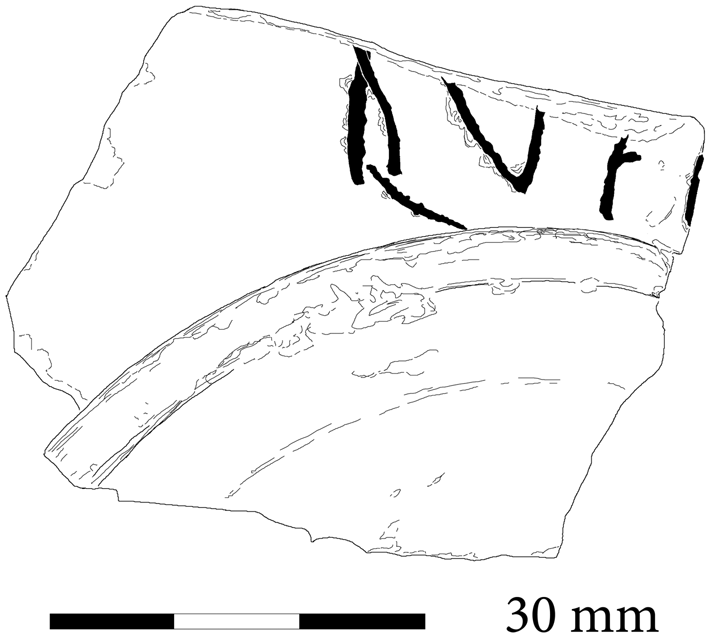
49. Ibid. (fig. 46). Wall sherd from the shoulder of a Dressel 20, incised in laboured capitals: […]BLOGɅ.Footnote 86
Catterick, amphora graffito (no. 49). (Drawn by R.S.O. Tomlin)

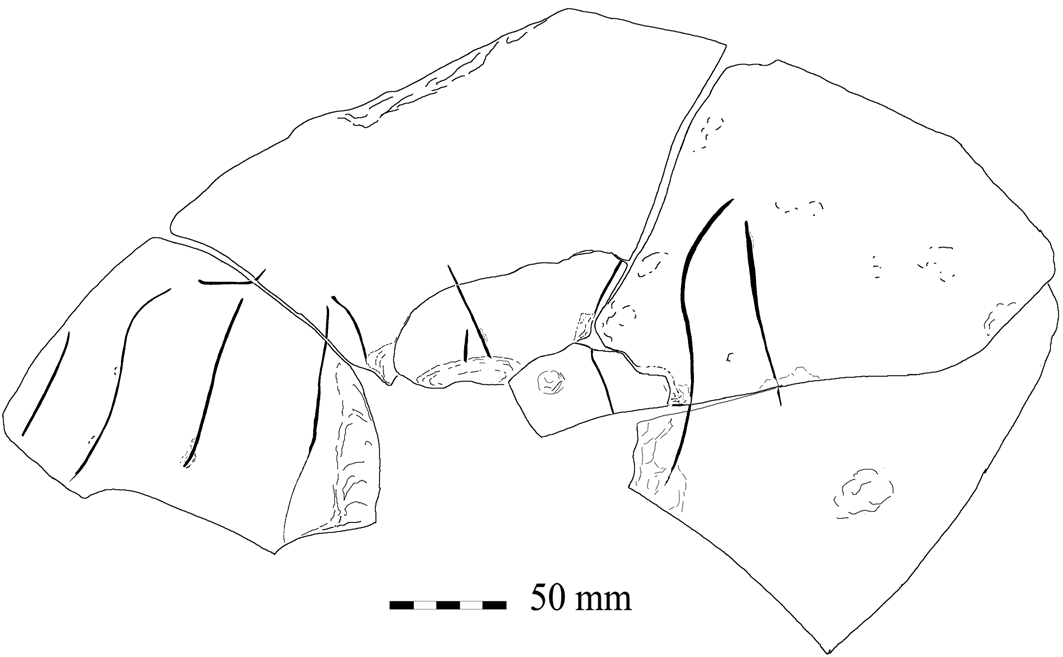
50. Ibid. (fig. 47). Two separate groups of conjoining sherds from the upper part of a Dressel 20, each with a graffito. (a) At the base of a handle stamped Q C CLE palm branch, in elongated letters: […].STṚẠṢSI, […].strassi.Footnote 87 (b) At the base of the other handle, a complete graffito: VI, probably (modii) VI. ‘6 modii’.Footnote 88
Catterick, amphora graffito (no. 50(a)). (Drawn by R.S.O. Tomlin).

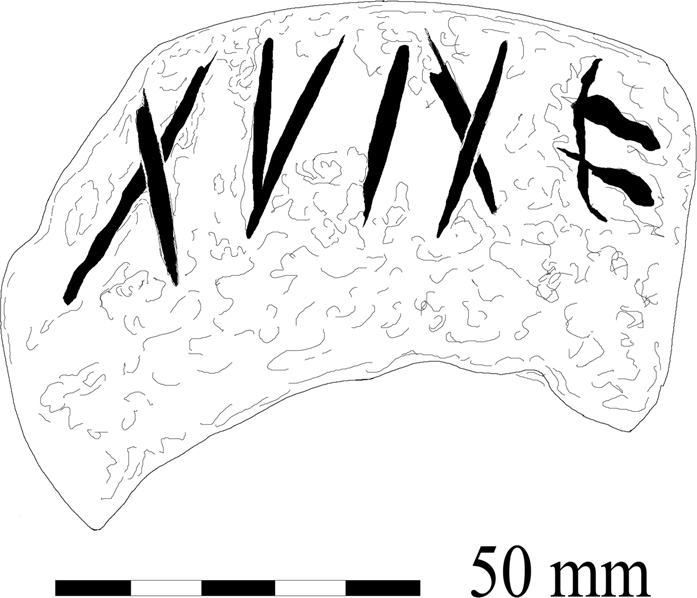
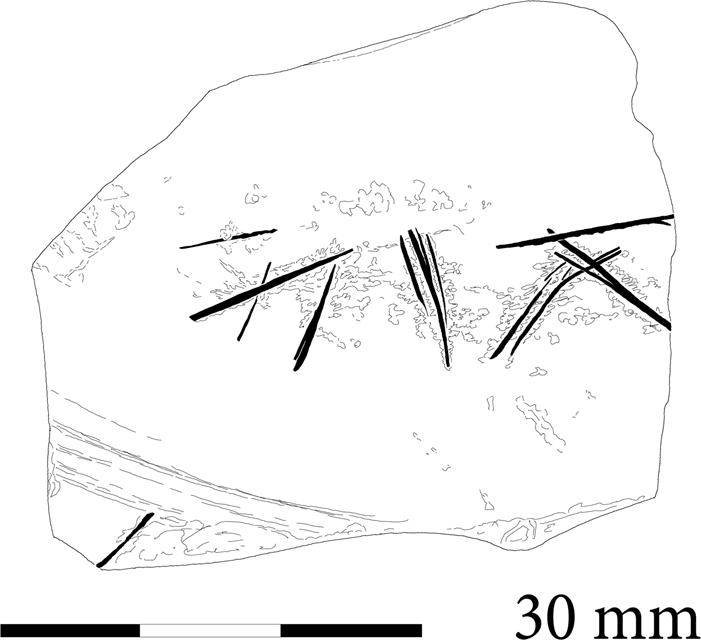
51. Ibid. (fig. 48). Rim sherd of a Dressel 20, its upper surface crudely incised in cramped letters much worn, reading outwards: […]XVNẸ[…], perhaps […]XV Ne[…].Footnote 89
Catterick, amphora rim graffito (no. 51). (Drawn by R.S.O. Tomlin)

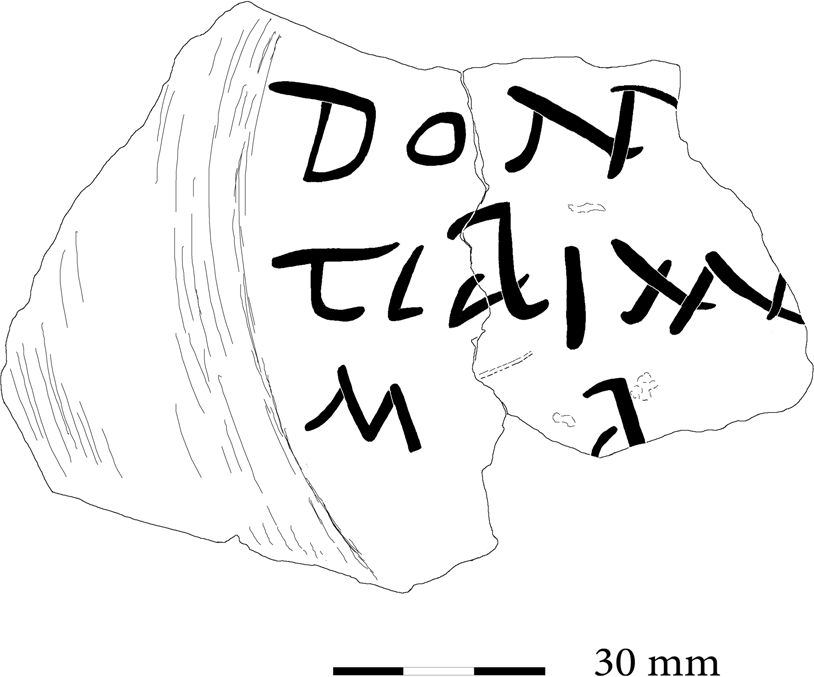
52. Ibid. (fig. 49).Two conjoining base sherds of a black-burnished mortarium, inscribed before firing. On the underside, burnished rather than incised, is the left-hand portion of three lines of cursive letters: […] | DON.[..] | TIBI..[.] | M[..]Ḅ[…] | […], perhaps […] | don[um] | tibi […] | […], ‘… a gift for you …’.Footnote 90
Catterick, mortarium graffito (no. 52). (Drawn by R S O Tomlin)

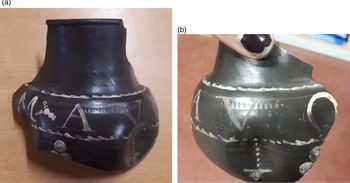
53. Ibid. (fig. 50). Rim sherd preserving the upper profile and almost half the circumference of a Moselle black-slip motto beaker. Well-formed capitals are painted in white slip between two bands of decoration: […]M x AVO[…], perhaps auo[co cura]m, ‘I divert anxiety’.Footnote 91
Catterick, motto beaker (no. 53) (Photo: NAA)

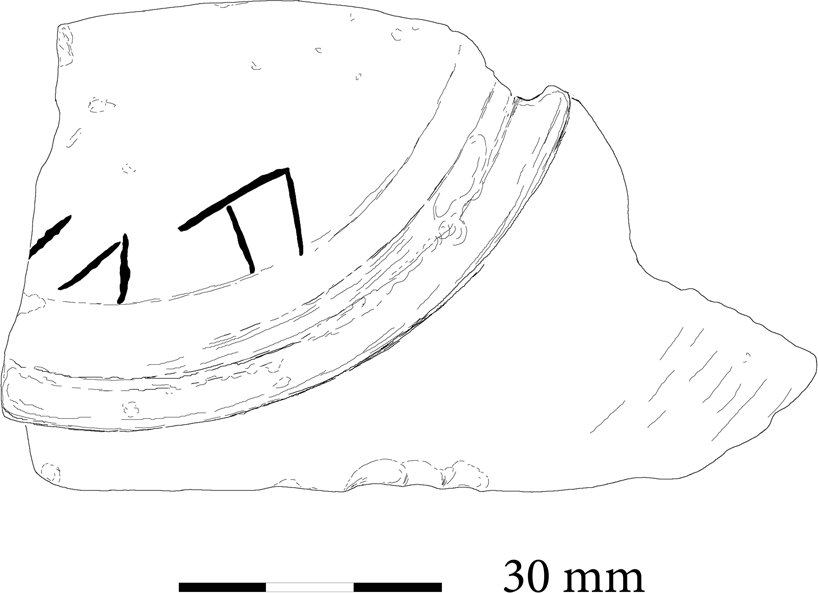
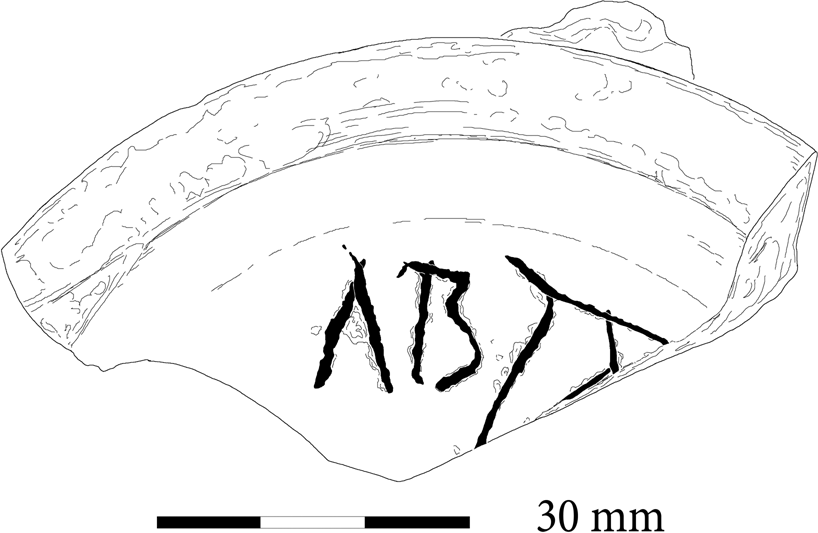
54. Ibid. (fig. 51). Base sherd of a Samian bowl (Dr. 31R, central Gaulish), incised before firingFootnote 92 in capitals: ɅBḶẠṬ[…].Footnote 93
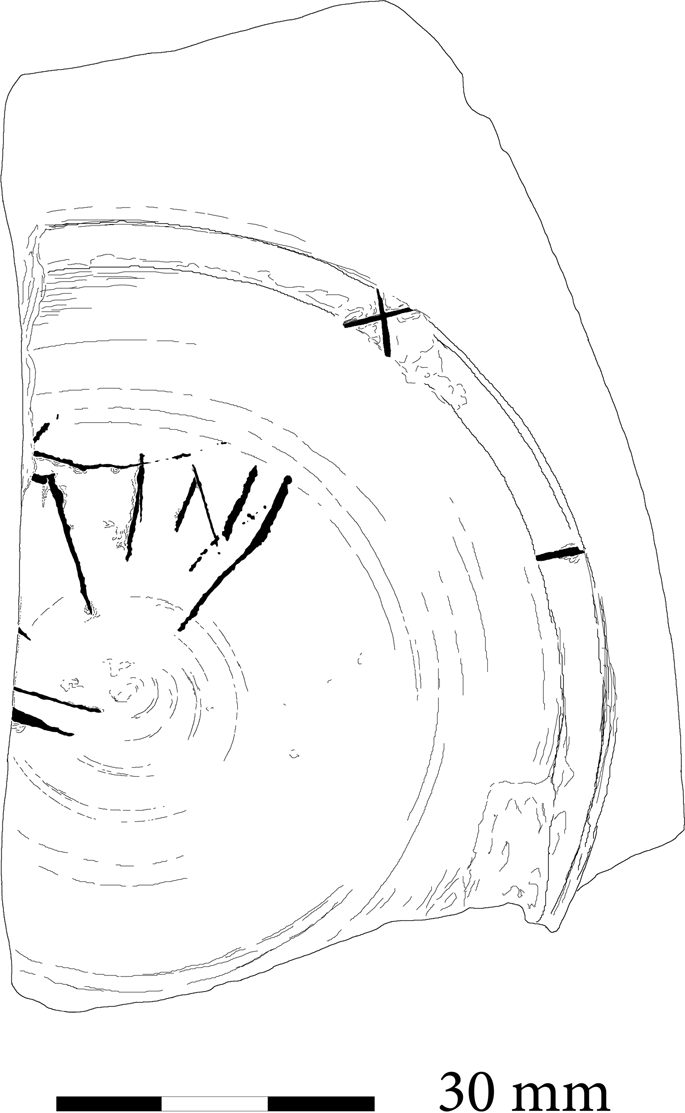
Catterick, Samian graffito (no. 54). (Drawn by R.S.O. Tomlin)

55. Ibid. (fig. 52). Wall sherd from a Samian cup (Dr. 27, CG), incised on the lower curve: ɅIɅṬ[…], probably Aiat[us].Footnote 94
Catterick, Samian graffito (no. 55). (Drawn by R.S.O. Tomlin)

56. Ibid. (fig. 53). Base sherd of a Samian platter (Dr. 18/31R, CG), coarsely incised on the wall above the foot-ring: […].ARC̣Ạ.[…], perhaps [M]arca[nus].Footnote 95
Catterick, Samian graffito (no. 56). (Drawn by R.S.O. Tomlin)

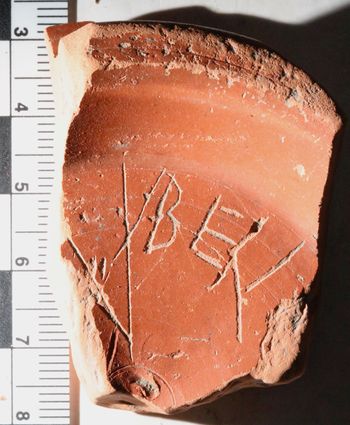
57. Ibid. (fig. 54). Base sherd of a Samian bowl (Dr. 31, east Gaulish), rather worn. Scratched underneath: BELI[…], probably Beli[cianus].Footnote 96
Catterick, Samian graffito (no. 57). (Photo: R.S.O. Tomlin)

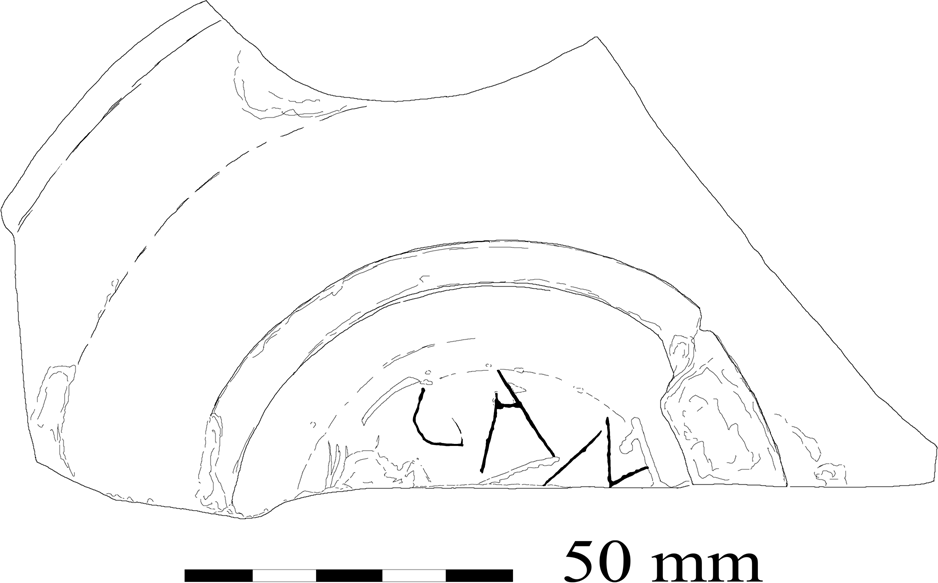
58. Ibid. (fig. 55). Base sherd of a Samian platter (Dr. 18/31R, CG) comprising half the foot-stand. Incised underneath: CAIO[…], Caio or Caio[nis].Footnote 97
Catterick, Samian graffito (no. 58). (Drawn by R.S.O. Tomlin)

59. Ibid. (fig. 56). Two conjoining sherds preserving the profile and one-quarter of the foot-stand of a Samian platter (Dr. 18/31, CG). Incised underneath along the upper circumference: CAN[…], probably Can[didus].Footnote 98
Catterick, Samian graffito (no. 59). (Drawn by R.S.O. Tomlin)

60. Ibid. (fig. 57). Rim sherd of a Samian platter (?Dr. 18/31, EG), scratched on the wall: ḌɅB.[…].Footnote 99
Catterick, Samian graffito (no. 60). (Drawn by R.S.O. Tomlin)

61. Ibid. (fig. 58). Two conjoining base sherds of a Samian platter (Dr. 18/31, CG), incised on the wall above the foot-ring: LɅỊIN[…], Laen[as] or Latin[us].Footnote 100
Catterick, Samian graffito (no. 61). (Drawn by R.S.O. Tomlin)

62. Ibid. (fig. 59). Base sherd of a Samian bowl (Dr. 31, CG), scratched underneath along the lower circumference: […]IORII, perhaps [Ma]iorii, ‘(Property) of Maiorius’.Footnote 101
Catterick, Samian graffito (no. 62). (Drawn by R.S.O. Tomlin)

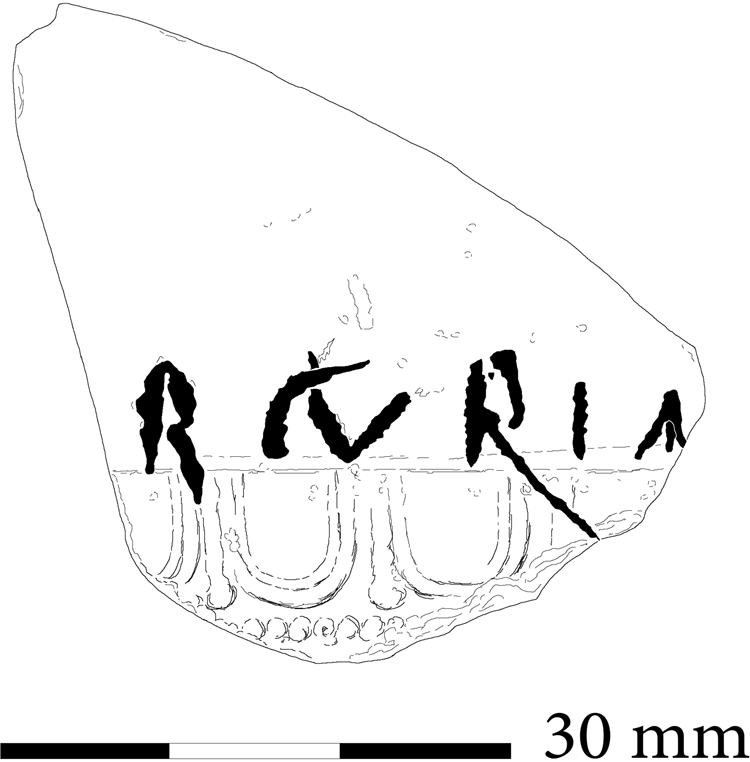
63. Ibid. (fig. 60). Wall sherd of a Samian bowl (Dr. 37, CG), crudely incised above the band of ovolo decoration in small capitals: […]RCVRIA[…], [Me]rcuria[lis].Footnote 102
Catterick, Samian graffito (no. 63). (Drawn by R.S.O. Tomlin)

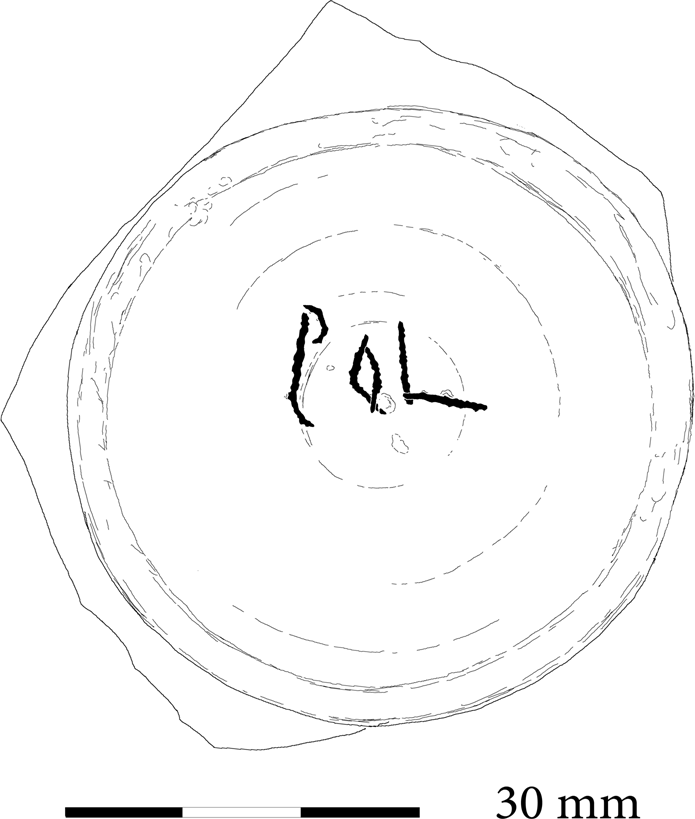
64. Ibid. (fig. 61). Base sherd of a Samian cup (Dr. 33, CG) stamped ALBVCI, preserving the whole foot-stand. Neatly incised underneath: POL, probably Pol(lio).Footnote 103
Catterick, Samian graffito (no. 64). (Drawn by R.S.O. Tomlin)

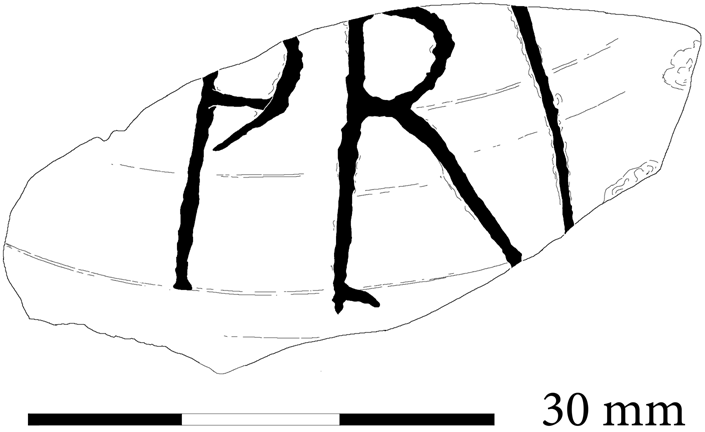
65. Ibid. (fig. 62). Wall sherd of a Samian cup (Dr. 27, south Gaulish), neatly incised in capitals: PRI, probably Pri(mus).Footnote 104
Catterick, Samian graffito (no. 65). (Drawn by R.S.O. Tomlin)

66. Ibid. (fig. 63). Base sherd of a Samian platter (Dr. 18/31, CG), incised on the wall just above the foot-stand in capitals: QVỊ[…], probably Qui[etus] or Qui[ntus].Footnote 105
Catterick, Samian graffito (no. 66). (Drawn by R.S.O. Tomlin)

67. Ibid. (fig. 64). Wall sherd of a Samian cup (Dr. 27, SG), coarsely incised: […].VINTI, [Q]uinti, ‘(Property) of Quintus’.Footnote 106
Catterick, Samian graffito (no. 67). (Drawn by R.S.O. Tomlin)

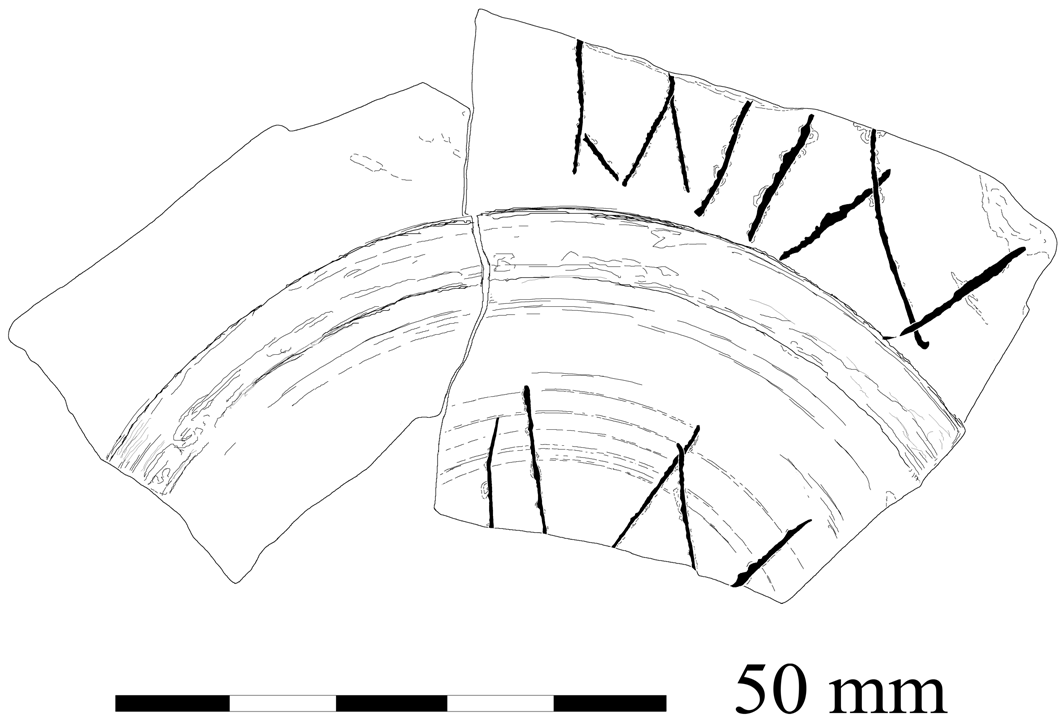
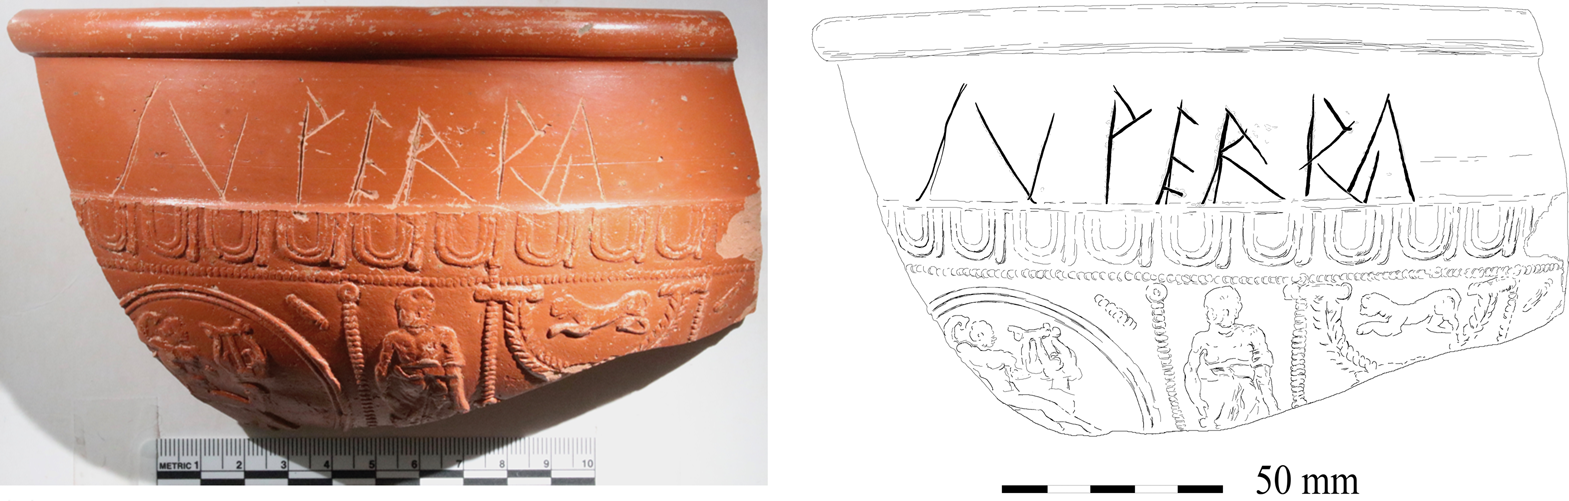
68. Ibid. (fig. 65). Large rim sherd of a Samian bowl (Dr. 37, CG, a.d. 150–80). It conjoins another rim sherd, five wall sherds and the base, amounting to about half the vessel. Incised below the rim in angular capitals: SVPERRA, Super <r>a, ‘Supera’.Footnote 107
Catterick, Samian graffito (no. 68). (Photographed and drawn by R.S.O. Tomlin)

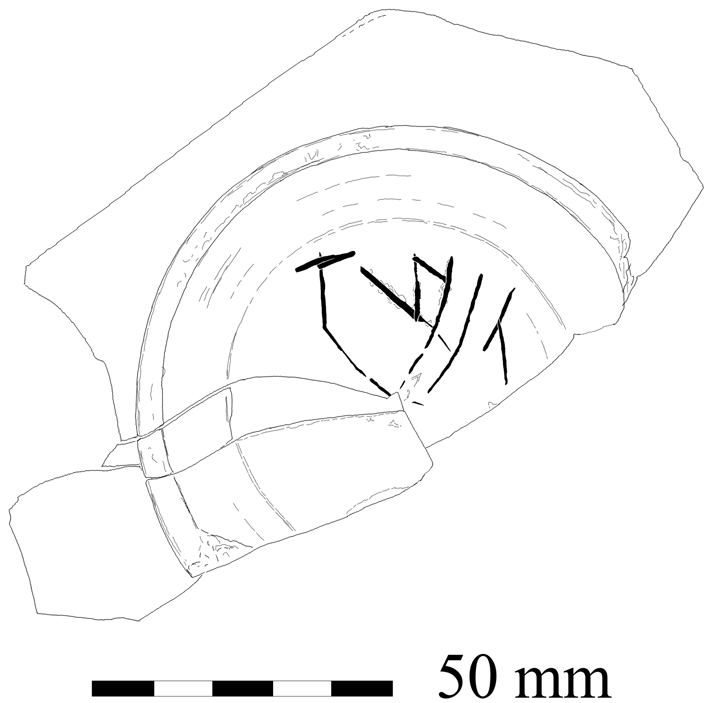
69. Ibid. (fig. 66). Three conjoining base sherds of a Samian platter (Dr. 18) stamped OFPA[…] for Patricius i of La Graufesenque (a.d. 65–90), which include half the foot-stand. Incised underneath along the upper circumference: TVIIL, t(urma) Vel(ocis) | […], ‘The troop of Velox, (property) of …’.Footnote 108
Catterick, Samian graffito (no. 69). (Drawn by R.S.O. Tomlin)

70. Ibid. Small wall sherd of a Samian cup (Dr. 33, CG), incised above the junction between wall and base: […]ẠḶỊṢ, perhaps […]alis.Footnote 109
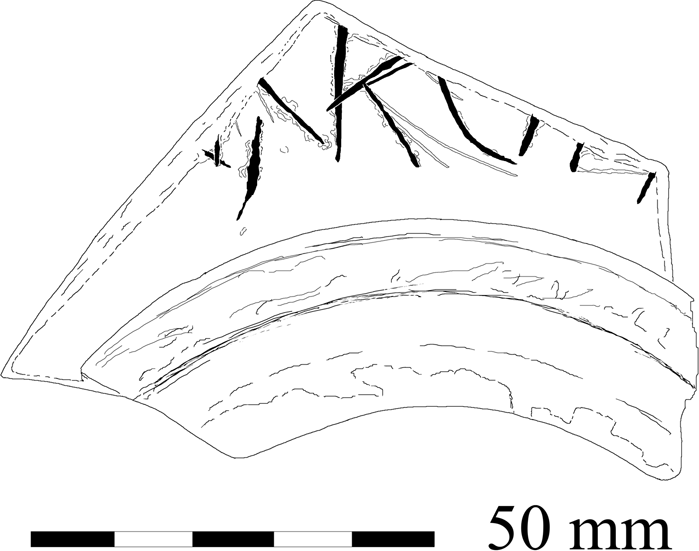
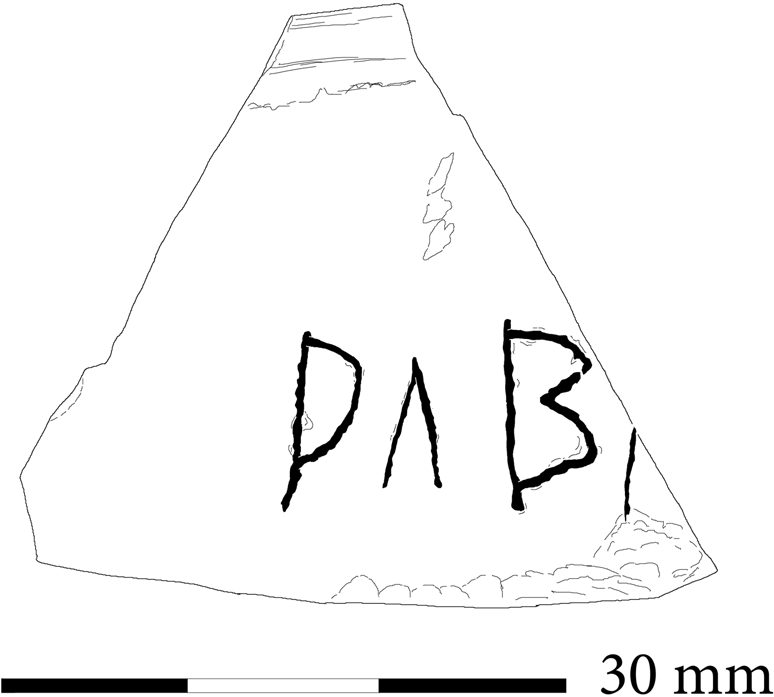
71. Ibid. Small sherd from the floor of a Samian vessel (SG) stamped OFM[…]. Incised underneath along the upper circumference in capitals: […]ARA[…].Footnote 110
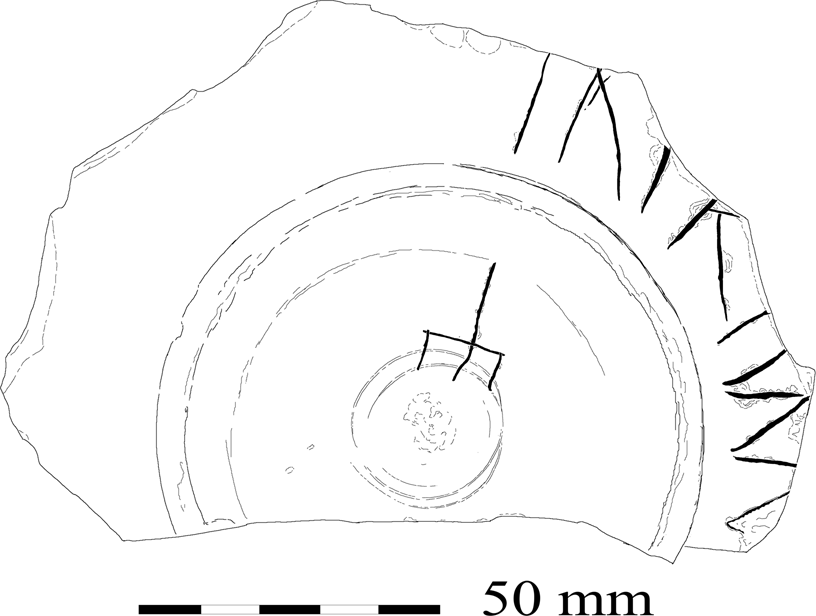
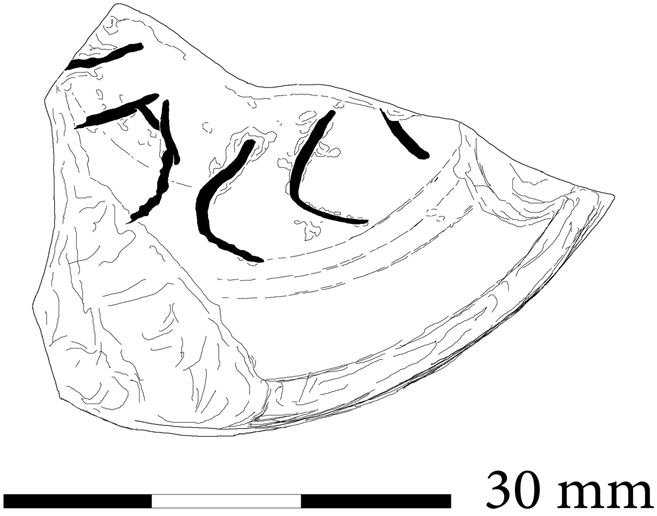
72. Ibid. (fig. 67). Base sherd of a Samian platter (Dr. 18/31) stamped BITVRIXoF (Biturix of Lezoux, a.d. 125–50), preserving two-thirds of the foot-stand. Incised on the wall just above the foot-stand, in crude capitals: IɅ.ṚỊỊNV[…].Footnote 111
Catterick, Samian graffito (no. 72). (Drawn by R.S.O. Tomlin)

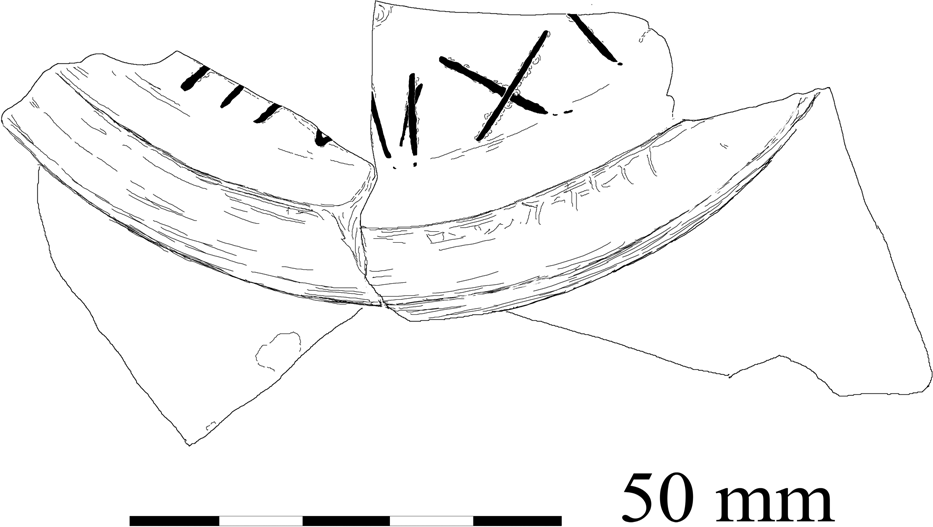
73. Ibid. (fig. 68). Two conjoining base sherds of a Samian platter (Dr. 18/31R, CG), incised underneath within the foot-ring: […]ỊỊṂỊXỊ[…].Footnote 112
Catterick, Samian graffito (no. 73). (Drawn by R.S.O. Tomlin)

74. Ibid. Base sherd of a Samian platter (Dr. 18/31R, CG) preserving one-quarter of the foot-stand. Scratched underneath along the upper circumference, the upper tips of three letters: […]ỊTɅ̣[…].Footnote 113
75. Ibid. Small Samian wall sherd (CG), incised: […].LIɅ̣[…], probably […]lia[nus].Footnote 114
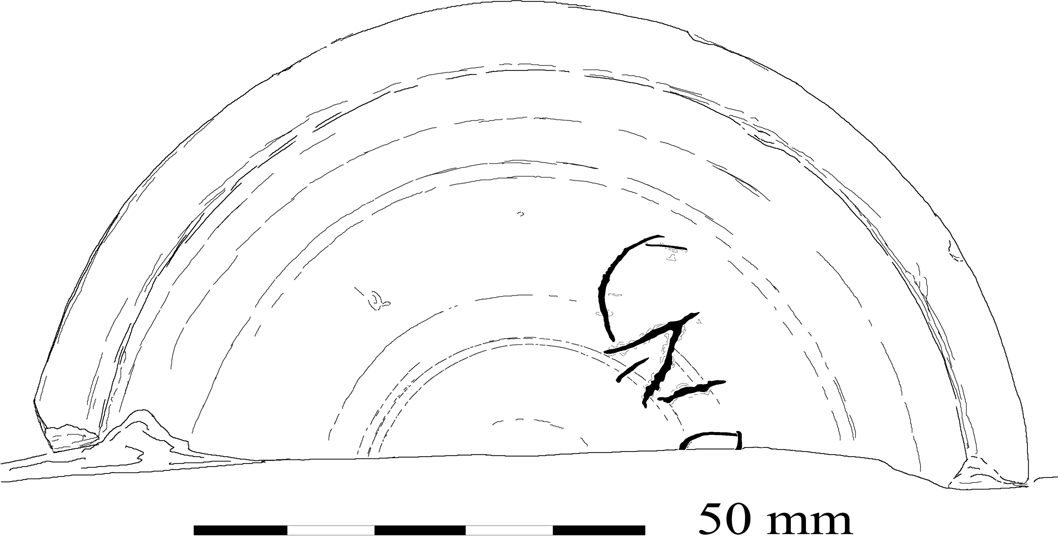
76. Ibid. (fig. 69). Small base sherd of a Samian bowl (Dr. 31, CG). Coarsely incised underneath along the lower circumference, unusually with the strokes extending up into the inner face of the foot-ring (which however would have been quite easy if the vessel were tilted): […].ỌCC.[…].Footnote 115
Catterick, Samian graffito (no. 76). (Drawn by R.S.O. Tomlin)

77. Ibid. Base sherd of a Samian platter (Dr. 18) stamped […]NTIM (Carantus i of La Graufesenque, a.d. 65–95), preserving one-quarter of the foot-stand. Scratched underneath along the upper circumference: […]ONI[…].Footnote 116
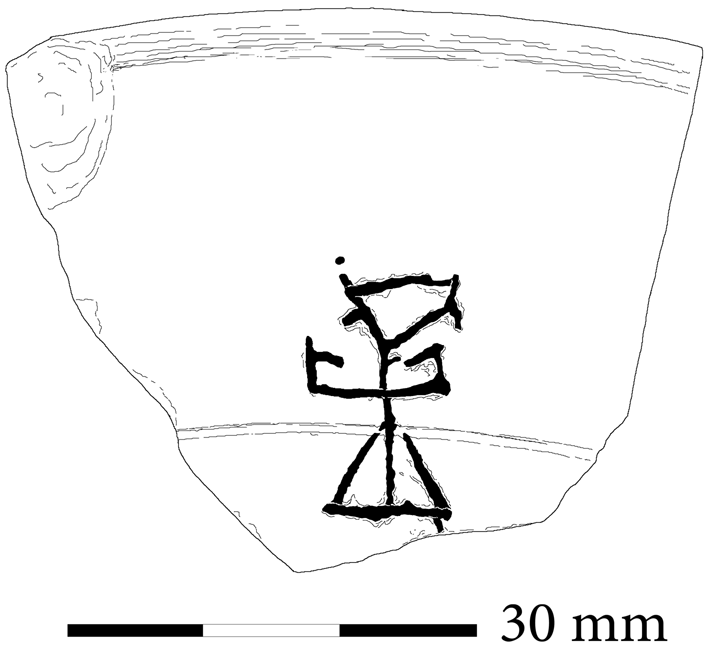
78. Ibid. (fig. 70). Rim sherd of a Samian cup (Dr. 33, CG) found with, but not conjoining, three fragments of a cup stamped by Albucianus (Lezoux, a.d. 155–95). Carefully incised on the wall, a stylised human figure consisting of an angular ‘circle’ above a triangle with a horizontal line at their junction, like those associated with the cult of the goddess Tanit at Carthage.Footnote 117
Catterick, Samian graffito (no. 78). (Drawn by R.S.O. Tomlin)

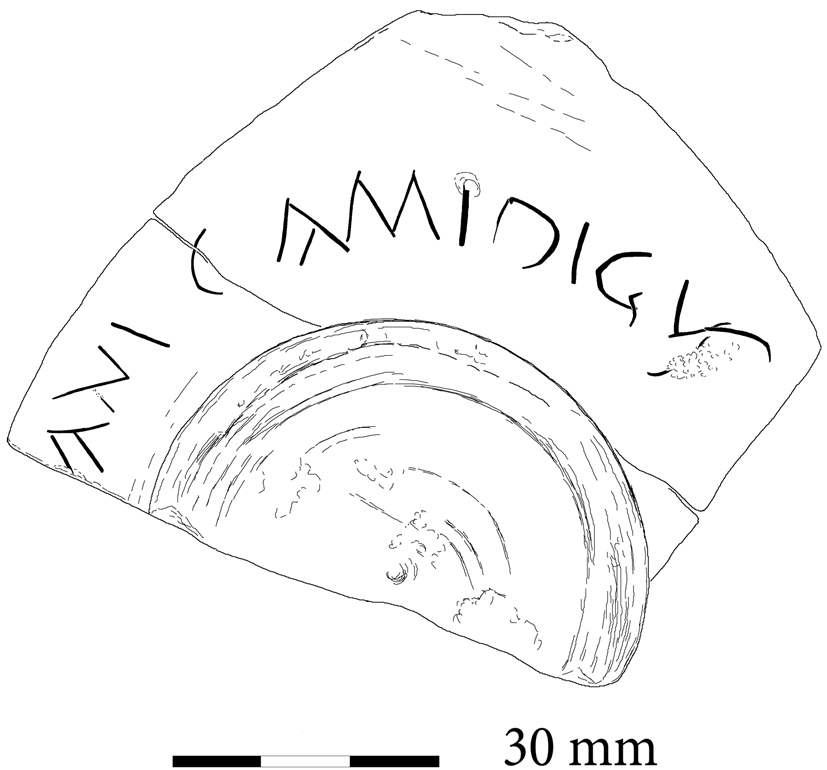
79. Ibid. (fig. 71). Two conjoining sherds of a greyware shallow dish, incised before firing on the underside above the foot-ring, in capitals: […]ANI CAMIDIGVS, […]ani Camidigus.Footnote 118
Catterick, coarseware graffito (no. 79). (Drawn by R.S.O. Tomlin)

80. Ibid. (fig. 72). Wall sherd of a greyware vessel, incised before firing in capitals with a broad point: […]ṆGEṆ[…], [I]ngen[uus].Footnote 119
Catterick, coarseware graffito (no. 80). (Drawn by R.S.O. Tomlin)

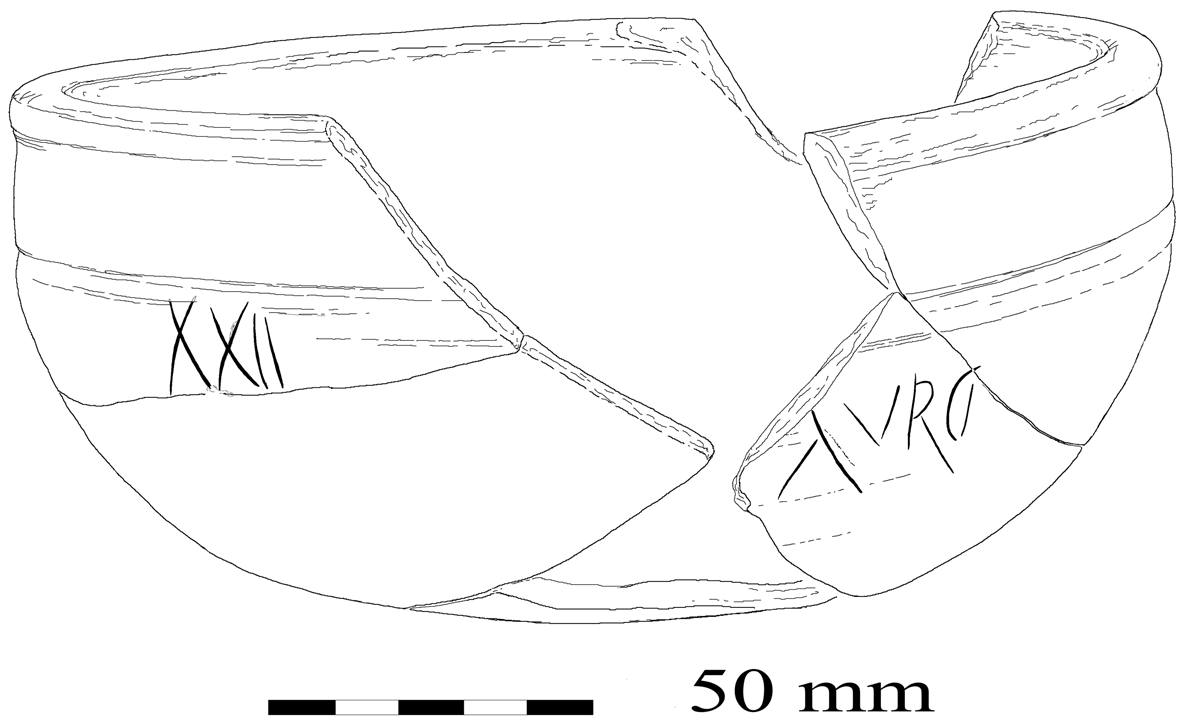
81. Ibid. (fig. 73). Seventeen conjoining sherds comprising most of a bowl in creamy-white fabric with two graffiti made after firing.Footnote 120 Incised on the wall in capitals: (a) XXII, ‘22’; (b) ɅVRCI.Footnote 121
Catterick, coarseware bowl with graffiti (no. 81). (Drawn by R.S.O. Tomlin)

82. Ibid. Eighteen sherds of a large grey jar, not all conjoining, which preserve the whole of the rim and neck, about half of the base and a large piece of the wall decorated with a band of ‘ripple’ decoration. Incised on the shoulder above this band: […]P̣PXXXXS, […] p(lena) p(ondo) XXXX s(emis), ‘[…] … weight full, 40½ (pounds)’.Footnote 122
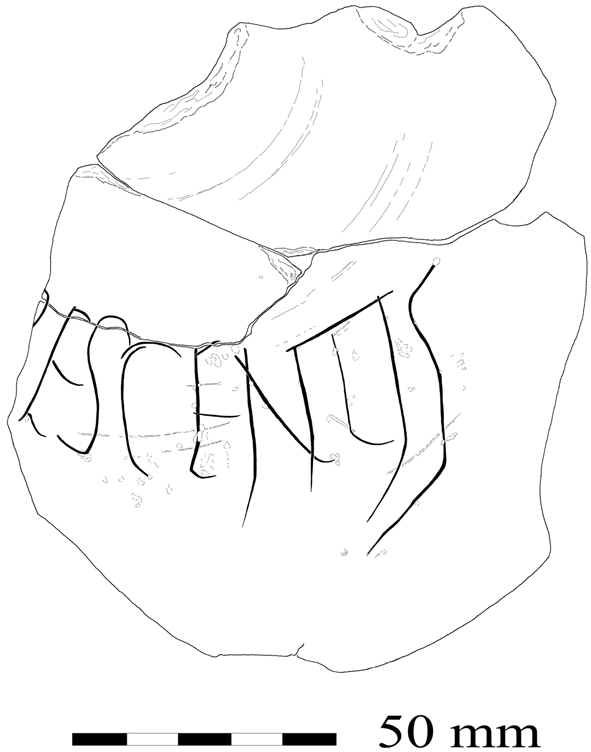
83. Ibid. (fig. 74). Three conjoining wall sherds from the shoulder of a pale-buff vessel, probably a flagon. Incised below the neck in elongated capitals: […].ESCENTIS, [Cr]escentis, ‘(Property) of Crescens’.Footnote 123
Catterick, coarseware graffito (no. 83). (Drawn by R.S.O. Tomlin)

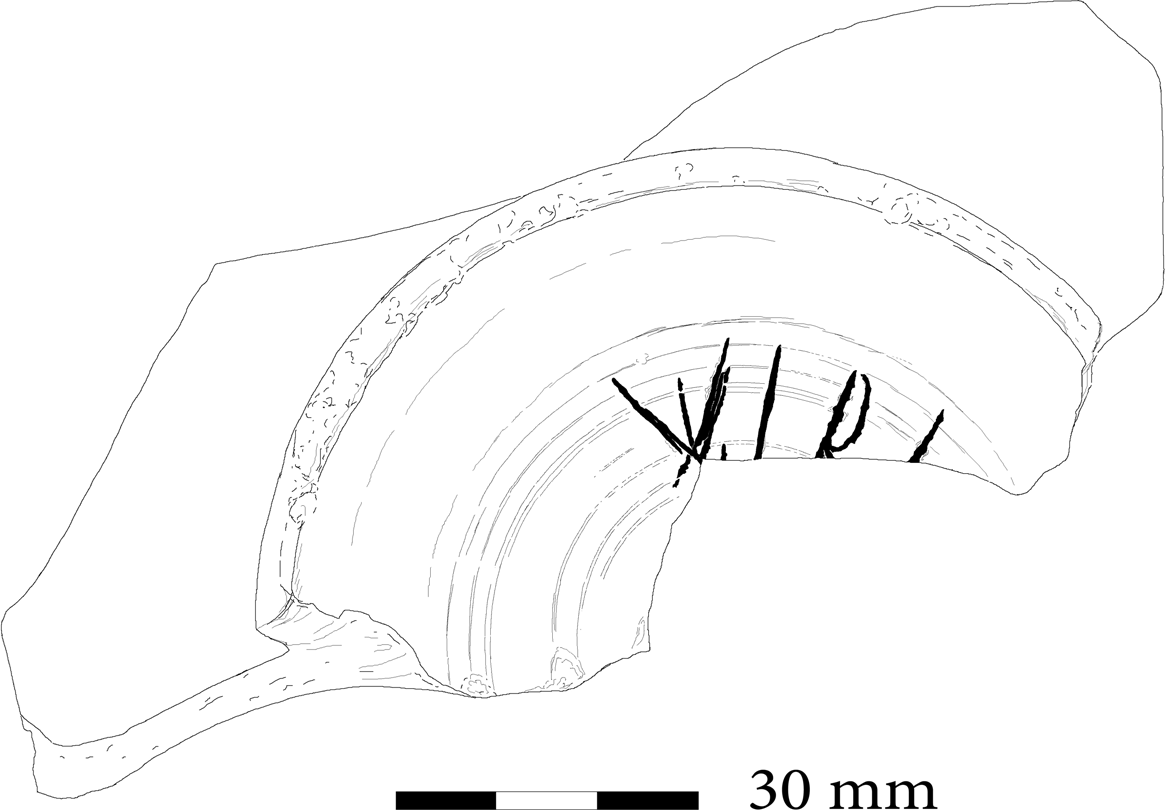
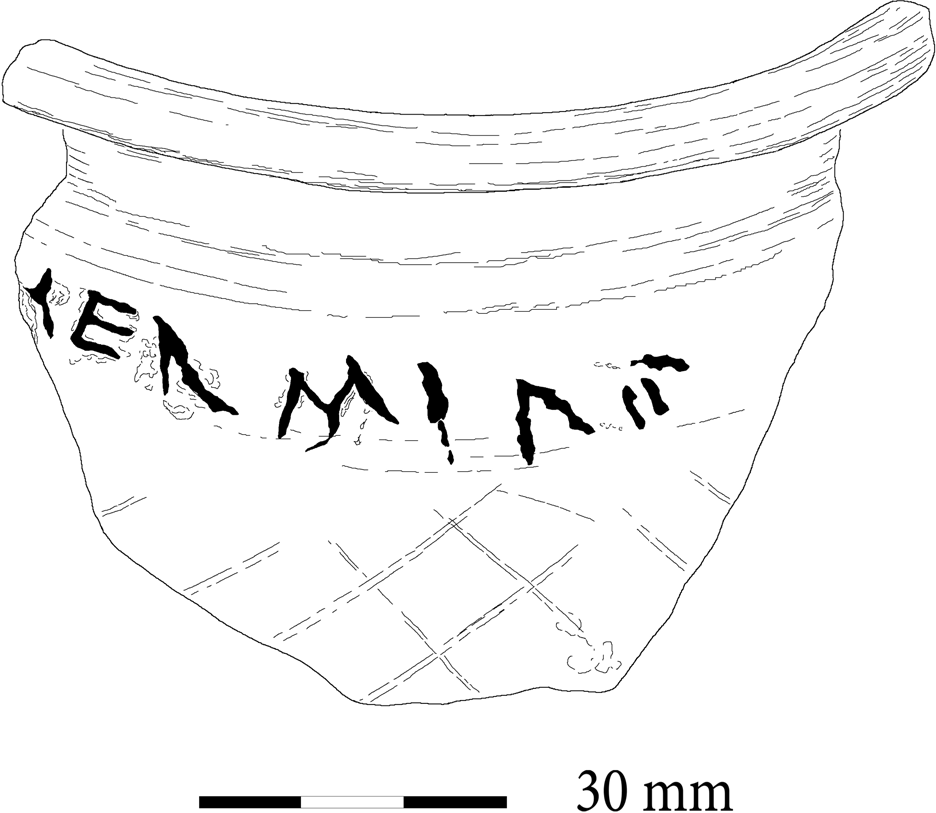
84. Ibid. (fig. 75). Rim sherd of a black-burnished jar, coarsely incised on the shoulder: […]ḤẸṚMIɅṢ, probably Hermias.Footnote 124
Catterick, coarseware graffito (no. 84). (Drawn by R.S.O. Tomlin)

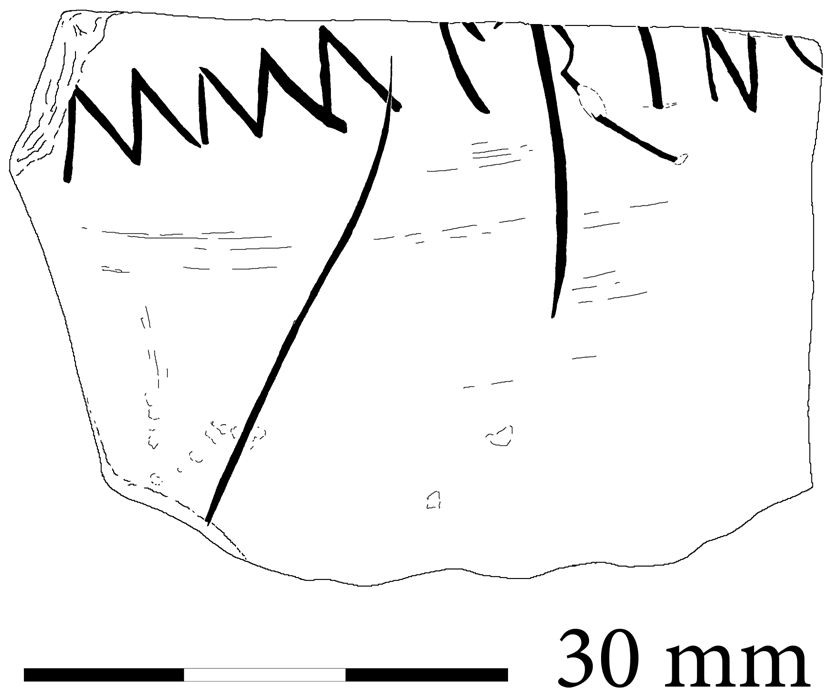
85. Ibid. Two conjoining black-burnished wall sherds with another, not conjoining. Faintly scratched on the wall: IɅN traces, perhaps Ian[uar]i, ‘(Property) of Ianuarius’.Footnote 125
86. Ibid. (fig. 76). Two conjoining buff wall sherds, lightly incised: IVṆỊɅ̣[…], Iunia or perhaps Iunia[nus].Footnote 126
Catterick, coarseware graffito (no. 86). (Drawn by R.S.O. Tomlin)

87. Ibid. Two conjoining rim sherds of a grey jar, preserving almost half of the circumference. Notched into the upper surface of the rim, in a series of straight or diagonal transverse cuts: IVSTI, Iusti, ‘(Property) of Iustus’.Footnote 127
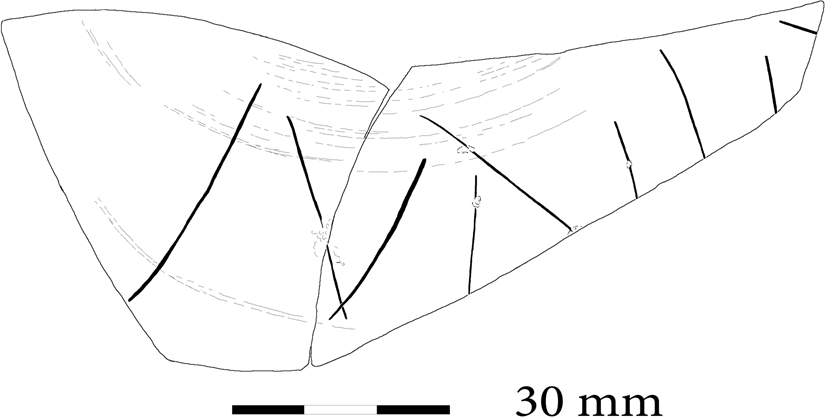
88. Ibid. (fig. 77). Buff wall sherd, neatly incised: […]MMɅṚRIN.[…], probably M<m>ar<r>in[us], ‘Marinus’.Footnote 128
Catterick, coarseware graffito (no. 88). (Drawn by R.S.O. Tomlin)

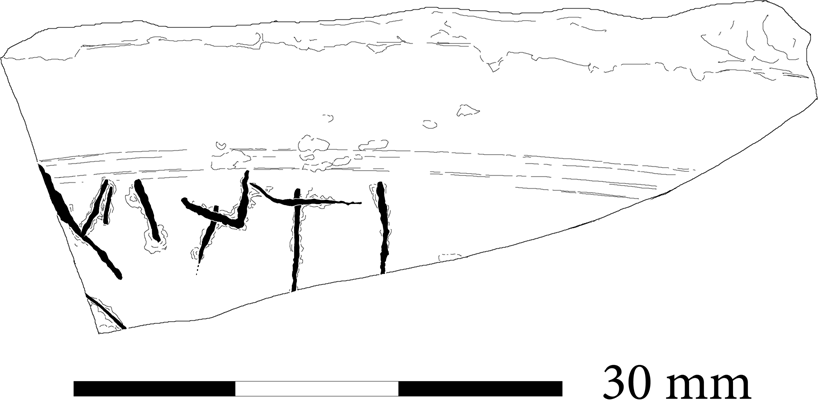
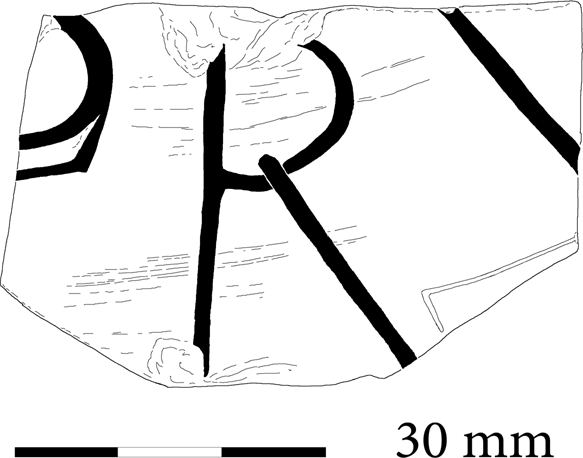
89. Ibid. (fig. 78). Buff wall sherd, incised in large capitals: […]PRV[…], perhaps Pru[dens].Footnote 129
Catterick, coarseware graffito (no. 89). (Drawn by R.S.O. Tomlin)

WALES
CLWYD
90. Rossett, Wrexham (SJ 37 57) (fig. 79). Lead ingot or ‘pig’ with one end missing, 0.53 m (tapering to 0.49 m) by 0.16 m (tapering to 0.08 m), 0.11 m thick (tapering to 0.09 m), weight 63.4 kg, foundFootnote 130 in 2019. On the upper face is a text moulded in relief, in capitals of varying size with ligatures.Footnote 131 […] CaeS Δ AvG Δ BR͡It Δ X ṃaGvl Δ f̣vSvm Δ Op I͡N Δ P͡RoV Δ T͡R͡EB͡E͡L Δ maxImo Δ LEg Δ AVg, [Neronis] Caes(aris) Aug(usti) (plumbum) Brit(annicum) (e)x Magul(…) fusum op(eribus) in prov(incia) Trebel(lio) Maximo leg(ato) Aug(usti),Footnote 132 ‘(Property) of Nero Caesar Augustus, British (lead) from Magul(…), smelted at the works in the province when Trebellius Maximus was imperial legate’ (a.d. 63–69).
Rossett, lead pig with moulded inscription (no. 90). (Photo: Wrexham Museum)

C. ADDENDA ET CORRIGENDA
(a) Britannia 50 (2019), 503, no. 13 (Richborough). Whetstone with a graffito read as *IX. Another whetstone has since been foundFootnote 133 with a similar graffito, consisting of two six-pointed ‘stars’ linked by two short horizontal lines (*=*), which suggests that both graffiti are non-literate marks of identification.
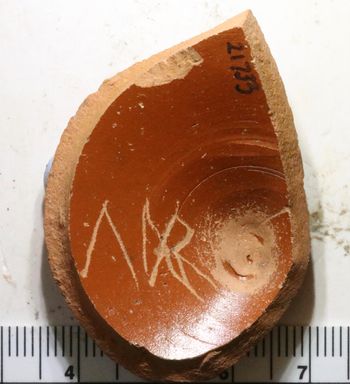
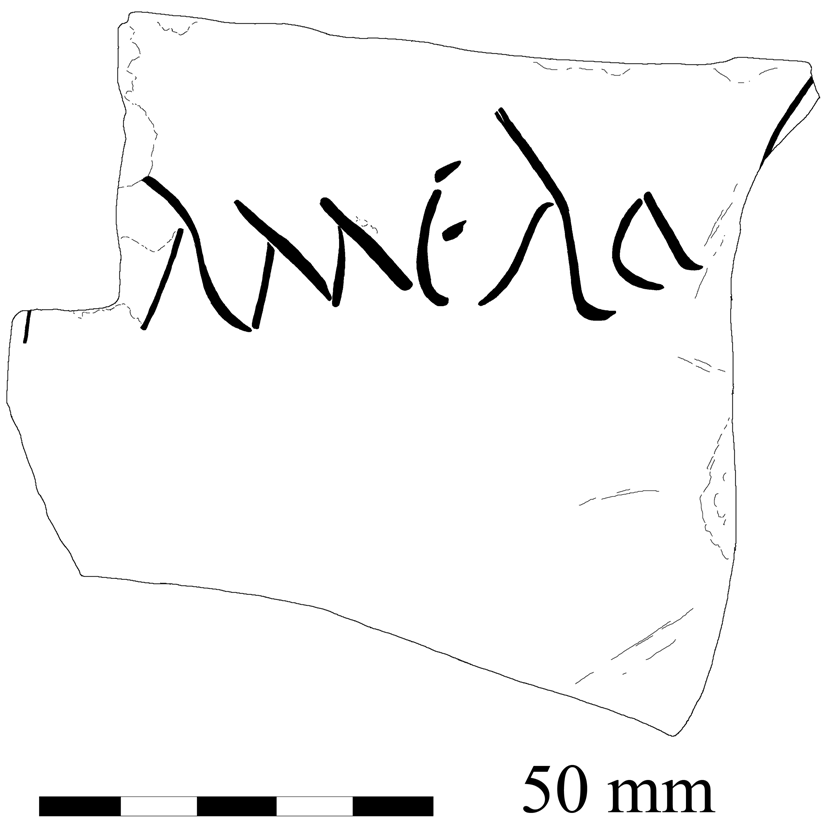
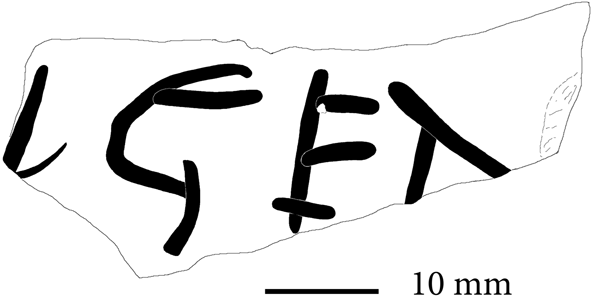
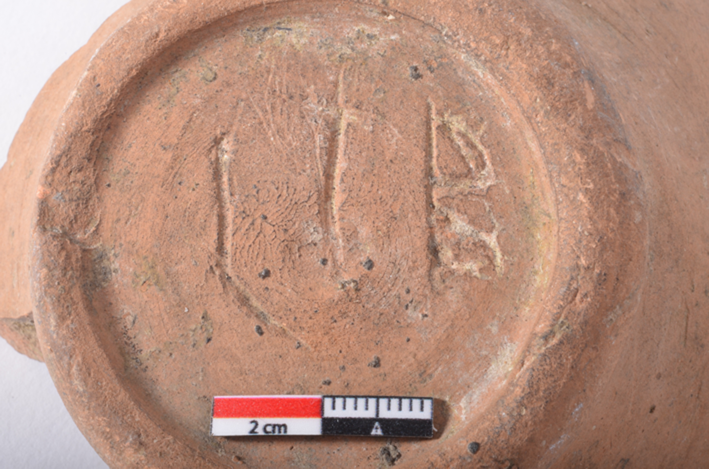
(b) RIB II.8, 2503.118 (Richborough) (fig. 80). Base sherd of a jug with a graffito incised underneath after firing, read as C I̅ B and interpreted as ‘perhaps C(ohors) I B(aetasiorum)’. A better reading is LIB, probably Lib(eralis).Footnote 134
Richborough, coarseware graffito (Add. (b)). (Photo: English Heritage)

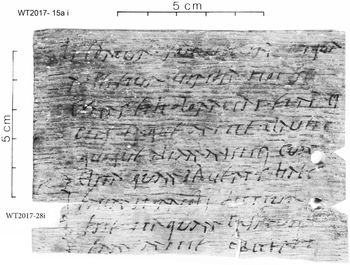
(c) Tab. Vindol. 890 (Britannia 50 (2019), 231–5) (fig. 81). After this letter from Iulius Verecundus to his slave Audax was published, two conjoining fragments were found in another location (inv. no. WT 2017.28), which preserve the width of column (ii) and supply the missing (lower) part of line 7 and two more lines (8–9). The text now reads (from the sentence-beginning in 4):
Vindolanda, Tab. Vindol. 890 (ii) (Add. (c)). (Photo: Vindolanda Trust)

‘Also you sent another key with the box than you should have done, for this is said to be (the key) of the little storeroom. So send as soon as possible the one (that) ought (to have been sent) …’Footnote 135
D. CHANGES OF LOCATION
(a) RIB 97 (Bitterne). This altar dedicated to the goddess Ancasta, said to be in Tudor House Museum, is now on display in the SeaCity Museum, Southampton.Footnote 136
(b) RIB 2222 (Bitterne). This milestone of Gordian III, said to be ‘now lost’, is in store at Cultural Services, Southampton City Council.Footnote 137
(c) RIB 2223 (Bitterne). This milestone of Gallus and Volusian, also said to be ‘now lost’, is in store at Cultural Services, Southampton City Council.Footnote 138
(d) RIB 2224 (Bitterne). This milestone of Gordian III and Tetricus, said to be in Tudor House Museum, is in store at Cultural Services, Southampton City Council.Footnote 139
(e) RIB 2225 (Bitterne). This milestone of Tetricus, also said to be in Tudor House Museum, is in store at Cultural Services, Southampton City Council.